问答
发起
提问
文章
攻防
活动
Toggle navigation
首页
(current)
问答
商城
实战攻防技术
活动
摸鱼办
搜索
登录
注册
Linux应急响应-常见服务日志篇
渗透测试
Linux应急响应-常见服务日志篇
系统日志 ---- ### btmp /var/log/btmp,记录所有尝试登录但是登录失败的日志,显示前十条 ```bash root@mon0dy-ubuntu:~# lastb --time-format iso -10 root ssh:notty 58.56.52.226 2023-03-11T14:30:23+0800 - 2023-03-11T14:30:23+0800 (00:00) root ssh:notty 58.56.52.226 2023-03-11T14:30:20+0800 - 2023-03-11T14:30:20+0800 (00:00) root ssh:notty 58.56.52.226 2023-03-11T14:30:16+0800 - 2023-03-11T14:30:16+0800 (00:00) root ssh:notty 58.56.52.226 2023-03-11T14:30:05+0800 - 2023-03-11T14:30:05+0800 (00:00) root ssh:notty 58.56.52.226 2023-03-11T14:30:02+0800 - 2023-03-11T14:30:02+0800 (00:00) root ssh:notty 58.56.52.226 2023-03-11T14:29:55+0800 - 2023-03-11T14:29:55+0800 (00:00) ssh:notty 64.62.197.191 2023-03-11T09:26:44+0800 - 2023-03-11T09:26:44+0800 (00:00) ssh:notty 64.62.197.187 2023-03-10T20:29:56+0800 - 2023-03-10T20:29:56+0800 (00:00) admin ssh:notty 43.156.108.211 2023-03-10T07:54:41+0800 - 2023-03-10T07:54:41+0800 (00:00) admin ssh:notty 43.156.108.211 2023-03-10T07:54:39+0800 - 2023-03-10T07:54:39+0800 (00:00) btmp begins 2023-03-01T07:46:00+0800 root@mon0dy-ubuntu:~# ``` ```bash lastb | awk '{print $3}' | sort | uniq -c | sort -n awk '{print $3}' :截取输出的数据中的第三列 sort :将数据进行分类 uniq -c :将分类好的数据进行去重并计数 sort -n : 将分类去重并计数的数据,进行分类并且按照数值进行从小到大排序。 ``` 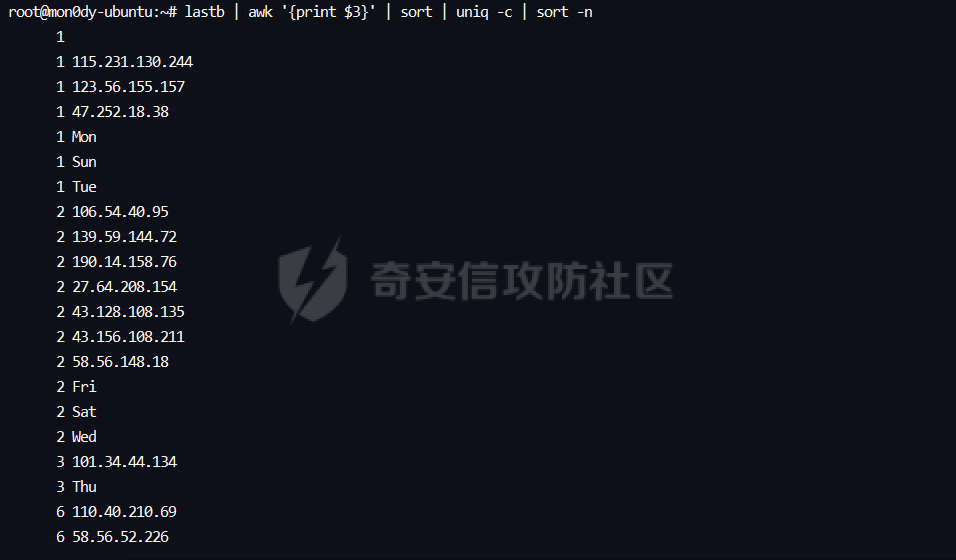 为什么会有Thu这种数据了,我们重新来看lastb,会发现有些用户名是空着的,所以使用awk '{print $3}'时,就会选中到后面的Sun那一列,这一点需要小心 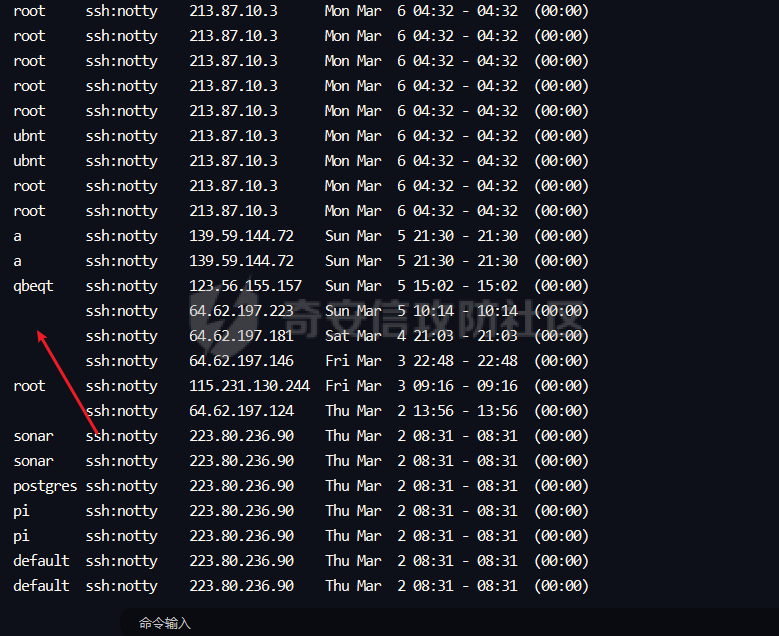 ### wtmp /var/log/wtmp,记录了所有的登录过(成功)系统的用户信息 日期格式化:`last --time-format iso`,看起来更舒服 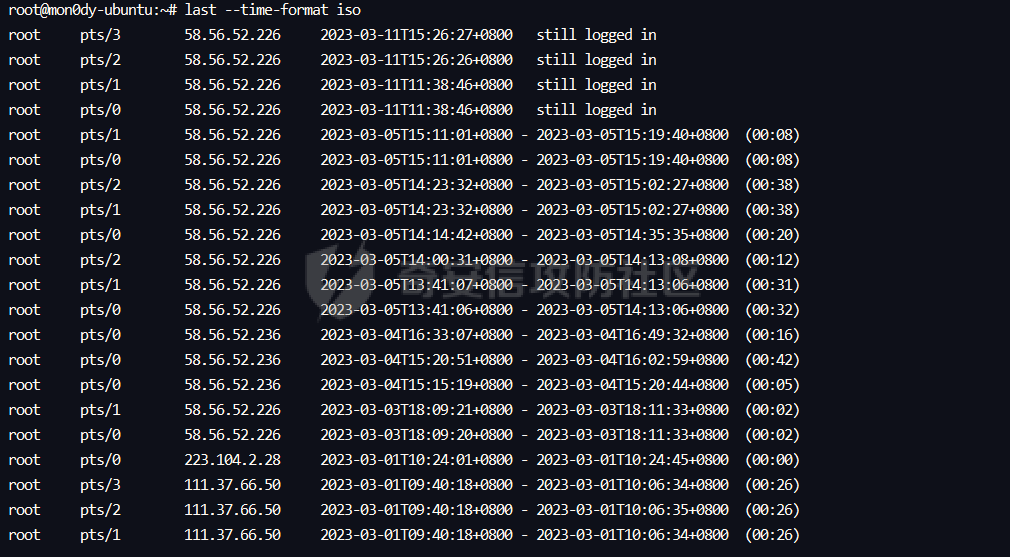 SSH日志 ----- 命令参数,查看网络连接  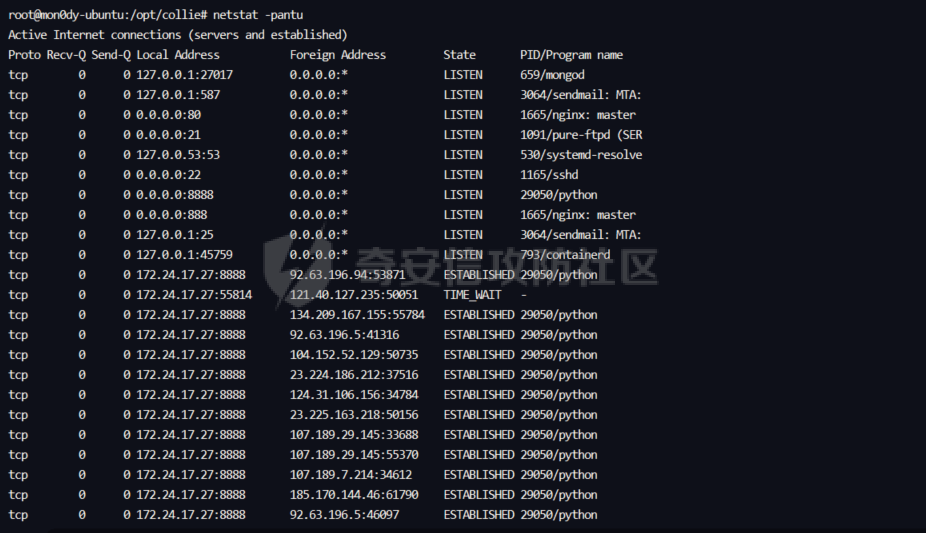 Proto:协议名 Recv-Q:网络接收队列 > 表示收到的数据已在本地接收缓冲,但是还有多少没有被进程取走,recv。如果接收队列Recv-Q一直处于阻塞状态,可能是遭受了拒绝服务 denial-of-service 攻击。 send-Q:网路发送队列 > 对方没有收到的数据或者说没有Ack的,还是本地缓冲区. > 如果发送队列Send-Q不能很快的清零,可能是有应用向外发送数据包过快,或者是对方接收数据包不够快。 recv-Q、send-Q这两个值通常应该为0,如果不为0可能是有问题的。packets在两个队列里都不应该有堆积状态。可接受短暂的非0情况。 2. Local Address:本地地址 > 1. 0.0.0.0:2000:表示监听服务器上所有ip地址的2000端口(0.0.0.0表示本地所有ip) > 2. \*:80:监听ipv4和ipv6的任意ip的80端口 > 3. :::2000:也表示监听本地所有ip的2000端口。和 0.0.0.0:2000 的区别是这里表示的是IPv6地址,0.0.0.0表示的是本地所有IPv4地址。 > 4. “:::” 这三个 : 的前两个 “::” ,是 “0:0:0:0:0:0:0:0” 的缩写,相当于IPv6的 “0.0.0.0” 。表示本机的所有IPv6地址,第三个 : 是IP和端口的分隔符 > 5. 127.0.0.1:8080:表示监听本机的loopback地址的8080端口。如果某个服务只监听了回环地址,那么只能在本机进行访问,无法通过tcp/ip 协议进行远程访问 > 6. ::1:9000:表示监听IPv6的回环地址的9000端口,::1这个表示IPv6的loopback地址 > 7. 192.168.1.1:80:监听ip为192.168.1.1的80端口 3. Foreign Address:外部地址,与本机端口通信的外部socket。显示规则与 Local Address 相同 4. State:状态,链路状态,共有11种。state列共有12中可能的状态,前面11种是按照TCP连接建立的三次握手和TCP连接断开的四次挥手过程来描述的。 比较重要的状态参数有两个,ESTABLISHED表示正在进行通讯: > 1. `LISTEN`:首先服务端需要打开一个socket进行监听,状态为LISTEN。来自远方TCP端口的连接请求 > 2. `ESTABLISHED`:代表一个打开的连接,双方可以进行或已经在数据交互了。代表一个打开的连接,数据可以传送给用户 查找特殊权限找好,默认root,-F指的是分隔符 如果第三部分是0,就print第一部分,也就是root ```php awk -F: '{if($3==0) print $1}' /etc/passwd ```  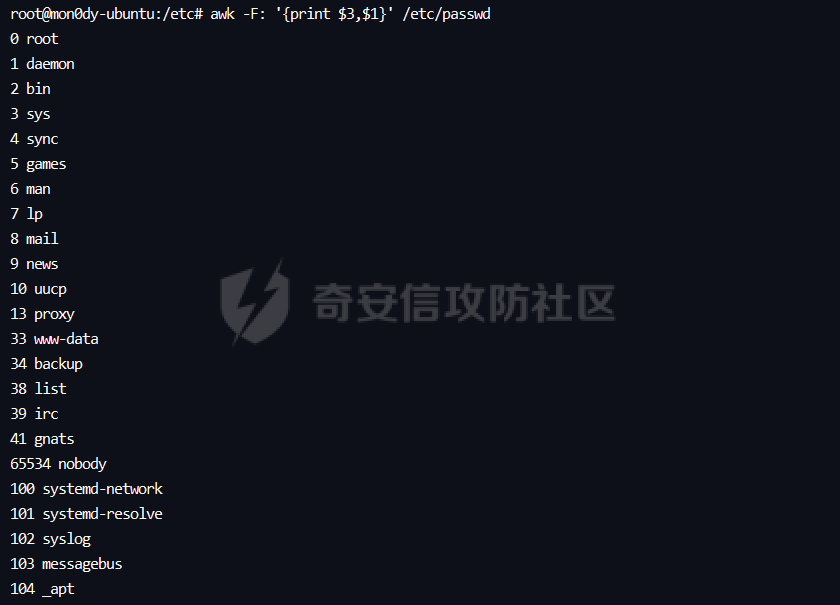 查找可以登录的用户 ```php s=$( sudo cat /etc/shadow | grep '^[^:]*:[^\*!]' | awk -F: '{print $1}');for i in $s;do cat /etc/passwd | grep -v "/bin/false\|/nologin"| grep $i;done | sort | uniq |awk -F: '{print $1}' ```  查看正在连接的ssh session,有很多种方法,如下 ```bash root@mon0dy-ubuntu:/opt/collie# who -a system boot 2022-02-19 01:02 LOGIN tty1 2022-02-18 17:02 821 id=tty1 LOGIN ttyS0 2022-02-18 17:02 810 id=tyS0 root - pts/0 2023-03-11 11:38 . 1300 (58.56.52.226) root - pts/1 2023-03-11 11:38 02:39 1319 (58.56.52.226) run-level 5 2022-02-18 17:03 pts/2 2023-03-05 15:02 20164 id=ts/2 term=0 exit=0 pts/3 2023-03-01 10:06 16760 id=ts/3 term=0 exit=0 pts/4 2022-12-10 21:39 7303 id=ts/4 term=0 exit=0 pts/5 2022-12-10 21:39 7338 id=ts/5 term=0 exit=0 root@mon0dy-ubuntu:/opt/collie# w 14:18:45 up 385 days, 21:16, 4 users, load average: 0.13, 0.16, 0.17 USER TTY FROM LOGIN@ IDLE JCPU PCPU WHAT root pts/0 58.56.52.226 11:38 5.00s 0.19s 0.00s w root pts/1 58.56.52.226 11:38 2:39m 19.58s 19.55s top root@mon0dy-ubuntu:/opt/collie# last -p now root pts/1 58.56.52.226 Sat Mar 11 11:38 still logged in root pts/0 58.56.52.226 Sat Mar 11 11:38 still logged in wtmp begins Wed Mar 1 09:40:18 2023 root@mon0dy-ubuntu:/opt/collie# netstat -tnpa | grep 'ESTABLISHED.*sshd' tcp 0 0 172.24.17.27:22 58.56.52.226:61764 ESTABLISHED 1318/sshd: root@not tcp 0 52 172.24.17.27:22 58.56.52.226:61763 ESTABLISHED 1263/sshd: root@pts root@mon0dy-ubuntu:/opt/collie# pgrep -af sshd 1165 /usr/sbin/sshd -D 1263 sshd: root@pts/0,pts/1 1318 sshd: root@notty root@mon0dy-ubuntu:/opt/collie# echo $SSH_CONNECTION 58.56.52.226 61763 172.24.17.27 22 root@mon0dy-ubuntu:/opt/collie# ss | grep ssh tcp ESTAB 0 0 172.24.17.27:ssh 58.56.52.226:61764 tcp ESTAB 0 0 172.24.17.27:ssh 58.56.52.226:61763 root@mon0dy-ubuntu:/opt/collie# ``` ### 日志 ```php Ubuntu:/var/log/auth.log Centos:/var/log/secure ``` 注意有些日志会打包,auth.log就是secure日志 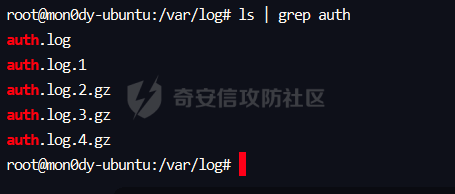 #### 登陆成功 ```bash root@mon0dy-ubuntu:/opt/collie# cat /var/log/auth.log | grep "Accept" Mar 5 13:41:06 mon0dy-ubuntu sshd[16791]: Accepted password for root from 58.56.52.226 port 22646 ssh2 Mar 5 13:41:07 mon0dy-ubuntu sshd[16843]: Accepted password for root from 58.56.52.226 port 22648 ssh2 Mar 5 13:41:26 mon0dy-ubuntu sshd[17180]: Accepted password for root from 58.56.52.226 port 22650 ssh2 Mar 5 14:00:31 mon0dy-ubuntu sshd[32618]: Accepted password for root from 58.56.52.226 port 6205 ssh2 Mar 5 14:00:31 mon0dy-ubuntu sshd[32641]: Accepted password for root from 58.56.52.226 port 6206 ssh2 ``` #### 计算成功登录的次数 ```bash root@mon0dy-ubuntu:/var/log# cat /var/log/auth.log | grep "Accept" | perl -e 'while($_=<>){ /for(.*?)from/; print "$1\n";}'|sort|uniq -c|sort -nr 26 root ``` #### 正常退出 `pam_unix(sshd:session): session closed`代表正常关闭session,所以只要在auth.log找这个特征就行 ```bash root@mon0dy-ubuntu:/var/log# cat /var/log/auth.log | grep "pam_unix(sshd:session): session closed" Mar 5 14:01:11 mon0dy-ubuntu sshd[1010]: pam_unix(sshd:session): session closed for user root Mar 5 14:01:54 mon0dy-ubuntu sshd[1918]: pam_unix(sshd:session): session closed for user root Mar 5 14:02:25 mon0dy-ubuntu sshd[2606]: pam_unix(sshd:session): session closed for user root Mar 5 14:03:49 mon0dy-ubuntu sshd[4296]: pam_unix(sshd:session): session closed for user root Mar 5 14:06:06 mon0dy-ubuntu sshd[6988]: pam_unix(sshd:session): session closed for user root Mar 5 14:06:38 mon0dy-ubuntu sshd[7633]: pam_unix(sshd:session): session closed for user root Mar 5 14:06:40 mon0dy-ubuntu sshd[7712]: pam_unix(sshd:session): session closed for user root Mar 5 14:06:48 mon0dy-ubuntu sshd[7908]: pam_unix(sshd:session): session closed for user root Mar 5 14:06:57 mon0dy-ubuntu sshd[8132]: pam_unix(sshd:session): session closed for user root Mar 5 14:07:05 mon0dy-ubuntu sshd[8328]: pam_unix(sshd:session): session closed for user root Mar 5 14:07:13 mon0dy-ubuntu sshd[8519]: pam_unix(sshd:session): session closed for user root ``` #### 登录密码错误 输错几次密码  出现了message repeated 2 times和PAM 2 more authentication failures,代表连续输错密码 ```bash Mar 11 14:29:53 mon0dy-ubuntu sshd[10106]: pam_unix(sshd:auth): authentication failure; logname= uid=0 euid=0 tty=ssh ruser= rhost=58.56.52.226 user=root Mar 11 14:29:55 mon0dy-ubuntu sshd[10106]: Failed password for root from 58.56.52.226 port 23238 ssh2 Mar 11 14:30:05 mon0dy-ubuntu sshd[10106]: message repeated 2 times: [ Failed password for root from 58.56.52.226 port 23238 ssh2] Mar 11 14:30:05 mon0dy-ubuntu sshd[10106]: Connection closed by authenticating user root 58.56.52.226 port 23238 [preauth] Mar 11 14:30:05 mon0dy-ubuntu sshd[10106]: PAM 2 more authentication failures; logname= uid=0 euid=0 tty=ssh ruser= rhost=58.56.52.226 user=root ``` 如果短时间内有大量的Failed password,说明被爆破了 `cat /var/log/auth.log | grep "Failed password for root"` 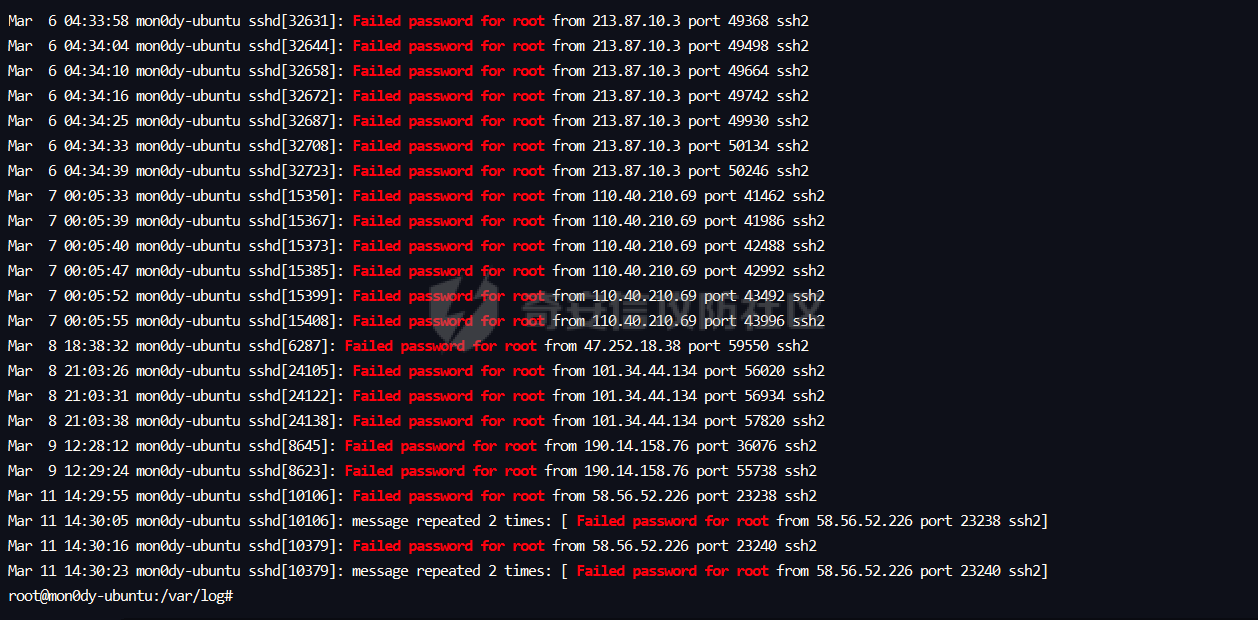 #### 计算登录失败的用户名及次数 invalid user说明这个用户并不存在,perl -e是输入语句来执行代码,可以用while read line;do;done来实现类似的功能,这里是匹配for和from中间的值,也就是root ```bash root@mon0dy-ubuntu:/var/log# cat /var/log/auth.log | grep "Failed password" | perl -e 'while($_=<>){ /for(.*?)from/; print "$1\n";}'|sort|uniq -c|sort -nr 41 root 1 invalid user yogesh 1 invalid user wojcikowski 1 invalid user vinicius 1 invalid user ubnt 1 invalid user tarun 1 invalid user svcpunejenkins 1 invalid user sharan 1 invalid user sardari 1 invalid user sanchit 1 invalid user sadegh 1 invalid user ravinder 1 invalid user nishant 1 invalid user nisha 1 invalid user myproxyoauth 1 invalid user monitoring 1 invalid user michele 1 invalid user manmohan 1 invalid user majid 1 invalid user karthik 1 invalid user jhms 1 invalid user jeffery 1 invalid user jaya 1 invalid user ian 1 invalid user helen 1 invalid user harsh 1 invalid user esmat 1 invalid user cloud 1 invalid user amit 1 invalid user akshat 1 invalid user afshin 1 invalid user admin 1 invalid user abrar 1 invalid user a root@mon0dy-ubuntu:/var/log# ``` #### 统计爆破者ip及次数 ```bash root@mon0dy-ubuntu:/var/log# cat /var/log/auth.log | grep "Failed password for" | grep "root" | grep -Po '(1\d{2}|2[0-4]\d|25[0-5]|[1-9]\d|[1-9])(\.(1\d{2}|2[0-4]\d|25[0-5]|[1-9]\d|\d)){3}' |sort|uniq -c|sort -nr 25 213.87.10.3 6 110.40.210.69 4 58.56.52.226 3 101.34.44.134 2 190.14.158.76 1 47.252.18.38 root@mon0dy-ubuntu:/var/log# ``` 计算多个账号的ip及次数 这里是root用户和yogesh用户,继续加的话就加`\|用户名`,当然我们也可以用awk,这里的grep -Po是匹配指定的两个字符串之间的内容,这里的正则是很标准的匹配ipv4地址的写法 ```bash root@mon0dy-ubuntu:/var/log# cat /var/log/auth.log | grep "Failed password for" | grep "root\|yogesh" | grep -Po '(1\d{2}|2[0-4]\d|25[0-5]|[1-9]\d|[1-9])(\.(1\d{2}|2[0-4]\d|25[0-5]|[1-9]\d|\d)){3}' |sort|uniq -c|sort -nr 25 213.87.10.3 6 110.40.210.69 4 58.56.52.226 3 101.34.44.134 2 190.14.158.76 1 47.252.18.38 1 112.28.234.131 ``` #### 更改密码 可以看到更改了git用户的密码 ```bash Mar 11 17:18:42 mon0dy-ubuntu passwd[12484]: pam_unix(passwd:chauthtok): authentication failure; logname=root uid=1003 euid=0 tty= ruser= rhost= user=git Mar 11 17:18:50 mon0dy-ubuntu passwd[12660]: pam_unix(passwd:chauthtok): authentication failure; logname=root uid=1003 euid=0 tty= ruser= rhost= user=git Mar 11 17:19:13 mon0dy-ubuntu su[12417]: pam_unix(su:session): session closed for user git Mar 11 17:19:22 mon0dy-ubuntu passwd[13410]: pam_unix(passwd:chauthtok): password changed for git ``` #### 切换用户 可以看到这里用户从root切换到了git ```bash Mar 11 17:15:38 mon0dy-ubuntu su[7951]: Successful su for git by root Mar 11 17:15:38 mon0dy-ubuntu su[7951]: + /dev/pts/2 root:git Mar 11 17:15:38 mon0dy-ubuntu su[7951]: pam_unix(su:session): session opened for user git by root(uid=0) Mar 11 17:15:38 mon0dy-ubuntu su[7951]: pam_systemd(su:session): Cannot create session: Already running in a session Mar 11 17:15:42 mon0dy-ubuntu su[7951]: pam_unix(su:session): session closed for user git ``` MySQL日志 ------- 正常来说,mysql的日志在/var/log/mysql/error.log,但是宝塔安装的MySQL日志路径不在这,先随便找一段 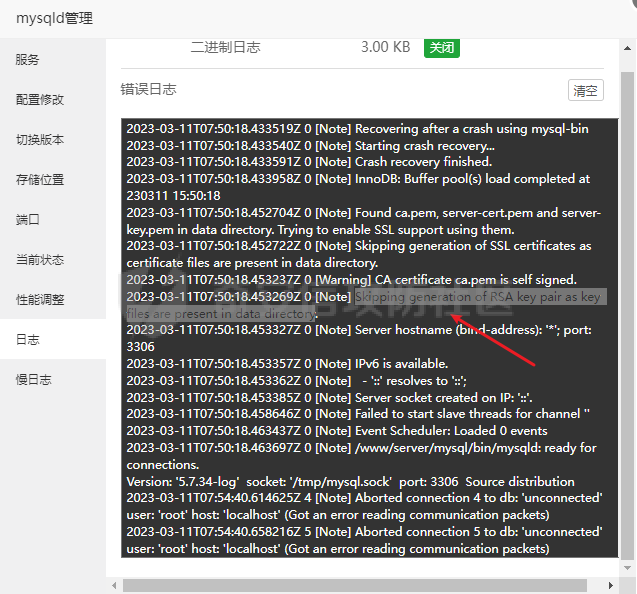 之后搜索`grep -r "Skipping generation of RSA key pair as key files are present in data directory" /www/server`  找到error日志为`/www/server/data/mon0dy-ubuntu.err`,慢查询日志为`/www/server/data/mysql-slow.log`(如果利用了慢查询注入就需要看慢查询日志了) 本次第一次输入正确密码,第二三次错误 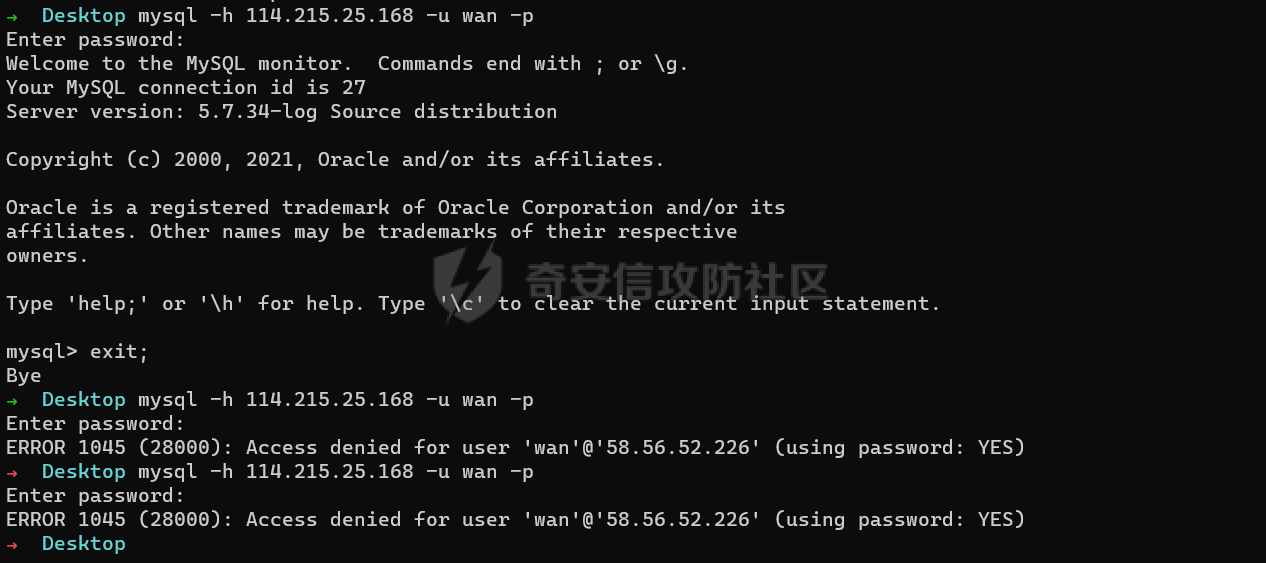 看日志,正确记录下了 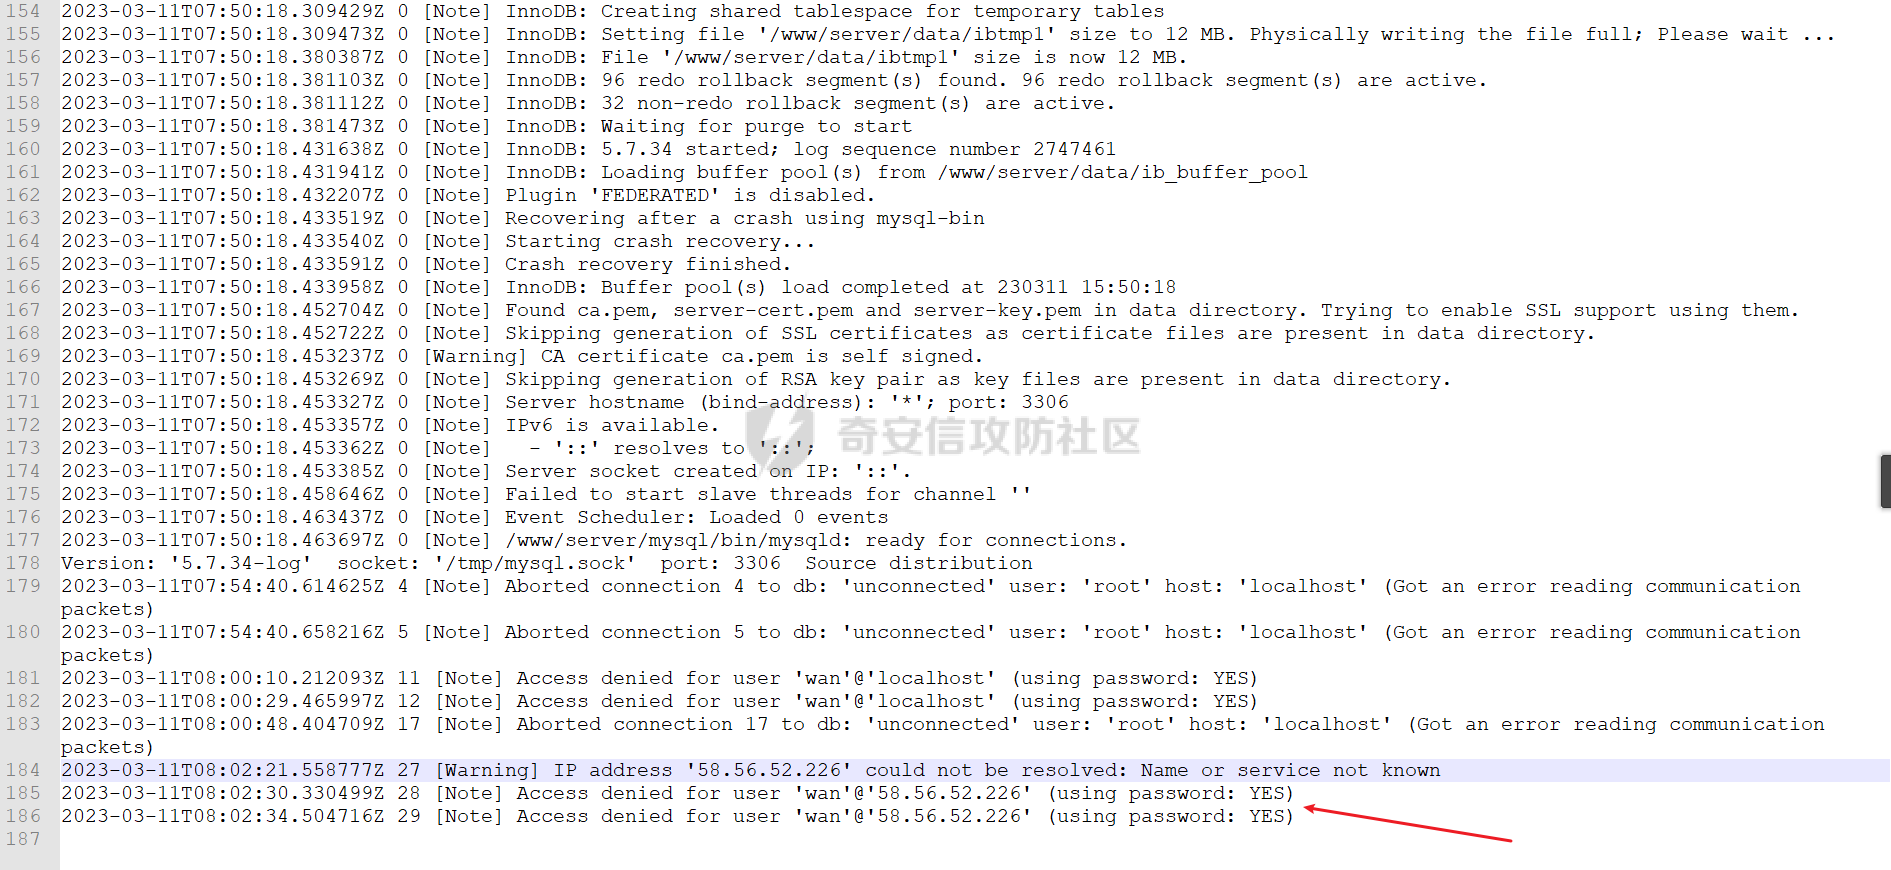 ### 登录错误的用户名及次数 这里的四次是有两次是我在本机测试的,另外两次是远程登录失败 ```php root@mon0dy-ubuntu:/www/server# cat /www/server/data/mon0dy-ubuntu.err | grep "Access denied for user" | grep "using password: YES" | awk -F "'" '{print $2}' | sort | uniq -c | sort -nr 4 wan root@mon0dy-ubuntu:/www/server# ``` ### 查看登陆失败的ip及次数 ```php root@mon0dy-ubuntu:/www/server# cat /www/server/data/mon0dy-ubuntu.err | grep "Access denied for user" | grep "using password: YES" | awk -F "'" '{print $2}' | sort| uniq | while read line;do echo $line;cat /www/server/data/mon0dy-ubuntu.err | grep "Access denied for user" | grep "using password" | awk -F "'" '{print $4}' | sort | uniq -c | sort -nr; done wan 3 localhost 2 58.56.52.226 root@mon0dy-ubuntu:/www/server# ``` FTP日志 ----- 用宝塔新建一个ftp  登录,试几次密码失败的,再用正确密码登录 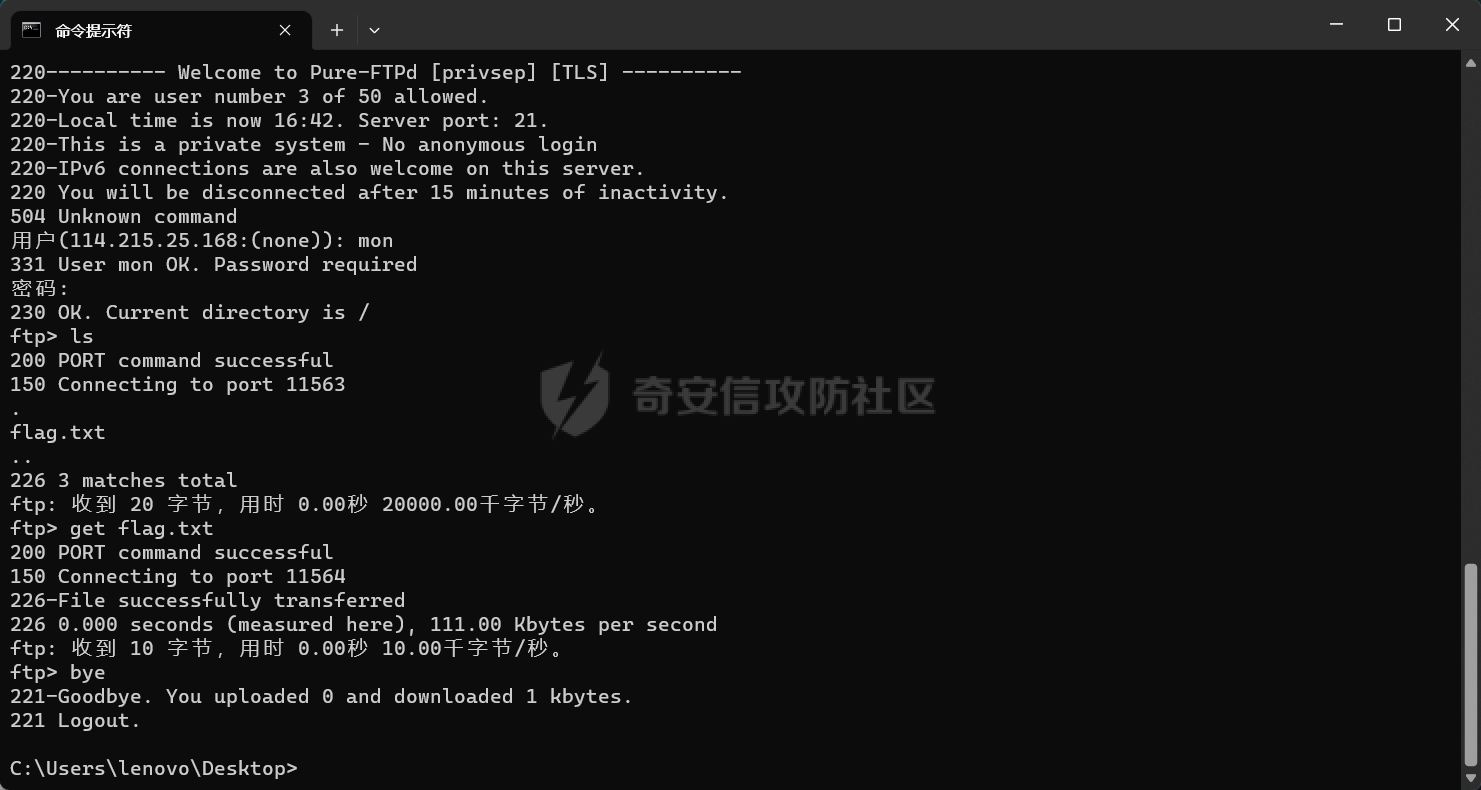 ```bash root@mon0dy-ubuntu:~# netstat -pantu | grep ftp tcp 0 0 172.24.17.27:39091 0.0.0.0:* LISTEN 9975/pure-ftpd (IDL tcp 0 0 0.0.0.0:21 0.0.0.0:* LISTEN 1091/pure-ftpd (SER tcp 0 0 172.24.17.27:21 58.56.52.226:57508 ESTABLISHED 10359/pure-ftpd (ID tcp 7 0 172.24.17.27:21 58.56.52.226:57497 ESTABLISHED 9975/pure-ftpd (IDL tcp6 0 0 :::21 :::* LISTEN 1091/pure-ftpd (SER ``` 但是并没有找到所谓的pureftpd.log,经过查资料,发现pureftpd的日志是存在了/var/log/syslog,可以看到刚才下载的flag 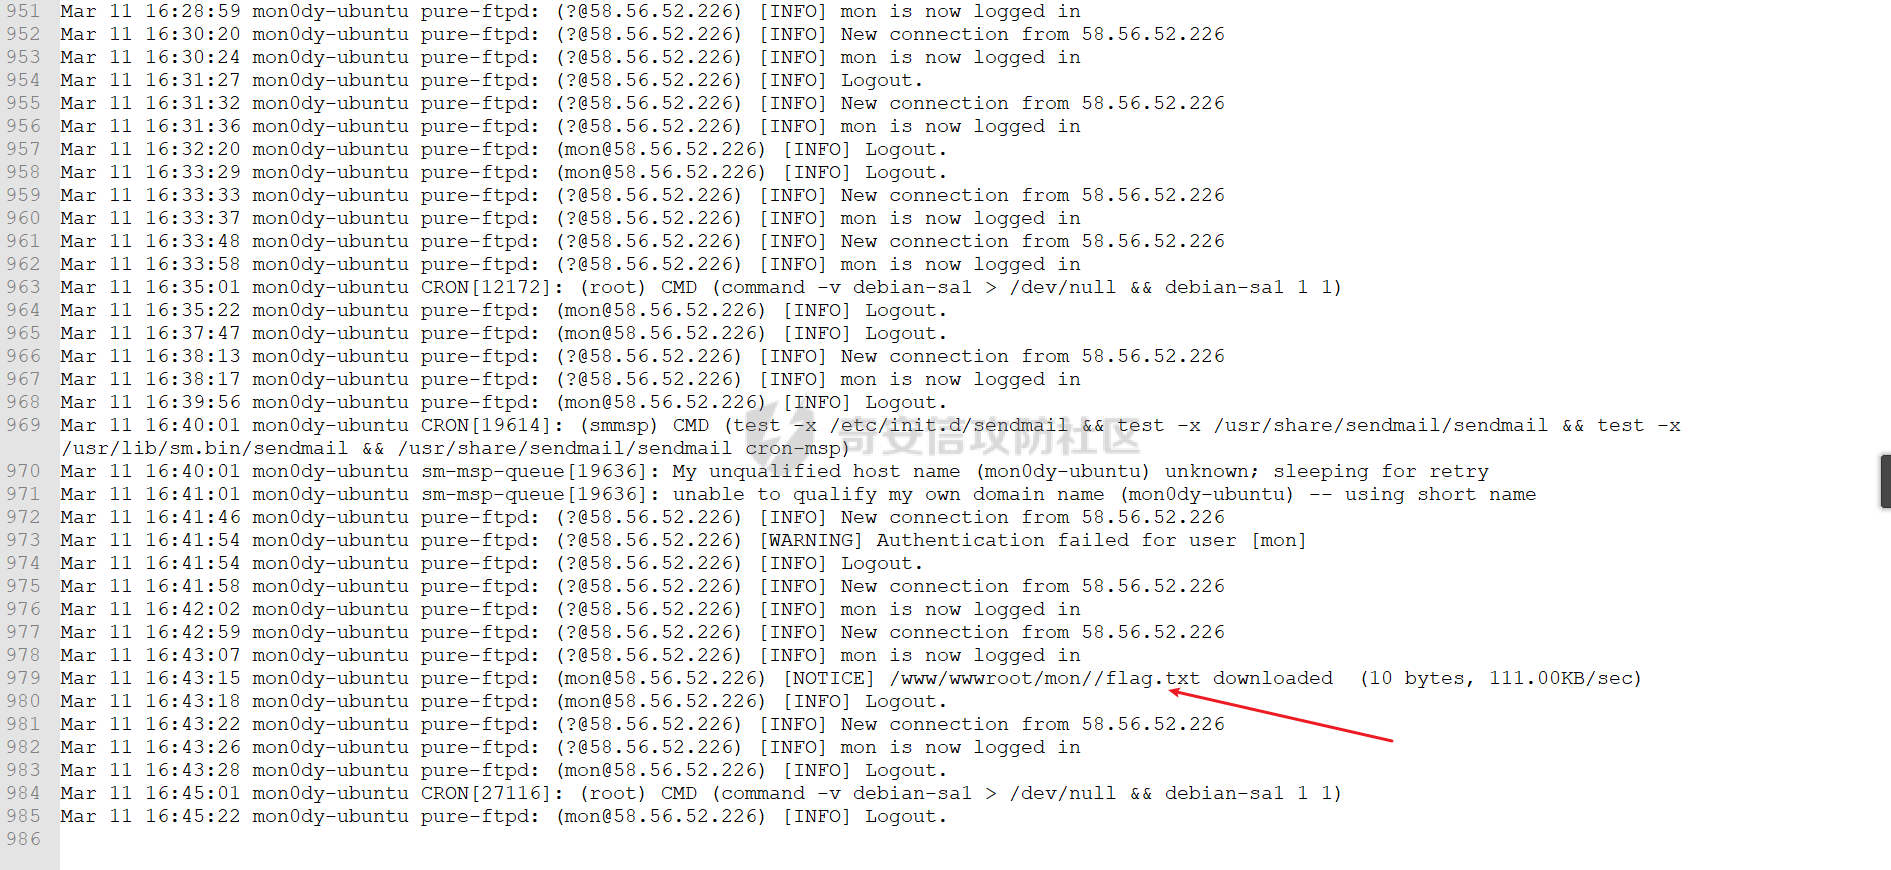 最开始的几次登陆失败 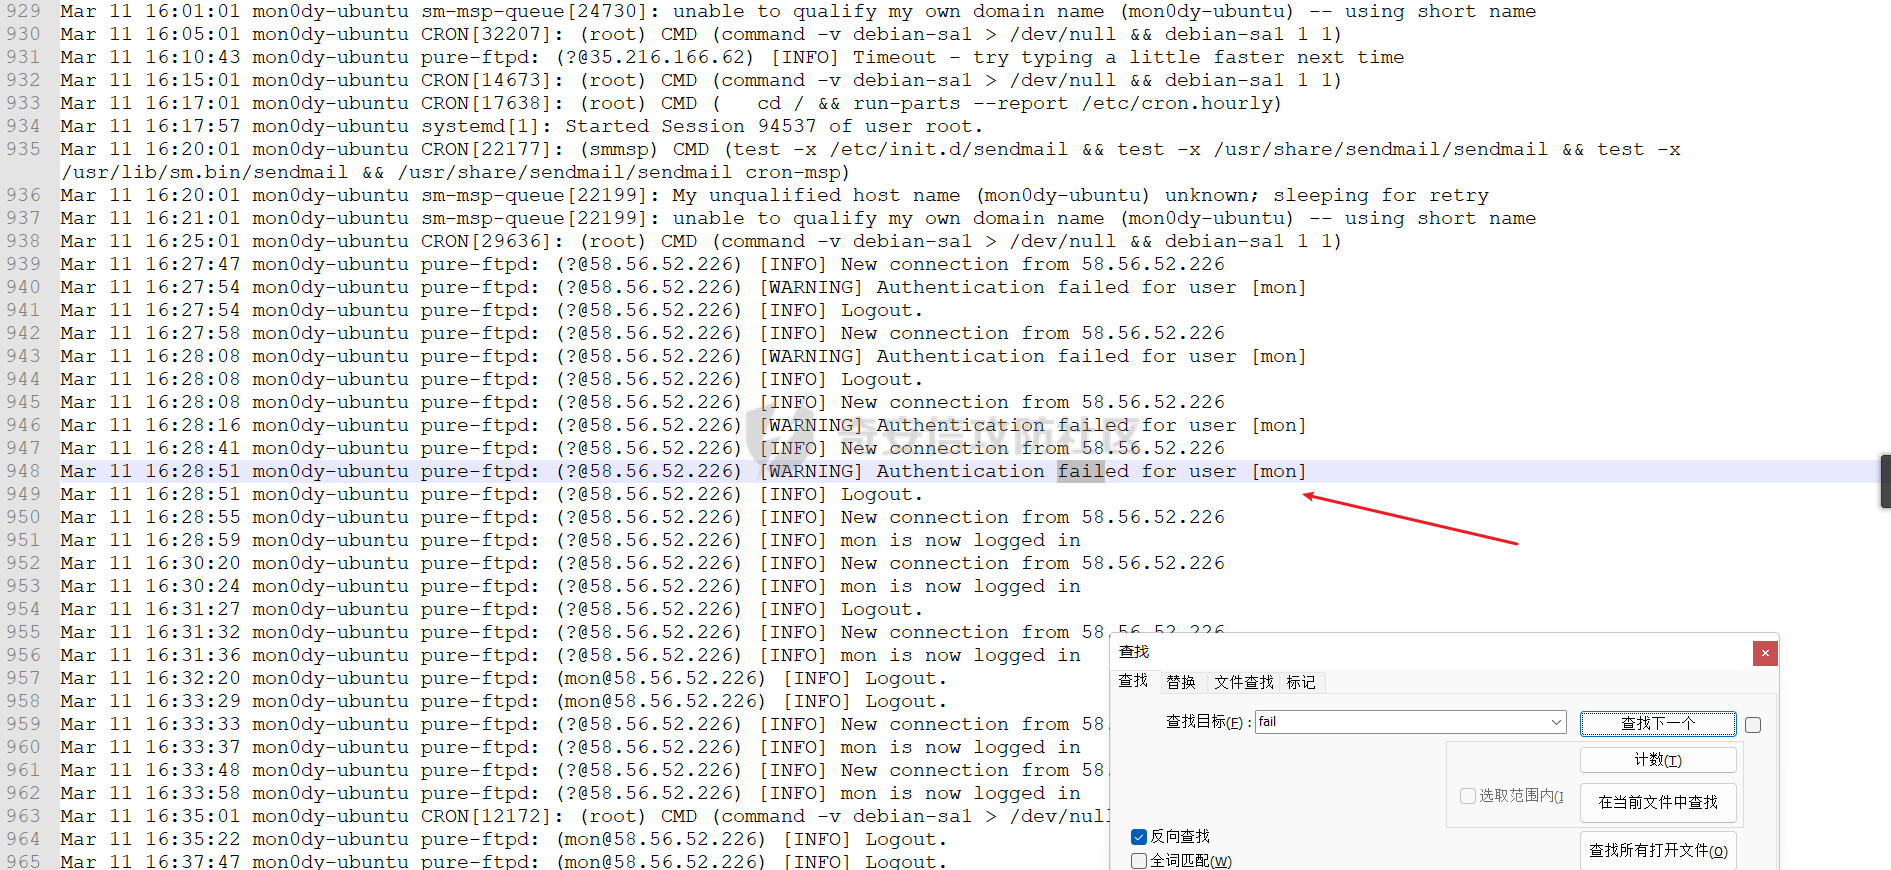 ### 计算登陆失败的用户的次数 ```bash root@mon0dy-ubuntu:~# cat /var/log/syslog | grep 'Authentication failed for user' | cut -d "[" -f 3 | cut -d "]" -f 1 | sort | uniq -c | sort -nr 5 mon root@mon0dy-ubuntu:~# ``` cat是切片的意思, cut -d'分隔字符' -f fields (用于有特定分隔字符),-d :后面接分隔字符。与 -f 一起使用;-f :依据 -d 的分隔字符将一段信息分割成为数段,用 -f 取出第几段的意思。 如果不切片  这里的第一个-f 3就是取第三段,也就是mon\],再切\],取第一个就是取\]左面的,也就是mon  ### 计算登陆失败的用户的ip的次数 首先就是切片获得用户名,也就是mon,之后在切片获取ip,因为格式是(?@58.56.52.226),所以要切@和) ```bash root@mon0dy-ubuntu:~# cat /var/log/syslog | grep 'Authentication failed for user' | cut -d "[" -f 3 | cut -d "]" -f 1 | sort | uniq | while read line;do echo $line;cat /var/log/syslog | grep $line | grep "Authentication failed for user" |cut -d "@" -f 2 | cut -d ')' -f 1 | sort | uniq -c | sort -nr; done mon 5 58.56.52.226 root@mon0dy-ubuntu:~# ``` 这样就对起来了 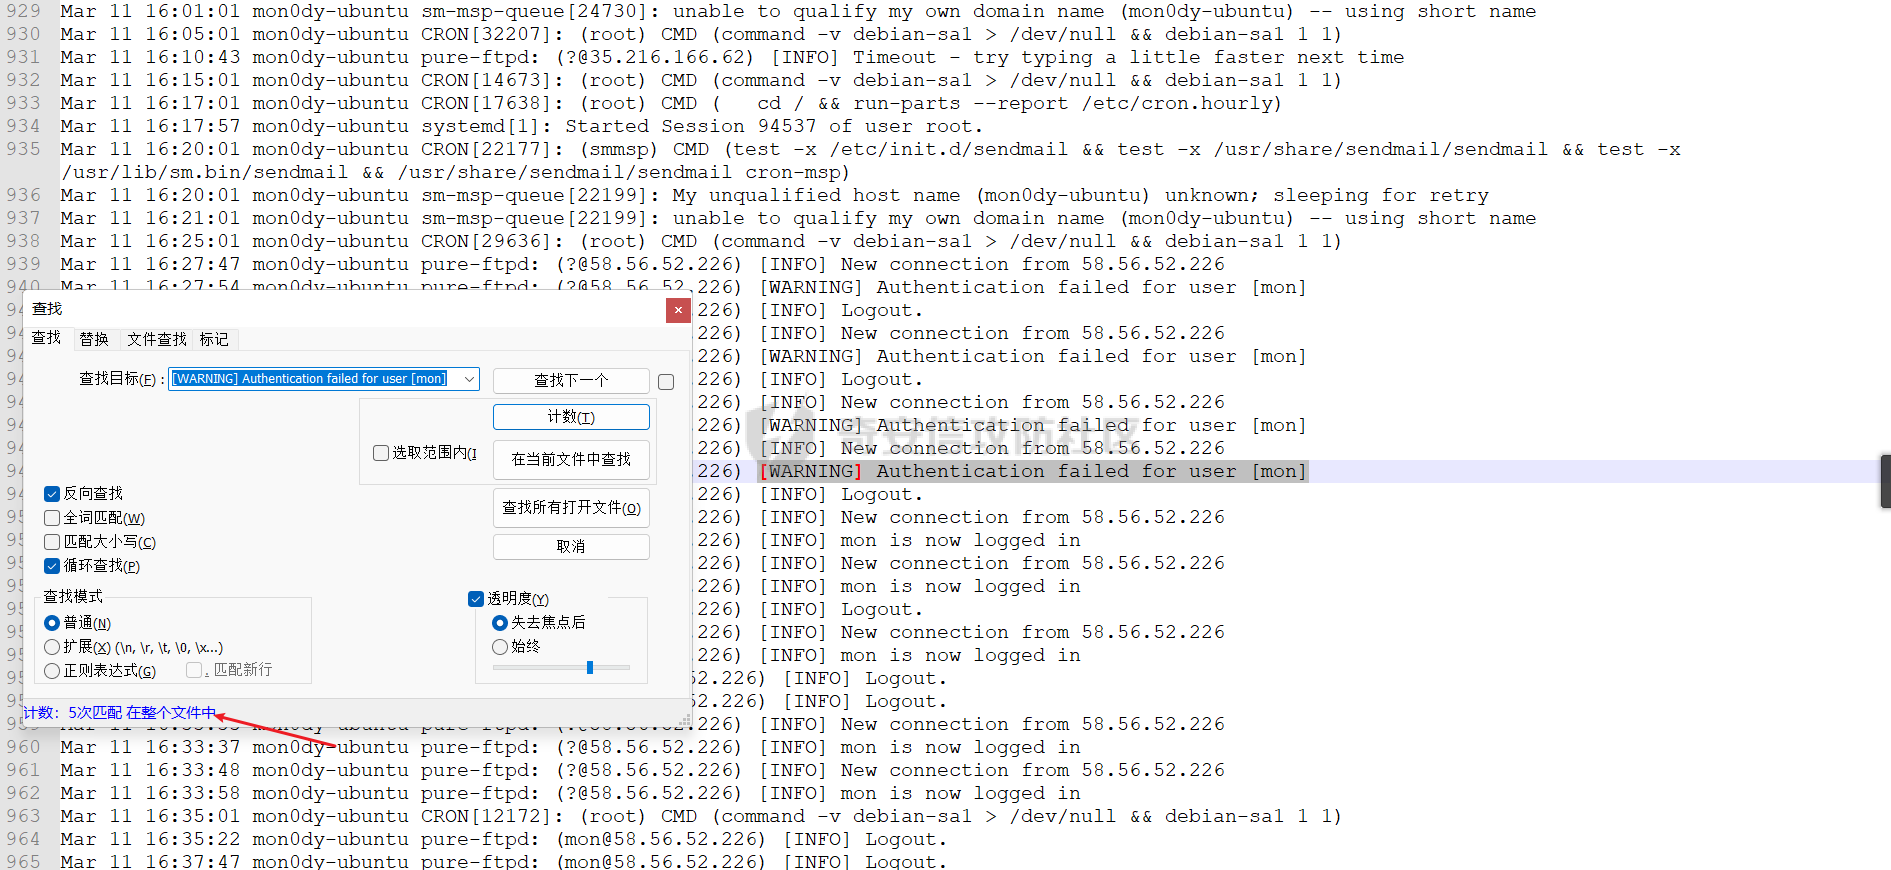 Redis日志 ------- 其配置文件位于/www/server/redis/redis.conf,默认日志位于/var/log/redis下,但是宝塔安装的redis日志位于/www/server/redis/redis.log 可以看到默认是没有密码的,是注释掉的 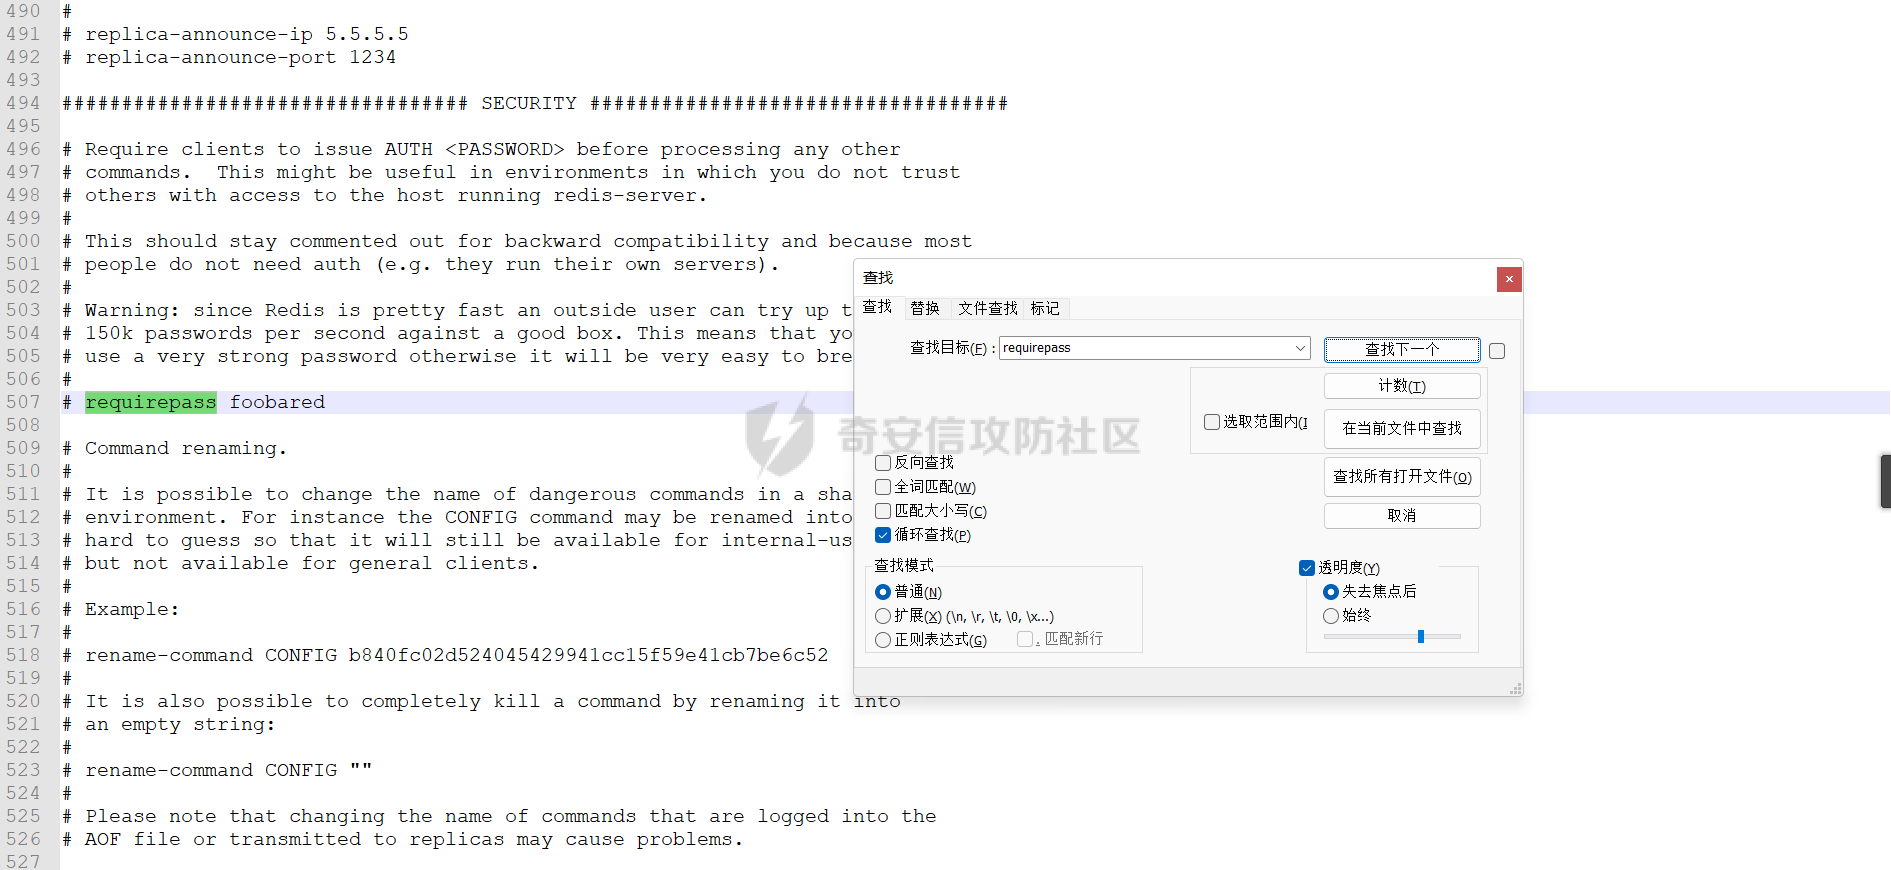 配置文件中也会写日志保存路径,日志等级默认为notice,还有debug、verbose、warning三个等级 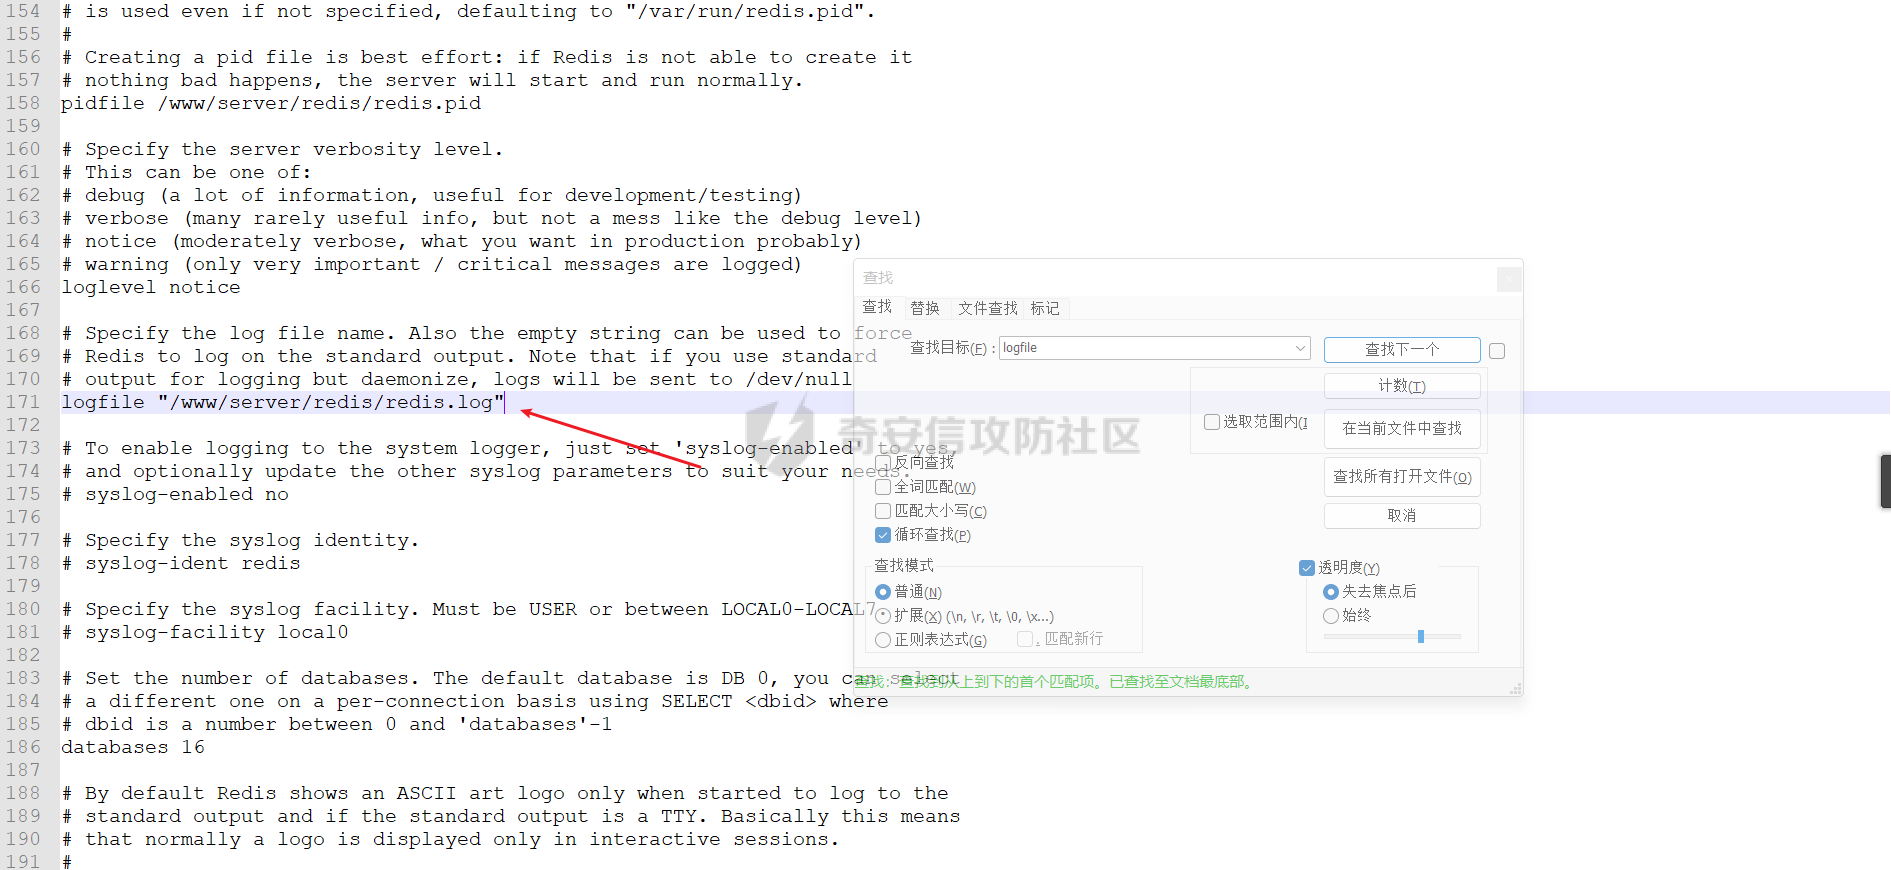 其日志其实也就是命令行输出的log 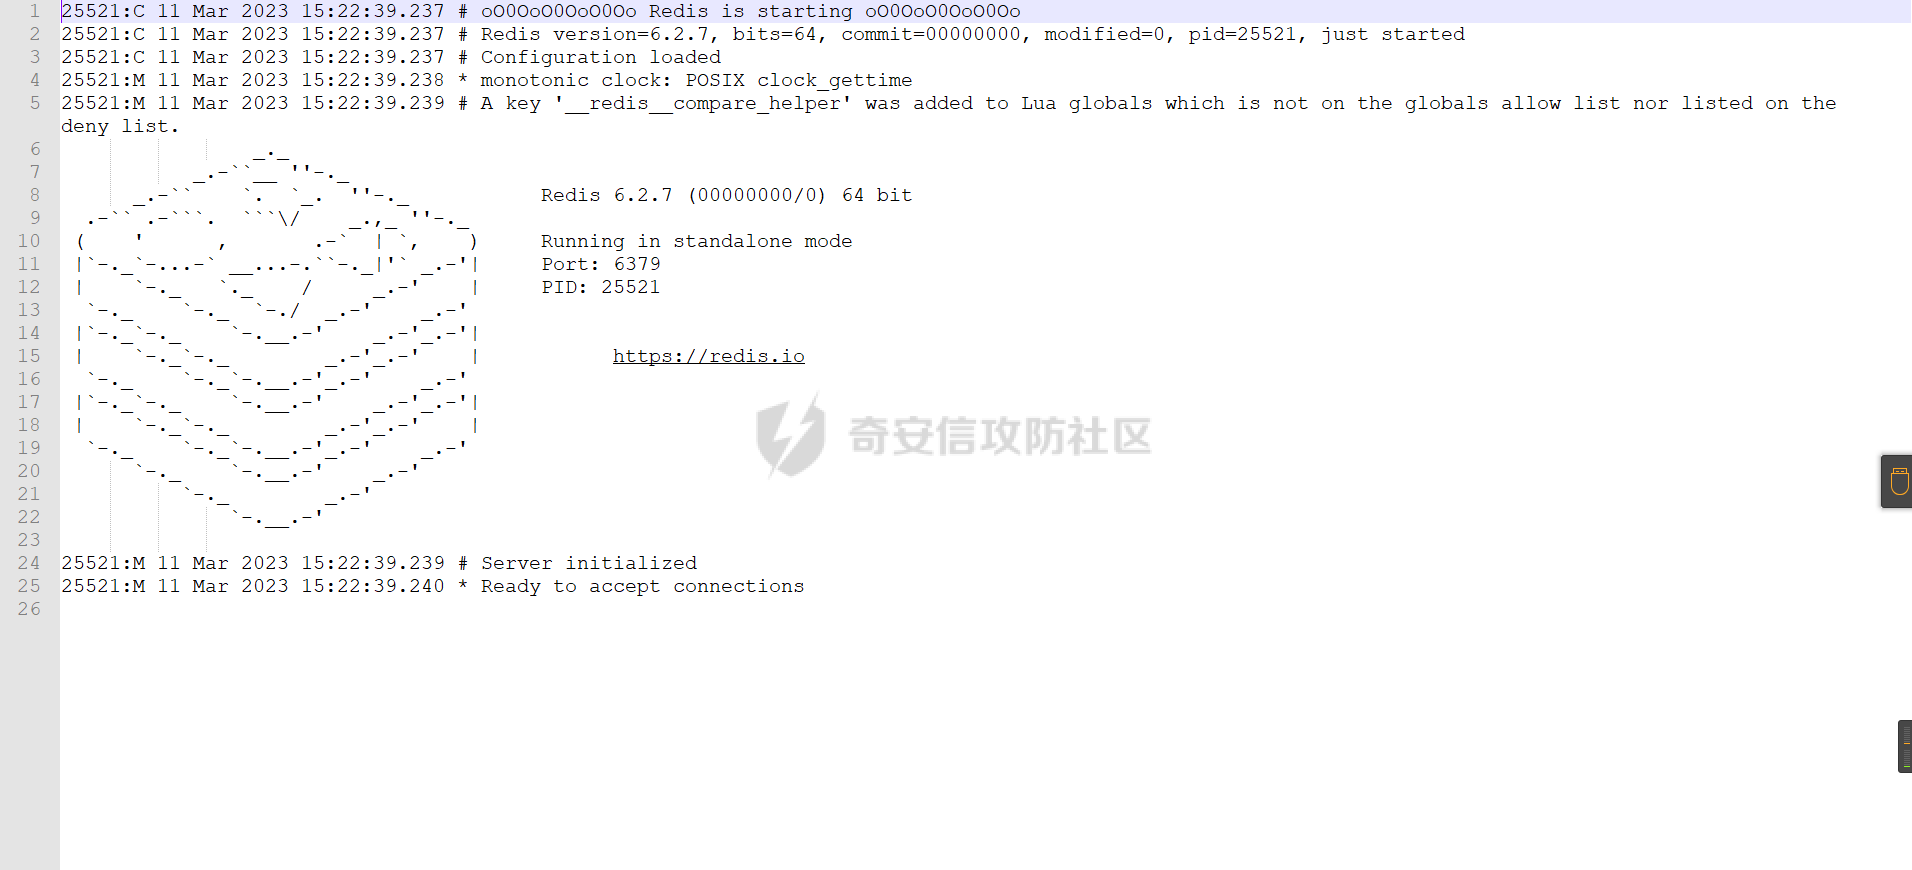 日志等级改成verbose,ip改成0.0.0.0,protected-mod更改为no,之后重启 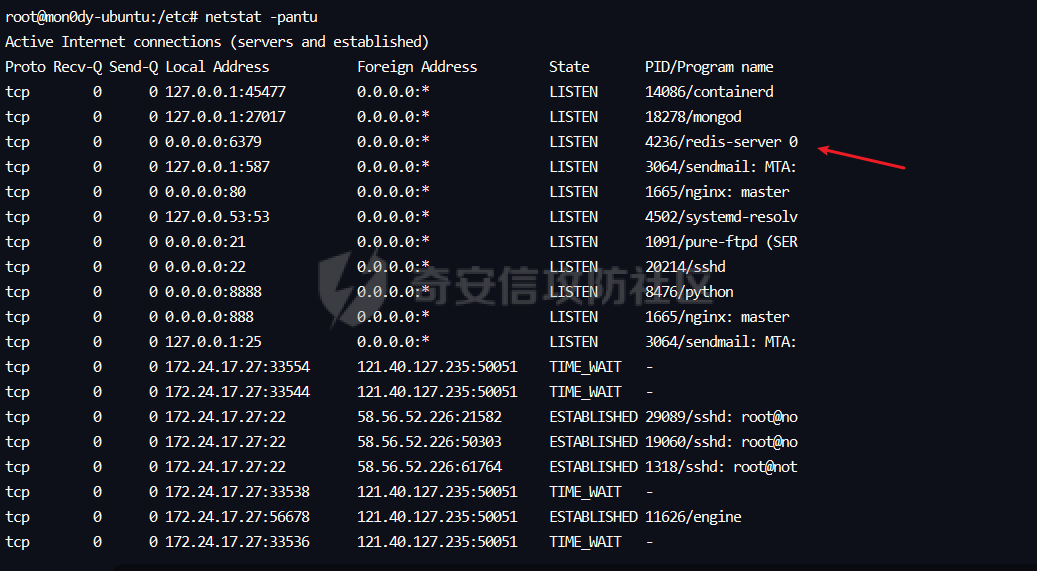 连接上去,随便执行点命令  在回来看日志,发现他只记录ip,不记录具体执行的命令 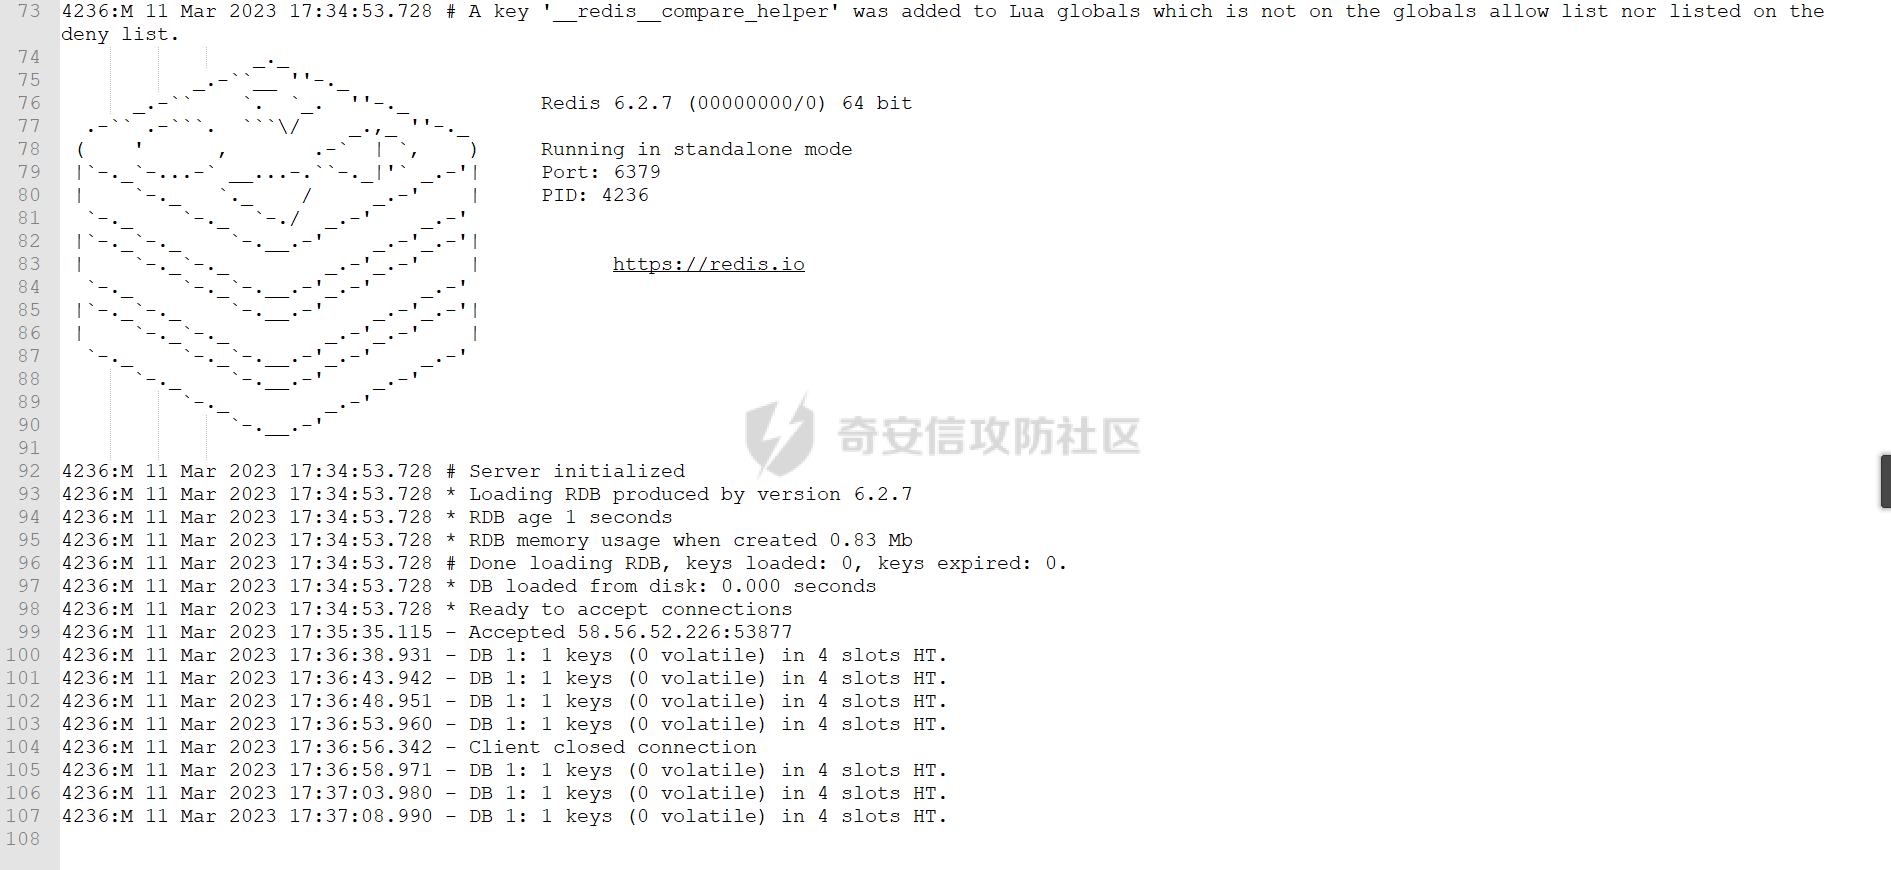 MongoDB日志 --------- 通过查看status可以快速确定config所在位置 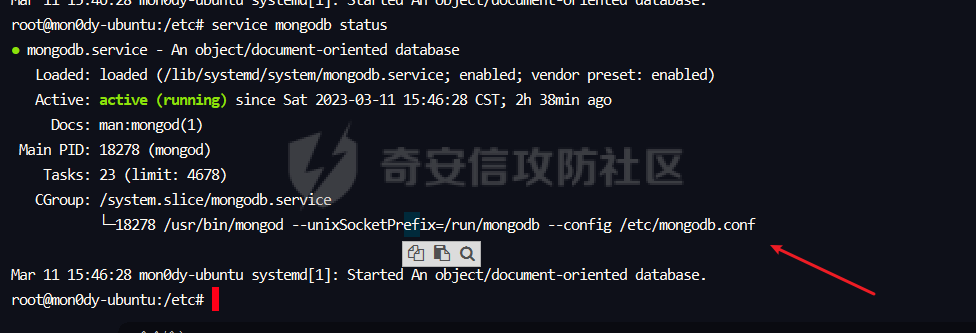 然后就可以获得logpath 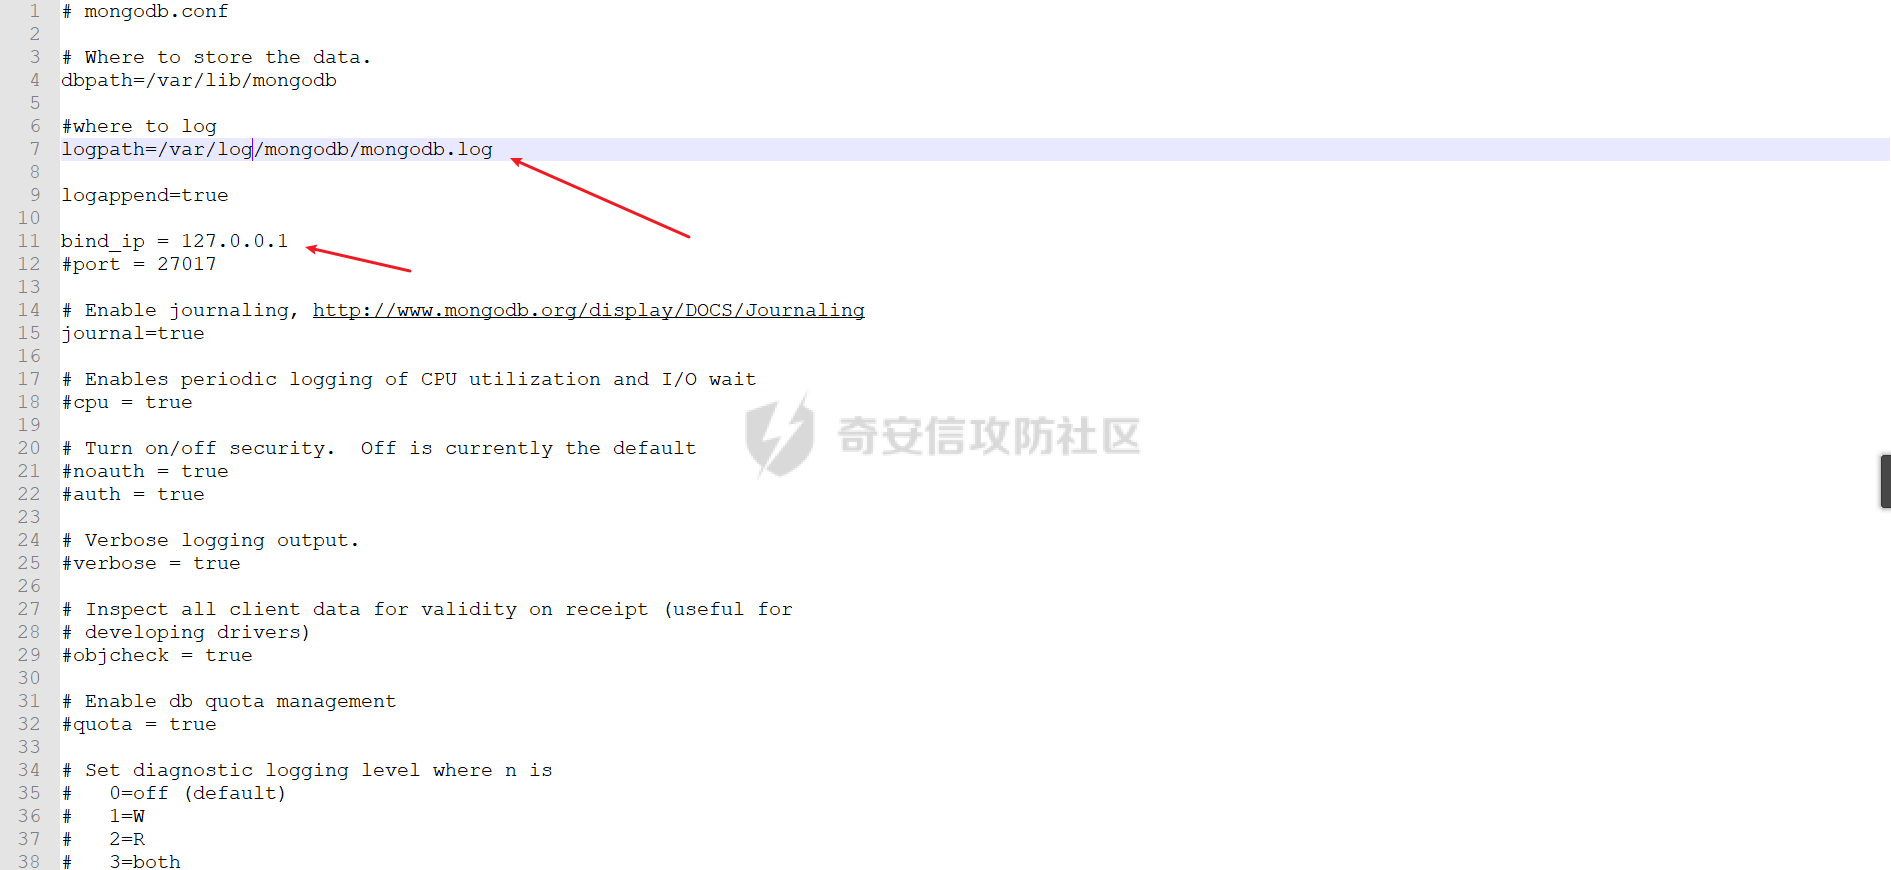 使用宝塔安装的一般在/www/server/mongodb/log/config.log 然后在本机操作一下 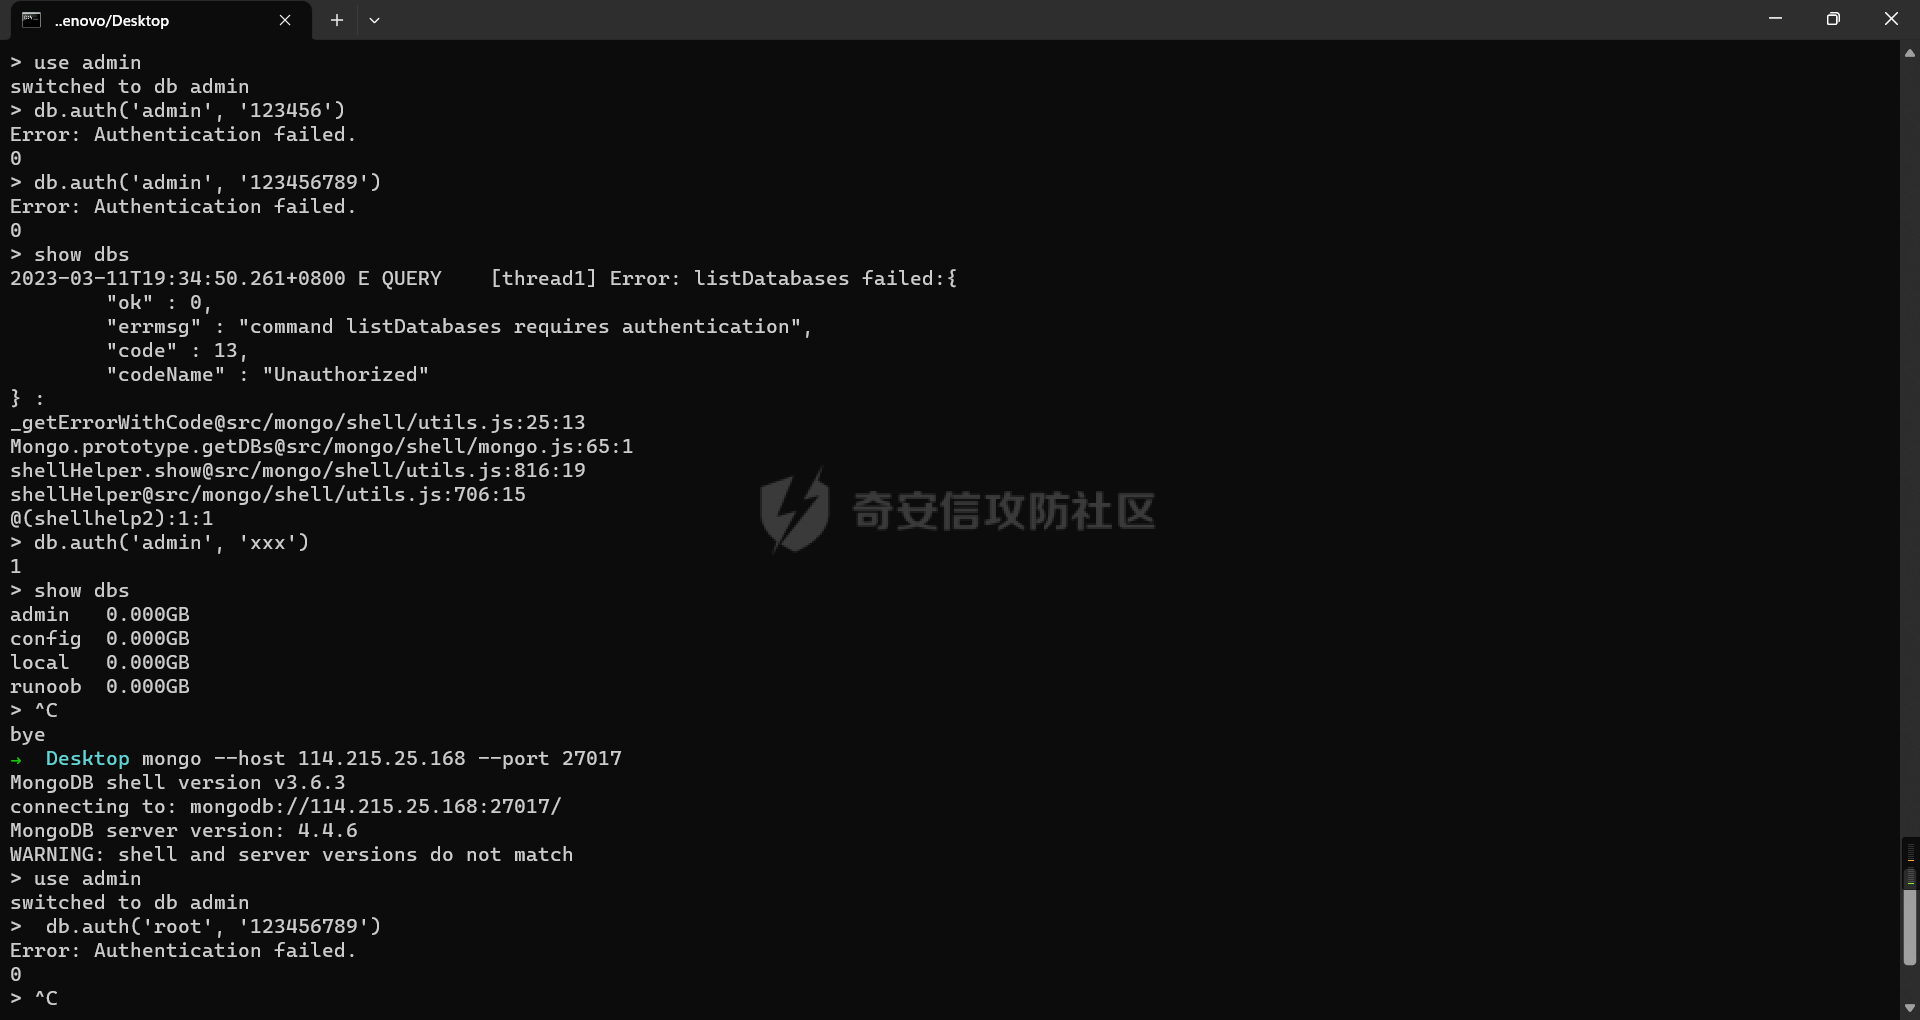 之后看日志,只看有用的部分 认证前的连接 ```bash {"t":{"$date":"2023-03-11T19:40:36.272+08:00"},"s":"I", "c":"NETWORK", "id":22943, "ctx":"listener","msg":"Connection accepted","attr":{"remote":"58.56.52.226:8198","connectionId":3,"connectionCount":1}} ``` 认证失败日志:Authentication failed 密码错误: ```bash {"t":{"$date":"2023-03-11T19:34:47.264+08:00"},"s":"I", "c":"ACCESS", "id":20249, "ctx":"conn2","msg":"Authentication failed","attr":{"mechanism":"SCRAM-SHA-1","speculative":false,"principalName":"admin","authenticationDatabase":"admin","remote":"58.56.52.226:19368","extraInfo":{},"error":"AuthenticationFailed: SCRAM authentication failed, storedKey mismatch"}} ``` 账号错误: ```bash {"t":{"$date":"2023-03-11T19:40:49.427+08:00"},"s":"I", "c":"ACCESS", "id":20249, "ctx":"conn3","msg":"Authentication failed","attr":{"mechanism":"SCRAM-SHA-1","speculative":false,"principalName":"root","authenticationDatabase":"admin","remote":"58.56.52.226:8198","extraInfo":{},"error":"UserNotFound: Could not find user \"root\" for db \"admin\""}} ``` 认证成功:Authentication succeeded ```bash {"t":{"$date":"2023-03-11T19:35:02.646+08:00"},"s":"I", "c":"ACCESS", "id":20250, "ctx":"conn2","msg":"Authentication succeeded","attr":{"mechanism":"SCRAM-SHA-1","speculative":false,"principalName":"admin","authenticationDatabase":"admin","remote":"58.56.52.226:19368","extraInfo":{}}} ``` 连接者的部分信息:连接者的机器版本:ubuntu18,以及MongoDB版本:3.6.3 ```bash {"t":{"$date":"2023-03-11T19:40:36.272+08:00"},"s":"I", "c":"NETWORK", "id":51800, "ctx":"conn3","msg":"client metadata","attr":{"remote":"58.56.52.226:8198","client":"conn3","doc":{"application":{"name":"MongoDB Shell"},"driver":{"name":"MongoDB Internal Client","version":"3.6.3"},"os":{"type":"Linux","name":"Ubuntu","architecture":"x86_64","version":"18.04"}}}} ``` 查看以root登录的次数 ```bash root@mon0dy-ubuntu:/etc# cat /www/server/mongodb/log/config.log | grep "Could not find user" | awk -F '\"' '{print $36}' | sort|uniq -c|sort -nr 1 root root@mon0dy-ubuntu:/etc# ``` apt-get日志 --------- /var/log/apt/history.log,记录apt-get历史命令,包括安装了什么,更新了什么,具体的软件包版本 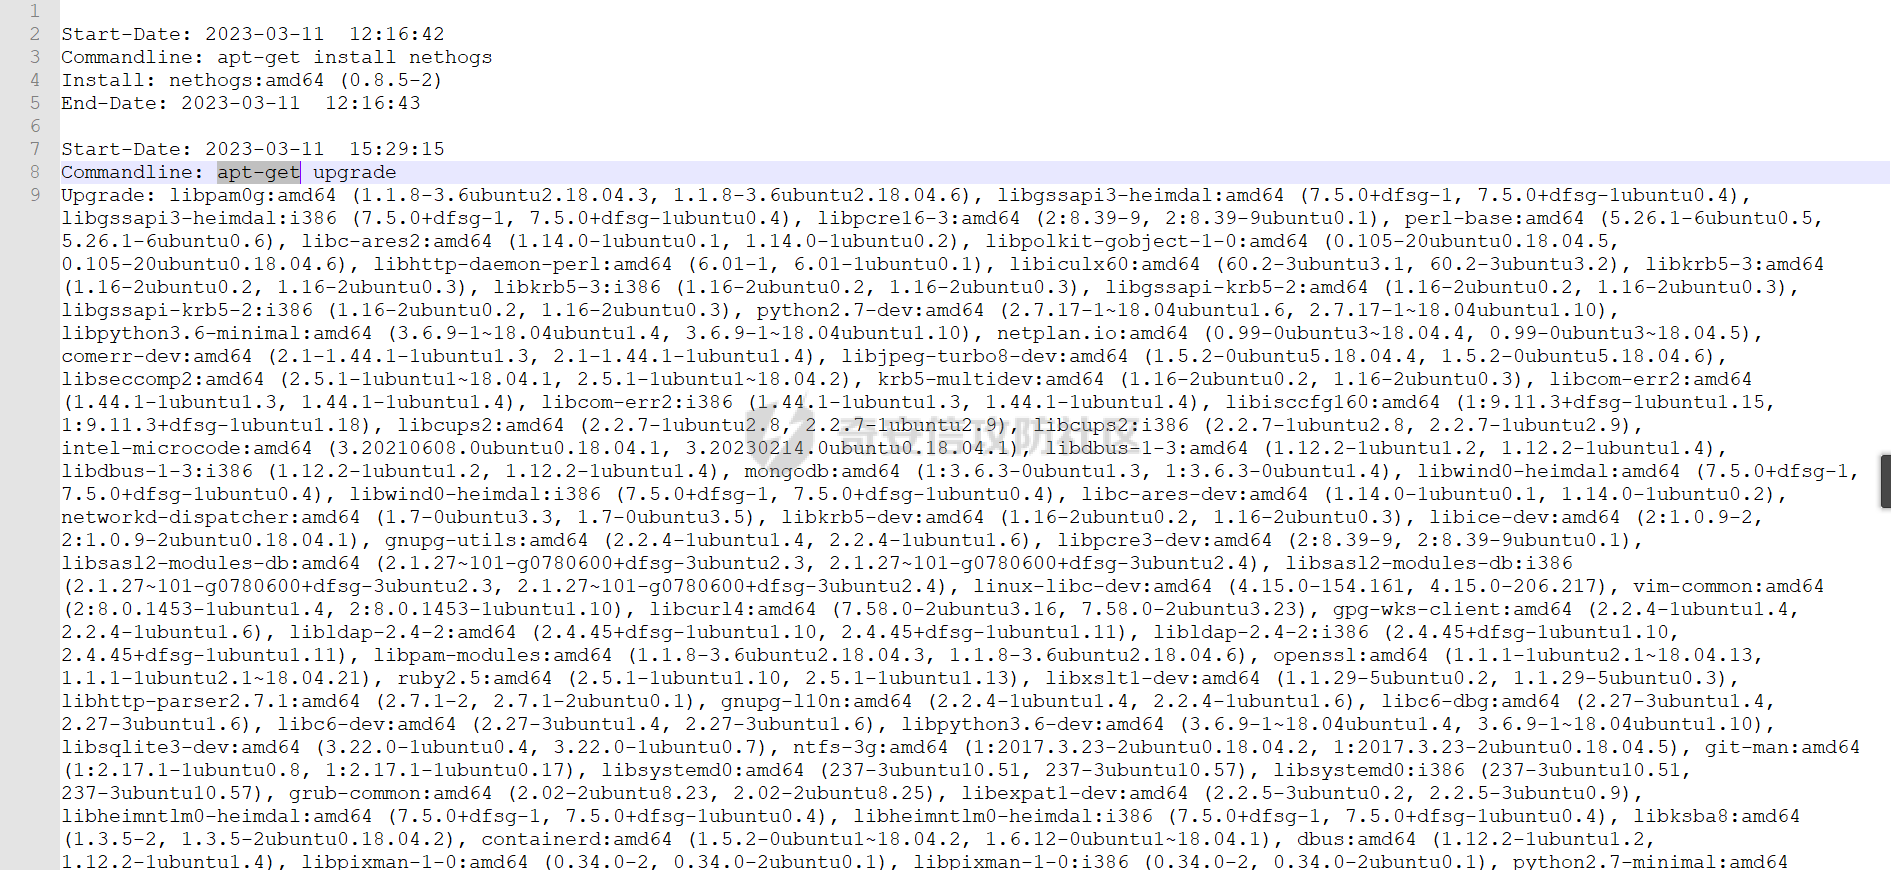 /var/log/apt/term.log,则是记录安装过程 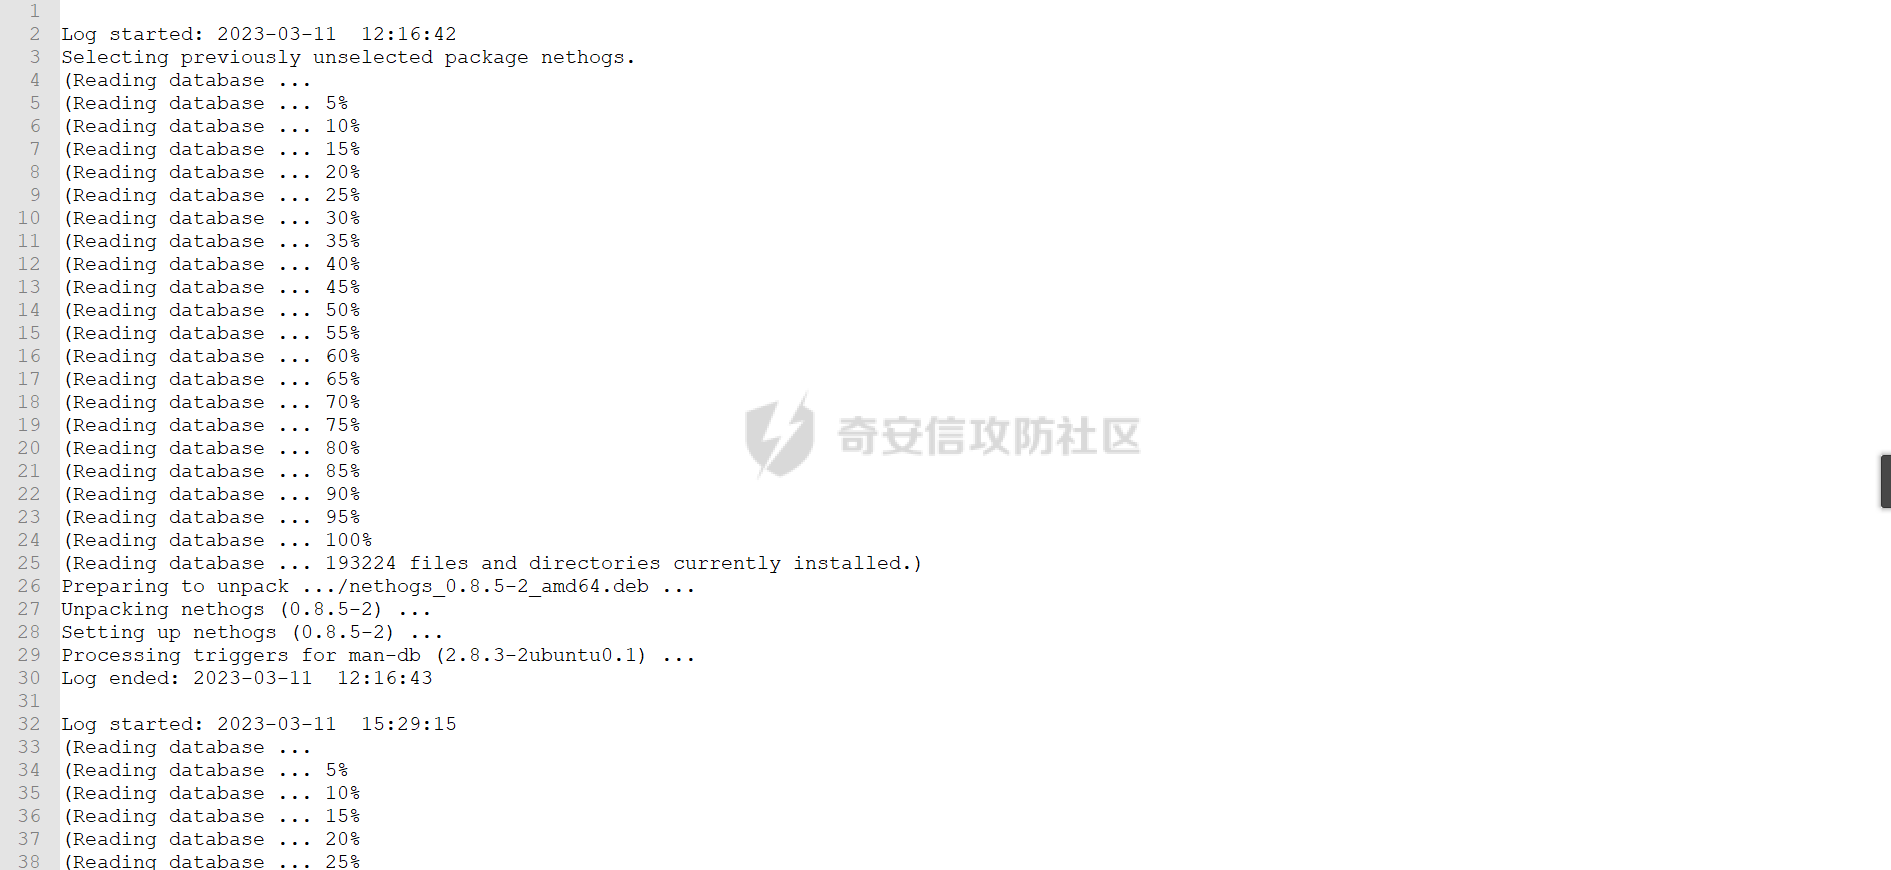 alternatives日志 -------------- /var/log/alternatives.log 软件更新,用于管理相同功能的不同软件或者是统一软件的不同版本,通常在upgrade是留下,记录更新时间和具体的替换过程 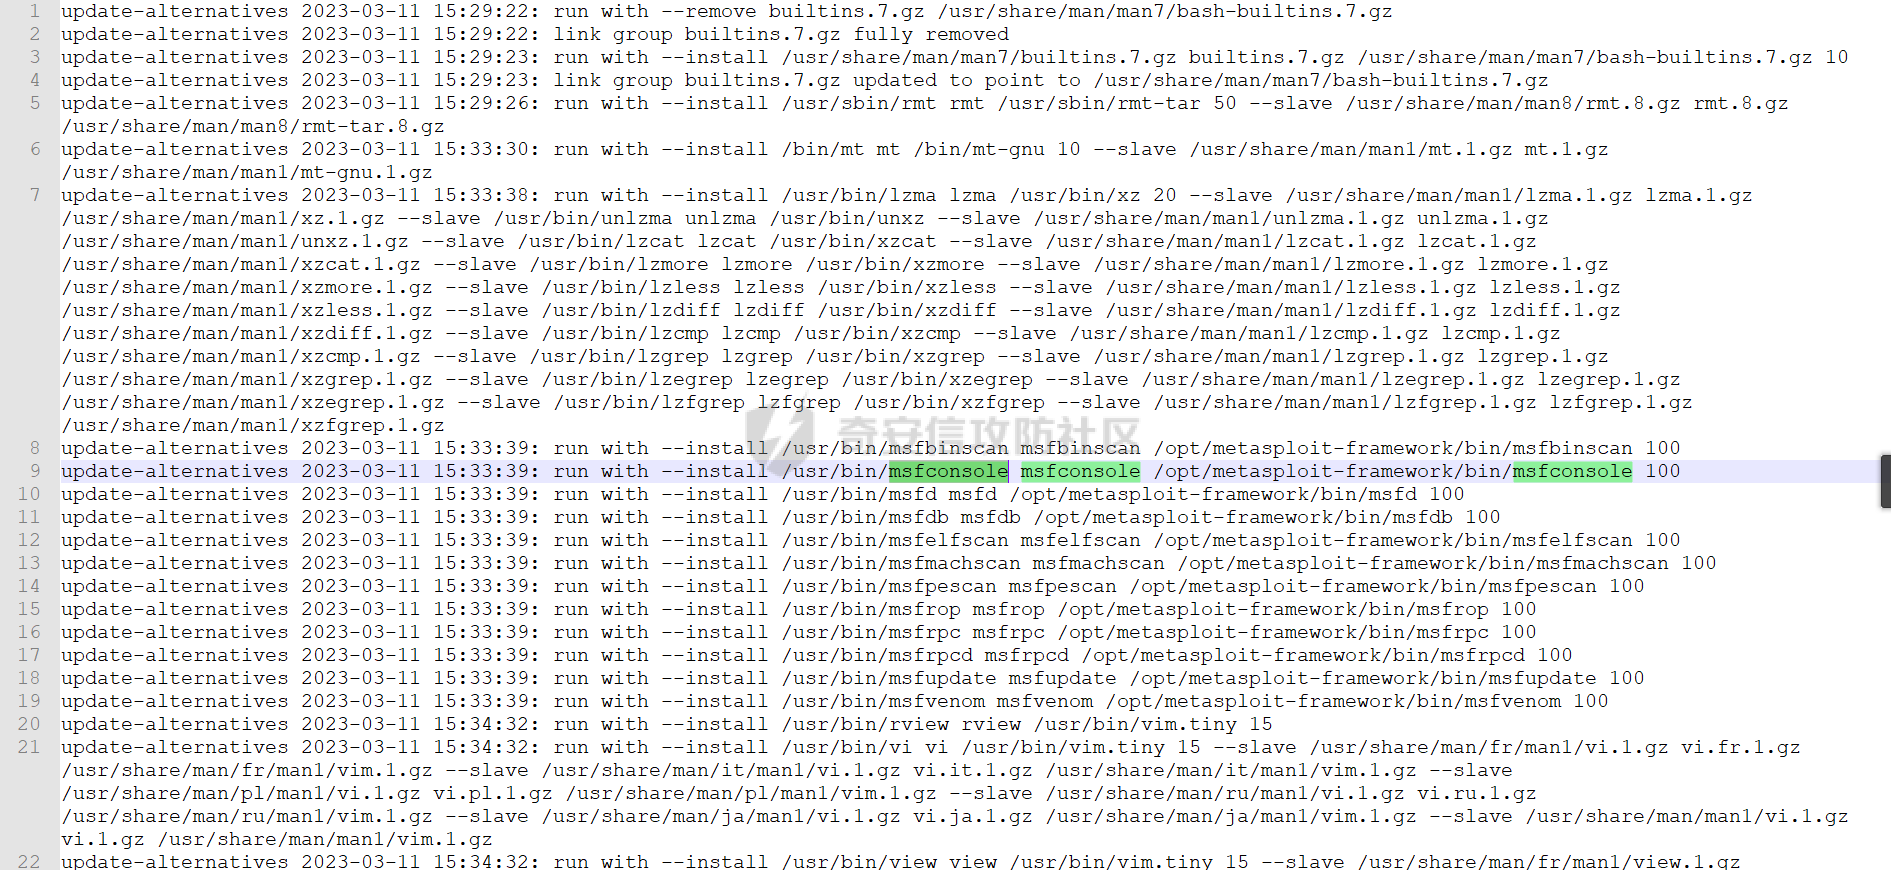 dpkg日志 ------ 安装包管理器日志,记录所有的安装,包括编译安装的,非apt-get安装的,比如这里的mysql57就是通过宝塔编译安装的 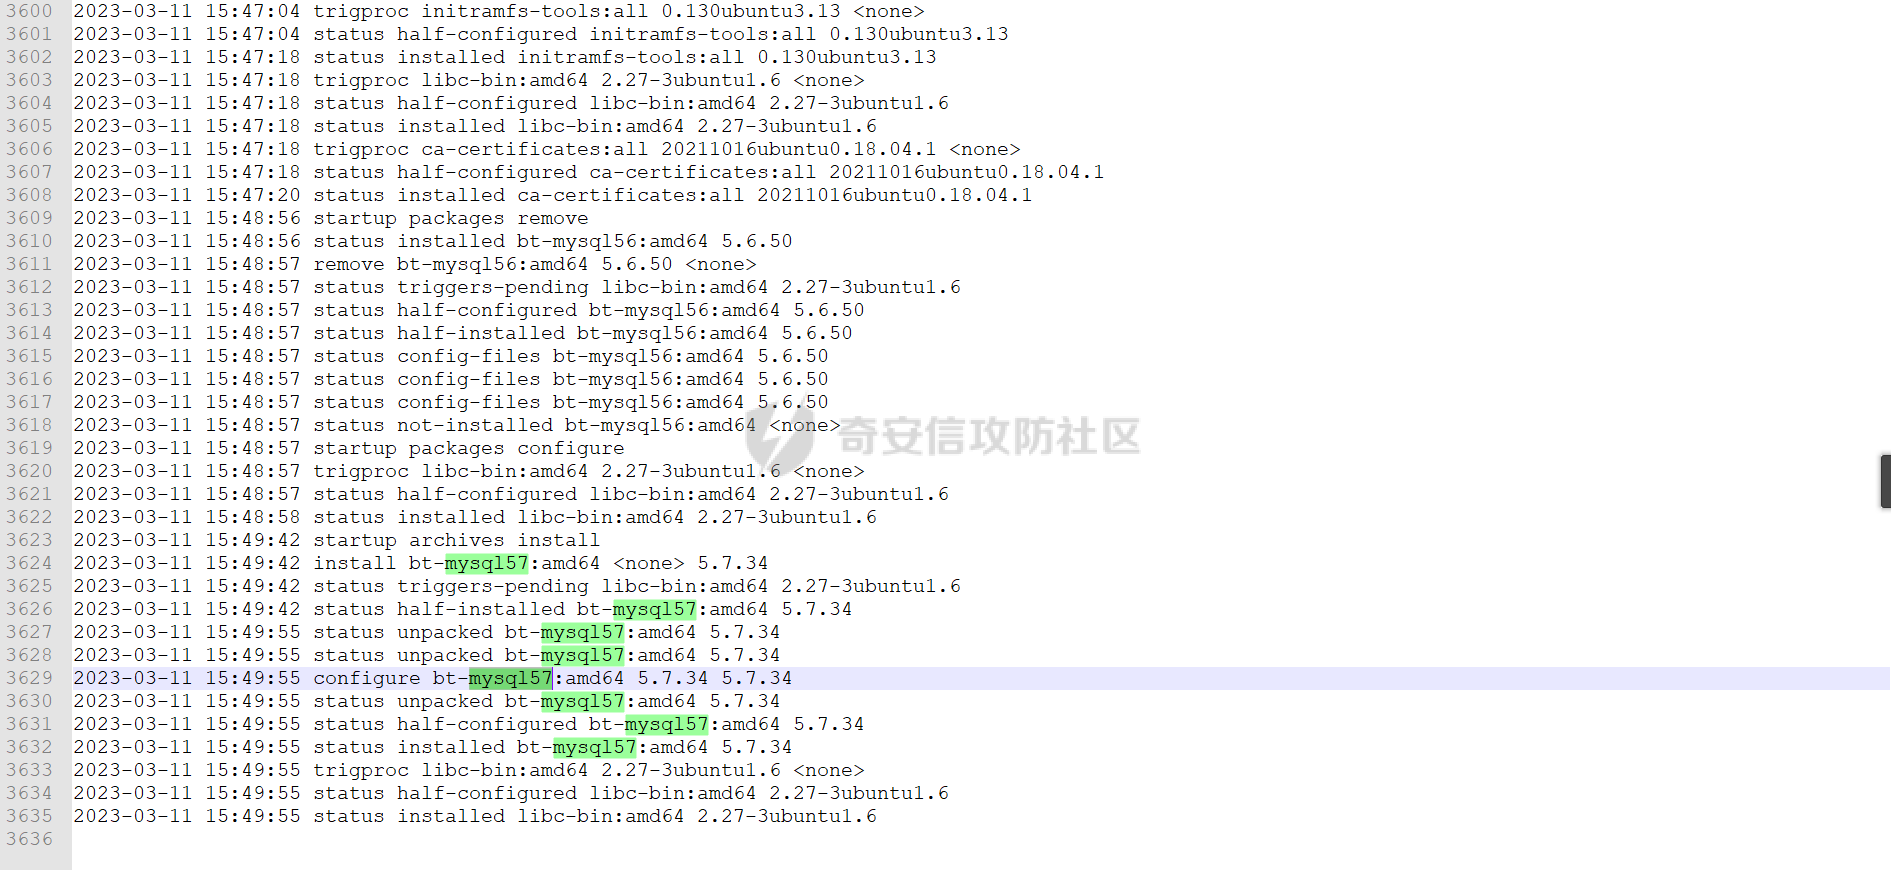
发表于 2023-03-16 09:00:01
阅读 ( 12071 )
分类:
应急响应
1 推荐
收藏
0 条评论
请先
登录
后评论
mon0dy
12 篇文章
×
发送私信
请先
登录
后发送私信
×
举报此文章
垃圾广告信息:
广告、推广、测试等内容
违规内容:
色情、暴力、血腥、敏感信息等内容
不友善内容:
人身攻击、挑衅辱骂、恶意行为
其他原因:
请补充说明
举报原因:
×
如果觉得我的文章对您有用,请随意打赏。你的支持将鼓励我继续创作!