问答
发起
提问
文章
攻防
活动
Toggle navigation
首页
(current)
问答
商城
实战攻防技术
活动
摸鱼办
搜索
登录
注册
移动安全之Android逆向系列:JNI动态注册
移动安全
本篇文章是Android逆向系列的第七篇,内容主要为JNI动态注册,基于上一篇的JNI静态注册,本文将深入了解学习JNI接口函数的用法,以计算器为例子,先在Eclipse中添加相应的组件及编辑对应的运算方法,接着借助JNI接口编写动态注册函数(使用到RegisterNatives方法),最后编写剩余的配置文件生成so文件并测试~
一、创建Android 工程 -------------- ### 1、创建新工程 > 之前有详细图介绍 选择左上角`File-New-Android Application Project`创建工程 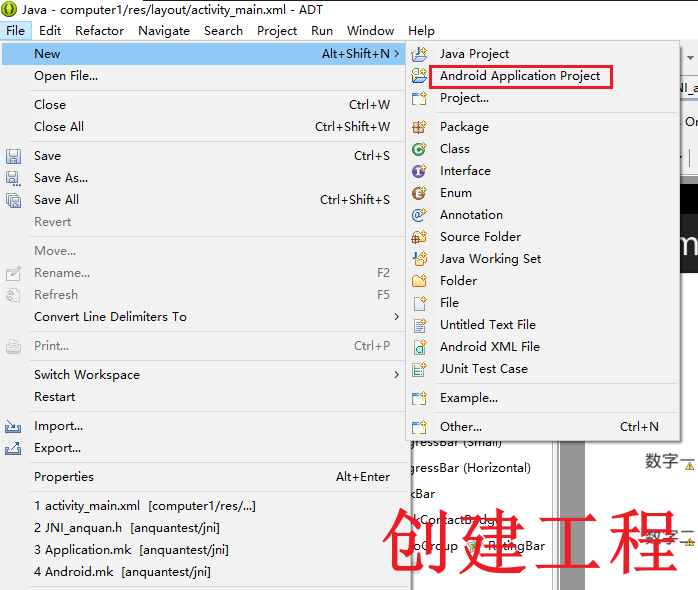 ### 2、添加组件 #### 1)添加Plain Text和Textview 在Palette中选择拖入`Plain Text`和`TextView` 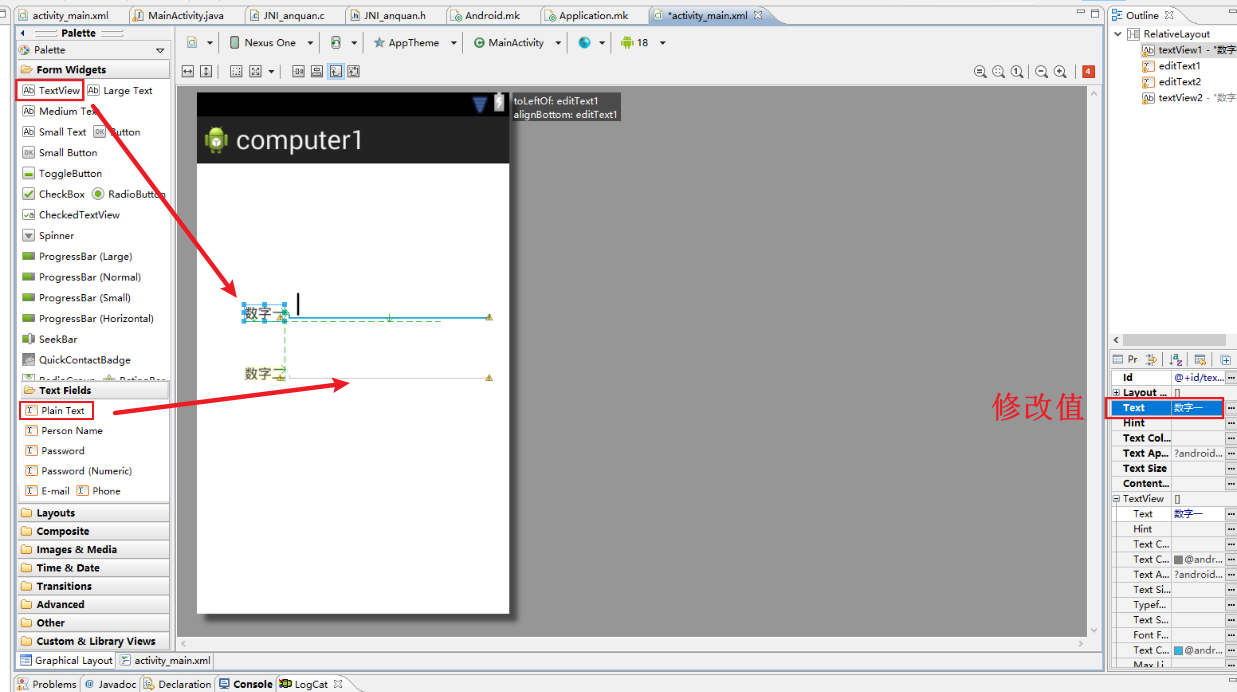 #### 2)添加Button 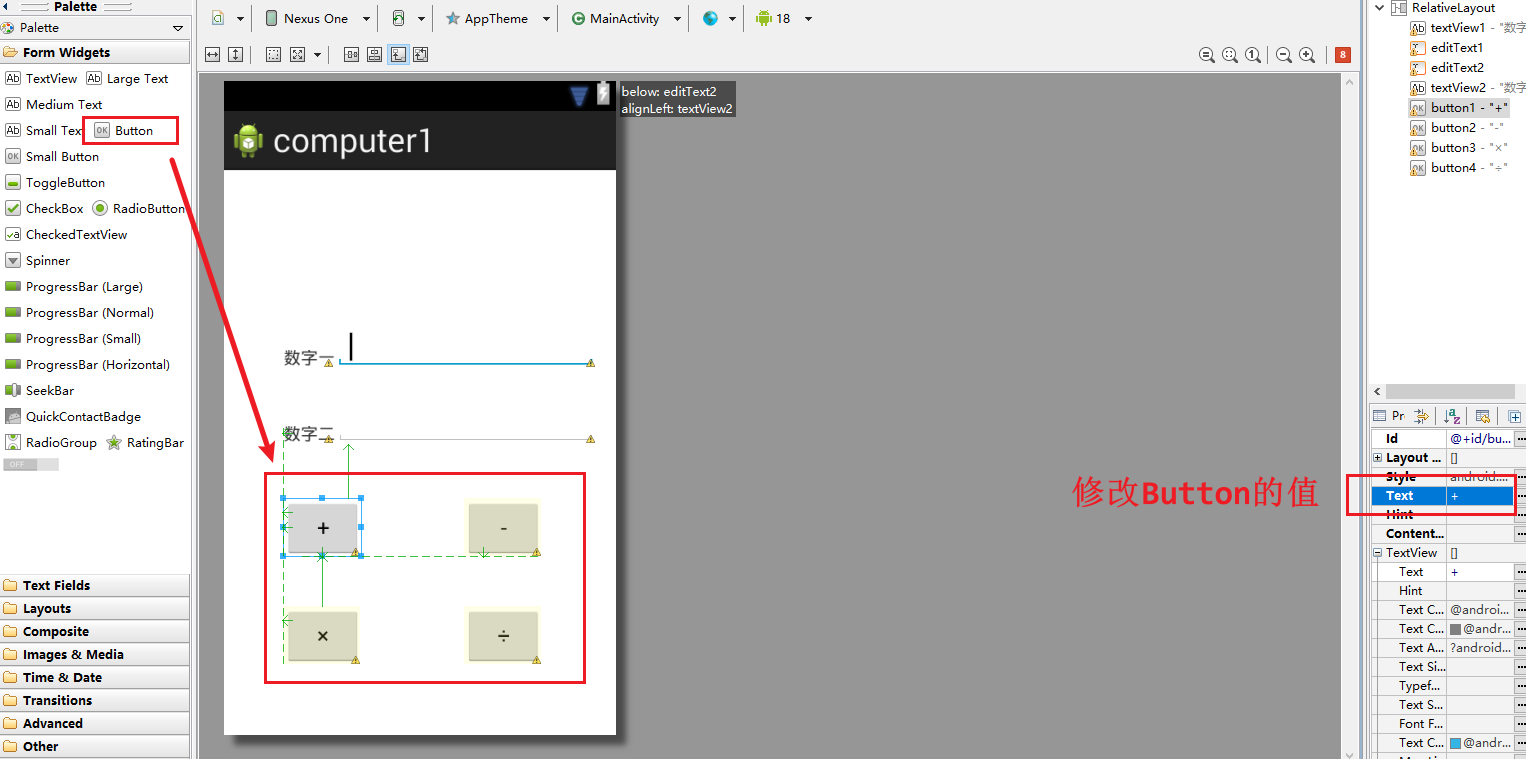 #### 3)activity\_main.xml配置文件中修改 双击Button组件,跳转到activity\_main.xml配置文件中 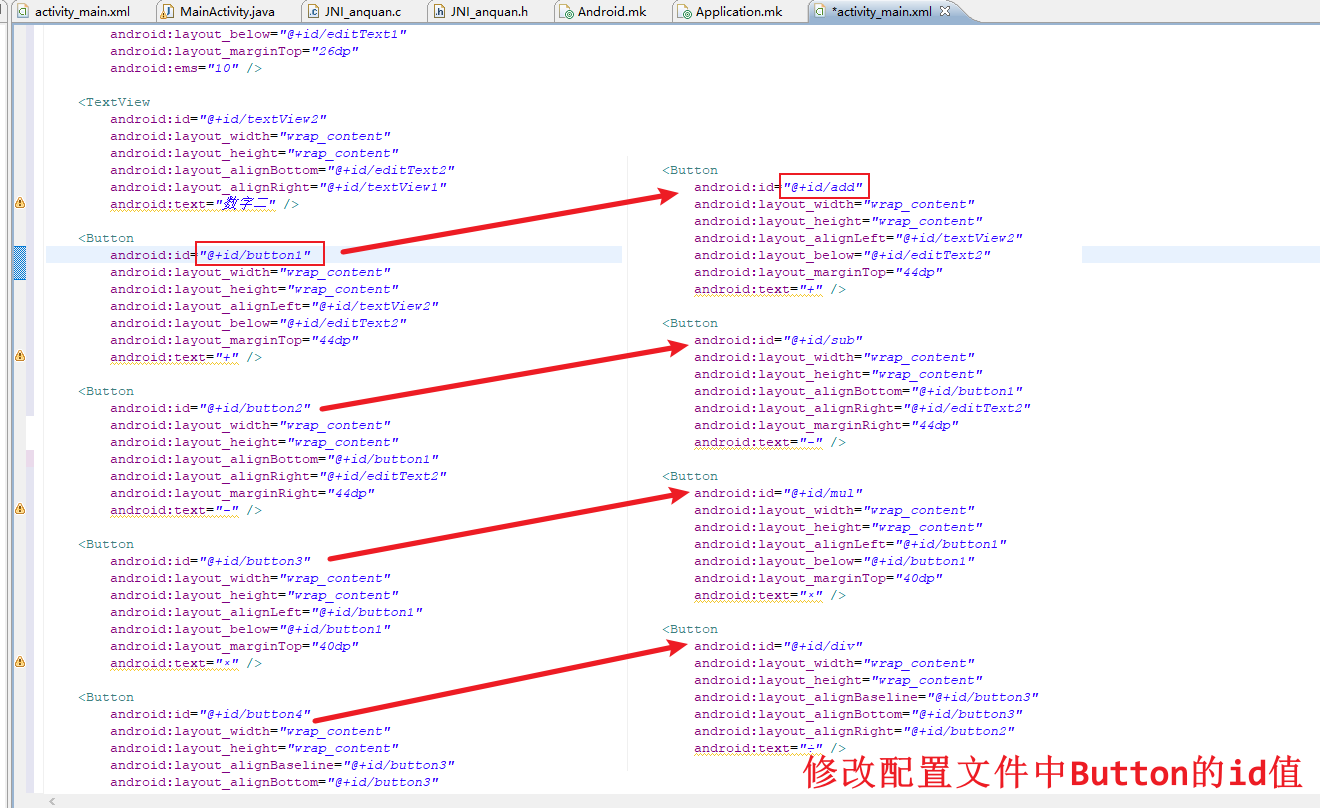 回到界面布局,在右边的Properties中也可以修改id值 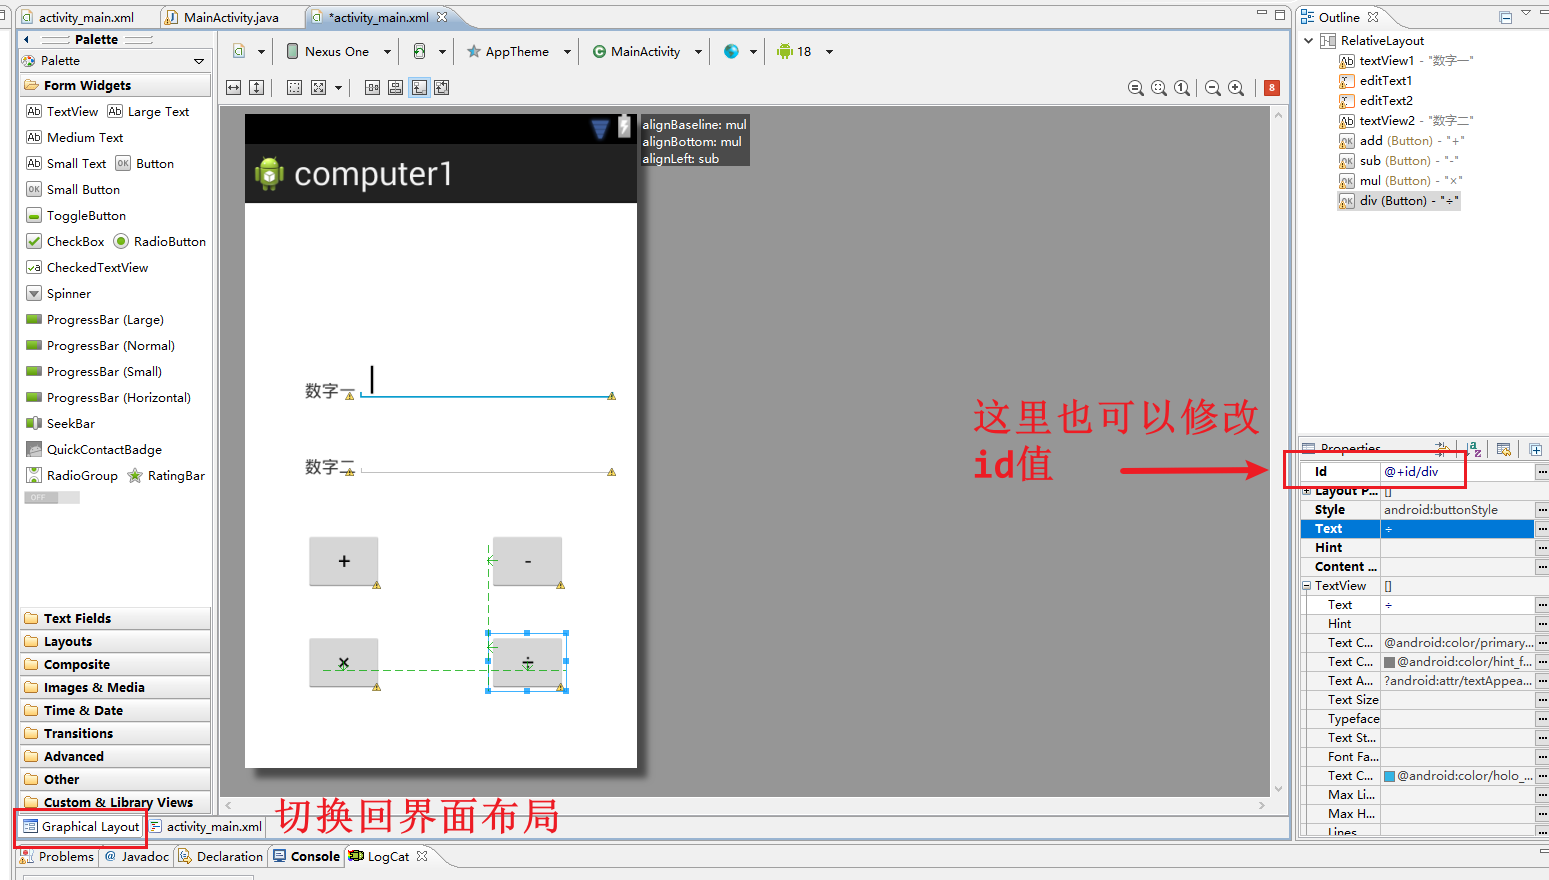 二、编辑MainActivity.java --------------------- ### 1、初始化控件-绑定编辑框和按钮 定义变量绑定编辑框和按钮,用于后续操作。在MainActivity.java中添加如下内容 ```java private EditText textone; private EditText texttwo; private Button add; private Button sub; private Button mul; private Button div; private void init() { // 绑定编辑框 textone = (EditText) findViewById(R.id.editText1); texttwo = (EditText) findViewById(R.id.editText2); // 绑定按钮 add = (Button) findViewById(R.id.add); sub = (Button) findViewById(R.id.sub); mul = (Button) findViewById(R.id.mul); div = (Button) findViewById(R.id.div); } ``` 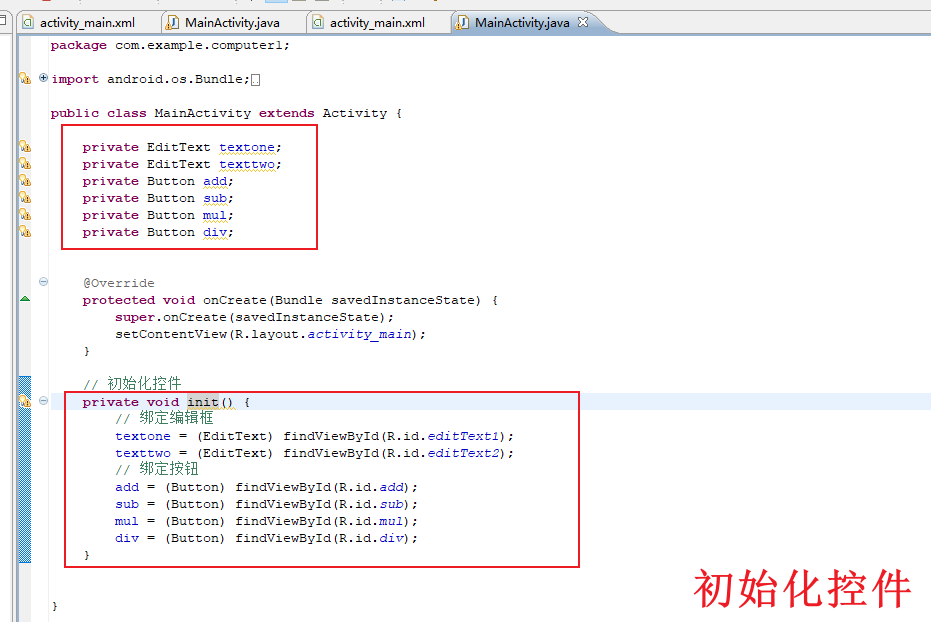 ### 2、定义native方法-加减乘除 定义加减乘除的方法,具体实现在so层 ```java private float one; private float two; // 定义native的加减乘除方法,具体的实现见so层 public native float add(float one, float two); public native float sub(float one, float two); public native float mul(float one, float two); public native float div(float one, float two); ``` 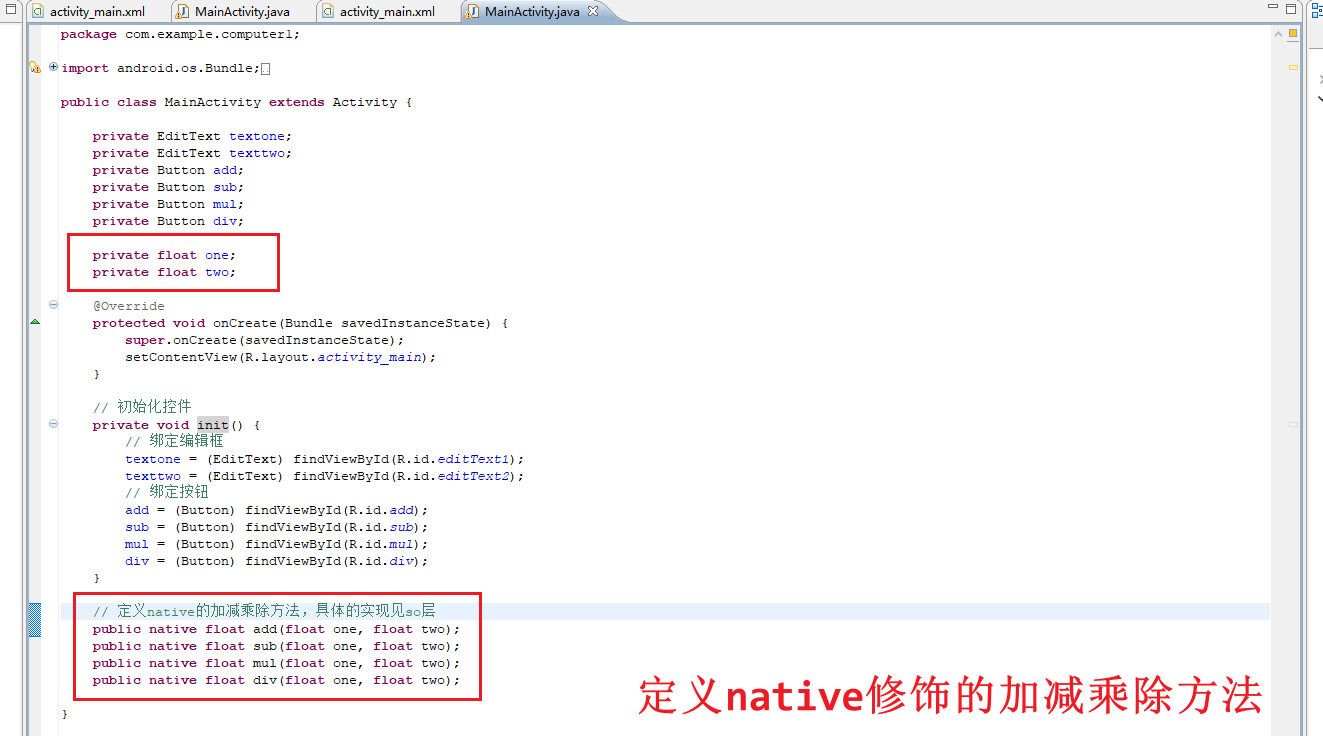 ### 3、获取编辑框的值 使用`getText()`方法获取编辑框的值 ```java one = Float.parseFloat(textone.getText().toString()); two = Float.parseFloat(texttwo.getText().toString()); ``` ### 4、编辑运算方法 定义`yunsuan()`方法,new出一个`OnClickListener`接口,在其中实现`onClick()`方法,`onClick()`方法用于获取用户按下按钮的ID值,根据不同ID做出不同的操作。比如按下加法按钮,获取到加法按钮的ID值`R.id.add`,获取两个编辑框的的值,使用Toast弹窗将加法运算的结果展示出来 使用`setOnClickListener()`方法设置点击事件监听,传入一个`OnClickListener`对象作为参数,`OnClickListener`对象携带了之前实现的`onClick(View v)`方法 ```java private void yunsuan(){ final OnClickListener ner=new OnClickListener() { @Override public void onClick(View v) { // TODO Auto-generated method stub switch (v.getId()) { case R.id.add: //获取两个编辑框的值 one = Float.parseFloat(textone.getText().toString()); two = Float.parseFloat(texttwo.getText().toString()); Toast.makeText(MainActivity.this, add(one,two)+"", 1).show(); break; case R.id.sub: one = Float.parseFloat(textone.getText().toString()); two = Float.parseFloat(texttwo.getText().toString()); Toast.makeText(MainActivity.this, sub(one,two)+"", 1).show(); break; case R.id.mul: one = Float.parseFloat(textone.getText().toString()); two = Float.parseFloat(texttwo.getText().toString()); Toast.makeText(MainActivity.this, mul(one,two)+"", 1).show(); break; case R.id.div: one = Float.parseFloat(textone.getText().toString()); two = Float.parseFloat(texttwo.getText().toString()); Toast.makeText(MainActivity.this, div(one,two)+"", 1).show(); break; default: break; } } }; add.setOnClickListener(ner); sub.setOnClickListener(ner); mul.setOnClickListener(ner); div.setOnClickListener(ner); } ``` 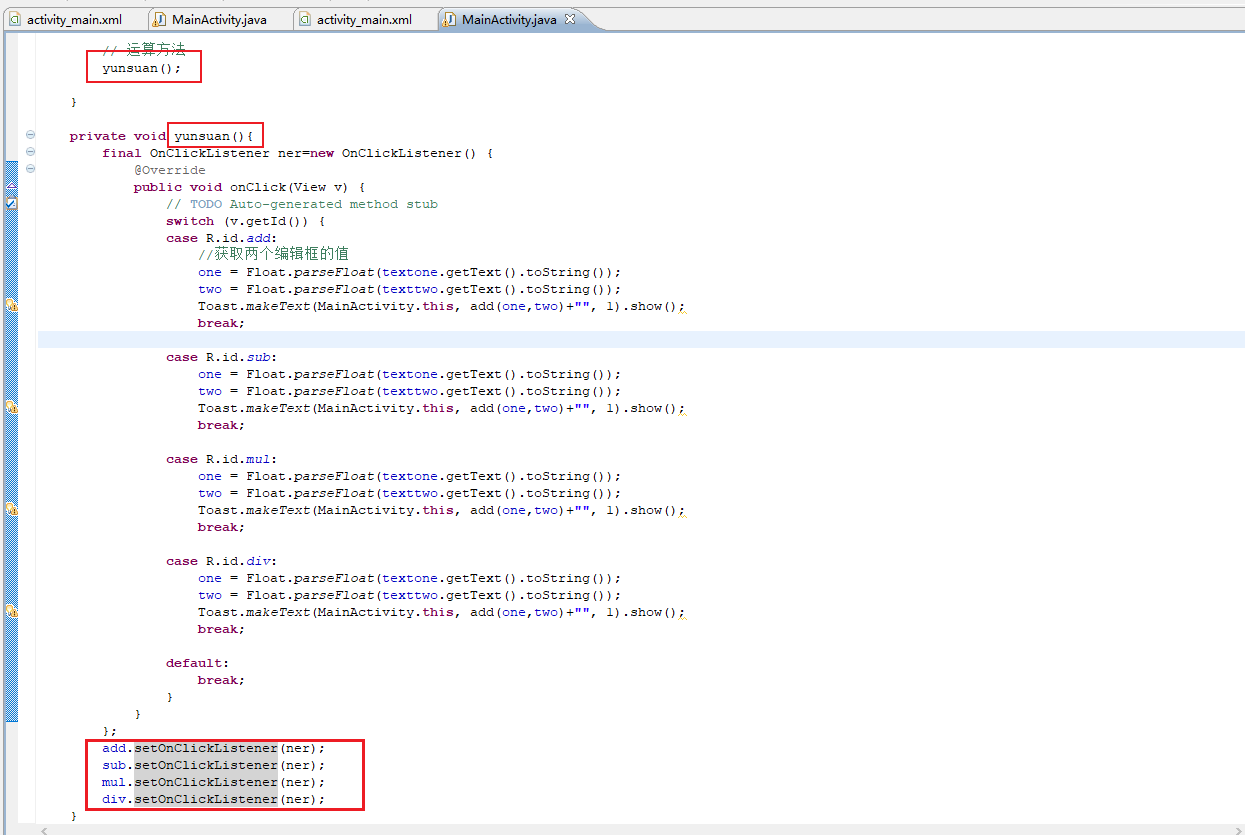 > 图中四个add写错了,改为add、sub、mul、div 三、创建C源文件|使用JNI -------------- ### 1、创建jni文件夹及C源文件 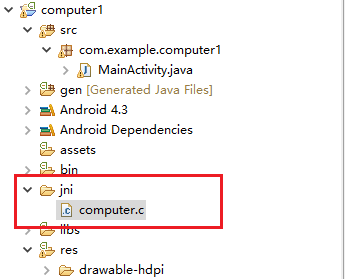 ### 2、编辑C源文件 #### 1)设置C层的运算函数-加减乘除 ```c #include <jni.h> jfloat addcc(JNIEnv *env, jobject obj, jfloat a, jfloat b){ return a+b; } jfloat subcc(JNIEnv *env, jobject obj, jfloat a, jfloat b){ return a-b; } jfloat mulcc(JNIEnv *env, jobject obj, jfloat a, jfloat b){ return a*b; } jfloat divcc(JNIEnv *env, jobject obj, jfloat a, jfloat b){ return a/b; } ``` #### 2)绑定C层和Java层的代码 使用`JNINativeMethod`结构体进行绑定  ```c JNINativeMethod nativeMethod[]={ {"add", "(FF)F", (void*)addcc}, {"sub", "(FF)F", (void*)subcc}, {"mul", "(FF)F", (void*)mulcc}, {"div", "(FF)F", (void*)divcc} }; ``` 第一个参数是java方法名:add等 第二个参数是参数签名,标记参数和返回值的类型,可以从方法定义中看出两个参数是float类型,返回值也是float类型。这里写`(FF)F` ```java public native float add(float one, float two); ``` 第三个参数是函数指针,指向jni函数,即C层中的函数 #### 3)编写注册函数 使用jni接口中的`RegisterNatives`方法  ```java jint reg(JNIEnv *env){ if ((*env)->RegisterNatives(env, _jclass, const nativeMethod, sizeof(nativeMethod)/sizeof(nativeMethod[0])) != JNI_OK) { return JNI_ERR; } return JNI_OK; } ``` #### 4)动态注册 使用JNI接口中的`JNI_OnLoad`方法进行动态注册 ```php JNIEXPORT jint JNICALL JNI_OnLoad(JavaVM* vm, void* reserved); ``` 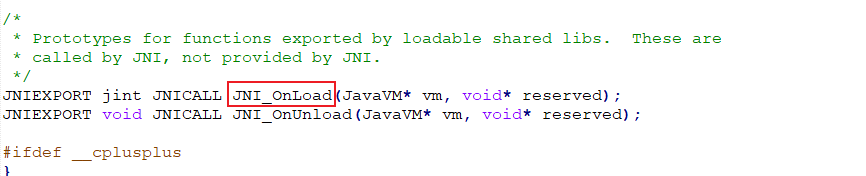 ```java // 使用JNI接口中的JNI_OnLoad进行动态注册 JNIEXPORT jint JNICALL JNI_OnLoad(JavaVM* vm, void* reserved){ JNIEnv* env; if( (*vm)->GetEnv(vm, (void**)&env, JNI_VERSION_1_4) != JNI_OK){ return JNI_ERR; } if( reg(env) != JNI_OK){ return JNI_ERR; } return JNI_VERSION_1_4; } ``` 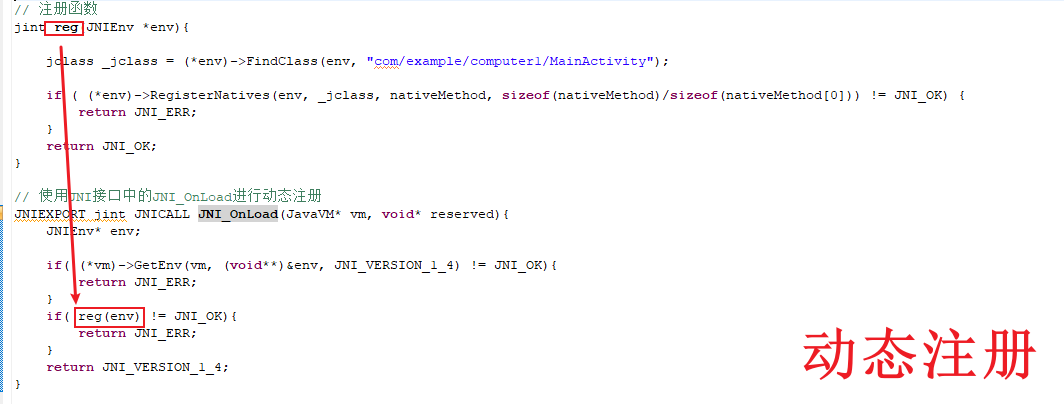 这里就完成使用JNLOnLoad进行动态注册,这里的JNLOnLoad类似Java里面的类,系统会自动调用!所以逆向在JNL-OnLoad下断点即可分析找->registerNative->RegisterNatives三个参数->Java层和C层绑定的一个逻辑关系 四、编写mk配置文件 ---------- ### 1、Android.mk ```php LOCAL_PATH := $(call my-dir) include $(CLEAR_VARS) LOCAL_MODULE := computer LOCAL_SRC_FILES := computer.c LOCAL_ARM_MODE := arm LOCAL_LDLIBS := -llog include $(BUILD_SHARED_LIBRARY) ``` 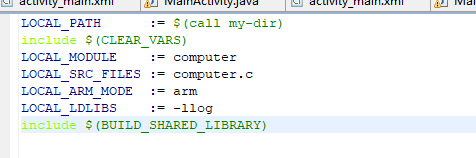 ### 2、Application.mk ```php APP_ABI := armeabi-v7a ``` 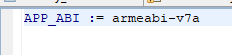 五、生成调用so库及连接手机测试 ---------------- ### 1、使用ndk编译生成so文件 ```php ndk-build ``` ### 2、添加调用so库代码 ```php static{ System.loadLibrary("computer"); } ``` 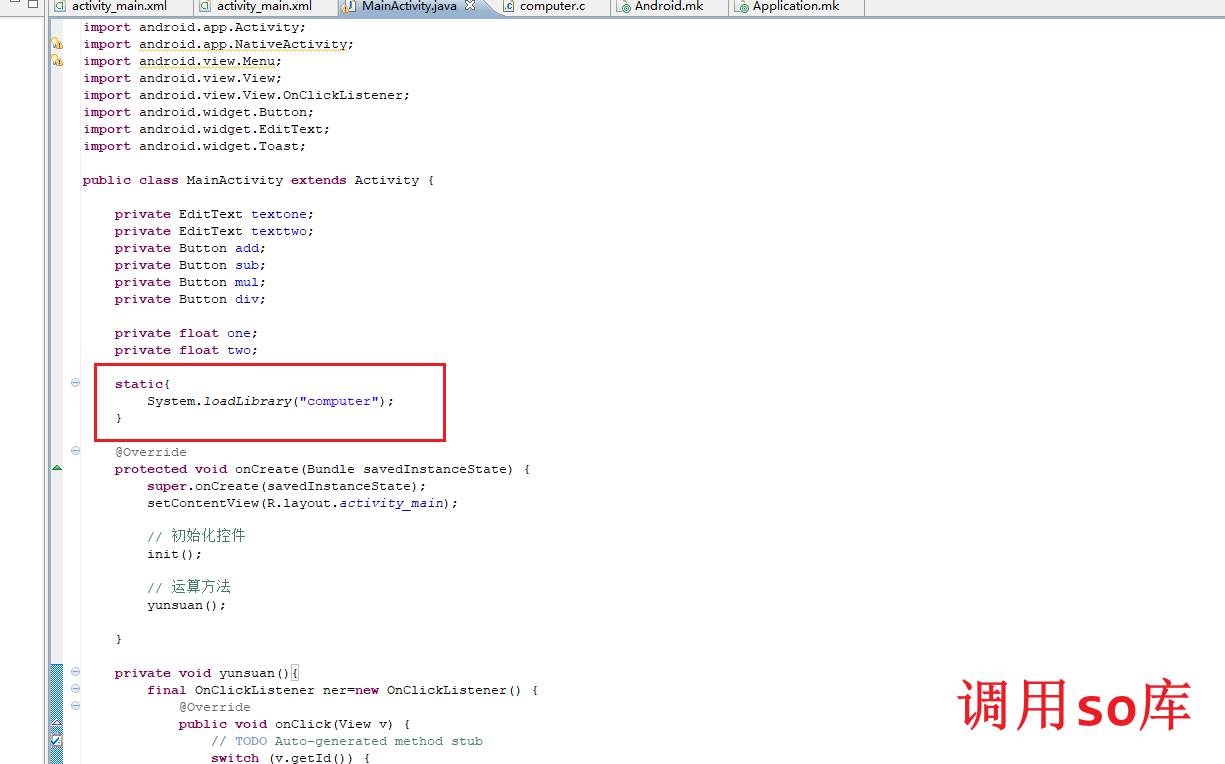 ### 3、手机测试 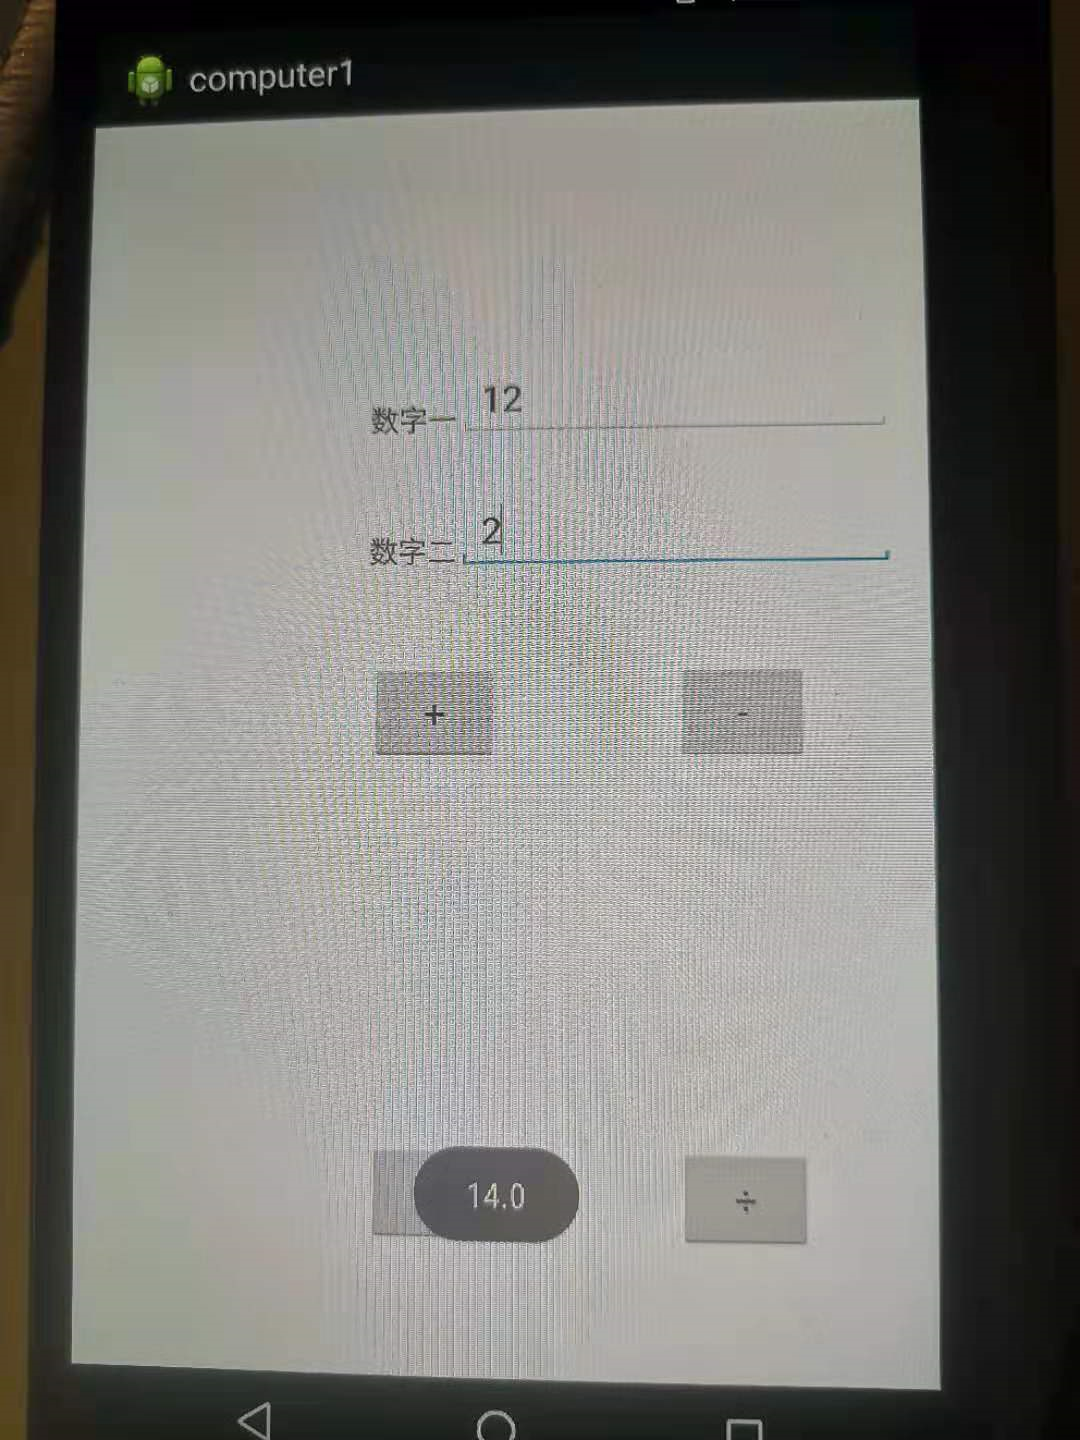
发表于 2021-09-29 14:01:58
阅读 ( 8553 )
分类:
渗透测试
1 推荐
收藏
1 条评论
Booly
2021-09-29 14:38
很受用!谢谢分享
请先
登录
后评论
请先
登录
后评论
xigua
26 篇文章
×
发送私信
请先
登录
后发送私信
×
举报此文章
垃圾广告信息:
广告、推广、测试等内容
违规内容:
色情、暴力、血腥、敏感信息等内容
不友善内容:
人身攻击、挑衅辱骂、恶意行为
其他原因:
请补充说明
举报原因:
×
如果觉得我的文章对您有用,请随意打赏。你的支持将鼓励我继续创作!