问答
发起
提问
文章
攻防
活动
Toggle navigation
首页
(current)
问答
商城
实战攻防技术
活动
摸鱼办
搜索
登录
注册
windows-syscall篇
渗透测试
windows-syscall篇 [toc] 最近学习windows,syscall始终是一个绕不过的问题。学免杀不可避免的学习syscall。主要后面需要用rust重写一个syswhispers3的工具嵌入到一个rust写的c2中。 在 R3 创建...
windows-syscall篇 ================ \[toc\] 最近学习windows,syscall始终是一个绕不过的问题。学免杀不可避免的学习syscall。主要后面需要用rust重写一个syswhispers3的工具嵌入到一个rust写的c2中。 在 R3 创建进程的时候,EDR 会 hook 用户层的相关 windows API 调用,从而完成对进程动态行为进行监控。在用户层的 hook 较于内核态的 hook 比较稳定,所以很多 EDR 会选择在用户层 hook,同时在内核层使用回调函数监控重要 api 调用。 为了避免用户层被 EDR hook 的敏感函数检测到敏感行为,可以利用从 ntdll 中读取到的系统调用号直接进行系统调用,所以其实syscall主要应对EDR 在 R3 上的 hook。 关于PEB ----- 进程环境信息块,是一个从内核中分配给每个进程的用户模式结构,每一个进程都会有从ring0分配给该进程的进程环境块,后续我们主要需要了解\_PEB\_LDR\_DATA以及其他子结构 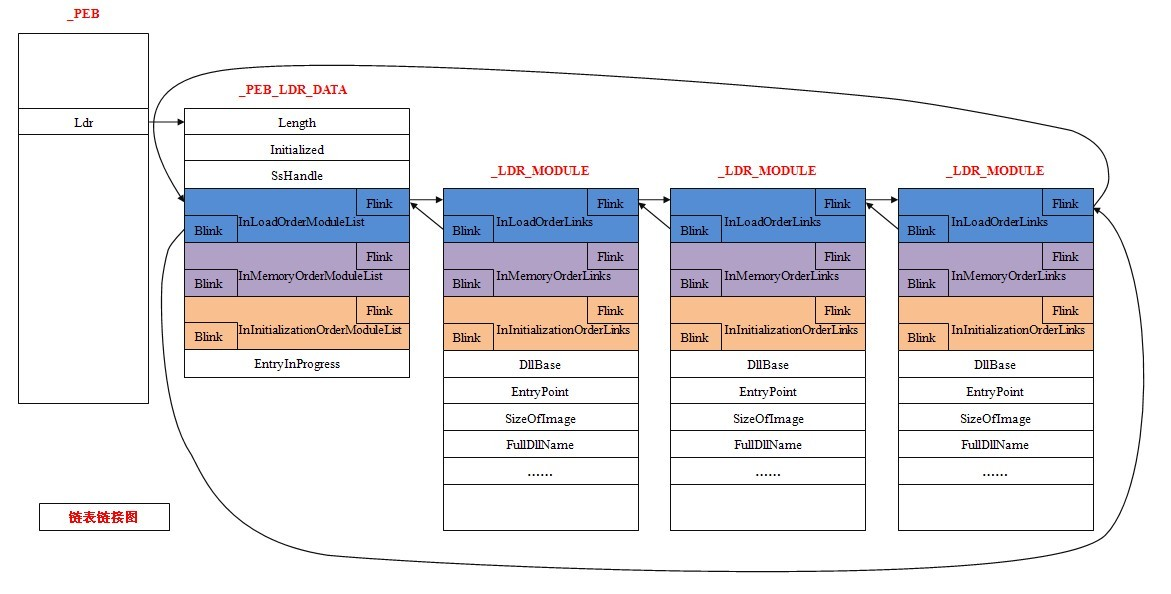 这张图是x86系统的结构体 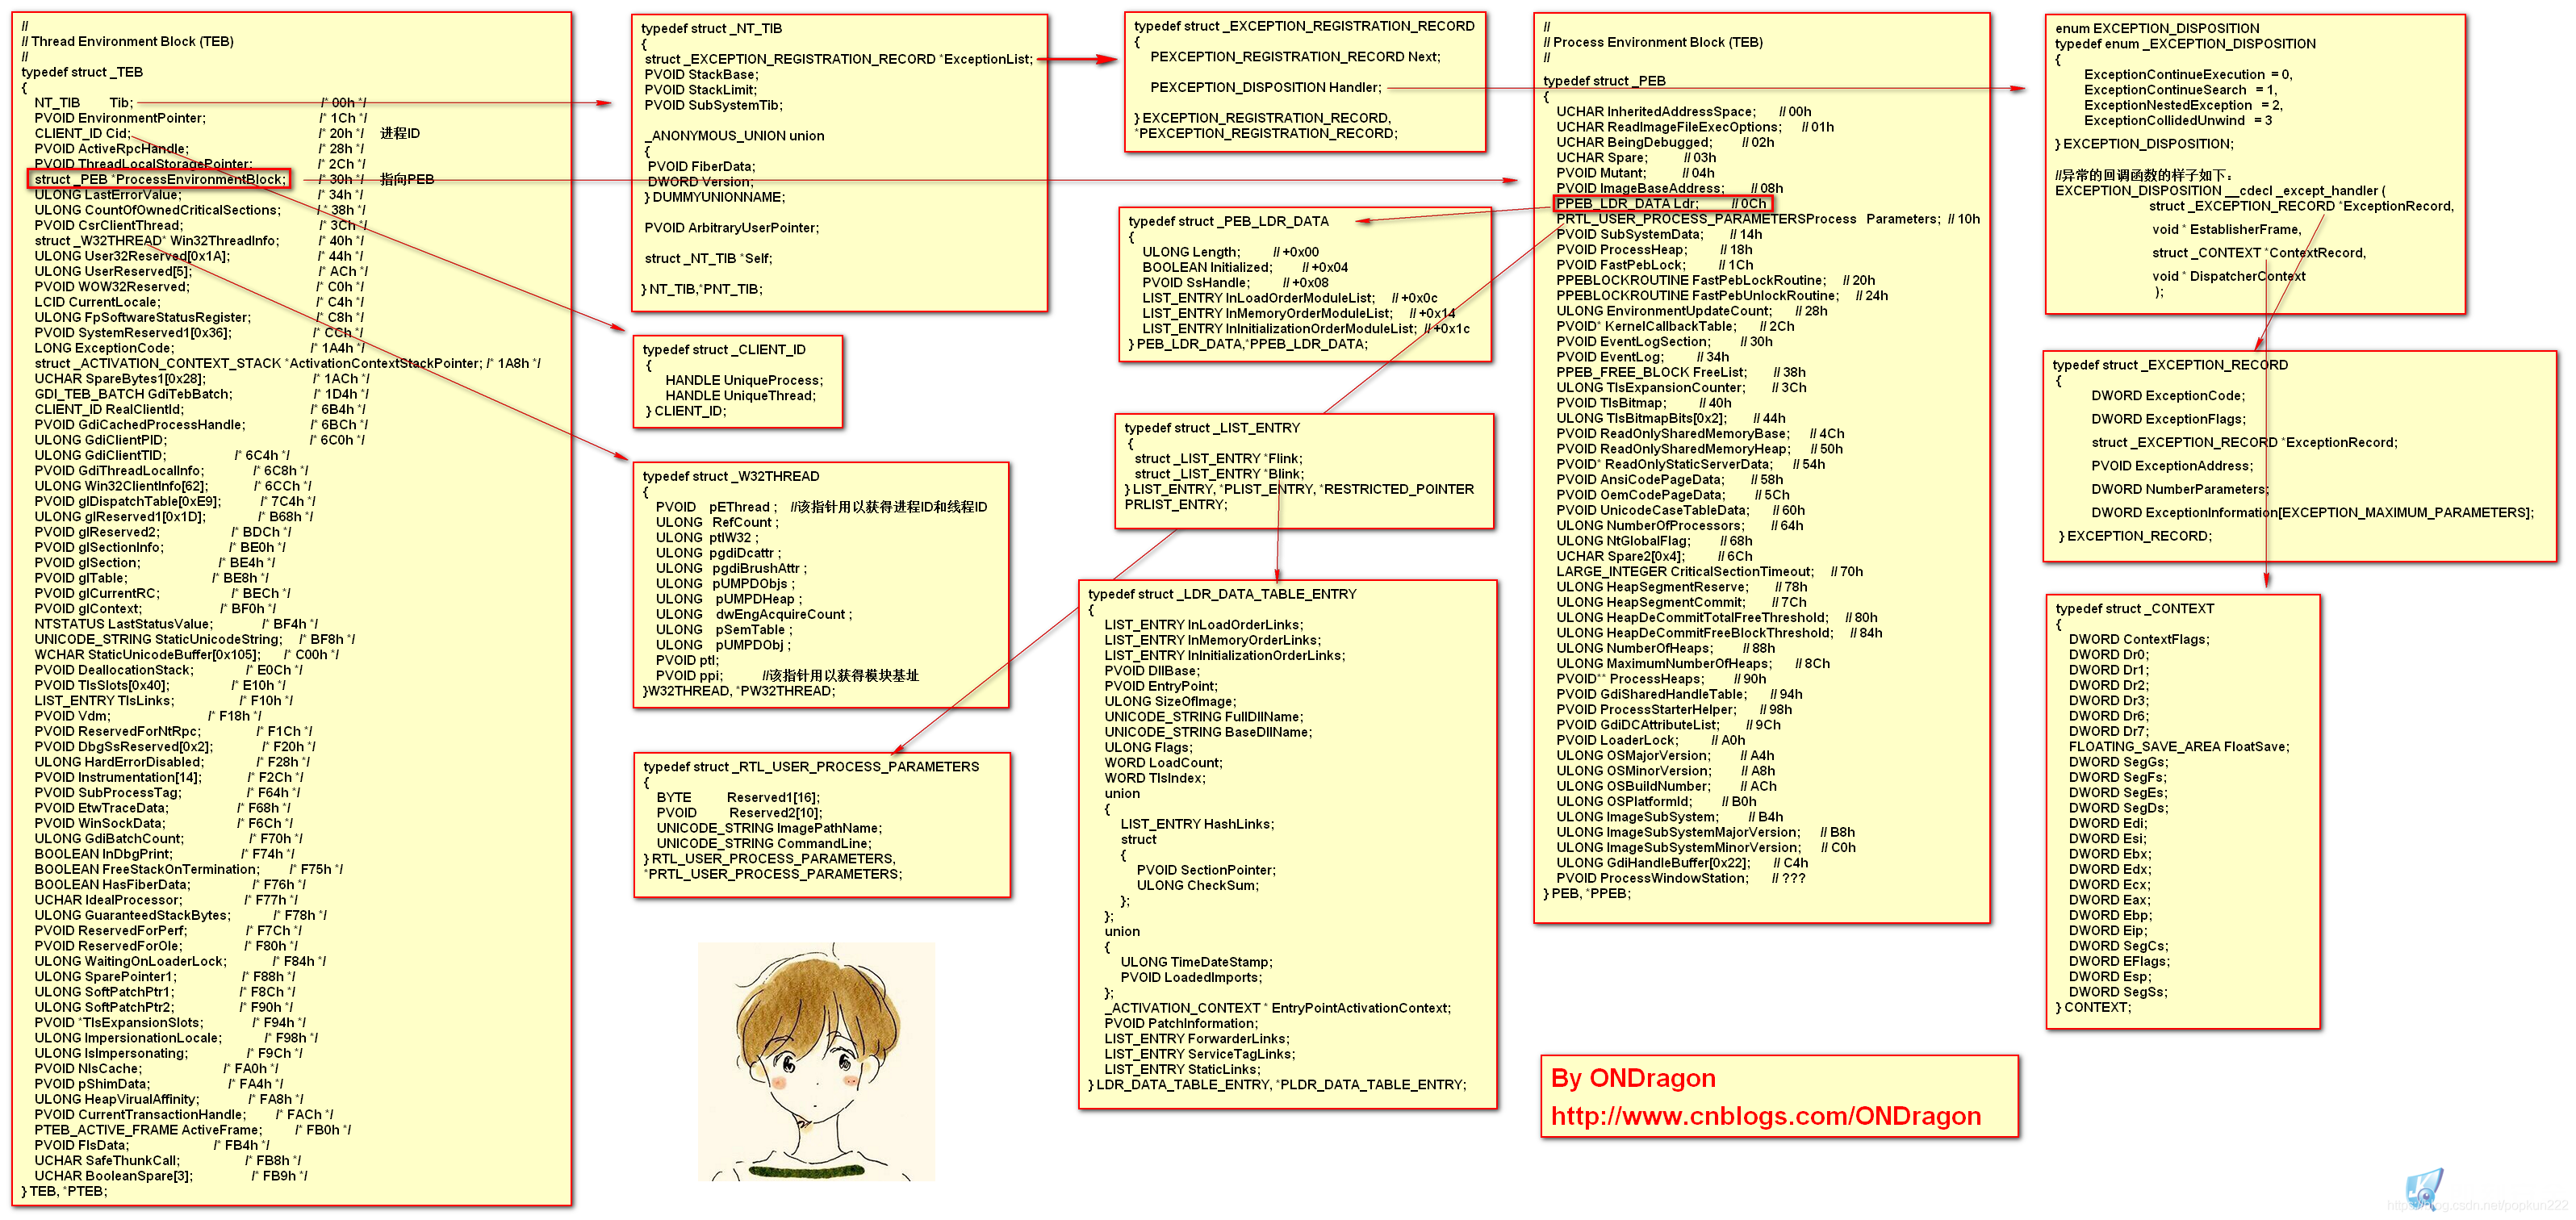 FS段寄存器指向当前的TEB结构,可以看到PEB在TEB的0x30偏移处。在编写代码时PEB的结构体也是需要我们自己定义的,微软官方并没有给出。 ```c typedef struct _PEB { BOOLEAN InheritedAddressSpace; BOOLEAN ReadImageFileExecOptions; BOOLEAN BeingDebugged; BOOLEAN Spare; HANDLE Mutant; PVOID ImageBase; PPEB_LDR_DATA LoaderData; PVOID ProcessParameters; PVOID SubSystemData; PVOID ProcessHeap; PVOID FastPebLock; PVOID FastPebLockRoutine; PVOID FastPebUnlockRoutine; ULONG EnvironmentUpdateCount; PVOID* KernelCallbackTable; PVOID EventLogSection; PVOID EventLog; PVOID FreeList; ULONG TlsExpansionCounter; PVOID TlsBitmap; ULONG TlsBitmapBits[0x2]; PVOID ReadOnlySharedMemoryBase; PVOID ReadOnlySharedMemoryHeap; PVOID* ReadOnlyStaticServerData; PVOID AnsiCodePageData; PVOID OemCodePageData; PVOID UnicodeCaseTableData; ULONG NumberOfProcessors; ULONG NtGlobalFlag; BYTE Spare2[0x4]; LARGE_INTEGER CriticalSectionTimeout; ULONG HeapSegmentReserve; ULONG HeapSegmentCommit; ULONG HeapDeCommitTotalFreeThreshold; ULONG HeapDeCommitFreeBlockThreshold; ULONG NumberOfHeaps; ULONG MaximumNumberOfHeaps; PVOID** ProcessHeaps; PVOID GdiSharedHandleTable; PVOID ProcessStarterHelper; PVOID GdiDCAttributeList; PVOID LoaderLock; ULONG OSMajorVersion; ULONG OSMinorVersion; ULONG OSBuildNumber; ULONG OSPlatformId; ULONG ImageSubSystem; ULONG ImageSubSystemMajorVersion; ULONG ImageSubSystemMinorVersion; ULONG GdiHandleBuffer[0x22]; ULONG PostProcessInitRoutine; ULONG TlsExpansionBitmap; BYTE TlsExpansionBitmapBits[0x80]; ULONG SessionId; } PEB, * PPEB; ``` 在PEB中的0x0c处为一指针,指向PEB\_LDR\_DATA结构,该结构体包含有关为进程加载的模块的信息(存储着该进程所有模块数据的链表)。 在PEB\_LDR\_DATA的0x0c,0x14,0x1c中为三个双向链表LIST\_ENTRY,在struct \_LDR\_MODULE的0x00,0x08和0x10处是三个对应的同名称的LIST\_ENTRY, PEB\_LDR\_DATA和struct \_LDR\_MODULE就是通过这三个LIST\_ENTRY对应连接起来的。 三个双向链表分别代表模块加载顺序,模块在内存中的加载顺序以及模块初始化装载的顺序. ```c typedef struct _PEB_LDR_DATA { ULONG Length; ULONG Initialized; PVOID SsHandle; LIST_ENTRY InLoadOrderModuleList; LIST_ENTRY InMemoryOrderModuleList; LIST_ENTRY InInitializationOrderModuleList; } PEB_LDR_DATA, * PPEB_LDR_DATA; ``` LIST\_ENTRY的结构体是下面这样 ```php typedef struct _LIST_ENTRY { struct _LIST_ENTRY *Flink; struct _LIST_ENTRY *Blink; } LIST_ENTRY, *PLIST_ENTRY, *RESTRICTED_POINTER PRLIST_ENTRY; ``` 每个双向链表都是指向进程装载的模块,结构中的每个指针,指向了一个LDR\_DATA\_TABLE\_ENTRY的结构: 这个结构很重要,提供了内存模块的基址和dll名称 ```php struct _LDR_DATA_TABLE_ENTRY { struct _LIST_ENTRY InLoadOrderLinks; //0x0 struct _LIST_ENTRY InMemoryOrderLinks; //0x8 struct _LIST_ENTRY InInitializationOrderLinks; //0x10 VOID* DllBase; //0x18 模块基址 VOID* EntryPoint; //0x1c ULONG SizeOfImage; //0x20 struct _UNICODE_STRING FullDllName; //0x24 模块路径+名称 struct _UNICODE_STRING BaseDllName; //0x2c 模块名称 ... }; ``` 还有一个很重要的结构体。每个加载的模块都有一个LDR\_MODULE结构体,其中的BaseAddress字段是模块在内存当中的基地址,BaseDllName指向一个UNICODE\_STRING,其包含模块的名称(kernel32.dll等)。实际上三个链表结构是被PEB\_LDR\_DATA和LDR\_MODULE结构共用的。 ```C typedef struct _LDR_MODULE { LIST_ENTRY InLoadOrderModuleList; LIST_ENTRY InMemoryOrderModuleList; LIST_ENTRY InInitializationOrderModuleList; PVOID BaseAddress; PVOID EntryPoint; ULONG SizeOfImage; UNICODE_STRING FullDllName; UNICODE_STRING BaseDllName; ULONG Flags; SHORT LoadCount; SHORT TlsIndex; LIST_ENTRY HashTableEntry; ULONG TimeDateStamp; } LDR_MODULE, * PLDR_MODULE; ``` 从这张图就可以看到很清晰的链表引用。 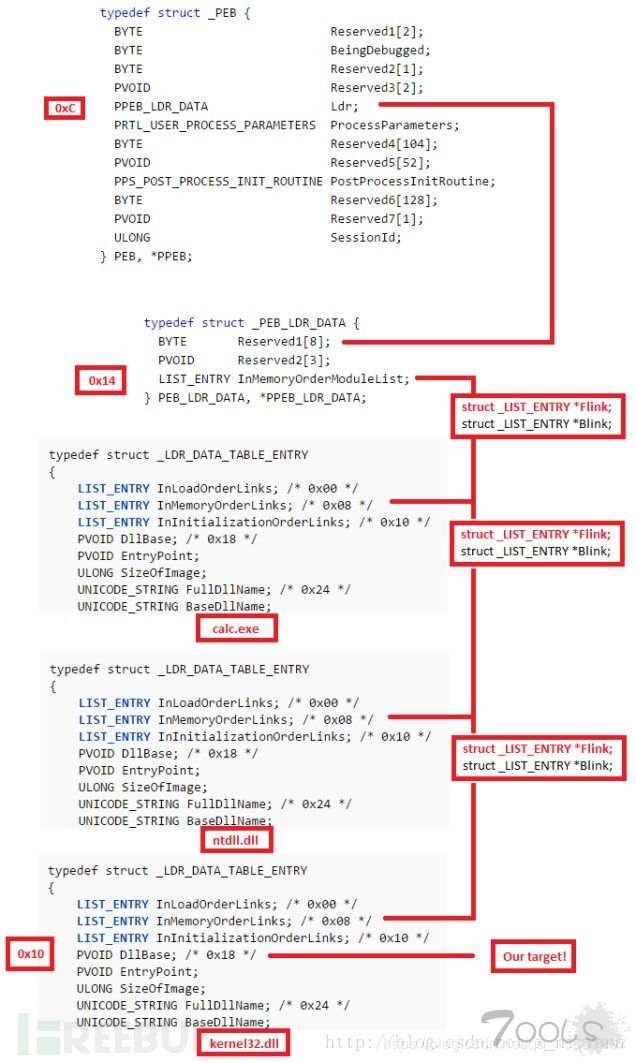 用代码获取相关信息 --------- 基本认识了PEB,那肯定还是要回到代码层面,怎么去获取到PEB进程的一些相关信息例如偏移地址等。这里微软给出了一些可以使用的函数。 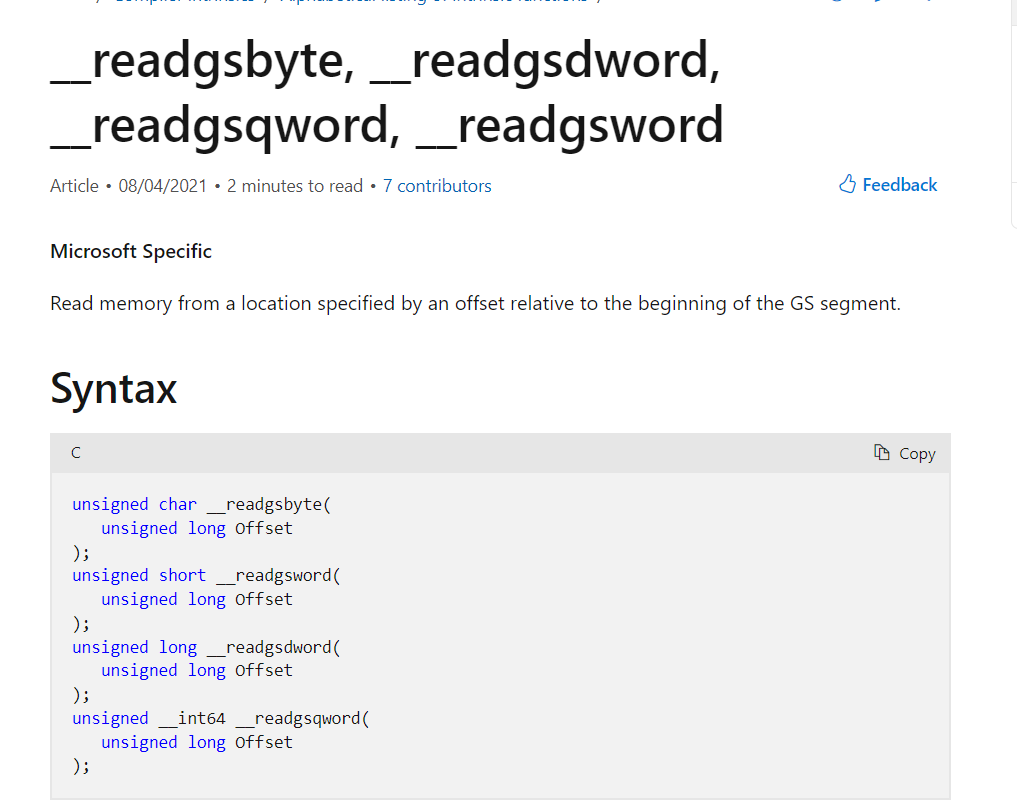 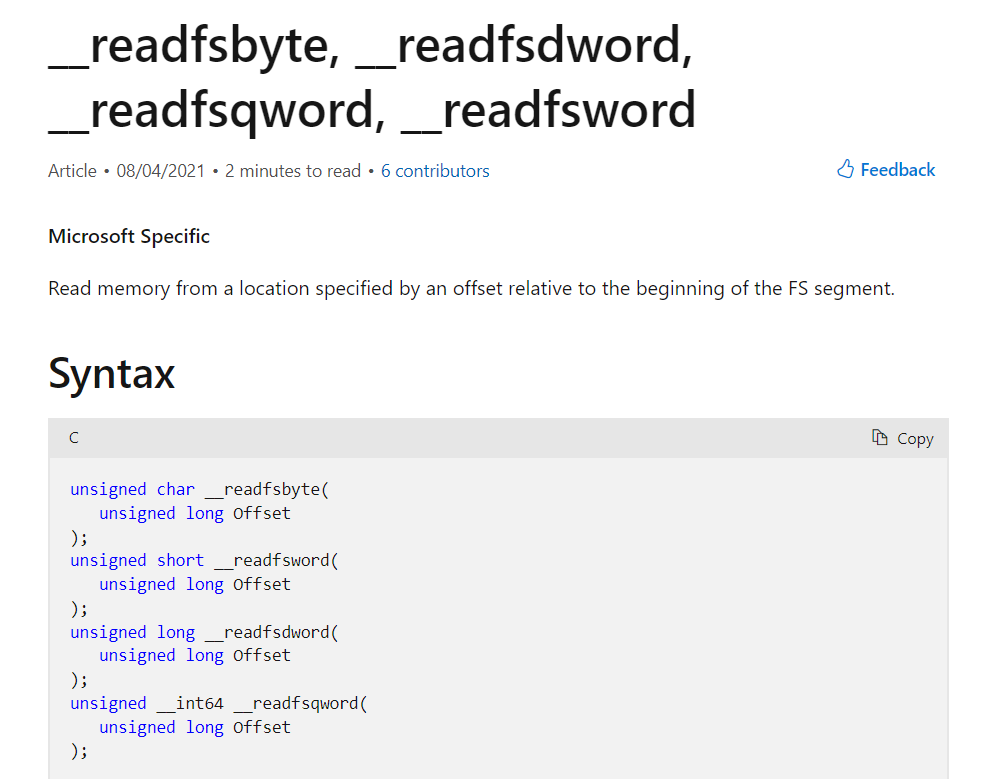 我们最终检索到PEN进程块的流程大概可以像这样来实现。 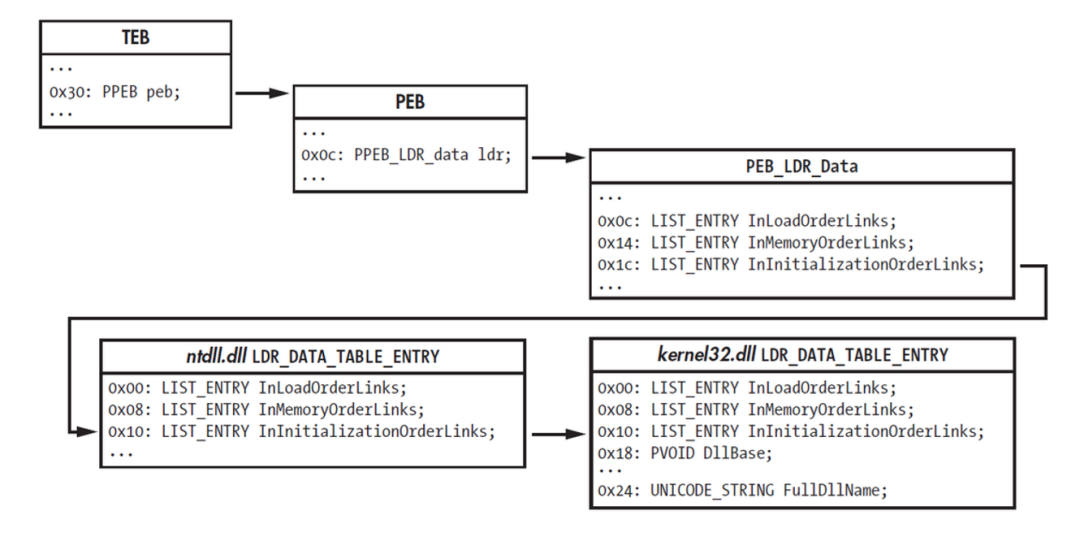 先自定义实现一些结构体。 ```c #pragma once #include <Windows.h> /*-------------------------------------------------------------------- STRUCTURES --------------------------------------------------------------------*/ typedef struct _LSA_UNICODE_STRING { USHORT Length; USHORT MaximumLength; PWSTR Buffer; } LSA_UNICODE_STRING, * PLSA_UNICODE_STRING, UNICODE_STRING, * PUNICODE_STRING, * PUNICODE_STR; typedef struct _LDR_MODULE { LIST_ENTRY InLoadOrderModuleList; LIST_ENTRY InMemoryOrderModuleList; LIST_ENTRY InInitializationOrderModuleList; PVOID BaseAddress; PVOID EntryPoint; ULONG SizeOfImage; UNICODE_STRING FullDllName; UNICODE_STRING BaseDllName; ULONG Flags; SHORT LoadCount; SHORT TlsIndex; LIST_ENTRY HashTableEntry; ULONG TimeDateStamp; } LDR_MODULE, * PLDR_MODULE; typedef struct _PEB_LDR_DATA { ULONG Length; ULONG Initialized; PVOID SsHandle; LIST_ENTRY InLoadOrderModuleList; LIST_ENTRY InMemoryOrderModuleList; LIST_ENTRY InInitializationOrderModuleList; } PEB_LDR_DATA, * PPEB_LDR_DATA; typedef struct _PEB { BOOLEAN InheritedAddressSpace; BOOLEAN ReadImageFileExecOptions; BOOLEAN BeingDebugged; BOOLEAN Spare; HANDLE Mutant; PVOID ImageBase; PPEB_LDR_DATA LoaderData; PVOID ProcessParameters; PVOID SubSystemData; PVOID ProcessHeap; PVOID FastPebLock; PVOID FastPebLockRoutine; PVOID FastPebUnlockRoutine; ULONG EnvironmentUpdateCount; PVOID* KernelCallbackTable; PVOID EventLogSection; PVOID EventLog; PVOID FreeList; ULONG TlsExpansionCounter; PVOID TlsBitmap; ULONG TlsBitmapBits[0x2]; PVOID ReadOnlySharedMemoryBase; PVOID ReadOnlySharedMemoryHeap; PVOID* ReadOnlyStaticServerData; PVOID AnsiCodePageData; PVOID OemCodePageData; PVOID UnicodeCaseTableData; ULONG NumberOfProcessors; ULONG NtGlobalFlag; BYTE Spare2[0x4]; LARGE_INTEGER CriticalSectionTimeout; ULONG HeapSegmentReserve; ULONG HeapSegmentCommit; ULONG HeapDeCommitTotalFreeThreshold; ULONG HeapDeCommitFreeBlockThreshold; ULONG NumberOfHeaps; ULONG MaximumNumberOfHeaps; PVOID** ProcessHeaps; PVOID GdiSharedHandleTable; PVOID ProcessStarterHelper; PVOID GdiDCAttributeList; PVOID LoaderLock; ULONG OSMajorVersion; ULONG OSMinorVersion; ULONG OSBuildNumber; ULONG OSPlatformId; ULONG ImageSubSystem; ULONG ImageSubSystemMajorVersion; ULONG ImageSubSystemMinorVersion; ULONG GdiHandleBuffer[0x22]; ULONG PostProcessInitRoutine; ULONG TlsExpansionBitmap; BYTE TlsExpansionBitmapBits[0x80]; ULONG SessionId; } PEB, * PPEB; typedef struct __CLIENT_ID { HANDLE UniqueProcess; HANDLE UniqueThread; } CLIENT_ID, * PCLIENT_ID; typedef struct _TEB_ACTIVE_FRAME_CONTEXT { ULONG Flags; PCHAR FrameName; } TEB_ACTIVE_FRAME_CONTEXT, * PTEB_ACTIVE_FRAME_CONTEXT; typedef struct _TEB_ACTIVE_FRAME { ULONG Flags; struct _TEB_ACTIVE_FRAME* Previous; PTEB_ACTIVE_FRAME_CONTEXT Context; } TEB_ACTIVE_FRAME, * PTEB_ACTIVE_FRAME; typedef struct _GDI_TEB_BATCH { ULONG Offset; ULONG HDC; ULONG Buffer[310]; } GDI_TEB_BATCH, * PGDI_TEB_BATCH; typedef PVOID PACTIVATION_CONTEXT; typedef struct _RTL_ACTIVATION_CONTEXT_STACK_FRAME { struct __RTL_ACTIVATION_CONTEXT_STACK_FRAME* Previous; PACTIVATION_CONTEXT ActivationContext; ULONG Flags; } RTL_ACTIVATION_CONTEXT_STACK_FRAME, * PRTL_ACTIVATION_CONTEXT_STACK_FRAME; typedef struct _ACTIVATION_CONTEXT_STACK { PRTL_ACTIVATION_CONTEXT_STACK_FRAME ActiveFrame; LIST_ENTRY FrameListCache; ULONG Flags; ULONG NextCookieSequenceNumber; ULONG StackId; } ACTIVATION_CONTEXT_STACK, * PACTIVATION_CONTEXT_STACK; typedef struct _TEB { NT_TIB NtTib; PVOID EnvironmentPointer; CLIENT_ID ClientId; PVOID ActiveRpcHandle; PVOID ThreadLocalStoragePointer; PPEB ProcessEnvironmentBlock; ULONG LastErrorValue; ULONG CountOfOwnedCriticalSections; PVOID CsrClientThread; PVOID Win32ThreadInfo; ULONG User32Reserved[26]; ULONG UserReserved[5]; PVOID WOW32Reserved; LCID CurrentLocale; ULONG FpSoftwareStatusRegister; PVOID SystemReserved1[54]; LONG ExceptionCode; #if (NTDDI_VERSION >= NTDDI_LONGHORN) PACTIVATION_CONTEXT_STACK* ActivationContextStackPointer; UCHAR SpareBytes1[0x30 - 3 * sizeof(PVOID)]; ULONG TxFsContext; #elif (NTDDI_VERSION >= NTDDI_WS03) PACTIVATION_CONTEXT_STACK ActivationContextStackPointer; UCHAR SpareBytes1[0x34 - 3 * sizeof(PVOID)]; #else ACTIVATION_CONTEXT_STACK ActivationContextStack; UCHAR SpareBytes1[24]; #endif GDI_TEB_BATCH GdiTebBatch; CLIENT_ID RealClientId; PVOID GdiCachedProcessHandle; ULONG GdiClientPID; ULONG GdiClientTID; PVOID GdiThreadLocalInfo; PSIZE_T Win32ClientInfo[62]; PVOID glDispatchTable[233]; PSIZE_T glReserved1[29]; PVOID glReserved2; PVOID glSectionInfo; PVOID glSection; PVOID glTable; PVOID glCurrentRC; PVOID glContext; NTSTATUS LastStatusValue; UNICODE_STRING StaticUnicodeString; WCHAR StaticUnicodeBuffer[261]; PVOID DeallocationStack; PVOID TlsSlots[64]; LIST_ENTRY TlsLinks; PVOID Vdm; PVOID ReservedForNtRpc; PVOID DbgSsReserved[2]; #if (NTDDI_VERSION >= NTDDI_WS03) ULONG HardErrorMode; #else ULONG HardErrorsAreDisabled; #endif #if (NTDDI_VERSION >= NTDDI_LONGHORN) PVOID Instrumentation[13 - sizeof(GUID) / sizeof(PVOID)]; GUID ActivityId; PVOID SubProcessTag; PVOID EtwLocalData; PVOID EtwTraceData; #elif (NTDDI_VERSION >= NTDDI_WS03) PVOID Instrumentation[14]; PVOID SubProcessTag; PVOID EtwLocalData; #else PVOID Instrumentation[16]; #endif PVOID WinSockData; ULONG GdiBatchCount; #if (NTDDI_VERSION >= NTDDI_LONGHORN) BOOLEAN SpareBool0; BOOLEAN SpareBool1; BOOLEAN SpareBool2; #else BOOLEAN InDbgPrint; BOOLEAN FreeStackOnTermination; BOOLEAN HasFiberData; #endif UCHAR IdealProcessor; #if (NTDDI_VERSION >= NTDDI_WS03) ULONG GuaranteedStackBytes; #else ULONG Spare3; #endif PVOID ReservedForPerf; PVOID ReservedForOle; ULONG WaitingOnLoaderLock; #if (NTDDI_VERSION >= NTDDI_LONGHORN) PVOID SavedPriorityState; ULONG_PTR SoftPatchPtr1; ULONG_PTR ThreadPoolData; #elif (NTDDI_VERSION >= NTDDI_WS03) ULONG_PTR SparePointer1; ULONG_PTR SoftPatchPtr1; ULONG_PTR SoftPatchPtr2; #else Wx86ThreadState Wx86Thread; #endif PVOID* TlsExpansionSlots; #if defined(_WIN64) && !defined(EXPLICIT_32BIT) PVOID DeallocationBStore; PVOID BStoreLimit; #endif ULONG ImpersonationLocale; ULONG IsImpersonating; PVOID NlsCache; PVOID pShimData; ULONG HeapVirtualAffinity; HANDLE CurrentTransactionHandle; PTEB_ACTIVE_FRAME ActiveFrame; #if (NTDDI_VERSION >= NTDDI_WS03) PVOID FlsData; #endif #if (NTDDI_VERSION >= NTDDI_LONGHORN) PVOID PreferredLangauges; PVOID UserPrefLanguages; PVOID MergedPrefLanguages; ULONG MuiImpersonation; union { struct { USHORT SpareCrossTebFlags : 16; }; USHORT CrossTebFlags; }; union { struct { USHORT DbgSafeThunkCall : 1; USHORT DbgInDebugPrint : 1; USHORT DbgHasFiberData : 1; USHORT DbgSkipThreadAttach : 1; USHORT DbgWerInShipAssertCode : 1; USHORT DbgIssuedInitialBp : 1; USHORT DbgClonedThread : 1; USHORT SpareSameTebBits : 9; }; USHORT SameTebFlags; }; PVOID TxnScopeEntercallback; PVOID TxnScopeExitCAllback; PVOID TxnScopeContext; ULONG LockCount; ULONG ProcessRundown; ULONG64 LastSwitchTime; ULONG64 TotalSwitchOutTime; LARGE_INTEGER WaitReasonBitMap; #else BOOLEAN SafeThunkCall; BOOLEAN BooleanSpare[3]; #endif } TEB, * PTEB; typedef struct _LDR_DATA_TABLE_ENTRY { LIST_ENTRY InLoadOrderLinks; LIST_ENTRY InMemoryOrderLinks; LIST_ENTRY InInitializationOrderLinks; PVOID DllBase; PVOID EntryPoint; ULONG SizeOfImage; UNICODE_STRING FullDllName; UNICODE_STRING BaseDllName; ULONG Flags; WORD LoadCount; WORD TlsIndex; union { LIST_ENTRY HashLinks; struct { PVOID SectionPointer; ULONG CheckSum; }; }; union { ULONG TimeDateStamp; PVOID LoadedImports; }; PACTIVATION_CONTEXT EntryPointActivationContext; PVOID PatchInformation; LIST_ENTRY ForwarderLinks; LIST_ENTRY ServiceTagLinks; LIST_ENTRY StaticLinks; } LDR_DATA_TABLE_ENTRY, * PLDR_DATA_TABLE_ENTRY; typedef struct _OBJECT_ATTRIBUTES { ULONG Length; PVOID RootDirectory; PUNICODE_STRING ObjectName; ULONG Attributes; PVOID SecurityDescriptor; PVOID SecurityQualityOfService; } OBJECT_ATTRIBUTES, * POBJECT_ATTRIBUTES; typedef struct _INITIAL_TEB { PVOID StackBase; PVOID StackLimit; PVOID StackCommit; PVOID StackCommitMax; PVOID StackReserved; } INITIAL_TEB, * PINITIAL_TEB; ``` 打印当前进程的FullDllName,也就是模块路径+名称。至于这里为什么要减去0x10字节呢,仔细看上面结构体的布局,因为LDR\_MODULE结构体在内存中的首地址是有0x10的偏移的(双向链表连接的是InInitializationOrderModuleList字段而不是LDR\_MODULE结构体) ```php #include <iostream> #include "PEB.h" #include <Windows.h> #include <stdio.h> #include <TLHELP32.H> int main() { PPEB Peb = (PPEB)__readgsqword(0x60); //PEB 可以通过x86_64:gs寄存器偏移96(0x60) x86:fs寄存器偏移0x48(0x30) 定位 PLDR_MODULE pLoadModule; pLoadModule = (PLDR_MODULE)((PBYTE)Peb->LoaderData->InMemoryOrderModuleList.Flink->Flink - 0x10); printf("%ws\r\n", pLoadModule->FullDllName.Buffer); } ``` 上述代码中,我们首先通过位于0x60的指向GS寄存器的指针检索到当前进程的PEB,我们访问LDR结构体,并且并向前链接到第二个内存顺序模块 这里我们可以用windbg具体查看一下可执行文件里面的结构体到底是怎能排布的。 首先查看当前进程的teb,可以看到在0x60偏移处指向的就是PEB。  找到peb内存起始地址,  查看PEB结构体内容,找到\_PEB\_LDR\_DATA。 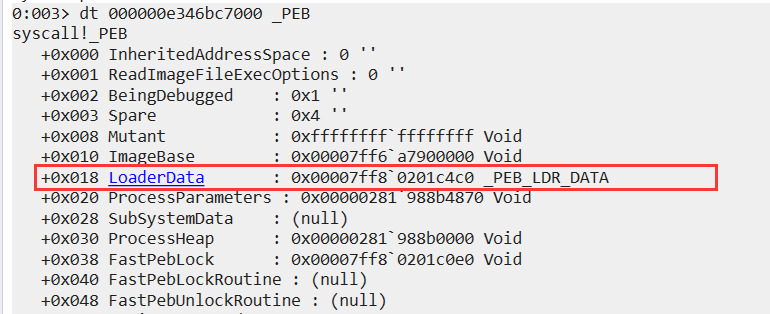 上面已经讲到在`_PEB_LDR_DATA`中存在三个双向链表,从而找到`InMemoryOrderModuleList`这个模块初始化加载顺序链表。   现在就能从`InMemoryOrderModuleList`这个链表的`Flink`指针找到依次加载到内存中的模块信息。这里显示的是当前PEB进程块也就是正在调试的模块信息,  大多数情况下`NTDLL`模块会是第二个内存模块,`kernel32dll`将会是第三个内存模块   最后打印的结果就是NTDLL模块FULLNAME.  在这里我们可以通过如下程序(代码参考crispr学长)来遍历进程所有在内存中加载过的模块以及基址: ```c #include <iostream> #include "peb.h" int main() { PPEB Peb = (PPEB)__readgsqword(0x60); //PEB 可以通过x86_64:gs寄存器偏移96(0x60) x86:fs寄存器偏移0x48(0x30) 定位 PLDR_MODULE pLoadModule; pLoadModule = (PLDR_MODULE)((PBYTE)Peb->LoaderData->InMemoryOrderModuleList.Flink - 0x10); PLDR_MODULE pFirstLoadModule = (PLDR_MODULE)((PBYTE)Peb->LoaderData->InMemoryOrderModuleList.Flink - 0x10); do { printf("Module Name:%ws\r\nModule Base Address:%p\r\n\r\n", pLoadModule->FullDllName.Buffer,pLoadModule->BaseAddress); pLoadModule = (PLDR_MODULE)((PBYTE)pLoadModule->InMemoryOrderModuleList.Flink - 0x10); } while ((PLDR_MODULE)((PBYTE)pLoadModule->InMemoryOrderModuleList.Flink -0x10) != pFirstLoadModule); } ``` 这里给出我用rust写的一个代码,主要为了后续想用rust写一个工具出来,实现的功能是一样的。rust在写windows这块相较于c++难写很多,一些api调用很麻烦这里不建议使用Windows\_sys依赖,最好自己定义。 ```rust use std::mem::size_of; use std::slice; use ntapi::ntldr::LDR_DATA_TABLE_ENTRY; use ntapi::ntpebteb::{*}; use ntapi::ntpsapi::{PPEB_LDR_DATA,GDI_HANDLE_BUFFER}; use ntapi::ntrtl::PRTL_USER_PROCESS_PARAMETERS; use winapi::shared::basetsd::{SIZE_T, ULONG_PTR}; use winapi::shared::minwindef::{USHORT, PBYTE}; use winapi::um::winnt::{PVOID, HANDLE, PRTL_CRITICAL_SECTION, PSLIST_HEADER, ULARGE_INTEGER, FLS_MAXIMUM_AVAILABLE}; use winapi::shared::ntdef::{UNICODE_STRING,ULONG, BOOLEAN, CHAR, ULONGLONG}; use ntapi::winapi_local::um::winnt::{__readgsqword}; #[repr(C)] pub struct LIST_ENTRY { pub Flink: *mut LIST_ENTRY, pub Blink: *mut LIST_ENTRY, } #[repr(C)] pub struct LDR_MODULE { InLoadOrderModuleList: LIST_ENTRY, InMemoryOrderModuleList: LIST_ENTRY, InInitializationOrderModuleList: LIST_ENTRY, BaseAddress: PVOID, EntryPoint: PVOID, SizeOfImage: ULONG, FullDllName: UNICODE_STRING, BaseDllName: UNICODE_STRING, Flags: ULONG, LoadCount: USHORT, TlsIndex: USHORT, HashLinks: LIST_ENTRY, TimeDateStamp: ULONG, } #[repr(C)] pub struct PEB { InheritedAddressSpace: BOOLEAN, ReadImageFileExecOptions: BOOLEAN, BeingDebugged: BOOLEAN, BitField: BOOLEAN, Mutant: HANDLE, ImageBaseAddress: PVOID, Ldr: PPEB_LDR_DATA, ProcessParameters: PRTL_USER_PROCESS_PARAMETERS, SubSystemData: PVOID, ProcessHeap: PVOID, FastPebLock: PRTL_CRITICAL_SECTION, IFEOKey: PVOID, AtlThunkSListPtr: PSLIST_HEADER, CrossProcessFlags: ULONG, u: PEB_u, SystemReserved: [ULONG; 1], AtlThunkSListPtr32: ULONG, ApiSetMap: PAPI_SET_NAMESPACE, TlsExpansionCounter: ULONG, TlsBitmap: PVOID, TlsBitmapBits: [ULONG; 2], ReadOnlySharedMemoryBase: PVOID, SharedData: PVOID, ReadOnlyStaticServerData: *mut PVOID, AnsiCodePageData: PVOID, OemCodePageData: PVOID, UnicodeCaseTableData: PVOID, NumberOfProcessors: ULONG, NtGlobalFlag: ULONG, CriticalSectionTimeout: ULARGE_INTEGER, HeapSegmentReserve: SIZE_T, HeapSegmentCommit: SIZE_T, HeapDeCommitTotalFreeThreshold: SIZE_T, HeapDeCommitFreeBlockThreshold: SIZE_T, NumberOfHeaps: ULONG, MaximumNumberOfHeaps: ULONG, ProcessHeaps: *mut PVOID, GdiSharedHandleTable: PVOID, ProcessStarterHelper: PVOID, GdiDCAttributeList: ULONG, LoaderLock: PRTL_CRITICAL_SECTION, OSMajorVersion: ULONG, OSMinorVersion: ULONG, OSBuildNumber: USHORT, OSCSDVersion: USHORT, OSPlatformId: ULONG, ImageSubsystem: ULONG, ImageSubsystemMajorVersion: ULONG, ImageSubsystemMinorVersion: ULONG, ActiveProcessAffinityMask: ULONG_PTR, GdiHandleBuffer: GDI_HANDLE_BUFFER, PostProcessInitRoutine: PVOID, TlsExpansionBitmap: PVOID, TlsExpansionBitmapBits: [ULONG; 32], SessionId: ULONG, AppCompatFlags: ULARGE_INTEGER, AppCompatFlagsUser: ULARGE_INTEGER, pShimData: PVOID, AppCompatInfo: PVOID, CSDVersion: UNICODE_STRING, ActivationContextData: PVOID, ProcessAssemblyStorageMap: PVOID, SystemDefaultActivationContextData: PVOID, SystemAssemblyStorageMap: PVOID, MinimumStackCommit: SIZE_T, FlsCallback: *mut PVOID, FlsListHead: LIST_ENTRY, FlsBitmap: PVOID, FlsBitmapBits: [ULONG; FLS_MAXIMUM_AVAILABLE as usize / (size_of::<ULONG>() * 8)], FlsHighIndex: ULONG, WerRegistrationData: PVOID, WerShipAssertPtr: PVOID, pUnused: PVOID, pImageHeaderHash: PVOID, TracingFlags: ULONG, CsrServerReadOnlySharedMemoryBase: ULONGLONG, TppWorkerpListLock: PRTL_CRITICAL_SECTION, TppWorkerpList: LIST_ENTRY, WaitOnAddressHashTable: [PVOID; 128], TelemetryCoverageHeader: PVOID, CloudFileFlags: ULONG, CloudFileDiagFlags: ULONG, PlaceholderCompatibilityMode: CHAR, PlaceholderCompatibilityModeReserved: [CHAR; 7], LeapSecondData: *mut LEAP_SECOND_DATA, LeapSecondFlags: ULONG, NtGlobalFlag2: ULONG, } fn main() { // test(); unsafe{ let peb = __readgsqword(0x60) as *mut PEB; let p_first_load_module = ((*peb).Ldr.as_ref().unwrap().InMemoryOrderModuleList.Flink as PBYTE).offset(-0x10) as *const LDR_MODULE ; let mut p_load_module = ((*peb).Ldr.as_ref().unwrap().InMemoryOrderModuleList.Flink as PBYTE).offset(-0x10) as *const LDR_MODULE ; loop { let module_base = p_load_module as *const LDR_DATA_TABLE_ENTRY; let module_name = (*module_base).FullDllName.Buffer as *const UNICODE_STRING; let slice = slice::from_raw_parts((*module_base).FullDllName.Buffer,(*module_base).FullDllName.Length as usize / 2); let string = String::from_utf16_lossy(slice); println!("Module Name: {:?}", string.trim()); println!("Module Base Address: {:?} \r\n", module_base); p_load_module = ((*p_load_module).InMemoryOrderModuleList.Flink as PBYTE).offset(-0x10) as *const LDR_MODULE ; if p_first_load_module as * const LDR_MODULE == ((*p_load_module).InMemoryOrderModuleList.Flink as PBYTE).offset(-0x10) as *const LDR_MODULE{ break; } } } } ```  掌握这一点后现在我们知道如何获取内存模块的基址,因此我们有能力遍历模块的导出地址表,这就涉及到通过该基址去遍历PE头文件从而获取导出地址表,可以将其分为四个步骤: - 1.获取每个模块的基地址 - 2.获取\_IMAGE\_DOS\_HEADER,并通过检查IMAGE\_DOS\_SIGNATURE来验证正确性 - 3.遍历\_IMAGE\_NT\_HEADER、\_IMAGE\_FILE\_HEADER、\_IMAGE\_OPTIONAL\_HEADER - 4.在\_IMAGE\_OPTIONAL\_HEADER中找到导出地址表,并将类型转为\_IMAGE\_EXPORT\_DIRECTORY 关于PE文件头的详细数据结构,如下: ```php typedef struct _IMAGE_NT_HEADERS { DWORD Signature; //PE文件头标志 => 4字节 IMAGE_FILE_HEADER FileHeader; //标准PE头 => 20字节 IMAGE_OPTIONAL_HEADER32 OptionalHeader; //扩展PE头 => 32位下224字节(0xE0) 64位下240字节(0xF0) } IMAGE_NT_HEADERS32, *PIMAGE_NT_HEADERS32; ``` 在`_IMAGE_DOS_HEADER`文件头中存在`_IMAGE_OPTIONAL_HEADER`。DataDirectory是可选映像头`_IMAGE_OPTIONAL_HEADER`的最后128个字节(16项 \* 8 bytes),也是IMAGE\_NT\_HEADERS(PE文件头)的最后一部分数据。 它由16个IMAGE\_DATA\_DIRECTORY结构组成的数组构成,指向输出表、输入表、资源块、重定位 等数据目录项的RVA(相对虚拟地址)和大小。 IMAGE\_DATA\_DIRECTORY的结构如下: ```php // //Directory format. // typedef struct _IMAGE_DATA_DIRECTORY { DWORD VirtualAddress; //数据块的起始RVA DWORD Size; //数据块的长度 } IMAGE_DATA_DIRECTORY, *PIMAGE_DATA_DIRECTORY; ``` 可以看到第一个数据就是`EXPORT ADDRESS Table`导出地址表在内存中的相对虚拟地址。 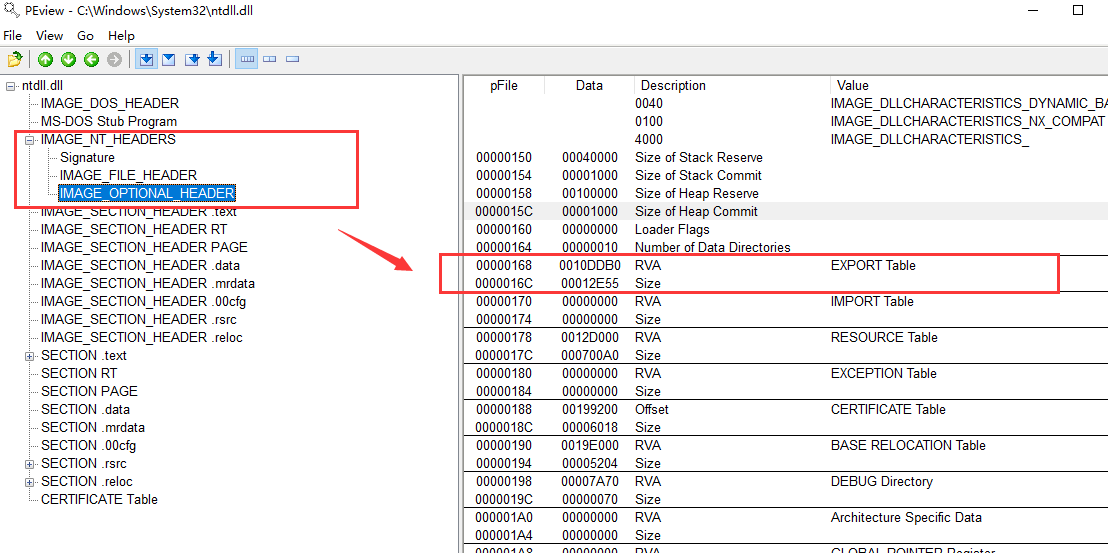 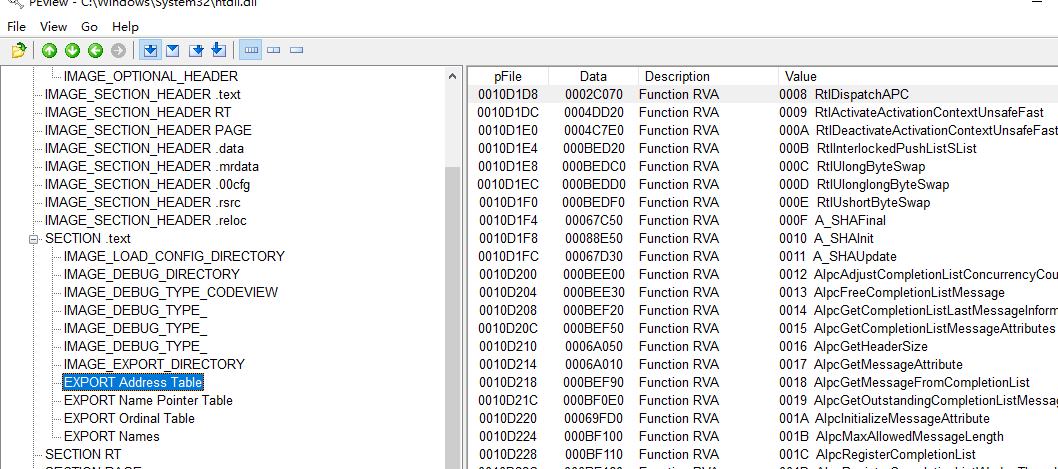 然后将其转换为`_IMAGE_EXPORT_DIRECTORY`类型,引出目录表`IMAGE_EXPORT_DIRECTORY`的结构如下。这样我们就得到了内存中各种函数的地址。 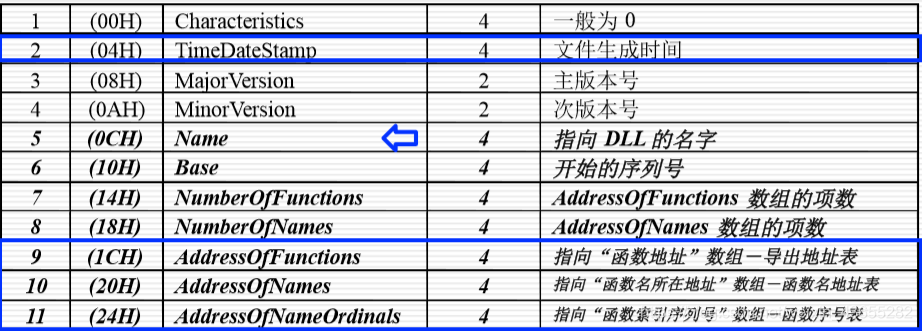 所以总的来讲,当我们得到NT\_Header时,由于PE头文件的数据结构已经给出,其前四个字节为一个DWORD类型的Signature,因此加上这四个字节就会得到FileHeader,然后在此基础上加上FileHeader数据结构所占大小最终得到Optional,只需要将其类型转为\_IMAGE\_EXPORT\_DIRECTORY就得到了我们的导出地址表,再通过: - 1.AddressOfNames 一个包含函数名称的数组 - 2.AddressOfNameOrdinals 充当函数寻址数组的索引 - 3.AddressOfFunctions 一个包含函数地址的数组 这三个数组结构就能获取到每个函数的地址和函数名称。 利用rust实现的代码 ```rust fn getPeHeader() -> i32{ unsafe{ let peb = __readgsqword(0x60) as *mut PEB; let mut p_load_module = ((*peb).Ldr.as_ref().unwrap().InMemoryOrderModuleList.Flink as PBYTE).offset(-0x10) as *const LDR_MODULE ; p_load_module = ((*p_load_module).InMemoryOrderModuleList.Flink as PBYTE).offset(-0x10) as *const LDR_MODULE ; let base = (*p_load_module).BaseAddress as PVOID; // let Dos = base as PIMAGE_DOS_HEADER; // 获取PE头 let dos_header = transmute::<PVOID, PIMAGE_DOS_HEADER>(base) ; if (*dos_header).e_magic != IMAGE_DOS_SIGNATURE{ return 1; } let nt_headers = transmute::<PVOID, PIMAGE_NT_HEADERS>(base.add((*dos_header).e_lfanew as usize )); let file_headers = transmute::<PVOID, PIMAGE_FILE_HEADER>(base.add((*dos_header).e_lfanew as usize + size_of::<u32>())) ; let optional_headers = transmute::<PVOID, PIMAGE_OPTIONAL_HEADER>(base.add((*dos_header).e_lfanew as usize + size_of::<u32>() + IMAGE_SIZEOF_FILE_HEADER)) as PIMAGE_OPTIONAL_HEADER; let export_directory = (*nt_headers).OptionalHeader.DataDirectory[IMAGE_DIRECTORY_ENTRY_EXPORT as usize]; if export_directory.Size == 0 { println!("No export table"); return 1; } // 获取导出表 let export_table = transmute::<PVOID, PIMAGE_EXPORT_DIRECTORY>(base.add(export_directory.VirtualAddress as usize)) ; // 遍历导出函数名表 let AddressOfNames = transmute::<PVOID, *const u32>(base.add((*export_table).AddressOfNames as usize)) ; let NumberOfFunctions = (*export_table).NumberOfFunctions as usize; let AddressOfFunctions = transmute::<PVOID, *const u32>(base.add((*export_table).AddressOfFunctions as usize)); let AddressOfNameOrdinales = transmute::<PVOID, *const u32>(base.add((*export_table).AddressOfFunctions as usize)); for i in 0..NumberOfFunctions-1 { let FunctionName = transmute::<PVOID, *const i8>(base.add(*AddressOfNames.add(i) as usize)) ; let FunctionRvaName = transmute::<PVOID, *const i8>(base.add(*AddressOfFunctions.add(i+1) as usize)) ; let FunctionAddress = CStr::from_ptr(FunctionRvaName); let FunctionNameString = ConstIntToString(FunctionName); println!("{}: {:p}", FunctionNameString, FunctionAddress); } return 0; }; } fn main() { getPeHeader(); } ``` 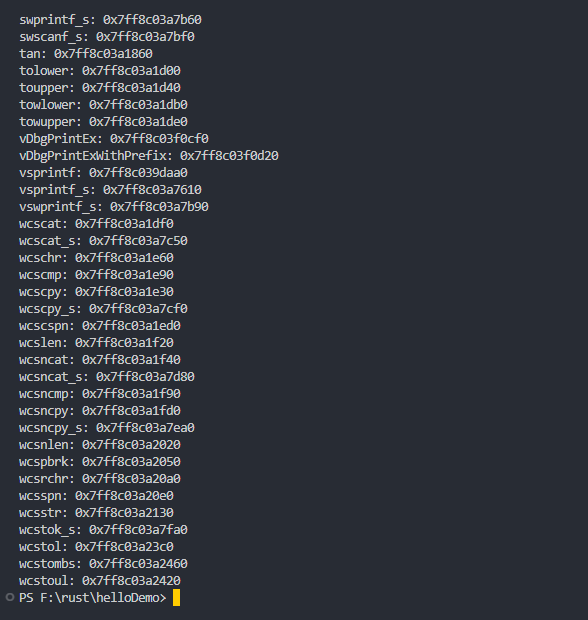 地狱之门项目 ------ 这个项目应该算是最古老的syscall利用版本了,但也是学习syscall的必看之路。 > 原理:通过直接读取进程第二个导入模块即NtDLL,解析结构然后遍历导出表,根据函数名Hash找到函数地址,将这个函数读取出来通过0xb8这个操作码来动态获取对应的系统调用号,从而绕过内存监控,在自己程序中执行了NTDLL的导出函数而不是直接通过LoadLibrary然后GetProcAddress 先来看一个正常的syscall调用的汇编代码,在执行syscall之前,都会执行`mov eax,xxx`赋值一个系统调用号(系统调用号被定义为WORD类型(16位无符号整数))给eax,从而直接在内核中执行函数。并且还通过`test byte ptr [SharedUserData+0x308 (00000000`7ffe0308)\],1 来验证当前的线程执行环境是x64还是x86,如果确定执行环境是基于x64则会通过syscall执行系统调用,否则会执行函数返回。  这是一个被上钩的NTDLL的汇编:ZwMapViewOfSection上的Hook是很明显的(jmp \\<offset>指令,而不是mov r10, rcx)。而ZwMapViewOfSection的邻居ZwSetInformationFile和NtAccessCheckAndAuditAlarm是干净的,它们的系统调用号分别是0x27和0x29。 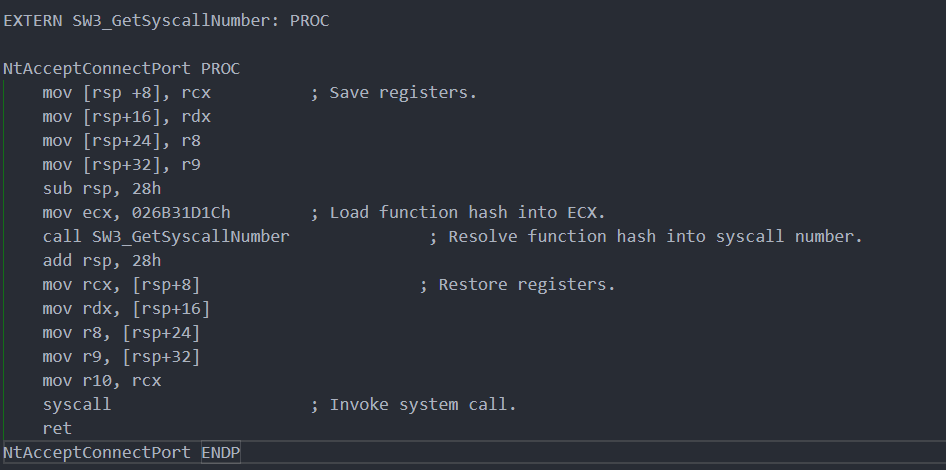 ### 项目代码分析 首先是实现了两个重要的结构体。在实现过程中需要定义一个与syscall相关联的数据结构:\_VX\_TABLE\_ENTRY事实上每一个系统调用都需要分配这样一个结构,结构体定义如下: ```php typedef struct _VX_TABLE_ENTRY { PVOID pAddress; DWORD64 dwHash; WORD wSystemCall; } VX_TABLE_ENTRY, * PVX_TABLE_ENTRY; ``` 其中包括了指向内存模块的函数地址指针,一个函数哈希(后续通过Hash查找内存模块的函数)以及一个无符号16位的系统调用号wSysemCall 同时还定义了一个更大的数据结构\_VX\_TABLE用来包含每一个系统调用的函数: ```php typedef struct _VX_TABLE { VX_TABLE_ENTRY NtAllocateVirtualMemory; VX_TABLE_ENTRY NtProtectVirtualMemory; VX_TABLE_ENTRY NtCreateThreadEx; VX_TABLE_ENTRY NtWaitForSingleObject; } VX_TABLE, * PVX_TABLE; ``` 项目最开始还是使用`__readgsqword`函数来获取TEB模块,如果是win64系统则从寄存器0x30偏移处获取TEB,否则从0X16. 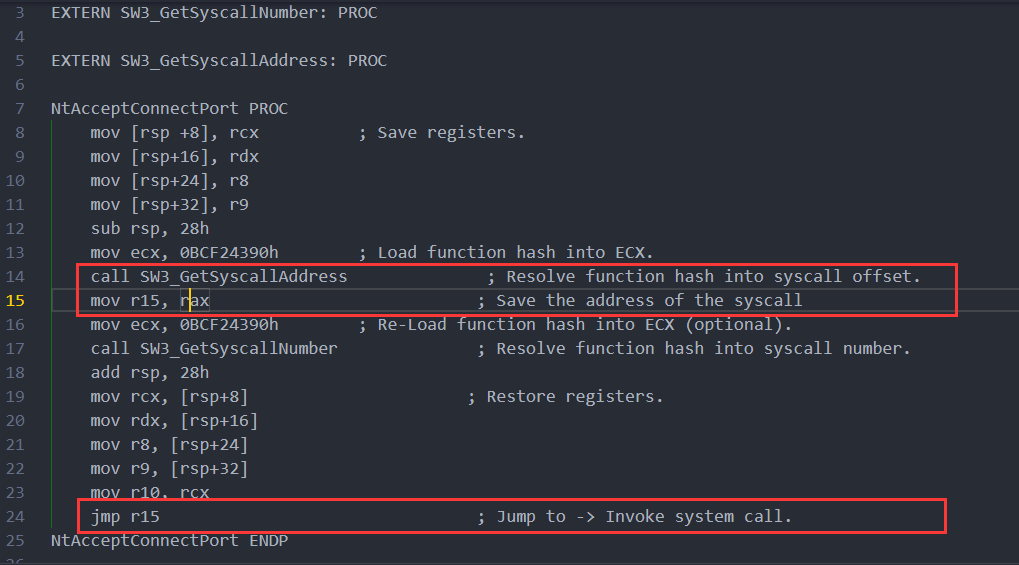 接下来就是获取导出地址表,和我们获取到的方式是差不多的。 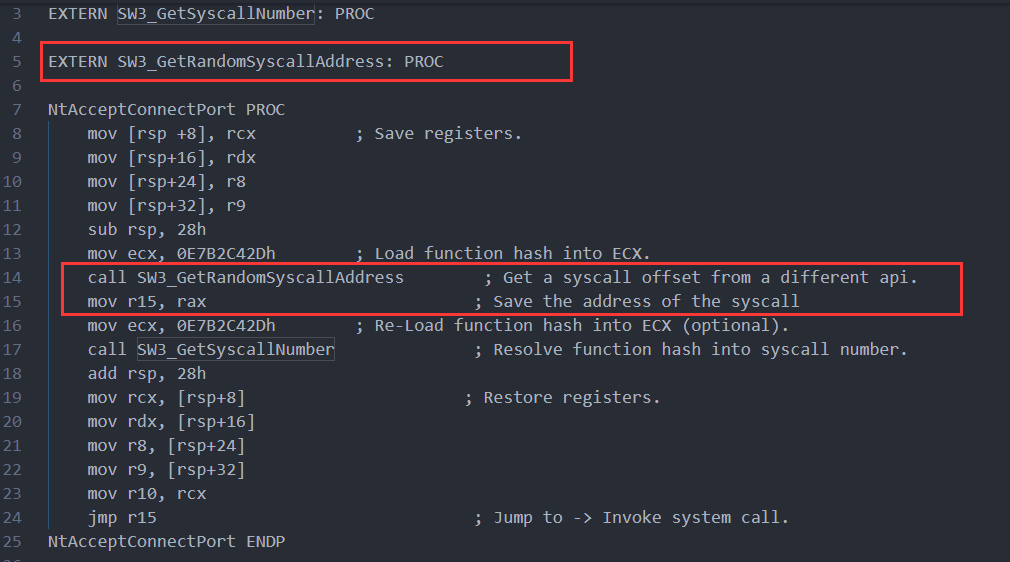 成功获取EAT指针之后现在就需要将之前定义的数据结构填充,通过GetVxTableEntry函数填充\_VX\_TABLE: ```php VX_TABLE Table = { 0 }; Table.NtAllocateVirtualMemory.dwHash = 0xf5bd373480a6b89b; GetVxTableEntry(ImageBase, ExportTable, &Table.NtAllocateVirtualMemory); Table.NtCreateThreadEx.dwHash = 0x64dc7db288c5015f; GetVxTableEntry(ImageBase, ExportTable, &Table.NtCreateThreadEx); Table.NtProtectVirtualMemory.dwHash = 0x858bcb1046fb6a37; GetVxTableEntry(ImageBase, ExportTable, &Table.NtProtectVirtualMemory); Table.NtWaitForSingleObject.dwHash = 0xc6a2fa174e551bcb; GetVxTableEntry(ImageBase, ExportTable, &Table.NtWaitForSingleObject); ``` 下面就是最核心的操作了,就是定位进行syscall的操作符(0xb8即mov eax)的位置。在代码中,首先遍历导出地址表,通过djb2算法算出函数名的hash值,与我们想要的函数的hash值进行比较,如果相等,则填充函数地址。并且后面还要验证汇编代码0xb8即mov eax是否存在。 最后就是获取到系统调用号,因为系统调用号是一个WORD类型,也就是两个字节并且是小端存储,因此通过高低位转换的方式最终动态获得系统调用号填充到函数结构体pVxTableEntry中。 ```c++ BOOL GetVxTableEntry(PVOID pModuleBase, PIMAGE_EXPORT_DIRECTORY pImageExportDirectory, PVX_TABLE_ENTRY pVxTableEntry) { PDWORD pdwAddressOfFunctions = (PDWORD)((PBYTE)pModuleBase + pImageExportDirectory->AddressOfFunctions); PDWORD pdwAddressOfNames = (PDWORD)((PBYTE)pModuleBase + pImageExportDirectory->AddressOfNames); PWORD pwAddressOfNameOrdinales = (PWORD)((PBYTE)pModuleBase + pImageExportDirectory->AddressOfNameOrdinals); for (WORD cx = 0; cx < pImageExportDirectory->NumberOfNames; cx++) { PCHAR pczFunctionName = (PCHAR)((PBYTE)pModuleBase + pdwAddressOfNames[cx]); PVOID pFunctionAddress = (PBYTE)pModuleBase + pdwAddressOfFunctions[pwAddressOfNameOrdinales[cx]]; if (djb2(pczFunctionName) == pVxTableEntry->dwHash) { pVxTableEntry->pAddress = pFunctionAddress; // Quick and dirty fix in case the function has been hooked WORD cw = 0; while (TRUE) { // check if syscall, in this case we are too far if (*((PBYTE)pFunctionAddress + cw) == 0x0f && *((PBYTE)pFunctionAddress + cw + 1) == 0x05) return FALSE; // check if ret, in this case we are also probaly too far if (*((PBYTE)pFunctionAddress + cw) == 0xc3) return FALSE; // First opcodes should be : // MOV R10, RCX // MOV RCX, <syscall> if (*((PBYTE)pFunctionAddress + cw) == 0x4c && *((PBYTE)pFunctionAddress + 1 + cw) == 0x8b && *((PBYTE)pFunctionAddress + 2 + cw) == 0xd1 && *((PBYTE)pFunctionAddress + 3 + cw) == 0xb8 && *((PBYTE)pFunctionAddress + 6 + cw) == 0x00 && *((PBYTE)pFunctionAddress + 7 + cw) == 0x00) { BYTE high = *((PBYTE)pFunctionAddress + 5 + cw); BYTE low = *((PBYTE)pFunctionAddress + 4 + cw); pVxTableEntry->wSystemCall = (high << 8) | low; break; } cw++; }; } } return TRUE; } ``` 现在每个我们想要调用的函数都获取到了对应的函数hash,系统调用号,函数地址指针,都存放在函数结构体pVxTableEntry中,最后要做的就是生成一段汇编代码来调用这些函数, 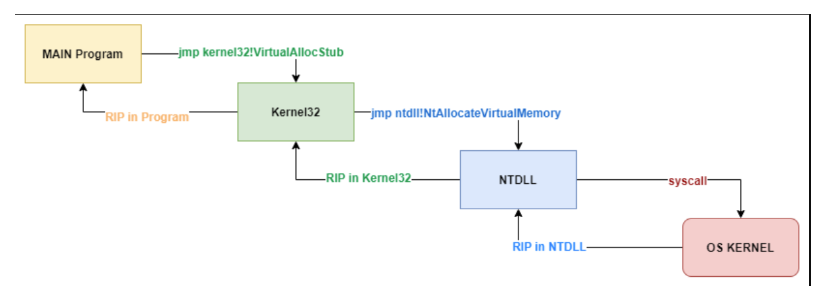 最后生成的汇编代码如下。这样我们便能够模拟引入Ntdll调用Nt函数的方式,也就是调用Native API而不是Win API来绕过Hooks ```asm .data wSystemCall DWORD 000h .code HellsGate PROC mov wSystemCall, 000h mov wSystemCall, ecx ret HellsGate ENDP HellDescent PROC mov r10, rcx mov eax, wSystemCall syscall ret HellDescent ENDP end ``` 光环之门 Halo’s Gate ---------------- 这个项目其实是在解决地狱之门的一些局限性,从分析地狱之门的代码中我们可以看到它所访问内存中的NTDLL也必须是默认的或者说是未经修改的,因为如果本身NTDLL已经被修改过,或者被Hook过则函数汇编操作码就不会是0xb8,对应着mov eax,而可能是0xE9,对应着jmp。因此当我们需要调用的NT函数已经被AV/EDR所Hook,那我们就无法通过地狱之门来动态获取它的系统调用号。 就像上面这张图片一样,ZwMapViewOfSection已经被Hook,而它的邻函数ZwSetInformationFile和NtAccessCheckAndAuditAlarm都没有被Hook,并且邻函数的系统调用号也是临接的。所以说其实我们可以查看被hook函数的邻函数,查看邻函数的系统调用号,然后再相应的加减调整即可。 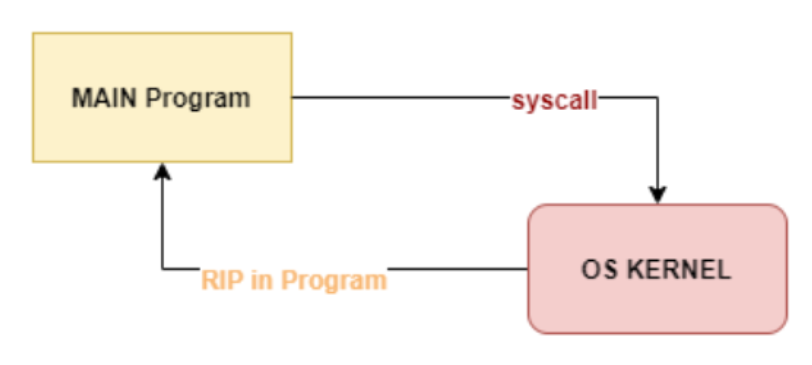 正常的没有被hook的函数应该是长这个样子。 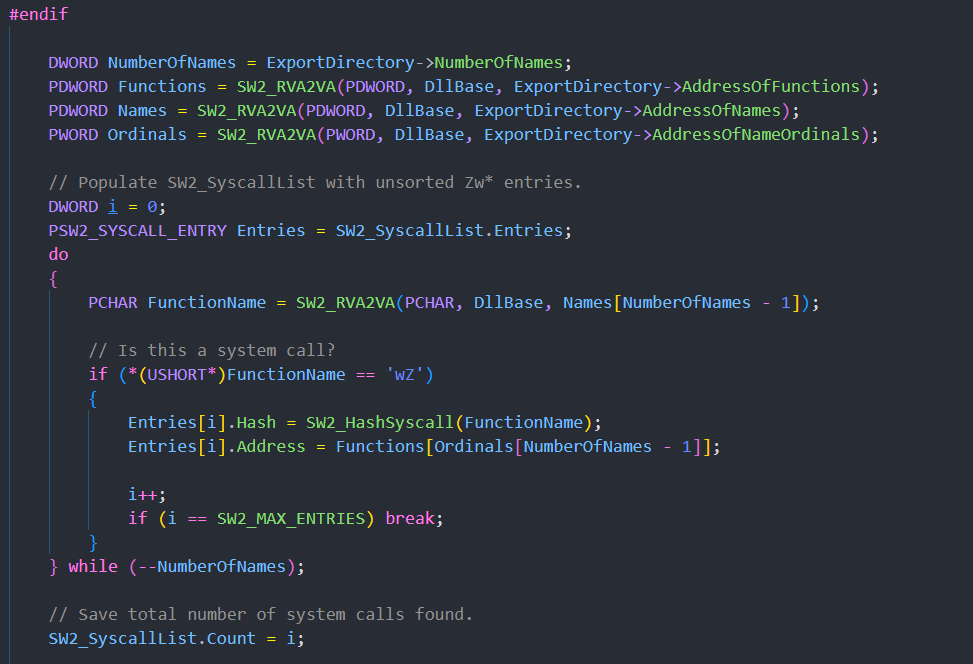 当出现被Hook的Nt函数时便采取向周围查询的方式: 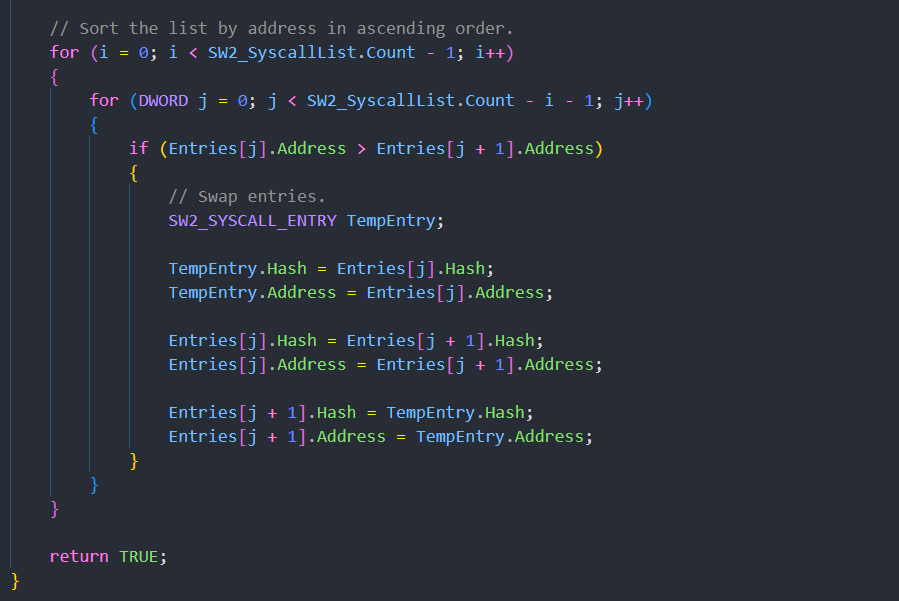 GetSSN ------ 这里还介绍一种更加方便简单和迅速的方法来发现SSN(syscall number),这种方法不需要unhook,不需要手动从代码存根中读取,也不需要加载NTDLL新副本,可以将它理解成为光环之门的延伸,试想当上下的邻函数都被Hook时,光环之门的做法是继续递归,在不断的寻找没有被Hook的邻函数,而在这里假设一种最坏的情况是所有的邻函数(指Nt\*函数)都被Hook时,那最后将会向上递归到SSN=0的Nt函数。 其实可以理解为系统调用的存根重新实现 + 动态 SSN 解析 首先我们需要知道: - 1.实际上所有的Zw函数和Nt同名函数实际上是等价的 - 2.系统调用号实际上是和Zw函数按照地址顺序的排列是一样的 因此我们就只需要遍历所有Zw函数,记录其函数名和函数地址,最后将其按照函数地址升序排列后,每个函数的SSN就是其对应的排列顺序 ```php void GetSSN() { std::map<int, string> Nt_Table; PBYTE ImageBase; PIMAGE_DOS_HEADER Dos = NULL; PIMAGE_NT_HEADERS Nt = NULL; PIMAGE_FILE_HEADER File = NULL; PIMAGE_OPTIONAL_HEADER Optional = NULL; PIMAGE_EXPORT_DIRECTORY ExportTable = NULL; PPEB Peb = (PPEB)__readgsqword(0x60); PLDR_MODULE pLoadModule; // NTDLL pLoadModule = (PLDR_MODULE)((PBYTE)Peb->LoaderData->InMemoryOrderModuleList.Flink->Flink - 0x10); ImageBase = (PBYTE)pLoadModule->BaseAddress; Dos = (PIMAGE_DOS_HEADER)ImageBase; if (Dos->e_magic != IMAGE_DOS_SIGNATURE) return 1; Nt = (PIMAGE_NT_HEADERS)((PBYTE)Dos + Dos->e_lfanew); File = (PIMAGE_FILE_HEADER)(ImageBase + (Dos->e_lfanew + sizeof(DWORD))); Optional = (PIMAGE_OPTIONAL_HEADER)((PBYTE)File + sizeof(IMAGE_FILE_HEADER)); ExportTable = (PIMAGE_EXPORT_DIRECTORY)(ImageBase + Optional->DataDirectory[0].VirtualAddress); PDWORD pdwAddressOfFunctions = (PDWORD)((PBYTE)(ImageBase + ExportTable->AddressOfFunctions)); PDWORD pdwAddressOfNames = (PDWORD)((PBYTE)ImageBase + ExportTable->AddressOfNames); PWORD pwAddressOfNameOrdinales = (PWORD)((PBYTE)ImageBase + ExportTable->AddressOfNameOrdinals); for (WORD cx = 0; cx < ExportTable->NumberOfNames; cx++) { PCHAR pczFunctionName = (PCHAR)((PBYTE)ImageBase + pdwAddressOfNames[cx]); PVOID pFunctionAddress = (PBYTE)ImageBase + pdwAddressOfFunctions[pwAddressOfNameOrdinales[cx]]; if (strncmp((char*)pczFunctionName, "Zw",2) == 0) { // printf("Function Name:%s\tFunction Address:%p\n", pczFunctionName, pFunctionAddress); Nt_Table[(int)pFunctionAddress] = (string)pczFunctionName; } } int index = 0; for (std::map<int, string>::iterator iter = Nt_Table.begin(); iter != Nt_Table.end(); ++iter) { cout << "index:" << index << ' ' << iter->second << endl; index += 1; } } ``` syswhispers2 ------------ syswhispers系列的目的简单来讲就是,通过获取 syscall number,进入 R3 自己实现函数调用过程。具体实现是用 SW2\_PopulateSyscallList,先解析 ntdll 中的 EAT,定位 Zw 开头的函数,最后按地址从小到大进行排序。在 syswhispers3 中出现了新的 EGG 手法,先用垃圾指令代替 syscall,在运行时再从内存中找出来替换 syscall。 SysWhispers1和SysWhispers2之间的区别: > 它的用法与SysWhispers1几乎相同,但现在我们无需指定要支持哪些版本的Windows。这两个版本之间的大多数改变都是用户不可见的,并且不再依赖于@j00ru的系统调用表,而使用的是@modexpblog推广的“按系统调用地址排序”技术,这将大大减少系统调用存根的大小。 > > SysWhispers2中的具体实现是基于@modexpblog代码的变种版本,其中的一个区别在于函数名哈希在每一代上都是随机的。@ElephantSe4l之前也发布过这种技术,并基于C++17实现了类似的功能,值得一看。 > > 原来的SysWhispers存储库仍然可以访问,但将来可能会被弃用。 可以来看看syswhispers2几个关键的函数。 - SW2\_PopulateSyscallList 首先判断系统为x64还是x86,然后就是通过`PEB`->`PEB_LDR_DATA`->`LDR_DATA_TABLE_ENTRY`中的双向链表找到ntdll模块基址。 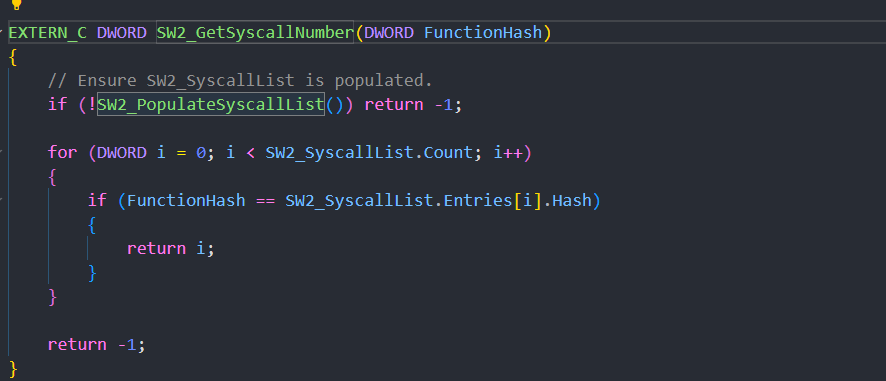 然后开始遍历ntdll的内核态函数基址,找到`zW`开头的函数记录函数基址和计算函数hash。关于`Nt`和`Zw`可以参考https://blog.csdn.net/u012410612/article/details/17096597  最后这里用到了上面提到的`GetSSN`,通过一个简单的冒泡排序就能够获取到系统函数的系统调用号。  - SW2\_GetSyscallNumber 另一个函数是 SW2\_GetSyscallNumber,这个函数循环遍历 SW2\_PopulateSyscallList 的数组,如果 Hash 相等就返回 循环的值 作为 SyscallNumber。 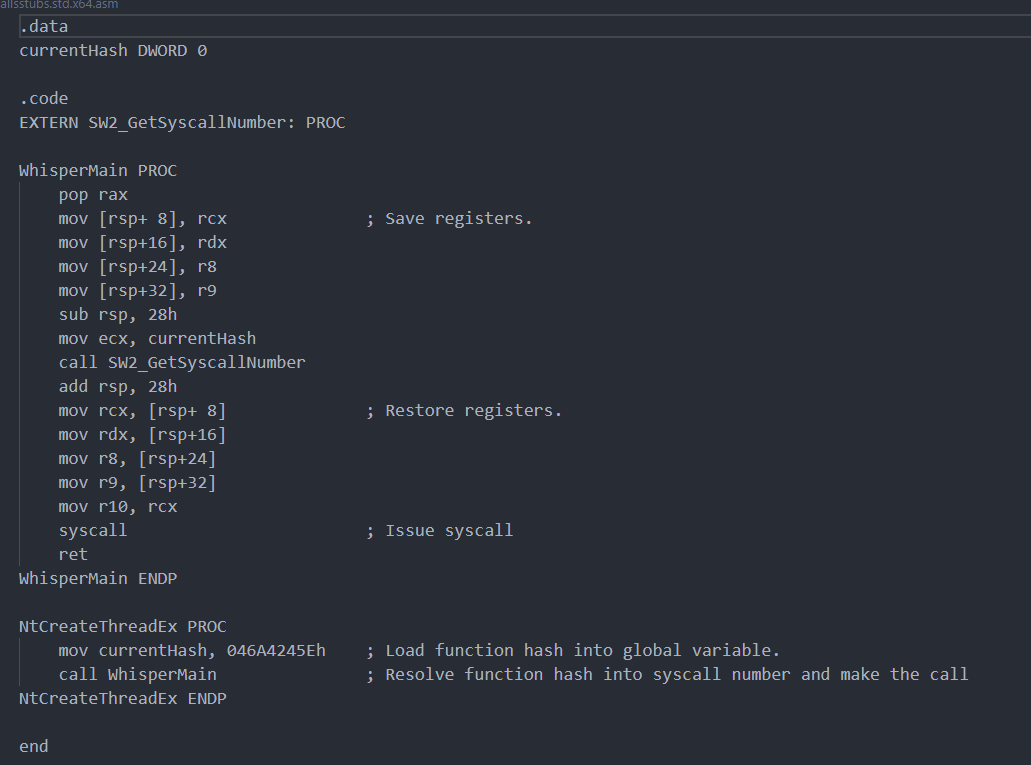 - SW2\_GetRandomSyscallAddress 最后一个函数就是`SW2_GetRandomSyscallAddress`,这个函数的作用是什么呢,顾名思义其实就是通过特征码定位的形式来获取随机一个 Native API 的 syscall 指令地址。 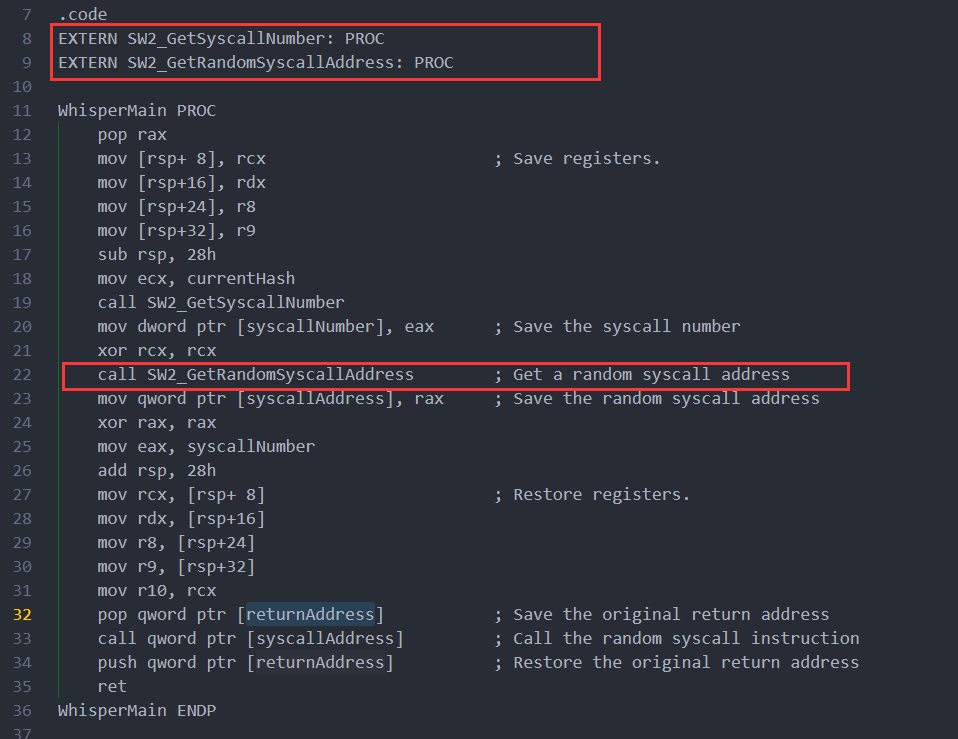 那么它的作用在哪呢,我们可以运行一下这个工具`python .\syswhispers.py --preset all -o syscall_embedded -c msvc`,生成4个文件。  `syscalls.h`就是定义了一些需要使用的结构体,而`syscall.c`就是上面提到的那些函数,主要区别就在于两个asm文件, 其中一个asm文件如下,这个很容易看懂,首先保存一下上下文信息,然后利用`SW2_GetSyscallNumber`获取调用号,恢复上下文,最后直接调用syscall。  另一个asm如下,在这里就出现了`SW2_GetRandomSyscallAddress`,上述代码片段与 syscallsstubs.std.x64.asm 中代码不同点在于,该段汇编代码隐藏了 syscall 指令的出现,Syswhispers2 项目使用 SW2\_GetRandomSyscallAddress 函数生成了随机的 syscall 指令地址,用于防止 syscall 指令在汇编代码片段中出现。在使用这个文件时需要注意,需要 #define RANDSYSCALL 声明宏,以开启 SW2\_GetRandomSyscallAddress 。 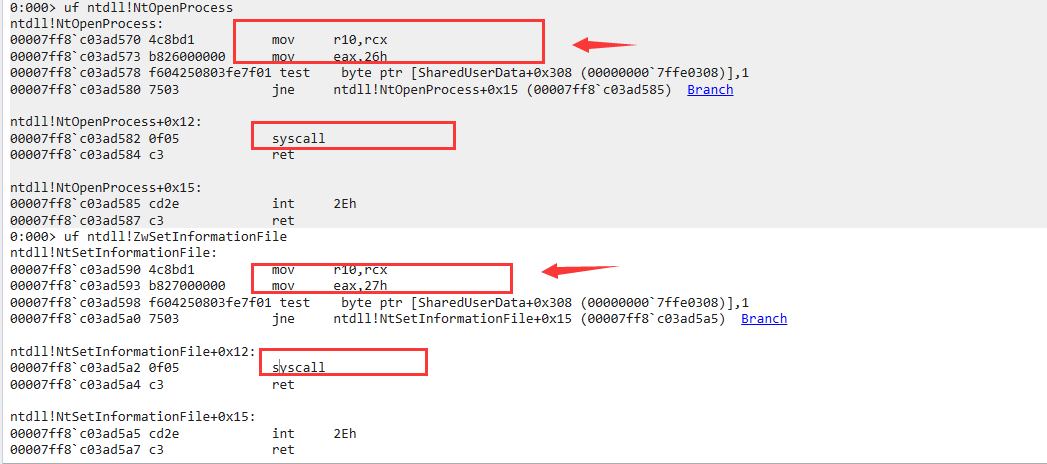 syswhispers3 ------------ 新的 SysWhisper3 ,重点解决了 SysWhisper2中syscall指令被查杀,以及syscall不是从ntdll发出这两个问题。 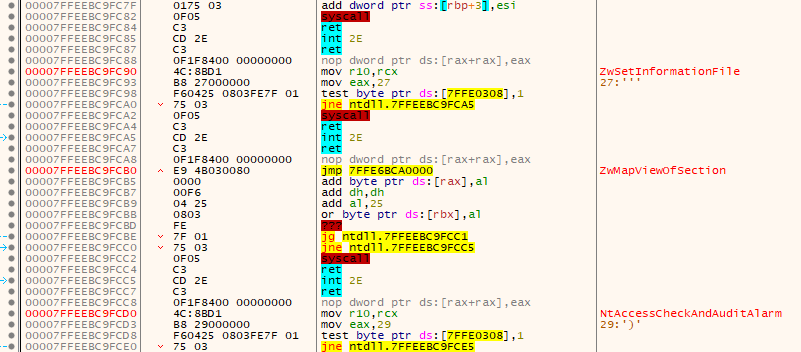 新的 SysWhisper3 支持一下几种方式生成asm文件,在其中`egg_hunter`属于 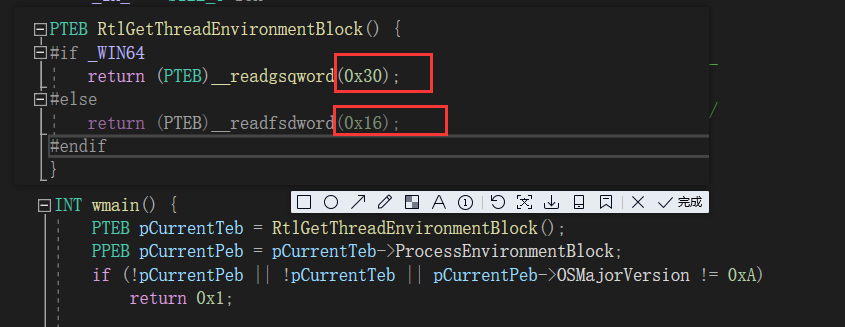 也可以在syscall这里用int2eh来代替,不过估计检测int2eh的规则早已经加到av里面了。  ### embedded 利用这种方式生成的asm其实就是syswhispers2中出现过的`syscallsstubs.std.x64.asm`,也很容易理解。 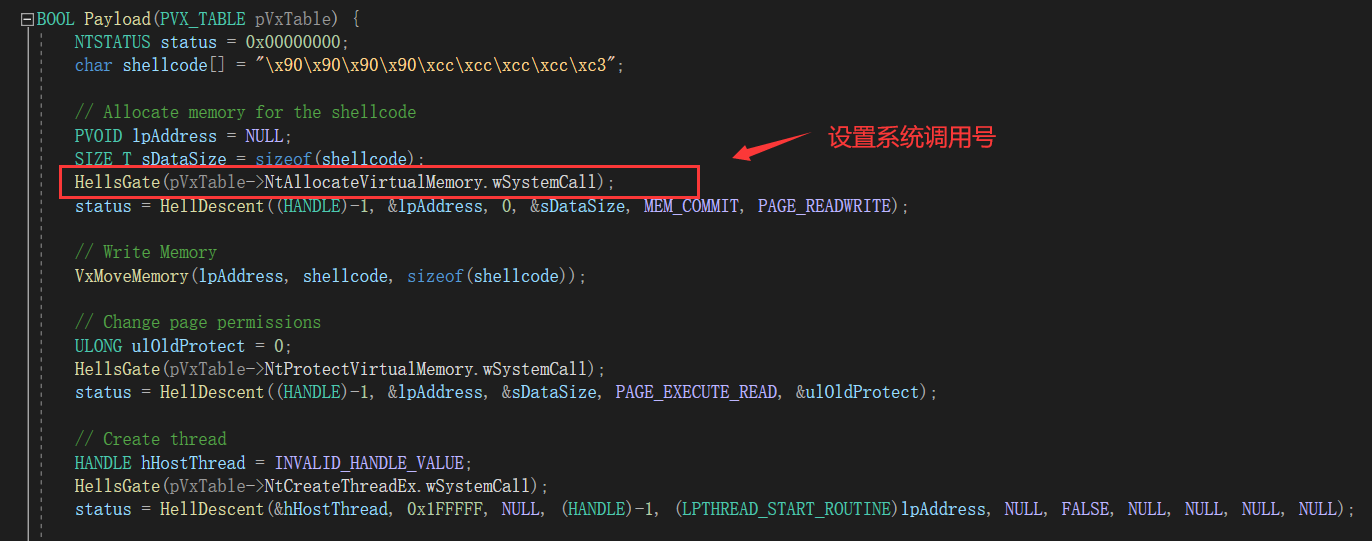 ### jumper & jumper\_randomized jumper的目的也是为了隐藏了 syscall 指令的出现,可以看到这里将`SW3_GetSyscallNumber`得到的地址放到r15里面,然后jmp跳到syscall地址。 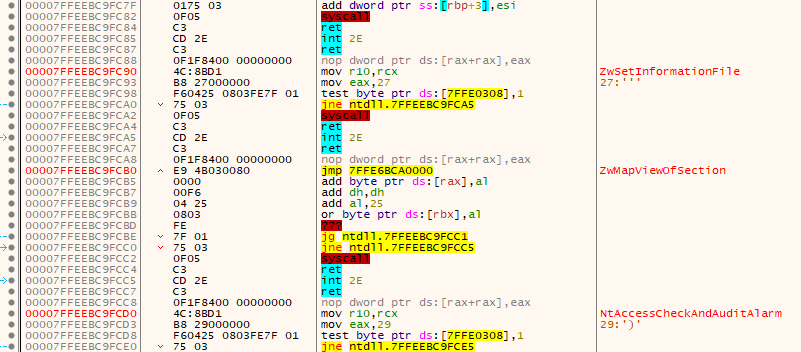 而jumper\_randomized的变化和SysWhisper2非常相似,使用 SW2\_GetRandomSyscallAddress 函数生成了随机的 syscall 指令地址,后面的jmp指令同样是用于防止syscall 指令在汇编代码片段中出现。 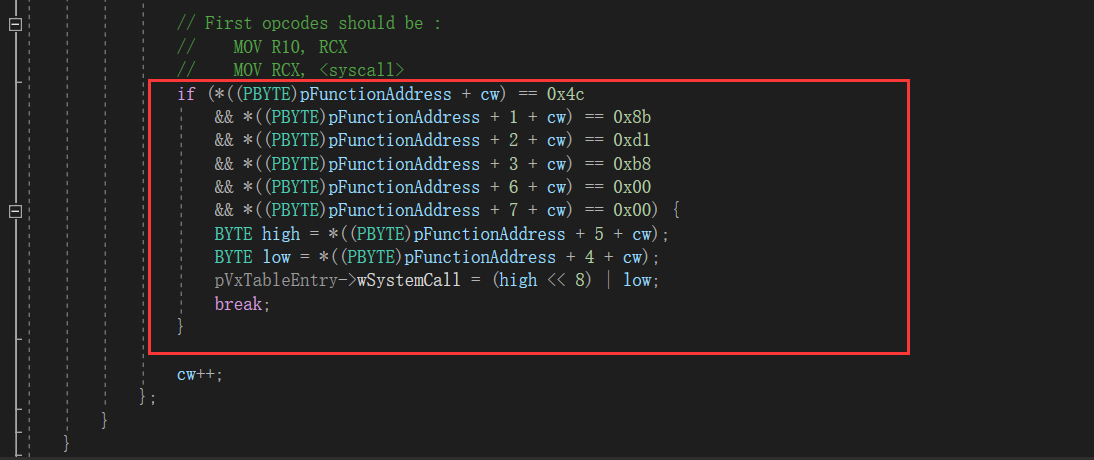 ### egg\_hunter 关于egghunter的概念可参考https://fuzzysecurity.com/tutorials/expDev/4.html 这个是`SysWhisper3`新出现的技术,先用垃圾指令代替 syscall,在运行时再从内存中找出来替换 syscall。这里的egg hunt使用 "DB" 来定义一个字节的汇编指令。 ```asm NtAllocateVirtualMemory PROC mov [rsp +8], rcx ; Save registers. mov [rsp+16], rdx mov [rsp+24], r8 mov [rsp+32], r9 sub rsp, 28h mov ecx, 003970B07h ; Load function hash into ECX. call SW2_GetSyscallNumber ; Resolve function hash into syscall number. add rsp, 28h mov rcx, [rsp +8] ; Restore registers. mov rdx, [rsp+16] mov r8, [rsp+24] mov r9, [rsp+32] mov r10, rcx DB 77h ; "w" DB 0h ; "0" DB 0h ; "0" DB 74h ; "t" DB 77h ; "w" DB 0h ; "0" DB 0h ; "0" DB 74h ; "t" ret NtAllocateVirtualMemory ENDP ``` 但实际上用这种方式会报错,因为只是提供了 syscall 的调用和返回的堆栈,但是没有释放,也就是说这里还并没有调用到syscall函数,我们需要将`w00tw00t`转换为`0x0f, 0x05, 0x90, 0x90, 0xC3, 0x90, 0xCC, 0xCC`,它转换为`syscall; nop; nop; ret; nop; int3; int3;`。所以后面需要使用 FindAndReplace 函数进行替换(代码参考https://klezvirus.github.io/RedTeaming/AV\_Evasion/NoSysWhisper/): ```php void FindAndReplace(unsigned char egg[], unsigned char replace[]) { ULONG64 startAddress = 0; ULONG64 size = 0; GetMainModuleInformation(&startAddress, &size); if (size <= 0) { printf("[-] Error detecting main module size"); exit(1); } ULONG64 currentOffset = 0; unsigned char* current = (unsigned char*)malloc(8*sizeof(unsigned char*)); size_t nBytesRead; printf("Starting search from: 0x%llu\n", (ULONG64)startAddress + currentOffset); while (currentOffset < size - 8) { currentOffset++; LPVOID currentAddress = (LPVOID)(startAddress + currentOffset); if(DEBUG > 0){ printf("Searching at 0x%llu\n", (ULONG64)currentAddress); } if (!ReadProcessMemory((HANDLE)((int)-1), currentAddress, current, 8, &nBytesRead)) { printf("[-] Error reading from memory\n"); exit(1); } if (nBytesRead != 8) { printf("[-] Error reading from memory\n"); continue; } if(DEBUG > 0){ for (int i = 0; i < nBytesRead; i++){ printf("%02x ", current[i]); } printf("\n"); } if (memcmp(egg, current, 8) == 0) { printf("Found at %llu\n", (ULONG64)currentAddress); WriteProcessMemory((HANDLE)((int)-1), currentAddress, replace, 8, &nBytesRead); } } printf("Ended search at: 0x%llu\n", (ULONG64)startAddress + currentOffset); free(current); } ``` 使用方式: ```php int main(int argc, char** argv) { unsigned char egg[] = { 0x77, 0x00, 0x00, 0x74, 0x77, 0x00, 0x00, 0x74 }; // w00tw00t unsigned char replace[] = { 0x0f, 0x05, 0x90, 0x90, 0xC3, 0x90, 0xCC, 0xCC }; // syscall; nop; nop; ret; nop; int3; int3 //####SELF_TAMPERING#### (egg, replace); Inject(); return 0; } ``` 但是 EDR 不仅会检测 syscall 的字符,还会检测 syscall 执行特定指令的位置。也就是说本来 syscall 是要从 ntdll 中执行的,但我们的方式会直接在程序的主模块中执行。 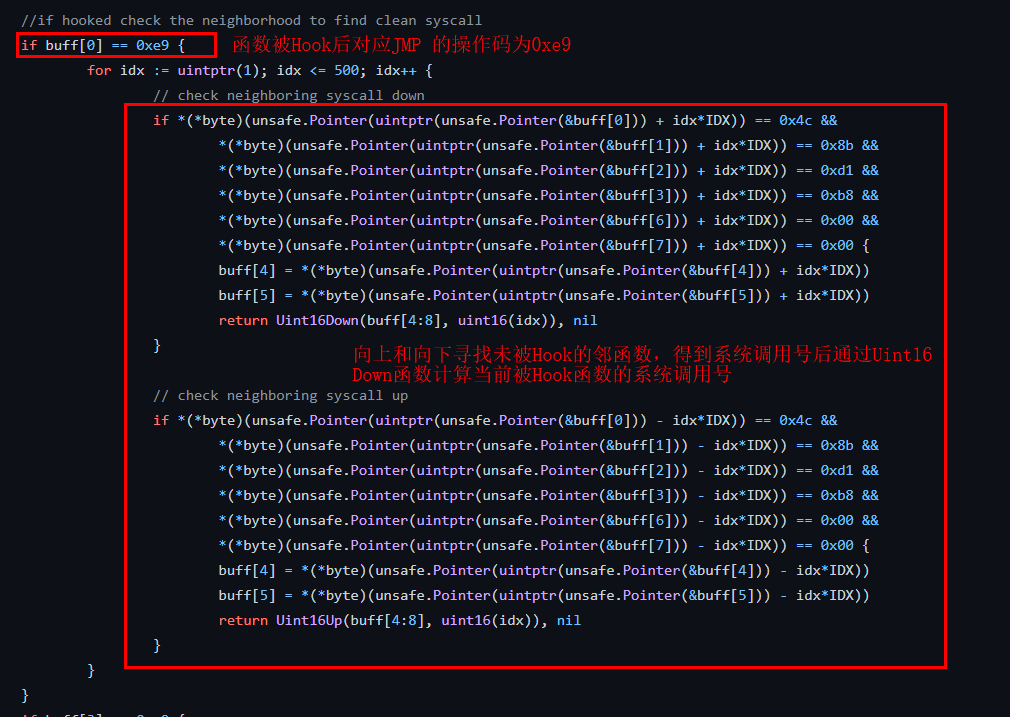 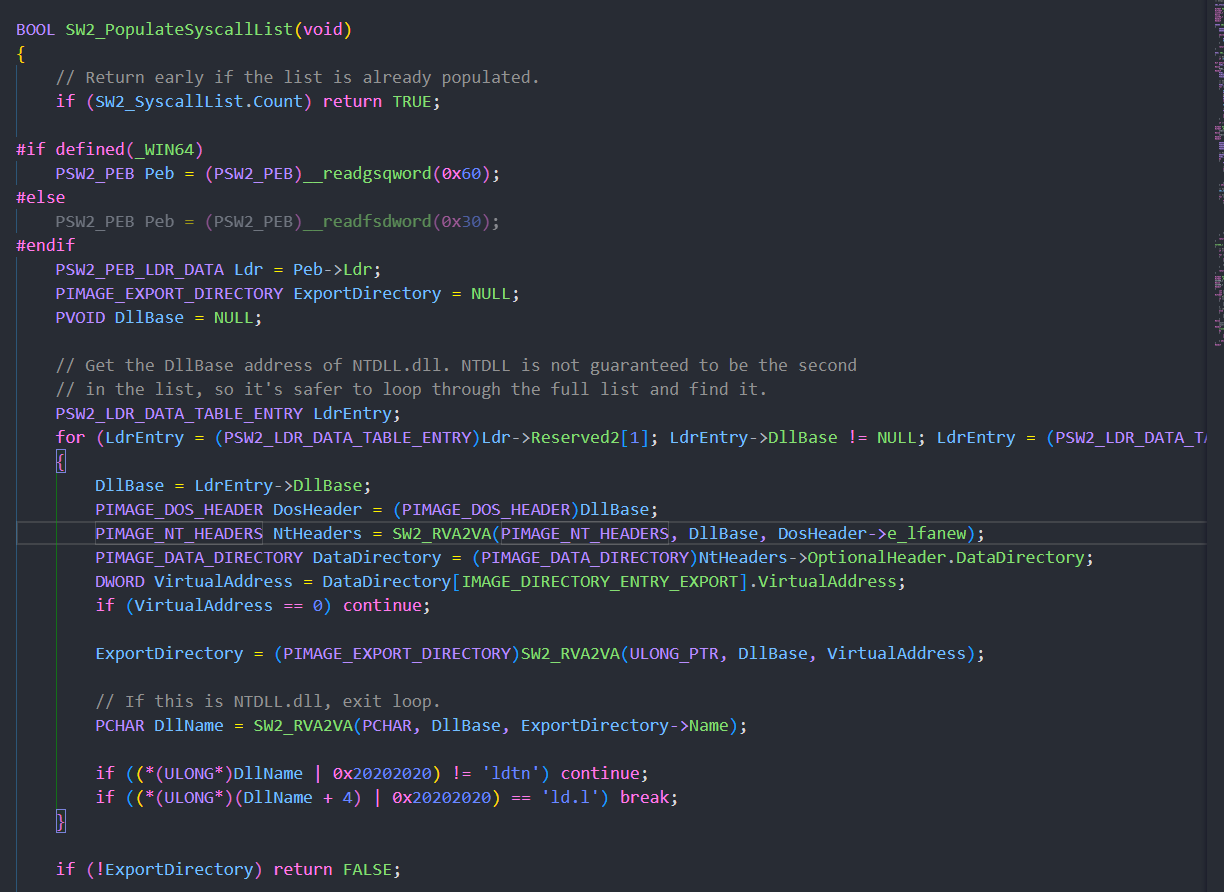 RIP 指向的不同为 EDR 提供了特征。针对于这种检测,可以在运行时候从内存中动态找出替换 syscall。首先添加一个 ULONG64 字段来存储 syscall 指令绝对地址,当 \_\_SW2\_SYSCALL\_LIST 被填充时,计算syscall 指令的地址。在这种情况下,已经有了 ntdll.dll 基地址,SysWhispers 从 DLL EAT 中计算 RVA最后就可以jmp syscall\\<address>,所以只需要计算 syscall 指令的相对位置即可。 ```c function findOffset(HANDLE current_process, int64 start_address, int64 dllSize) -> int64: int64 offset = 0 bytes signature = "\x0f\x05\x03" bytes currentbytes = "" while currentbytes != signature: offset++ if offset + 3 > dllSize: return INFINITE ReadProcessMemory(current_process, start_address + offset, ¤tbytes, 3, nullptr) return start_address + offset ``` 参考文章 <https://winternl.com/detecting-manual-syscalls-from-user-mode/> [https://klezvirus.github.io/RedTeaming/AV\_Evasion/NoSysWhisper/](https://klezvirus.github.io/RedTeaming/AV_Evasion/NoSysWhisper/) [https://blog.csdn.net/weixin\_43655282/article/details/104291312](https://blog.csdn.net/weixin_43655282/article/details/104291312) <https://bbs.kanxue.com/thread-151456.htm> [https://www.dailychina.news/showArticle?main\_id=a1057a0c93a81ba5960abe906c76377e](https://www.dailychina.news/showArticle?main_id=a1057a0c93a81ba5960abe906c76377e) <https://www.anquanke.com/post/id/267345#h3-7> [https://tttang.com/archive/1464/#toc\_hells-gate](https://tttang.com/archive/1464/#toc_hells-gate) <https://xz.aliyun.com/t/11496#toc-3> <https://www.kn0sky.com/?p=69> <https://bbs.kanxue.com/thread-266678.htm> <https://xz.aliyun.com/t/10478>
发表于 2023-04-18 10:43:58
阅读 ( 13165 )
分类:
内网渗透
1 推荐
收藏
0 条评论
请先
登录
后评论
KKfine
5 篇文章
×
发送私信
请先
登录
后发送私信
×
举报此文章
垃圾广告信息:
广告、推广、测试等内容
违规内容:
色情、暴力、血腥、敏感信息等内容
不友善内容:
人身攻击、挑衅辱骂、恶意行为
其他原因:
请补充说明
举报原因:
×
如果觉得我的文章对您有用,请随意打赏。你的支持将鼓励我继续创作!