问答
发起
提问
文章
攻防
活动
Toggle navigation
首页
(current)
问答
商城
实战攻防技术
漏洞分析与复现
NEW
活动
摸鱼办
搜索
登录
注册
安卓逆向-反调试与绕过反调试的几种姿势
移动安全
反调试在代码保护中扮演着很重要的角色,虽然不能完全阻止攻击者,但是还是能加大攻击者的时间成本,一般与加壳结合使用。 反调试可以分为两类:一类是检测,另一类是攻击,前者是去想各种办法去检测程序是否在被调试,如果正在被调试的话做出一些“反”的举措,比如退出等等,后者是采用攻击的方法,就是想办法让调试器不能正常工作或者是让调试器崩溃,从而阻止它,本章主要讲解检测方面的知识。
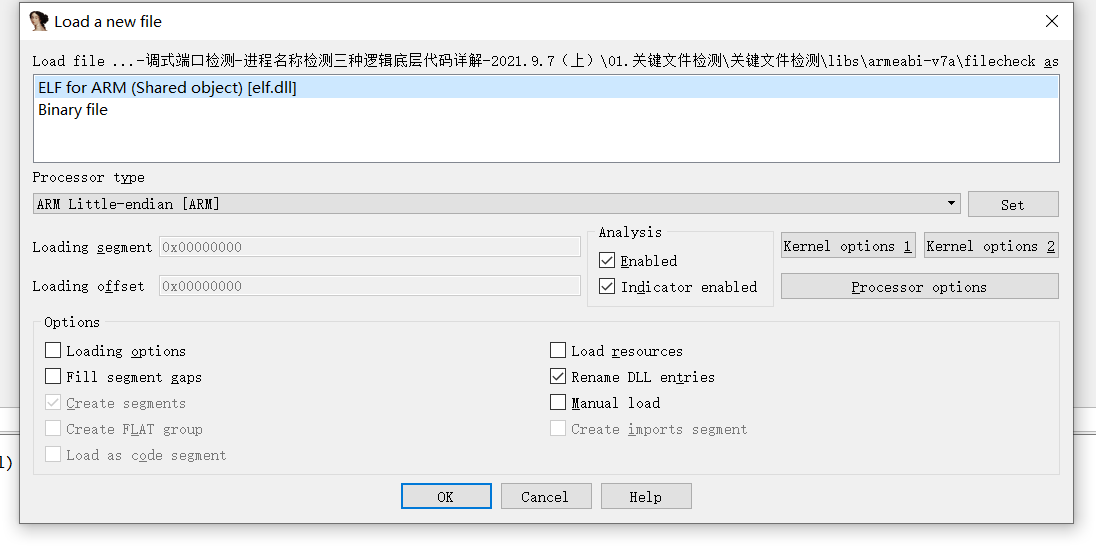
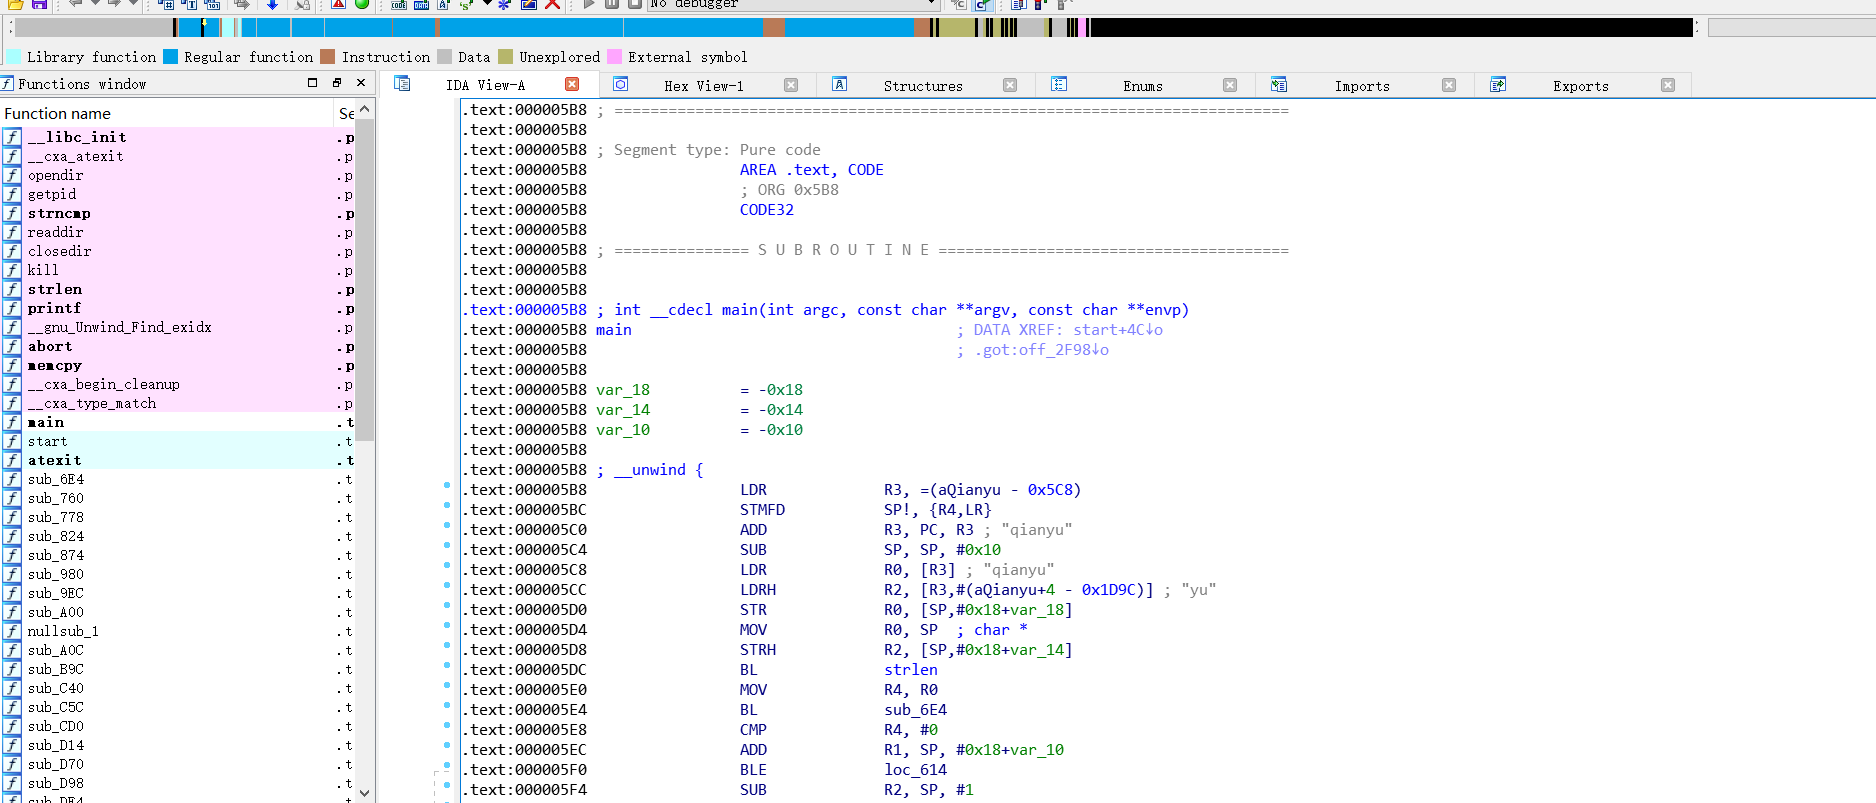
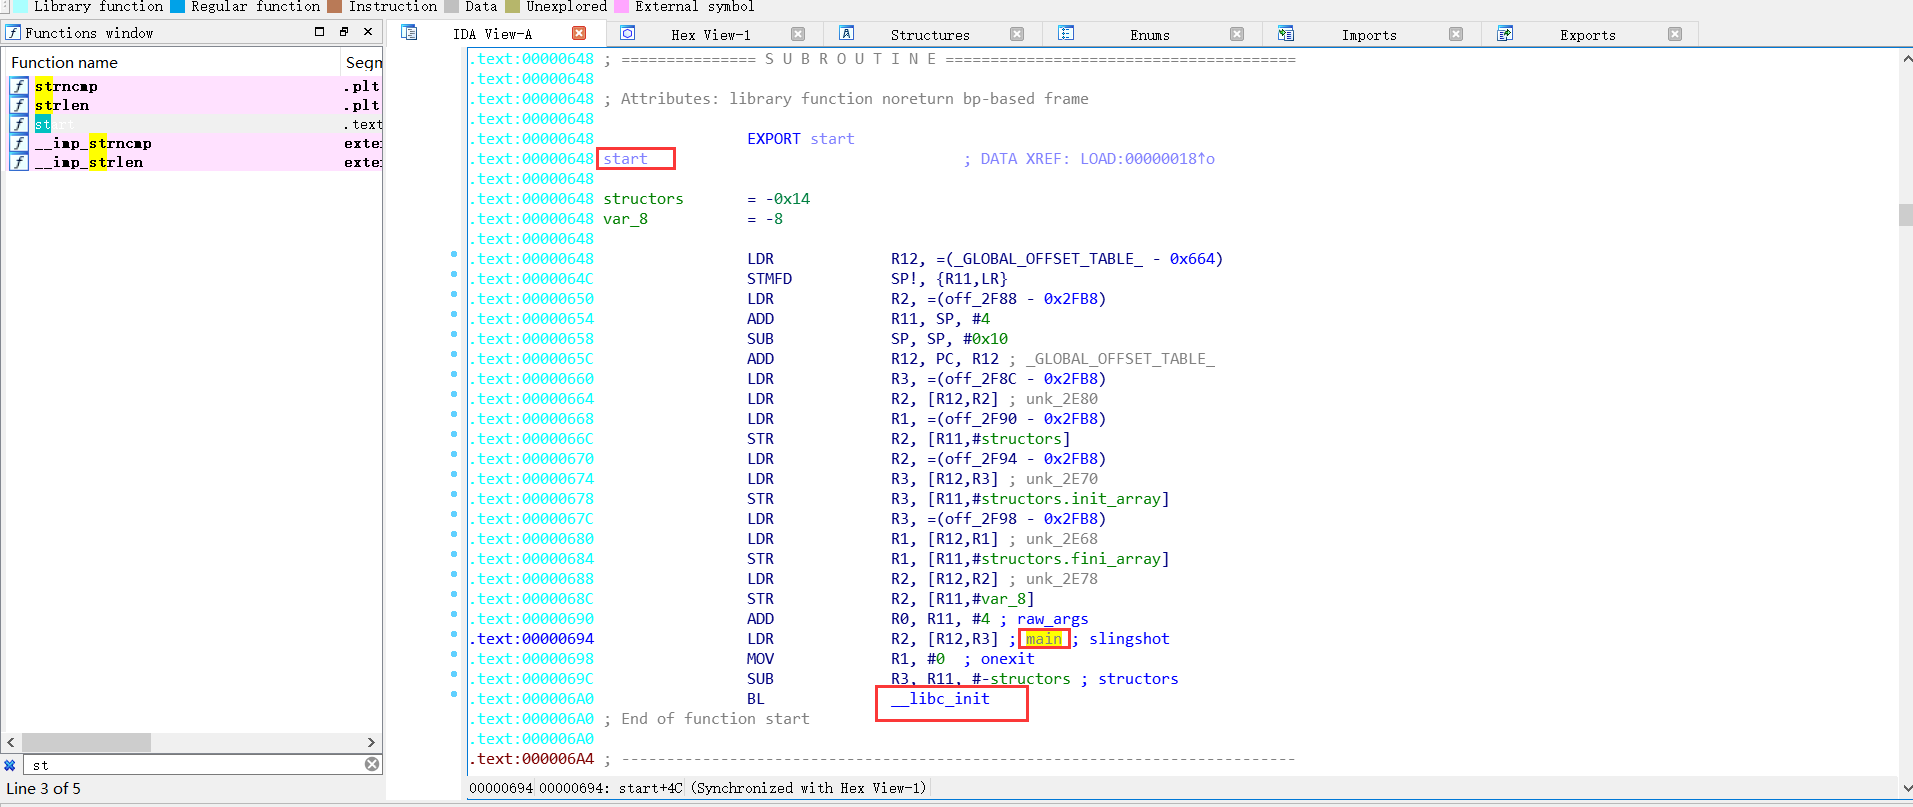
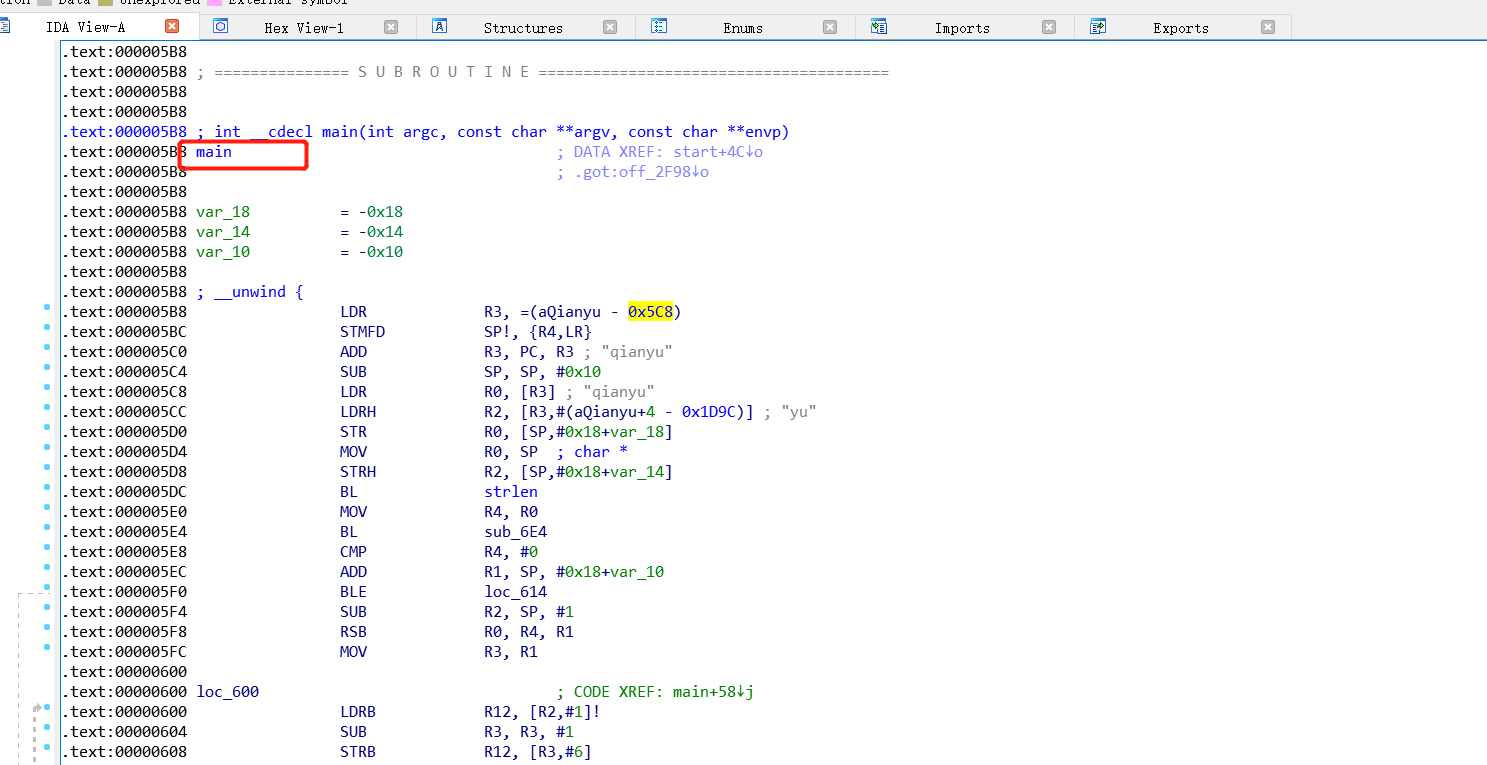
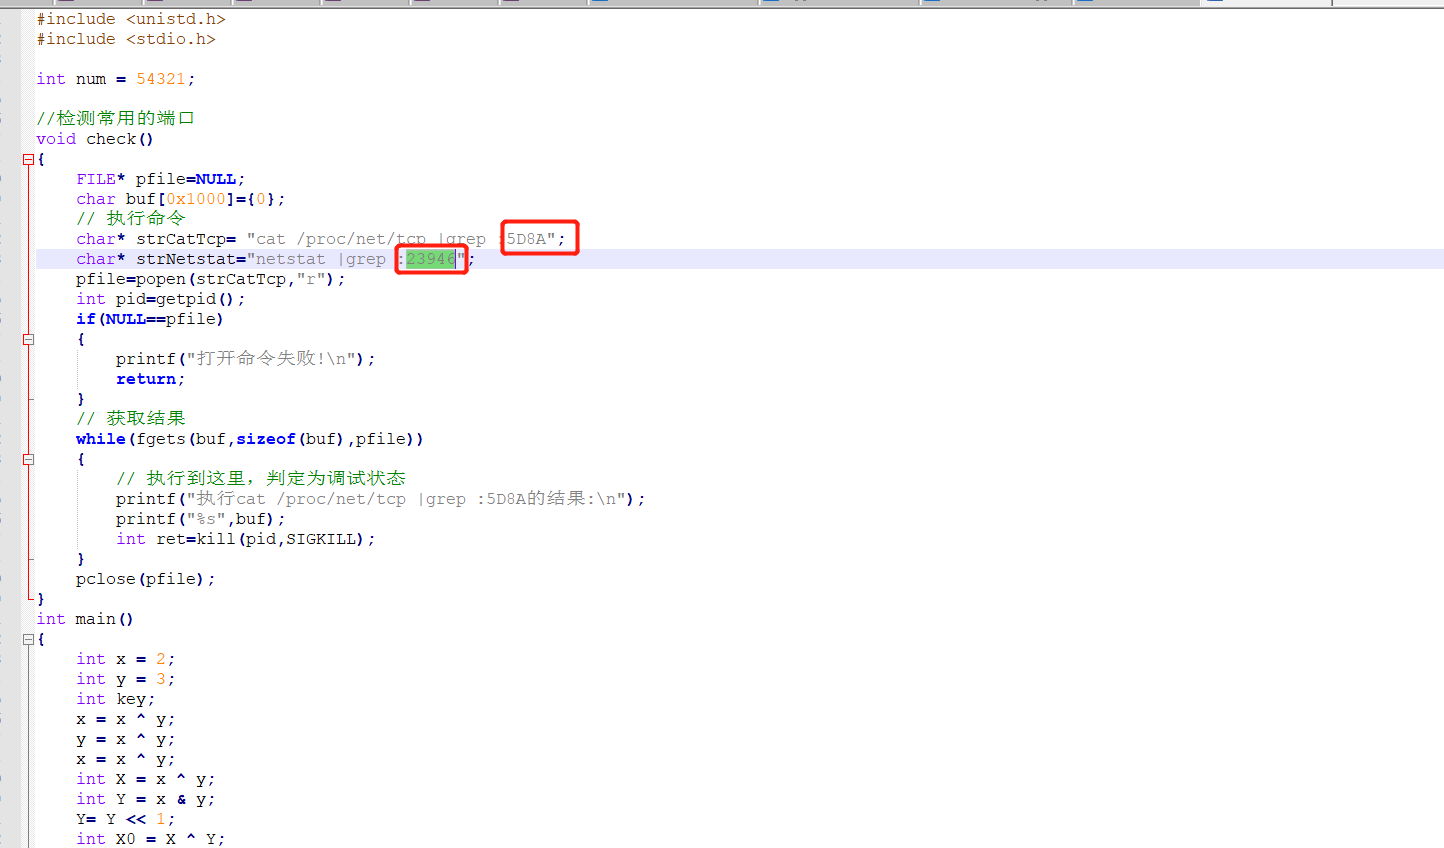
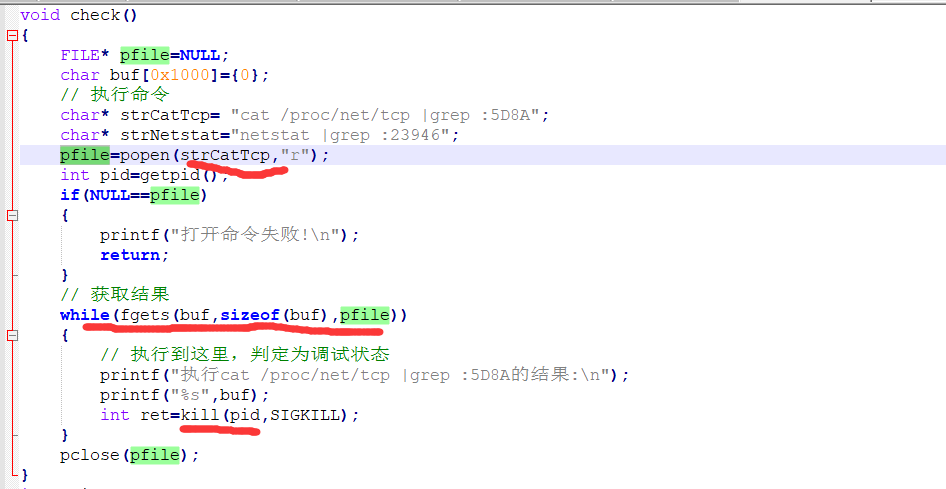
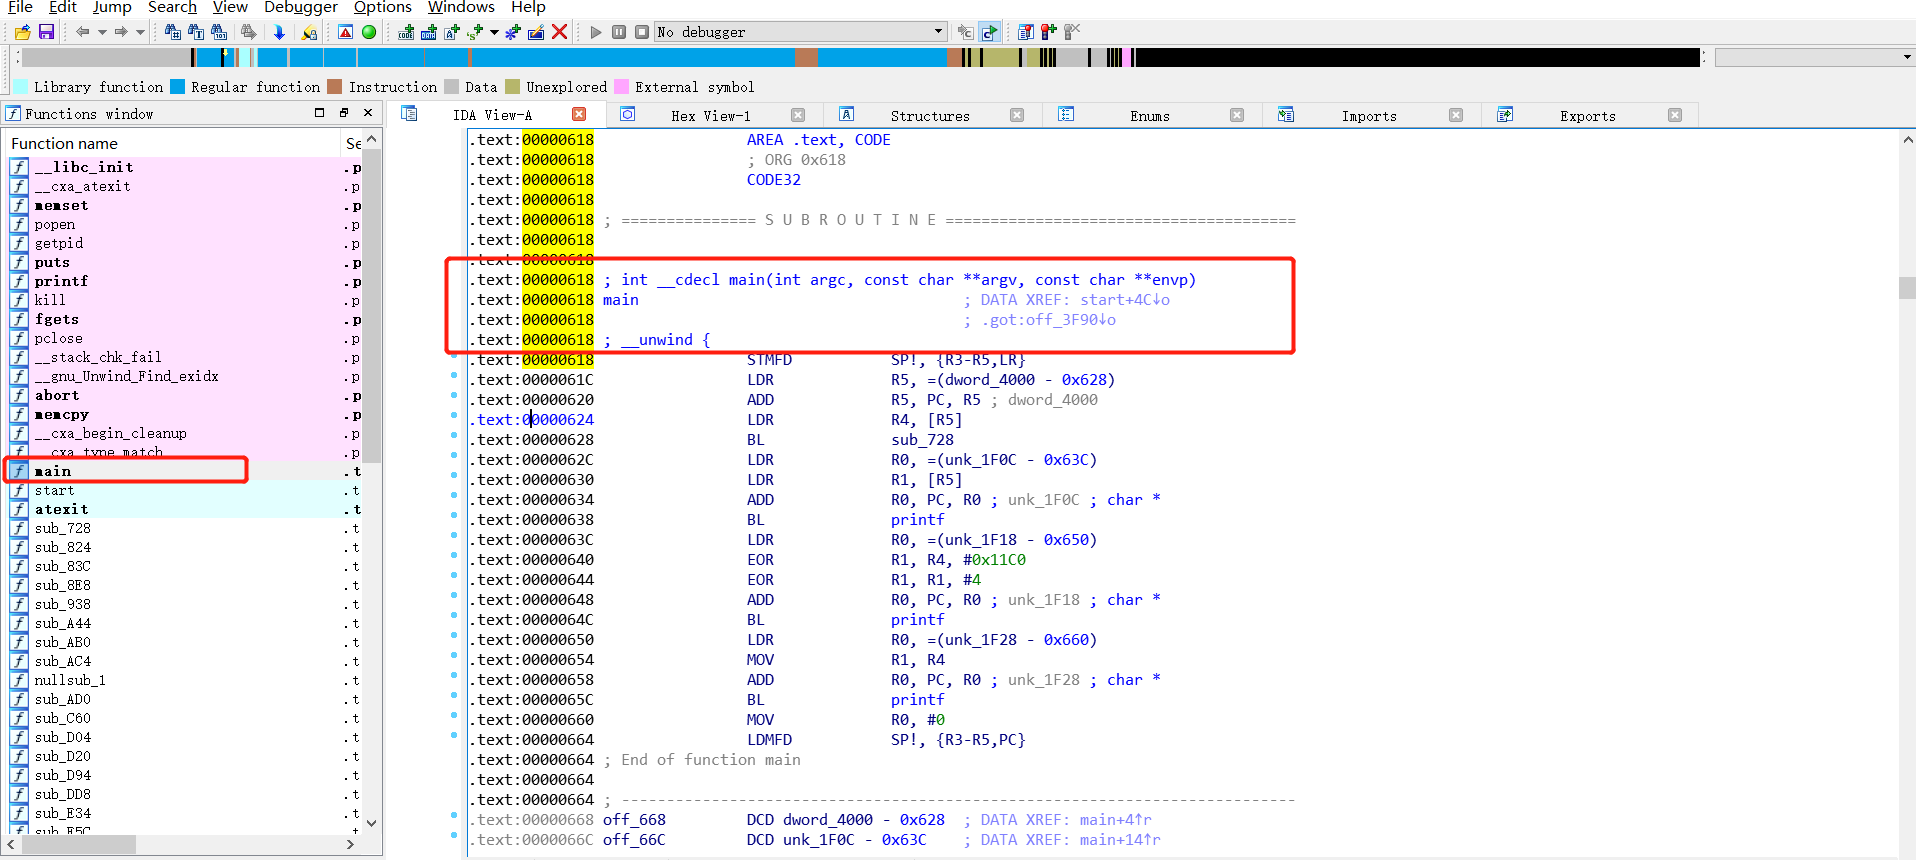
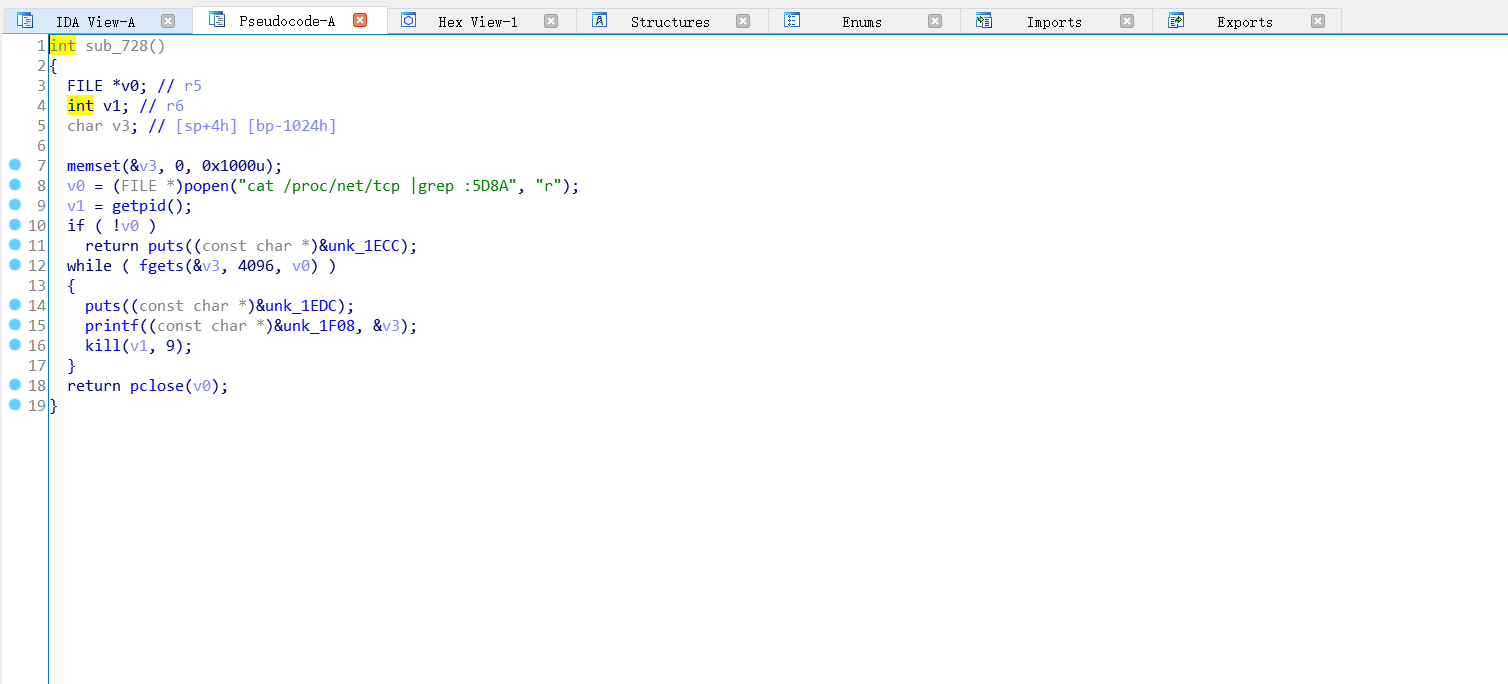
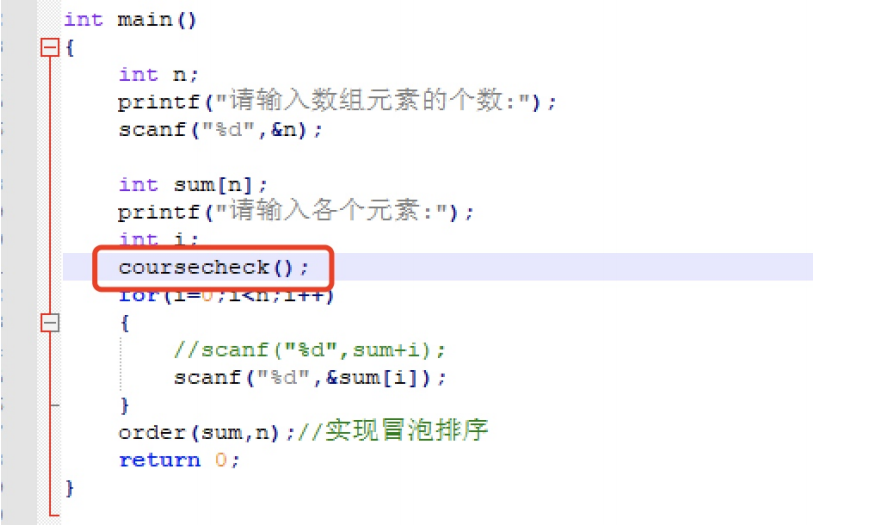
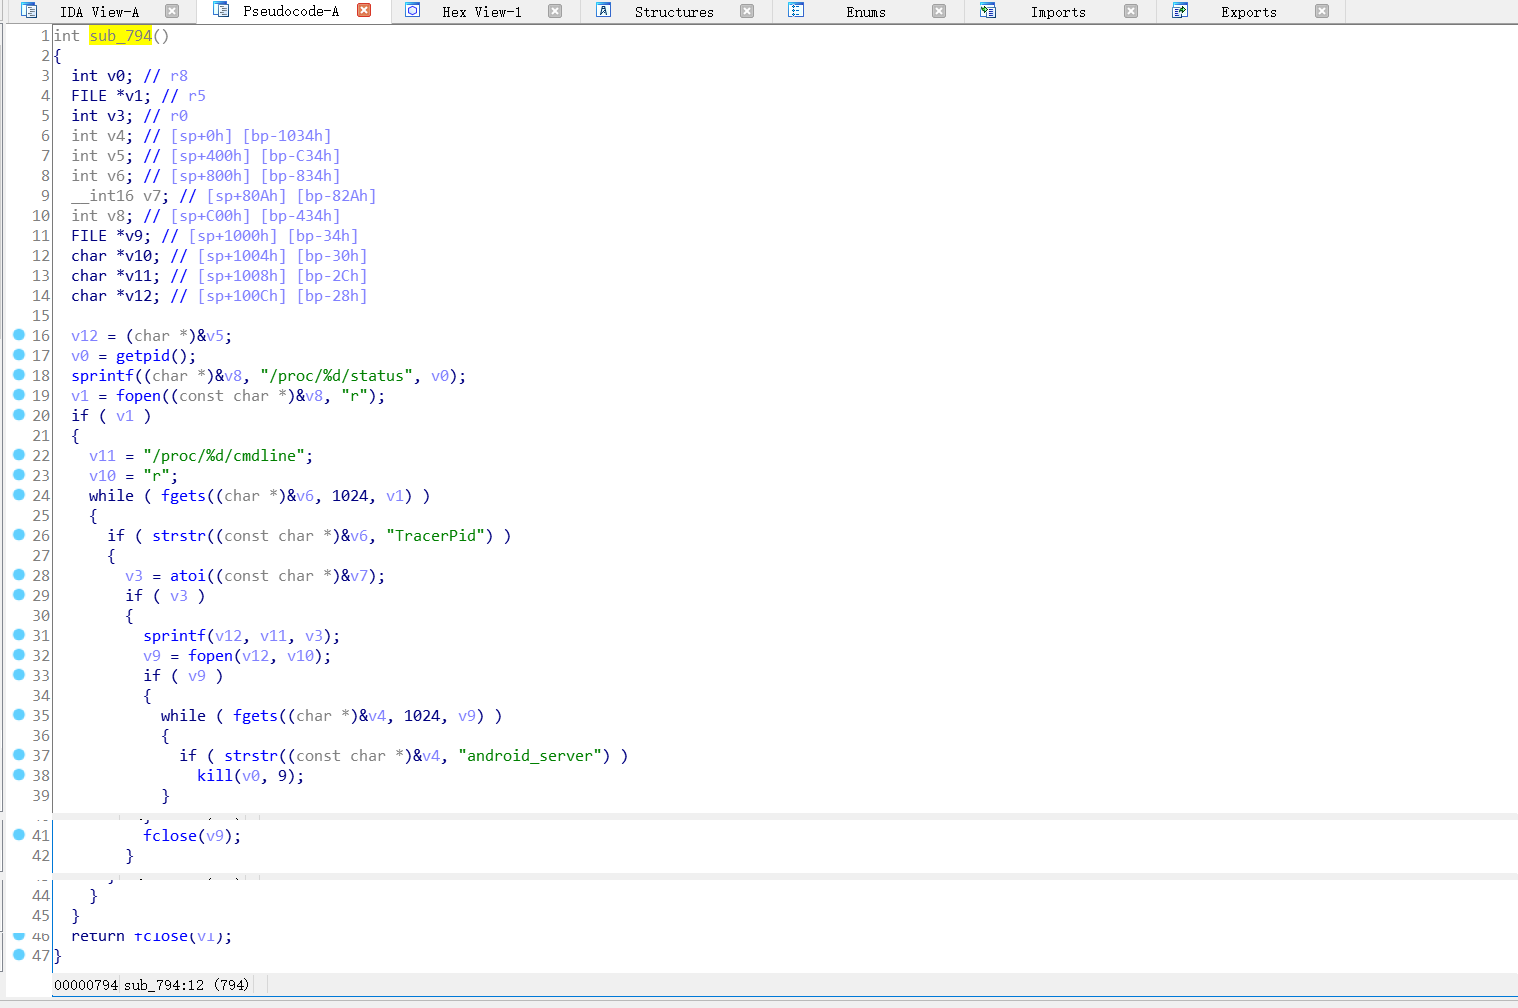
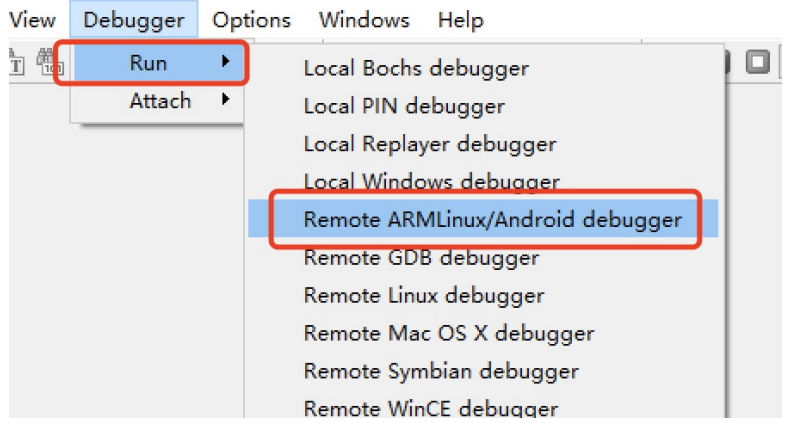
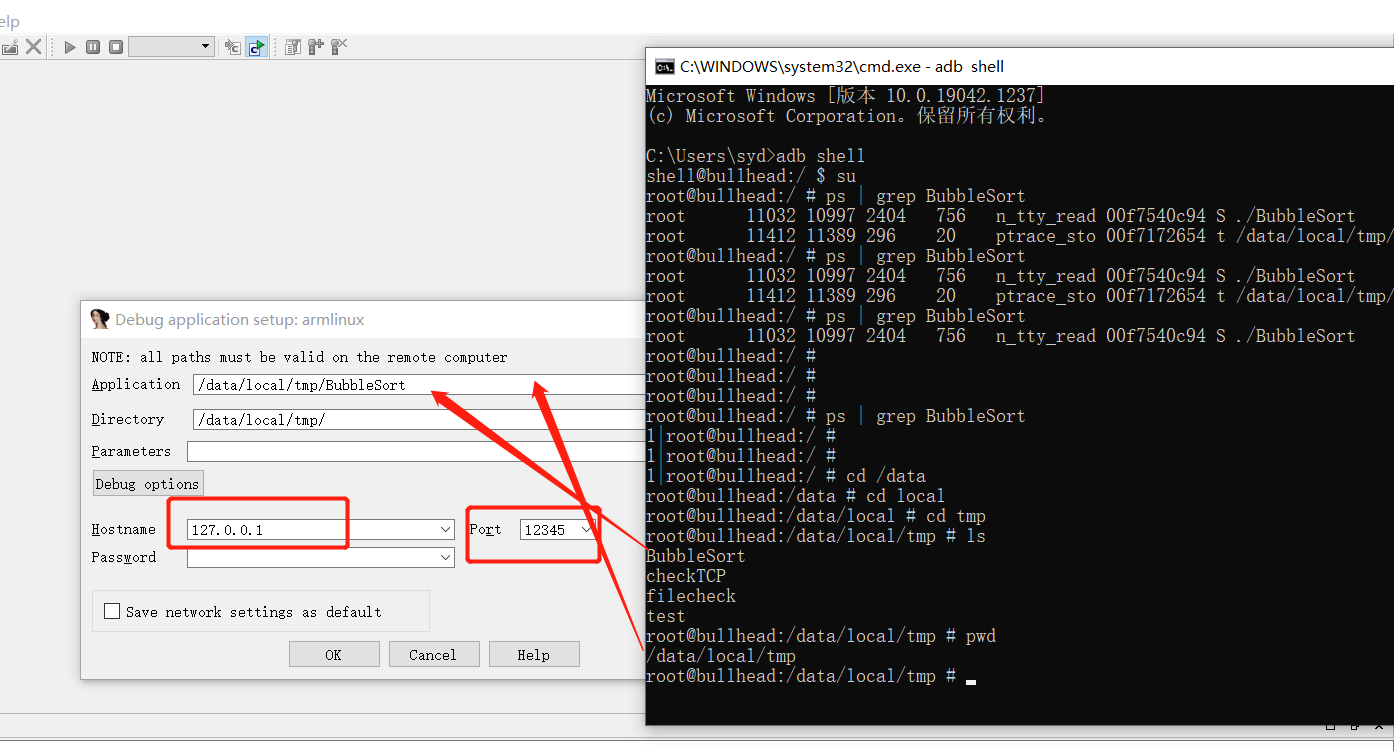
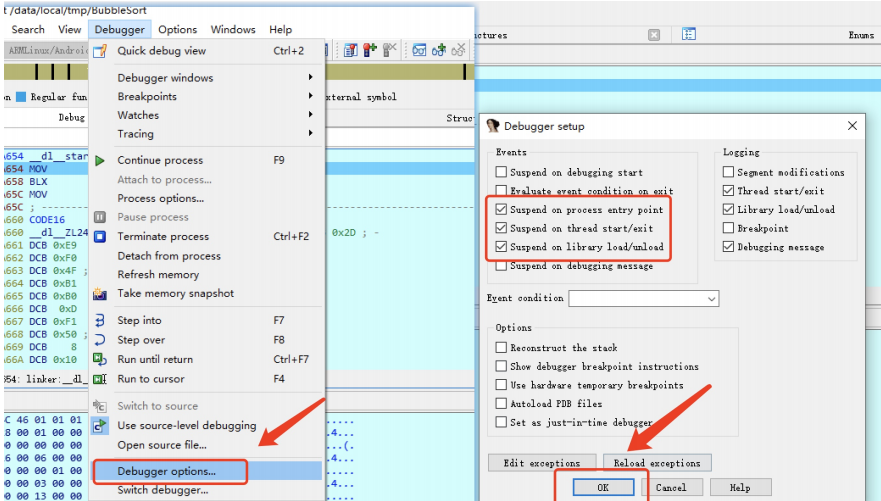
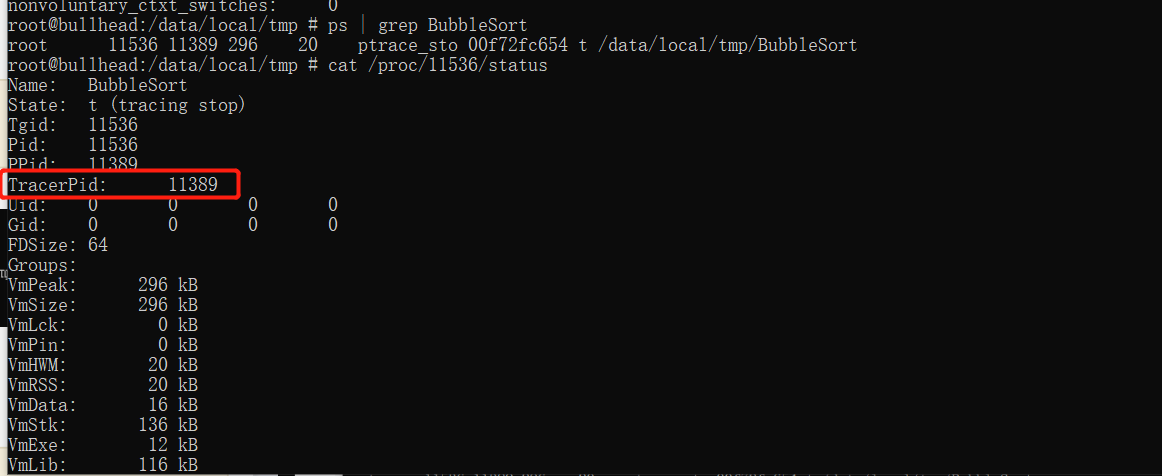
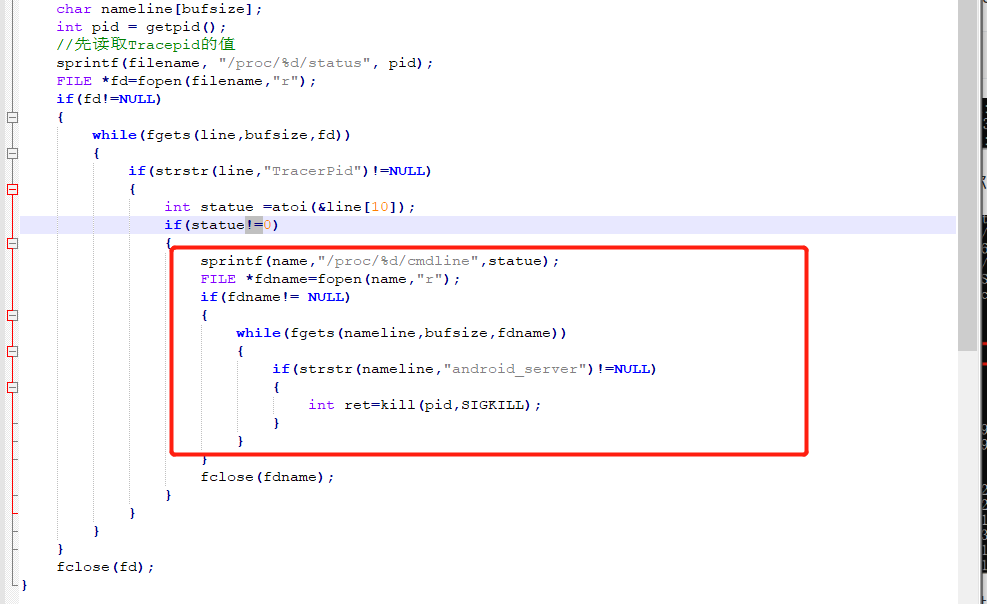
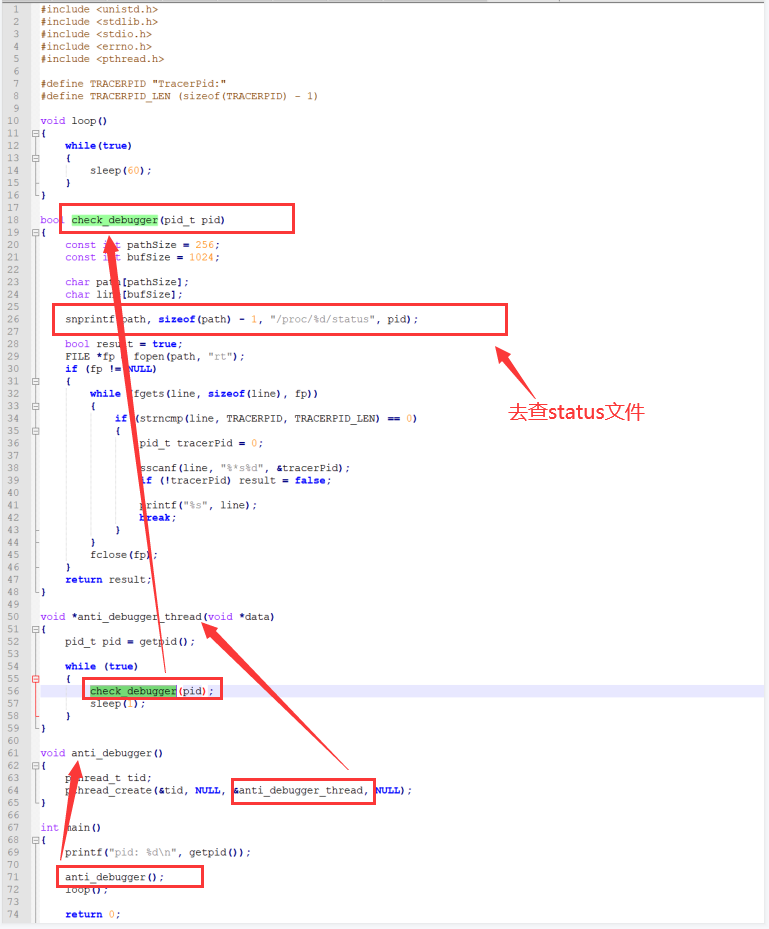
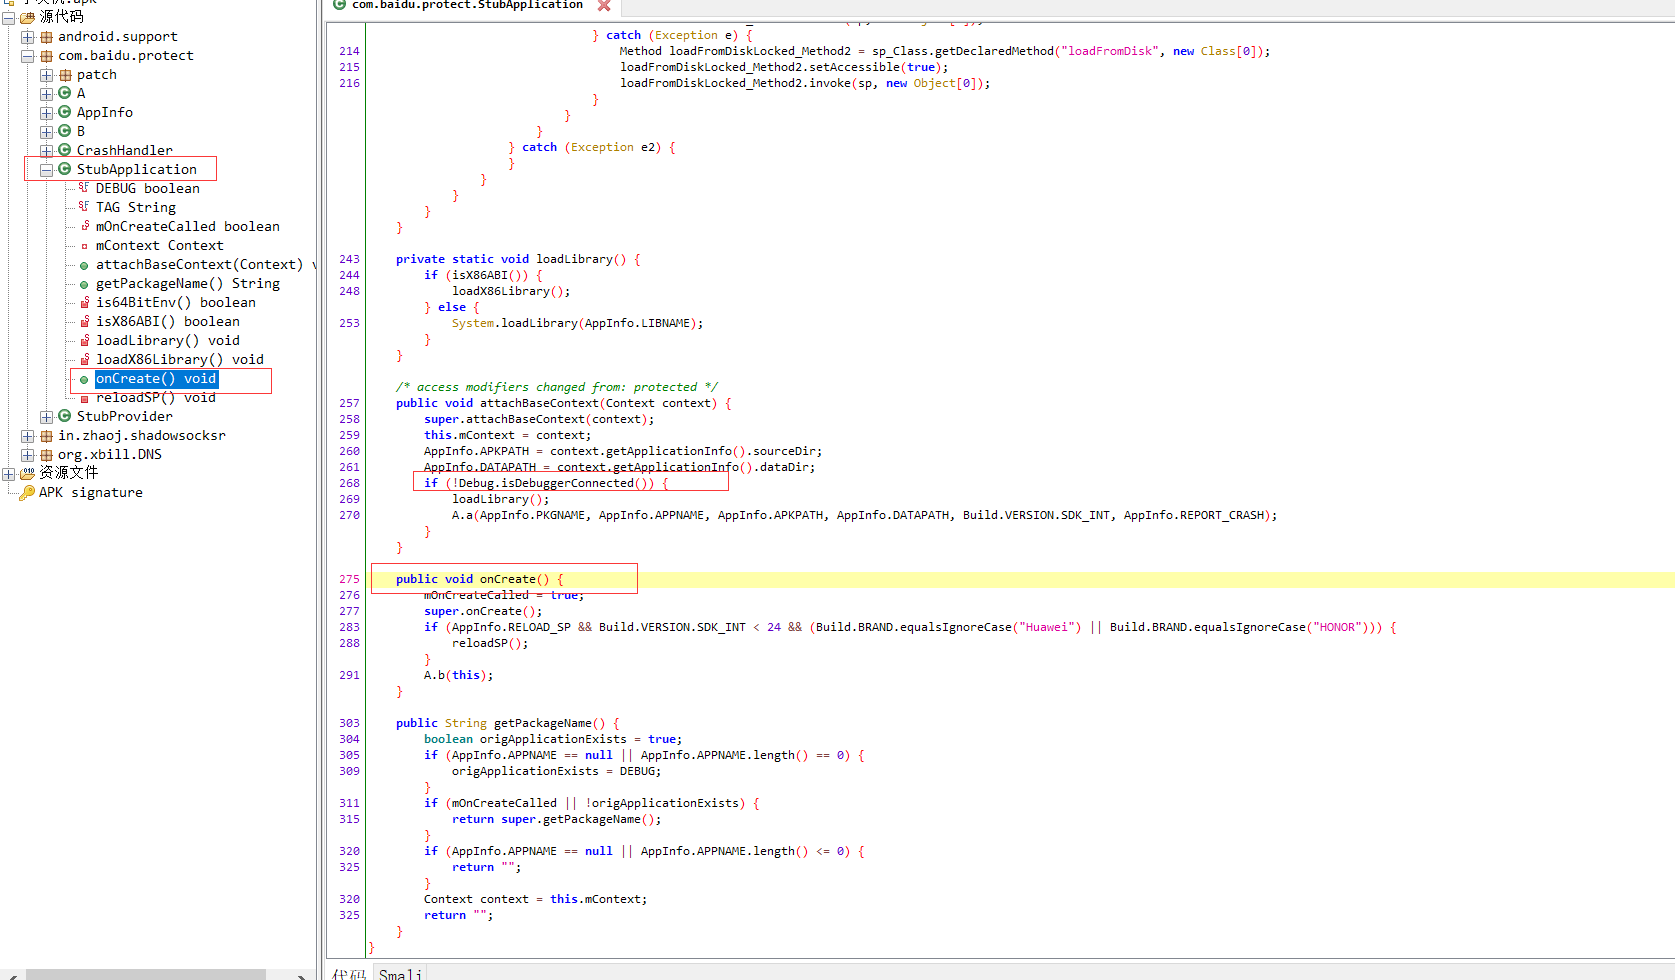
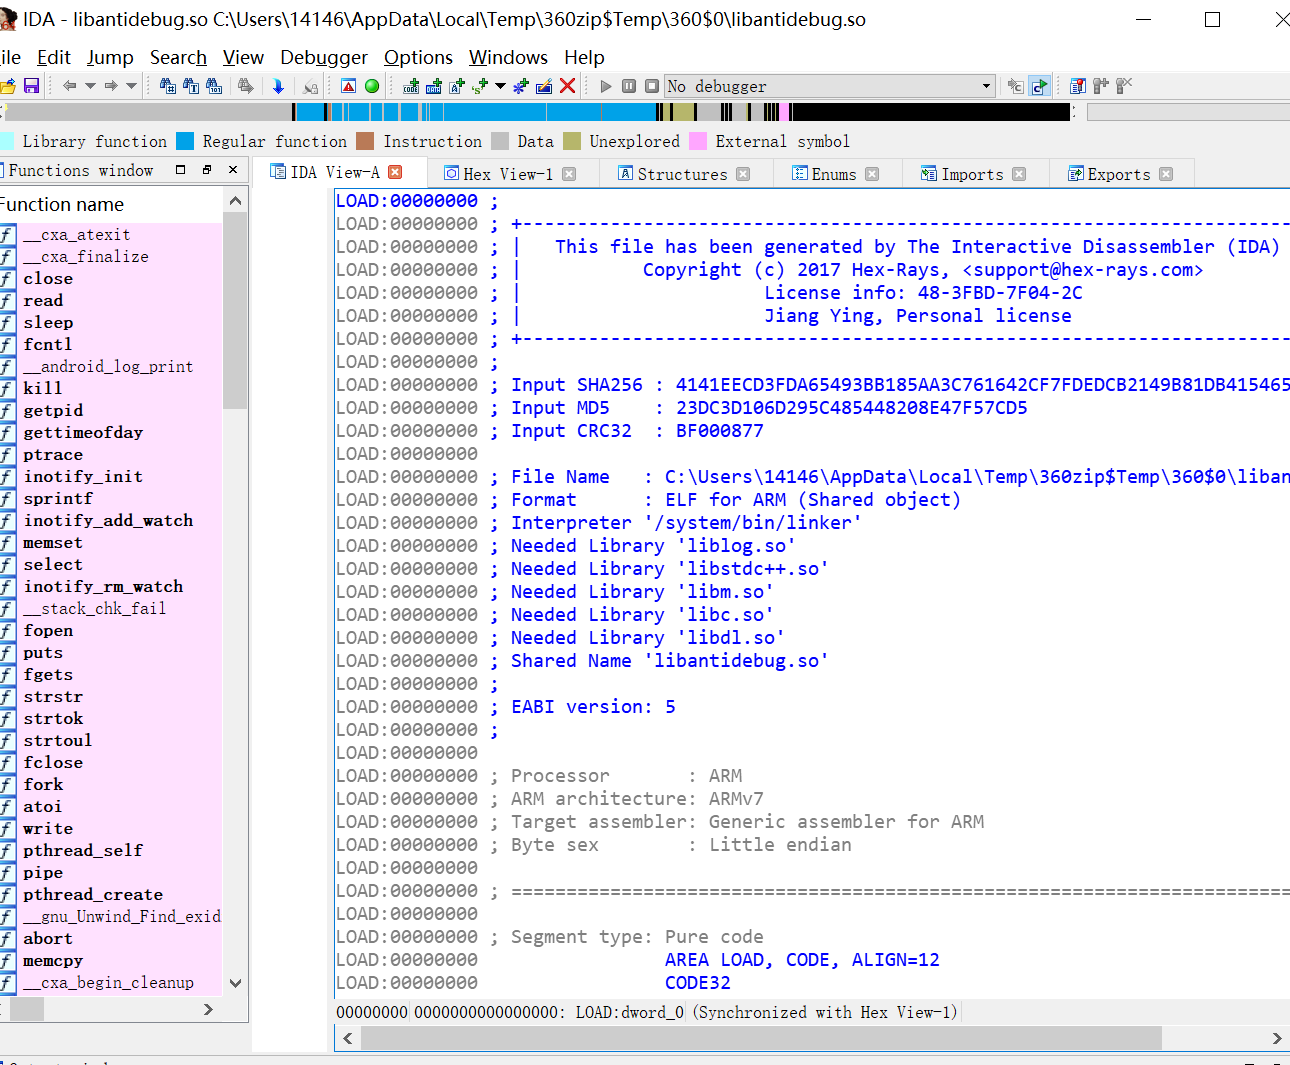
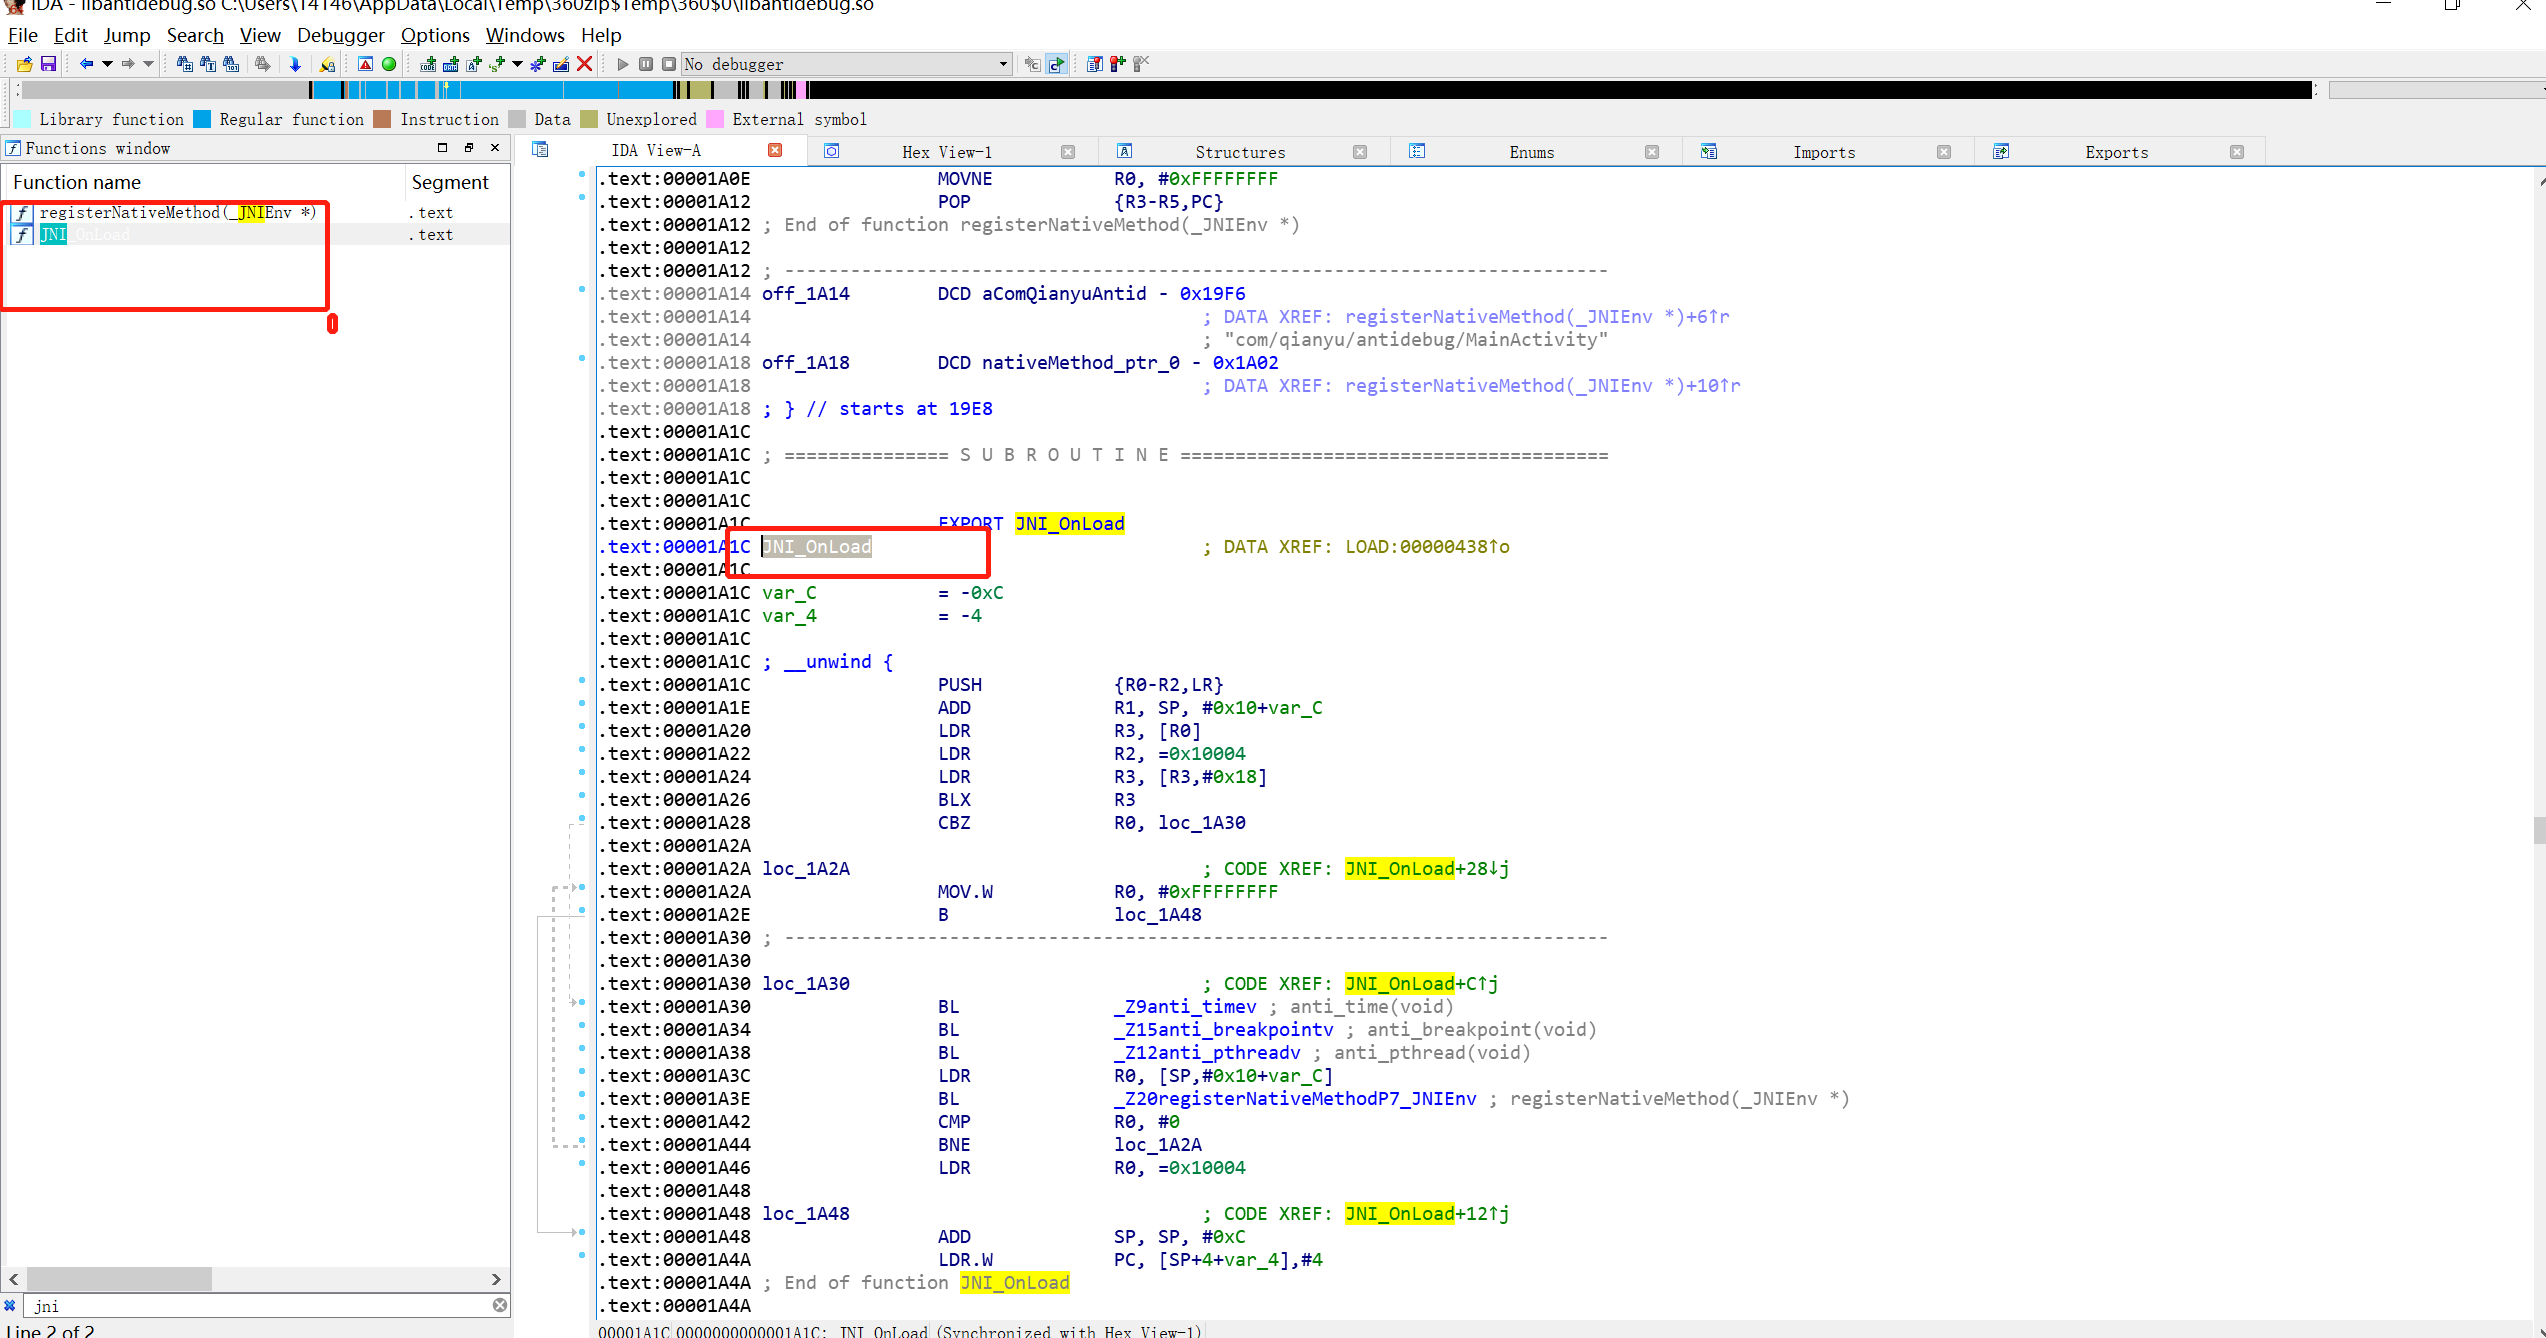
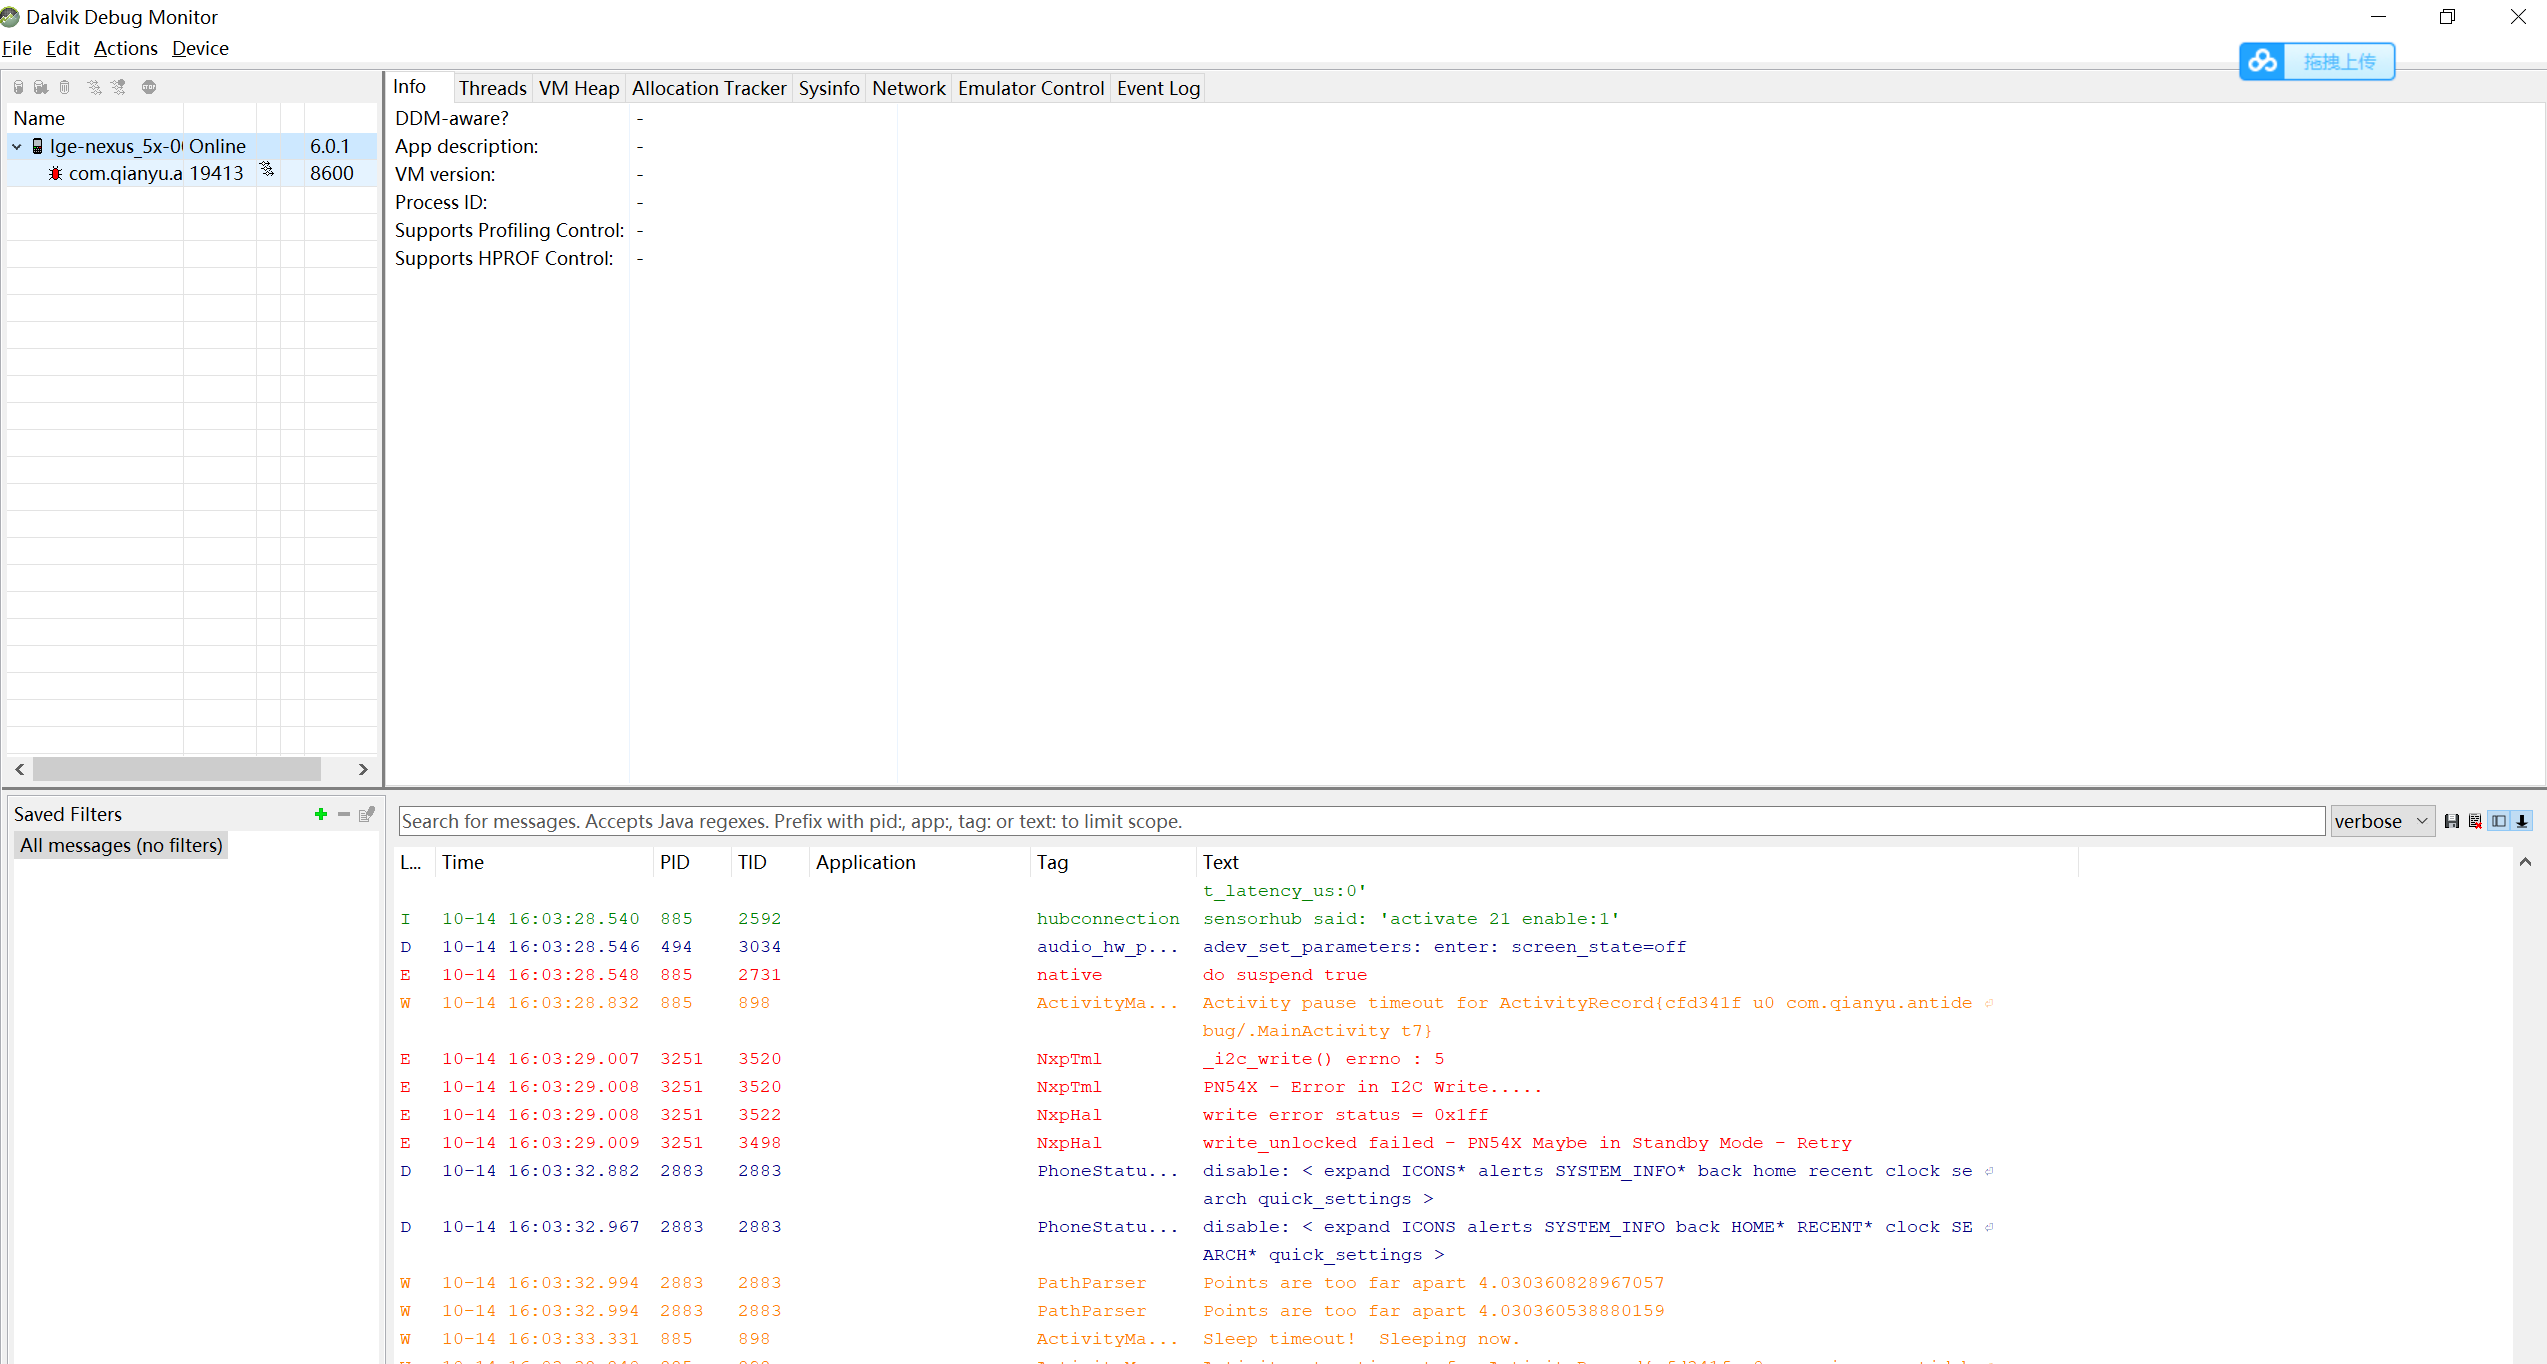
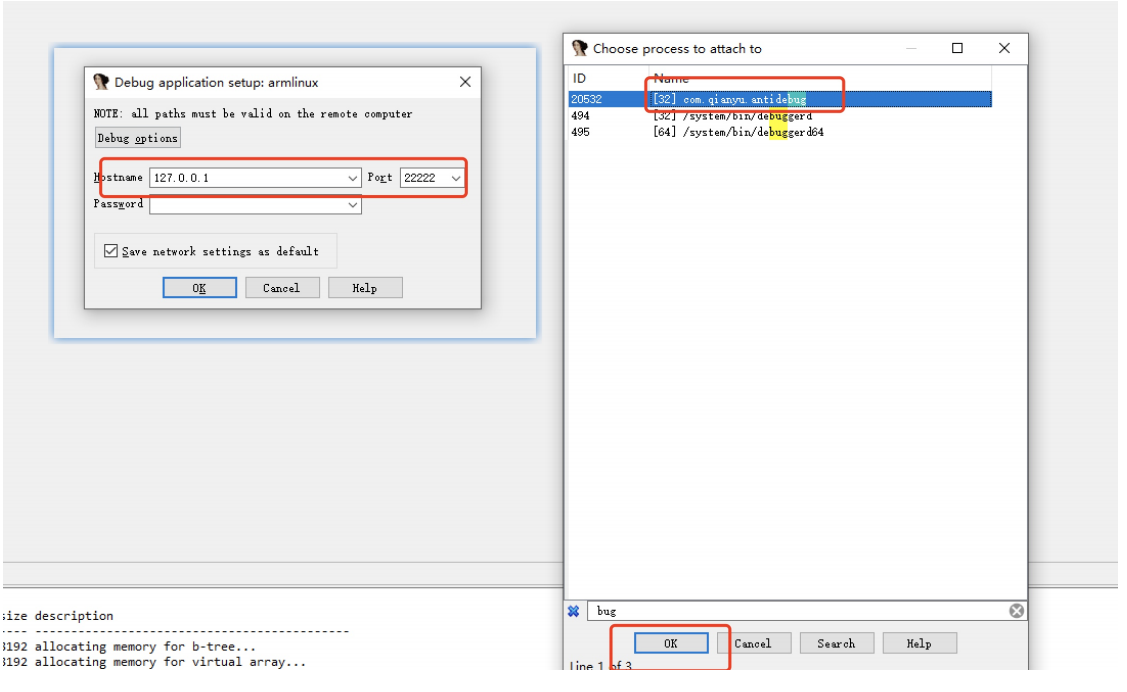
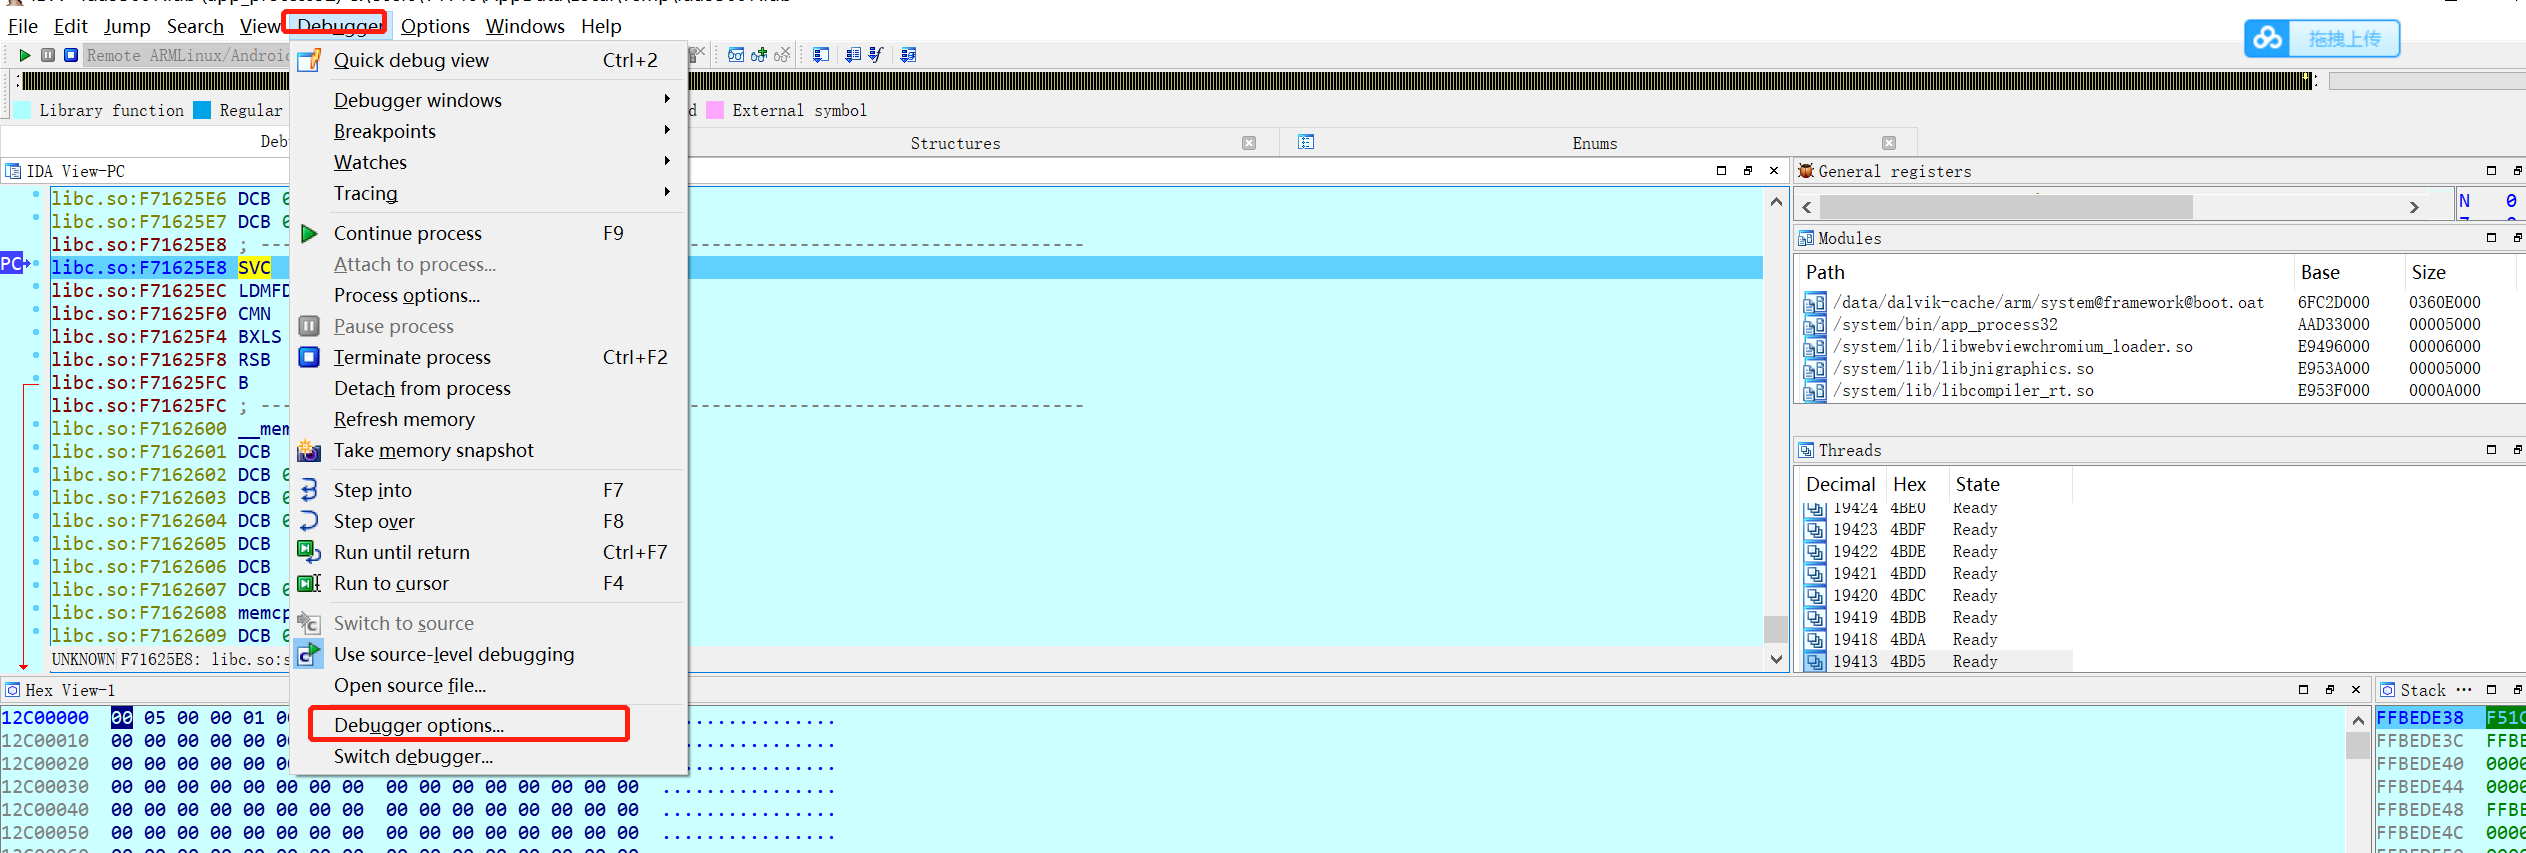
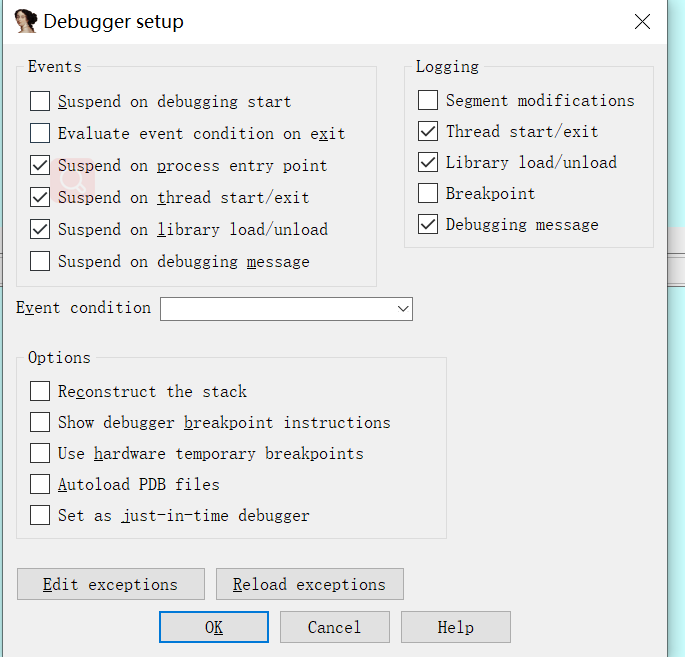
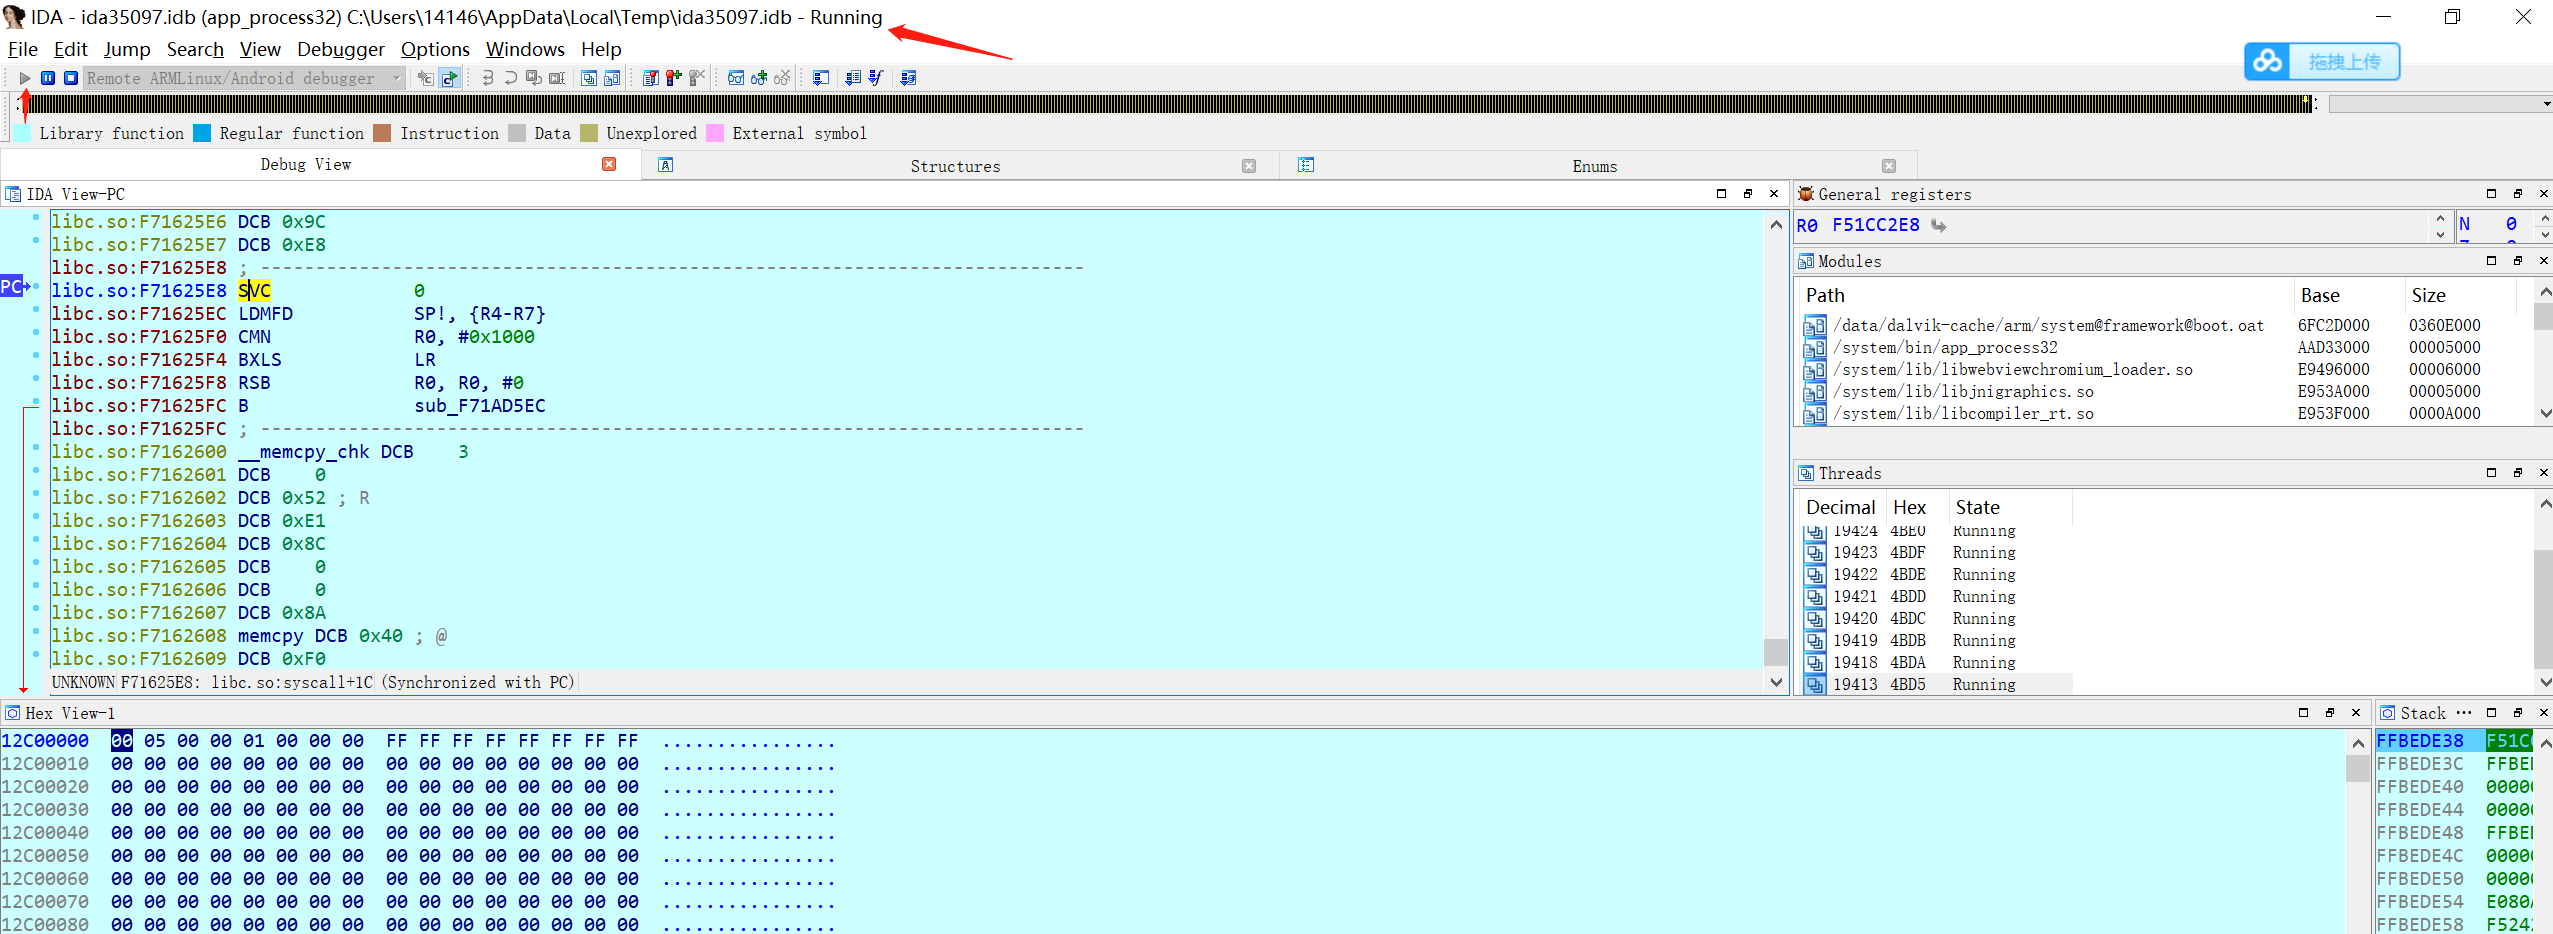
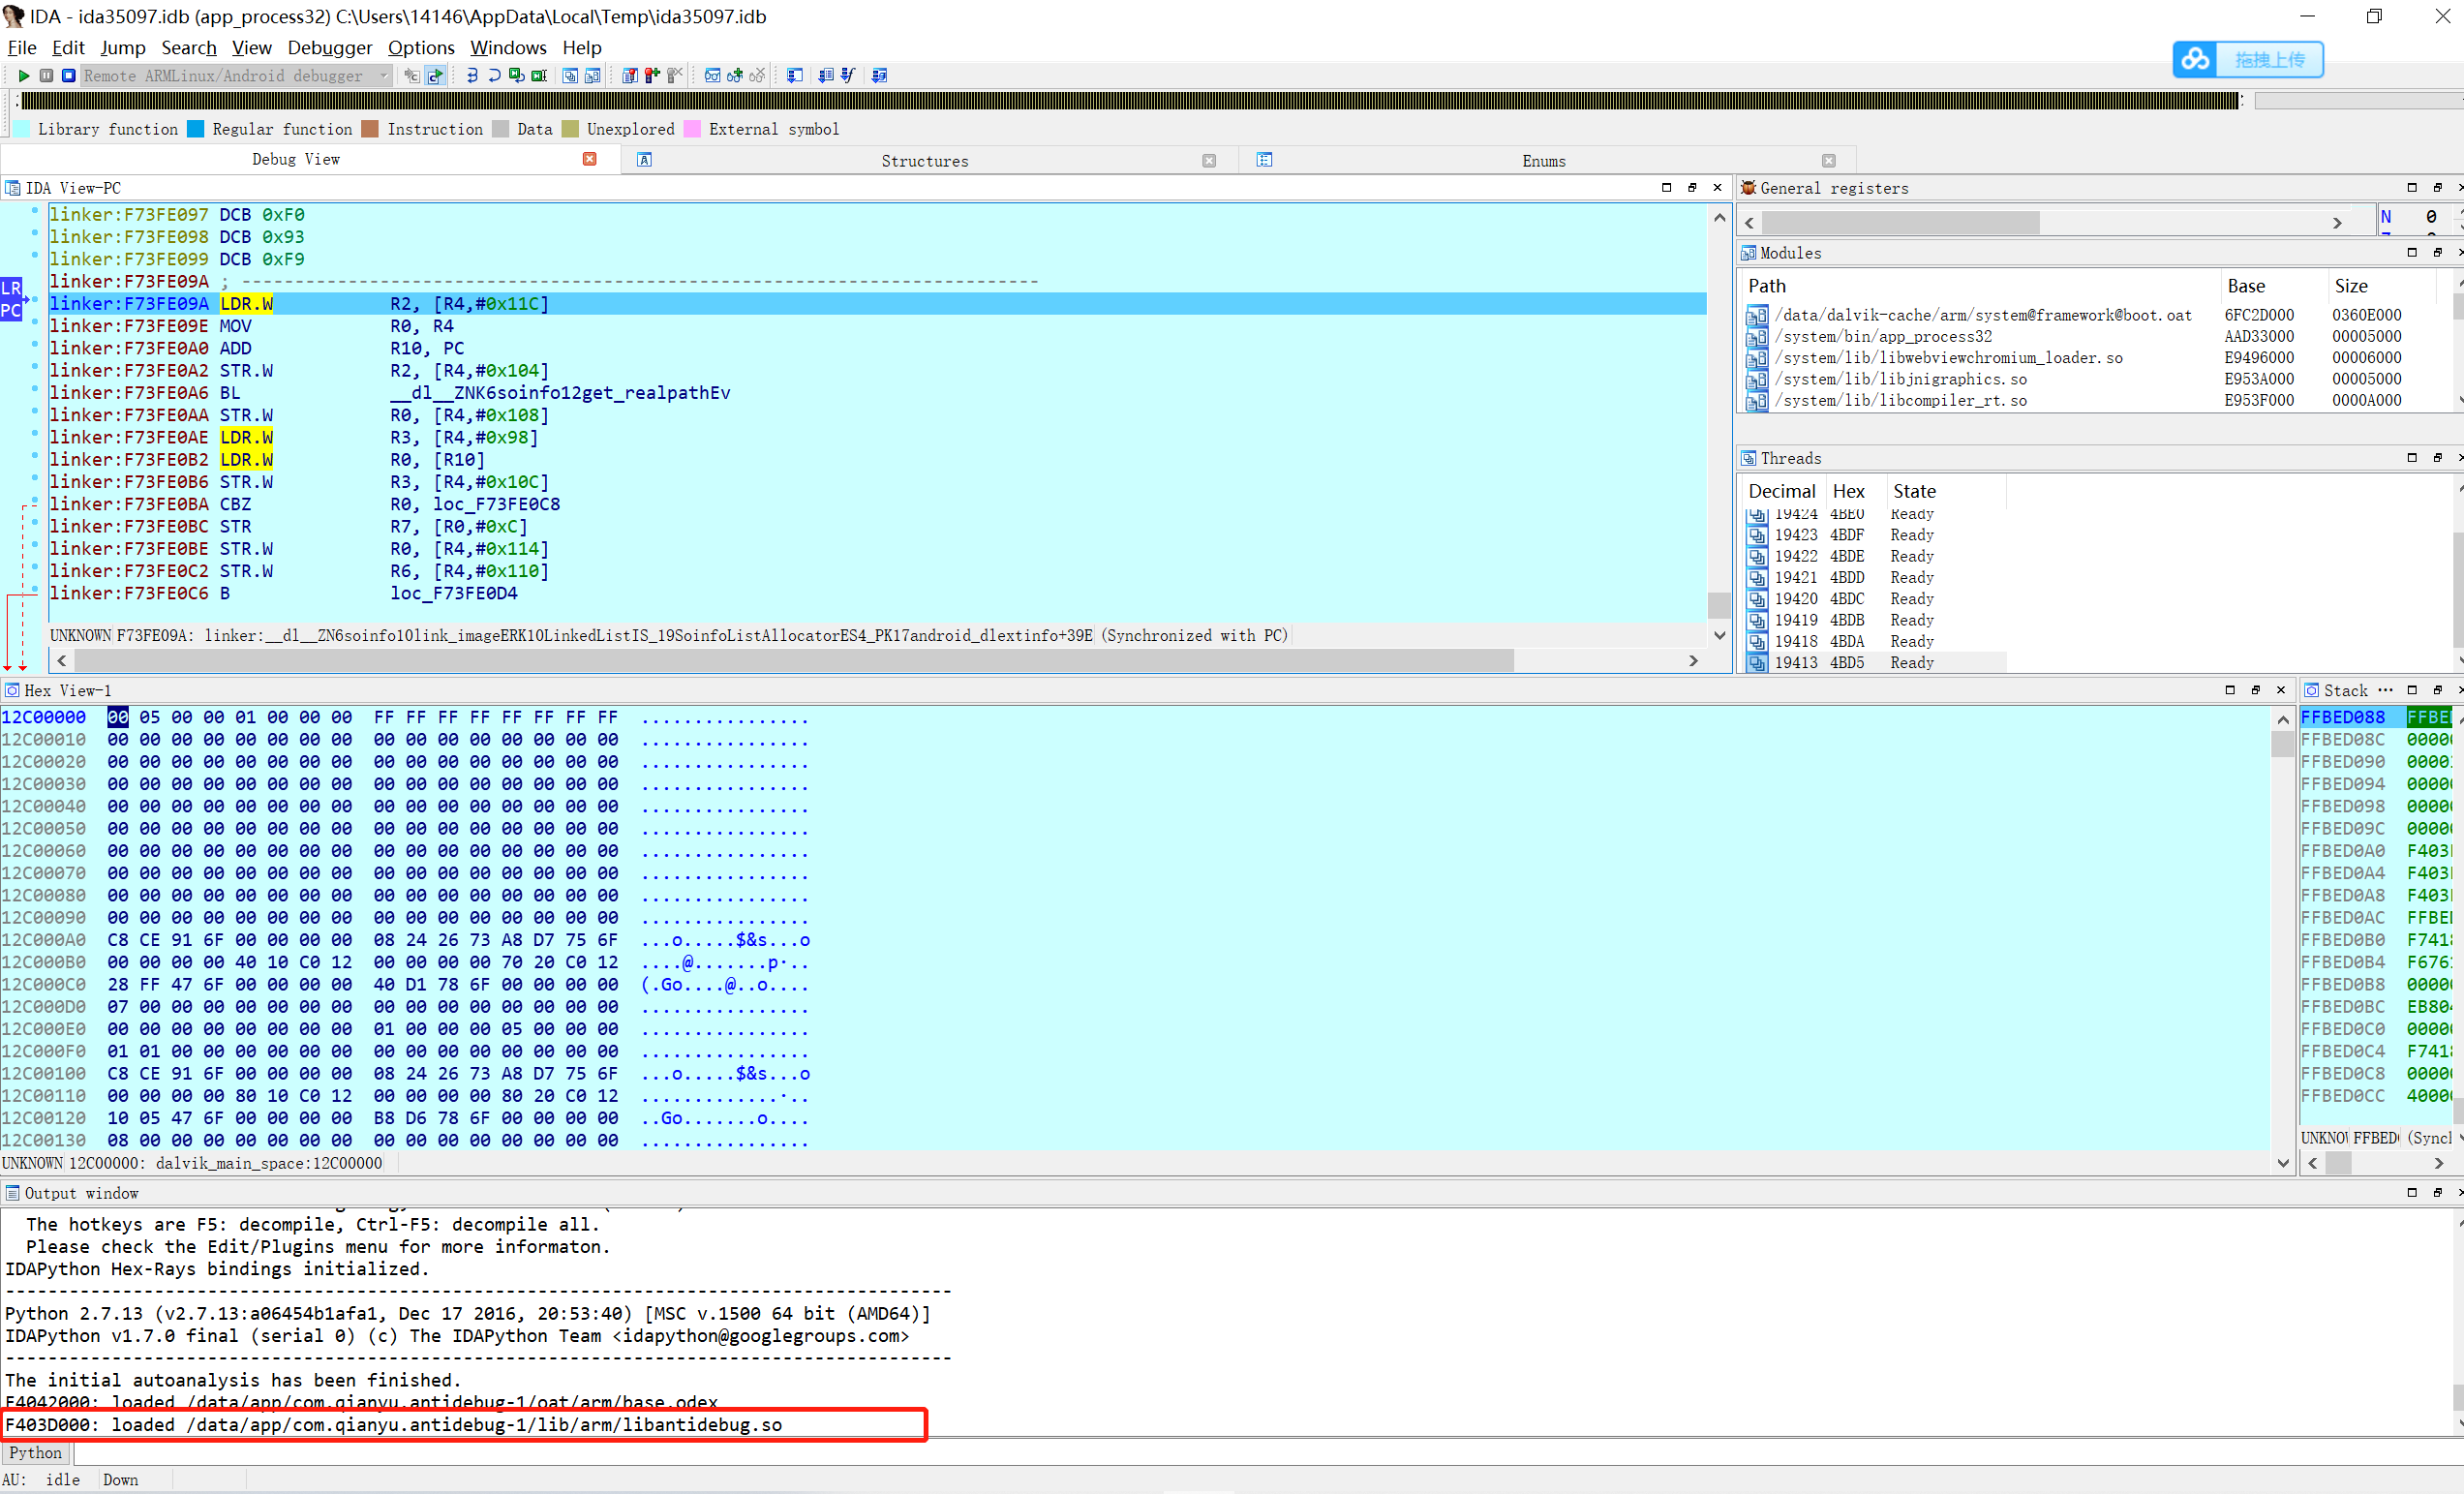
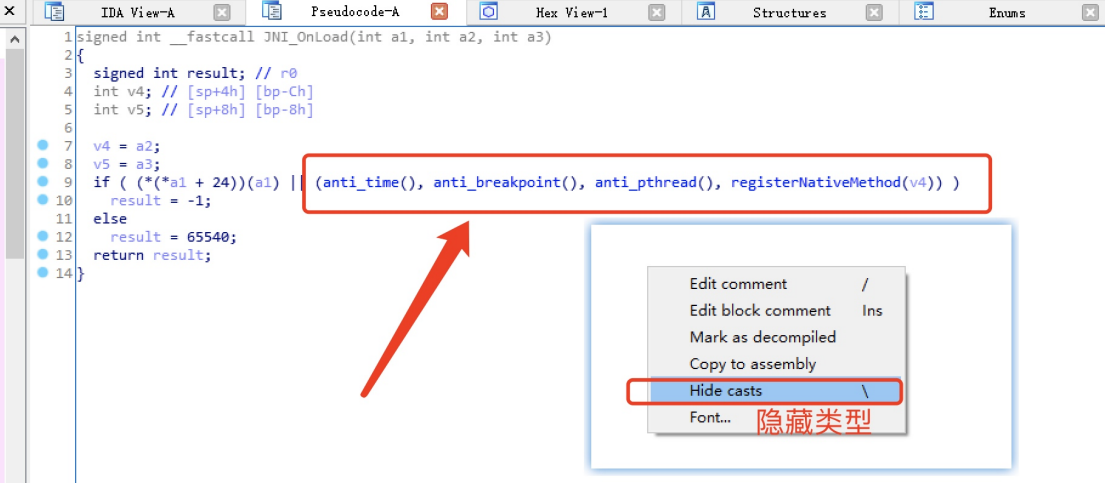
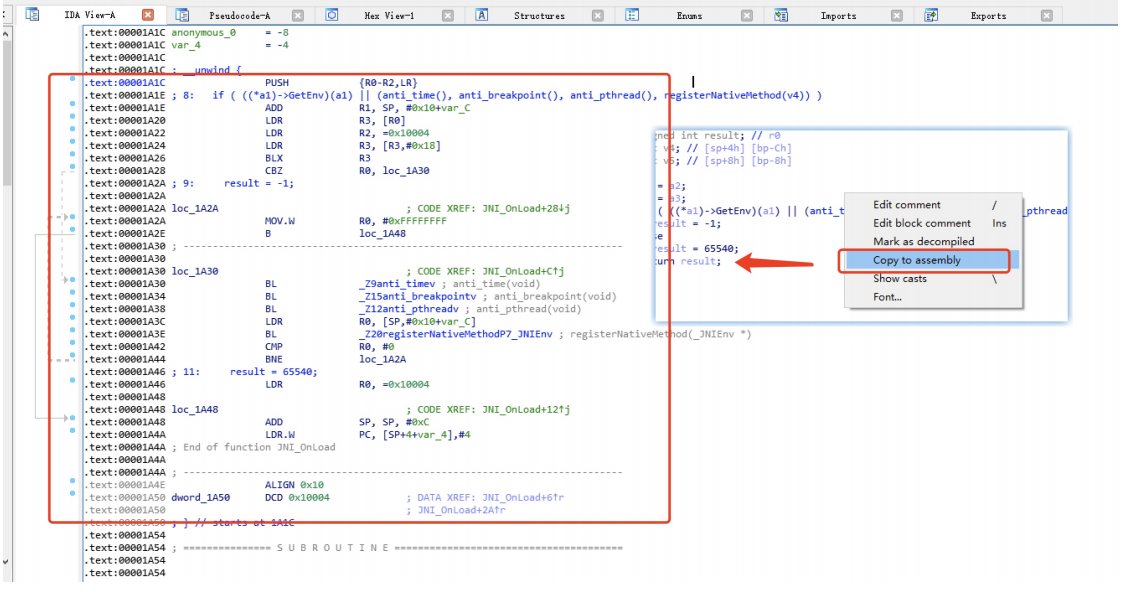
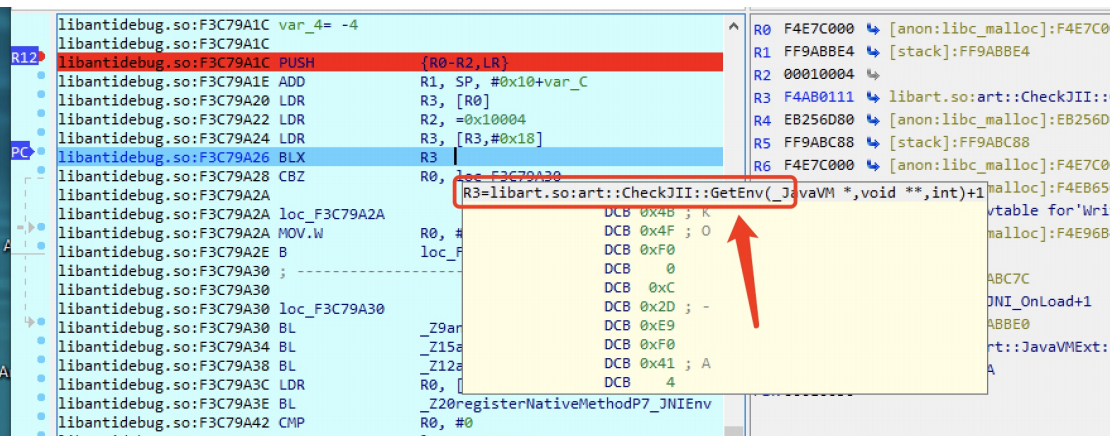
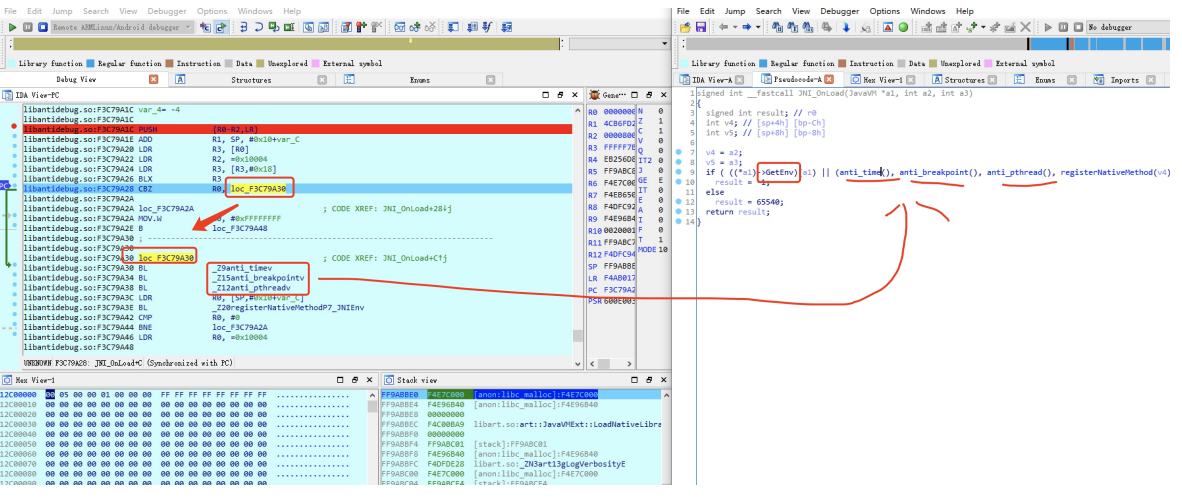
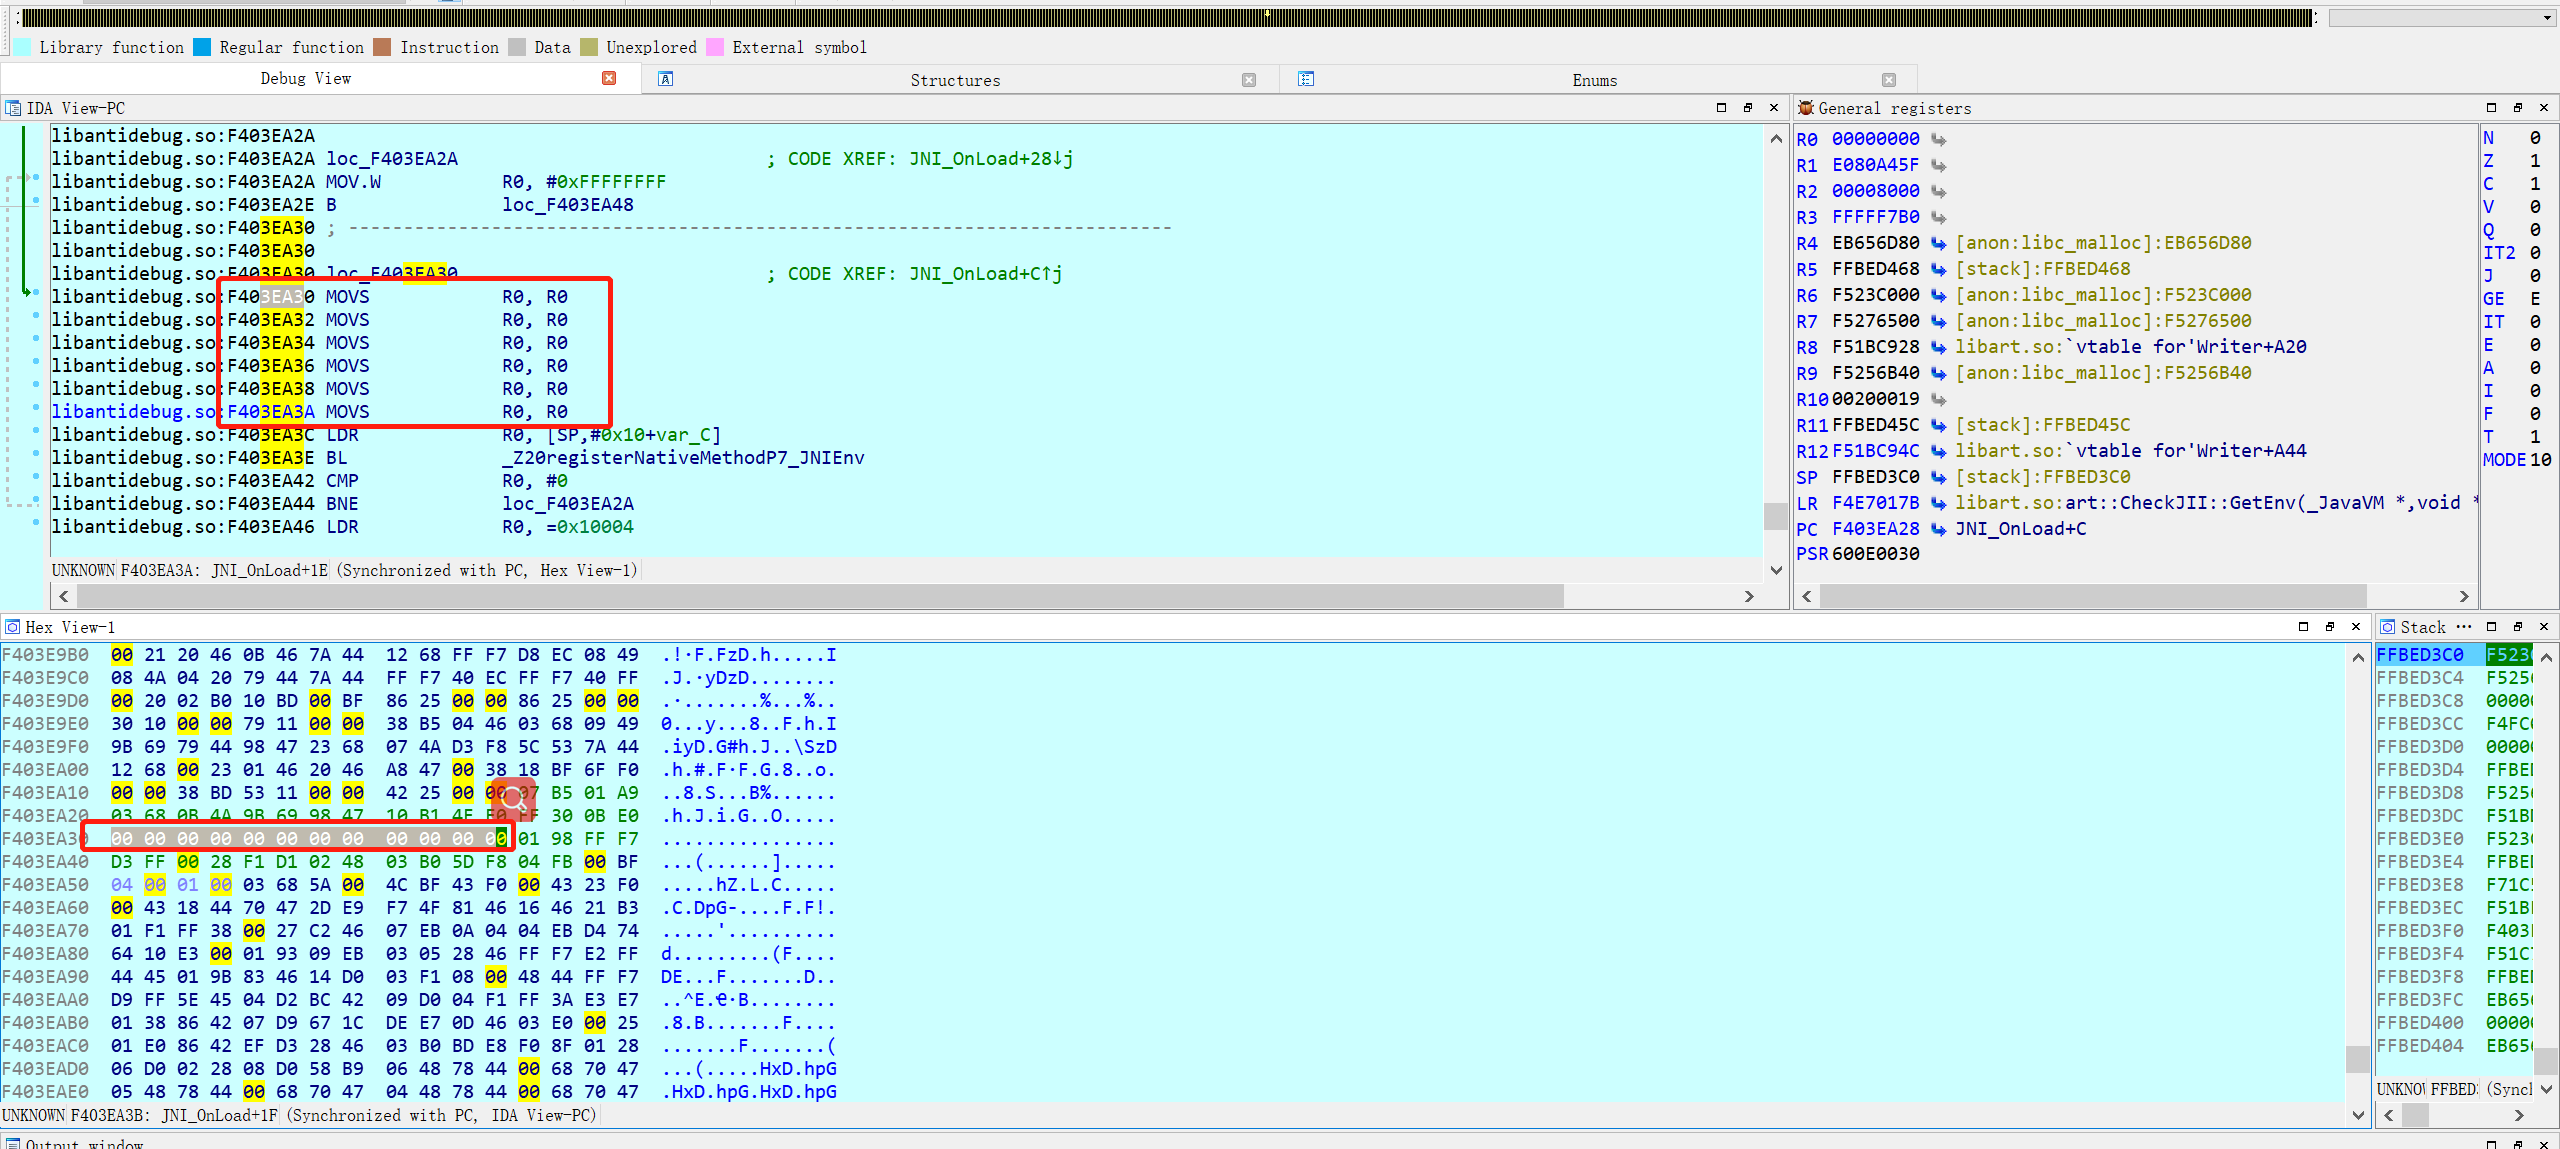
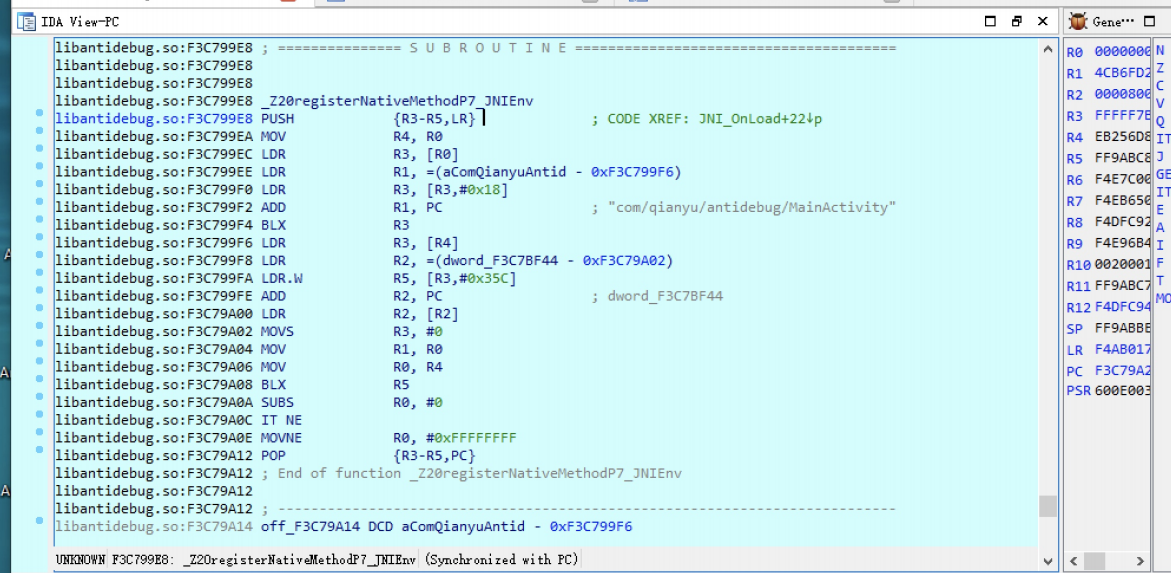
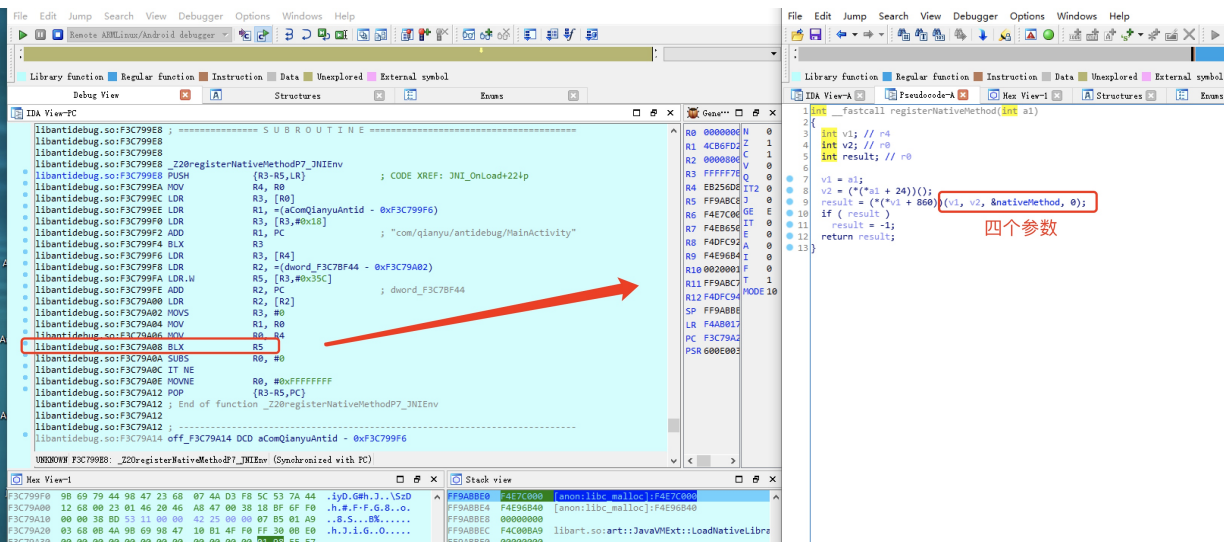
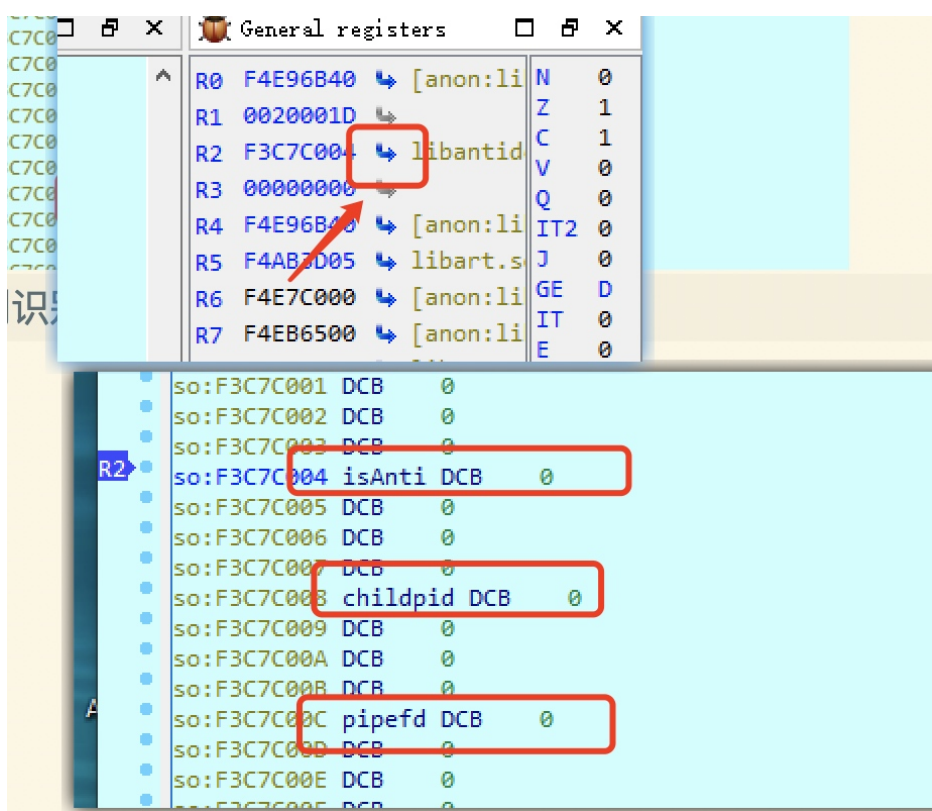
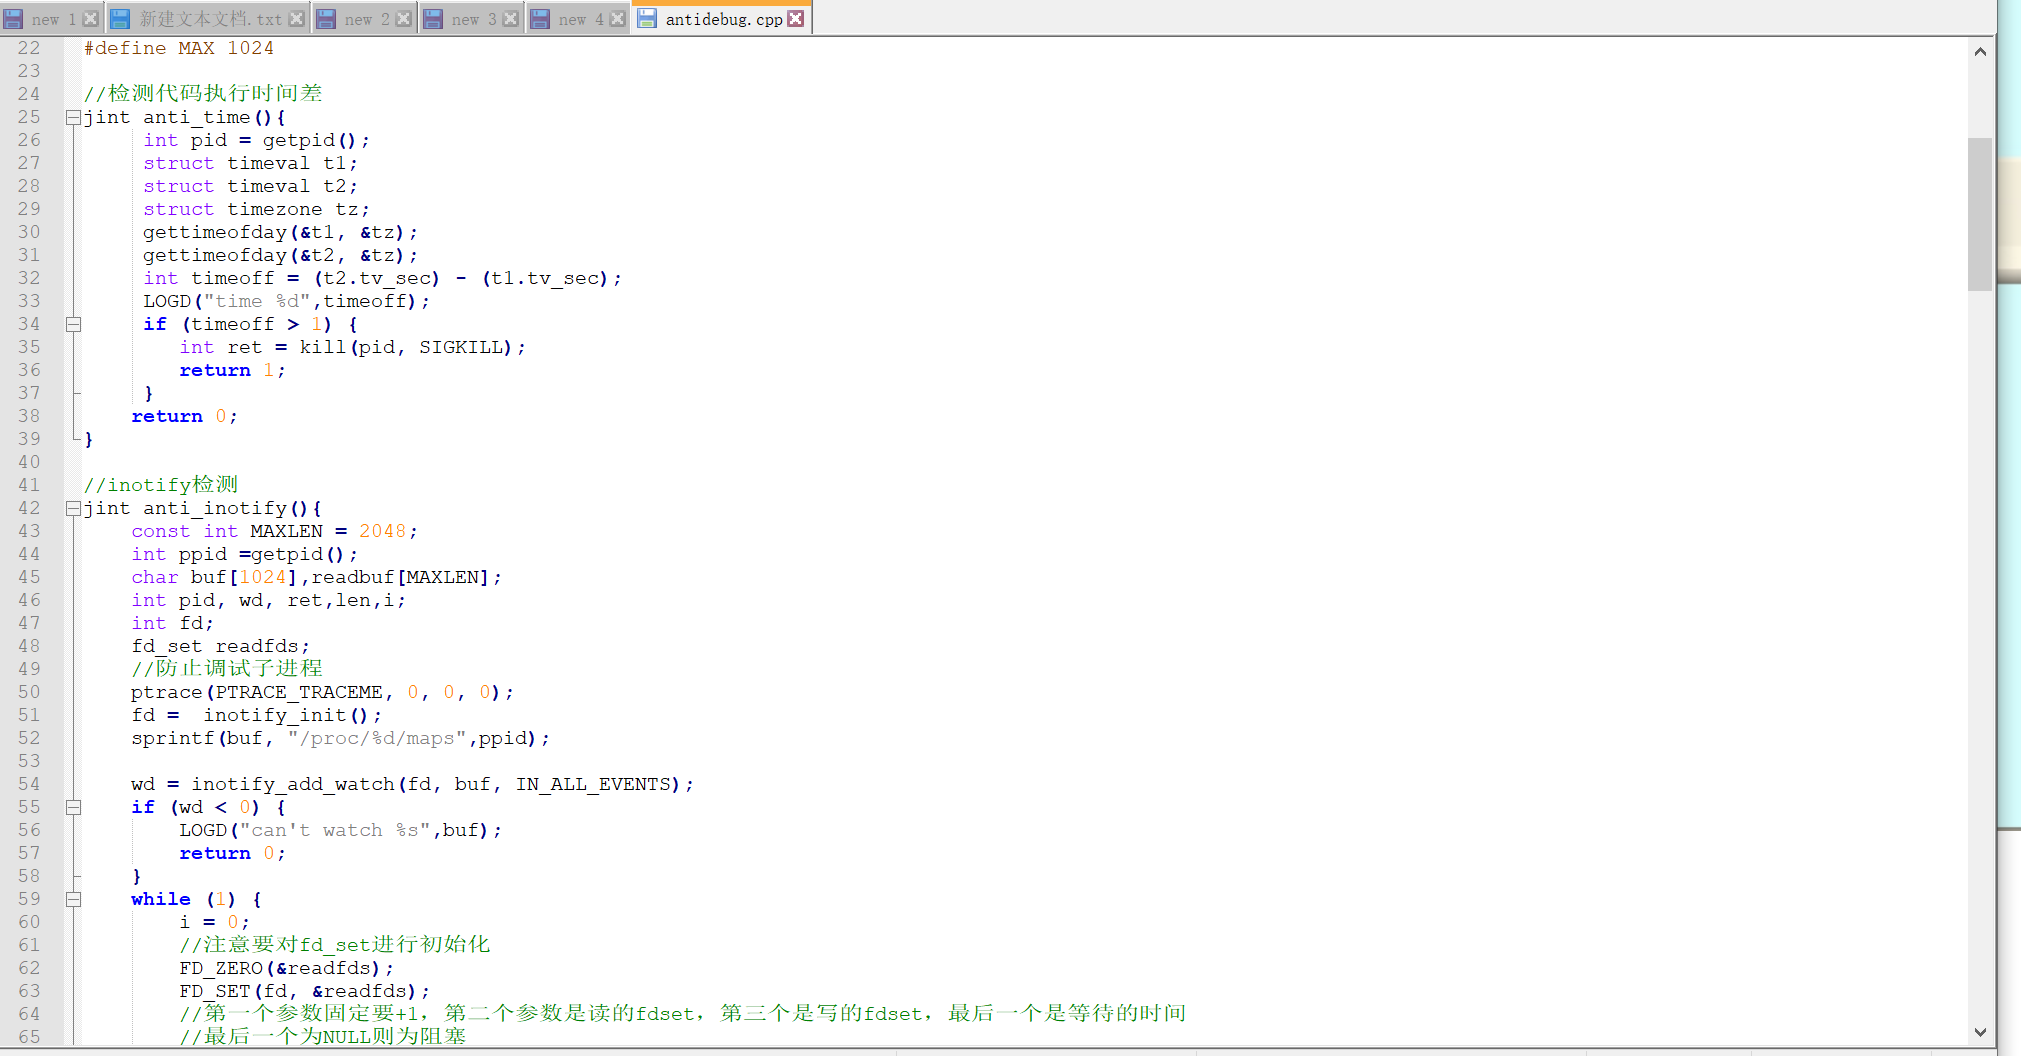
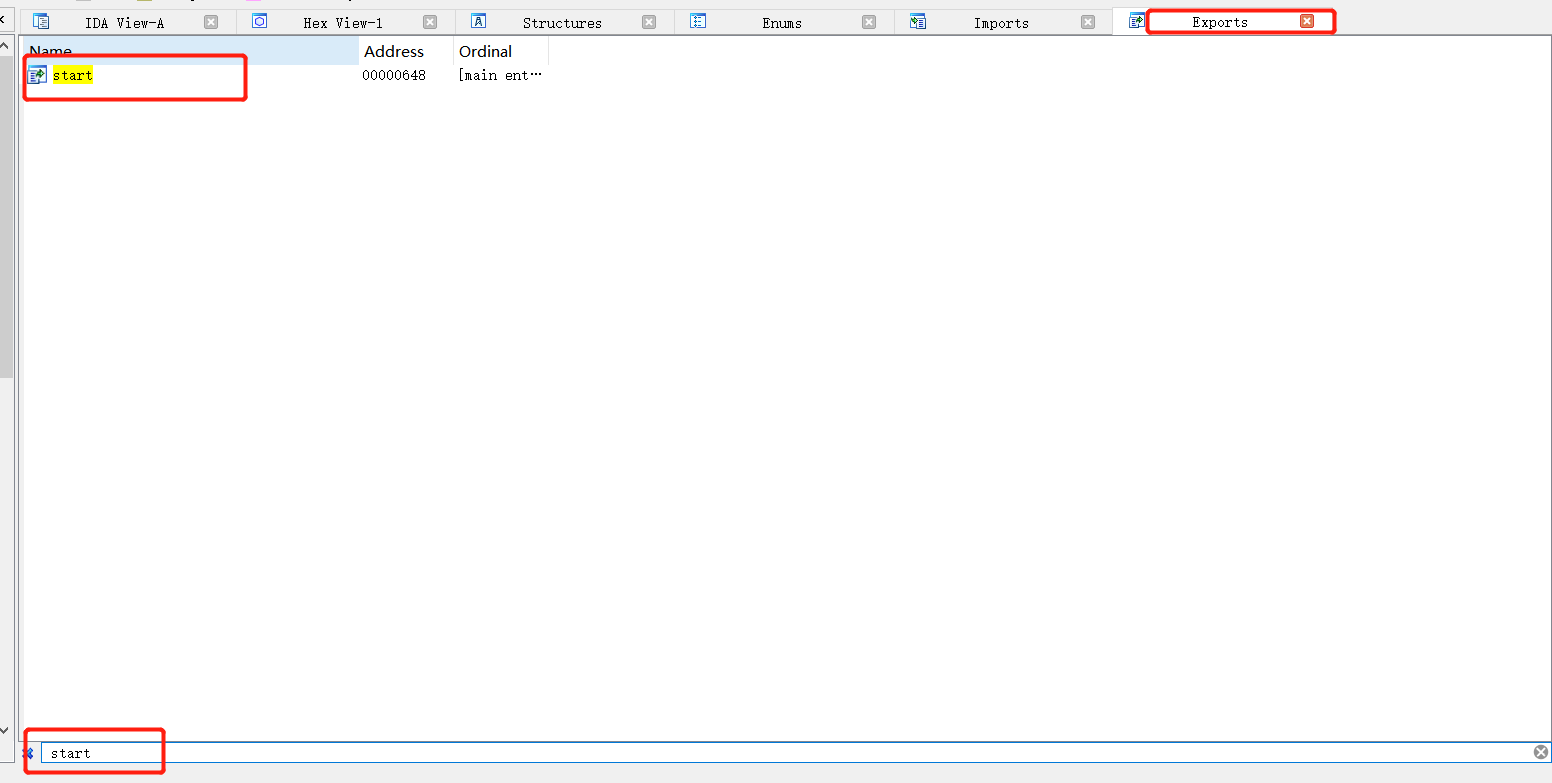
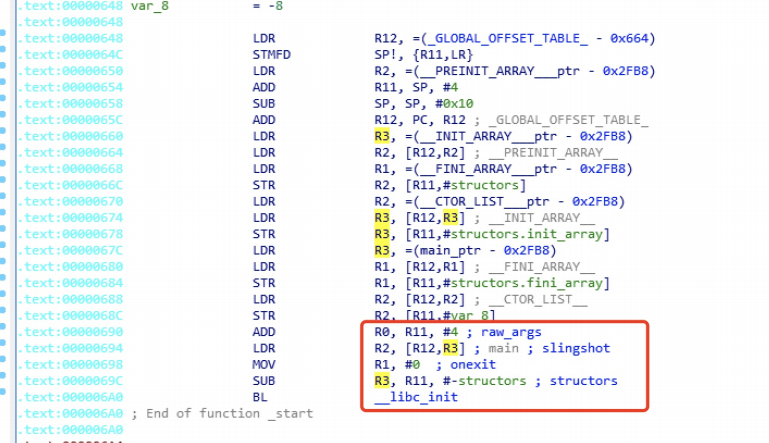
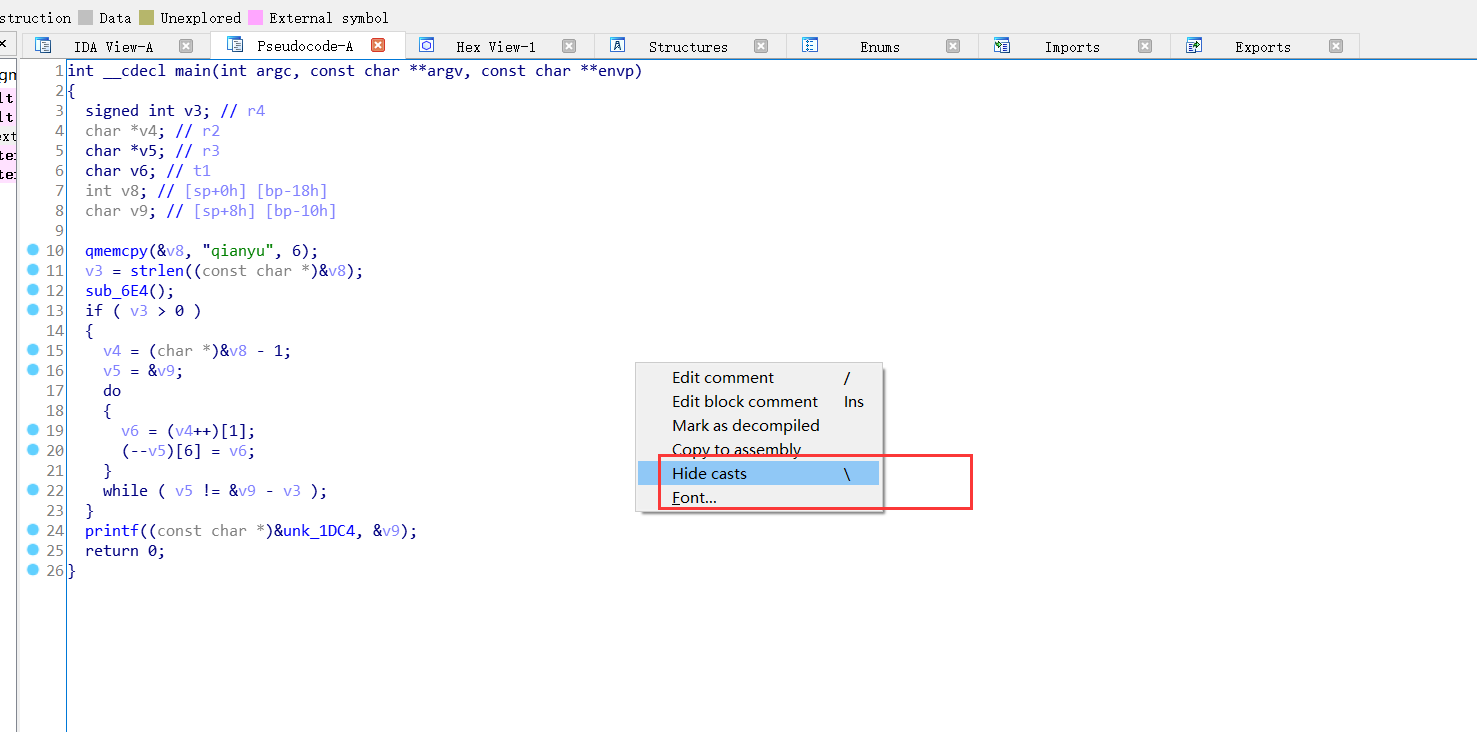
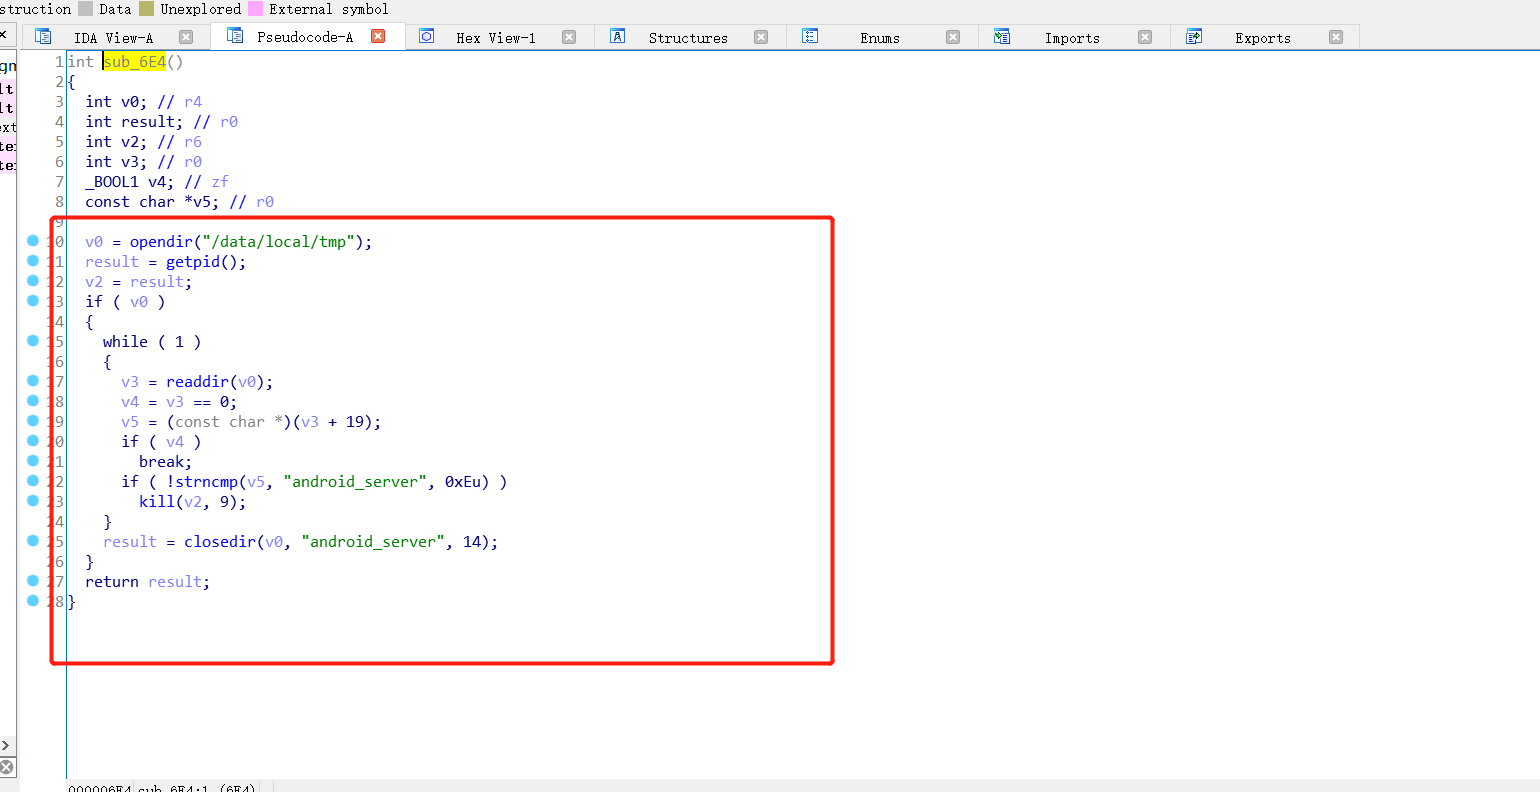
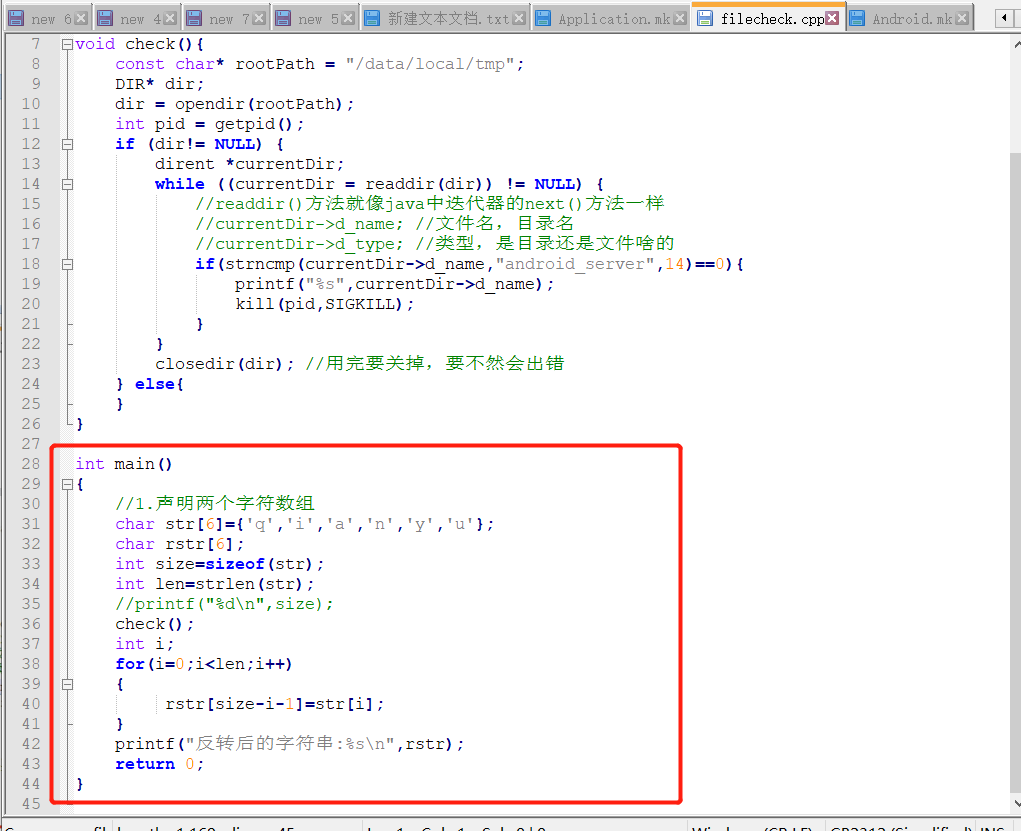
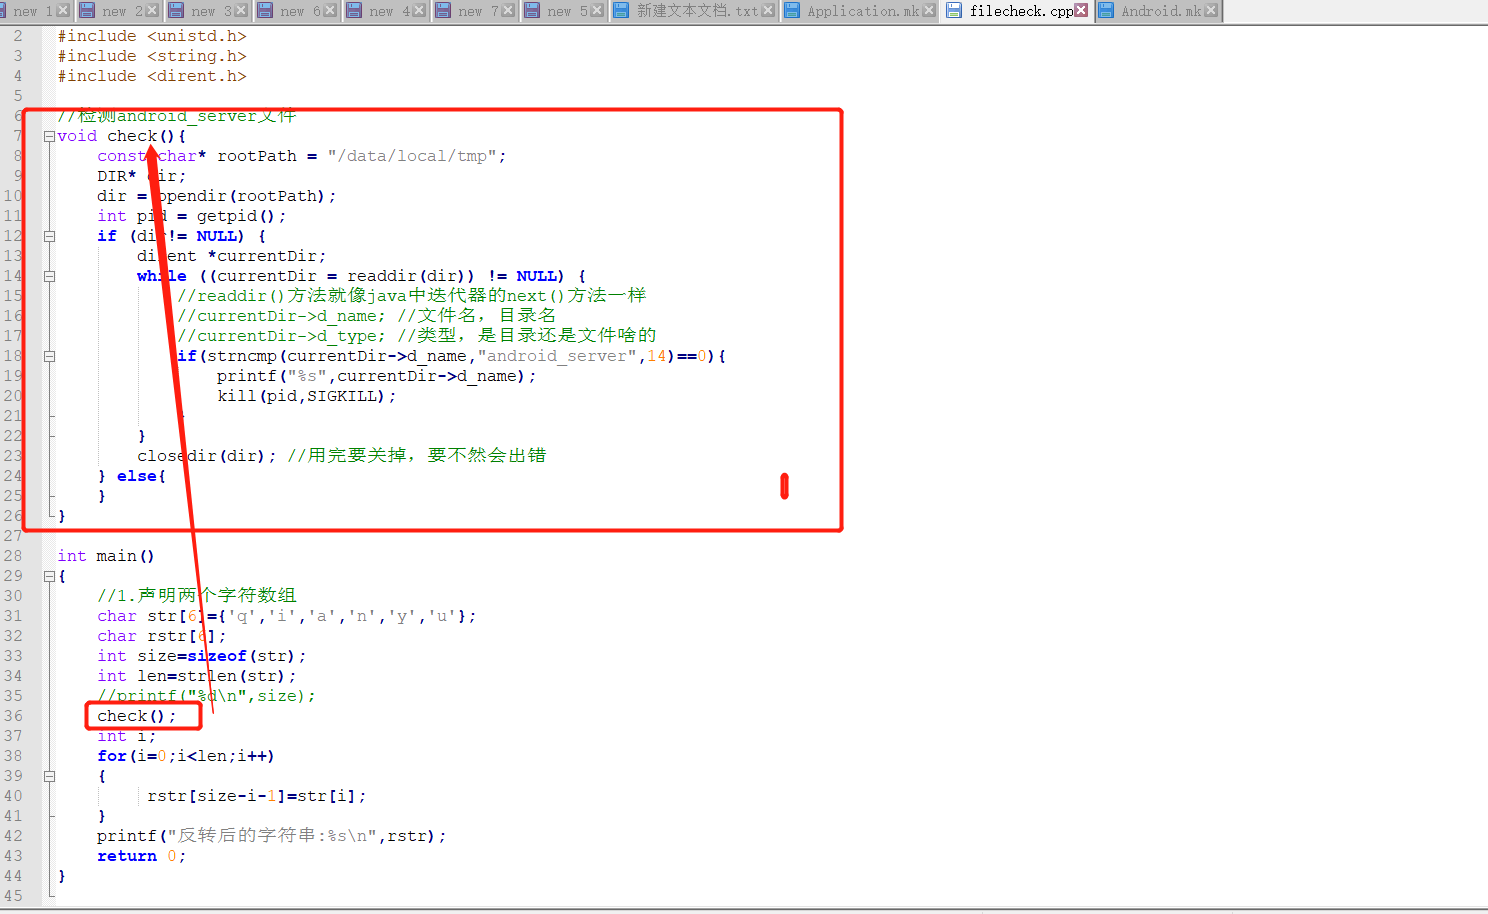
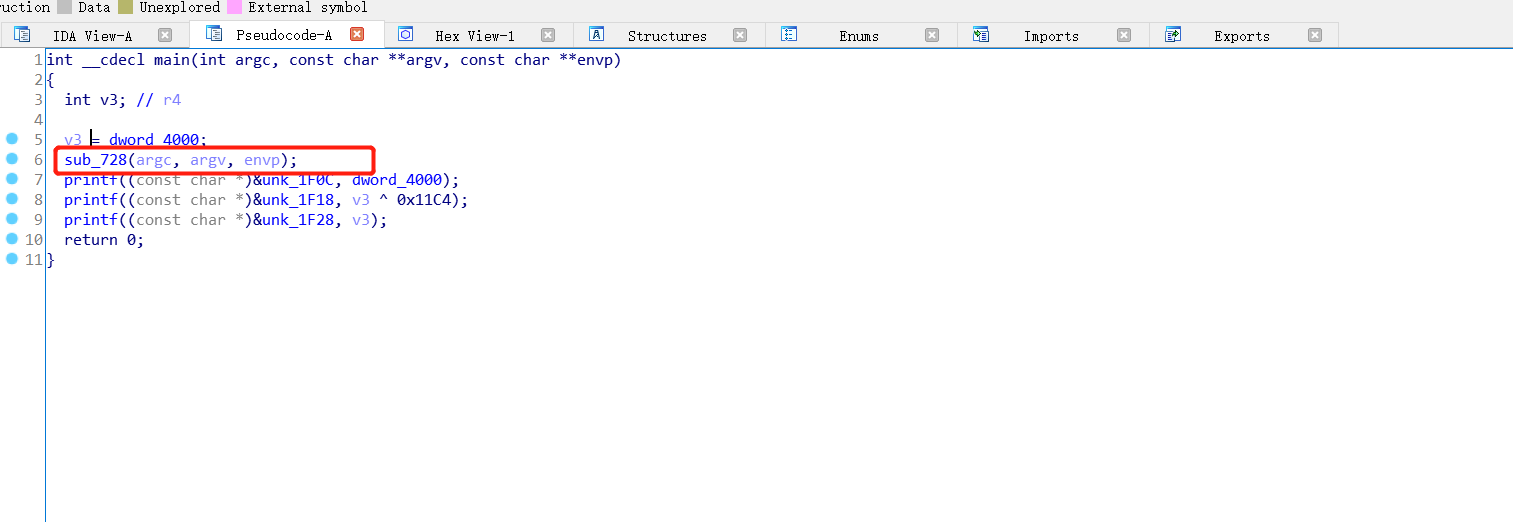
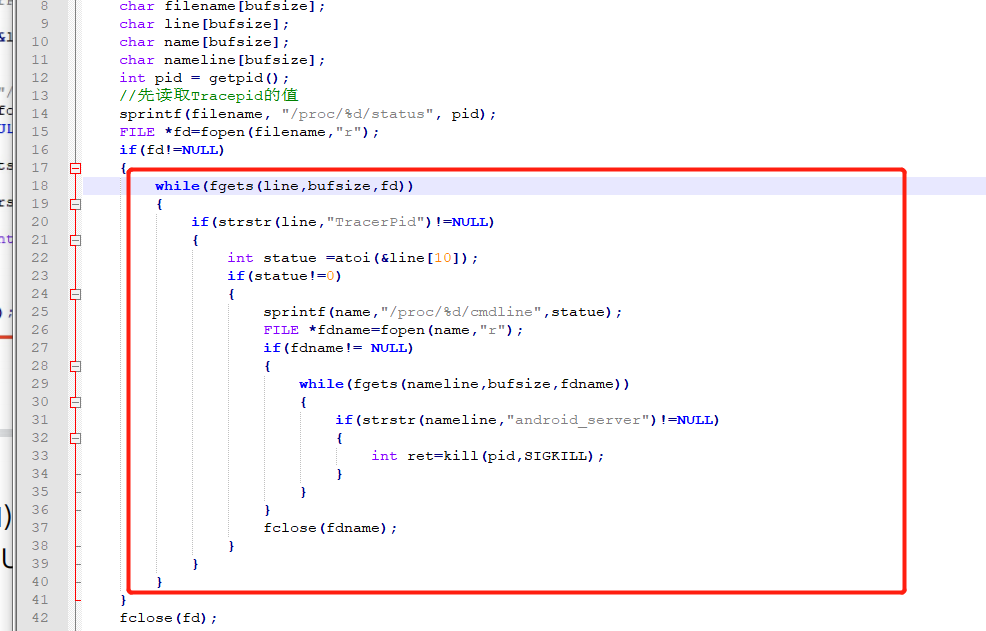
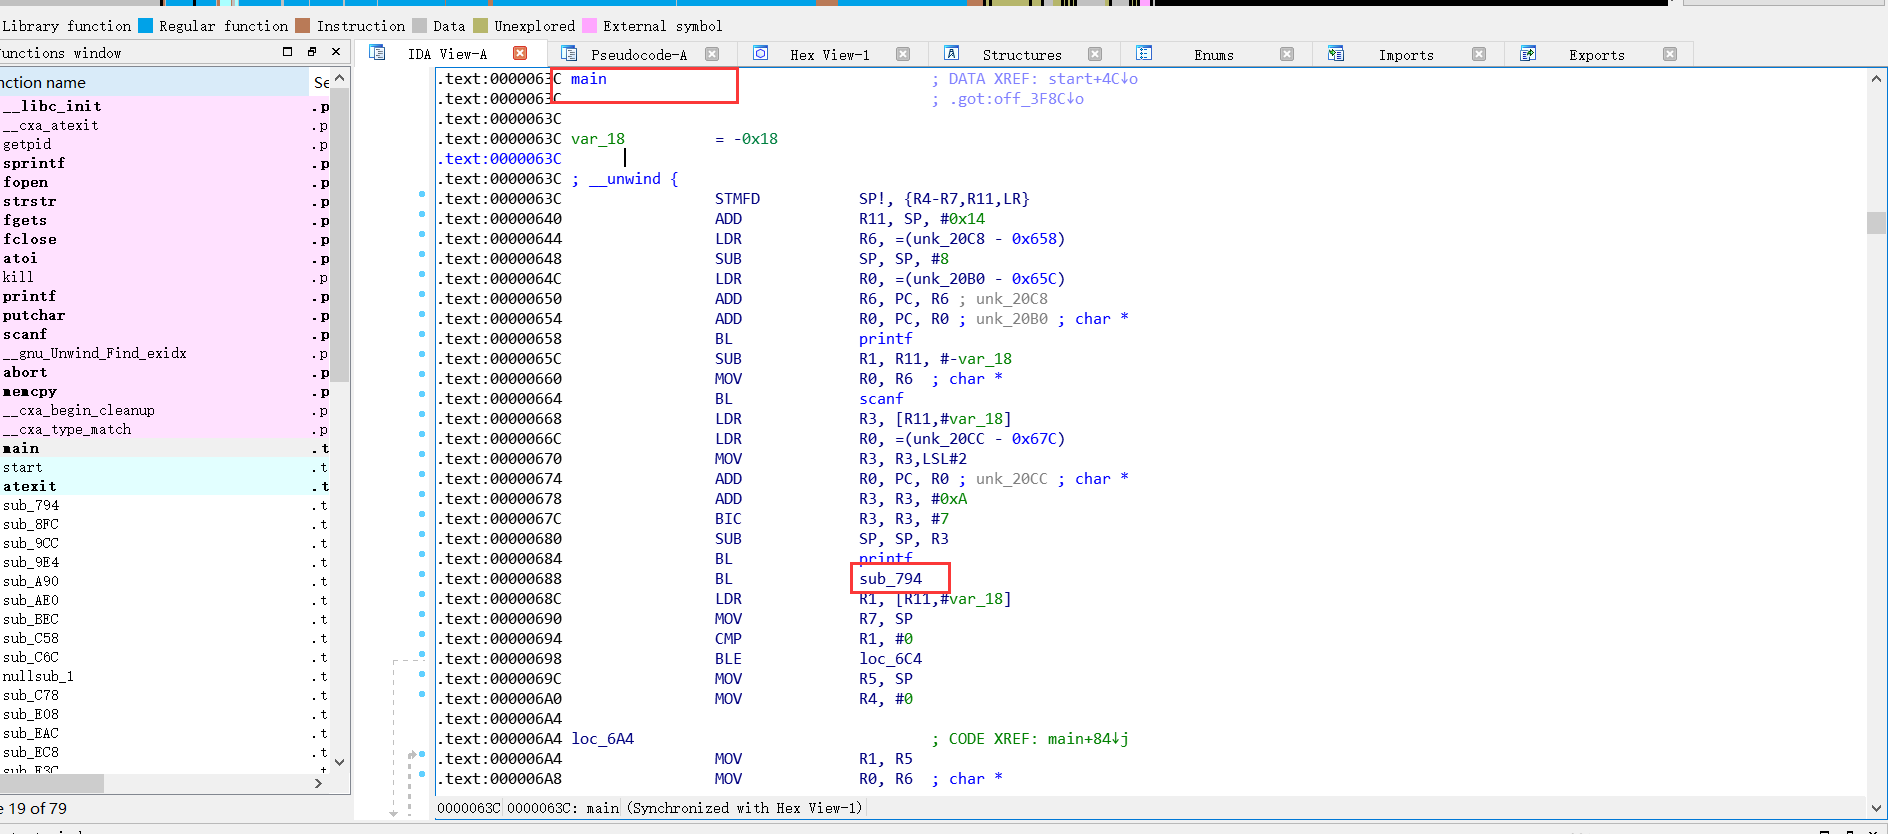
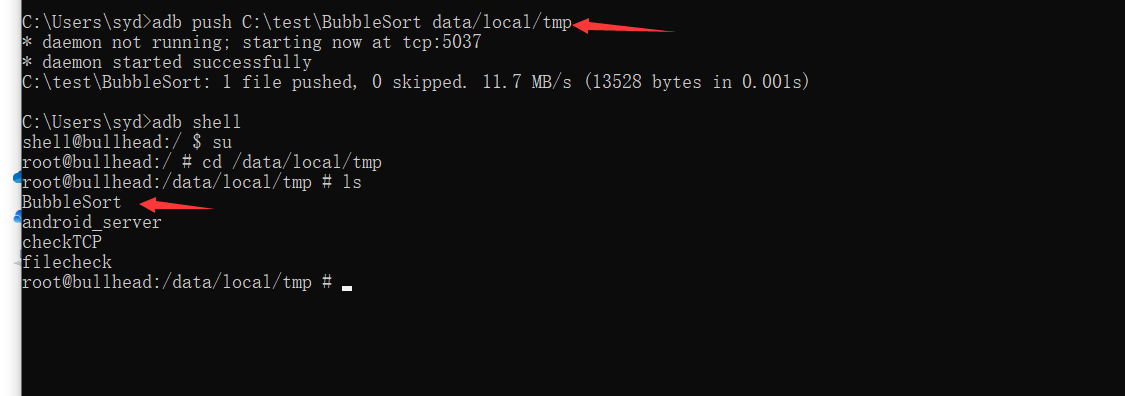
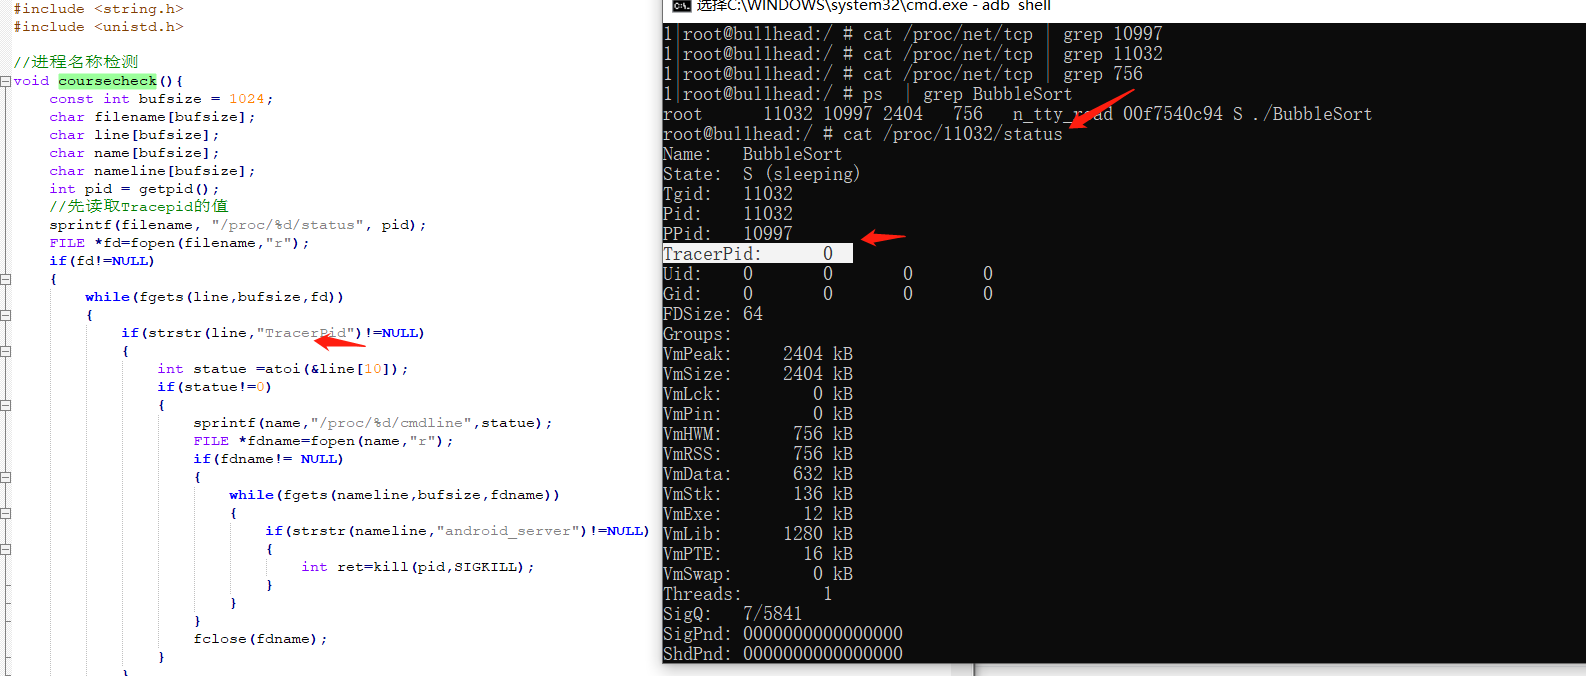
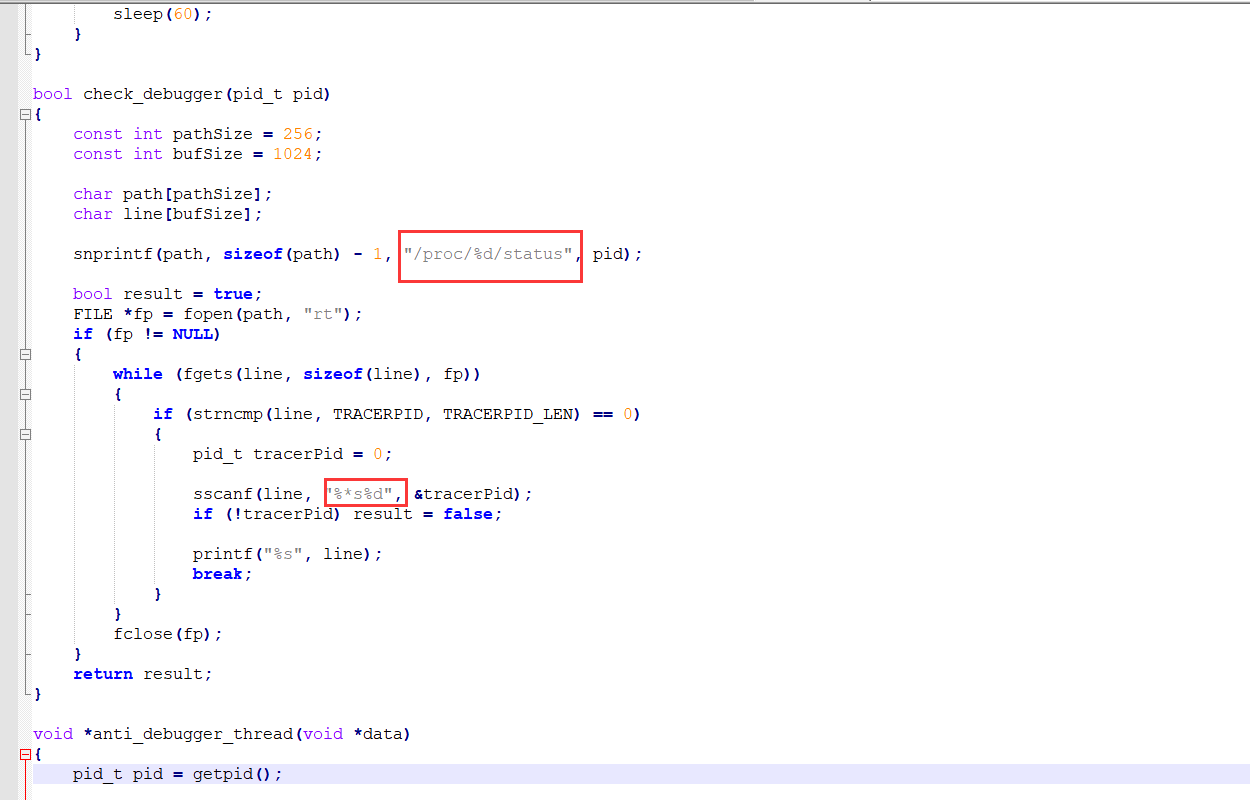
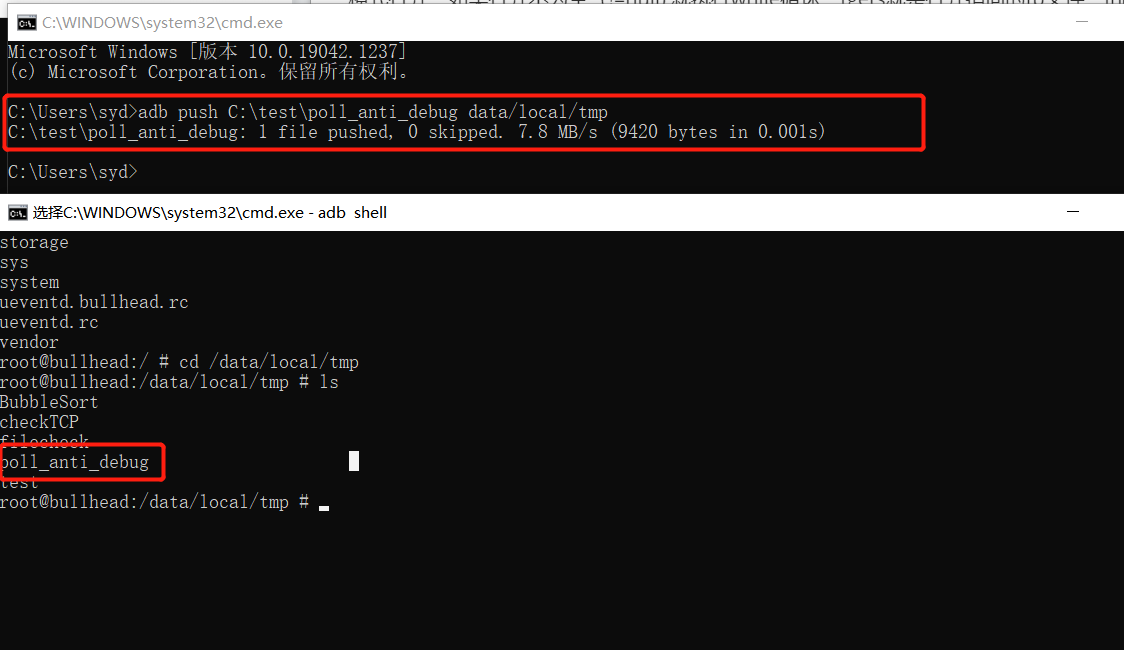
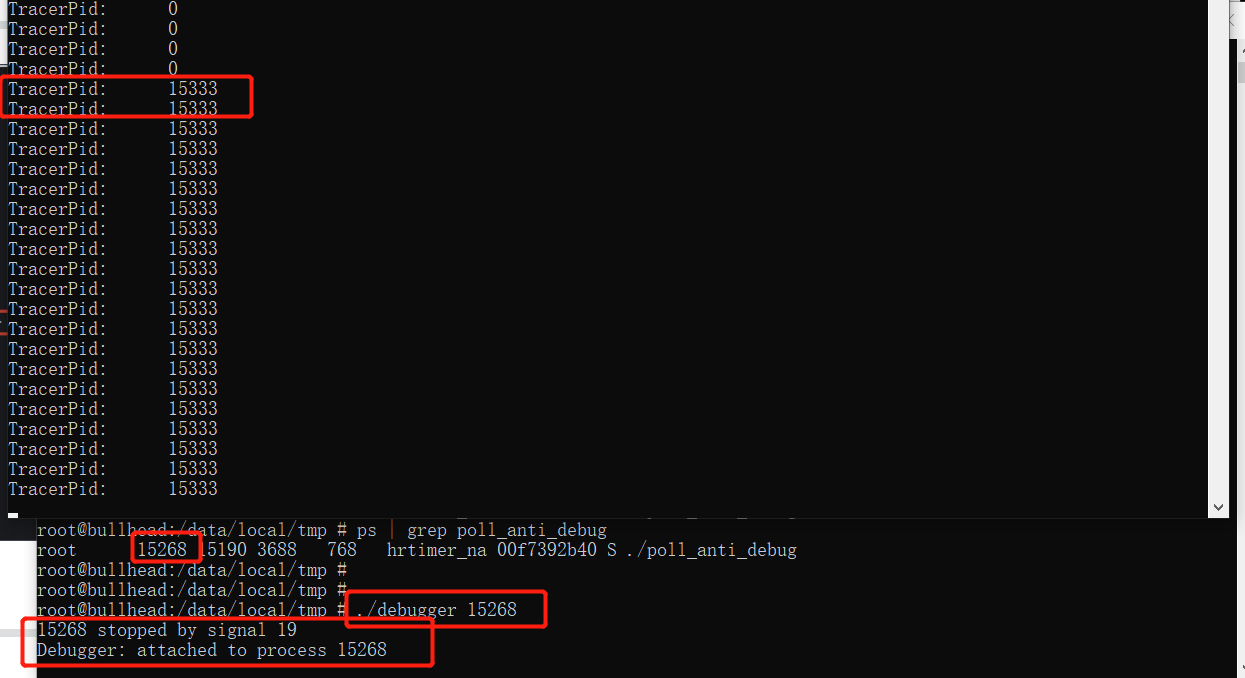
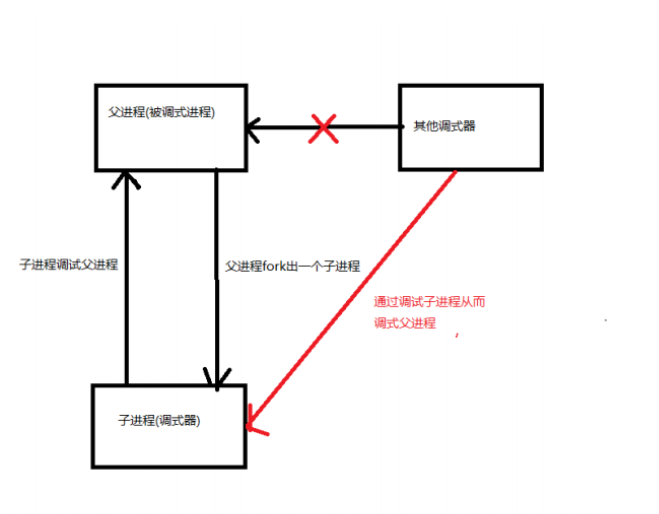
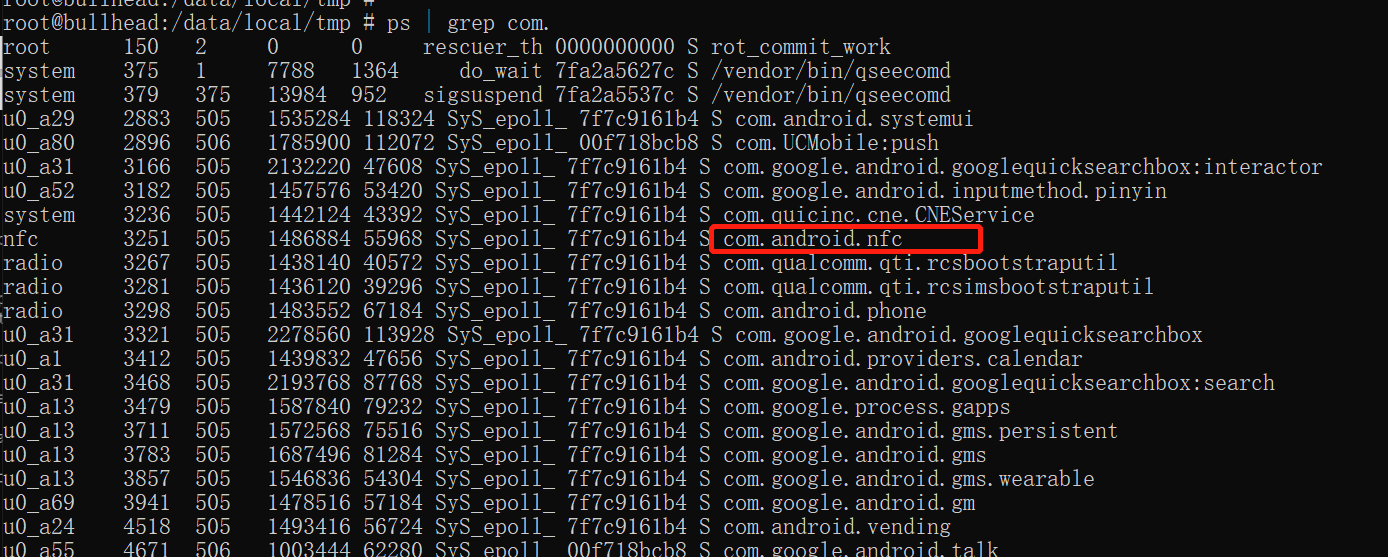
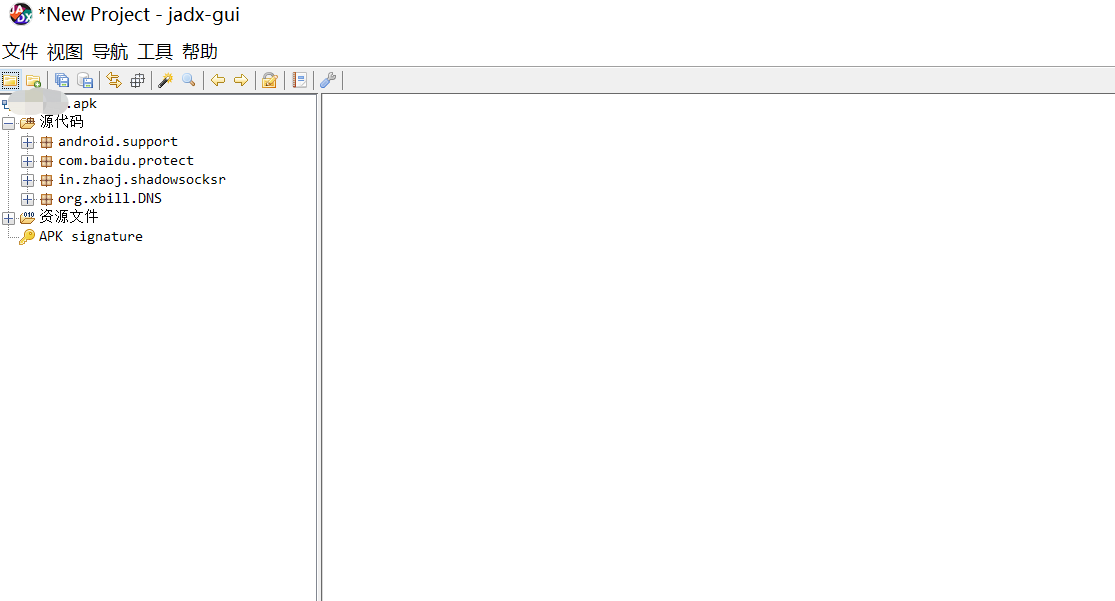
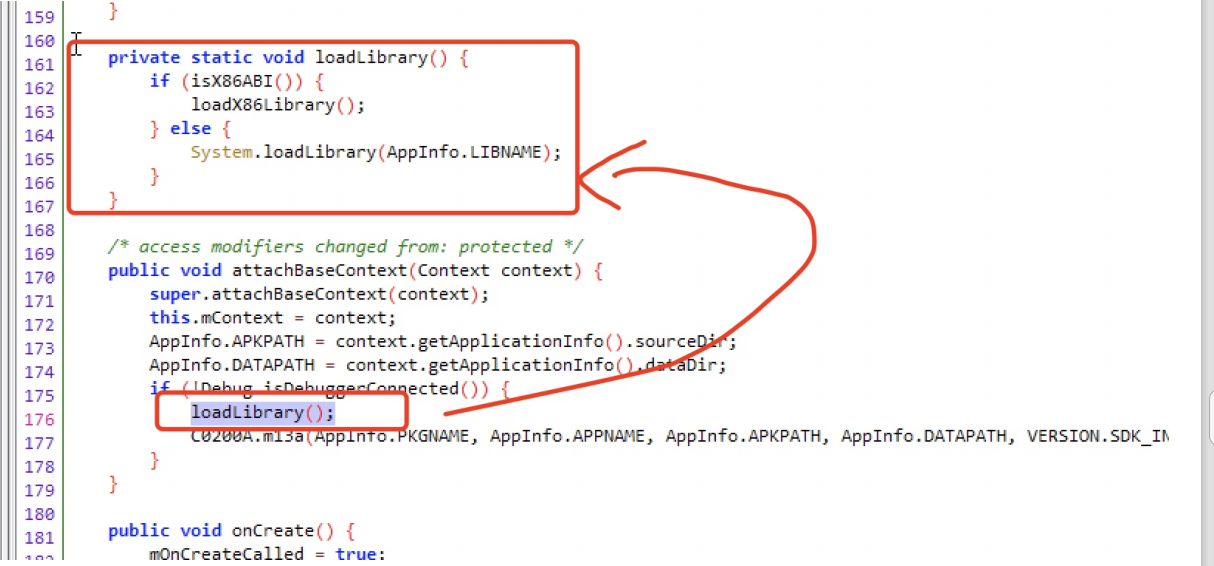
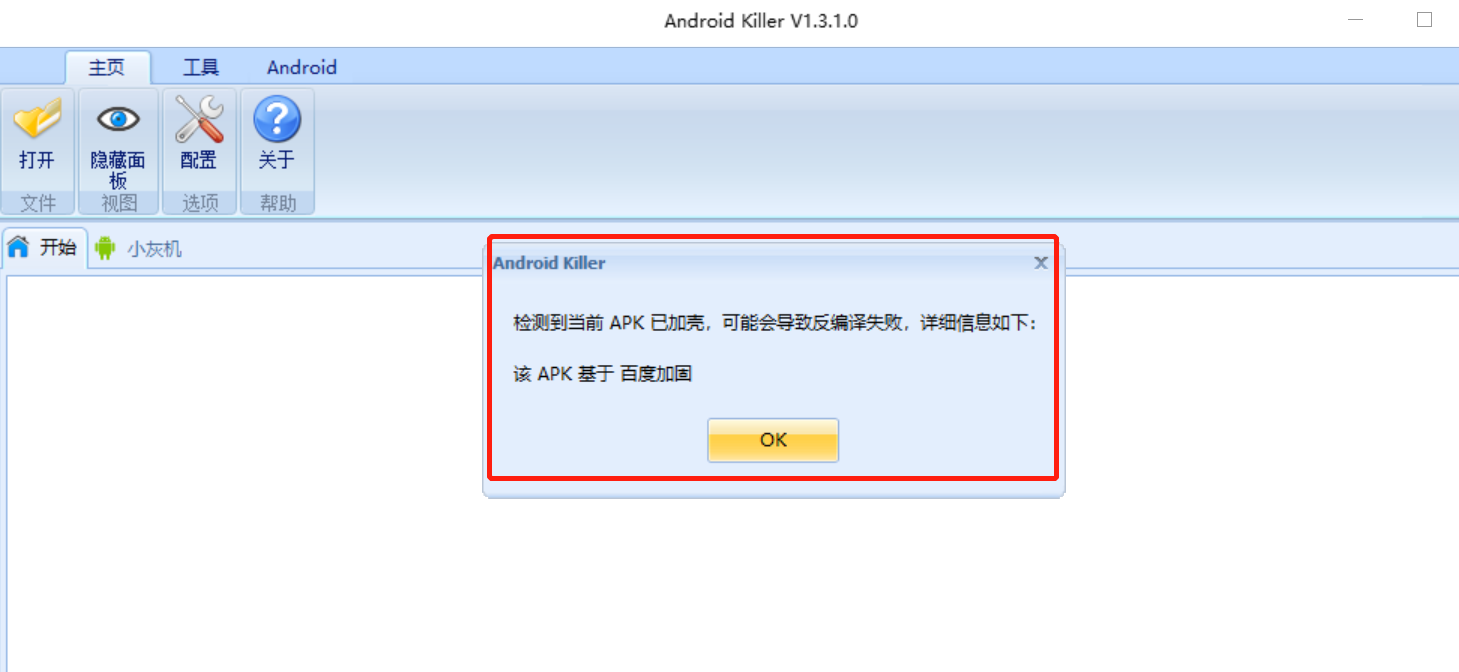
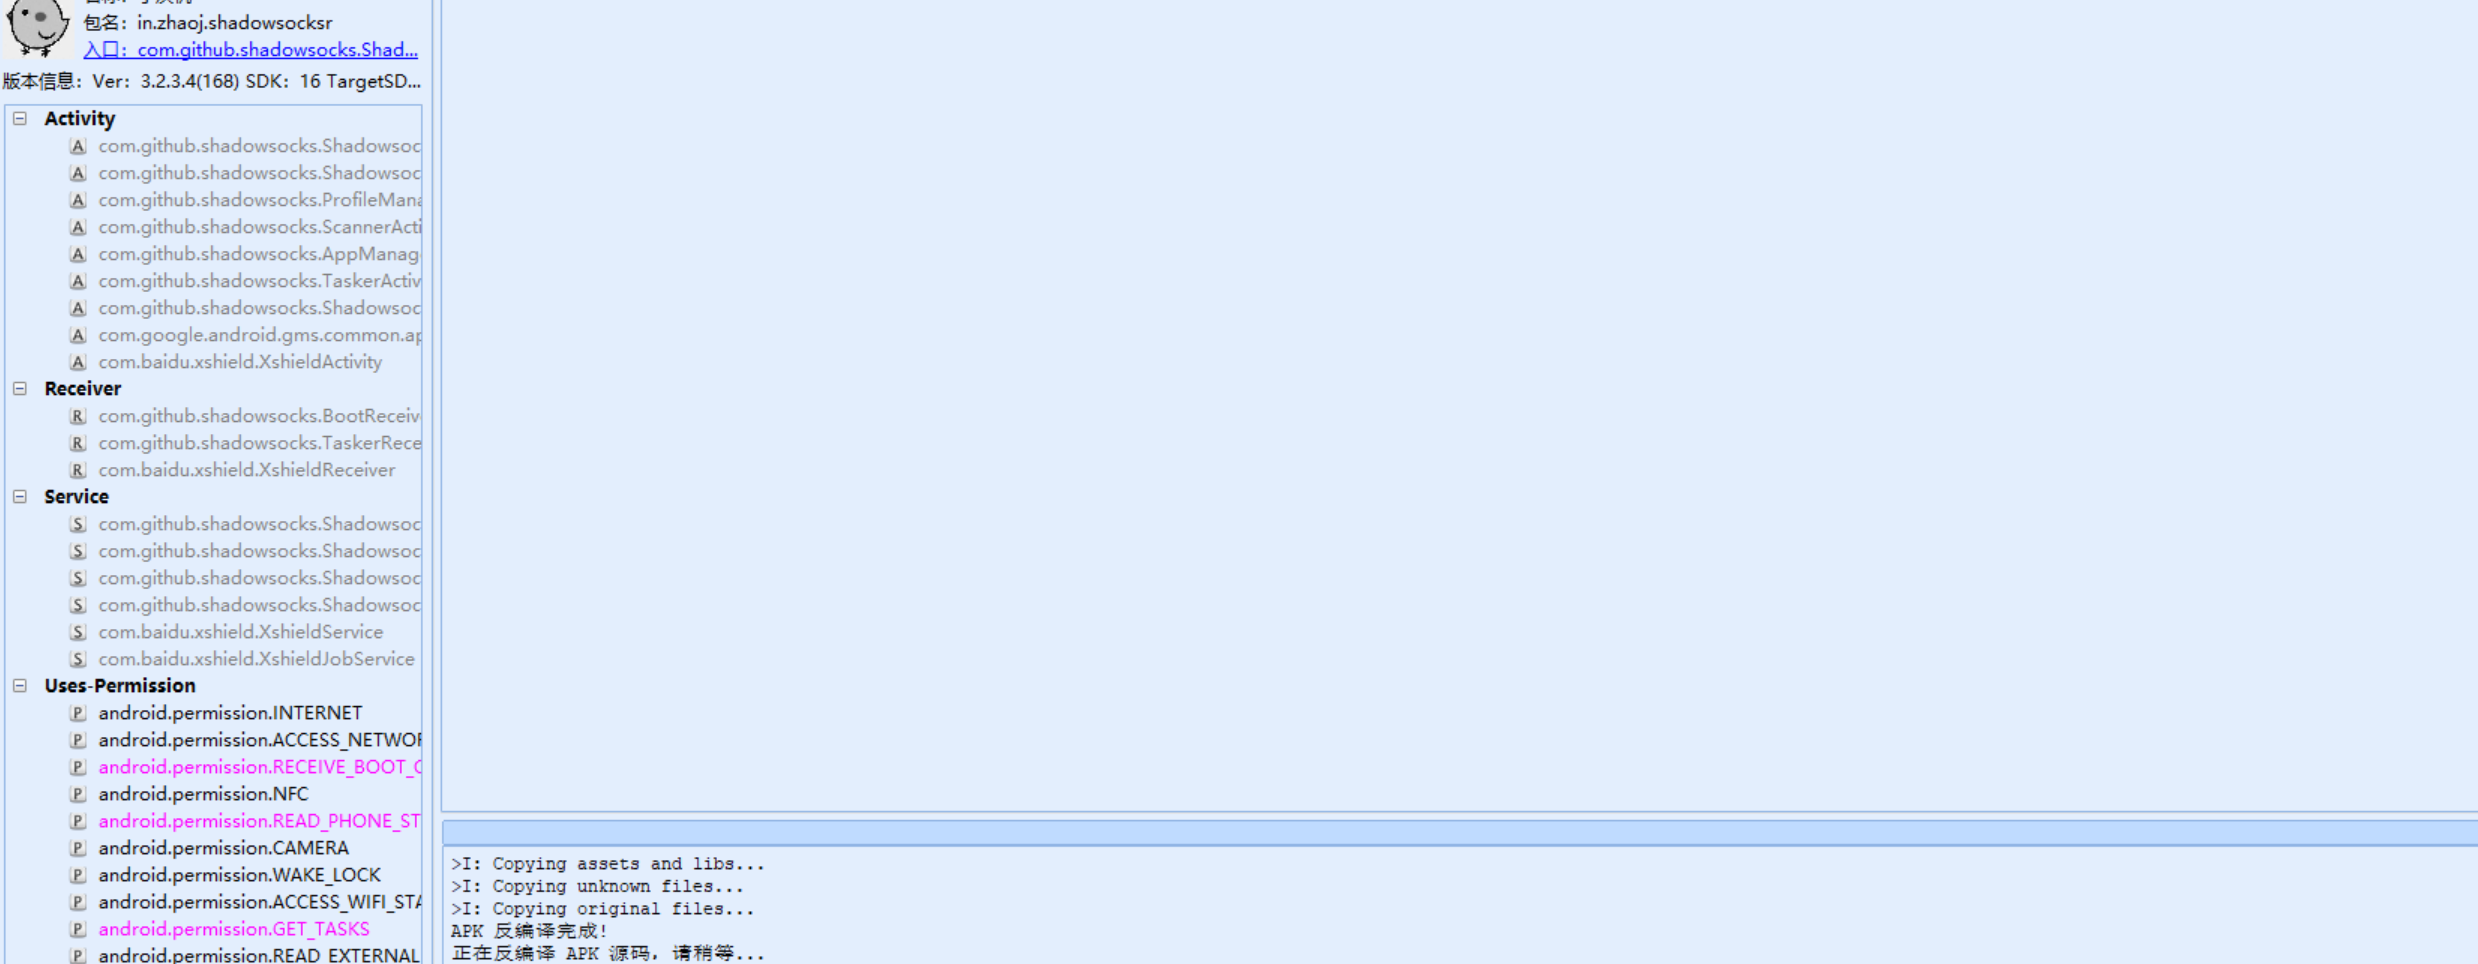
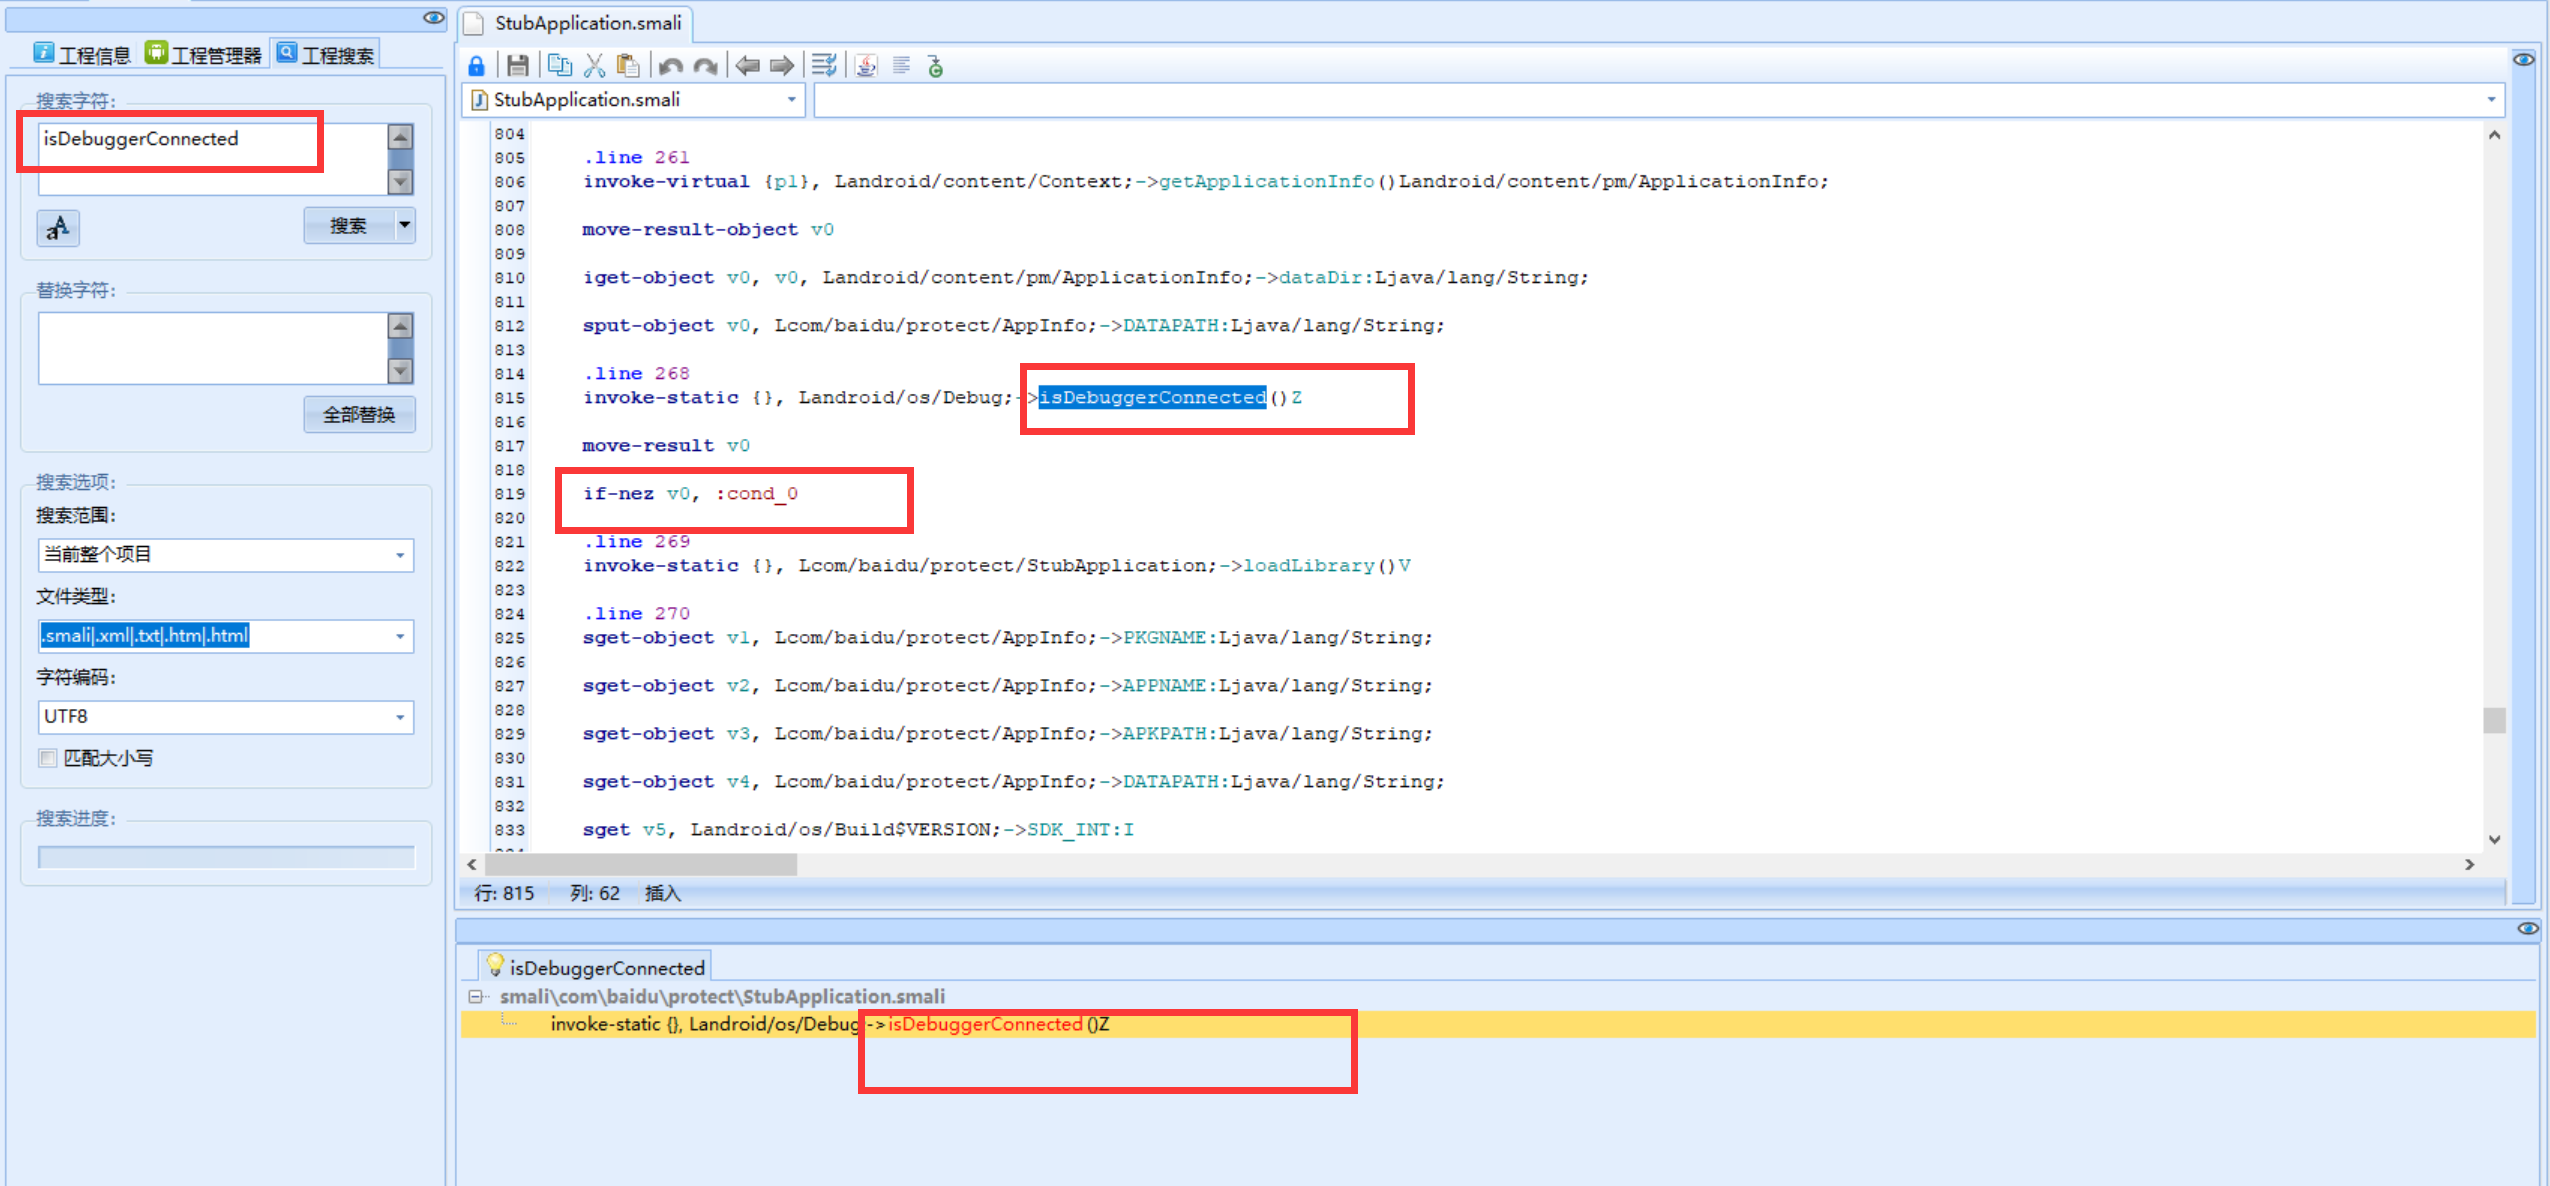
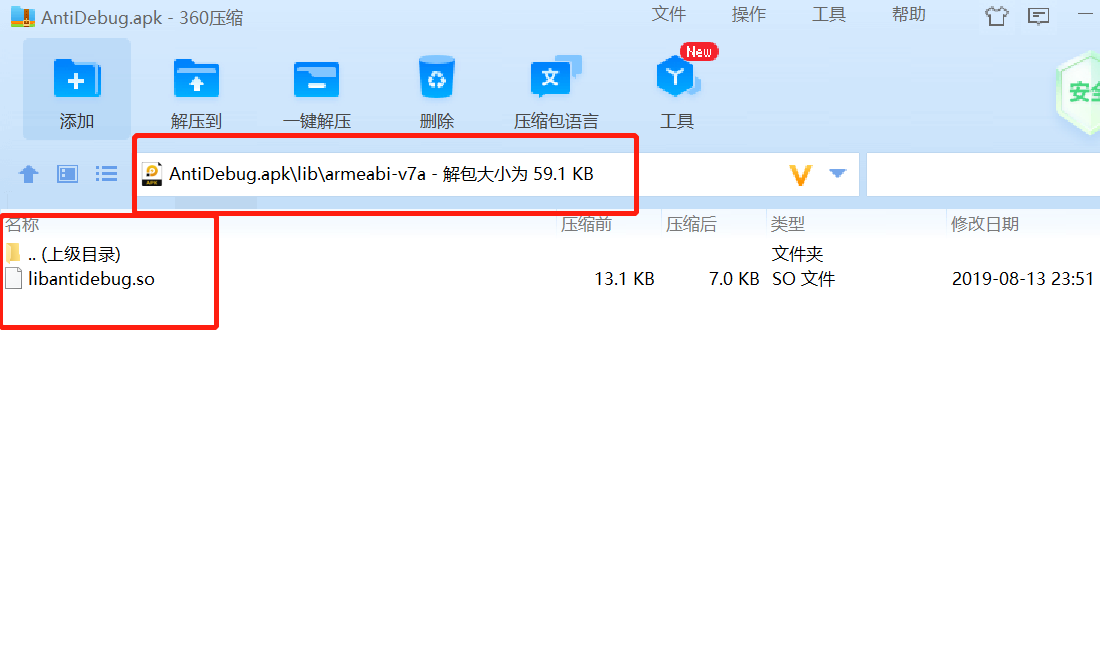
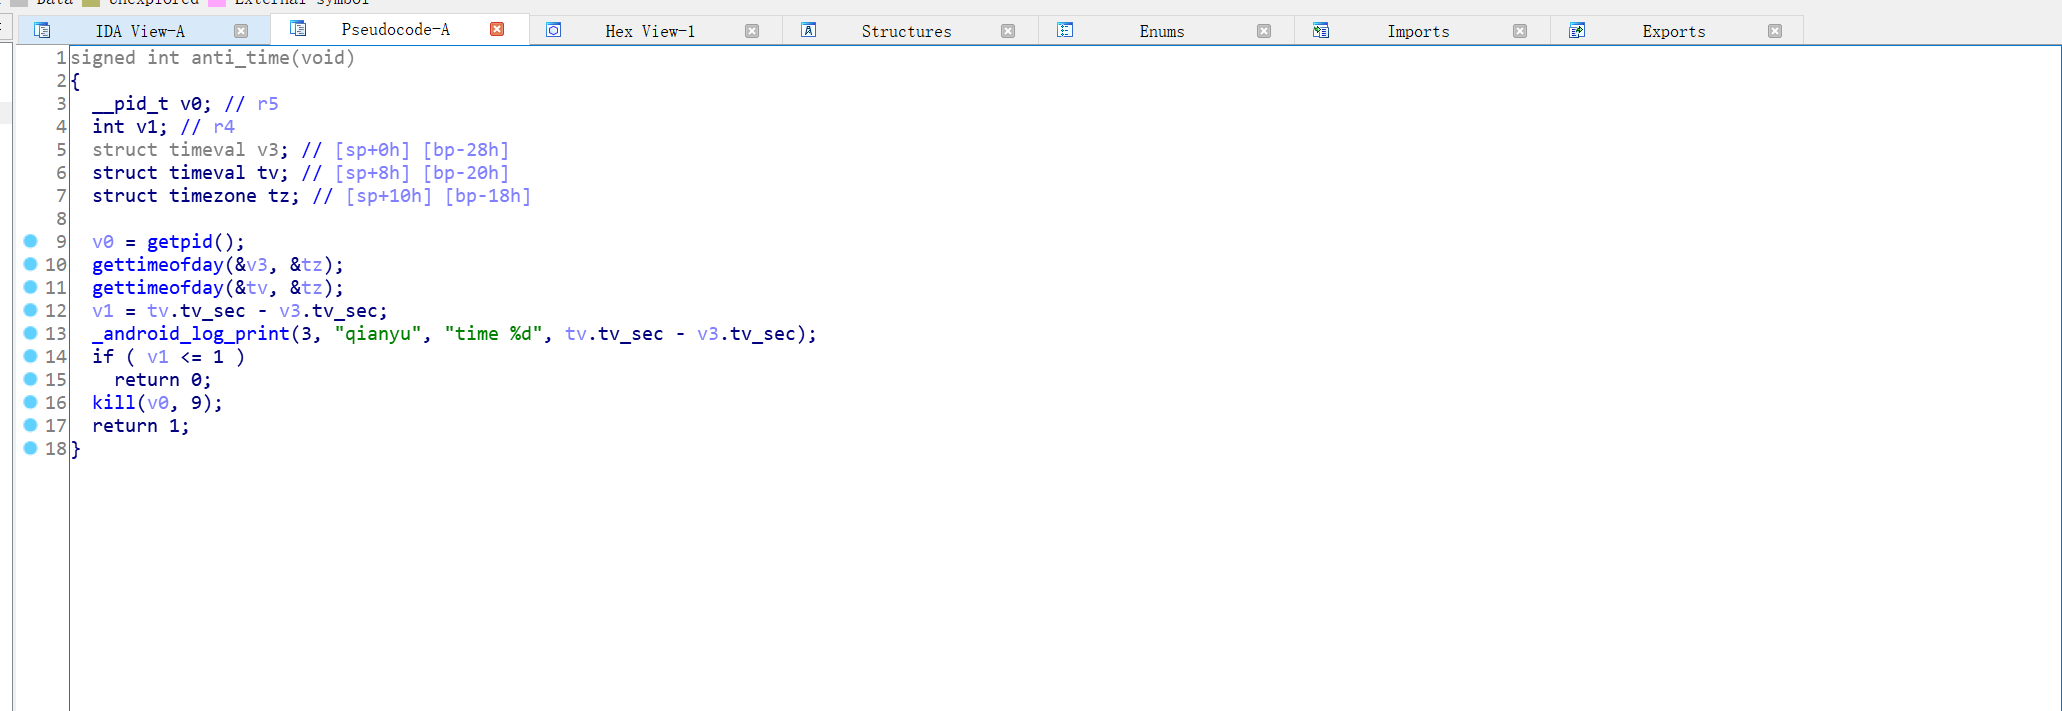
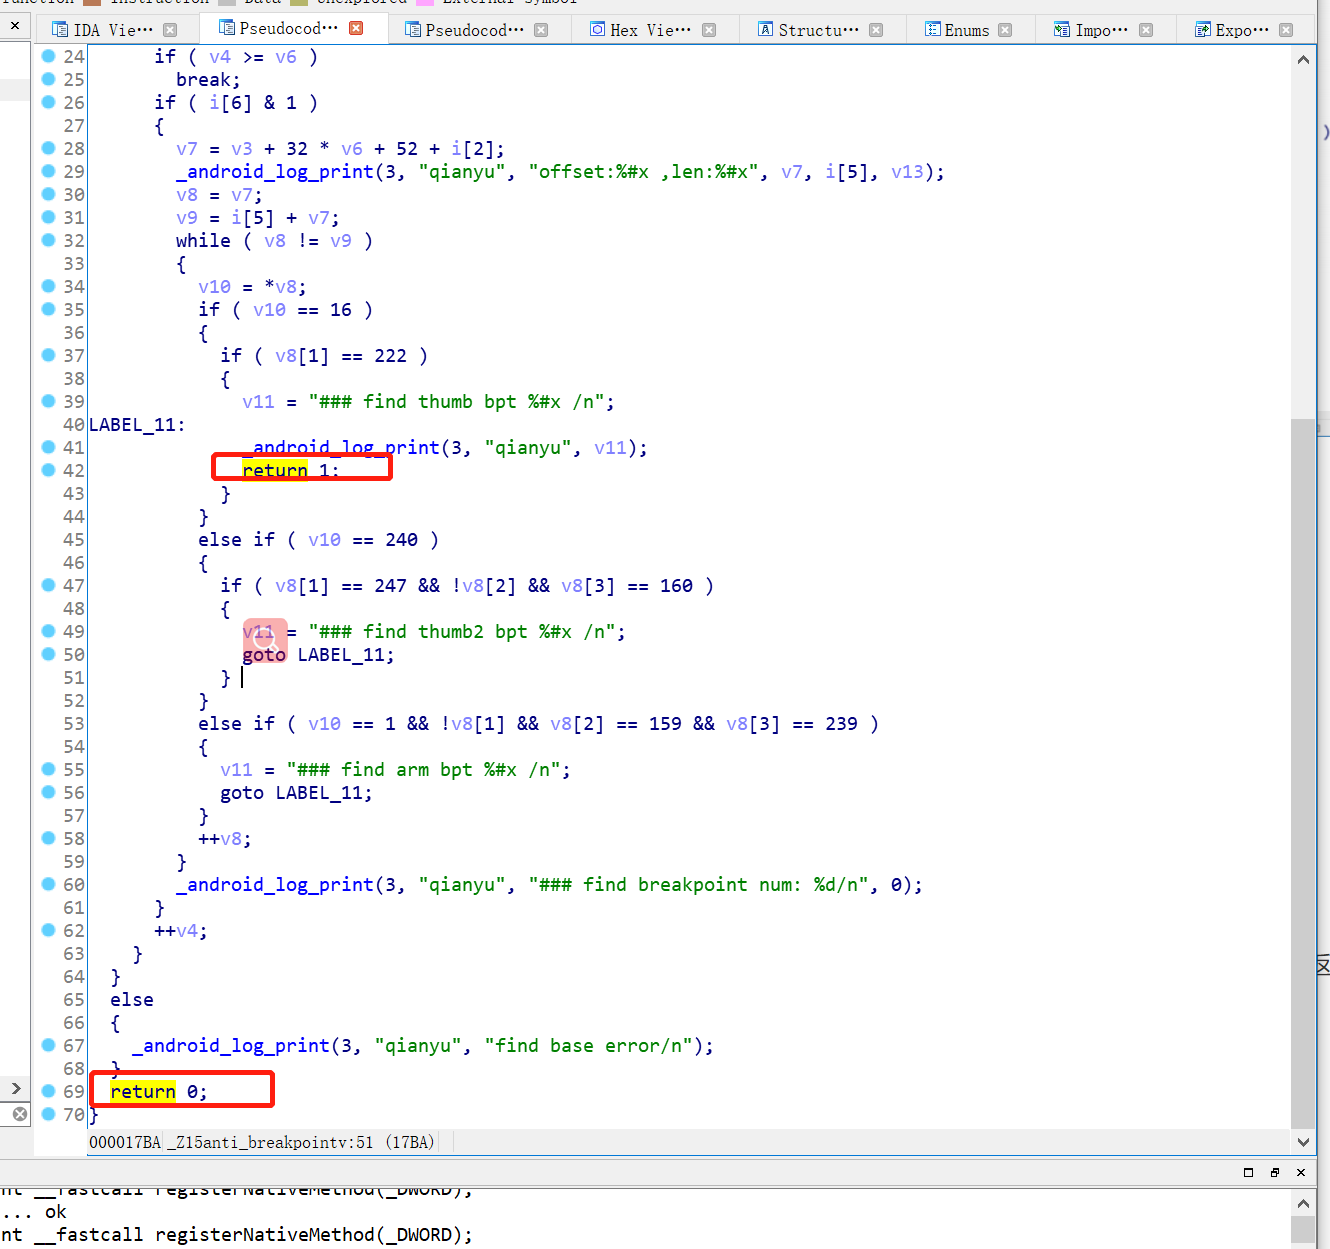
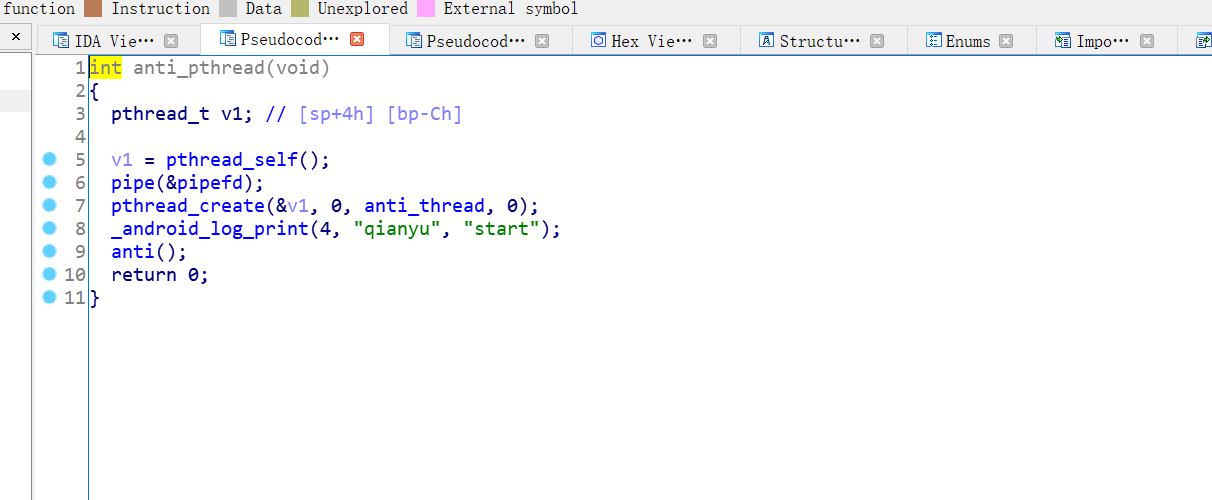
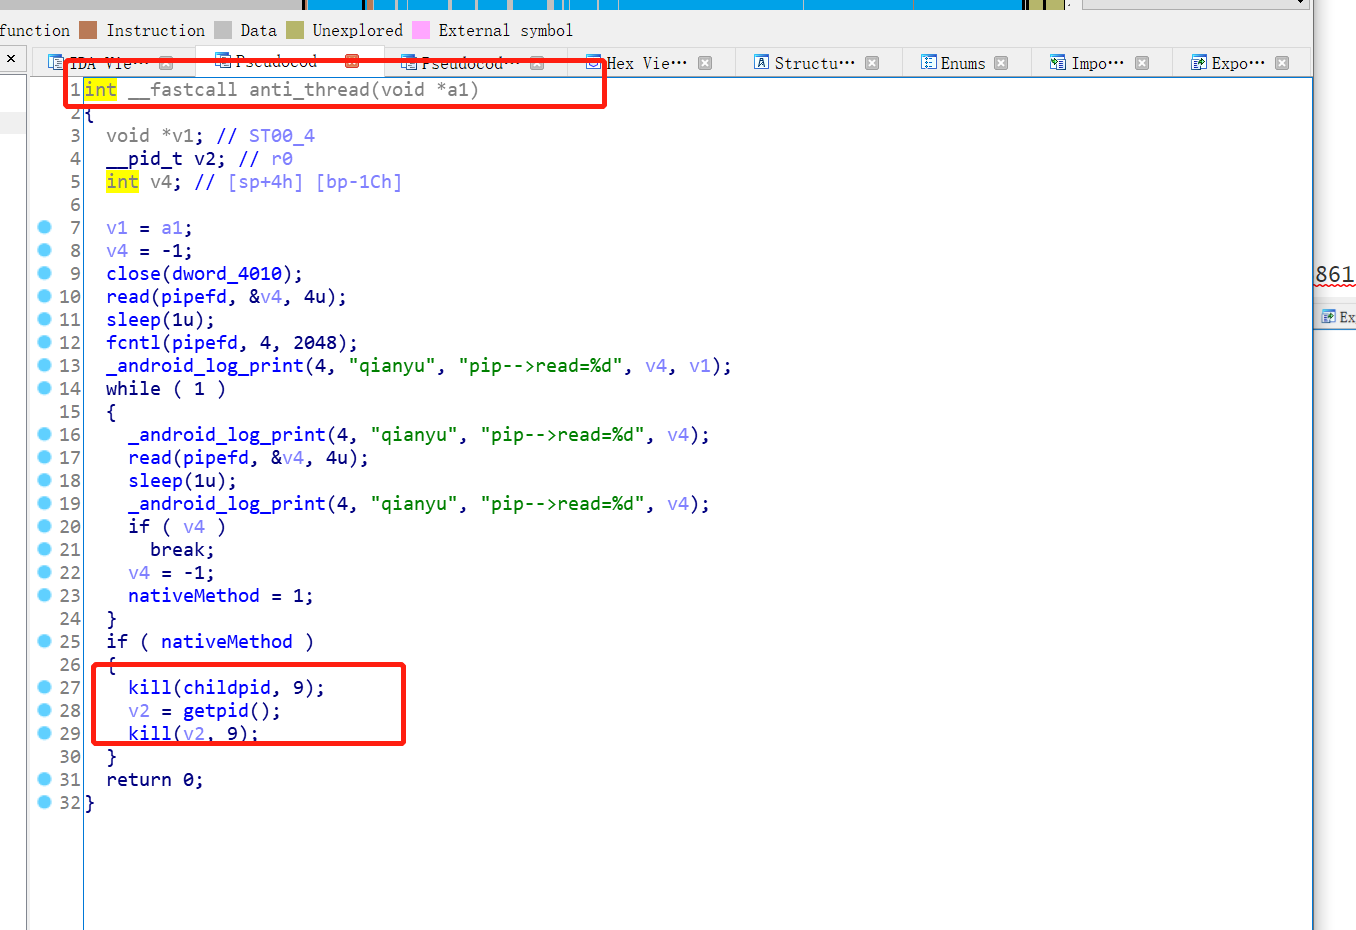
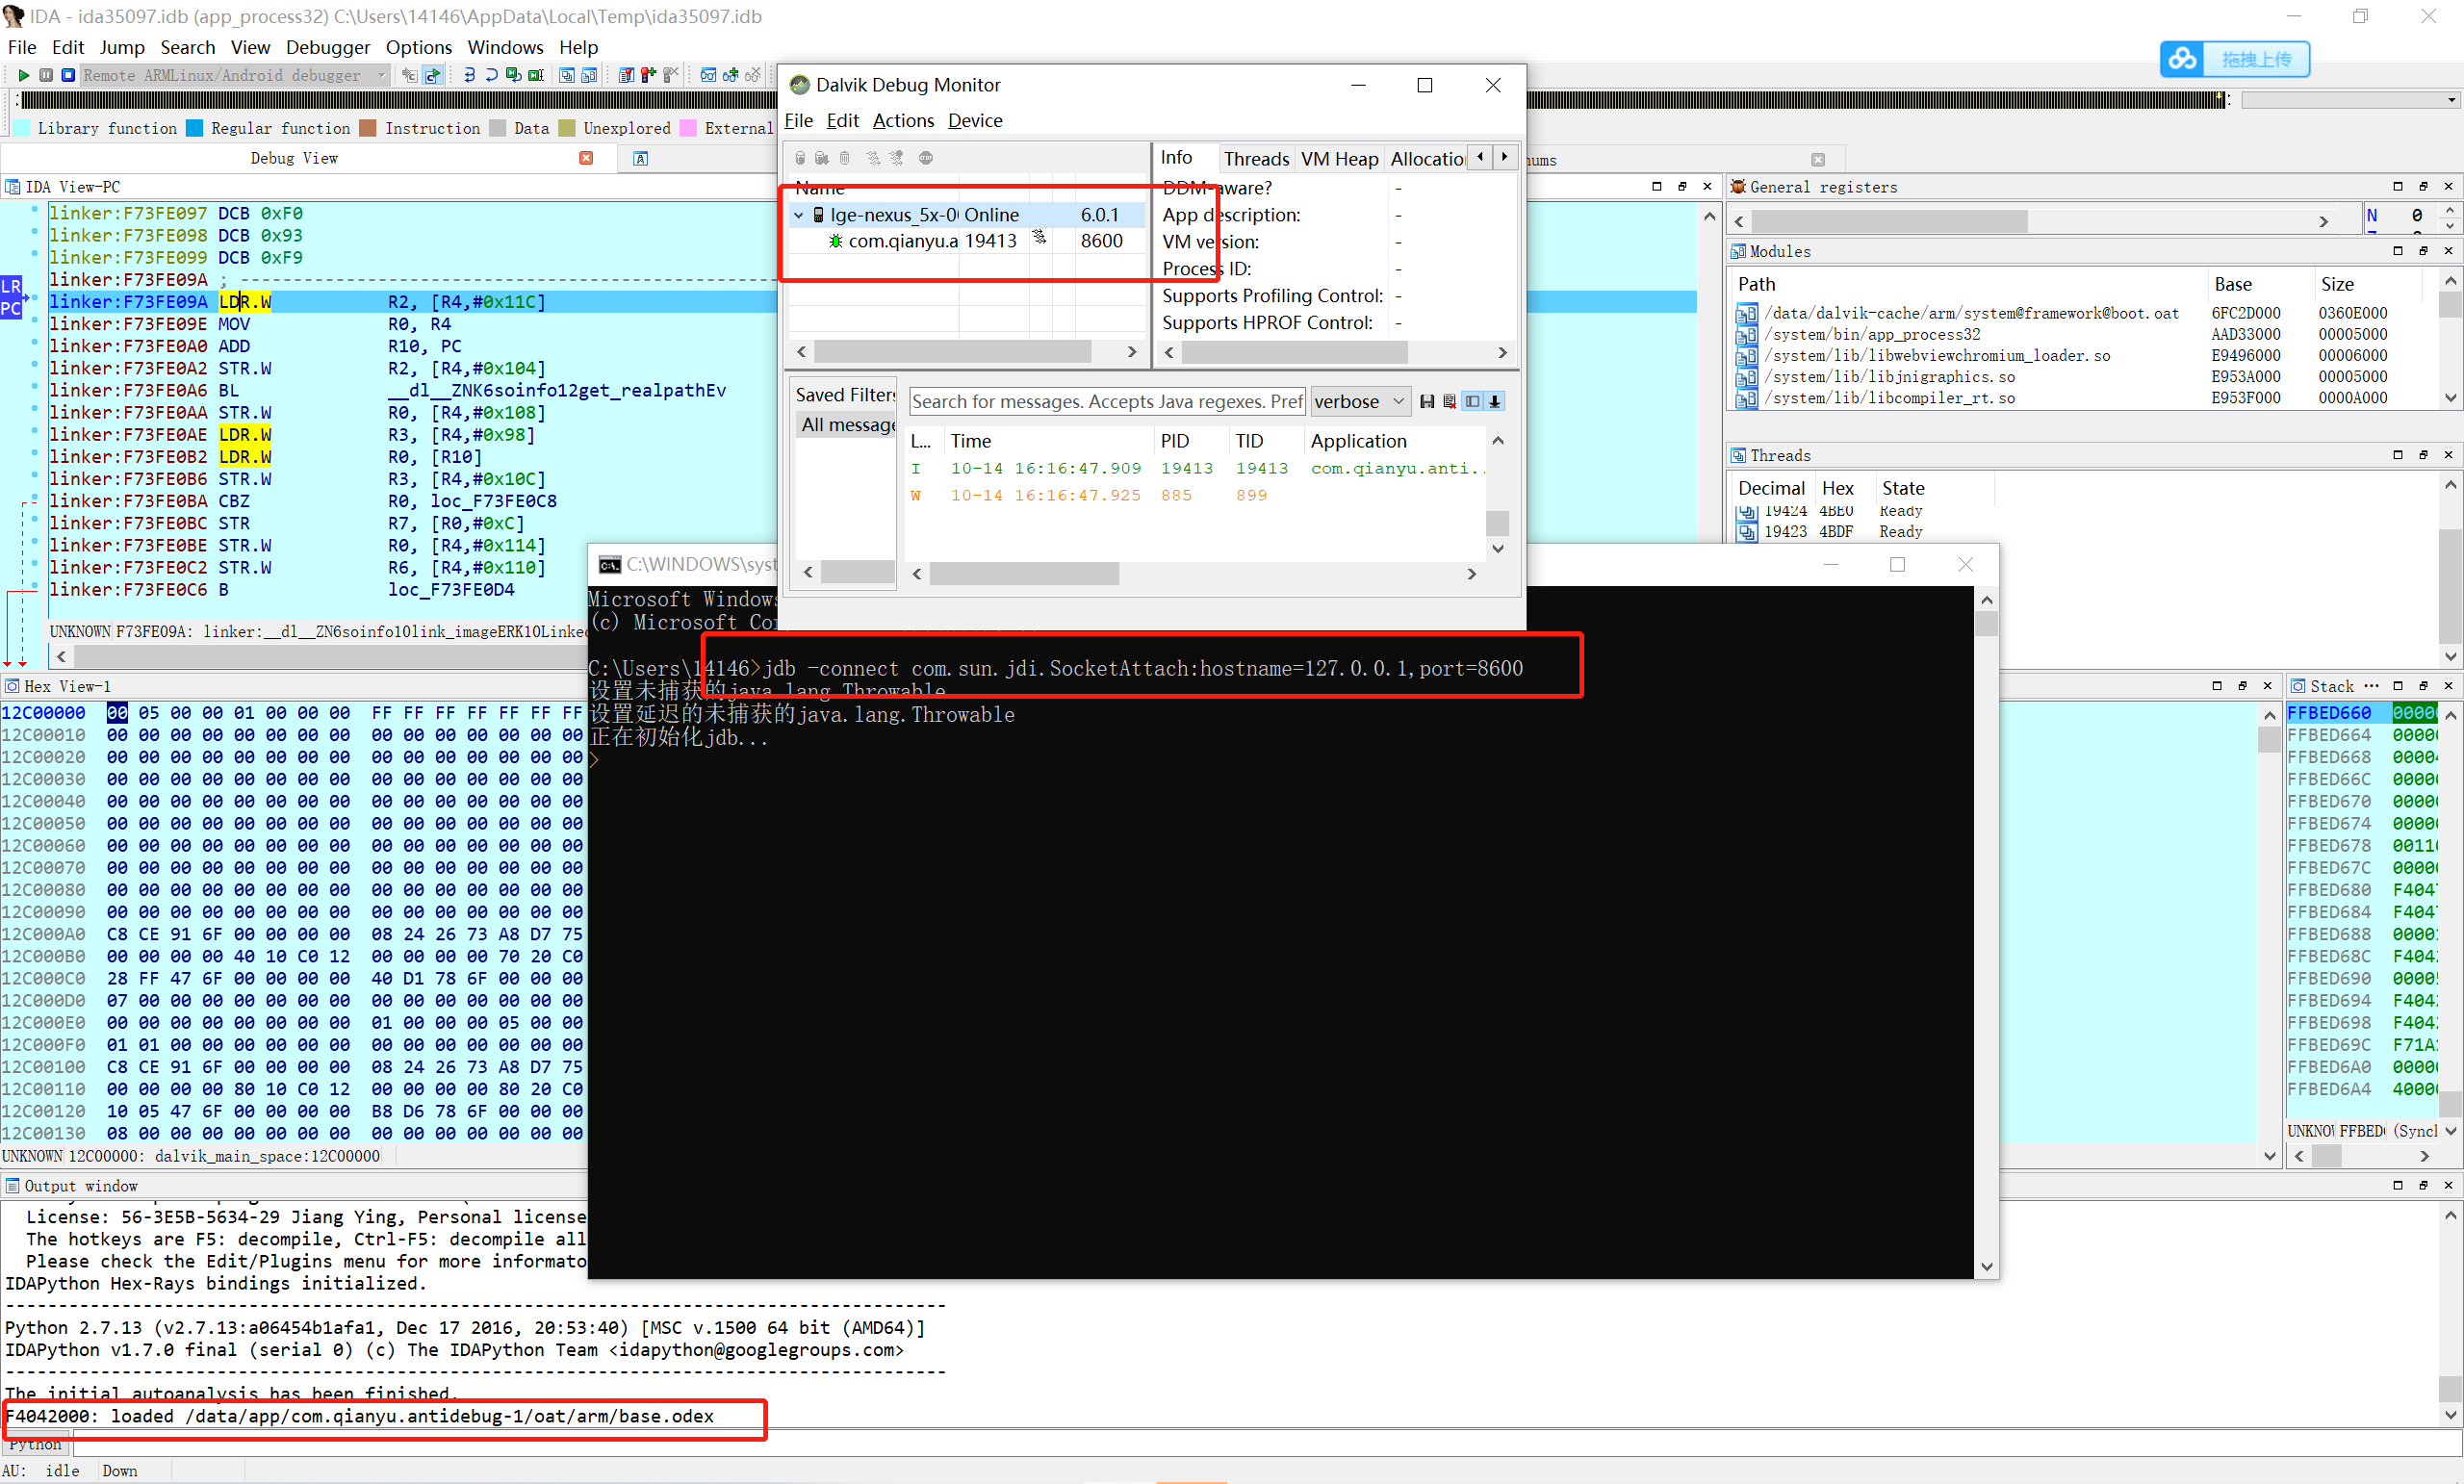
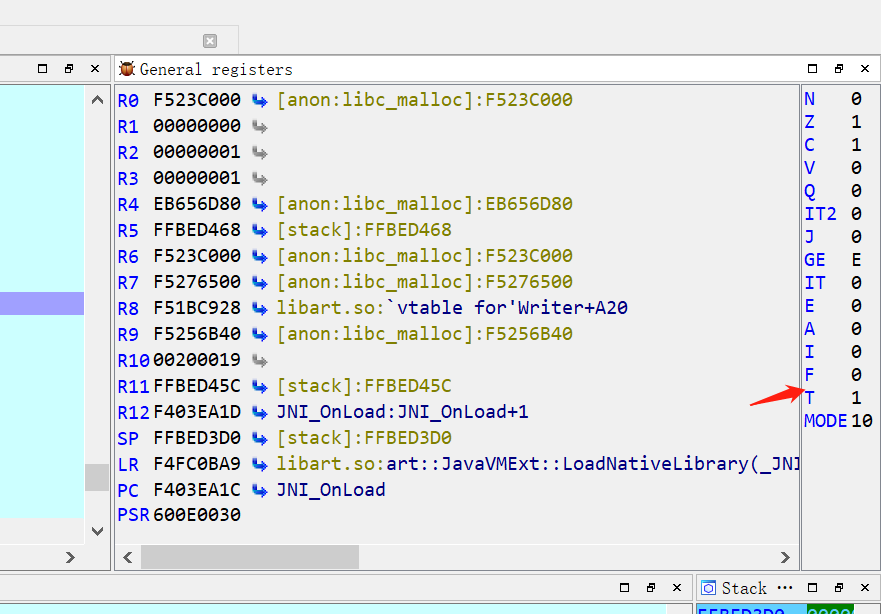
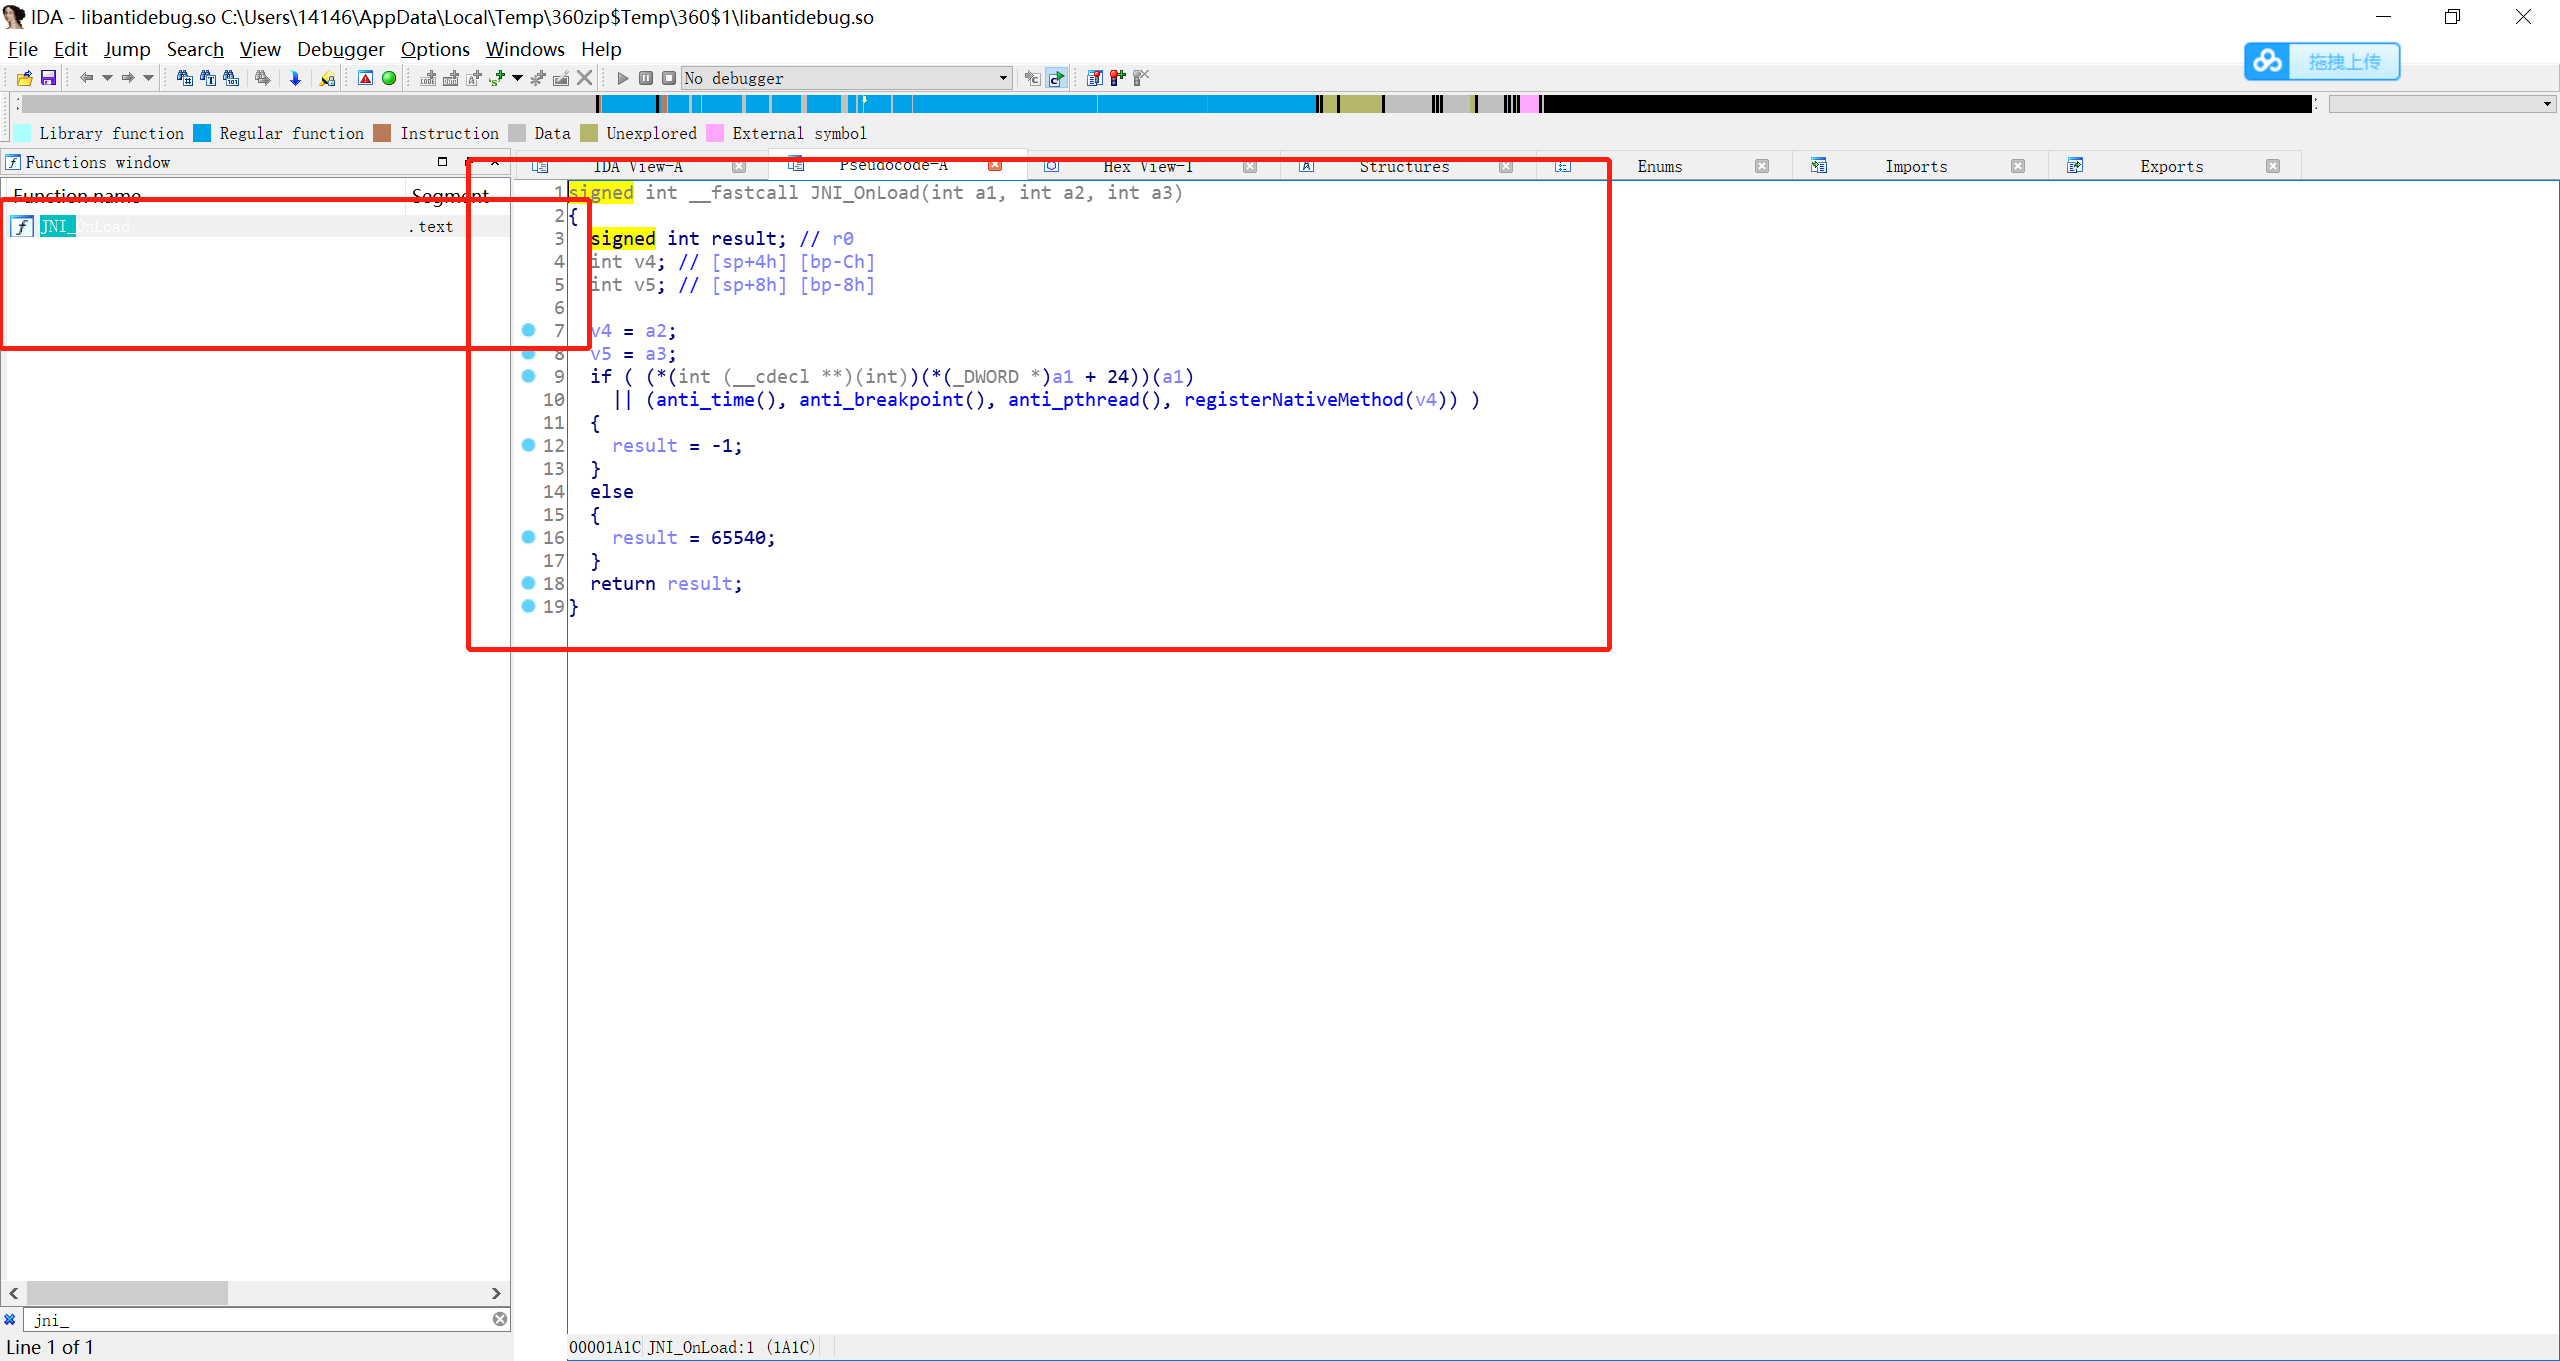
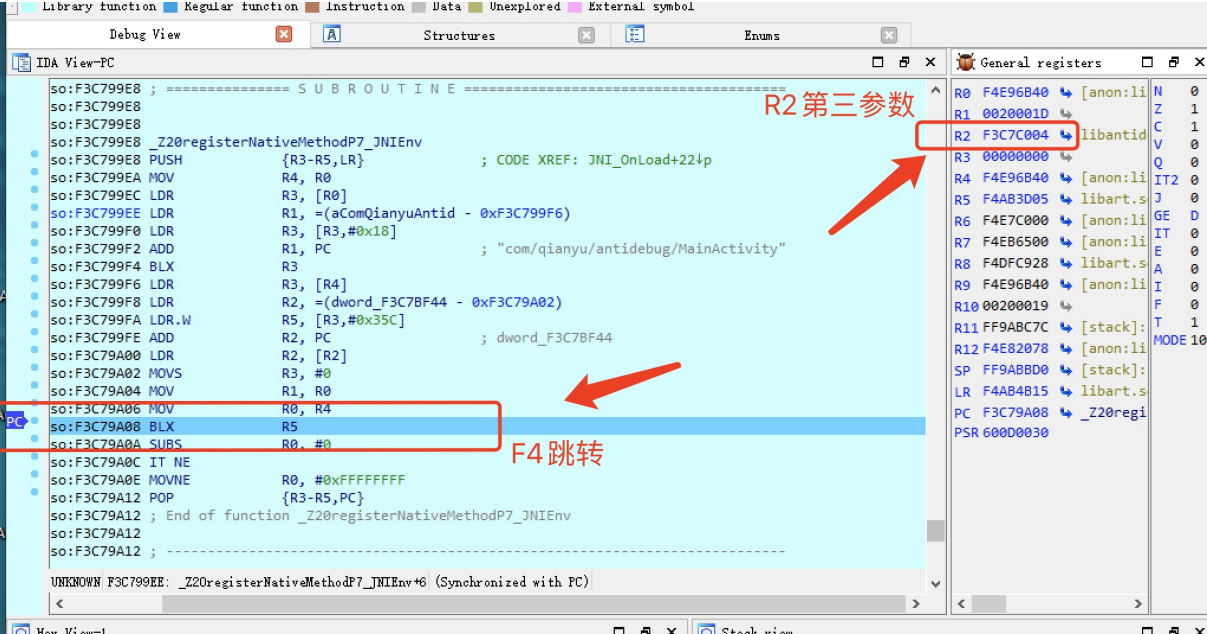
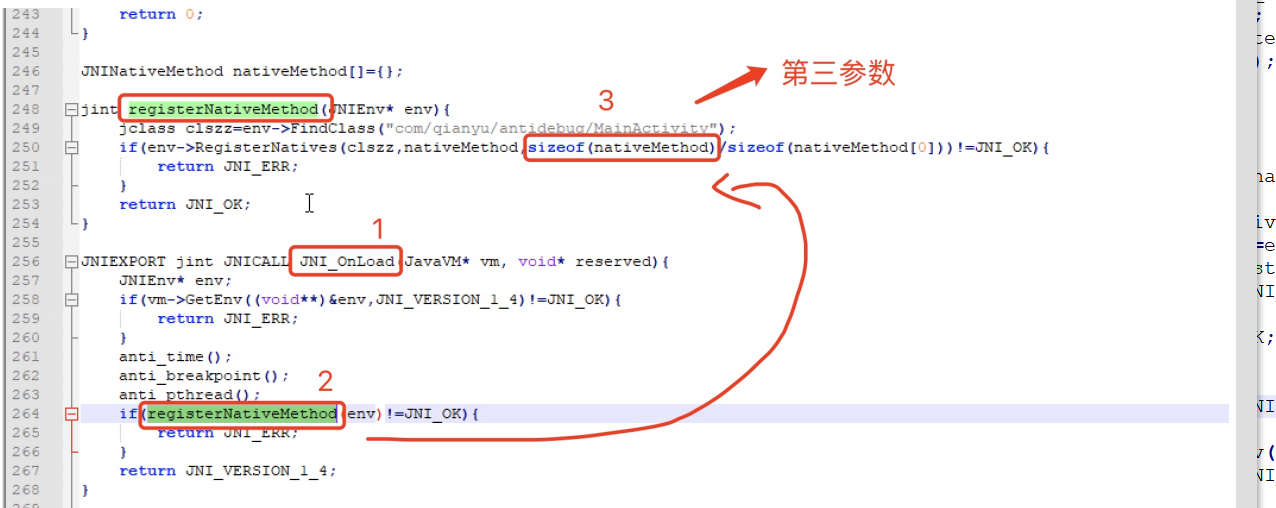
前言 -- ```php 反调试在代码保护中扮演着很重要的角色,虽然不能完全阻止攻击者,但是还是能加大攻击者的时间成本,一般与加壳结合使用。 反调试可以分为两类:一类是检测,另一类是攻击,前者是去想各种办法去检测程序是否在被调试,如果正在被调试的话做出一些“反”的举措,比如退出等等,后者是采用攻击的方法,就是想办法让调试器不能正常工作或者是让调试器崩溃,从而阻止它,本章主要讲解检测方面的知识。 ``` 一、实战详解分析-关键文件检测 --------------- ### 1、IDA案例思路分析 反调试通俗意思就是,程序挂起后突然出现八个F:FFFFFFFF或者在java层运行程序一直运行不起来等情况! 第一个反调试会检测android\_server,文件名检测!来分析下android\_server源文件 ![image-20210923220233320](https://shs3.b.qianxin.com/attack_forum/2021/12/attach-a5ab48c6ffd9af65131302b411937acaab0ddc1c.png) 接下来分析下filecheck,用IDA打开 ![image-20210923220426176](https://shs3.b.qianxin.com/attack_forum/2021/12/attach-3c105874effe5ff20b70aa9b5098eeea18d7fbf1.png) 拖入后,IDA反编译 ![image-20210923220525204](https://shs3.b.qianxin.com/attack_forum/2021/12/attach-7dbae9d56021bdd2c01ec6bf827fd80cdfe62250.png) 这是编译可执行文件,那么和so文件有什么区别呢? SO文件是可以找到JNI\_onload,那么编译可执行文件在IDA如何找逻辑所在处呢? 可看到**main函数的入口函数**,在Exports搜索start: ![image-20210926144617107](https://shs3.b.qianxin.com/attack_forum/2021/12/attach-1f581fda63a2d0025314d6408d66fcab44191739.png) ![image-20210928171115139](https://shs3.b.qianxin.com/attack_forum/2021/12/attach-c4f12cd41495d81d3b05ff6a2a439e22c60a9be8.png) 进来后看到main函数,还有了BL libc\_init指令,这时候看看有几个参数? ![image-20210928171249061](https://shs3.b.qianxin.com/attack_forum/2021/12/attach-22e08a948cfe2a6767ed9617b833771bf7f50ec3.png) 如果这个函数的参数超过了四个以上(>4),跳转的地址就得用其他的寄存器来替代,libc\_init当它这里没有被代替的时候,往下找最大的寄存器只出现了R3为止,没有出现R4以上的寄存器,那么就可以猜测传入的个数的参数为:0-3就是四个参数!TAB查看伪C代码: ![image-20210928172353677](https://shs3.b.qianxin.com/attack_forum/2021/12/attach-9d1bbb04b609f1c067f1d606915ba6a56a255970.png) 双击main方法 ![image-20210928173258956](https://shs3.b.qianxin.com/attack_forum/2021/12/attach-e470431d7077dd5b4cb462ba6bdfc9de1e46eb5a.png) 这样就是编译可执行程序所要找的main函数 就算在重新打开IDA反编译,还是直接进入main函数处,那么得知道如何进入main函数的地方 开始分析,TAB键打开伪c代码 ![image-20210928173729206](https://shs3.b.qianxin.com/attack_forum/2021/12/attach-cd84014eb855ba540553eb655d7bdc4f534f942b.png) 隐藏类型后: ![image-20210928173908137](https://shs3.b.qianxin.com/attack_forum/2021/12/attach-aee18a4b94cf798334fdc64b6502ccfcded725c3.png) check()检查,执行下面的循环if,判断if需要执行检查check,双击check进入 ![image-20210928180011857](https://shs3.b.qianxin.com/attack_forum/2021/12/attach-443c9d612cf1f6f089548308131ef22a43fef25d.png) v0 = opendir("/data/local/tmp"); opendir打开/data/local/tmp目录给V0,这是文件指针 result = getpid(); getpid给result。getpid是当前进程的ID。 v2 = result; result给V2 就是说当V0不为空的时候,要执行while里面的循环逻辑, V3=readdir(v0); readdir()返回参数dir 目录流的下个目录进入点。返回值:成功则返回下个目录进入点. 有错误发生或读取到目录文件尾则返回NULL. v4 = v3 == 0; 拿V3和0对比 v5 = (v3 + 19); 计算v3+19 if ( v4 ): 判断V3=readdir(v0);是否为null,为空结束循环 如果/data/local/tmp目录下有android\_server就会直接kill结束进程,这就是一个文件反调试逻辑思路。 ### 2、案例思路源码分析 过掉文件检查不难,直接改名字即可!开始分析下面的案例 ![image-20210928211601485](https://shs3.b.qianxin.com/attack_forum/2021/12/attach-cde1dcc1bec593e73e3a1ed393cc06b26df2b83d.png) C语言从这个main函数开始执行,首先对数组的开始一个声明,主要关心check函数, ![image-20210928211806646](https://shs3.b.qianxin.com/attack_forum/2021/12/attach-eea26e21937dd57a7ee1bbab7a24fd1f2703ce9e.png) check就是检测android\_server文件的!和之前理解的是一样的,定义了一个字符串指针指向目录/data/local/tmp,然后定义一个文件dir操作,用opendir打开tmp目录,打开后获取pid,接下来判断有没有打开,如果打开不为空(!=)就打开成功下面的while条件代码,currentDir有定义了一个指针,当读取的文件指针不为空(null),就继续往下读取。 **遍历一个文件时,如果你的指针指向的下一个位不为空,意味着你的指针的后面还有文件。** ### 3、Android底层详解 上传文件名为android\_server和filecheck可执行文件**(android\_server文件在IDA的dbgsrv目录下)** ```php adb push C:\test\filecheck data/local/tmp adb push C:\test\android_server data/local/tmp ``` ![image-20210928235820590](https://shs3.b.qianxin.com/attack_forum/2021/12/attach-a374a880d537ef31223fea66753e2fe67287c704.png) 成功上传到底层,可执行文件 为filecheck赋最高权限 ```php chmod 777 filecheck ``` ![image-20210929000057209](https://shs3.b.qianxin.com/attack_forum/2021/12/attach-391ed039d144a0c39b09cc07d99a2e03d0119406.png) 执行filecheck文件 ![image-20210929000308206](https://shs3.b.qianxin.com/attack_forum/2021/12/attach-3e9c65e97ede6bc65b36f163dbbc4453ce31186b.png) 我们看到执行失败,报处kliied 为android\_server改名测试 ![image-20210929000506490](https://shs3.b.qianxin.com/attack_forum/2021/12/attach-5f11b26a07f7b8bd003ed63140b4947f9cf03d42.png) 可以看到改名后,filecheck正常执行 二、实战详解分析-调试端口检测 --------------- ### 1、源码分析调试端口检测 ![image-20211014205714171](https://shs3.b.qianxin.com/attack_forum/2021/12/attach-a1abc9be0c8d60c12aef47e876813e6ae4628b95.png) 打开checkTCP.c文件开始分析 直接分析check方法 ![image-20210929000940227](https://shs3.b.qianxin.com/attack_forum/2021/12/attach-61f069257ebe814b04965da6016c766b4e37a687.png) 首先C文件中执行定义字符数组char buf\[0x1000\]={0};,然后执行命令cat /proc/net/tcp |grep :5D8A",这里grep :5D8A就是只查找存在5D8A字符的那一行,在/proc/net/tcp文件中5D8A代表端口的意思,5D8A是十六进制,转为十进制就是23946 ![image-20210929000900782](https://shs3.b.qianxin.com/attack_forum/2021/12/attach-769b82420adb68e7cadb5fa2096598d7abfb21e1.png) ![image-20210929103201116](https://shs3.b.qianxin.com/attack_forum/2021/12/attach-3d8705f51ee44397f4afd23e15968e8caf05445f.png) 如果存在23946这个端口就进入while循环,执行kill ![image-20210929103318832](https://shs3.b.qianxin.com/attack_forum/2021/12/attach-97d10efea085ffce550d8798d57256b81f4e6c74.png) ### 2、IDA分析调试端口检测 找到可执行文件 ![image-20210929103449507](https://shs3.b.qianxin.com/attack_forum/2021/12/attach-6b01d762473b7e9c39af3f97b7c3242352d8d30c.png) 使用IDA打开,找到main函数,开始分析 ![image-20210929103647692](https://shs3.b.qianxin.com/attack_forum/2021/12/attach-61d6a5a99b99003517f913699f5c4b10ffe132f6.png) 如何找到main函数 ```php 1、左边列表中 2、在Exports搜索start,双击进入找到main双击进入 ``` 找到main函数后,查看伪C代码 ![image-20210929104234815](https://shs3.b.qianxin.com/attack_forum/2021/12/attach-46b9eda7aa7ed52050dbd1e45f2cb1aa91b69ccd.png) 双击sub\_728 ![image-20210929104256542](https://shs3.b.qianxin.com/attack_forum/2021/12/attach-8905f69272f7a12e59fe00b1b29f6cae4dc87cc8.png) 这里的伪C代码和前面分析的c语言源码是一样的 ### 3、Android底层详解 上传可执行文件,上传android\_server文件 ```php adb push C:\test\checkTCP data/local/tmp adb push C:\test\android_server data/local/tmp ``` ![image-20210929105228340](https://shs3.b.qianxin.com/attack_forum/2021/12/attach-f14425eede7fb560b03d6aef71941b64f022cdf8.png) 为两个文件赋执行权限 ![image-20210929105427798](https://shs3.b.qianxin.com/attack_forum/2021/12/attach-576cf3d1d4bd932eb2429e480a44bada210964e7.png) **测试没有启动23946端口状态** 执行checkTCP文件 ![image-20210929105844964](https://shs3.b.qianxin.com/attack_forum/2021/12/attach-4ecc09c7904248b81c73454b753a06c46614253c.png) 没有输出,完成程序执行 **测试启动23946端口状态** 执行android\_server,启动23946端口 ![image-20210929105526149](https://shs3.b.qianxin.com/attack_forum/2021/12/attach-d19fe15c0bc6d5abef2ef91537386f9f0765ac08.png) 打开一个新窗口,执行checkTCP文件 ![image-20210929105620546](https://shs3.b.qianxin.com/attack_forum/2021/12/attach-7ddb9b9b5075b98b8776c0dcc64022340160ba83.png) 我们看到输入了cat /proc/net/tcp |grep :5D8A结果,并killed了checkTCP程序 三、实战详解分析-进程名称检测 --------------- ### 1、源码分析进程名称检测 找到c语言源码 ![image-20211014205735864](https://shs3.b.qianxin.com/attack_forum/2021/12/attach-a1f2835d0eb5af836b8854ae8ac10c65e147907c.png) 开始分析源码 ![image-20211014205753157](https://shs3.b.qianxin.com/attack_forum/2021/12/attach-f49eca1d88b0af440e53b827e8f0c90c08d888e7.png) 直接从main函数开始分析,看到coursecheck方法 ![image-20210929112248303](https://shs3.b.qianxin.com/attack_forum/2021/12/attach-c11d539063ef7390e0639ece59848929009b478b.png) ![image-20210929112312427](https://shs3.b.qianxin.com/attack_forum/2021/12/attach-5054eecdc06c32499f87c04ecf7905cc5390da4e.png) sprintf(filename, "/proc/%d/status", pid); 意思就是获取(getpid)pid值放到%d里面,然后可读的形式filename打开(r)操作,就是获取此时进程程序的一个状态。 FILE \*fd=fopen(filename,"r"); if(fd!=NULL) 开打一个文件fd,如果打开成功就进行while循环 ![image-20210929165405874](https://shs3.b.qianxin.com/attack_forum/2021/12/attach-46d4f02eea5e03ef31a2660cab4f23fecc596006.png) fgets是大小,(line,bufsize,fd)指向指针的地方, if(strstr(line,"TracerPid")!=NULL); strstr会判断有没有TracerPid字符串 int statue =atoi(&line\[10\]); atoi会截取字符串前十个字符,意思就是检测TracerPid:,这个冒号后一位置不等于0的话,就表示TracerPid发生改变,就意味着在调试。 下面还对android\_server进行检测,如果有着杀死进程。 ### 2、IDA分析进程名称检测 在实战中进程遇到进程名称检测,开始分析关于进程检测的可执行文件 在main函数中找到coursecheck方法 ![image-20210929203558069](https://shs3.b.qianxin.com/attack_forum/2021/12/attach-ecd3d7e1e304b176b495e025a5080411f471ca18.png) 双击sub\_794进入 ![image-20210929203658298](https://shs3.b.qianxin.com/attack_forum/2021/12/attach-c819593bb964118a157ce30d4032b308d6a7d8c3.png) getpid获取程序的pid,然后fopen指向命令,如果指向成功就进行检测TracerPid值,这里只是v6,这里v6在IDA识别为未定义的值。 ### 3、Android底层详解 上传进程检测可执行文件及android\_server文件 ```php adb push C:\test\BubbleSort data/local/tmp adb push C:\test\android_server data/local/tmp ``` ![image-20210929204254368](https://shs3.b.qianxin.com/attack_forum/2021/12/attach-0325ba1ab404b8c55d97c3c7fd88bfcda0bab6f8.png) 赋权BubbleSort文件 ```php chmod 777 BubbleSort ``` ![image-20210929204410339](https://shs3.b.qianxin.com/attack_forum/2021/12/attach-242d8f11047a2de79935f77724ca9baa370a6a3d.png) 执行程序 ![image-20210929204546605](https://shs3.b.qianxin.com/attack_forum/2021/12/attach-58dd4270dcde97502c520af1bc453836273348e3.png) 打开一个新窗口,查看BubbleSort文件运行状态 ```php ps | grep BubbleSort ``` ![image-20210929205251240](https://shs3.b.qianxin.com/attack_forum/2021/12/attach-558402979ed85b65654696b8ffe1a4ba97d76621.png) 11032是进程名称 查看该进程下的status文件 ```php cat /proc/11032/status ``` ![image-20210929205647476](https://shs3.b.qianxin.com/attack_forum/2021/12/attach-689a59d8fe65ca2ab8cff44ceba6825744d54b6d.png) 执行命令后就会遍历程序里面的内容,如果有TracerPid则不等于null,进入if,atoi检测前十位就是TracerPid:,判断TracerPid:后面的内容,如果为0就不进入下一个if,如果不为0就进入if继续执行。 那么现在让他发生变化,需要使用IDA! 先运行android\_server启动,先给android\_server,并不用默认端口启动 ```php mv android_server test ./test -p12345 ``` ![image-20210929211145238](https://shs3.b.qianxin.com/attack_forum/2021/12/attach-737481254bfabcdb3de3b4d0e82ecf5a1e1f00de.png) 在电脑端进行端口转发 ```php adb forward tcp:12345 tcp:12345 ``` ![image-20210929211233196](https://shs3.b.qianxin.com/attack_forum/2021/12/attach-0e94dc16eb6f9938eabc00b8a130dbd7995bc82e.png) 完成后,打开IDA,连接本地的12345端口 ![image-20210929211305930](https://shs3.b.qianxin.com/attack_forum/2021/12/attach-719951c9ffe9df8a72a60822f6b305e8b167200e.png) 配置IDA连接 ![image-20210929212208781](https://shs3.b.qianxin.com/attack_forum/2021/12/attach-11515bbd938a26228e0c2d36a80cb61cc51a4a81.png) 配置IDA选项 ![image-20210929211606263](https://shs3.b.qianxin.com/attack_forum/2021/12/attach-7c0b9f0f887e197bcdd81cad734476398740d9b5.png) 继续ps查询BubbleSort程序 ```php ps | grep BubbleSort ``` ![image-20210929212233379](https://shs3.b.qianxin.com/attack_forum/2021/12/attach-5031ddf07c29fdef5f26c37424e233bf066ed3da.png) 根据进程名称11536查看进程文件夹中的status内容 ![image-20210929212411910](https://shs3.b.qianxin.com/attack_forum/2021/12/attach-309c721595db2ca98132a1ccf1437e3d4b1edfa1.png) 可以看到这时候TracerPid内容不为0了,为11389,发生了变化 ![image-20210929212648205](https://shs3.b.qianxin.com/attack_forum/2021/12/attach-1666fb6504849079662ff84dfe5c7d353eb633a3.png) 源码提示如果检测到TracerPid的值不等于0对程序进程打印然后杀死进程。 如何过滤掉?首先他要获取TracerPid,返回值为R0,那么修改R0或者注释即可,或者刷机修改系统内容,或者把TracerPid修改回去都可以 进程名称检测: ```php 当动态调试的时候找到TracerPid赋值的地方,手动把它赋值修改为0即可。 ``` 四、实战详解分析-轮循检查技术 --------------- **简述:**轮循检查主要通过**safe\_attach函数**和**handle\_events函数**来实现的,轮询检测反调试技术基于**循环检测进程的状态,判断当前进程是否在被调试**。 **优点:**实现比较简单 **缺点:**系统资源消耗大 **原理:**读取进程的/proc/\[pid\]/status文件,通过该文件得到调试,当前进程的调试器(检测调试器的\[pid\]) **实现:**通过status文件内的TracerPid字段的值判断当前进程或线程是否正在被调试。 **status文件中各字段简述:** Name:进程名称 State:进程状态 Tgid:一般进程的名称 Pid:一般进程的ID,它的值和getpid函数的返回值相等 PPid:父进程的ID TracerPid:实现调试功能的进程ID,值为0表示当前进程未被调试。 **绕过反调试检测的方案:** 1、动态调试时修改TracerPid字段值为0, 2、修改内核,让TracerPid字段值为负值 ### 1、源码分析-轮循检测技术 ![image-20210930152700791](https://shs3.b.qianxin.com/attack_forum/2021/12/attach-b765f8de18bfcffcda4800162bfc24a99cc3b4cf.png) 打开main.cpp ![image-20210930153102297](https://shs3.b.qianxin.com/attack_forum/2021/12/attach-b22c8d5a151fd8bd6874295f3a31fd75bcfbe842.png) 从main函数入口分析,main函数中调用了anti\_debugger()方法,anti\_debugger有调用了anti\_debugger\_thread方法,anti\_debugger\_thread中有调用了check\_debugger方法 下面详细分析check\_debugger中的内容 ![image-20210930153538397](https://shs3.b.qianxin.com/attack_forum/2021/12/attach-2d8dbf4da381379c46804dbd2a2ea088c3662ce1.png) fopen中f是file,就是打开文件操作的意思,fopen打开path,path是上面传入path路径的256并以rt模式打开,如果打开不为空(!=null),就执行while循环,fgets就是打开指向的fp文件,if通过strncmp函数进行判断,使用line参数和TRACERPID参数进行对比,最多比较前 TRACERPID\_LEN个字节, 如line参数和TRACERPID参数内容一致,进入if判断,if中tracerPid为0直接打印,还有if (!tracerPid)不为0就返回flase!! 这就是简单的一个检查遍历然后根据不同的结果返回不同的值。 ### 2、IDA分析轮循检测技术 上传轮循检测的可执行文件poll\_anti\_debug,并赋执行权限 ```php adb push C:\test\poll_anti_debug data/local/tmp chmod 777 poll_anti_debug ``` ![image-20210930161630958](https://shs3.b.qianxin.com/attack_forum/2021/12/attach-e19100a21c1e35286ee599108f7ddd11d4199aee.png) 目前上传了检测调试程序,还需要上传调试程序 ![image-20210930162250120](https://shs3.b.qianxin.com/attack_forum/2021/12/attach-3de29dc32cf994e8bb74ca6fef3fc85efcbbe95c.png) 上传debugger调试程序,并赋权 ```php adb push C:\test\debugger data/local/tmp chmod 777 debugger ``` ![image-20210930162356198](https://shs3.b.qianxin.com/attack_forum/2021/12/attach-17b10dc571216e7bc2f07e8c372fd7464818a114.png) 运行检测调试程序poll\_anti\_debug ![image-20210930162502139](https://shs3.b.qianxin.com/attack_forum/2021/12/attach-499ae8f95ff3d27b5f758c2de6af6ec869b8544f.png) 一直在循环打印TracerPid: 0 我们开启debugger程序,来模拟我们现在正在调试,将pid值设置为poll\_anti\_debug程序的pid ![image-20210930164223315](https://shs3.b.qianxin.com/attack_forum/2021/12/attach-61af3718cf79b3794b7a6760455663e884a5bad2.png) 我们看到poll\_anti\_debug检测到TracerPid的值发生了变化。 这就是轮循检测。 五、实战详解分析-self-debugging反调试 -------------------------- ### 1、原理简述 **原理:** Self的英文意思是自己,顾名思义,self-debugging就是通过调试自身检测出是否被调试。 父进程创建一个子进程,通过子进程调试父进程。 **特点:** 非常实用、高效率的实时反调试技术 **优点(可以作为受保护进程的主流反调试方案):** 消耗的系统资源较少 几乎不影响受保护的进程性能 可以轻易地阻止其他进程调试受保护的进程 **缺点:** 实现比较复杂 **实现:** 核心ptrace函数 进程的信号机制 **注意:** 进程暂停状态比较多 **暂停状态** **signal-delivery-stop状态:**调试器和被调试进程之间的关系 **group-stop状态(难):**sigcont信号 同时满足两个条件:进程/线程处于被调试状态;被调试进程/线程收到了暂停信号-->重置为0 sigstop sigtstp sigttin sigttou **syscall-stop状态** **ptrace-event-stop状态** **反-反调试方法:** 让父进程不fork 把while函数循环去掉 不能调试父进程,但是可以调试子进程,配合双IDA调试,挂起子进程 **下图可以明确表示出self-debugging反调试特点:** ![image-20211009150633702](https://shs3.b.qianxin.com/attack_forum/2021/12/attach-84d0bd258ab8881a036ec212579f3240fcd373d6.png) fork是一个函数,fork函数fork出一个子进程来调试自己,那么别的函数就无法进程调试了,那么通过调试fork出来的子进程从而调试父进程。 **同一时刻,一个进程只能被一个进程附加(调试)** 用的比较少,还没进程名称检查用的多 ### 2、self-debugging反调试案例详解 将测试文件debugger和self-debugging上次到测试机 ```php adb push C:\test\debugger data/local/tmp adb push C:\test\self-debugging data/local/tmp ``` ![image-20211009151616260](https://shs3.b.qianxin.com/attack_forum/2021/12/attach-713d8e08332134d65cd5401393623fac1d918655.png) 上传成功后进行赋权 ```php chmod 777 debugger self-debugging ``` ![image-20211009151725191](https://shs3.b.qianxin.com/attack_forum/2021/12/attach-b0aa8c69f22c35c4bc2aeb9eae79c9f5cf651bd2.png) 找个进程调试,我们选择nfc ```php ps | grep com. ``` ![image-20211009151823524](https://shs3.b.qianxin.com/attack_forum/2021/12/attach-60d63d34d97844db183a7de31edde9bfe7776677.png) nfc进程的PID是3251,我们通过debugger程序开始调试 ```php ./debugger 3251 ``` ![image-20211009152328706](https://shs3.b.qianxin.com/attack_forum/2021/12/attach-7812acbd7a4c16bc4ec077ebf6b1d182943a07ef.png) 前面见过如果一个进程被调试,他的TracerPid会发生什么变化?查看下: ```php cat /proc/3251/status ``` ![image-20211009152656089](https://shs3.b.qianxin.com/attack_forum/2021/12/attach-aa228ce4d411084a3d5bf71901cce3c38d5544e4.png) 此时TracerPid变化为5574,5574是什么呢 ```php ps | grep 5574 ``` ![image-20211009152756381](https://shs3.b.qianxin.com/attack_forum/2021/12/attach-d9d01858dfc47b8d30512bd32ed6f38d10d45e5f.png) 可以看到5574是debugger程序的PID,那么结论就是,TracerPid会变成调试器的PID 运行self-debugging: ![image-20211009153004145](https://shs3.b.qianxin.com/attack_forum/2021/12/attach-67acd235b27baf8606e932e4ced15d7606539db5.png) 可以看到main pid为5636是主进程的PID child pid为5637是子进程的PID 这是我在用debugger程序去调试self-debugging测试一下 ```php ./debugger 5636 ``` ![image-20211009154000703](https://shs3.b.qianxin.com/attack_forum/2021/12/attach-2622666b210aa67a4eeb0cee7275cb0f8a21d525.png) ```php PTRACE_ATTACH: Operation not permitted ``` 不允许操作,可以看到这就是验证了之前讲的,一个进程只能被一个进程附加(调试)。那么怎么办呢 **如果一个主进程不能被附加,就附加他的子进程即可。** ```php ./debugger 5637 ``` ![image-20211009154354730](https://shs3.b.qianxin.com/attack_forum/2021/12/attach-2ea4e5be1cf3d095b58f2a6bdb17b9d4ce4c6fae.png) 这时候就可以了,这就是self-debugging反调试的流程和原理,绕过self-debugging直接附加在他的子进程即可。 六、实战详解分析-Java层反调试 ----------------- ```php JDWP协议 JDWP 是 Java Debug Wire Protocol 的缩写,它定义了调试器(debugger)和被调试的 Java 虚拟机(target vm)之间的通信协议 安卓程序动态调试条件(两个满足之一) 1、在AndroidMainfest.xml中,application标签下,Android:debuggable=true 2、系统默认调试,在bulid.prop(boot.img),ro.debugable=1 Android SDK中有android.so.debug类提供了一个isDebuggerConnected方法,用于判断JDWP调试器是否正在工作。 ``` java层反调试基于以上两个原理执行 ### 1、静态分析-实战案例 jadx开打测试apk ![image-20211009163103887](https://shs3.b.qianxin.com/attack_forum/2021/12/attach-1255a42e544a1f9839d91ce13749c9b79bd03abe.png) 找到Oncreate ![image-20211009171612858](https://shs3.b.qianxin.com/attack_forum/2021/12/attach-309fc63248dd6063b410f271370e0ae5b8f88c44.png) isDebuggerConnercted方法,用于判断JDWP调试器是否正在工作。 ![image-20211009171722685](https://shs3.b.qianxin.com/attack_forum/2021/12/attach-16fe73c65c83015c64a8815d1617fa1ce77bd46a.png) Debug.isDebuggerConnected()获取一个值进行比较,如果为真,就进行加载 loadLibrary();库。 ![image-20211009171909279](https://shs3.b.qianxin.com/attack_forum/2021/12/attach-72566fcc0f4eebe2f03e900d5b50a1612e69919e.png) 所以会根据isDebuggerConnected进行一个判断,只要符合条件成立就执行if里面的逻辑,不成立不加载加载 loadLibrary库。这就是在java层进行反调试。也能用来保护代码。 **那如何绕过判断JDWP调试器呢?** 使用AndroidKiller反编制apk安装包: ![image-20211013115155513](https://shs3.b.qianxin.com/attack_forum/2021/12/attach-5bdfe1b2bcb5c2e7936ac240332afe5497cd2779.png) 遇到加壳先不管,加壳后期会教,主要用该APK熟悉java层反调试的逻辑,以及如何修改的思路。 ![image-20211013115414711](https://shs3.b.qianxin.com/attack_forum/2021/12/attach-6e434ac038b409f8a59346104df3874eaee12669.png) AndroidKiller反编译后,直接工程搜索: isDebuggerConnected ![image-20211013115600685](https://shs3.b.qianxin.com/attack_forum/2021/12/attach-415d18e45132e6bf89d27c53fc967b90c302a347.png) 通过工程搜索找到smile代码处,那么可看到有判断条件,绕过的方法很多,将if-nez修改为if-eqz,或者删除,注释或者该判断条件等等。 七、实战案例分析 -------- ### 案例一:静态分析-AntiDebug ![image-20211013215458553](https://shs3.b.qianxin.com/attack_forum/2021/12/attach-f4eb592921b6881ac5173c8203fb7de19e522bf4.png) **拿到一个apk第一步先去查壳,第二步adroidkiller查看没有签名,然后就可以逆向破解逻辑了** jadx反编译antiDebug.apk,并查询onCreate方法 ![image-20211014004728215](https://shs3.b.qianxin.com/attack_forum/2021/12/attach-7e64ec1a53c9c3a3c4f3c33312d818ba8a5d6b8e.png) ![image-20211014004759140](https://shs3.b.qianxin.com/attack_forum/2021/12/attach-83971bee290f286bc0889c64ddea7068410879eb.png) System.loadLibrary("antidebug");直接加载antidebug,那么说明逻辑在so库里面,ida分析 找到so文件,使用IDA打开 ![image-20211014005026207](https://shs3.b.qianxin.com/attack_forum/2021/12/attach-3846e7f7c5e6ed388c25affaba99ee06177830a0.png) ![image-20211014005111204](https://shs3.b.qianxin.com/attack_forum/2021/12/attach-2dcf9d8dc43b2300f3a3801e979fa4e43a6a2db9.png) 滴入IDA后,第一步搜索静态注册找到jni\_OnLoad函数 ![image-20211014005416765](https://shs3.b.qianxin.com/attack_forum/2021/12/attach-c47eaa57d1b89dbc1cb9d295e1005abcf365af20.png) 查看伪C代码 ![image-20211014005653133](https://shs3.b.qianxin.com/attack_forum/2021/12/attach-14eb73b08da06bfc377e254e9b204e529a04cbcf.png) 两个赋值之后进行if判断,if判断用了或运算符,就是括号里面四个参数有一个成立if条件成立 ![image-20211014005829110](https://shs3.b.qianxin.com/attack_forum/2021/12/attach-31d7ecdc7cff29d799b935ccfffe9ebe92d0faad.png) 那么只要找到四个参数的返回值进行修改,让他们返回值整理翻一个一个假即可 **anti\_time()方法分析** 1)先查anti\_time(),双击函数名称进入 ![image-20211014010036758](https://shs3.b.qianxin.com/attack_forum/2021/12/attach-4610a101a850813044ce73cd025660649887f8ad.png) 首先定义结构体类型,时间类型timeval, 定义v0=getpid,然后调用了同一个函数gettimefday传入两个不同的值。 v1=tv.tv\_sec - v3.tv\_sec;:通过传入不同的参数调用tv\_sec做差值获取到v1,如果v1小于等于1返回0,否则就kill进程。这就是一个简单的时间测试,脱壳也会在之后教学。 **anti\_breakpoint()方法分析** ![image-20211014153229272](https://shs3.b.qianxin.com/attack_forum/2021/12/attach-bf6c75216b106f1ae53a2e875bee756324ec524b.png) 目的是想要返回值不触发,只需要里面函数的返回值都为0 即可,来分析一下逻辑,这里很多if嵌套,if在嵌套while等等,那么最终不执行return 1,可以在很多if中进行修改判断条件即可,方法很多。 **anti\_pthread()方法分析** ![image-20211014153948338](https://shs3.b.qianxin.com/attack_forum/2021/12/attach-8135d7856c15e96c2a24e03875903525dddda20a.png) pthread\_self创建子线程 pipe(&pipefd); pipe是管道的意思,意思是是实现进程通信。 pthread\_create创建线程,传入四个参数,查看第三个参数:anti\_thread ![image-20211014154316612](https://shs3.b.qianxin.com/attack_forum/2021/12/attach-fd82ed12888b39b831ef4a03f4356ec04ecf5b71.png) 最后都是return 0这里就是获取一个线程。 ### 案例二:动态分析 上面通过静态的方式简单熟悉了代码,现在通过动态分析反调试如何绕过该方法。 #### 1、环境调试 **1、安装apk** ```php adb install C:\test\AntiDebug.apk ``` ![image-20211014155013486](https://shs3.b.qianxin.com/attack_forum/2021/12/attach-702cc40ccd3be020bc57961b7a6eb949c471dab2.png) **2、上传android\_server** 利用adb将android\_server文件传送到真机下指定的文件目录内(android\_server文件在IDA\\dbgsrv目录下) ```php adb push C:\test\android_server data/local/tmp ``` ![image-20210814155335583](https://shs3.b.qianxin.com/attack_forum/2021/12/attach-1661bae6f6573bacbec7b6ff3dfcfb3b9779c195.png) 可以去android目录下面去看看是否成功 ```php adb devices adb shell su cd /data/local/tmp/ ls -al ``` ![image-20210814155601486](https://shs3.b.qianxin.com/attack_forum/2021/12/attach-804a9752660028dfa2bd1d842d1ce363a9da72f1.png) 将android\_server改名为test,并赋予777权限给test ```php mv android_server test chmod 777 test ``` ![image-20211014155516994](https://shs3.b.qianxin.com/attack_forum/2021/12/attach-ab897aababc4aff1ad983a9ed305ff4b0f34b607.png) **3、启动环境** 然后直接运行test,设置端口为22222 ```php ./test -p22222 ``` ![image-20211014155606681](https://shs3.b.qianxin.com/attack_forum/2021/12/attach-e4ed0e69413074690cb6881bc9392946ef1bd60c.png) 进行将22222端口转发到电脑端 ```php adb forward tcp:22222 tcp:22222 ``` ![image-20211014160109128](https://shs3.b.qianxin.com/attack_forum/2021/12/attach-f9844a0a87da1ee62a68eb86597207c9620ad0a7.png) **4、挂起程序** 在jadx中打开apk,MainActivity.xml中有标出 ![image-20211014155857589](https://shs3.b.qianxin.com/attack_forum/2021/12/attach-ed32953a422e94b4170b3af9f45dc3b4eb54fad9.png) ```php com.qianyu.antidebug.MainActivity ``` 挂起程序 ```php adb shell am start -D -n com.qianyu.antidebug/.MainActivity ``` ![image-20211014160248189](https://shs3.b.qianxin.com/attack_forum/2021/12/attach-73f3b8671f6f5a7675d98d1189dcb1045e0d633d.png) 安卓启动的端口是23946 开启后再次打开另外一个CMD窗口,将安卓上面的23946端口转发到win电脑上 ```php adb forward tcp:23946 tcp:23946 ``` ![image-20210814160750956](https://shs3.b.qianxin.com/attack_forum/2021/12/attach-a02816a27515001de97583c57e191f58f0c67916.png) 接下接下来就是要调试APK安装到真机上 ```php adb install E:\IDA7.0\test\javandk1.apk ``` ![image-20210814161526810](https://shs3.b.qianxin.com/attack_forum/2021/12/attach-5eaac6ea88a57979ed384ead2f1d2bff469439b0.png) **5、配置DDMS** ![image-20211014160411454](https://shs3.b.qianxin.com/attack_forum/2021/12/attach-2a1a413e04c455c9bc837174e36c2b7f997a4db2.png) **6、配置IDA** ![image-20211014161414385](https://shs3.b.qianxin.com/attack_forum/2021/12/attach-6e89c615f68e734622b49841abc950e40dd010d4.png) 然后勾选三项配置 ![image-20211014161519397](https://shs3.b.qianxin.com/attack_forum/2021/12/attach-d46963a16a03d99c91e50626c00085cb8abd24e1.png) ![image-20211014161501910](https://shs3.b.qianxin.com/attack_forum/2021/12/attach-260ceb5136d40b859770930ad25955d10d45f4c9.png) 然后F9进入run状态 ![image-20211014161601770](https://shs3.b.qianxin.com/attack_forum/2021/12/attach-7f7ce520a9d3fefb2a077a0c4b448fc520116379.png) 加载so文件 ```php jdb -connect com.sun.jdi.SocketAttach:hostname=127.0.0.1,port=8600 ``` ![image-20211014161709972](https://shs3.b.qianxin.com/attack_forum/2021/12/attach-6a96d946dbe78ba144c9f54995bc69baa9b81c12.png) 再次run ![image-20211014161732179](https://shs3.b.qianxin.com/attack_forum/2021/12/attach-1f9f526899212455ba0ff0938430e6cef8c7adf9.png) libantidebug.so就加载进来了,这样就可以开始IDA动态分析了 #### 2、动态调试分析 在Modules找到libantidebug.so的JNI-onload: ![image-20211014161958408](https://shs3.b.qianxin.com/attack_forum/2021/12/attach-5bd6c3a6644c6d5914e6fff5f09d46cd7f2c067d.png) 在JNI\_onload下断点 ![image-20211014162205639](https://shs3.b.qianxin.com/attack_forum/2021/12/attach-6411ac793b2900e033d126adc9a71d3a9e390ebf.png) F9执行 ![image-20211014162255608](https://shs3.b.qianxin.com/attack_forum/2021/12/attach-352cd77d717885487613be7bfe75477e74107b2e.png) 可以看到红色变为蓝色后,程序就运行到了下断点出。 此时进来后看到状态寄存器T=1: ![image-20211014162408419](https://shs3.b.qianxin.com/attack_forum/2021/12/attach-fd6770d8819981f09aa4085005a8698ceaa2ee93.png) 说明他这里面都是thumb模式指令。 ![image-20211014162715013](https://shs3.b.qianxin.com/attack_forum/2021/12/attach-2a1b20a67f53aa56a678d3e6041cdafdf3195e21.png) 0 2 4 6 8 A,都是每次增加两位 接下来进行动静结合深入理解 通过解压apk,在libs下找到so库文件,丢入IDA打开JNI\_onload,并按F5查看伪c代码 ![image-20211014163136817](https://shs3.b.qianxin.com/attack_forum/2021/12/attach-129bb04872d758a0127659b8c6b4f6c56c5f3fa3.png) ![image-20211014163154513](https://shs3.b.qianxin.com/attack_forum/2021/12/attach-73ad4f7b0e2a5a178ea569f81116d3d2a04b498c.png) 这四个函数和反调试有关,来找一个函数位置,复制到汇编代码 ![image-20211014165459018](https://shs3.b.qianxin.com/attack_forum/2021/12/attach-69fd237ec37e327d1a5035c52be9dd3cfba1e696.png) 接下来和动态一起从上往下依次分析,R3是什么 ![image-20211014165741162](https://shs3.b.qianxin.com/attack_forum/2021/12/attach-aa8f3b5d31d247c3b4f2b8a22c3803f6d49efd23.png) 直接F8过来,R3是GetEnv,继续步入 ![image-20211014165930366](https://shs3.b.qianxin.com/attack_forum/2021/12/attach-c7bfc3a7a545f0406dcbbfbfeda5b2a57aaf53c8.png) 可看到BLX R3就是源码中的GetEnv,if条件如果Env获取成功的话就会执行后面的三个函数 ![image-20211014170047426](https://shs3.b.qianxin.com/attack_forum/2021/12/attach-d8441f483802910cde0f22865b906b3ecb920f7c.png) 通过前面就知道,这里三个函数会在这里进行反调试,如何跳过不执行呢? 同步PC寄存器 ![image-20211014170706665](https://shs3.b.qianxin.com/attack_forum/2021/12/attach-1a1714e4d159a2c69d2b60dd55f37cb37e6bb31b.png) 接下来吧三个函数NOP掉即可!F2修改为00后,F2保存 ![image-20211014170900638](https://shs3.b.qianxin.com/attack_forum/2021/12/attach-c2c9fdc4998b81ad402bbee1735e58f99fa1359c.png) 操作完成后可以看到三个函数就没有了。 查看下registerNative,双击进入 ![image-20211014171019584](https://shs3.b.qianxin.com/attack_forum/2021/12/attach-27a20dac27539d3cd9dc9b85bec2905ddf38c01e.png) ![image-20211014171027828](https://shs3.b.qianxin.com/attack_forum/2021/12/attach-cb0038bcbddd0a3fe3c31d0602052f063d303fe0.png) ![image-20211014171104090](https://shs3.b.qianxin.com/attack_forum/2021/12/attach-d4d1f9bf2073679cd8bd51403a10230652363092.png) 此时BL R5里面有四个参数,遇到registerNative共四个参数,只需要看第三个参数即可,这里有R5寄存器有四个参数,可以跳转到R5查看:F4 ![image-20211014172613510](https://shs3.b.qianxin.com/attack_forum/2021/12/attach-c59ded292a7eb1f7a7a8f995aff499b38b6d9704.png) 这时候F4跳转过来后,查看第三个参数R2点击箭头进入 ![image-20211014172654237](https://shs3.b.qianxin.com/attack_forum/2021/12/attach-06616081f553c9174cb51df140a52aa81751d857.png) 可以看到识别地址后什么也没有,前面是没有分析该函数源码,查看源码 ![image-20211014172820224](https://shs3.b.qianxin.com/attack_forum/2021/12/attach-4256a11b06e736c680de1f08a977f4974996c9ae.png) 在c文件中jni\_onload充当什么作用呢? main入口函数: 在java层要使用loadLibrary加载so库,loadLibrary会便利so库,就是以main做为入口函数。 所以分析的C文件是要从JNI\_Onload这里开始分析: ![image-20211014173153591](https://shs3.b.qianxin.com/attack_forum/2021/12/attach-ce6a73f14e76b86d1d22ebafd420b3a5e1314f54.png) 可以看到JNINativeMethod nativeMethod\[\]={};,这里为空,什么都没做!返回为空。那么这时候就绕过了反调试保护。 八、总结 ---- ```php 本章节从静态调试和动态调试出发,详解解读了文件检测、端口检测、进程名称检测、定时轮询检测、self-debugging反调试,JDWP协议反调试。 关键文件检测:对特定目录下的特定文件名称进行检测,如:android_server等,如果存在,将结束程序。 调试端口检测:对正在运行的特定端口进行检测,如:23946等,如果存在,将结束程序。 进程名称检测:对正在运行的特定进程名称进行检测,如:android_server等,如果存在,将结束程序。 轮循检测:启动一个循环,定时对TracerPid的值等其他特点进行检测,如果发生被调试的特征的变化,将结束进程。 self-debugging反调试:利用一个进程只能被调试一次的特点,创建一个子进程用来对自身进行调试,让其他调试程序无法调试。 JDWP协议反调试:通过一个isDebuggerConnected方法,用于判断JDWP调试器是否正在工作,如果存在,将结束程序。 ```
发表于 2021-10-19 18:04:09
阅读 ( 8181 )
分类:
漏洞分析
0 推荐
收藏
1 条评论
miracles
2022-06-01 15:06
能不能分享一下项目的案例
请先
登录
后评论
请先
登录
后评论
嗯嗯呐
4 篇文章
×
发送私信
请先
登录
后发送私信
×
举报此文章
垃圾广告信息:
广告、推广、测试等内容
违规内容:
色情、暴力、血腥、敏感信息等内容
不友善内容:
人身攻击、挑衅辱骂、恶意行为
其他原因:
请补充说明
举报原因:
×
如果觉得我的文章对您有用,请随意打赏。你的支持将鼓励我继续创作!